
The method of developing a widget does not differ much from that of developing a regular Magento module. In a few words, a Magento widget is a Magento module that generates admin add-ons, which you can easily insert into CMS pages or CMS blocks with simple actions.
We will start by creating a sample module that provides one simple widget.
The widget called Social Widget Icons outputs a block that includes the AddThis social sharing icons, the same sharing icons that we added in Chapter 6, Making the Theme Socially Ready.
The final frontend result is shown by the following screenshot:
Let's start by creating the module's directory structure and the main files. The module folder must be located into app/code.
Here, you have to decide in which code pool you want to create the module. Usually, you can create your module under the local code pool.
The following screenshot will show you the folder and the files that you need to create this widget:

You can create all the folders and the files that you can see in the preceding screenshot, and then perform the following steps to create each file of the module:
- Now that we created the module, open the
BookStore_SocialWidget.xmlfile located in theetcfolder, and create the file that will enable the module with the following code:<?xml version="1.0"?> <config> <modules> <BookStore_SocialWidget> <active>true</active> <codePool>local</codePool> <depends> <Mage_Cms/> </depends> </BookStore_SocialWidget> </modules> </config> - Now, let's create the default module
Helper. The default helper should be defined to make the translation subsystem work properly. You need not write any code here; you only need to define a class that extends the core helper,Mage_Core_Helper_Abstract.Open the
Data.phpfile in app/code/local/BookStore/SocialWidget/Helper/and insert the following code:<?php /** * BookStore Social Widget */ class BookStore_SocialWidget_Helper_Data extends Mage_Core_Helper_Abstract { } - Now to set up the module configuration, we need to create the configuration file called
config.xml. Every module has this file and it contains a lot of information such as the module version and the default configurations. It is also used to define the helper and blocks' base class names.So, let's create the
config.xmlfile inapp/code/local/BookStore/SocialWidget/etc/with the following code:<?xml version="1.0"?> <config> <modules> <BookStore_SocialWidget> <version>0.0.1</version> </BookStore_SocialWidget> </modules> <global> <helpers> <socialwidget> <class>BookStore_SocialWidget_Helper</class> </socialwidget> </helpers> <blocks> <socialwidget> <class>BookStore_SocialWidget_Block</class> </socialwidget> </blocks> </global> </config> - Then, we need to declare the widgets. All the widgets provided by the module must be declared in the
widget.xmlfile that is located inside theetcfolder with the theconfig.xmlfile. In thewidget.xmlfile you created, insert the following code that defines a single widget:<?xml version="1.0"?> <widgets> <socialwidget_icons type="socialwidget/icons"> <name>Social Sharing Type: Icons</name> <description type="desc">Adds social sharing with Icons</description> </socialwidget_icons> </widgets>Of course you can define multiple widgets in the same file, for example:
<?xml version="1.0"?>
<widgets>
    <socialwidget_icons type="socialwidget/icons">
        <name>Social Sharing Type: Icons</name>
        <description type="desc">Adds social sharing withIcons</description>
    </socialwidget_icons>
    <socialwidget_buttons type="socialwidget/buttons">
        <name>Social Sharing Type: Buttons</name>
        <description type="desc">Adds social sharing with classics Buttons</description>
    </socialwidget_buttons>
</widgets>
Now we will work with a single widget definition as the first example. As you can see from the preceding code, the widget instance must contain the following information:
- A unique name node used in the system (in our case,
socialwidget_icons) - The widget
name - The
type="..."attribute - A short description of the widget
- A unique name node used in the system (in our case,
- We will now create the frontend blocks for our widgets.
We will create the code that will return an output of the widget in the frontend. To do this, open the
Icons.phpfile you created inapp/code/local/BookStore/SocialWidget/Block/Icons.phpand add the following code:<?php class BookStore_SocialWidget_Block_Buttons extends Mage_Core_Block_Abstract implements Mage_Widget_Block_Interface { protected function _toHtml() { $html = ' . . .'; // code to be displayed in the frontend return $html; } }We have just created a class that implements an interface, but we don't have all the methods of that interface because they are already implemented in the ancestors of the
method toHtml()class, which is implemented inMage_Core_Block_Abstract. - Now that we have created the frontend block, we need to insert the expected output into HTML. As planned, we want to add the
addthiscode in theIcons.phpfile inside the$htmlvariable. The following code is the same code used in Chapter 6, Making the Theme Socially Ready:<!-- AddThis Button BEGIN --> <div class="addthis_toolbox addthis_default_style addthis_32x32_style"> <a class="addthis_button_facebook"></a> <a class="addthis_button_twitter"></a> <a class="addthis_button_pinterest_share"></a> <a class="addthis_button_google_plusone_share"></a> <a class="addthis_button_compact"></a><a class="addthis_counter addthis_bubble_style"></a> </div> <script type="text/javascript" src="//s7.addthis.com/js/300/addthis_widget.js#pubid=xa-52cae78918520295"></script> <!-- AddThis Button END -->
- Simply copy the code, insert it into the
$htmlvariable, and save theIcons.phpfile, which should look like the following code:<?php class BookStore_SocialWidget_Block_Icons extends Mage_Core_Block_Abstract implements Mage_Widget_Block_Interface { protected function _toHtml() { $html ='<!-- AddThis Button BEGIN --> <div class="addthis_toolbox addthis_default_style addthis_32x32_style"> <a class="addthis_button_facebook"></a> <a class="addthis_button_twitter"></a> <a class="addthis_button_pinterest_share"></a> <a class="addthis_button_google_plusone_share"></a> <a class="addthis_button_compact"></a><a class="addthis_counter addthis_bubble_style"></a> </div> <script type="text/javascript" src="//s7.addthis.com/js/300/addthis_widget.js#pubid=xa-52cae78918520295"></script> <!-- AddThis Button END -->'; return $html; } }
Now our first widget is completed, and we are done with programming. Let's go to the admin panel and check if our brand new widget is available to be added to either a CMS page or a static block. To do this, follow these steps:
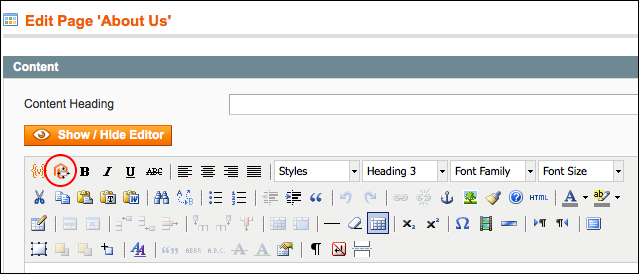
- Let's go to CMS | Pages in the admin panel and add the widget instance on the About Us page. Open it from the list of CMS pages, and click on the Content tab on the left.
If you have the WYSIWYG editor enabled to insert the widget, click on the second button on the left, the one with the Magento logo icon, as shown in the following screenshot:
Otherwise, click on the Insert Widget button with the editor disabled, as shown in the following screenshot:

A widget selection and configuration pop-up opens with the options of all the available widgets.
- Select the new widget Social Sharing Type: Icons and click on the Insert Widget button.

As you can see in the CMS page content, the result is a short piece of code that calls the widget:
{{widget type="socialwidget/icons"}}With the editor enabled, you will see an icon that indicates the presence of a widget, as shown in the following screenshot:

- Open the page at the frontend and you will see the social sharing icons where you placed the widget.