
Once you understand the hierarchy of themes and know the basic information, you are ready to create your own custom theme. But, before you put your hands on the code, I will always recommend that you already have a mock-up to be developed, rather than designing as you go.
This will allow you to have a clear idea of what you will achieve without wasting unnecessary time to decide the position of the blocks. In this case, I have prepared the following custom layout for a hypothetical store selling books online:

Now that we a mock-up ready to be transformed into a Magento theme, you have to decide the name of the package to create and use that for the whole project.
I will call my theme package "bookstore"; you could create one with your name, the name of your customer, or the name of the project.
Now let's see how to begin the creation of our new theme, starting from one of the main folders, the app folder .
- Create the
bookstorepackage folder atapp/design/frontend/, so you will haveapp/design/frontend/bookstore. - Create the child theme folder
defaultatapp/design/frontend/, so you will haveapp/design/frontend/bookstore/default. - Create all the necessary subfolders inside the default theme:
app/design/frontend/bookstore/default/templateapp/design/frontend/bookstore/default/layoutapp/design/frontend/bookstore/default/locale
Once we have created the app, let's create the skin folder. This folder contains the static files of the theme such as images, JSS, and CSS files.
- Create the
bookstorepackage folder atskin/frontend/, so you will haveskin/frontend/bookstore. - Create the
defaulttheme folder atskin/frontend/, so you will haveskin/frontend/bookstore/default. - Create all the necessary subfolders inside the default theme:
skin/frontend/bookstore/default/imagesskin/frontend/bookstore/default/cssskin/frontend/bookstore/default/js
To sum up, we will have the structure as shown in the following screenshot:

Now that our theme structure is ready, we have to create the main files we need. As I said before, we can create empty files or copy the files from the base theme. I recommend that you copy the files from the base theme, so you already have blocks and blocks of code that we can keep and edit as you wish.
We start by creating the main files in the app folder, by performing the following steps:
- Copy the template files. Only copy the following ones, and not everything, and only use what needs to be changed; less is more! Copy the files from
app/design/frontend/base/default/template/and paste them toapp/design/frontend/bookstore/default/template/:/page/1column.phtml: This is the file that handles the structure of the page with one column/page/2columns-left.phtml: This is the file that handles the structure of the page with two columns, with the sidebar on the left/page/2columns-right.phtml: This is the file that handles the structure of the page with two columns, with the sidebar on the right/page/2columns-left.phtml: This is the file that handles the structure of the page with three columns (main content and two sidebars)/page/html/head.phtml: This is the file for the head of the theme/page/html/header.phtml: This is the building block of the file header of the theme/page/html/footer.phtml: This is the file of the footer structural block of the theme
- Create the
layout.xmlfile atapp/design/frontend/base/default/layout/. This basic structure of the local XML file is similar to the following code:<?xml version="1.0" encoding="UTF-8"?> <!-- /** * local.xml * Local layout modifications for our local theme * @category design * @package bookstore * @copyright Copyright (c) 2013 Andrea Saccà. */ --> <layout version="0.1.0"> <default> </default>
In the next chapter, we will see how to override specific positions, insert JavaScript, CSS files, and other cool stuff.
- Copy the template files present at
skin/frontend/bookstore/default/css/, wherestyles.cssis the main stylesheet andprint.cssis the style sheet used for printing.
Now that we have the basis of the theme ready, before activating it, we have to disable the caching system of Magento throughout the development phase to avoid any inconsistencies during the development process by performing the following steps:
- Navigate to the Admin Panel, System | Cache Management; the following page opens:
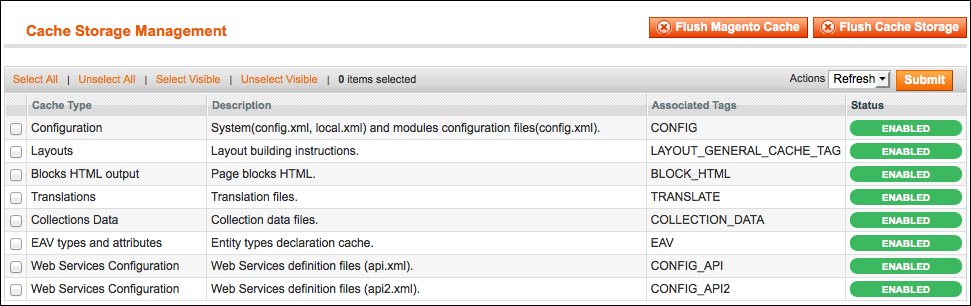
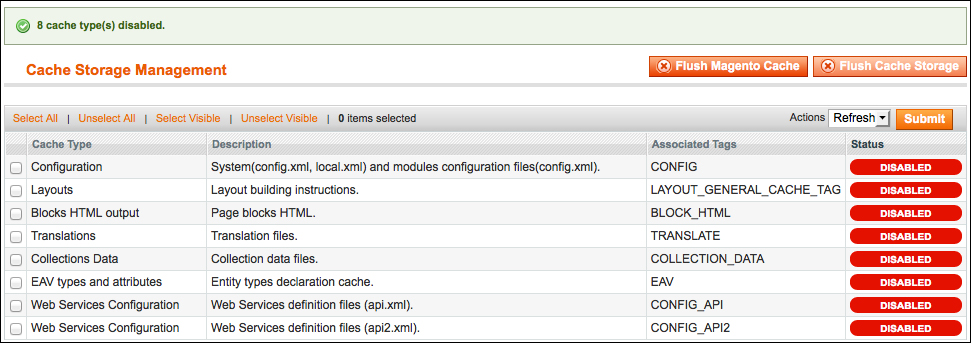
- Select all the items and in the Actions dropdown, select Disable, and click on the Submit button to save. After doing this, you should see the success message and the page looks similar to the following screenshot:
Ok we are ready! Now that we have our theme and have disabled the cache, let's activate the theme. To activate the theme, go to System | Configuration | Design tab.
Tip
Keep in mind that the scope of the default configuration is a single website/store view. You can check this configuration on the left-hand side of this page. If you are using a multistore, and you want to have different designs for different stores, you should define the design package or theme by switching first to the configuration scope on the left, selecting the appropriate store view.
Inside the Package box, insert the name of the package you created before in the Current Package Name option. In this case, we insert bookstore, and then click on the Save Config button, as shown in the following screenshot:

In this way, we are telling Magento to use our bookstore package for the current configuration.
Our theme is now ready and active. Let's go to the frontend and see what happens. If you have done everything right, you should see the following page:

As you can see, it is a blank page with no style, but don't worry about that. Now we have created our theme that is ready to be customized!