
With all of the tools, techniques, and practices we've discussed so far, we've still only been been thinking about testing units: the smallest, meaningfully testable pieces of code. It's time to expand the focus, and start testing code that incorporates multiple units.
That means we need to:
- Think about what integration testing and system testing actually are
- Learn how to identify testable multi-unit segments of a program
- Use the tools we've learned in order to create tests for these segments
Integration testing is the process of checking whether the units of our program work together properly. At this stage, thanks to our unit tests, we can assume that each unit works as expected in isolation, and we're kicking the tests up to a new level of complexity. It's not practical to start the process with integration testing because, if the units don't work, the integration won't work either, and it will be harder to track down the problems. Once the units are solid, though, it's necessary to test that the things we build out of them also work. The interactions can be surprising.
While you're doing integration testing, you'll be putting the units together into bigger and bigger collections, and testing these collections. When your integration tests expand to cover the entirety of your program, they become system tests.
The trickiest part of integration testing is choosing which units to integrate into each test, so that you always have a solid base of code that you can believe in: a place to stand, while you pull in more code.
We're going to work through an exercise that will help you with the process of deciding where to put the boundaries of integration tests:
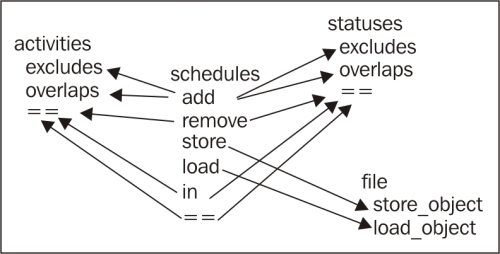
- Using a piece of paper or a graphics program, write down names or representations for each of the units in the time planner project from Chapter 7, Test-driven Development Walk-through. Group the methods of each class together. Being part of the same class is an obvious relationship between units, and we'll take advantage of this. The
==symbol here represents the Python==operator, which invokes the__eq__method on an object:
- Now draw arrows between units that are supposed to directly interact with each other, from the caller to the callee. Laying everything out in an orderly fashion, as in step 1, can actually make this harder, so feel free to move the classes around to help the lines make sense:
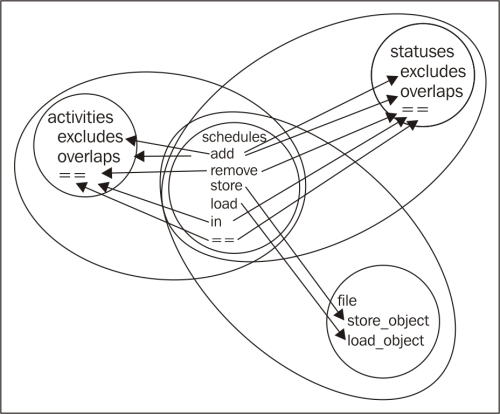
- Draw circles around each class and each pair of classes connected by at least one line:
- Continue the process by drawing circles around overlapping pairs of circles, until there are only three circles left. Circle a pair of them, and then put one more big circle around the whole mess:
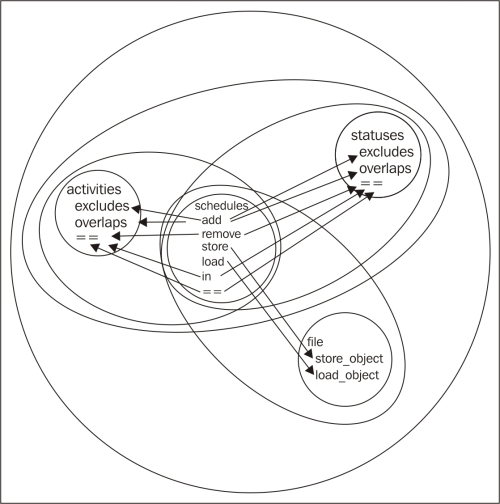
- Now, to decide which integration tests to write first, we just have to look at the number of circles surrounding all parts of it. The more deeply nested the circle that contains every unit involved in an integration test is, the sooner we write that test.
What we just did is a way to visualize and solidify the process of building integration tests. While it's not critical to actually draw the lines and circles, it's useful to follow the process in your head. For larger projects, a lot can be gained from actually drawing the diagrams. When you see the diagram, the next correct step tends to jump right out at you—especially if you use multiple colors to render the diagram—where it might otherwise be hidden behind the complexity of the program.