The Model View Controller (MVC) is a widely used web development pattern. The MVC pattern defines three interconnected components, namely model, view, and controller.
The model represents the application data, logic, or business rules.
The view is a representation of information or a model. A model can have multiple views, for example, marks of a student can be represented in a tabular format or graphical chart.
The controller accepts client requests and initiates commands to either update the model or change the view.
The controller controls the flow of the application. In JEE applications, a controller is usually implemented as a servlet. A controller servlet intercepts requests and then maps each request to an appropriate handler resource. In this section, we will build a classic MVC front controller servlet to redirect requests to views.
Spring MVC is a web application framework that takes advantage of Spring design principles:
- Dependency injection
- Interface-driven design
- POJO without being tied up with a framework
Spring MVC is used for the following advantages:
- Testing through dependency injection
- Binding of request data to domain objects
- Form validation
- Error handling
- Multiple view technologies
- Supports different formats such as JSP, Velocity, Excel, and PDF
- Page workflow
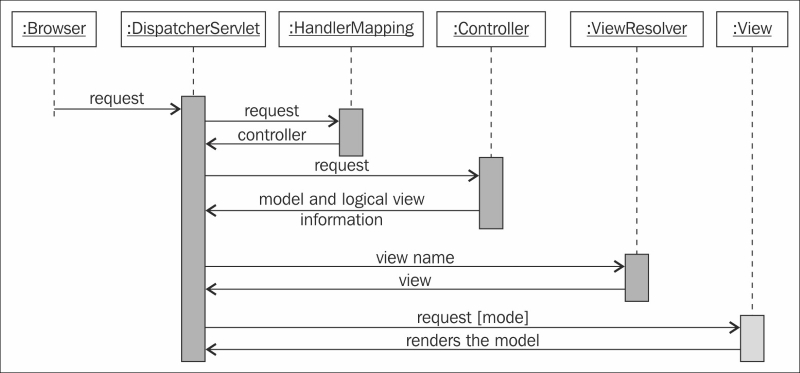
In Spring MVC, the following is a simplified request-handling mechanism:
DispatcherServletreceives a request and confers with handler mappings to find out which controller can handle the request, and it then passes the request to that controller- The controller performs the business logic (can delegate the request to a service or business logic processor) and returns some information back to
DispatcherServletfor user display/response. Instead of sending the information (model) directly to the user, the controller returns a view name that can render the model. DispatcherServletthen resolves the physical view from the view name and passes the model object to the view. This wayDispatcherServletis decoupled from the view implementation.- The view renders the model. A view can be a JSP page, a servlet, a PDF file, an Excel report, or any presentable component.
The following sequence diagram represents the flow and interaction of Spring MVC components:
We will build a Spring web application and unit test code using JUnit by performing the following steps:
- Launch Eclipse and create a dynamic web project called
SpringMvcTest. - Open
web.xmland enter the following lines:<display-name>SpringMVCTest</display-name> <servlet> <servlet-name>dispatcher</servlet-name> <servlet-class> org.springframework.web.servlet.DispatcherServlet </servlet-class> <load-on-startup>1</load-on-startup> </servlet> <servlet-mapping> <servlet-name>dispatcher</servlet-name> <url-pattern>/</url-pattern> </servlet-mapping> <context-param> <param-name>contextConfigLocation</param-name> <param-value> /WEB-INF/dispatcher-servlet.xml </param-value> </context-param> </web-app>The dispatcher is a
DispatcherServletand it maps all requests. Note thecontextConfigLocationparameter. This indicates that the Spring beans are defined in/WEB-INF/dispatcher-servlet.xml. - Create an XML file called
dispatcher-servlet.xmlinWEB-INFand add the following lines:<?xml version="1.0" encoding="UTF-8"?> <beans xmlns="http://www.springframework.org/schema/beans" xmlns:context="http://www.springframework.org/schema/context" xmlns:xsi="http://www.w3.org/2001/XMLSchema-instance" xsi:schemaLocation=" http://www.springframework.org/schema/beans http://www.springframework.org/schema/beans/spring-beans-3.0.xsd http://www.springframework.org/schema/context http://www.springframework.org/schema/context/spring-context-3.0.xsd"> <context:component-scan base-package="com.packt" /> <bean class= "org.springframework.web.servlet.view. InternalResourceViewResolver"> <property name="prefix"> <value>/WEB-INF/pages/</value> </property> <property name="suffix"> <value>.jsp</value> </property> </bean>This XML defines a Spring view resolver. Any view will be found under the
/WEB-INF/pageslocation with the.jspsuffix, and all beans are configured under thecom.packtpackage with Spring annotations. - Create a
LoginInfoclass in thecom.packt.modelpackage. This class represents the login information. Add two private string fields,userIdandpassword, generate getters and setters - Create a JSP page called
login.jspunder/WEB-INF/pagesand add the following lines to create a form using the Spring tag library. Modify the form and add normal HTML input for username and password:<%@ taglib prefix="sf" uri="http://www.springframework.org/tags/form"%> <sf:form method="POST" modelAttribute="loginInfo" action="/onLogin"> </sf:form>
- Create a controller class called
com.packt.controller.LoginControllerto handle the login request. Add the following lines:@Controller @Scope("session") public class LoginController implements Serializable { @RequestMapping({ "/", "/login" }) public String onStartUp(ModelMap model) { model.addAttribute("loginInfo", new LoginInfo()); return "login"; } }The
@Controllerannotation indicates that the class is a Spring MVC controller class. Insample-servlet.xml, we defined<context:component-scan base-package="com.packt" />, so Spring will scan this@Controllerannotation and create a bean.@RequestMappingmaps any request with the default path/SpringMvcTest/or/SpringMvcTest/loginto theonStartUpmethod. This method returns a view namedlogin. The view resolver defined in the XML file will map the login request to/WEB-INF/pages/login.jsp page. - Create another method in the
Loginclass to handle the login submit request:@RequestMapping({ "/onLogin" }) public String onLogin(@ModelAttribute("loginInfo") LoginInfo loginInfo, ModelMap model) { if(!"junit".equals(loginInfo.getUserId())) { model.addAttribute("error", "invalid login name"); return "login"; } if(!"password".equals(loginInfo.getPassword())) { model.addAttribute("error", "invalid password"); return "login"; } model.addAttribute("name", "junit reader!"); return "greetings"; }The method is mapped with
/onLogin.@ModelAttribute("loginInfo")is the model submitted from thelogin.jspform. This method checks whether the username isjunitand password ispassword. If the user ID or password does not match, then an error message is shown in theloginpage; otherwise, thegreetingsview is opened. - Change
login.jspto submit the form to/SpringMvcTest/onLogin, and themodelattributename isloginInfo:<sf:form method="POST" modelAttribute="loginInfo" action="/SpringMvcTest/onLogin">
Also, add the following JSTL expression to display the error message:
<h1>${error}</h1> - Create a JSP file called
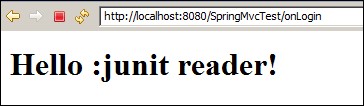
greetings.jspand add the following lines:<h1>Hello :${name}</h1> - In the browser, enter
http://localhost:8080/SpringMvcTest/. This will open theloginpage. In theloginpage, do not enter any value; just hit Submit. It will show the error message Invalid login name. Now, enterjunitin theuser Idfield andpasswordin thePasswordfield and hit Enter; the application will greet you with following message: