
In our previous example, the components we built communicated with each other exclusively through the application state, both for reading and transacting data. While this approach works, it is not always the best except for very simple use cases. In this section, we will learn an alternate way of performing this communication using core.async channels.
The application we will build is a super simple virtual agile board. If you've heard of it, it's similar to Trello (see https://trello.com/). If you haven't, fear not, it's essentially a task management web application in which you have cards that represent tasks and you move them between columns such as Backlog, In Progress, and Done.
By the end of this section, the application will look like the following:
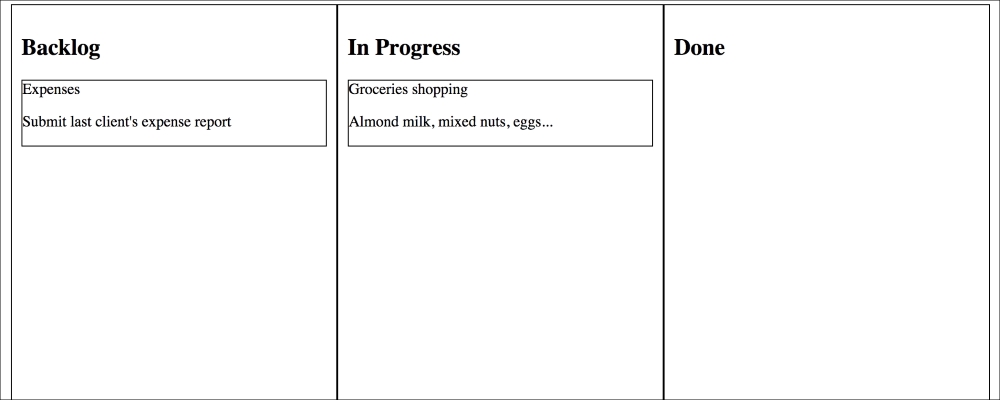
We'll limit ourselves to a single feature: moving cards between columns by dragging and dropping them. Let's get started.
We're already familiar with the om-start (see https://github.com/magomimmo/om-start-template) leiningen template, and since there is no reason to change it, that's what we will use to create our project—which I called om-pm for
Om Project Management:
lein new om-start om-pm
cd om-pm
As before, we should ensure we have the right dependencies in our project.clj file:
  :dependencies [[org.clojure/clojure "1.6.0"]
                 [org.clojure/clojurescript "0.0-2511"]
                 [org.om/om "0.8.1"]
                 [org.clojure/core.async "0.1.346.0-17112a-alpha"]
                 [com.facebook/react "0.12.2"]]
Now validate that we are in good shape by making sure the project compiles properly:
lein cljsbuild auto
Compiling ClojureScript.
Compiling "dev-resources/public/js/om_pm.js" from ("src/cljs" "dev-resources/tools/repl")...
Successfully compiled "dev-resources/public/js/om_pm.js" in 13.101 seconds.
Next, open the src/cljs/om_pm/core.cljs file and add the namespaces that we will be using to build the application:
(ns om-pm.core
  (:require [om.core :as om :include-macros true]
            [om.dom :as dom :include-macros true]
            [cljs.core.async :refer [put! chan <!]]
            [om-pm.util :refer [set-transfer-data! get-transfer-data! move-card!]])
  (:require-macros [cljs.core.async.macros :refer [go go-loop]]))
The main difference this time is that we are requiring core.async functions and macros. We don't yet have an om-pm.util namespace, but we'll get to that at the end.
It's time we think what our application state will look like. Our main entity in this application is the card, which represents a task and has the attributes id, title, and description. We will start by defining a couple of cards:
(def cards [{:id 1
             :title "Groceries shopping"
             :description "Almond milk, mixed nuts, eggs..."}
            {:id 2
             :title "Expenses"
             :description "Submit last client's expense report"}])
This isn't our application state yet, but rather a part of it. Another important piece of state is a way to track which cards are on which columns. To keep things simple, we will work with only three columns: Backlog, In Progress, and Done. By default, all cards start out in the backlog:
(def app-state
  (atom {:cards cards
         :columns [{:title "Backlog"
                    :cards (mapv :id cards)}
                   {:title "In Progress"
                    :cards []}
                   {:title "Done"
                    :cards []}]}))
This is all the state we need. Columns have a :title and a :cards attribute, which contains the IDs of all cards in that column.
Additionally, we will have a helper function to make finding cards more convenient:
(defn card-by-id [id]
  (first (filterv #(= id (:id %)) cards)))
Tip
Beware of lazy sequences
You might have noticed the use of mapv instead of map for retrieving the cards IDs. This is a subtle but important difference: map is lazy by default, but Om can only create cursors for maps and vectors. Using mapv gives us a vector back, avoiding laziness altogether.
Had we not done that, Om would consider the list of IDs as a normal value and we would not be able to transact it.
There are many ways to slice up an Om application into components, and in this section, we will present one way as we walk through each component's implementation.
The approach we will follow is similar to our previous application in that from this point on, we present the components bottom-up.
Before we see our first component, however, we should start with Om's own root component:
(om/root project-view app-state
         {:target (. js/document (getElementById "app"))})
This gives us a hint as to what our next component will be, project-view:
(defn project-view [app owner]
  (reify
    om/IInitState
    (init-state [_]
      {:transfer-chan (chan)})

    om/IWillMount
    (will-mount [_]
      (let [transfer-chan (om/get-state owner :transfer-chan)]
        (go-loop []
          (let [transfer-data (<! transfer-chan)]
            (om/transact! app :columns
                          #(move-card! % transfer-data))
            (recur)))))

    om/IRenderState
    (render-state [this state]
      (dom/div nil
               (apply dom/ul nil
                      (om/build-all column-view (:columns app)
                                    {:shared     {:cards (:cards app)}
:init-state state}))))))The previous component is fairly different from the ones we have seen so far. More specifically, it implements two new protocols: om/IInitState and om/IWillMount. Additionally, we dropped om/IRender altogether in favor of om/IRenderState. Before we explain what these new protocols are good for, we need to discuss our high-level design.
The project-view component is our application's main entry point and receives the whole application state as its first argument. As in our earlier Contacts application, it then instantiates the remaining components with the data they need.
Different from the Contacts example, however, it creates a core.async channel—transfer-chan—which works as a message bus. The idea is that when we drag a card from one column and drop it on another, one of our components will put a transfer event in this channel and let someone else—most likely a go block—perform the actual move operation.
This is done in the following snippet taken from the component shown earlier:
    om/IInitState
    (init-state [_]
      {:transfer-chan (chan)})
This creates what Om calls the component local state. It uses a different lifecycle protocol, om/IInitState, which is guaranteed to be called only once. After all, we need a single channel for this component. init-state should return a map representing the local state.
Now that we have the channel, we need to install a go-loop to handle messages sent to it. For this purpose, we use a different protocol:
    om/IWillMount
    (will-mount [_]
      (let [transfer-chan (om/get-state owner :transfer-chan)]
        (go-loop []
          (let [transfer-data (<! transfer-chan)]
            (om/transact! app :columns #(move-card! % transfer-data))
            (recur)))))
Like the previous protocol, om/IWillMount is also guaranteed to be called once in the component life cycle. It is called when it is about to be mounted into the DOM and is the perfect place to install the go-loop into our channel.
We get hold of it from the component local state using the om/get-state function. Once we get a message, we transact the state. We will see what transfer-data looks like very shortly.
We complete the component by implementing its render function:
...
om/IRenderState
    (render-state [this state]
      (dom/div nil
               (apply dom/ul nil
                      (om/build-all column-view (:columns app)
                                    {:shared     {:cards (:cards app)}
                                     :init-state state}))))
...
The om/IRenderState function serves the same purpose of om/IRender, that is, it should return the DOM representation of what the component should look like. However, it defines a different function, render-state, which receives the component local state as its second argument. This state contains the map we created during the init-state phase.
Next, we will build multiple column-view components, one per column. Each of them receives the list of cards from the application state as their shared state. We will use that to retrieve the card details from the IDs we store in each column.
We also use the :init-state key to initialize the local state of each column view with our channel, since all columns need a reference to it. Here's what the component looks like:
(defn column-view [{:keys [title cards]} owner]
  (reify
    om/IRenderState
    (render-state [this {:keys [transfer-chan]}]
      (dom/div #js {:style      #js {:border  "1px solid black"
                                     :float   "left"
                                     :height  "100%"
                                     :width   "320px"
                                     :padding "10px"}
                    :onDragOver #(.preventDefault %)
                    :onDrop     #(handle-drop % transfer-chan title)}
               (dom/h2 nil title)
               (apply dom/ul #js {:style #js {:list-style-type "none"
                                              :padding         "0px"}}
                      (om/build-all (partial card-view title)
                                    (mapv card-by-id cards)))))))
The code should look fairly familiar at this point. We used inline CSS in the example to keep it simple, but in a real application, we would probably have used an external style sheet.
We implement render-state once more to retrieve the transfer channel, which will be used when handling the onDrop JavaScript event. This event is fired by the browser when a user drops a draggable DOM element onto this component. handle-drop takes care of that like so:
(defn handle-drop [e transfer-chan column-title]
  (.preventDefault e)
  (let [data {:card-id
              (js/parseInt (get-transfer-data! e "cardId"))
              :source-column
              (get-transfer-data! e "sourceColumn")
              :destination-column
              column-title}]
    (put! transfer-chan data)))
This function creates the transfer data—a map with the keys :card-id, :source-column, and :destination-column—which is everything we need to move the cards between columns. Finally, we put! it into the transfer channel.
Next, we build a number or card-view components. As mentioned previously, Om can't create cursors from lazy sequences, so we use filterv to give each card-view a vector containing their respective cards. Let's see its source:
(defn card-view [column {:keys [id title description] :as card} owner]
  (reify
    om/IRender
    (render [this]
      (dom/li #js {:style #js {:border "1px solid black"}
                   :draggable true
                   :onDragStart (fn [e]
                                  (set-transfer-data! e "cardId" id)
                                  (set-transfer-data! e "sourceColumn" column))}
              (dom/span nil title)
              (dom/p nil description)))))
As this component doesn't need any local state, we go back to using the IRender protocol. Additionally, we make it draggable and install an event handler on the onDragStart event, which will be triggered when the user starts dragging the card.
This event handler sets the transfer data, which we use from handle-drop.
We have glossed over the fact that these components use a few utility functions. That's OK, as we will now define them in a new namespace.
Go ahead and create a new file under src/cljs/om_pm/ called util.cljs and add the following namespace declaration:
(ns om-pm.util)
For consistency, we will look at the functions bottom-up, starting with move-card!:
(defn column-idx [title columns]
  (first (keep-indexed (fn [idx column]
                         (when  (= title (:title column))
                           idx))
                       columns)))

(defn move-card! [columns {:keys [card-id source-column destination-column]}]
  (let [from (column-idx source-column      columns)
        to   (column-idx destination-column columns)]
    (-> columns
        (update-in [from :cards] (fn [cards]
                                   (remove #{card-id} cards)))
        (update-in [to   :cards] (fn [cards]
                                   (conj cards card-id))))))
The move-card! function receives a cursor for the columns in our application state and simply moves card-id between the source and destination. You will notice we didn't need any access to core.async or Om specific functions, which means this function is pure and therefore easy to test.
Next, we have the functions that handle transfer data:
(defn set-transfer-data! [e key value]
  (.setData (-> e .-nativeEvent .-dataTransfer)
            key value))

(defn get-transfer-data! [e key]
  (-> (-> e .-nativeEvent .-dataTransfer)
      (.getData key)))
These functions use JavaScript interoperability to interact with HTML's DataTransfer (see https://developer.mozilla.org/en-US/docs/Web/API/DataTransfer) object. This is how browsers share data related to drag and drop events.
Now, let's simply save the file and make sure the code compiles properly. We can finally open dev-resources/public/index.html in the browser and play around with the product of our work!