
With the failure of Wired Equivalent Privacy (WEP), a stopgap measure was introduced to enhance the security of these wireless networks without requiring a hardware replacement for systems currently using WEP. WPA could be implemented on these networks with a simple software and/or firmware upgrade to the existing infrastructure. WPA2, discussed later in this chapter, requires a hardware component as well. It is possible to run WPA on devices that support WPA2; however, the opposite is not always true.
WPA comes in two flavors, which are:
- WPA Personal
- WPA Enterprise
WPA Personal, also called WPA Pre Shared Key (PSK), is the most common authentication method used on wireless networks today. It is the standard for residential implementations and SMBs have also found it easy to implement. The other flavor, known as WPA Enterprise, requires a RADIUS server on the network to authenticate the clients. Residential and small business tend to use WPA PSK, in part because of the administrative overhead of WPA Enterprise. Whereas WPA PSK uses a single shared key for authentication, TKIP is used to generate unique encryption keys whenever a client connects to the network. These per-session keys increase the security of the communication between the wireless client and the access point. In a typical WPA PSK setup, wireless administrators configure the WPA PSK key on each of the APs or on the controller and then distribute the key to employees in their organization. The key will remain the same for all the employees; there are some advantages and disadvantages in using this kind of solution.
With this type of implementation, it is difficult to keep the knowledge of the PSK from users. The key can be included in the image distributed to new laptops and trusted administrators can put it into devices that require manual input; however, if any one of the employees is able to learn what the PSK is, and is cooperating with external threats, the entire network is at risk. In addition, if any one of the devices that is configured with the key is compromised, the WPA PSK used on the network could also be determined. With the knowledge of the WPA PSK password, anyone can join the network, or capture the traffic and subsequently decrypt the information passing through the network. As we discussed earlier, an attacker only needs to be in range of the wireless network and know the encryption method to capture the traffic. An attacker who is only listening to the wireless traffic is very difficult to identify and this type of attack is typically not detected by traditional security defense mechanisms. These kinds of passive attacks are most difficult to detect and can remain undetected for years.
The minimum password length of the WPA PSK key is eight ASCII characters. We will discuss the steps involved in this authentication method in brief:
- Each user is given a password to authenticate to the network; those who have this password can access the network. The password, also called the Pre-shared Master Key (PMK), is the same for all the users.
- By using this master key, a transient, or temporal, key is generated between the client and AP for every new session. Pairwise Transient Keys (PTK) are used to encrypt the data and the key is valid until the session ends.
Even if the attacker has knowledge of the master key used in the network, they cannot decrypt the packets without calculating the temporal key. To determine the temporal key, the attacker will also need to capture the handshake between the wireless client and the access point during the initiation of a new session.
The following figure explains key aspects of the WPA PSK exchange:

The PSK is vulnerable to a dictionary attack. To crack the WPA PSK key, a dictionary, or wordlist, is required and the captured traffic should also contain four-way handshake packets. During this exercise, we create a monitor mode interface using a compatible wireless card and then scan the air for available wireless networks. Once the target is identified and the required packets are captured, you can proceed to crack the WPA key. In this example, we use the default wordlist available in Kali Linux to crack the WPA PSK key. The following steps will show you how to capture the wireless traffic and then crack the WPA PSK key with aircrack-ng:
- Bring the card up and create a monitor mode interface on the wireless card.
#ifconfig wlan0 up
#airmon-ng start wlan0
You should be able to see the following screen:

- Make sure the WLAN interface is up and running. Once confirmed, start airmon-ng to create a monitor mode interface by using the following command:
#airmon-ng start wlan0
- Once you have created the monitor mode interface, scan the air for available wireless networks by using airodump-ng. airodump-ng will scan all the 14 channels in 2.4 Ghz frequency and show the list of wireless access points in range.
#airodump-ng mon0
From the following output, you can confirm that the wireless network with the name Seclab is using WPA PSK authentication. The access point with the MAC address
90:94:E4:C8:04:E8is functioning on channel 9. Now you have all the required information to start capturing the four-way handshake.
- To increase the likelihood that you are able to capture the data that you are looking for, it is recommended that you identify the channel that the AP is communicating on and limit your radio to listen on that channel. The following command has been constructed to specify the name of the file to save the capture, channel to sniff, and finally the interface to use, which should be a monitor mode interface:

Here are the airodump-ng options in use in this example:
-cSpecifies the channel to sniff
-wSpecifies the file to save the captured data
- Once a client connects to the wireless network, airodump-ng is looking to capture the four-way handshake. After the capture of this handshake is complete, we are able to see this indicated in the airodump-ng output at the top-right corner, as seen in the following screenshot:

- After capturing the four-way handshake, it is now time to crack the key using a wordlist. Kali Linux contains a default wordlist. Use aircrack-ng to crack the key using that dictionary.
#aircrack-ng labfiles/wpacrack/wpa-Seclab-01.cap –w /usr/share/wordlists/rockyou.txtYou should be able to see the following output:

The following screenshot shows that aircrack-ng is successful in cracking the WPA PSK key. The key is shown in plain text.

As was indicated earlier, the process of cracking a WPA PSK is accomplished by a dictionary attack. If the PSK is complicated or does not appear in the dictionary file that you have selected, the brute force method is used. If your initial attempt to crack the WPA PSK fails, you can look at alternatives. One such alternative that can potentially speed up the process of cracking is rainbow tables. Whether you use rainbow tables or just a dictionary, the chance of cracking depends on the presence of password in the dictionary used.
Later in this section, we will discuss how to generate rainbow tables to fasten the process of cracking. With knowledge of the WPA key, the attacker can now join the network and perform advanced attacks against the target. Passive attacks can also be performed, typically without arousing any suspicion. The attacker can silently capture the traffic and decrypt the data using the key, and extract sensitive information such as usernames and passwords.
Wi-Fi Protected Access II (WPA2) is a full implementation of the IEEE 802.11i standard. As with WPA, it is available in two flavors: WPA2 Personal and WPA2 Enterprise. WPA2 PSK uses a passphrase as a method of authentication whereas WPA2 Enterprise uses a RADIUS server to authenticate users. WPA2 uses the Advanced Encryption Standard encryption protocol (WPA2-AES). It is stronger than both of the protocols discussed earlier, WPA and WEP, thus it is recommended to use WPA2 in place of WPA and WEP where it is supported by the hardware and software applications.
Even with the increased encryption available with WPA2 PSK, it is still vulnerable to a dictionary attack. In this section, we will show you how to capture the wireless traffic using airodump-ng and crack the key using aircrack-ng.
To prepare the wireless card for capturing the wireless traffic, put the card in monitor mode. Capture the four-way handshake when any wireless clients, like laptops or mobile devices, connect to the wireless network. You may need to wait for some time to accomplish this task. As with WPA PSK, a couple of activities will allow you to capture this handshake. Either wait until a legitimate client connects to the network or forcibly disconnect any wireless client that is already connected to the network and watch as the client tries to connect again with the network. Either of these should allow you to capture the handshake required for an attempt break the PSK. Once the four-way handshake is captured, you can again proceed to crack the WPA2 PSK key with aircrack-ng.
After identifying the wireless network through scanning activity, the attack plan is to sniff on the channel on which the access point is communicating. Whenever a wireless client connects to the wireless access point with the WPA2 PSK password, the attacker sniffing on the channel will capture the four-way handshake that took place between the wireless client and access point. Captured wireless traffic is used to crack the key by using aircrack-ng. aircrack-ng takes two parameters: one is the wireless traffic in a pcap format that should contain a valid handshake packet, and the second parameter is the wordlist. It checks for each and every word in the list and presents us the WPA2 key if, and only if, it is found in the wordlist; the chance of cracking the key is as good as the size and strength of the words you use in the wordlist. Preparing the wordlist in the context of the target network can yield better results.
Follow the following steps to crack the WPA2 PSK key:
- Bring the card up and create a monitor mode interface on the wireless card.
#ifconfig wlan0 upThe following output shows us that the wireless interface is up and running:

- Create a monitor mode interface of the wireless card, by running the following command:
#airmon-ng start wlan0
- Once you create the monitor mode interface, scan the air for available wireless networks. airodump-ng will scan all the 14 channels in 2.4 Ghz frequency and shows the list of wireless access points in range.
#airodump-ng mon0
You should be able to see the following output, as a result:
- From the output, you can observe that the wireless network named
Seclabwith WPA2PSK authentication is functioning on channel 9. Proceed by sniffing specifically on channel 9 looking to capture a handshake. To start capturing traffic on channel 9, use airodump-ng with the following command:#airodump-ng mon0 –c 9 –w labfiles/wpacrack/wpa2-SeclabThe various airodump-ng options can be summarized in the following table:
-cSpecifies the channel to sniff
-wSpecifies the file to save the captured data
- As soon as a wireless client shows up in the network, airodump-ng will capture the handshake and the display will indicate in the top-right corner when we have successfully captured a four-way handshake, as seen in the following screenshot:

- Use aircrack-ng to crack the key by supplying the wordlist. Here we use the default wordlist provided in Kali Linux.
#aircrack-ng labfiles/wpacrack/wpa2-Seclab-01.cap –w /usr/share/wordlists/rockyou.txt

The following output shows that aircrack-ng is successful in cracking the key. The key is shown in plain text. You can speed up the process of cracking using rainbow tables.

During the process of cracking WPA/WPA2 PSK, a Pairwise Master Key is derived from ESSID and the password, which is then used to calculate Pairwise Transient Key; this is again used to calculate the MIC (Message Integrity Code) value for the initial handshake process. If the generated MIC equals the MIC in the original handshake, then we can infer that the password used to generate the PMK is the correct password used on the network. PMK is never shared over the network, it is calculated using the passphrase configured on the client. The access point also derives the same PMK using the passphrase configured on it. To generate the PMK by using the passphrase, the following formula is used:
PMK = PBKDF2(PassPhrase, ssid, ssidLength, 4096, 256)
The PBKDF2 algorithm is used to generate the PMK, taking the SSID and passphrase as input. For example, the PMK in hexadecimal can be seen next for the SSID packt and passphrase password. This hexadecimal key is used to derive PTK.
HEX KEY: bdc69337120db5e30e0da46cbbc2a3b29bd59f9edfbbc1713c448f0aa0cf8cd7
PTK is derived on the fly using a four-way handshake process and is used for encrypting the data. The PMK is never used to encrypt the data directly, only to derive the PTK for every session. A new PTK is generated for every session between the client and the access point. Thus, no two sessions will have the same PTK key. Although cracking WPA/WPA2 and generating PMK values from the wordlist for the target SSID takes up so much CPU resources and time, generating PMKs for the target network beforehand can speed up the process of cracking the WPA/WPA2 key.
We will discuss how to generate rainbow tables using airolib-ng, genpmk, and use the tables while cracking the WPA/WPA2 key.
To generate rainbow tables, we require the target network SSID and wordlist. Follow these steps:
Use the following command to generate a rainbow table for the SSID Seclab by using the default wordlist available in Kali Linux:
#genpmk –f /usr/share/wordlists/rockyou.txt –d /root/labfiles/wpacrack/genpmk-hash-Seclab2 –s Seclab
Let's see what each term in the preceding command represents:
|
|
Specifies the wordlist (dictionary) |
|
|
Specifies the database filename to be created |
|
|
Specifies the SSID |
Let's look at genpmk options:

genpmk takes some time to generate the PMK table depending on various factors like CPU resources, architecture, and so on. The following screenshot shows that genpmk is calculating PMK for every password in the list:

Once the rainbow tables are ready, you can use it in the cracking process to decrease the time required to crack the key. We will use the generated rainbow table along with an application called coWPAtty to crack the WPA/WPA2 key.
coWPAtty can be used to crack WPA/WPA2 PSK keys with a dictionary, or wordlist, file. It can also be used along with a provided rainbow table generated using genpmk.
To crack the key with the help of rainbow tables, run the following command:
#cowpatty –d labfiles/wpacrack/genpmk-hash-Seclab –r labfiles/wpacrack/ilovehate-01.cap –s Secclab
Let's look at the coWPAtty options:
|
|
Specifies the rainbow table to use |
|
|
Specifies the capture file containing the four-way handshake |
|
|
Specifies the SSID |
The following screenshot shows the detailed available options in coWPAtty:

It took us about 6.33 seconds to crack the key. In this example, coWPAtty tries 140,000 passwords per second to crack the key. The output shows that coWPAtty is successful in cracking the WPA key. The correct WPA PSK password is ilovehate2. If tested without rainbow tables, we may not get the exact count of passphrases tested per second and it will always be lower.

To generate rainbow tables using airolib-ng, you need to know the target network SSID and have a good dictionary file. Rainbow tables generated for a specific SSID, say Seclab, cannot be used to crack the key of a network with the SSID nolab. The generated hashes will only be correct if the exact SSID of the target is used to generate them.
Rainbow tables have to be generated for each target SSIDs we need to pentest. To generate the rainbow tables, follow these steps:
- airolib-ng is the tool used to generate rainbow tables. We first create a new text file and put our target SSID in it. The SSID is
Seclab. - We then create a database named
seclabin airolib-ng and push the SSID inside the database by using the following command:#airolib-ng seclab –import essid /root/labfiles/wpacrack/ssid
- Import the password dictionary into the database
seclab. Use the following command to achieve that:#airolib-ng seclab –import passwd /usr/share/wordlists/rockyou.txt
You can check the statistics of the newly created database. The next screenshot shows that there are
1ESSID and9,611,374passwords dumped into the database. The actual work of airolib-ng is to generate the PMK table from these SSID and passwords in its database.
- To generate the hashes, type the following command:
#airolib-ng seclab –batchOnce you start airolib-ng with the
–batchoption, it will take some time to calculate the hashes; it depends on various factors like CPU, power, and available hardware. It is a time-consuming process, as you can see in the following screenshot:
- Once generated, you can verify the consistency of the generated hashes using the
–verifyswitch. Run the next command:
After generating rainbow tables, we can use them with aircrack-ng to crack the WPA/WPA2 key. Here we use rainbow tables generated by using airolib-ng like before.
- Now run the following command:
#aircrack-ng labfiles/wpacrack/ilovehate-01.cap –r seclabAs you can see in the following screenshot, the -r switch specifies the database (rainbow table) generated by airolib-ng:

It took about 11 seconds to crack the key. Aircrack-ng tried 75,000 passwords per second to crack the key. The number of passwords tested per second depends on various factors, but using rainbow tables certainly speeds up the process.
Wi-Fi Protected Setup (WPS) is a wireless security protocol designed to allow users to simply secure wireless networks and reduce the complexity of adding new hosts. It is typically used on residential networks where technical expertise is often limited and simplicity is mandatory. The on boarding process leverage a PIN, which is either obtained from the AP's configuration interface, or may also be printed on a table affixed to the AP. It may also be associated with a button press that enables the device to begin the onboarding process.
It was discovered in 2011 that the WPS PIN feature is vulnerable to a brute force attack where an attacker is able to recover the WPA/WPA2 key on the device. Although this attack is not possible on all access points, it can be a successful means of attack on most access points and routers with older firmware. A firmware update on the device can mitigate this attack; however, as discussed earlier, it is common for these devices to go without patches or updates for long periods of time.
In this section, we will show you how to crack the WPS PIN using a tool called reaver. Follow the following steps to crack the WPS PIN:
- Bring the wireless card up and create a monitor mode interface on the wireless card.
#ifconfig wlan0 up
#airmon-ng start wlan0
You should be able to see the following screen:

- We will be using Reaver, a tool included on the Kali distribution, to crack the WPS PIN. Reaver is a tool designed exclusively to brute force the WPS PIN authentication. If it is able to discover the PIN, it then proceeds to display the WPA/WPA2 PSK password on the router to the attacker automatically. Because of the brute force nature of this attack, it can often take a significant amount of time to successfully recover the WPS PIN, and hence the PSK using this method.
The following figure shows the successful creation of the monitor mode interface:

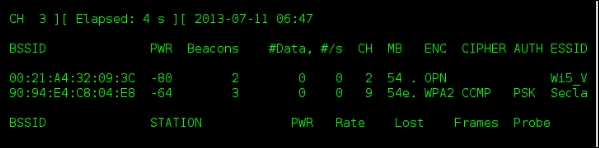
- Scan the air for available wireless networks using the monitor mode interface. airodump-ng will scan all the 14 channels in 2.4 Ghz frequency and shows the list of wireless access points in range. In the following output, we can see our access point named
Seclabwith WPA2 PSK authentication enabled. The access point is functioning on channel 9.#airodump-ng mon0You should be able to see the following result:

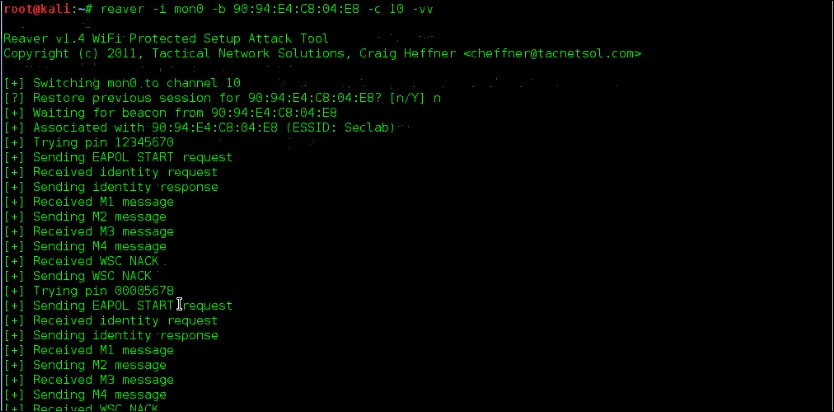
- Our challenge is to use Reaver to brute force the WPS PIN and retrieve the WPA/WPA2 PSK key that is preconfigured on the device. Now we run Reaver against the access point by using the following command:
#reaver –i mon0 –b 90:94:e4:c8:04:e8 –c 10 –vv
Let's look at what each term signifies:
|
|
Specifies the interface to use |
|
|
The MAC address of the wireless access point |
|
|
The channel to listen |
|
|
Verbatim mode, which displays additional information about what is happening |
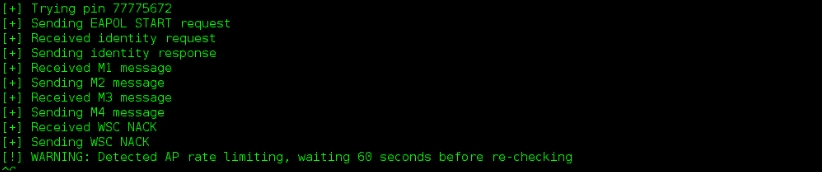
The following output shows that Reaver is trying to brute force the WPS PIN with random combinations of eight-digit PINs:
Once the correct eight-digit PIN is supplied to the wireless access point, it will give us the WPA/WPA2 PSK key in plain text. We can see Reaver trying different combinations of the WPS PIN like in the following screenshot:
In the preceding example, this attack was successful, but keep in mind that many vendors have released firmware updates to address this exploit. On success, the preceding command shows us the WPA PSK key in plain text. In this case, it is ilovehate2.

WPA Enterprise and WPA2 Enterprise use 802.1x, a port-based authentication protocol, to authenticate users. It leverages a centralized authentication server to authenticate the users, devices, or both. Only after authentication are the user and device allowed to access the resources on the network. To prevent access before the authentication succeeds, only Extensible Authentication Protocol over LAN (EAPOL) traffic is allowed until the client is successfully authenticated.
The three components in 802.1x authentication are supplicant (wireless client), authenticator (access point), and authentication server (RADIUS). The flow can be summarized in the following steps:
- The initial communication between supplicant and authenticator is done through EAPOL messages.
- The authenticator encapsulates these messages in the RADIUS protocol to communicate with the authentication server. It is up to the authentication server to allow or deny the user to log on to the network.
- Typically, the RADIUS server will be configured to look at active directory, or other centralized databases, to authenticate the users.
- EAP-Request Identity and EAP-Response Identity frames are exchanged between supplicant and authenticator. In the backend, the authenticator encapsulates the messages in RADIUS Access-Request packets and sends it to the authentication server.
- On final arrival of the RADIUS Access-Accept packet from the authentication server, the authenticator sets the port to an authorized state and allows the client to send normal traffic over that port.
- If the authentication is not successful, the port remains in an unauthorized state and non-EAP traffic is not allowed.
We have just seen how the supplicant, authenticator, and authentication server work together to authenticate the users before joining the network. In this scenario, if the supplicant is not properly configured then there is a chance of compromising the credentials used by the supplicant.
The following figure depicts a normal exchange during an 802.1x client to authenticate to the wireless network:

In a normal flow, the supplicant authenticates the authentication server based on the certificates. The authentication server offers a certificate that is validated by the supplicant to see if it is trusted. In this attack scenario, the attacker attempts to offer a fake certificate to the supplicant and asks for the credentials. Normally, this forged certificate should be rejected by the supplicant and the authentication process halted; however, in many of the supplicants, the default configuration allows it to accept any certificate from an authentication server and to proceed with sending the user credentials. This behavior provides a situation where an attacker is allowed to set up a fake RADIUS server and collect the artifacts required to get the credentials.
In this section, we will set up a RADIUS server on our pentesting host machine and a fake access point using hostapd. When any wireless client attempts to authenticate with our wireless access point, we end up gathering MSCHAP challenge and response. Later, an offline dictionary attack can be mounted against the gathered challenge and response using asleap.
To begin, we will configure a WPA Enterprise wireless network that uses 802.1x for authentication. This network will be hosted on an AP that we configure in parallel to the network that we are attempting to infiltrate. Since 802.1x requires a RADIUS server for authentication, we will be using a special RADIUS server that is specifically modified to accept any authentication attempts from connecting clients. By using the captured MSCHAP data, we try to crack the Windows domain credentials using asleap. This attack is successful against Enterprise wireless clients only if the clients are not properly configured.
To perform the attack, you should use a wireless adapter capable of supporting master mode. This allows the adapter to be configured to impersonate an access point and have other clients connect to it. This procedure is used in several places in this book.
- Bring the wireless card up and assign the IP address
192.168.1.1to the wireless interface.#ifconfig wlan1 192.168.1.1 up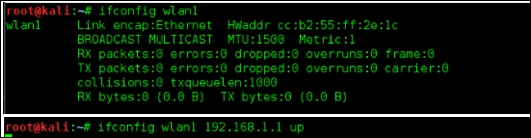
- Use a text editor and add the following content into a file to be used with
dhcpd:
The preceding configuration file creates a pool of IP addresses from
192.168.1.100through192.168.1.254to be used for connecting clients. The gateway address is defined as192.168.1.1, the IP address of the wireless interfacewlan1on the attacker machine. DNS servers are set up as the attacker machine as primary, and public DNS servers as secondaries, in the event we are not attempting to manipulate any DNS responses during the attack. - The next step is to forward the traffic from the wireless interface
wlan1to the wired interfaceeth0where Internet connectivity is available. To do this, we run a script,iptables.sh, in the attacker machine.#sh labfiles/fakeap-1/hostap/iptables.sh
The content of the
iptablesconfiguration looks like the following screenshot:
- Using the DHCP configuration created in Step 2, enable the DHCP server on this interface to assign IP addresses to wireless clients by running the following command:
#dhcpd –cf labfiles/fakeap-1/hostap/dhcp.conf wlan1
We need a RADIUS server to authenticate the users; FreeRADIUS can be installed on Kali Linux to act as a RADIUS server. A patched version of FreeRADIUS designed to accept any authentication attempt is available as FreeRADIUS-WPE (Wireless Pwnage Edition). This edition will simplify the collection of credentials users send as part of their authentication attempt to our access point.
Configure the server according to our situation. The scenario here is that we create a virtual access point on the interface
wlan1(192.168.1.1) with 802.1x security; simultaneously, we create a RADIUS server on the interfaceeth0(10.0.2.15). Whenever a wireless client connects to our virtual access point, the request is forwarded to the RADIUS server on the eth0 interface. If the client authenticates successfully then it is allowed through the virtual access point. - Now it is time to configure the
freeradiusclient configuration file. Open theclients.conffile located at the/etc/freeradiusdirectory. Add the following lines to this file:client 192.168.0.0/16 { Secret = testing123 Shortname = private-network-2 }
Secret is set to
testing123, which is a shared key between the authenticator (the access point) and server. - Edit the
usersfile located at/etc/freeradiusto add the usertest. Using the following format:test Cleartext-Password := "test"You will now get the following output:

- Edit the
eap.conffile located at/etc/freeradiusto make the default EAP type to PEAP.
- Edit the
radius.conffile located at/etc/freeradiusto reflect the following content:
- When the configuration files are ready, set up the RADIUS server on the wired interface
eth0. The–ioption tells the RADIUS server the interface to listen on and the–poption specifies the port to listen.#freeradius –i 10.0.2.15 –p 1812 -X
The following output shows that the RADIUS server is listening on
10.0.2.15at port1812ready to serve requests from wireless clients:
- Now that RADIUS is in place to authenticate clients, we will create our impersonated access point to serve clients and listen for their authentication requests. We will be creating an Enterprise wireless access point with the help of
hostapd. The configuration file used byhostapdis located in the/etc/hostapd/directory.The following is the content in the configuration file. Use it as the configuration file with hostapd:

- Now run the
hostapdto broadcast our fake access point. Run the following command:#hostapd /etc/hostapd/hostapd-8021x.conf –dd
Once any client connects to the network
Seclab, it will be assigned the IP address192.168.1.100from the DHCP program running on the attacker machine. The client will attempt to initiate the 802.1x process to authenticate their connection and will send their credentials through to the RADIUS server we configured. The RADIUS server will provide an Access-Accept to the access point allowing the user to connect. During this process, we will collect the Challenge and Response information from the connecting client. Once collected challenge and response, we can crack the windows password using asleap, which is already available in Kali Linux. - We can view the details of the connecting clients from the FreeRADIUS-WPE log file.
#tail –f /var/log/freeradius/freeradius-server-wpe.log
- With this captured challenge/response information, we can run
asleapwith the following command to crack the Windows credentials. In this example, we will use the built-in wordlist.#asleap –C ee:42:ba:e4:d4:83:c9:c1 –R 20:59:27:00:0f:8a:3a:b8:bf:4a:ff:f0:1b:dd:db:53:27:c7:f4:18:2a:ac:ef:0b –W /usr/share/wordlists/rockyou.txt
Take a look at the usage options:
|
|
Specify the challenge |
|
|
Specify the response |
|
|
Specify the dictionary |
The following are the complete list of options available in asleap:

The following output shows that asleap is able to crack the Windows password successfully using the dictionary available in Kali Linux. Here, the chance of cracking the password is as good as the dictionary supplied to asleap:

By performing this attack on Enterprise wireless clients, the attacker can determine the Windows domain credentials of Enterprise users. With the domain credentials obtained, they are now able to authenticate to the legitimate Enterprise network with the privilege level of the captured credentials. With this level of access, additional attacks, including man in the middle attacks, are possible. These will be discussed in later chapters.
We will also discuss a slight variation of this attack. In the previous example, we had used a wireless card to emulate an access point and configured a WPA Enterprise network. Sometimes during a pentest, it may be difficult to use a wireless card for this functionality and an actual access point may be a better option. Here, we will configure a real access point to connect to our RADIUS server running on our laptop; in that way, we can remove the virtual access point used in the earlier attack.
We set up a FreeRADIUS server in Kali Linux (attacker machine) as the RADIUS server to authenticate wireless clients. Follow these steps:
- Set up the wireless router to use our RADIUS server on a Kali machine with the IP
192.168.0.100. Enter the username and password of the administrator to enter into the router.
- Go to the Wireless Settings tab on your router (the name may differ from router to router) to change the security mode to WPA Enterprise or Enterprise EAP (Extensible Authentication Protocol).
- Provide the RADIUS server IP address as your Kali Linux machine IP (
192.168.0.100). Configure the RADIUS port to1812and provide the shared secret astesting123. - Apply these configuration changes. Often this will also require that the router be rebooted.

- Start the FreeRADIUS server with the
–ioption specifying the IP address and the–poption specifying the port to listen. Before starting the server, check that your configuration files are properly configured. The FreeRADIUS server should be installed prior to this step.
- Check that
clients.confin the/etc/freeradiusdirectory has the following lines. If not, paste the same into the file:Client 192.168.0.0/16 { Secret = testing123 Shortname = private-network-2 }
- Check that the
usersfile in the /etc/freeradiusdirectory has the following line. If not found, paste it into the file:
- Check that the
eap.confin the/etc/freeradiusdirectory has the following line:
- Check that the
radiusd.conffile in/etc/freeradiushas the following changes made:
- When any wireless clients connect to our impersonated Enterprise network, the configured router sends the authentication request to the RADIUS server running on Kali (attacker machine). The RADIUS server logs the challenge and response from the connecting client and issues an Access-Accept back to the router. Here in this scenario, we have configured only one user named
test. To allow a specific user whose password are already known, add them to users file located in/etc/freeradiusdirectory.The following screenshot is the output from the FreeRADIUS server; we can see Radius Access-Accept messages indicating a successful authentication of the client:
