The goal of most penetration testing exercises is the extraction of sensitive information from the target network. To achieve this goal, the pentester will typically pursue many different avenues, such as crafting and sending spear phishing e-mails with malicious attachments, invasive vulnerability scanning, intricate social engineering exercises, or fuzzing and reverse engineering software packages looking for holes. Although this type of methodology can be effective, it is often very tedious and the chance of success may be reduced based on factors such as the patching cycle of software, security applications/appliances deployed, user security awareness, and so on. It is very possible that in order to get that much-needed foothold into a target, an often overlooked and much less complex tactic can be utilized. We are not suggesting that these other efforts are not worthwhile, especially in a full-scale penetration test for a client; however, a lot of information can be gathered in a very passive way, perhaps while you are simultaneously working on other activities.
Sniffing wireless network traffic on the target network is often given less importance during penetration testing activities; however, we have found that in wireless-focused pentests it can prove extremely effective. The typical attack-infect-extract methodology regularly employed by pentesters is not the only way to achieve the goals of the pentest. At times, simply sniffing on the target network can yield the same results. As we've demonstrated in previous chapters, sniffing data on a wireless network is relatively easy compared to when only a wired network is in scope.
In this chapter, we will discuss some additional ways sniffing can be used to extract sensitive information from wireless networks, even those who have implemented encryption to protect the data transmission. Specifically, we will be covering the following topics:
- Capturing traffic with Wireshark
- Analyzing wireless packet capture
- Extracting data from unencrypted protocols
- Merging packet capture files
Wireshark is a popular open source packet analyzer and a very powerful tool for many IT professionals. It provides a deep level of visibility into network traffic, making it useful for many purposes. A SOC (Security Operations Centre) analyst may use it as an incident response tool to investigate a reported intrusion; a network analyst can use it to troubleshoot connectivity problems; and an application administrator might use it to see what parameters are being sent between nodes. Because of this flexibility and visibility, it is an ideal tool for digging through the traffic captured during our wireless security assessment. In addition to its ability to do after-the-fact analysis, Wireshark has the ability to capture traffic on live interfaces. This enables us to capture wireless traffic via the monitor mode interface on the wireless adapter.
Running Wireshark on Windows is not covered in any depth in this book since Kali is our platform of choice, but be aware that monitor mode is not supported on Windows operating systems. This limits the effectiveness of Wireshark on Windows systems for sniffing.
Follow the following steps to start Wireshark and begin capturing the wireless traffic:
- Run the following command to start Wireshark:
#wireshark - You can start capturing by selecting the monitor mode interface of the wireless card, as shown as follows:

- There is an alternate way to start capturing: go to Capture → Interfaces. Select the interface to start capturing the traffic, in our case mon0:

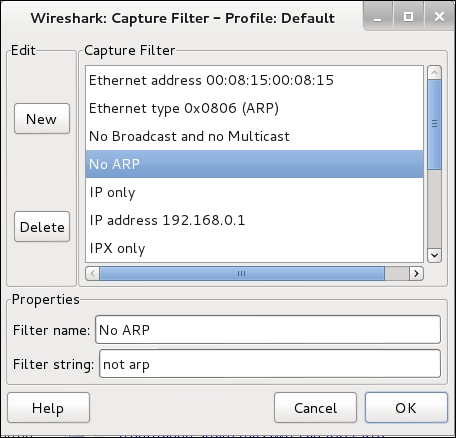
Capture filters are applied during the live capturing sessions. Those packets that match the criteria are passed up to the Wireshark capturing engine. The application of these capture filters will reduce the amount of packets to be captured, reducing the amount of noise you have to wade through to find the information you are most interested in. For example, if you do not wish to capture ARP traffic, then apply the capture filter No ARP. This will exclude all the ARP traffic during the live capturing session. The result is a PCAP trace with no ARP information in it. It is recommended to use capture filters sparingly; packets discarded by capture filters will not be saved into the capture file for later analysis.
An alternative to capture filters, Display Filters, will be covered later. This allows you to focus on certain traffic by only displaying to the screen the packets you are interested in.
- Press Start. You should see the number of packets incrementing and displayed in the status window. If you are not receiving any packets, check whether the wireless card is on the same channel as the target access point. You are also able to save the packet capture to a file on disk for later analysis.
To decrypt using Wireshark, follow these steps:
- Enable the wireless toolbar by choosing View → Wireless Toolbar. This toolbar is very handy for analyzing wireless capture files.
- You can input the decryption keys in the Decryption Keys tab shown in the toolbar or via Edit → Preferences → IEEE 802.11 or Edit → Preferences → Protocols → IEEE 802.11, depending on your version.
In newer versions of Wireshark, the Decryption Keys option has been removed from the wireless toolbar and you will need to navigate to the IEEE 802.11 section in the preferences section, as shown in the following screenshot:

You can decrypt WEP, WPA, and WPA2 traffic using Wireshark. You need to have the correct key configured to decrypt the traffic.
- Go to the preceding Decryption Keys section and enter the new keys by selecting New. Then, input the key, as shown in the following screenshot:

The keys are tested in the order in which they are listed. For example, if you have configured more than one key in Wireshark, it will try with the first key; if decryption is not successful, it moves to the second key in the list, and so on.
Once the key is added to the store, it will display all the keys present in the store. Currently, we have configured a WEP and WPA key, as shown in the following screenshot:

After capturing the traffic, open the trace file in Wireshark. It will automatically decrypt the traffic with the correct key and shows us the decrypted traffic. Once decrypted, we can see the normal traffic and extract useful information from it.
It is rare these days that you will ever run into WEP while conducting a penetration test. WEP has been broken for many years and many regulations have required that organizations move to a more secure wireless communication mechanism. In this example, we will show you how to decrypt packets encrypted using WEP.
WEP uses either 64 or 128 bit keys to encrypt the data. To decrypt the data, we need to derive the key used to encrypt the packets. It is possible to crack the WEP-encrypted data packets if we capture enough of these packets for analysis. The aircrack-ng suite of tools allows us to both capture and crack the key used to encrypt the traffic. Unlike WPA/WPA2 PSK, a dictionary file is not required to crack the key; however, we can also crack the key using aircrack-ng along with a dictionary.
Aircrack-ng has many options to crack the WEP key, but we are interested in using it with dictionary attack. We use the –n option, which specifies the key length. The data captured in the file is encrypted with the 64 bit key so we use –n 64.
The following is list of options available with aircrack-ng:

The –w option is used to specify the dictionary to use with aircrack-ng.
Here, we try to crack the key using a dictionary file. If the password is in the dictionary, our attempt will be successful. Follow these steps:
- Run the following command to crack the WEP key using aircrack-ng along with a dictionary file:
#aircrack-ng –w /usr/share/wordlists/rockyou.txt –n 64 decrypt-wep-01.cap-wSpecifies the dictionary file.
-nSpecifies the key length. Like 64/128/152/256/512.
We will get the following output:

- If the key is found in the dictionary, aircrack-ng displays the key in plain text as well as in hex format. To decrypt the data, we use hex key format. The following output shows that the key is successfully cracked using aircrack-ng. In our case, the key is india.

- Equipped with the WEP password, we will now use airdecap-ng to decrypt the data. Mentioned next is the list of options available in airdecap-ng. The option
-wspecifies the WEP key in Hex format.
- Use airdecap-ng to decrypt the data capture file using the preceding cracked key.
#airdecap-ng –w 69:6E:64:69:61 decrypt-wep-01.capThe following output shows that it has found 1504 WEP packets in the capture and successfully decrypted them:

- The decrypted data capture file is created in the same directory. In our case, it is
decrypt-wep-01-dec.cap. Now you can open the file in Wireshark to view the information inside the capture file.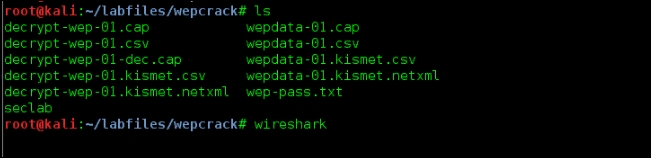
Airdecap-ng is also capable of decrypting 802.11 packets captured from WPA/WPA2-enabled wireless networks. As discussed earlier, WPA varies from WEP in the way that keys are derived and used to encrypt the packets. We may not be able to directly decrypt the traffic even if the PMK is identified. To decrypt the WPA data packets, you need two things: the first is the WPA key, and the second is the WPA handshake that took place between the client and the access point. If you only have any one of them, either the key or the handshake, you will not be successful in decrypting the WPA packets.
Follow the following steps to decrypt WPA traffic:
- Use airdecap-ng with the password and SSID of the network.
–pspecifies the WPA passphrase.–soption specifies the SSID. - Run the following command to decrypt the packets captured from the WPA-enabled wireless network:
#airdecap-ng –p ilovehate2 –s Seclab decrypt-wpa2-01.capHave a look at the airdecap-ng options:
-pSpecifies the WPA passphrase in ASCII format
-sSpecifies the SSID
The following output shows that airdecap-ng is able to decrypt WPA packets successfully:

Up until now, we have discussed how to create monitor mode on a wireless card and start capturing the traffic on a wireless network – either with Wireshark directly or using airodump-ng to save the traffic captured from the air. After the packet capture, the next step is to use Wireshark to dig through those packets looking for information that could prove useful in furthering the goals of the penetration test.
There are many unprotected data streams that are typically transmitted over wireless networks that could contain sensitive data. In this section, we will discuss several of these protocols and how display filters in Wireshark will allow us to hone in on these specific types of packets and the data they contain. The more comfortable you become with display filters and combining them together, the more information you will be able to extract from the packet capture.
Display Filters are used to focus on a certain type of traffic. They are applied to existing PCAP files and the traffic that matches the filter is displayed on the screen. The primary difference between capture filters, discussed earlier in this chapter, and display filters is that capture filters are applied before capturing the traffic, whereas display filters are applied to the resulting view to the user. As mentioned, it is recommended that you use display filters more often than capture filters to limit the chance of missing critical information because it matched the capture filter and was not collected. The following screen capture shows where the display filters are applied to the captured traffic. The packets that match this filter will be displayed in the primary window.

As with capture filters, display filters use a specific language to tell Wireshark what you are looking for. After some time, you will become more fluent with this language, but as you begin it is recommended that you leverage the Wireshark references that provide examples on how to find the nuggets of information you are most interested in.
Two sites that provide a wealth of information on getting started with display filters are:
- Wireshark Wiki (https://wiki.wireshark.org/DisplayFilters): Overview of the filters and commonly used filter examples. It shows you how to filter between two hosts, for a specific protocol, or how to look for items in the headers of packets.
- Wireshark Display Filter Reference (https://www.wireshark.org/docs/dfref/): Index for all of the display filters with in-depth descriptions on their use. This also includes protocol references and the fields available within each of the protocols.
Wireshark also has a pseudo-guided filter creation process that allows you to pick through the protocols and some Boolean variables. You can combine these together to construct the display filter. You can access this feature by clicking the Expression… button next to the display filter field.
The following figure shows an example of this with DNS chosen as the protocol:

With a handle on the basics of creating display filters, let's now take a look at some common examples of data that can be extracted from our capture that can assist with furthering our efforts and achieving the goals of our penetration test.
Wireshark provides some capabilities of learning more about the devices that are communicating over the wireless network, which can be helpful at determining potential targets. You can also identify where critical resources are located, such as DHCP and DNS.
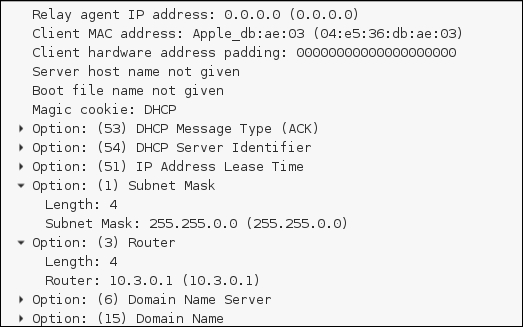
The following screenshot shows the usage of the display filter bootp to focus only on DHCP traffic. You can identify the IP scheme used on the network and which device is servicing DHCP requests.

Digging into the DHCP ACK packet, you can also see the details that were provided to the client; this indicates things such as issued IP address, gateway, DNS servers, and subnet mask. All of these are very useful in determining relationships on the target network.
Applying the ARP display filter can provide the IP addresses of the devices that are communicating on the Layer 2 network. You will be able to see the IP and MAC addresses of the devices connected to the wireless network. Follow these steps:
- Go to File | Open… | <
your decrypted file>. - Type
arpin the filter box to see all ARP packets inside the data capture, as shown in the following screenshot:
It can also be helpful to know who the top talkers on the target wireless network are. This can be determined by accessing the WLAN Endpoints report, under Statistics.
- Navigate to Statistics → WLAN Traffic. The following screenshot shows the addresses, number of packets, and bytes collected in the capture file:

Domain Name System (DNS) is used to resolve the IP address associated with a hostname. Commonly, when a user is interacting with web services and other network devices, they do not know the IP address of the resource they are trying to reach. Instead, they use the hostname associated with that resource in their web browser, or other tools, to reach that device. Behind the scenes, a DNS server is queried for that hostname and it in turn provides the IP address. This process is also used for identifying which name servers service a specific domain or which host is responsible for receiving an e-mail sent to domain users.
DNS is critical to the functionality and usability of today's networks. By default, DNS uses port 53, TCP for domain transfers and UDP for queries. We can gather quite a bit of information about the relationships between clients and servers, commonly accessed network elements, and popular destination on the Internet by analyzing the DNS traffic on a network.
In the following example, we create a display filter to look at the DNS requests we have captured. This can assist us with other aspects of our penetration test such as determining the most-visited domains, or domains often visited by one client. This preference can assist us with conducting Man-in-the-Middle attacks using most-visited domains, as shown in Chapter 6, Man-in-the-Middle Attacks Using Evil Twin Access Points.
To view all of the DNS requests in your capture, use the dns display filter demonstrated next:

Another way to quickly access the name resolution that has occurred in your packet capture is by using the Statistics menu in Wireshark. This dialog box will itemize all of the names to IP resolutions that have been discovered in your capture. This can be accessed by navigating to Statistics | Show address resolution.
The following figure shows an example from a capture. You can see which hosts, internal and external, were determined through DNS and other name resolutions:

Finally, the Statistics menu can also provide a list of the top destinations, based on a filter. This can tell you what the top destinations from the clients on your network are. Does your target organization use a SaaS service for their e-mail or CRM? Perhaps that would make a good destination to spoof in an attempt to collect credentials from targeted users. You can access this report by navigating to Statistics |IP Statistics | IP Destinations, as shown:

The resulting list will show you the top HTTP and HTTPS destinations for the packet capture you have loaded. The following figure is an example of the data that is returned. This example only displays the IP addresses of the destinations; however, you can also do name resolution for these IP addresses.

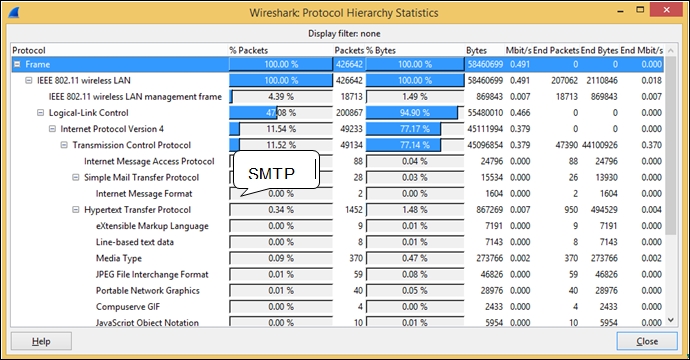
It is very hard to go through each and every packet in a PCAP file to determine whether a protocol is used or not. To view statistics of all the protocols captured in the PCAP, use the Protocol Hierarchy option under the Statistics tab to itemize all of the protocols in use and how much of the captured traffic is attributed to that protocol.
To access this information, navigate to Statistics | Protocol Hierarchy. This will help us prioritize the protocols to target in the following sections, as shown: