
Now that you have an idea about how React Native works and how to create components, let's create your first React Native application. Throughout this book, we will be developing a note-taking application which we'll call ReactNotes. By the end of the book, you'll have a fully featured application that allows you to create notes, save them to a device, view the list of the notes you've saved, take pictures with the device and attach them to your notes, and much more.
In this chapter, we'll build the skeleton of the application, create a HomeScreen and NoteScreen. We'll also add navigation that allows you to switch between the screens, and along the way you'll learn about creating your own components and handling events.
The topics that we will cover in this chapter are:
- How to generate iOS and Android project files
- Examining the React Native starter template
- Creating the first component,
SimpleButton - Debugging with Chrome Developer Tools
- Exploring navigation and transitioning between screens
- Developing the UI to create notes
To start building our note taking application for iOS, we are going to need a couple of command-line tools.
- React Native 0.14.2 requires Node.js v4+, we are going to use v5.0.0; visit https://nodejs.org for more information (we recommend managing different node versions with NVM https://github.com/creationix/nvm)
- Install the latest version of NPM from https://www.npmjs.com/
Great, now that we have these tools we can install the react-native-cli. The react-native-cli exposes an interface that does all the work of setting up a new React Native project for us:
- To install
react-native-cli, use thenpmcommand:npm install -g react-native-cli - Next, we are going to generate a new React Native project called
ReactNotesusing thecliand thereact-native initcommand. The output of the command looks similar to the following:$ react-native init ReactNotesThis will walk you through the creation of a new React Native project in
/Users/ethanholmes/ReactNotes. - Set up a new React Native app in
/Users/ethanholmes/ReactNotes:create .flowconfig create .gitignore create .watchmanconfig create index.ios.js create index.android.js create ios/main.jsbundle create ios/ReactNotes/AppDelegate.h create ios/ReactNotes/AppDelegate.m create ios/ReactNotes/Base.lproj/LaunchScreen.xib create ios/ReactNotes/Images.xcassets/AppIcon.appiconset/Contents json create ios/ReactNotes/Info.plist create ios/ReactNotes/main.m create ios/ReactNotesTests/ReactNotesTests.m create ios/ReactNotesTests/Info.plist create ios/ReactNotes.xcodeproj/project.pbxproj create ios/ReactNotes.xcodeproj/xcshareddata/xcschemes/ReactNotes.xcscheme create android/app/build.gradle create android/app/proguard-rules.pro create android/app/src/main/AndroidManifest.xml create android/app/src/main/res/values/strings.xml create android/app/src/main/res/values/styles.xml create android/build.gradle create android/gradle.properties create android/settings.gradle create android/app/src/main/res/mipmap-hdpi/ic_launcher.png create android/app/src/main/res/mipmap-mdpi/ic_launcher.png create android/app/src/main/res/mipmap-xhdpi/ic_launcher.png create android/app/src/main/res/mipmap-xxhdpi/ic_launcher.png create android/gradle/wrapper/gradle-wrapper.jar create android/gradle/wrapper/gradle-wrapper.properties create android/gradlew create android/gradlew.bat create android/app/src/main/java/com/reactnotes/MainActivity.java
To run your app on iOS:
   Open /Users/ethanholmes/ReactNotes/ios/ReactNotes.xcodeproj in Xcode
   Hit Run button
To run your app on Android:
   Have an Android emulator running, or a device connected
   cd /Users/ethanholmes/ReactNotes
   react-native run-android
The
rootdirectory of theXcodeproject is generated in theReactNotesfolder, with the same name as we gavereact-native-cliwhen we ran the command. Follow the steps at the end of the React Native set up to see what it produces.
We are going to start by running the starter template in the iOS simulator through Xcode:
- In Xcode, select
File|Openand navigate to theReactNotesfolder. - Open the
ReactNotes.xcodeprojfile, as shown in the following figure: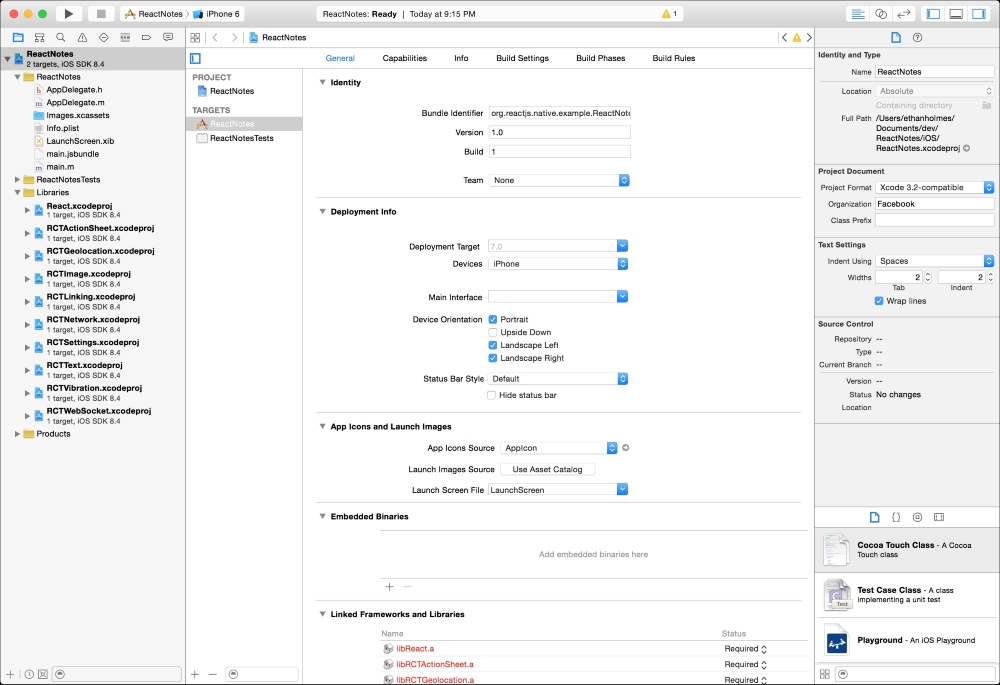
- Click on Run (or Cmd + R) to run the application in the iOS simulator, the following screenshot will be shown:
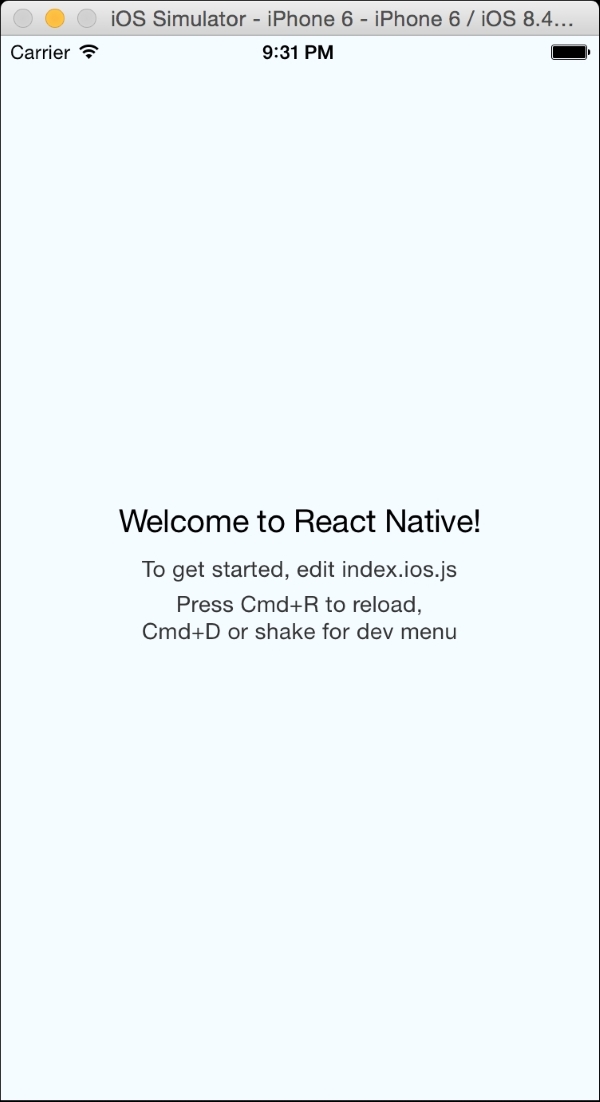
Just like that, we already have the React Native template up and running on the iOS simulator!
Facebook has a detailed step by step guide set up on Android SDK and emulator. You can access the React Native Docs at https://facebook.github.io/react-native/docs/android-setup.html. In this section, we will only cover the basics of running the application on the Android emulator.
When running the project in the iOS simulator, we can run it from the Xcode IDE. Android, on the other hand, doesn't require any particular IDE and can be launched directly from the command line.
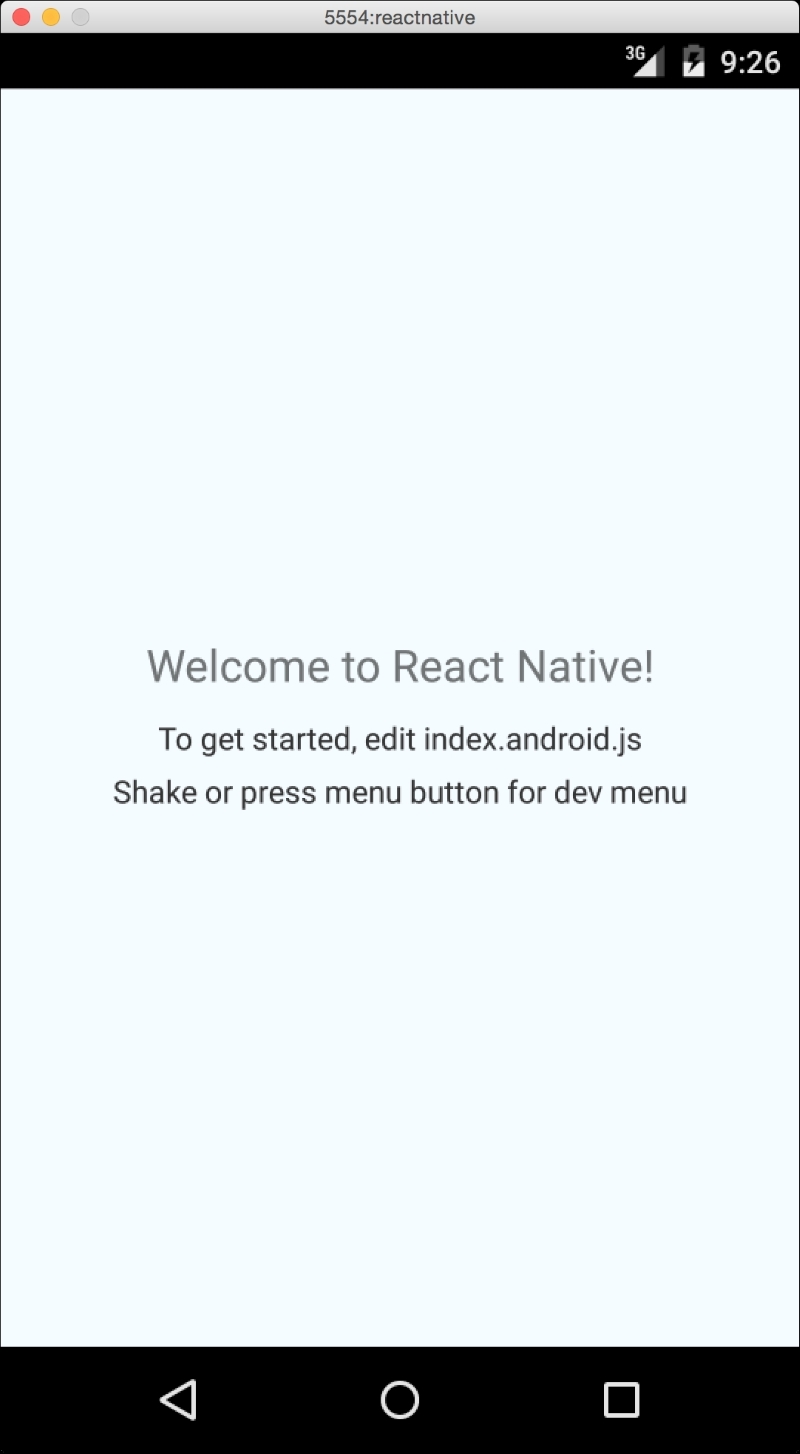
To install the android apk to the emulator, use the following command:
$ react-native run-android
The following screenshot will be generated:
Let's start by modifying the contents of the starter template and display a different message.
Open index.ios.js, located in the root directory, in the text editor of your choice. Here is the code that react-native-cli generated:
/**
 * Sample React Native App
 * https://github.com/facebook/react-native
 */
'use strict';

var React = require('react-native');
var {
  AppRegistry,
  StyleSheet,
  Text,
  View,
} = React;

var ReactNotes = React.createClass({
  render: function() {
    return (
      <View style={styles.container}>
        <Text style={styles.welcome}>
          Welcome to React Native!
        </Text>
        <Text style={styles.instructions}>
          To get started, edit index.ios.js
        </Text>
        <Text style={styles.instructions}>
          Press Cmd+R to reload,{'
'}
          Cmd+D or shake for dev menu
        </Text>
      </View>
    );
  }
});

var styles = StyleSheet.create({
  container: {
    flex: 1,
    justifyContent: 'center',
    alignItems: 'center',
    backgroundColor: '#F5FCFF',
  },
  welcome: {
    fontSize: 20,
    textAlign: 'center',
    margin: 10,
  },
  instructions: {
    textAlign: 'center',
    color: '#333333',
    marginBottom: 5,
  },
});

AppRegistry.registerComponent('ReactNotes', () => ReactNotes);A lot of things are included in here, but bear with us as we break it down for you. If we take a closer look at the render method, we can see the familiar View and Text components that we encountered in the previous chapter. Note how the index file is a component itself (ReactNotes). Change the value in line 30 to Welcome to React Notes!. Save it and then press Cmd + R from the simulator or, in the top menu, navigate to Hardware | Shake Gesture and select Reload from the pop-up action sheet. The text on screen re-renders to show the text value we just modified! We are no longer constrained to wait for the Xcode to recompile in order to see our changes as we can reload straight from the simulator. Continue making changes and reload it in the simulator to get a feel for the work flow.