
In the previous chapter, we learned what packet analyzers are used for. In this chapter we will learn more about the Wireshark GUI features, and see how it helps in capturing and analyzing packets effectively, by covering the following topics:
- Capturing packets with Wireshark interface lists
- Capturing packets with Wireshark start options
- Capture options
- Wireshark filter examples
- Wireshark Packet List pane
- Wireshark Packet Details pane
- Wireshark features
- The tcpdump and snoop examples
Start Wireshark by clicking on the Wireshark icon or type Wireshark in the command line. When Wireshark starts it launches the following screen and provides the following ways to capture packets:

The following table explains the various options that we have on the Start screen:
|
Sr. no. |
Wireshark capture options |
What is this? |
|---|---|---|
|
1 |
Interface List |
Opens up a live list of capture interfaces, and counts the incoming/outgoing packets |
|
2 |
Start |
You can choose an interface from the list and start capturing packets |
|
3 |
Capture Options |
Provides various options for capturing and displaying packets |
|
4 |
Open Recent |
Wireshark displays recently used packets |
We will cover each capturing option in detail one by one.
Click on Interface List; Wireshark will show a list of available network interfaces in the system and which one is active, by showing packets going in and out of the Interface, as shown in the following screenshot:
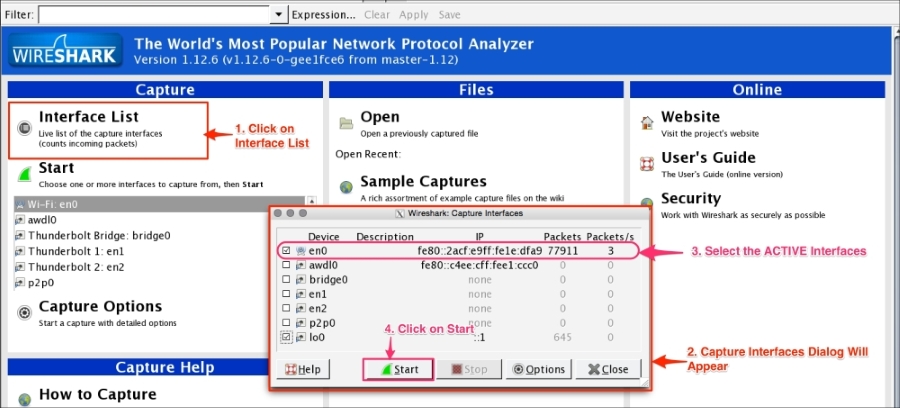
Choose the right (live) interfaces and click on the Start button to start capturing packets. If you want to capture packets on loopback (127.0.0.1), select the interface lo0.

In Start options, users can multiselect or select the interface displayed in the list and then click on Start. This doesn't give you the flexibility to see on which interface the packets are active. Users can configure the capture options by double clicking on the interface or by clicking on Capture Options:

Wireshark provides the flexibility to configure packets that need to be captured with various capture options. To begin, try these basic settings:
- Choose the live interface, where packets are going in and out.
- Click on Capture Options, Wireshark will open the Capture Options dialog box.
- Enable the promiscuous mode, which will allow the network interface to receive all packets.
- Check the snaplength size. This option will tell you the size of data for each frame that should be captured by Wireshark; this is useful when capturing the header frame or to keep the packet size small.
- Name Resolution tries to resolve the numerical address (for example, the MAC address, the IP address, and port) to its corresponding name, under the category where the following options are defined:
- Resolve MAC addresses: This is used to convert the MAC address to a human-readable format; for example
28:cf:e9:1e:df:a9will translate to192.168.1.101. - Resolve network-layer names (IP name resolution): This is used to convert the IP address to its corresponding hostname (for example,
216.58.220.46will translate togoogle.com). - Resolve transport-layer name (TCP/UDP port name resolution): This is used to convert well-known ports to human-readable format (for example,
443will translate tohttps).
- Resolve MAC addresses: This is used to convert the MAC address to a human-readable format; for example
- Use the external network name resolver to perform a reverse DNS lookup for each unique IP address (for example
216.58.196.14will translate tons4.google.com) also referred to as reverse DNS lookup.
Users can also choose these options by selecting the Wireshark View menu and applying the following settings:
- View | Name Resolution | Use External Network Name Resolver
- View | Name Resolution | Enable for MAC Layer
- View | Name Resolution | Enable for Transport Layer
- View | Name Resolution | Enable for Network Layer
The drawbacks of name resolution are as follows:
- Once you have enabled these name resolution options, Wireshark will generate extra packets to resolve the name from the name server if the traffic is huge and there are high numbers of unique IP addresses. With these settings Wireshark will become very slow.
- Wireshark caches the resolved DNS name, so if the name server information changes, manual reload is required.
Wireshark provides a range of capture filter options, use these options to decide which packets will save to the disk. These options are useful when capturing packets over a longer period of time. Wireshark uses the Berkeley Packet Filter (BPF) syntax for this purpose, for example tcp src port 22. This option also saves disk space. For example, to capture only TCP packets, follow the given steps:
- Click on Capture Options. The dialog box will open as shown in the screenshot.
- Select the active interface and set the promiscuous mode setting to enabled or disabled.
- Click on Capture Filter. Once the dialog box appears, choose the TCP only filter and click on OK.

- Click on the Start button to start capturing just the TCP packets.
Users can fine-tune Wireshark to auto-capture files periodically. To do this, click on Capture Options | Capture Files, as shown in the following screenshot:

Wireshark will generate files such as test_00001_20150623001728.pcap and test_00002_20150623001818.pcap.
The formats of the multiple generated files are as follows:
test: This is the filename00001: This is the file number20150623001728: This is the date/time stamppcap: This is the file extension