
In the previous chapter, an assortment of Grunt tasks were introduced, and information was provided to become familiar with how to obtain plugins as well as the syntax used to add plugins to your project. In this chapter, we will look at the actual installation and configuration of grunt tasks using the Angular Seed project. There will be two main files that we will be focusing closely on: package.json and gruntfile.js. These two files are where the grunt configuration takes place, some of it automatically, such as when we install a plugin and the package.json file is updated, as shown in the examples in Chapter 3, All about Grunt Plugins. Other configuration is completed manually so that plugin behavior can be defined- and customized as per the project's requirements.
- Reviewing the installation of Grunt tasks
- Discussing package.json and gruntfile.js
- Introducing the Grunt API
In each task that was outlined in Chapter 3, All about Grunt Plugins there was a distinctly common thread that existed between all of the plugins: the installation process. Installation of plugins is accomplished through Terminal or command line, and the syntax is very simple. As previously described, here is the common format of the task installation syntax for grunt plugins:
npm install [package name] --save-dev
The npm install command invokes the installation of a package, [package name]. Additionally, this command has an optional flag, -save-dev, which instructs the installer to save the package as a development dependency. Plugins saved as devDependencies are saved locally to the project and registered in the package.json file in the devDependencies configuration section. The plugin itself, when installed as a devDependencies configuration, will be located in your project's node-modules directory. In this section, we will be installing plugins in the Angular Seed project note that the installation order of plugins is not important).
As mentioned previously, one of the repetitive tasks that we will want to configure to run in our automated build will be linting our JavaScript. We will need the contrib-jshint plugin to perform this work for us. As has been shown, the installation process from plugin to plugin is virtually the same. We will perform the same process and have a look at the results of the installation process. Ensure that you are in the root of the sample_project directory:
cd [Your Project Directory]
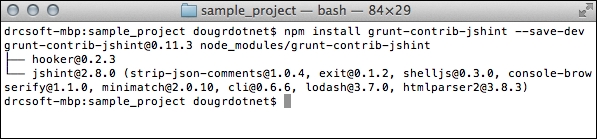
As before, once confirmed that we are in the root of our sample_project directory, run the NPM install command for contrib-jshint:
npm install grunt-contrib-jshint –save-dev
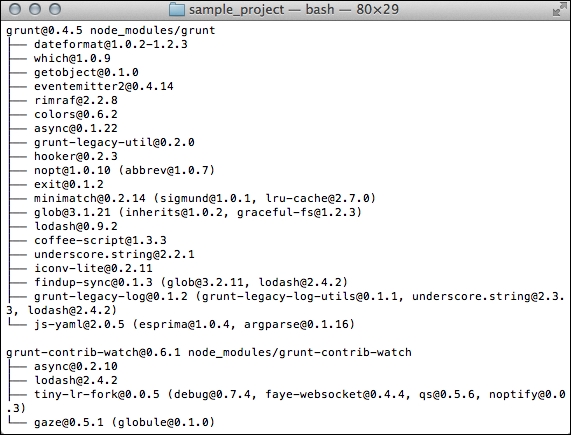
Your output should be similar to the following contrib-jshint installation log. If you have a look at the output, you will see that some additional packages have been installed along with the plugin and all of the packages that we are installing. These additional packages are plugin dependencies that are required by the plugin. So, in the case of contrib-jshint, note that strip-json-comments, exit, shelljs, console-browserfy, minimatch, cli, lodash, and htmlparser have all been installed as dependencies of jshint. You can find these additional packages in the npm directory, https://www.npmjs.com/, in order to learn more about each one. For instance, strip-json-comments allow you to use comments in your json files and then strip them out at build time. You can find information about strip-json-comments at https://www.npmjs.com/package/strip-json-comments:
Installation will automatically update our package.json file, registering contrib-jshint in devDependencies:
"devDependencies": {
"bower": "^1.3.1",
"grunt": "^0.4.5",
"grunt-contrib-jshint": "^0.11.3",
"grunt-contrib-watch": "^0.6.1",
"http-server": "^0.6.1",
"jasmine-core": "^2.3.4",
"karma": "~0.12",
"karma-chrome-launcher": "^0.1.12",
"karma-firefox-launcher": "^0.1.6",
"karma-jasmine": "^0.3.5",
"karma-junit-reporter": "^0.2.2",
"protractor": "^2.1.0",
"shelljs": "^0.2.6"
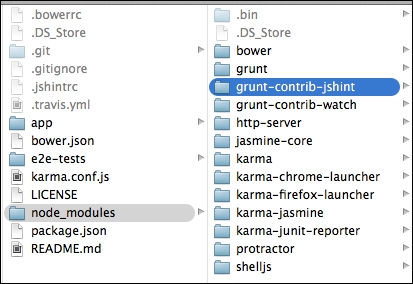
}As expected, contrib-jshint is installed in the node-modules directory located at the root of the sample_project directory:
This is all that needs to be done in order to install the contrib-jshint plugin in sample_project. The plugin is now ready to be configured in gruntfile.js; however, we will continue to install more plugins at this point. We will focus on configuration later on, without the interruption of installing plugins. It should be noted that it is perfectly fine to install plugins and configure, then later install more plugins and modify the gruntfile.js configuration. These steps can be repeated over and over to continually meet the requirements of your project. One of the beauties of Grunt is that it allows you to modify and scale your build requirements with your project as your project's needs evolve.
As we progress through our build process, we will want to compress or minify our JavaScript so that we can decrease loading time and improve performance. The contrib-uglify plugin handles this compression with the optimization of JavaScript code, removal of unneeded whitespace, shortening of variable names, and other parsing operations, in order to reduce file size. The installation process is, again, the same as what we have been performing thus far. First, if you aren't already in your project directory, change directories to the root of your sample_project:
cd [Your Project Directory]
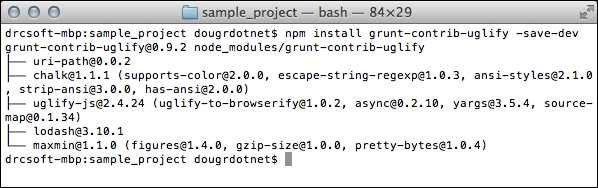
Once in the root of your sample_project, run the npm install command to install contrib-uglify in your project:
npm install grunt-contrib-uglify –save-dev
After running the install command, your console output should be similar to the following:
As we would expect, package.json will have been updated to add the registration of contrib-uglify to the devDependencies section:
"devDependencies": {
"bower": "^1.3.1",
"grunt": "^0.4.5",
"grunt-contrib-jshint": "^0.11.3",
"grunt-contrib-uglify": "^0.9.2",
"grunt-contrib-watch": "^0.6.1",
"http-server": "^0.6.1",
"jasmine-core": "^2.3.4",
"karma": "~0.12",
"karma-chrome-launcher": "^0.1.12",
"karma-firefox-launcher": "^0.1.6",
"karma-jasmine": "^0.3.5",
"karma-junit-reporter": "^0.2.2",
"protractor": "^2.1.0",
"shelljs": "^0.2.6"
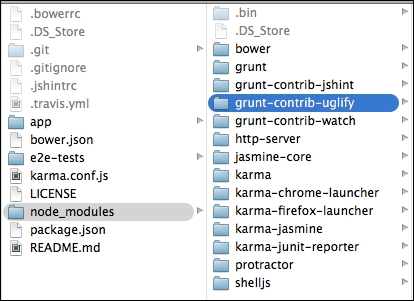
}A quick inspection of our sample_project's node-modules directory should confirm that the contrib-uglify package has been successfully installed:
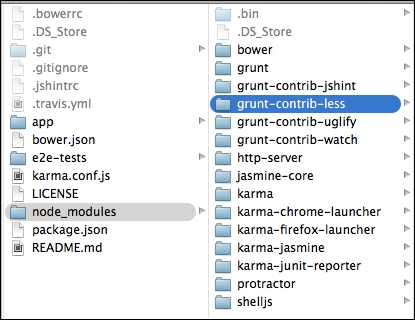
The sample_project will illustrate the use of LESS, which provides extensibility to CSS through the use of variables, mixins, and conditional logic. The contrib-less task handles the compilation of LESS files into CSS. An additional bonus is that we can use contrib-less to handle our CSS minification to help reduce file size. As we have done in each package installation, ensure that you are in the root of your sample_project directory, if not, change directories to the project root:
cd [Your Project Directory]
Once confirmed that you are in the root of your project, run the npm install command in order to install contrib-less in sample_project:
npm install grunt-contrib-less –save-dev
When the install command is completed, you should see a console output similar to the following:

Note that package.json has been updated with the contrib-less registration:
"devDependencies": {
    "bower": "^1.3.1",
    "grunt": "^0.4.5",
    "grunt-contrib-jshint": "^0.11.3",
    "grunt-contrib-less": "^1.0.1",
    "grunt-contrib-uglify": "^0.9.2",
    "grunt-contrib-watch": "^0.6.1",
    "http-server": "^0.6.1",
    "jasmine-core": "^2.3.4",
    "karma": "~0.12",
    "karma-chrome-launcher": "^0.1.12",
    "karma-firefox-launcher": "^0.1.6",
    "karma-jasmine": "^0.3.5",
    "karma-junit-reporter": "^0.2.2",
    "protractor": "^2.1.0",
    "shelljs": "^0.2.6"
  }
The contrib-less package should now be installed in the sample_project's node-modules directory:
The first plugin that we will install is the contrib-watch task. This detects file changes and responds to these events by running additional configured tasks. The configuration takes place in gruntfile.js. To put this in a clearer perspective, our project will have JavaScript files that be modified frequently. Every time we save modifications, we want to run jshint on the files to lint them for errors. Rather than having to do this manually each time, we will configure contrib-watch to automate the linting process for us. More on this configuration later; for now, let's just get contrib-watch installed.
Open a command prompt and change directories to your Angular Seed sample project root directory that we created in Chapter 2, Foundation for Creating an app using Angular.JS:
cd [Your Project Directory]
Once we are in our project directory, we can simply install contrib-watch with the following npm command:
npm install grunt-contrib-watch –save-dev
Your output should look similar to the following:
The devDependencies section will now look similar to this excerpt from package.json:
"devDependencies": {
"bower": "^1.3.1",
"grunt": "^0.4.5",
"grunt-contrib-watch": "^0.6.1",
"http-server": "^0.6.1",
"jasmine-core": "^2.3.4",
"karma": "~0.12",
"karma-chrome-launcher": "^0.1.12",
"karma-firefox-launcher": "^0.1.6",
"karma-jasmine": "^0.3.5",
"karma-junit-reporter": "^0.2.2",
"protractor": "^2.1.0",
"shelljs": "^0.2.6"
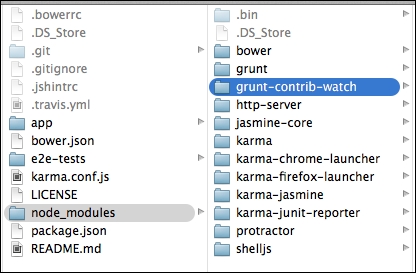
}The contrib-watch plugin is now installed in the node-modules directory located at the root of the sample_project directory:
The contrib-watch plugin is now installed in sample_project and ready to be configured in gruntfile.js. Before moving on to configuration, let's continue to install additional plugins that we will need to get going.