The 7 Minute Workout app has been an excellent opportunity for us to learn about AngularJS. Working through the app, we have covered a number of AngularJS constructs. Still, there are areas such as AngularJS form (HTML) support and client-server communication that remain unexplored. This is partially due to the fact that 7 Minute Workout from a functional standpoint had limited touchpoints with the end user. Interactions were limited to starting, stopping, and pausing the workout. Also, the app neither consumes, nor produces any data (except workout history).
In this Lesson, we plan to delve deeper into one of the two aforementioned areas, AngularJS form support. Keeping up with the health and fitness theme (no pun intended), we plan to build a Personal Trainer app. The new app will be an extension to 7 Minute Workout, allowing us to build our own customized workout plans that are not limited to the 7 Minute Workout plans that we already have.
The topics we will cover in this Lesson include:
- Defining Personal Trainer requirements: Since we are building a new app in this Lesson, we start with defining the app requirements.
- Defining the Personal Trainer model: Any app design starts with defining its model. We define the model for Personal Trainer, which is similar to the 7 Minute Workout app built earlier.
- Defining the Personal Trainer layout and navigation: We define the layout, navigation patterns, and views for the new app. We also set up a navigation system that is integrated with AngularJS routes and the main view.
- Adding support pages: Before we focus on the form capability and build a workout builder view, we build some supporting pages/views for workout and exercise listing.
- Defining the workout builder view: We lay out the workout builder view to manage workouts.
- Building forms: We make extensive use of HTML forms and input elements to create custom workouts. In the process, we learn more about Angular forms. The concepts that we cover include:
- ng-model and NgModelController: We learn about the directive
ng-modelof the primaryformobject and associated controllerNgModelController. - Data formatting and parsing: We explore the
NgModelControllerformatter and parser pipeline architecture and implementation. We also create our own parser/formatter. - Input validation: We learn about the validation capabilities of AngularJS and the role
ng-modelandNgModelControllerplay here. - Input and form states: Forms and input controls expose state information that can be used to provide a better user experience.
- Common form scenario: We go through some common form usage scenarios and how to handle them in AngularJS.
- Dynamically generated form input: We look at the
ng-formdirective and how to use the directive to manage dynamic generated input.
- ng-model and NgModelController: We learn about the directive
- Nuances of scope inheritance: Scope inheritance in Angular has some nuances that are important to understand and work around. We dedicate a section to learn about them.
Time to get started!
The 7 Minute Workout app is good, but what if we could create an app that allows us to build more such workout routines customized to our fitness level and intensity requirements? With this flexibility, we can build any type of workout whether it is 7 minutes, 8 minutes, 15 minutes, or any other variations. The opportunities are limitless.
With this premise, let's embark on the journey of building our own Personal Trainer app that helps us to create and manage training/workout plans according to our specific needs. Let's start with defining the requirements for the app.
Note
The new Personal Trainer app will now encompass the existing 7 Minute Workout app. The component that supports workout creation will be referred to as "Workout Builder". The 7 Minute Workout app itself will also be referred to as "Workout Runner". In the coming Lessons, we will fix Workout Runner, allowing it to run any workout created using Workout Builder.
Based on the notion of managing workouts and exercises, these are some of the requirements that our Personal Trainer app should fulfil including:
- The ability to list all available workouts.
- The ability to create and edit a workout. While creating and editing a workout, it should have:
- The ability to add workout attributes including name, title, description, and rest duration
- The ability to add/remove multiple exercises for workouts
- The ability to order exercises in the workout
- The ability to save workout data
- The ability to list all available exercises.
- The ability to create and edit an exercise. While creating and editing an exercise, it should have:
- The ability to add exercise attributes such as name, title, description, and procedure
- The ability to add pictures for the exercise
- The ability to add related videos for the exercise
- The ability to add audio clues for the exercise
All the requirements seem to be self-explanatory; hence, let's start with the design of the application. As customary, we first need to think about the model that can support these requirements.
No surprises here! The Personal Trainer model itself was defined when we created the 7 Minute Workout app. The two central concepts of workout and exercise hold good for Personal Trainer too.
The only problem with the existing workout model is in the way it has been implemented. Since the model definition is inside WorkoutController (workout.js), we are in no position to reuse the same model for Personal Trainer.
We can either recreate a similar model for Personal Trainer (which does not feel right), or we can refactor the existing code in a way that the model classes (constructor functions) can be shared. Like any sane developer, we will be going with the second option. Let's understand how we can share the model across the application.
JavaScript is a malleable language. You do not need to define any type upfront to use it. We don't have to declare our model to use it. We can very well create the model using the standard object notation ({}) any time we need. Still, we define the constructor function for our model. Defining an explicit model structure helps us in clearly communicating what we are working against.
To share these model classes, we plan to do something unconventional. We are going to expose the model as an AngularJS service using the factory template. Things will be clear once we do this refactoring.
To start with, download the base version of the new Personal Trainer app from the companion codebase in Lesson03/checkpoint1.
This code has the complete 7 Minute Workout (Workout Runner) app. We have added some more content to support the new Personal Trainer app. Some of the relevant updates are:
- Adding the new
WorkoutBuildermodule. This module contains implementations pertaining to Personal Trainer. Checkapp.jsfor the module declaration. - Updating layout and styles of the app: Check
app.cssandindex.htmlfixes. - Adding some blank HTML partials for Personal Trainer in the
workoutbuilderfolder underapp/partials/. - Defining some new routes for Personal Trainer. We cover route setup for the app in the coming section.
In the last Lesson, we dedicated a complete section to learning about AngularJS services, and one thing we learned there was that services are useful for sharing data across controllers and other AngularJS constructs. We essentially do not have data but a blueprint that describes the shape of the data. The plan, hence, is to use services to expose the model structure. Open the model.js file present in the shared folder under app/js.
The new model definition for Exercise looks like this:
angular.module('app').factory('Exercise', function () {
    function Exercise(args) {
        //Existing fields
    }
    return Exercise;
});
We define a new factory service Exercise on the app module (the main module of our app). The service implementation declares the Exercise constructor function that is the same as the one used in 7 Minute Workout (Workout Runner) and then returns the function object.
Make note that we do not use this:
return new Exercise({});Instead, we use this:
return Exercise;
Since services are singleton in nature, if we use the first option we are stuck with a single instance of the Exercise object. By doing return Exercise, we are actually returning a constructor function reference. Now we can inject the Exercise service anywhere and also use new Exercise({}) to create the model object.
Look at the other model WorkoutPlan; a similar implementation has been done for this too.
That's all on the model design front. The next thing we are going to do is define the structure for the new app.
The skeleton structure of Personal Trainer looks like this:
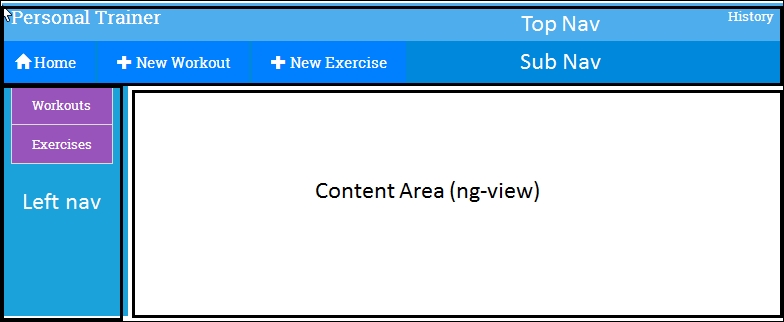
This has the following components:
- Top Nav: This contains the app branding title and history link.
- Sub Nav: This has navigation elements that change based on the active view (the view shown is
ng-view). - Left nav: This contains elements that are dependent upon the active view.
- Content Area: This is the main view. This is where most of the action happens. We will create/edit exercises and workouts and show a list of exercises and workouts here.
Look at the source code files, there is a new folder workoutbuilder under app/partials. It has view files for each element that we have described previously with some placeholder content. We will be building these views as we go along in this Lesson.
However, firstly we need to link up these views within the app. This requires us to define the navigation patterns for the app and accordingly define the app routes.
The navigation pattern that we plan to use for the app is the list-detail pattern. We create list pages for exercises and workouts available in the app. Clicking on any list item takes us to the detail view for the item where we can perform all CRUD operations (create/read/update/delete). The following routes adhere to this pattern:
|
Route |
Description |
|---|---|
|
|
This just redirects to |
|
|
This lists all the available workouts. This is the landing page for Personal Trainer. |
|
|
This creates a new workout. |
|
|
This edits an existing workout with the specific ID. |
|
|
This lists all the available exercises. |
|
|
This creates a new exercise. |
|
|
This edits an existing exercise with the specific ID. |
The route configurations in app.js define these new routes.
We have also tried to integrate top navigation and left navigation elements into the preceding route definitions that are not supported out-of-the-box. The next section talks about this integration.
The basic idea around integrating left and top navigation into the app is to provide context-aware subviews that change based on the active view. For example, when we are on a list page as opposed to editing an item, we may want to show different elements in the navigation. An e-commerce site is a great example of this. Imagine Amazon's search result page and product detail page. As the context changes from a list of products to a specific product, the navigation elements that are loaded also change.
To integrate left and top navigation into Workout Builder, we have extended the app at a number of locations. To start with, look at the new routes in app.js. Some of these routes contain custom properties that are not part of the standard route configuration object created using when (https://code.angularjs.org/1.3.3/docs/api/ngRoute/provider/$routeProvider):
$routeProvider.when('/builder/workouts', {
templateUrl: 'partials/workoutbuilder/workouts.html',
controller: 'WorkoutListController',
leftNav: 'partials/workoutbuilder/left-nav-main.html',
topNav: 'partials/workoutbuilder/top-nav.html'
});
Open the index.html file and pay attention to the highlighted code:
<div class="navbar navbar-default navbar-fixed-top top-navbar">
    <!--Existing html-->
    <div id="top-nav-container" class="second-top-nav">
        <div id="top-nav" ng-include="currentRoute.topNav"></div>
    </div>
</div>
<div class="container-fluid">
  <div id="content-container" class="row">
    <div class="col-sm-2 left-nav-bar" ng-if="currentRoute.leftNav">
      <div id="left-nav" ng-include="currentRoute.leftNav"></div>
        </div>
        <div class="col-sm-10 col-sm-offset-2">
            <div id="page-content" ng-view></div>
        </div>
</div>
</div>
The index.html file has been updated and now defines three areas, one each for top and left navigation, and one for the main view.
Looking back at route configuration, the templateUrl property in the route definition references the view template that is loaded in the ng-view directive of the div element. We try to simulate something similar to what Angular does for our left and top navigation.
The value of the topNav property is used to load the top navigation view in the top-nav div element ("id = top-nav") using the ng-include directive. We do the same for left navigation too. The ng-if directive in the left-nav section is used to hide left navigation if the current route configuration does not define the leftNav property. We will shortly see how to set up the currentRoute property used in the ng-include expression mentioned previously.
With this configuration in place, we can associate different left and top navigation views with different pages. In the preceding route configuration for the workout list, the left navigation comes from left-nav-main.html and top navigation from top-nav.html. Look at the other route configuration too, to learn what other navigation templates we have configured.
The last part of this integration is setting up the currentRoute property and binding it to ng-include. Angular sets up the ng-view template using the route configuration templateUrl property, but it does not know or care about the topNav and leftNav properties that we have added. We need to write some custom code that binds the navigation URLs with the respective ng-includes directives.
To do this linkup, open root.js and add these event handler lines to RootController:
$scope.$on('$routeChangeSuccess', function (e, current, previous) {
  $scope.currentRoute = current;
});
We subscribe to the $routeChangeSuccess event raised by the $route service. As the name suggests, the event is raised when the route change is complete or the main view is loaded. The current and previous parameters are the route configuration objects for the loaded and the previous view respectively. These are the same objects that we configured inside the $routeProvider.then function. Once we assign the current object to currentRoute, it is just a matter of referencing the route properties in ng-include (currentRoute.topNav or currentRoute.leftNav) and the correct template for left and top navigation are loaded. Look at the highlighted code of the index.html file outlined previously.
The reason this event handler is in RootController is because RootController is defined outside the ng-view directive and encompasses nearly the complete index page. Hence, it is a good place to plug common functionality used across child views.
Go ahead and load the workout builder page #/builder. We will be redirected to the workouts page under #/builder. This page lists all the available workouts.
The workout list page is currently empty but the left and top navigation links work. Click on the New Workout or New Exercise link on top nav and the app loads the create workout/exercise pages. The left navigation associated with the list pages (left-nav-main.html) has two links: Workouts and Exercises, to switch between the workout and exercise list.
With a little customization, we have been able to create a decent navigation system that reacts to the main view change and loads the correct views in left and top navigation. Along the same lines, we can always add footer and multiple subviews to our app if desired.
Note
For more complex needs, there is a compelling offering from the community called ui-router (http://angular-ui.github.io/ui-router/site). It supports complex routing scenarios and nested views. With ui-router, we are not limited to a single ng-view.
The skeleton layout, views, and navigation are now in place and it's time to add some meat to the implementation. The exercise and workout list is something that is easy to implement, so let's take that first.
Even before we start implementing the workout and exercise list pages, we need a data store for exercise and workout data. The current plan is to have an in-memory data store and expose it using an Angular service. In the coming Lesson, where we talk about server interaction, we will move this data to a server store for long-term persistence. For now, the in-memory store will suffice. Let's add the store implementation.
The plan here is to create a WorkoutService instance that is responsible for exposing the exercise and workout data across the two applications. The main responsibilities of the service include:
Open the companion codebases, copy the services.js and directives.js files from the shared folder under Lesson03/checkpoint2/app/js, and add them to the shared folder locally. Add references to these files to the index.html script reference section too.
There is nothing new here that we have not seen. The basic outline of the service looks like this:
angular.module('app')
   .factory("WorkoutService", ['WorkoutPlan', 'Exercise',
     function (WorkoutPlan, Exercise) {
       var service = {};
       var workouts = [];
       var exercises = [];
       service.getExercises = function () {//implementation}
       service.getWorkouts = function (){//implementation}
       //Some initialization code to load existing data.
       return service;
    }]);
We create the WorkoutService object on the main module app and inject the model services: WorkoutPlan and Exercise. The two methods: getExercises and getWorkouts, as the names suggest, return the list of exercises and workouts respectively. Since we plan to use the in-memory store to store workout and exercise data, the exercises and workouts arrays store this data. As we go along, we will be adding more functions to the service.
Time to add the controller and view implementation for the workout and exercise list!
Copy the exercise.js and workout.js files from the workoutbuilder folder under Lesson03/checkpoint2/app/js/. Also, go ahead and update index.html with the references to these two files, at the end of the script declaration area. Again some standard stuff here! Here is the description of the files:
workout.js: This defines theWorkoutListControllercontroller that loads workout data usingWorkoutService. The$scope.gotofunction implements navigation to the workout detail page. This navigation happens when we double-click on an item in the workout list. The selected workout name is passed as part of the route/URL to the workout detail page.exercises.js: This has two controllers defined that are:ExercisesNavControllerandExerciseListController.ExerciseListControlleris used by the exercise list view.xerciseNavControlleris there to support theleft-nav-exercises.htmlview, and just loads the exercise data. If we look at the route definition, this view is loaded in the left navigation when we create/edit a workout.
Lastly, we need to implement the list views that have so far been empty!
Copy the workouts.html and localhost exercises.html views from the workoutbuilder folder under Lesson03/checkpoint2/app/partials.
Both the views use ng-repeat to list out the exercises and workouts. The ng-dblclick directive is used to navigate to the respective detail page by double-clicking on the list item.
Go ahead and refresh the builder page (#/builder); one workout is listed, the 7 Minute Workout. Click on the Exercises link on the left navigation to load the 12 exercises that we have already configured in WorkoutService.
The easy stuff is out of the way. Time to add the ability to load, save, and update exercise/workout data!
The core functionality Personal Trainer provides is around workout and exercise building. Everything is there to support these two functions. In this section, we focus on building and editing workouts using AngularJS.
The WorkoutPlan model has already been defined, so we are aware of the elements that constitute a workout. The workout builder page facilitates user input and lets us build/persist workout data.
Once complete, the workout builder page will look like this:
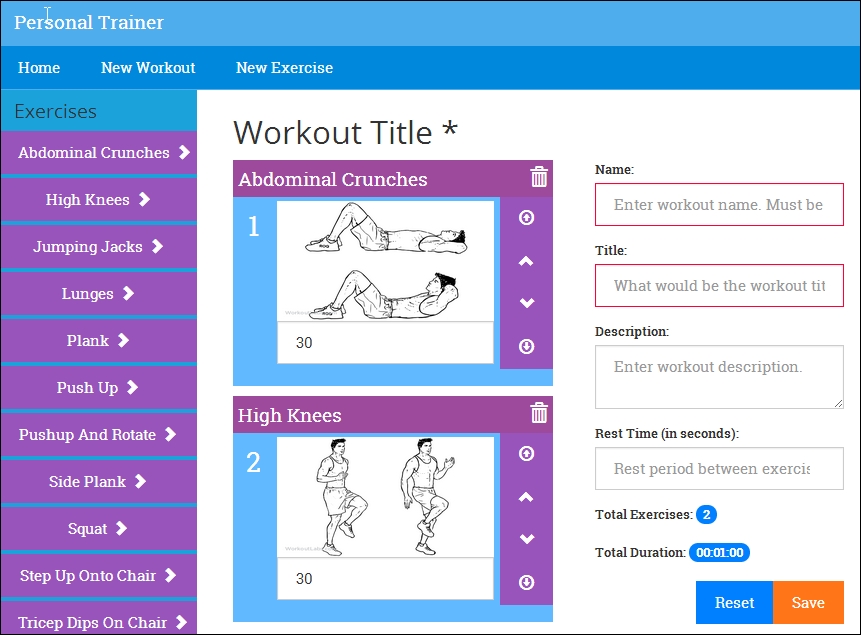
The page has a left navigation that lists out all the exercises that can be added to the workout. Clicking on the arrow icon on the right adds the exercise to the end of the workout.
The center area is designated for workout building. It consists of exercise tiles laid out in order from top to bottom and a form that allows the user to provide other details about the workout such as name, title, description, and rest duration.
This page operates in two modes:
- Create/New: This mode is used for creating a new workout. The URL is
#/builder/workouts/new. - Edit: This mode is used for editing the existing workout. The URL is
#/builder/workouts/:id, where:idmaps to the name of the workout.
With this understanding of the page elements and layout, it's time to build each of these elements. We will start with left nav (navigation).
Left nav for the Workout Builder app shows the list of exercises that the user can add to the workout by clicking on the arrow next to the name of the exercise. Copy the left nav implementation from left-nav-exercises.html located in the companion codebase folder workoutbuilder under Lesson03checkpoint3apppartials locally. A simple view looks like this:
<div id="left-nav-exercises" ng-controller="ExercisesNavController">
    <h4>Exercises</h4>
    <div ng-repeat="exercise in exercises|orderBy:'title'" class="row">
        <button class="btn btn-info col-sm-12" ng-click="addExercise(exercise)">{{exercise.title}}<span class="glyphicon glyphicon-chevron-right"></span></button>
    </div>
</div>
The view implementation contains ng-repeat used to list out all the exercises and the ng-controller directive pointing to ExercisesNavController. The ng-click directive refers to the function (addExercise) that adds the clicked exercise to the workout.
We have already added ExercisesNavController to exercise.js earlier in this Lesson. This controller loads all the available exercises used to bind the ng-repeat directive. The missing piece is the implementation of the addExercise(exercise) function.
Implementing the add exercise functionality from left nav is a bit tricky. The views are different; hence, the scope of left nav and the scope of the main view (loaded as part of the route in ng-view) is different. There is not even a parent-child hierarchy to share data.
We always want to keep the UI section as decoupled as possible, hence the option we have here is to either use AngularJS events ($broadcast or $emit), or create a service to share data. We covered both techniques in the previous Lesson while working on 7 Minute Workout.
For our current implementation, we will go the service way and introduce a new service into the picture that is WorkoutBuilderService. The reason for going the service way will be clear when we work on the actual workout, save/update logic, and implement the relevant controllers.
The ultimate aim of the WorkoutBuilderService service is to co-ordinate between the WorkoutService (that retrieves and persists the workout) and the controllers (such as ExercisesNavController and others we will add later), while the workout is being built, hence reducing the amount of code in the controller to the bare minimum.
WorkoutBuilderService tracks the state of the workout being worked on. It:
- Tracks the current workout
- Creates a new workout
- Loads the existing workout
- Saves the workout
WorkoutBuilderService has a dependency on WorkoutService to provide persistence and querying capabilities.
Copy the services.js file and from the WorkoutBuilder folder under Lesson03/checkpoint3/app/js, add a reference for services.js in the index.html file after existing script references.
Let's look at some relevant parts of the service.
Unlike WorkoutService, WorkoutBuilderService has a dependency on model services: WorkoutPlan and Exercise. WorkoutBuilderService also needs to track the workout being built. We use the buildingWorkout property for this. The tracking starts when we call the startBuilding method on the service:
service.startBuilding = function (name) {
  if (name) { //We are going to edit an existing workout
  buildingWorkout =
    WorkoutService.getWorkout(name);
    newWorkout = false;
  }
  else {
  buildingWorkout = new WorkoutPlan({});
  newWorkout = true;
}
  return buildingWorkout;
};
The basic idea behind this tracking function is to set up a WorkoutPlan object (buildingWorkout) that will be made available to views that manipulate the workout details. The startBuilding function takes the workout name as a parameter. If the name is not provided, it implies we are creating a new workout, and hence a new WorkoutPlan object is created and assigned; if not, we load the workout details by calling WorkoutService.getWorkout(name). In any case, the buildingWorkout property has the workout being worked on.
The newWorkout object signifies whether the workout is new or an existing one. It is used to differentiate between the save and update case when the save method on this service is called.
The rest of the methods, that is, removeExercise, addExercise, and moveExerciseTo are self-explanatory and affect the exercise list that is part of the workout (buildingWorkout).
WorkoutBuilderService is calling a new function getWorkout on WorkoutService which we have not added yet. Go ahead and copy the getWorkout implementation from the services.js file under Lesson03/checkpoint3/app/js/shared. We will not dwell into the new service code as the implementation is quite simple.
Let's get back to left nav and implement the remaining functionality.
To add exercises to the workout we are building, we just need to inject the dependency of WorkoutBuilderService into the ExercisesNavController and call the service method addExercise:
$scope.addExercise = function (exercise) {
    WorkoutBuilderService.addExercise(exercise);
}
Internally, WorkoutBuilderService.addExercise updates the buildingWorkout model data with the new exercise.
The preceding implementation is a classic case of sharing data between independent MVC components. The shared service exposes the data in a controlled manner to any view that requests it. While sharing data, it is always a good practice to expose the state/data using functions instead of directly exposing the data object. We can see that in our controller and service implementations too. ExerciseNavController does not update the workout data directly; in fact it does not have direct access to the workout being built. Instead, it relies upon the service method addExercise to change the current workout's exercise list.
Since the service is shared, there are pitfalls to be aware of. As services are injectable through the system, we cannot stop any component from taking dependency on any service and calling its functions in an inconsistent manner, leading to undesired results or bugs. For example, the WorkoutBuilderService needs to be initialized by calling startBuilding before addExercise is called. What happens if a controller calls addExercise before the initialization takes place?
Next, we implement the workout builder controller (WorkoutDetailController).As we work on this controller, the integration between the service, the left nav controller, and workout builder controller will be self-evident.
WorkoutDetailController is responsible for managing a workout. This includes creating, editing, and viewing the workout. Due to the introduction of WorkoutBuilderService, the overall complexity of this controller has reduced. Other than the primary responsibility of integrating with the view, WorkoutDetailController will delegate most of the other work to WorkoutBuilderService.
WorkoutDetailController is associated with two routes/views namely /builder/workouts/new and /builder/workouts/:id. This handles both creating and editing workout scenarios. The first job of the controller is to load or create the workout that it needs to manipulate. We plan to use Angular's routing framework to pass this data to WorkoutDetailController.
Go ahead and update two routes (app.js) by adding the highlighted content:
$routeProvider.when('/builder/workouts/new', {
    <!—existing route data-->
    controller: 'WorkoutDetailController',
    resolve: {
        selectedWorkout: ['WorkoutBuilderService', function (WorkoutBuilderService) {
            return WorkoutBuilderService.startBuilding();
        }],
    }});
$routeProvider.when('/builder/workouts/:id', {;
    <!—existing route data-->
    controller: 'WorkoutDetailController',
    resolve: {
      selectedWorkout: ['WorkoutBuilderService', '$route', function (WorkoutBuilderService, $route) {
      return WorkoutBuilderService.startBuilding($route.current.params.id);
        }],
    }});
The updated route definition uses a new route configuration property resolve. Remember we have already used a similar property resolve in the previous Lesson when we worked with the $modal dialog service and passed the video URL to the modal dialog to play:
resolve: {
  video: function () {
    return '//www.youtube.com/embed/' + videoId;}},
Here too, resolve behaves in a similar manner.
Let's try to learn a bit more about the resolve object as it is a handy feature.
The resolve property is part of the route configuration object, and provides a mechanism to pass data and/or services to a specific controller. This is the same controller that is instantiated as part of a route change (specified in the controller property of the route configuration object). The resolve object property can be one of the following:
- A string constant: The string name should be an AngularJS service. This is not very useful or often used as AngularJS already provides the ability to inject a service into the controller.
- A function: In this case, the return value of the function can be injected into the controller with the property name. If the function returns a promise (we discussed promises in Lesson 1, Building Our First App – 7 Minute Workout), the route is not resolved and the view is not loaded till the promise itself is resolved. Once the promise is resolved, the resolved value is injected into the controller. If the promise fails, the
$routeChangeErrorevent is raised on$rootScopeand the route does not change.
We add a property selectedWorkout (that points to a function) to resolve an object in both routes. This function, when executed during the route change, starts the workout building process by calling the WorkoutBuilderService.startBuilding function.
For the new workout route, we do not pass any parameter:
WorkoutBuilderService.startBuilding();
For the edit route (route with :id), we pass the workout name in a route/URL:
WorkoutBuilderService.startBuilding($route.current.params.id);
The return value of selectedWorkout is the workout returned by WorkoutBuilderService.startBuilding.
Note
The previous $route.current property contains useful details about the current route. The params object contains values for all placeholder tokens that are part of the route. Our edit route (/builder/workouts/:id) has only one token ID, hence params.id will point to the value of the last fragment of the workout edit route.
These tokens are also available through an Angular service $routeParams. We will cover $routeParams later in the Lesson. We did not use startBuilding($routeParams.id) here, as this service is not read during the resolve function call.
Note that any function properties of the resolve object can take dependencies similar to an AngularJS controller. Have a look at the selectedWorkout declaration:
selectedWorkout: ['WorkoutBuilderService', function (WorkoutBuilderService) {We take a dependency on WorkoutBuilderService.
Using the resolve configuration to load the selected workout has another advantage. We can handle routes that are not found.
With dynamically generated routes, there is always a chance of a route being invalid. For example, the workout edit route, such as builder/workouts/abc or builder/workouts/xyz, points to workout names (abc and xyz) that don't exist. In such a scenario, the workout builder page does not make sense.
The resolve configuration can help here. If a workout with a given name is not found, we can redirect the user back to the workout list page. Let's see how. Open app.js and add the highlighted code, to edit the workout route:
$routeProvider.when('/builder/workouts/:id', {
    //existing code
    resolve: {
      selectedWorkout: ['WorkoutBuilderService', '$route', '$location', function (WorkoutBuilderService, $route, $location) {
var workout =
WorkoutBuilderService.startBuilding($route.current.params.id);
            if (!workout) {
                $location.path('/builder/workouts');
            }
            return workout;
        }],
    }
We try to load the workout with a specific ID (workout name) and if not found, redirect the user back to the workout list page. Since we are using the $location service, we need to add it as a dependency in the selectWorkout function.
There is another use case the resolve object can handle that involves asynchronous server interaction using promises. We will cover this scenario in the next Lesson. For now, let's continue with the WorkoutDetailController implementation.
To implement ExerciseDetailController, we inject the current workout being built using DI. We have already set up the preceding resolve object to get the workout. Add a new controller declaration to workout.js (located in the WorkoutBuilder folder under appjs) after the WorkoutListController declaration:
angular.module('WorkoutBuilder').controller('WorkoutDetailController', ['$scope', 'WorkoutBuilderService', 'selectedWorkout', function ($scope, WorkoutBuilderService, selectedWorkout) {
  var init = function () {
  $scope.workout = selectedWorkout; // Resolved workout
  };
  init();
}]);
The $scope.workout object tracks the workout we are working on.
For now, this is enough for the controller implementation. Let's update the skeleton workout builder view.
Go back a few pages and check the layout of workout builder page. The page is divided into two sections, the section on the left contains the exercises in the workout and the section on the right contains a form to enter other details about the workout.
Copy content from the workout.html file under Lesson03/checkpoint3/app/partials/workoutbuilder to your local view code. Now run the app, navigate to #/builder/workouts, and double-click on the 7 Minute Workout tile. This should load the 7 Minute Workout details with a view similar to the one shown at the start of the section Building a workout.
We will be dedicating a lot of time to this view so let's understand some specifics here.
The exercise list div (id="exercise-list") lists outs the exercises that are part of the workout in order. To render the exercise list, we use a template for each exercise item and render it using ng-include="'workout-exercise-tile'" inside ng-repeat. The template HTML is available at the end of the same file. Functionally, this template has:
- The delete button to delete the exercise
- Reorder buttons to move the exercise up and down the list as well as to the top and bottom
The second div element for workout data (id="workout-data") contains the HTML input element for details such as name, title, and rest duration and a button to save and reset the workout changes.
The complete thing has been wrapped inside the HTML form element so that we can make use of the form-related capabilities that AngularJS provides. Nonetheless, what are these capabilities?
Forms are such an integral part of HTML development that any framework that targets client-side development just cannot ignore them. AngularJS provides a small but well-defined set of constructs that make standard form-based operations easier.
If we think carefully, any form of interaction boils down to:
- Allowing user input
- Validating those inputs against business rules
- Submitting the data to the backend server
AngularJS has something to offer for all the preceding use cases.
Note
Angular 1.3 forms have a number of new features and improvements over their predecessors (Angular 1.2.x). While working on the app, we will highlight any feature that is exclusive to version 1.3.
Since the framework is constantly updated, it is always advisable to refer to the framework documentation on a specific version to find out what capabilities are supported.
For user input, it allows us to create two-way bindings between the form input elements and the underlying model, hence avoiding any boilerplate code that we may have to write for model input synchronization.
It also provides constructs to validate input before it is can be submitted.
Lastly, Angular provides $http and $resource services for client-server interaction and persisting data to the server.
Since the first two use cases are our main focus in this Lesson, let's learn more about AngularJS user input and data validation support.
The primary form-related constructs in AngularJS are:
For the ng-model directive to work correctly, another set of directives is required, which include:
The first directive that requires our focus is the ng-model directive. Let's explore this directive and understand how it works.
One of the primary roles of the ng-model directive is to support two-way binding between user input and the underlying model. With such a setup, changes in a model are reflected in the view, and updates to the view too are reflected back on the underlying model. Most of the other directives that we have covered so far only support one-way binding from models to views. This is also due to the fact that ng-model is only applied to elements that allow user input.
The ng-model directive works with the input, textarea, and select HTML elements as these are primarily responsible for user input. Let's look at these elements in more detail.
Open workout.html and look for ng-model. Here too, it has only been applied to HTML elements that allow user data input. These include input, textarea, and select. The workout name input setup looks like this:
<input type="text" name="workoutName" id="workout-name" ng-model="workout.name">
The preceding ng-model directive sets up a two-way binding between the input and model property workout.name.
Angular supports most of the HTML5 input types, including text, date, time, week, month, number, URL, e-mail, radio, and checkbox. This simply means binding between a model and any of these input types just works out-of-the-box.
The textarea element too works the same as input:
<textarea name="description" ng-model="workout.description" . . . > </textarea>Here we bind textarea to workout.description. Under the cover, there are directives for each input, textarea, and select, which co-ordinates with the ng-model directive to achieve two-way binding.
Note
It is important to understand that the ng-model directive is there to update the model. When the actual update is done, it is influenced by the supporting directives: input, textarea, and select. For example, when ng-model is used with input, the change and input events (yes, input is the name of an event too) are subscribed by the input directive, and model data is updated when these events are triggered. This effectively creates a two-way binding between the model data and the HTML element on which ng-model is declared.
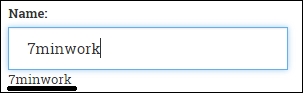
Why don't we verify this binding work? Add a model interpolation expression against any of the linked input such as this one:
<input type="text" … ng-model="workout.name">{{workout.name}}
Open the workout builder page, and type something in the input, and see how the interpolation is updated instantaneously. The magic of two-way binding!
Using ng-model with select is a bit different as we can set up the select options in multiple ways.
Let's look at how select has been set up:
<select … name="duration" ng-model="exercise.duration"
ng-options="duration.value as duration.title for duration in durations"></select>
There are no inner option tags! Instead, there is a ng-options attribute. If you recall the ng-repeat expression, the ng-options expression looks similar. It allows us to bind an object or array to select. The ng-options directive here binds to an array, durations. The array looks like this:
$scope.durations = [{ title: "15 seconds", value: 15 },
                    { title: "30 seconds", value: 30 }, ...]
The ng-options directive supports multiple formats of data binding. The format we use is:
[selected] as [label] for [value] in array
Where:
selected: What (duration.value) gets assigned tong-model(exercise.duration) when the item is selectedlabel: What is shown (duration.title) in the dropdownvalue: This is an item (duration) in the array that binds to aselectoption
The selected parameter is optional and only required if we want to set a subproperty of a selected item to ng-model, which we do want. If it sounds confusing, update the ng-options expression in the view to:
ng-options="duration.title for duration in durations"
Then, add the {{exercise.duration}} interpolation just after the select end tag (</select>). Refresh the workout builder page and try to select a time duration from the drop-down box. The interpolation value is an object instead of the integer time. See the following screenshot:

Revert the ng-options expression and try again, this time the interpolation should have the correct time duration.
Note
The ng-options directive also supports binding to an object property and multiple expression formats. Check the documentation on select to know more about these options at https://code.angularjs.org/1.3.3/docs/api/ng/directive/select
The ng-options directive gives us great flexibility when it comes to binding an object or array to select. However, we can still use the traditional option tag instead of ng-options. The same select tag if implemented with the option tag would look like this:
<select ... ng-model="exercise.duration">
  <option value="{{duration.value}}"
    label="{{duration.title}}"
    ng-repeat="duration in durations"
    ng-selected="exercise.duration==duration.value">
    {{duration.title}}
  </option>
</select>
In this case, the option tags are generated using ng-repeat. Also, the ng-model directive binds to the option value property ({{duration.value}}). The ng-selected directive is used to bind the initial value of the model data to the view.
Clearly ng-options is a better alternative to option as it provides more flexibility and is a little less verbose. Given that the option tag approach only works with string values, it is always advisable to use ng-options.
Like input, select too supports two-way binding. We saw how changing select updates a model, but the model to view binding may not be apparent. To verify if a model to a view binding works, open the 7 Minute Workout app and verify the duration dropdowns. Each one has a value that is consistent with model value (30 seconds).
AngularJS does an awesome job in keeping the model and view in sync using ng-model. Change the model and see the view updated, change the view and watch the model updated instantaneously. Starting from Angular 1.3, things just got even better. In 1.3, we can even control when the updates to the view are reflected on the model.
The ng-model-options directive is pretty useful if we want to control when the model should be updated on view changes. To understand what it has to offer, let's try out some of its options.
Let's take the same workoutName input and try it out. Update the workoutName input to this:
<input type="text" … ng-model="workout.name"
  ng-model-options="{updateOn:'blur'}">{{workout.name}}
Open the workout builder page and enter some content in workoutName input. Model interpolation does not update as we type, but only when we leave the input—interesting!
The updateOn expression allows us to customize on what event model data should be updated, and we can configure multiple events here (space-delimited).
Change previous updateOn to:
ng-model-options="{updateOn:'blur mouseleave'}"The model is now updated on blur, as well as when the mouse leaves the input. To experience the mouseleave event, start typing with the mouse cursor inside the workoutName input and then move the mouse out. The model interpolation changes to reflect what we have typed!
Another interesting feature that ng-model-options provides is what we call a debounce effect. Again, the best way to learn about it is by using it. Update the ng-model-options value to this:
ng-model-options = "{updateOn:'default blur'
  , debounce: {'default': 1000, 'blur': 0}}"
Refresh the workout builder page and change the workout name. The model does not get updated as you type, but it eventually does (after one second) without us leaving the field.
This debounce mechanism dictates how long Angular waits after an event to update the underlying model. The default keyword previously used is a special string that signifies the default event of the control.
As we type, the debounce setup waits for a second before applying model changes. However, in the case of blur, changes are reflected immediately.
Wondering why we require these options? Well, there are indeed some use cases where these options help. Assume we want to remotely validate if a username entered by a user exists. In a standard setup, every keypress would result in a remote call for validating a name. Instead, if we do a model update on blur, only one remote call would suffice. Type ahead input too can utilize these options (especially the debounce option) to reduce the number of remote requests.
The ng-model-options directive has some other interesting options that we will not be covering here. Look at the platform documentation at https://docs.angularjs.org/api/ng/directive/ngModelOptions to learn more about them.
So far, we have looked at ng-model from the data binding perspective, but ng-model has some other uses too.
The ng-model directive in itself is a mini MVC component that has its own controller. Through this controller, it exposes an API to format and validate model data.
Let's try to understand what happens when we create a form and add an input with ng-model. Consider this screenshot that is based on workout.html form layout:
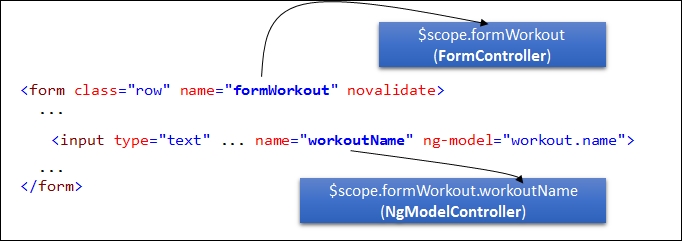
As we can see from the preceding screenshot, when Angular encounters the form tag, it executes the form directive. This directive creates an instance of a special Angular class FormController that is made available to us on the current scope. See the previous screenshot. $scope.formWorkout is a FormController object and its name derives from a form name (name="formWorkout"). The form controller (the FormController object) provides an API to check and manipulate the state of the form.
On similar lines, when AngularJS encounters the ng-model directives, it creates a model controller (an instance of the ngModelController class). If the element with ng-model is defined inside a named form, the model controller instance is available as a property of the form controller (see $scope.formWorkout.workoutName in the screenshot).
Similar to FormController, NgModelController too provides an API to manipulate the model data. The next few sections cover the form, the model directives, and their respective controllers in more detail.
One question that we may have is, "Why do we need to know about form, ng-model directives?" Or do we really need to learn about FormController and NgModelController in detail? These are valid questions that we should address before getting into specifics.
We need to know about the form and ng-model directives from the usage perspective.
The FormController class is a useful utility class to manage the HTML form state.
NgModelController is commonly used to check the validation state of the input element. It is desirable to understand the inner working of a model controller as the complete validation framework, data parsing, and formatting are dependent on the NgModelController implementation.
Once we have a clear understanding of how these controllers work, life becomes a little easier when dealing with Angular form quirks.
NgModelController is the command center for the ng-model directive. It provides an API to:
- Format and parse model data
- Validate model data
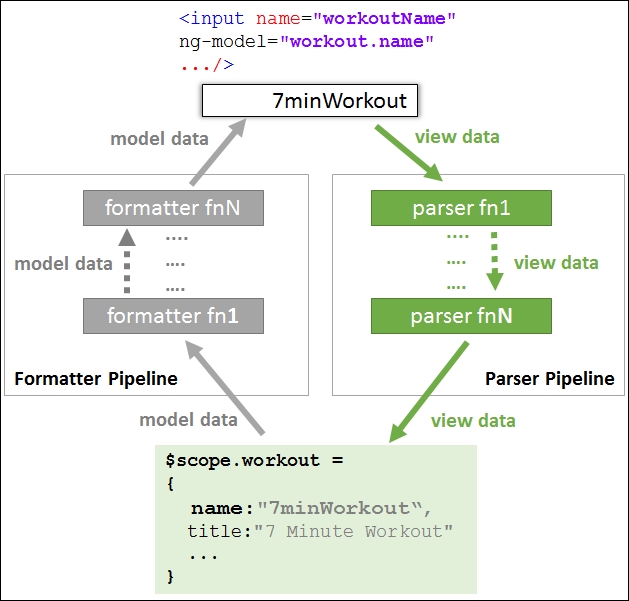
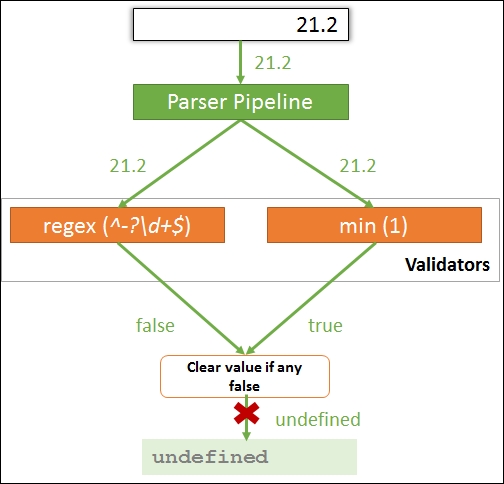
To support formatting, parsing, and data validation, AngularJS implements a pipeline architecture (http://en.wikipedia.org/wiki/Pipeline_%28software%29). In a pipeline setup, data/control passes from one component to another in a linear fashion. There is uniformity of interface when it comes to the components that are part of a pipeline. The output from one component feeds into the next component in pipeline, so on and so forth.
AngularJS model controller defines two pipelines:
- Formatter: This pipeline is used as
$formatters. It is an array of formatter functions that are called one after another when the model value changes. The return value of one formatter function acts as an input to another. At the end of pipeline execution, the value returned by last formatter is rendered in the view. A formatter function takes one parameter, value, and should return the same or a transformed value. - Parser: This pipeline is used as
$parsers. This is also an array of parser functions. Parser pipeline is executed when the view element is updated by the user and model data needs to be synchronized (the reverse of when the formatter pipeline is executed). Similar to formatters, parsers too are called in sequence one after another, passing in the view data. Any parser can update the data before passing to the next parser in line. The last return value gets assigned to the underlying model.
The following screenshot helps us visualize the formatter and parser pipelines in the context of model and view:
Having such a complex architecture for such a simple concept of model-view synchronization seems to be an overkill, but that is not the case. In fact, the pipeline architecture provides enough flexibility and extensibility. The complete AngularJS validation infrastructure is built upon formatter and parser pipelines.
As the name suggests, these pipelines make formatting a model and parsing view data easier. For example, if we want to format model data as uppercase in the input textbox, we can simply define the following formatter (code courtesy: API docs https://code.angularjs.org/1.3.3/docs/api/ng/type/ngModel.NgModelController):
function upperCase(value) {
   if (value) { return value.toUpperCase();}
}
ngModel.$formatters.push(upperCase);
An important consequence of using pipeline architecture with ng-model is that the order in which the pipeline functions are registered affects the overall behavior of the pipeline and hence ng-model. This holds true for both formatter and parser pipelines. Any pipeline function can short-circuit (clear) or update the value it receives during its execution, affecting the behavior of subsequent pipeline functions.
To understand the parser and formatter pipeline better, let's implement a sample formatter and parser function that can convert a decimal value to an integer value for our restBetweenExercise input textbox.
The rest between exercise input takes the rest duration (in seconds) between two exercises. Therefore, it does not make sense to save a decimal value for such input. Let's create a formatter and parser to sanitize the user input and model data.
Our formatter and parser functions work on similar lines, both converting the input value into integer format. Add the following watch function to WorkoutDetailController:
var restWatch = $scope.$watch('formWorkout.restBetweenExercise',
  function (newValue) {
if (newValue) {
      newValue.$parsers.unshift(function (value) {
         return isNaN(parseInt(value)) ? value : parseInt(value);
      });
      newValue.$formatters.push(function (value) {
         return isNaN(parseInt(value)) ? value : parseInt(value);
      });
      restWatch(); //De-register the watch after first time.
    }
});
We register our formatter and parser once the restBetweenExercise model controller is created. The watch has been registered just to know when the model controller instance is created.
The expression inside the parser/formatter function is as follows:
return isNaN(parseInt(value)) ? value : parseInt(value);
It checks for the result of parseInt; if it is NaN (not a number), then it returns the value as it is, otherwise it returns the parsed value. Observe that we are not clearing the value if it is not a number, instead we are returning it as it is. Other formatters/parsers in the pipeline can take care of non-numeric values.
Also, we register our parser at the start of the parser pipeline by calling unshift and formatter at the end of the pipeline by calling push.
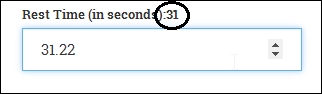
We can now test it out. Add the model data interpolation next to the Rest Time label:
Rest Time (in seconds):{{workout.restBetweenExercise}}Load the workout builder page, enter a numeric non-integer value, and check the interpolation. It contains the integer part only. See the following screenshot:
This is our parser in action! To test the formatter, we need to provide a model property with a decimal value. We can set the model value in the controller init function where we assign the selected workout, something like this:
$scope.workout.restBetweenExercise = 25.53;Load the workout builder page and we should see the following output:
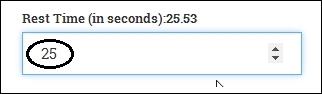
This is our formatter in action!
We now have a fair understanding of formatter and parser pipeline, and have created a set of formatter/parser set too.
Formatters and parsers can be useful in a number of scenarios when dealing with user input. For example, we can implement a parser that takes the rest time input in hh:mm:ss format and converts it into seconds in the model. A formatter can be created to do the reverse.
It's time now to look at AngularJS validation infrastructure.
As the saying goes "never trust user input", and Angular has us covered here! It has a rich validation support that makes sure data is sanitized before submission.
In AngularJS, we have built-in support for validating input types including text, numbers, e-mails, URLs, radios, checkboxes, and a few others. Depending on the input type, we set the parameters (such as <intput type='email'). Correct validations are automatically setup by Angular.
Other than validations based on input type, there is also support for validation attributes including the standard required, min, max, and custom attributes such as ng-pattern, ng-minlength, and ng-maxlength.
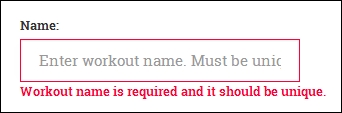
Let's add the required validation to workout name (name="workoutName") input and see how it works. Update the workout name input to this:
<input type="text" name="workoutName" class="form-control" id="workout-name" placeholder="Enter workout name. Must be unique." ng-model="workout.name" required>Now the input needs to have a value, else validation fails. However, how can we know if validation has failed? NgModelController comes to our rescue here. It can provide the validation state of the input. Let's add a message label after the input and verify this:
<label ng-show="formWorkout.workoutName.$error.required" ng-class="{'text-danger': formWorkout.workoutName.$error.required}">
  Workout name is required and it should be unique.</label>
Load the new workout page (#/buider/workouts/new) now and the error label appears as shown in the following screenshot:
Every model controller (such as formWorkout.workoutName shown previously) has a property $error that contains a list of all errors for the specific ng-model directive. The $error key (the property name) is the name of the validation (required in our case) that is failing and the value is true. If the key is not present on the $error object, it implies the input does not have the corresponding validation error. We use the $error.required error key to show the validation error and set an error class style.
Adding such a basic validation was easy, but there is a small issue here. The validation message is shown as soon as we load the form, not an ideal user experience. For a better user experience, the message should show up only after the user interacts with the input and not before that. AngularJS can help here too.
Every element that uses ng-model—including input, textarea, and select—has some states defined on the associated model controller:
$pristine: The value of this istrueas long as the user does not interact with the input. Any updates to the input field and$pristineis set tofalse. Oncefalse, it never flips, unless we call the$setPristine()function on the model controller.$dirty: This is the reverse of$pristine. This istruewhen the input data has been updated. This gets reset tofalseif$setPristine()is called.$touched: This is part of Angular 1.3. This istrueif the control ever had focus.$untouched: This is part of Angular 1.3. This istrueif the control has never lost focus. This is just the reverse of$touched.$valid: This istrueif there are validations defined on the input element and none of them are failing.$invalid: This istrueif any of the validations defined on the element are failing.
$pristine$dirty or $touched$untouched is a useful property that can help us decide when error labels are shown. Change the ng-show directive expression for the preceding label to this:
ng-show="formWorkout.workoutName.$dirty && formWorkout.workoutName.$error.required"Now reload the page, the error message is gone! Nonetheless, remember the control is still invalid.
As we can see, having a model state gives us great flexibility while managing the view, but the advantages don't end here. Based on the model state, Angular also adds some CSS classes to an input element. These include the following:
ng-valid: This is used if the model is valid.ng-invalid: This is used if the model is invalid.ng-pristine: This is used if the model is pristine.ng-dirty: This is used if the model is dirty.ng-untouched: This is part of Angular 1.3. This is used when the input is never visited.ng-touched: This is part of Angular 1.3. This is used when the input has focus.ng-invalid-<errorkey>: This is used for a specific failed validation.ng-valid-<errorkey>: This is used for a specific validation that does not have failure.
To verify it, just load the workout builder page and inspect the workoutName input element in the developer console:
<input type="text" name="workoutName" class=" form-control ng-pristine ng-untouched ng-invalid ng-invalid-required" ...>Add some content to input and tab out. The CSS changes to this:
<input type="text" name="workoutName" class=" form-control ng-dirty ng-valid ng-valid-required ng-touched" ...>These CSS class transitions are tremendously useful if we want to apply visual clues to the element depending on its state. For example, look at this snippet:
input.ng-invalid { border:2px solid red; }It draws a red border around any input control that has invalid data.
As we add more validations to Workout Builder, observe (in the developer console) how these classes are added and removed as the user interacts with the input element.
Now that we have an understanding of model states and how to use them, let's get back to our discussion on validations.
The workout data needs to be validated for a number of conditions. Let's get the complete set of validations from the workout.html file located in the workoutbuilder folder under Lesson03/checkpoint4/app/partials. Copy the inner content from <div id="workout-data" class="col-sm-3"> and replace the existing content inside the corresponding div element locally.
Also, comment out the formatter/parser watch that we created earlier to convert numeric data to integer values. We plan to do validations on the same field and those validations might interfere with the formatter/parser.
The workout.html view now has a number of new validations including, required, min, ng-pattern, ng-minlength, and ng-maxlength. Multiple validation error messages have also been associated with failing validations.
Let's test out one such validation (the restBetweenExercise model field) and understand some subtleties around AngularJS validations. Change the label Rest Time again to this:
Rest Time (in seconds): {{ workout.restBetweenExercise }}Open the new workout builder page and enter some content in the input field of Rest Time. If we enter a numeric value, the model data updates immediately and gets reflected in the label, but, if we try to enter a negative value or non-numeric data, the model property is cleared. There are some important conclusions that we can derive from this behavior:
- Updates to a model and model validation happen instantaneously, not on input blur
- Once validations are in place, AngularJS does not allow invalid values to be assigned to the model from view
- This holds good the other way around too. Invalid model data does not show up in the view either
Note
It is possible to alter this behavior in Angular 1.3. As we saw earlier, ng-model-options allow us to control when the model is updated.
An option that we did not cover earlier but will make more sense now is the property allowInvalid available on ng-model-options. If this is set to true, invalid view values are reflected on the model.
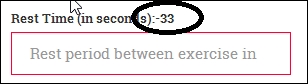
We can confirm the last finding too by setting the restBetweenExecise value to an invalid value. Update the init method set of WorkoutDetailController:
$scope.workout.restBetweenExercise = -33;
Now load a new workout builder view again. The value in the corresponding input is empty but the restBetweenExercise model has a value, as shown here:
To understand what happened, we need to understand how AngularJS does validation. This discussion however needs to be divided into two parts: one corresponding to pre-Angular 1.3 and the other to Angular 1.3.
Angular 1.3 differs a bit from its predecessors, hence this division. If you are still using pre-Angular 1.3, you can skip the section dedicated to validation in Angular 1.3.
In AngularJS, validations are done using the parser/formatter pipelines. As detailed earlier, these pipelines are a series of functions called one after another and allowing us to format/parse data.
Angular too uses these pipelines to register validation functions within the pipeline. Whenever we use a specific input type (email, url, number), or we apply validation such as required, min, or max, Angular adds corresponding validation functions to the two pipelines.
These validation functions (inside the pipeline) test the input value against a condition and return undefined if the validation fails, otherwise, pass the value along to the next in the pipeline. The end effect is that model or view data is cleared on validation failures.
For example, have a look at the restBetweenExercise input:
<input type="number" ng-model="workout.restBetweenExercise" min="1" ng-pattern="/^-?d+$/" required ...>
It has checks for number, format, required, and minimum values. If we inspect the $formatters and $parsers pipeline for this input, a total of six formatters and five parsers are registered (a mere observation, not a documented fact). One of the validation functions that do regular expression-based validation (ng-pattern) is registered in both the formatter and parser pipelines and its implementation looks like this (from AngularJS source code 1.2.15):
function(value) {
  return validateRegex(pattern, value);
};
The validateRegex function returns undefined if the regex validation fails, hence clearing the value.
The following diagram depicts the behavior of the parser pipeline when data is invalid:
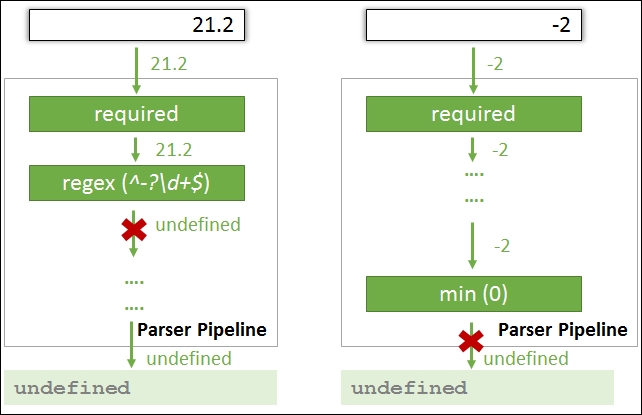
In the preceding screenshot, the first validation fails at the regex parser and the second at min value parser.
The formatter validation pipeline that maps model data to a view behaves in a similar manner to the parser pipeline. An important consequence of this behavior is that, if data in the model is invalid, it does not show up in the view and the view element is empty. Due to this, we cannot know the initial state of a model if the data is invalid and there is no validation error to guide us.
One of the major differences between pre-Angular 1.3 and 1.3 is that the validation functions of 1.3 are not part of parser/formatter pipelines. Validators in 1.3 are registered on the model controller property object $validators. Angular calls each function defined on the $validators property to validate the data.
Another difference is that validator functions in 1.3 return a Boolean value to signify if the validation passed or failed. In pre-Angular 1.3, the original value was returned if validation passed, and undefined when validation failed. To contrast the approach, look at the regex validator (ng-pattern) implementation in Angular 1.3.3:
function(value) {
        return ctrl.$isEmpty(value) || isUndefined(regexp)
                             || regexp.test(value);
};
This function returns a Boolean result.
Due to the way validators are set up in Angular 1.3, there are some important implications:
- Formatters and parsers always run before validators get a chance to validate input. In pre-Angular 1.3, we could control the order.
- In the case of a parser pipeline (the one that converts a view value to a model) specifically, if there is failure during parsing, the validator pipeline is not called.
- In pre-Angular 1.3, a failed validator in the pipeline used to clear the input value, and the subsequent validators received
undefined. In 1.3, each validator gets a chance to validate the input value irrespective of the outcome of other validations.
Look at the following diagram that highlights the data flow for Angular 1.3 validators:
Hope this discussion clears things up in terms of how validation in AngularJS works. Having this understanding is essential for us while we build bigger and more complex forms for our apps.
Angular 1.3 has another form of benefit. It can help us manage validation messages for failed validations more effectively. Angular 1.3 introduces two new directives: ng-messages and ng-message, to manage validation messages. Let's learn how these directives work.
Some inputs contain a lot of validations and controlling when a validation message shows up can become complex. For example, the restBetweenExercise inputs have a number of validations. To highlight failed validation, there are four error labels that look like this:
<label ng-show="formWorkout.restBetweenExercise.$dirty && formWorkout.restBetweenExercise.$error.required" class="text-danger">Time duration is required.</label>
Angular 1.3 provides a better mechanism to show/hide an error message based on the state of the control. It exposes two directives: ng-messages and ng-message that allow us to show/hide error messages, but with a less verbose syntax.
The restBetweenExercise error messages with the ng-messages directive look like this:
<div ng-messages="formWorkout.restBetweenExercise.$error"
ng-if="formWorkout.restBetweenExercise.$dirty">
    <label ng-message="required" class="text-danger">
Time duration is required.</label>
    <label ng-message="number" class="text-danger">
Time duration should be numeric.</label>
    <label ng-message="min" class="text-danger">
Only positive integer value allowed.</label>
    <label ng-message="pattern" class="text-danger">
Only integer value allowed.</label>
</div>
To try it out, comment the existing validation labels for restBetweenExercise, and add the preceding code after the restBetweenExercise input.
These directives belong to a new Angular module ngMessages, hence a script reference to angular-messages.js needs to be added to index.html:
<script src="http://ajax.googleapis.com/ajax/libs/angularjs/1.3.3/angular-messages.js"></script>
And the module needs to be referenced in app.js, as follows:
angular.module('app', ['ngRoute', . . . , 'ngMessages']).Open the workout builder page and play around with the restBetweenExercise input. The validation messages are now being managed by the ng-messages directive.
The ng-messages directive basically watches the state of an object (object properties) and shows/hides the message (using ng-message) based on the state changes.
The ng-messages directive is normally used with the $error property of the model controller. Whenever an error key on the $error object is true, the corresponding ng-message is displayed. For example, empty input for restBetweenExercise has only one $error key:
{ "required": true }Hence the following error label shows up:
<label ng-message="required" class="text-danger">
  Time duration is required.</label>
Interestingly, if we enter a negative decimal value such as -22.45, the $error now has this:
{ "min": true, "pattern": true }However, only the min object-related message is shown. This is the standard behavior of the ng-messages directive whereas it only shows the first failed validation. To show all the failed validations, we need to add another property to the ng-messages HTML:
<div ng-messages=". . ." ng-messages-multiple>The ng-messages directive also supports message reuse and message override, which becomes relevant when working on large apps that have numerous messages. We would not be covering this topic, but it is recommended that you look at the framework documentation on ng-messages (https://code.angularjs.org/1.3.3/docs/api/ngMessages) to learn more about this scenario.
The ng-messages directive is a pretty useful directive and if you are on Angular 1.3, it's better to use the ng-messages directive to show validation errors instead of the standard ng-show/ng-hide-based approach.
Let's now do something a little more interesting and a bit more complex. Let's implement a custom validation for an exercise count!
A workout without any exercise is of no use. There should at least be one exercise in the workout and we should validate this restriction.
The problem with exercise count validation is that it is not something that the user inputs directly and the framework validates. Nonetheless, we still want a mechanism to validate the exercise count in a manner similar to other validations on this form.
Since Angular validations are built over ng-model, our custom solution too will depend on it. Add these lines inside the exercise list div element (id="exercise-list") at the very top:
<span name="exerciseCount" ng-model = "workout.exercises.length"> </span>
  <div class="alert alert-danger" ng-show = "formWorkout.exerciseCount.$dirty && formWorkout.exerciseCount.$error.count">
  The workout should have at least one exercise!
</div>
The previous span has an ng-model attribute pointing to exercise count. Quite interesting!
A standard HTML span does not support a name attribute. Add to that, the ng-model directive on span too makes no sense as the user is not directly manipulating the exercise count. Still, we have defined both the name and ng-model attribute on the span object.
Remember what we learned in the ng-model—beyond data binding section? When Angular encounters ng-model on an element inside a form, it creates an NgModelController object and exposes it on the scope using the name attribute (exerciseCount). The span setup is there to just get hold of the model controller so that the exercise count validator can be registered.
Let's see how to implement the custom validation logic. Add these two watches to WorkoutDetailController:
$scope.$watch('formWorkout.exerciseCount', function (newValue) {
     if (newValue) {
         newValue.$setValidity("count",
           $scope.workout.exercises.length > 0);
     }});

$scope.$watch('workout.exercises.length',
   function (newValue, oldValue) {
     if (newValue != oldValue) {
          $scope.formWorkout.exerciseCount.$dirty = true;
          $scope.formWorkout.$setDirty();
          $scope.formWorkout.exerciseCount
.$setValidity("count", newValue > 0);
     }});
The first watch is on formWorkout.exerciseCount, an instance of NgModelController. This watch contains the initialization code for the exercise count validation. The watch is required because the WorkoutDetailController completes execution before the ng-model directive gets the chance to instantiate and attach the exerciseCount model controller to formWorkout. This watch gets fired once the model controller is available. We check for the number of exercises in the workout and set the validity of the model using the API method:
  newValue.$setValidity("count",
    $scope.workout.exercises.length > 0);
The $setValidity function is used to set the validation key ("count") on the $error object for a failed validation. The second parameter signifies whether the validation defined by the key (the first parameter) is valid. A false value implies the validation has failed. The previous HTML uses formWorkout.exerciseCount.$error.count to show the error message accordingly.
Next, we need a mechanism to re-evaluate our validation logic when exercises are added or removed from the workout. The second watch takes care of this. Whenever the length of the exercises array changes, the watch is fired.
The watch implementation sets the form and the exerciseCount model controller, $dirty, as the exercises array has changed. Finally, the watch re-evaluates the count validation by calling $setValidity. If the workout has no exercise, the expression $scope.workout.exercises.length > 0 returns false, causing the count validation to fail.
Since we are implementing our own custom validation, we need to explicitly set the $dirty flag at both the form and element level. Form controllers have an API specifically for that $setDirty property, but in the model controller we just set the $dirty property directly.
Open the new workout builder page, add an exercise, and remove it; we should see the error The workout should have at least one exercise!.
Note
Implementing custom validation directly inside the controller is not a standard practice. What we have here is an ad hoc setup for validation. A custom validator is otherwise implemented using validator functions, which are registered with the model controller's parser and formatter pipelines for validation.
Also, given the fact that custom validations are implemented using directives, we plan to postpone this discussion to later Lessons. We implement one such validation in Lesson 5, Working with Directives. The validation checks the uniqueness of the workout name field and returns an error if a workout already exists with the specific name.
In case you are having issues with validation, code updates so far are available in the checkpoint5 folder under Lesson03 in the companion codebase.
What we did using custom validation could have been easily done by using an error label and ng-class without involving any of the model validation infrastructure. By hooking our custom validation into the existing validation infrastructure, we do derive some benefits. We can now determine errors with a specific model and errors with the overall form in a consistent and familiar manner.
To understand how model validation rolls up into form validation, we need to understand what form-level validation has to offer. However, even before that, we need to implement saving the workout, and call it from the workout form.
The workout that we are building needs to be persisted (in-memory only). The first thing that we need to do is extend the WorkoutService and WorkoutBuilderService objects.
WorkoutService needs two new methods: addWorkout and updateWorkout:
service.updateWorkout = function (workout) {
    var workoutIndex;
    for (var i = 0; i < workouts.length; i++) {
      if (workouts[i].name === workout.name) {
          workouts[i] = workout;
          break;
      }
}
    return workout;
};

service.addWorkout = function (workout) {
    if (workout.name) {
        workouts.push(workout);
        return workout;
    }
}
The addWorkouts object does a basic check on the workout name and then pushes the workout into the workout array. Since there is no backing store involved, if we refresh the page, the data is lost. We will fix this in the next Lesson where we persist the data to a server.
The updateWorkout object looks for a workout with the same name in the existing workouts array and if found, updates and replaces it.
We only add one save method to WorkoutBuilderService as we are tracking the context in which workout construction is going on:
service.save = function () {
  var workout = newWorkout ?
    WorkoutService.addWorkout(buildingWorkout):
      WorkoutService.updateWorkout(buildingWorkout);
   newWorkout = false;
   return workout;
};
The save method calls WorkoutService, addWorkout, or updateWorkout based on whether a new workout is being created or an existing one is being edited.
From a service perspective, that should be enough. Time to integrate the ability to save workouts into WorkoutDetailController and learn more about the form directive!
Forms in Angular have a different role to play as compared to traditional forms that post data to the server. We can confirm that by looking at our form definition:
<form class="row" name="formWorkout" novalidate>
It is missing the standard action attribute.
The standard form behavior of posting data to the server using full-page post-back does not make sense with a SPA framework such as AngularJS. In Angular, all server requests are made through AJAX invocations originating from controllers, directives, or services.
The form here plays a different role. When the form encapsulates a set of input elements (such as input, textarea, and select) it provides an API for:
- Determining the state of the form, such as whether the form is dirty or pristine based on the input controls on it
- Checking validation errors at the form or control level
Similar to input, textarea, and select, form too is a directive that on execution creates a special FormController object and adds it to the current scope. The earlier form declaration creates a controller with the name formWorkout in the WorkoutDetailController scope.
Before we look at the form controller API in more detail, let's add the save method to Workout Builder to save the workout when the Save button is clicked. Add this code to WorkoutDetailController:
$scope.save = function () {
    if ($scope.formWorkout.$invalid) return;
    $scope.workout = WorkoutBuilderService.save();
    $scope.formWorkout.$setPristine();
}
We check the validation state of the form using its $invalid property and then call the WorkoutBuilderService.save method if the form state is valid. Finally, we set the form to pristine state by calling the $setPristine method on the form controller.
Except for the new form controller, the rest of the API is pretty standard. Let's look at the controller API in a little more detail.
FormController plays a similar role for form HTML, as NgModelController plays for input elements. It provides useful functions and properties to manage the state of the form. We already have used some API functions and properties in the previous save method. The API includes the following functions:
$addControl(modelController): This API method is used to register a model controller (NgModelController) with the form. The input-related directives call this internally. When we register a model controller with a form, changes in the model controller affect the state of the form and hence the form controller. If the model controller marks input as dirty, the form becomes dirty. If there are validation errors in the model controller, then it results in the form state changing to invalid as well.$removeControl(modelController): When we remove the model controller from the form controller, it no longer tracks the model controller state.$setValidity(validationKey, status, childController): This is similar to the$setValidityAPI ofNgModelControllerbut is used to set the validation state of the model controller from the form controller.$setDirty(): This is used to mark the form dirty.$setPristine(): This is used to make the form pristine. This is often used to mark the form pristine after persisting the data to server on save. When the form loads for the first time, it is in the pristine state.$setUntouched(): This is part of Angular 1.3. This is used to mark the form untouched. This is mostly called in sync with$setPristine, after data is saved.
Other than the state manipulation API, there are some handy properties that can be used to determine the state of the form. These include $pristine, $dirty, $valid, $invalid, and $error. Except for the $error property, the rest are similar to model controller properties.
We use the $dirty property with the workout title:
<h2 class="col-sm-5 col-sm-offset-1">{{workout.title}} {{formWorkout.$dirty?'*':''}} ...It appends an asterisks (*) symbol after the title when the form is dirty.
We use the $invalid property of the form controller to verify if there are validation errors before we perform a save in WorkoutDetailController.
The $error property on the form controller is a bit more complex. It aggregates all failures across all contained inputs. The $error key (property name) corresponds to the failing error condition and the value is an array of controllers that are invalid. For a model controller, the value was just true or false. If we put a breakpoint on the $scope.save function on a new workout page, and click on Save, the $error object looks something like this:

The count error is for the custom validation we did for the exercise count. Three other validation errors are pertaining to empty inputs. Play around with the input elements and check how the formWorkout.$error object behaves. See how consistent it is with the individual model controller errors.
With this, we have covered most of the FormController API. The workout can now be saved, and later reopened for editing from workout the list page (#/builder/workouts).
Since forms are so commonplace in HTML development, there are some standard use cases and quirks that we encounter while using them with Angular. The next few sections talk about these quirks and use cases.
The first one is related to validation/error messages not shown when the form is submitted.
To observe the first quirk, open a new workout builder page and directly click on the Save button. Nothing is saved as the form is invalid, but validations on individual form input do not show up at all. It now becomes difficult to know what elements have caused validation failure. The reason behind this behavior is pretty obvious. If we look at the error message bindings for any input element, it looks like this:
ng-show="formWorkout.workoutName.$dirty && formWorkout.workoutName.$error.required"
Remember that earlier in the Lesson, we explicitly disabled showing validation messages till the user has touched the input control. The same issue has come back to bite us and we need to fix it now.
If we look at the model controller API, we do not have a function to mark the model dirty, in fact we have a method that is the other way around, $setPristine. Changing/manipulating the $dirty property directly is not desirable as this and similar properties such as $pristine, $valid, and $invalid are there to determine the state of the model controller and not to update its state.
Therefore, setting the $dirty flag is ruled out; instead we plan to employ a nifty trick. Let's introduce a new variable, submitted. This variable is set to true on the Save button click. Update the save implementation by adding the highlighted code:
$scope.save = function () {
    $scope.submitted = true; // Will force validations
    if ($scope.formWorkout.$invalid) return;
    $scope.workout = WorkoutBuilderService.save();
    $scope.formWorkout.$setPristine();
    $scope.submitted = false;
}
Nonetheless, how does this help? Well, there is another part to this fix that requires us to change the error message related to the ng-show expression. The expression now changes to:
ng-show="(submitted || formWorkout.workoutName.$dirty) && formWorkout.workoutName.$error.required"With this fix, the error message is shown when the control is dirty or form Submit button is pressed (submitted is true). This expression fix now has to be applied to every ng-show directive where $dirty check is done.
Time to refactor the code as the expression has become a little complex. Add a hasError method in WorkoutDetailController:
$scope.hasError = function (modelController, error) {
  return (modelController.$dirty || $scope.submitted) && error;
}
The function does a similar check to the previous one in ng-show, but here we pass, in the controller, the error state parameter. The ng-show expression now becomes:
ng-show = "hasError(formWorkout.workoutName, formWorkout.workoutName.$error.required)"
Apply similar updates to all ng-show directives where $dirty is used.
If we now open the new workout builder page and click on the Save button, we should see all validation messages on the input controls:
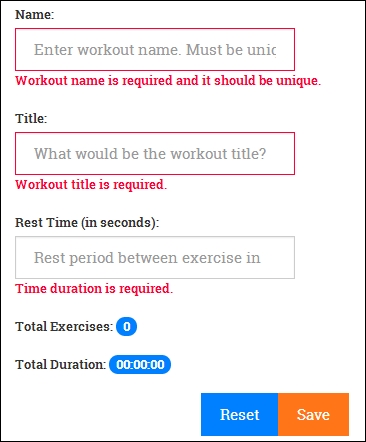
Another common issue that we might encounter when we use AngularJS services and share data is unwanted model updates. To demonstrate this:
- Open the existing 7 Minute Workout app, delete some of the exercises, and update some fields.
- Then, navigate away from the page by clicking on the Home link on the top nav.
- Now open the 7 Minute Workout app again.
The changes have persisted! However, we did not save the workout.
Why did model changes persist in spite of not saving them? Any guesses? To give you a hint, the issue is not with the form or controller implementation, but the service implementation. Look at the getWorkout(name) function under sharedservices.js.
Time's up! Let's understand why. The getWorkout(name) implementation looks like this:
var result = null;
angular.forEach(service.getWorkouts(), function (workout) {
  if (workout.name === name) result = workout;
});
return result;
We iterate over the workout list and return the workout that matches the workout name. There lies the problem!
We return an element from the workout array (by calling service.getWorkouts()) and then bind it directly in the workout builder page. Due to this, any change to the workout in the workout builder affects the actual workout data. To fix the problem, we just need to return a copy of the workout instead of the original.
Update the getWorkout method implementation by changing the if condition to this:
if (workout.name === name) result = angular.copy(workout);That's it! Go ahead and try updating the existing workout and navigate away. This time, changes are not persisted when we leave the page and come back.
Resetting the form to its initial state is another common requirement that we should add to our Workout Builder app.
The standard way of resetting the form is to call the reset method on the form object such as document.forms["formWorkout"].reset() or to use input type="reset", which clears all the form inputs. The drawback of this approach is that fields are completely cleared, instead of reverting back to their original content.
For Workout Builder, we will reset the form to its initial state using a similar approach outlined in the last section. Open workout.js, update WorkoutDetailController, and add the reset method:
$scope.reset = function () {
  $scope.workout =
WorkoutBuilderService.startBuilding($routeParams.id);
  $scope.formWorkout.$setPristine();
  $scope.submitted = false;
};
We reset the workout object, set the form to pristine and the submitted variable to false for future validation. The startBuilding function internally calls the getWorkout method on WorkoutService. As we saw in the last section, getWorkout always returns a new copy of a workout, which finally gets assigned to $scope.workout as just mentioned, causing the form to reset to its original state.
However, what about the $routeParams reference given in the preceding code? $routeParams is an AngularJS service that complements the $route service and contains data about specific URL fragments. Since we have used it in save, why not formally introduce it and learn a bit more about it?
The $routeParams service contains route fragment values derived from the current route, for routes that are dynamic in nature. To understand it better, let's look at the route configuration for Workout Builder in the edit mode:
$routeProvider.when('/builder/workouts/:id', {The previous route has a variable part :id that changes based on the name of the workout. For 7 Minute Workout, the route is this:
/builder/workout/7minuteworkout
The $routeParams service maps the literal string value 7minuteworkout to the id property and makes the data available to any controller/service (in this case, $routeParams.id).
In the case of a new workout, the route is /builder/workouts/new, and does not use any placeholder. Therefore, $routeParams.id is undefined in this case.
Coming back to the reset implementation, remember to add $routeParams dependency to the WorkoutDetailController declaration for the reset function to work correctly.
Finally, to bind the method to the form element, add a reset button to the form after the save button declaration:
<button class="btn btn-primary pull-right" ng-click="reset()">Reset</button>
We can now try it out. Create a new workout or open the existing one. Make some changes and click on Reset. The form should be reset to the state when it was loaded.
The reset is done, what next? We have still not implemented validation for the exercise duration of exercises that are dynamically added to the workout. Let's take care of this scenario too.
For dynamically generated form elements, as we have in the exercise list section, we still want to validate data entered by the user. AngularJS falls short in this scenario as the obvious validation mechanism does not work.
Ideally something like this should work for our exercise list in ng-repeat:
<input type="number" name="{{exercise.name}}-duration" ng-model="exercise.duration"/>Sadly, this does not work. AngularJS literally creates a model controller with the name {{exercise.name}}-duration. The reason is that the name attribute on the form and input (with ng-model) do not support interpolations. There is still an open issue on this (visit https://github.com/angular/angular.js/issues/1404 for more information).
The mechanism or workaround that Angular gives us to support dynamically generated inputs is the ng-form directive. This directive behaves in a similar manner to the form directive. It allows us to create nested forms and do individual form-level validation, with each form having its own set of inputs. Let's add ng-form and validate exercise duration.
Change the exercise list item template script (id="workout-exercise-tile") and wrap the select tag into an ng-form directive together with a validation label:
<ng-form name="formDuration">
  <select class="select-duration form-control" name="duration"
  ng-model="exercise.duration" ng-options="duration.value as duration.title for duration in durations" required>
    <option value="">Select Duration</option>
  </select>
  <label ng-show=
     "hasError(formDuration.duration,
      formDuration.duration.$error.required)"
      class="text-danger">Time duration is required.</label>
</ng-form>
The ng-form directive behaves similarly to form. It creates a form controller and adds it to the scope with the name formDuration. All validations within the ng-form happen in the context of the formDuration form controller as we can see in the previous binding expressions. This is possible because ng-repeat creates a new scope for each item it generates.
Other than the formDuration added to the ng-repeat scope, internally the formDuration controller is also registered with the parent form controller (formWorkout) using the controller API function $addControl.
Due to this, the validation state and dirty/pristine state of the child forms roll up into the parent form controller (formWorkout). This implies:
- If there are validation errors at the child form controller, even the parent form controller state becomes invalid (
$invalidreturns true for parent) - If the child form controller is set to dirty, the parent form controller is also marked dirty
- Conversely, if we call
$setPristineon the parent form controller, all child form controllers are also reset to the pristine stage
Refresh the workout builder page again and now the validation on exercise duration also works and integrates well with the parent formWorkout controller. If there is any error in the exercise duration input, the formWorkout controller is also marked invalid.
Note
If you are having problems with the implementation, check checkpoint6 folder under Lesson03 for a working implementation of what we have achieved thus far.
Checkpoint6 also contains implementation for Delete Workout that we will not cover. Look at the code and see where it has been extended to support the delete functionality
Other than workout persistence, we now have a fully functional workout builder. A good time to start building some customized workouts!
We have now reached a point where we should feel comfortable working with Angular. The only major topics left are client-server interaction, directives, and unit testing. However, from what we have learned thus far, we have enough ammunition to build something decent. Purposefully, we have overlooked one important topic that is critical for us to understand before we take up any serious Angular development: scope inheritance.
We need to understand the nuances of scope inheritance (prototypal inheritance). Scope inheritance behavior can stump even the most experienced developers. To learn about it, we need to revisit the concept of scopes, but this time from an inheritance hierarchy perspective.
To refresh our memory, scopes in Angular are created mostly as part of directive execution. Angular creates a new scope(s) whenever it encounters directives that request for a new scope. The ng-controller, ng-view, and ng-repeat directives are good examples of such directives.
Depending upon how these directives are declared in HTML, the scope hierarchy is also affected. For nested directives that request for the new scope, more often than not, the child directive scope inherits from the parent directive scope. This inheritance adheres to the standard JavaScript prototypal inheritance.
Prototypal inheritance in JavaScript can catch developers off-guard, especially the ones who come from an object-oriented background (lot of us do). In prototypal inheritance, an object inherits from other objects, as there is no concept of classes here.
Note
There is a good tutorial available online at http://javascript.info/tutorial/inheritance, in case you are interested in exploring prototypal inheritance in depth.
Prototypal inheritance on the surface seems to work similarly to class-based inheritance. An object derives from other objects, and hence can use the parent objects' properties and functions. Nonetheless, there is a big difference when it comes to updating/writing to properties.
In prototypal inheritance, the parent object and preceding prototypal chain are consulted for reads, but not for writes.
Interesting! Let's try to understand this hypothesis with examples. All the following examples use the Angular scope object.
Note
You can try these snippets in jsFiddle. Here is a basic fiddle for this at http://jsfiddle.net/cmyworld/9ak1gahe/. Remember to open the browser debugger console to see the log messages.
Consider this piece of code and corresponding scope setup:
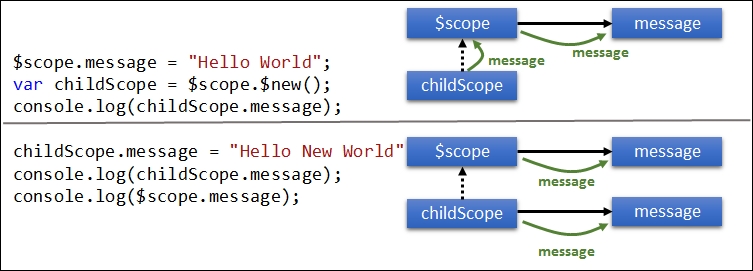
The first console.log logs the message property (Hello World) defined on the parent $scope. During reads, JavaScript looks for a message property on the childScope object. Since childScope does not have this property, it traverses up the hierarchy (the parent object) in search of message, and finds it on the parent $scope object.
The subsequent assignment childScope.message = "Hello New World";, should have then overwritten the message variable on the parent object, but it does not! Instead, a new message property is created on childScope, and it shadows the parent $scope.message property. Clearly, reads traverse the prototypal chain but writes do not.
This premise holds good for the primitive property (number, Boolean, date, and string) and object assignments, but if the property is declared on an object (declared on the parent object), changes to it on the child scope are reflected in the parent object too. Consider this variation to the preceding example:
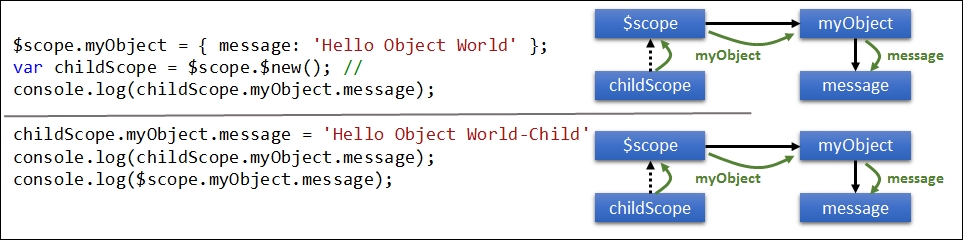
This time no new property is created on the childScope object, and the last two console.log functions print the same message ('Hello Object World - Child').
The write did not happen on childScope this time due to a subtle read here. JavaScript had to first look for the myObject property before it could resolve the message reference. The myObject property was found on parent $scope and that was used.
Consider another variation:
$scope.myObject = { message: 'Hello Object World' };
var childScope = $scope.$new(); //creates a child scope

childScope.myObject= {message:'Hello Object World - Child'};
console.log(childScope.myObject.message);
console.log($scope.myObject.message);
This time, like the first case, a new property myObject is created on childScope. $scope.myObject and childScope.myObject are two different objects and can be manipulated independently.
Now that we understand the subtleties, what are the implications? This behavior affects two-way binding and property assignments.
Strangely enough, we have not faced this issue, in spite of our working on forms that have a number of these two-way bindings (ng-model). There are two good reasons for this:
- The complete form container has only one scope (except the exercise list scopes that are created due to
ng-repeat), which is the scope created as part ofng-view. - None of the
ng-modelexpressions that we have used bind to a primitive object. Each one binds to an object property, such asng-model="workout.name".
It is not very difficult to create something that highlights this two-way binding issue, in the context of real angular controllers and directives. Look at this jsFiddle http://jsfiddle.net/cmyworld/kkrmux2f. There are two sets of input, both used to enter user-specific data. The first set of inputs has the two-way binding issue, whereas the second set works just fine.
Let's try another case: and this time on the workout builder view.
The use case is, whenever the user clicks on any of the exercise tiles that are part of the workout, we need to show the exercise description between the tiles and the input fields. Simple enough?
Let's begin the pursuit. Update the exercises-list div style to this:
<div id="exercises-list" class="col-sm-4 col-sm-offset-1">
Add a new div element for the exercise description just around the workout-data parameter of div:
<div id="exercise-description" class="col-sm-1">
  {{selectedExercise.details.description}}</div>
<div id="workout-data" class="col-sm-3">
Finally, update the workout.exercises ng-repeat directive to this:
<div ng-repeat="exercise in workout.exercises" class="exercise-item" ng-click="selectedExercise=exercise">The exercise-description parameter of div has an interpolation to a variable selectedExercise that should contain the current selected exercise. We assign selectedExercise when the exercise tile is clicked, inside the ng-click expression.
The implementation looks correct but it does not work. Open the 7 Minute Workout app and try it yourself. Clicking on any of the workout tiles has no effect. Again, the reason is prototypal inheritance!
When we used selectedExercise=exercise in ng-repeat, the property got created on a scope that was created as part of the ng-repeat execution, and not on the original scope.
How can we fix this? Well, one option is to change the ng-click directive to this:
ng-click="$parent.selectedExercise=exercise"Make the change, and refresh the page, and try clicking again. This time it works, as shown here:

$parent is a special property on every $scope object that points to the parent scope from which the scope was created.
While the usage of $parent does solve this problem, it is not the recommended way to achieve this fix. The fix is brittle and whenever a new scope is added (this can be due to the addition of a new directive at some point in the future) in the HTML hierarchy, the $parent link might not point to the correct parent scope. In such a scenario, we have to fix the expression again, leading to undesired results such as, $parent.$parent.$parent.selectedExercise.
The correct way to fix this would be to create an object with a selected exercise property to track the exercise. In WorkoutDetailController, add a variable to track the selected exercise at the top:
$scope.selected = {};Change the interpolation for the description to this:
{{selected.exercise.details.description}}Change the ng-click expression to this:
ng-click="selected.exercise=exercise"
We have a perfectly working solution for our use case. This time, we track the selected exercise as a sub property (exercise) of selected object and hence things just work.
That's it on scopes inheritances and the nuances around it. A very important topic that is essential to grasp to be a pro Angular dev.
Note
Another excellent discussion on this topic is available under this Angular wiki article at https://github.com/angular/angular.js/wiki/Understanding-Scopes. An essential and highly informative read!
Looking back at the goals that we had for Personal Trainer, we still have stuff pending. Adding/editing new exercises needs to be implemented and lastly the Personal Trainer app needs to integrate with the implementation of 7 Minute Workout (Workout Runner). The Workout Runner app needs to support the running of any workout that we build using Personal Trainer.
We will be ending this Lesson here. But one of the earlier tasks of creating an exercise builder is something I will urge everyone to go ahead and implement. The solution is similar to Workout Builder except the data elements are exercise-specific. It will be a good exercise for us to reinforce our learnings.