The last piece of the MEAN puzzle is, of course, AngularJS. Back in 2009, while building their JSON as platform service, developers Miško Hevery and Adam Abrons noticed that the common JavaScript libraries weren't enough. The nature of their rich web applications raised the need for a more structured framework that would reduce redundant work and keep the project code organized. Abandoning their original idea, they decided to focus on the development of their framework, naming it AngularJS and releasing it under an open source license. The idea was to bridge the gap between JavaScript and HTML and to help popularize single-page application development. In this Lesson, we'll cover the following topics:
- Understanding the key concepts of AngularJS
- Introducing Bower's frontend dependencies manager
- Installing and configuring AngularJS
- Creating and organizing an AngularJS application
- Utilizing Angular's MVC architecture properly
- Utilizing AngularJS services and implementing the
Authenticationservice
AngularJS is a frontend JavaScript framework designed to build single-page applications using the MVC architecture. The AngularJS approach is to extend the functionality of HTML using special attributes that bind JavaScript business logic with HTML elements. The AngularJS ability to extend HTML allows cleaner DOM manipulation through client-side templating and two-way data binding that seamlessly synchronizes between models and views. AngularJS also improves the application's code structure and testability using MVC and dependency injection. Although starting with AngularJS is easy, writing larger applications is a more complex task, which requires a broader understanding of the framework's key concepts.
With its two-way data binding, AngularJS makes it very easy to get started with your first application. However, when progressing into real-world application development, things can get more complicated. So, before we can continue with our MEAN application development, it would be best to clarify a few key concepts of AngularJS.
The core module of AngularJS is loaded with everything you need to bootstrap your application. It contains several objects and entities that enable the basic operation of an AngularJS application.
The angular global object contains a set of methods that you'll use to create and launch your application. It's also worth noticing that the angular object wraps a leaner subset of jQuery called jqLite, which enables Angular to perform basic DOM manipulation. Another key feature of the angular object is its static methods, which you'll use to create, manipulate, and edit the basic entities of your application including, the creation and retrieval of modules.
With AngularJS, everything is encapsulated in modules. Whether you choose to work with a single application module or break your application into various modules, your AngularJS application will rely on at least one module to operate.
Every AngularJS application needs at least one module to bootstrap, and we'll refer to this module as the application module. AngularJS modules are created and retrieved using the angular.module(name, [requires], [configFn]) method, which accepts three arguments:
When calling the angular.module() method with a single argument, it will retrieve an existing module with that name; if it can't find one, it will throw an error. However, when calling the angular.module() method with multiple arguments, AngularJS will create a module with the given name, dependencies, and configuration function. Later in this Lesson, you will use the angular.module() method with the name of your module and a list of dependencies to create your application module.
The AngularJS team has decided to support the continuous development of the framework by breaking Angular's functionality into external modules. These modules are being developed by the same team that creates the core framework and are being installed separately to provide extra functionality that is not required by the core framework to operate. Later in this Lesson, you'll see an example of an external module, when we discuss the routing of an application.
In the same way the AngularJS team supports its external modules, it also encourages outside vendors to create third-party modules, which extends the framework functionality and provides developers with an easier starting point. Later in this book, you will encounter third-party modules that will help you speed up your application development.
One of the most popular features of AngularJS is its two-way data binding mechanism. Two-way data binding enables AngularJS applications to always keep the model synchronized with the view and vice versa. This means that what the view renders is always the projection of the model. To understand this better, the AngularJS team provides the following diagram:
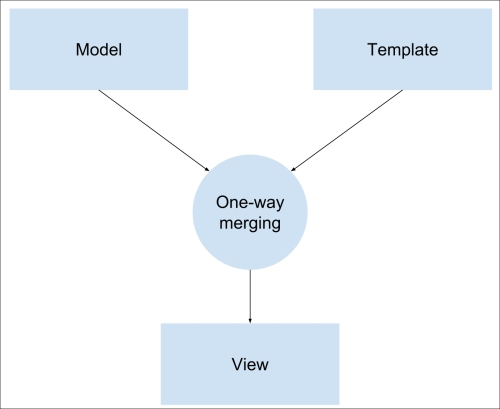
Traditional one-way data binding
As you can see from the preceding diagram, most templating systems bind the model with templates in one direction. So, every time the model changes, the developer has to make sure that these changes reflect in the view. A good example is our EJS template engine, which binds the application data and EJS template to produce an HTML page. Fortunately, AngularJS templates are different. Take a look at the following diagram:
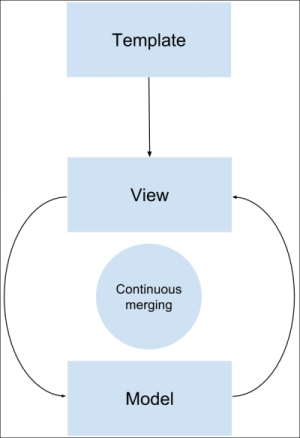
AngularJS two-way data binding
AngularJS uses the browser to compile HTML templates, which contain special directives and binding instructions that produce a live view. Any events that happen in the view automatically update the model, while any changes occurring in the model immediately get propagated to the view. This means the model is always the single source of data for the application state, which substantially improves the development process. Later in this Lesson, you will learn about AngularJS scopes and how controllers and views use them in referring to the application model.
A dependency injection is a software design pattern popularized by a software engineer named Martin Fowler. The main principle behind dependency injection is the inversion of control in a software development architecture. To understand this better, let's have a look at the following notifier example:
var Notifier = function() {
  this.userService = new UserService();
};

Notifier.prototype.notify = function() {
  var user = this.userService.getUser();

  if (user.role === 'admin') {
    alert('You are an admin!');
  } else {
    alert('Hello user!');
  }
};
Our Notifier class creates an instance of a userService, and when the notify () method is called, it alerts a different message based on the user role. Now this can work pretty well, but what happens when you want to test your Notifier class? You will create a Notifier instance in your test, but won't be able to pass a mock userService object to test the different results of the notify method. Dependency injection solves this by moving the responsibility of creating the userService object to the creator of the Notifier instance, whether it is another object or a test. This creator is often referred to as the injector. A revised, injection-dependent version of this example will be as follows:
var Notifier = function(userService) {
  this.userService = userService;
};

Notifier.prototype.notify = function() {
  var user = this.userService.getUser();

  if (user.role === 'admin') {
    alert('You are an admin!');
  } else {
    alert('Hello user!');
  }
};
Now, whenever you create an instance of the Notifier class, the injector will be responsible for injecting a userService object into the constructor, making it possible to control the behavior of the Notifier instance outside of its constructor, a design often described as inversion of control.
Now that you know how dependency injection works, let's review the implementation AngularJS uses. To understand this better, let's go over the following example of a module's controller () method, which creates an AngularJS controller:
angular.module('someModule').controller('SomeController', function($scope) {
  ...
});
In this example, the controller method accepts two arguments: the controller's name and the controller's constructor function. The controller's constructor function is being injected with an AngularJS object named $scope. AngularJS knows how to inject the right object here because its injector object can read the function argument's names. But developers often use a minifying service to obfuscate and minimize JavaScript files for production deployment needs. A minifying service will make our controller look as follows:
angular.module('someModule').controller('SomeController', function(a) { ... });So, now the AngularJS injector won't be able to understand which object it should inject. To solve this, AngularJS provides better syntax to annotate dependencies. Instead of passing a function as a second argument, you can pass an annotated array of dependencies that won't change when minified and will let the injector know which dependencies this controller constructor is expecting.
An annotated version of our controller will be as follows:
angular.module('someModule').controller('SomeController', ['$scope', function($scope) {

}]);
Now, even if you obfuscate your code, the list of dependencies will stay intact, so the controller can function properly.
We previously stated that AngularJS extends HTML instead of building against it. The mechanism that allows this is called directives. AngularJS directives are markers, usually attributes or element names, which enable the AngularJS compiler to attach a specified behavior to a DOM element and its children elements. Basically, directives are the way AngularJS interacts with DOM elements and are what enables the basic operation of an AngularJS application. What makes this feature even more special is the ability to write your own custom directives that it imparts.
AngularJS comes prebundled with necessary directives, which define the functionality of an Angular application. A directive is usually placed on an element as an attribute or defined as the element name. In this section, we'll review the most popular core directives, but you will encounter more of Angular's directives along the book examples.
The most basic directive is called ng-app and is placed on the DOM element (usually the page's body or html tag) you want Angular to use as the root application element. A body tag with the ng-app directive will be as follows:
<body ng-app></body>
We'll discuss the ng-app directive in greater detail in the next section, but for now, let's discuss other common core directives included in Angular's core:
ng-controller: This tells the compiler which controller class to use to manage this element viewng-model: This is placed on input elements and binds the input value to a property on the modelng-show/ng-hide: This shows and hides an element according to a Boolean expressionng-repeat: This iterates over a collection and duplicates the element for each item
We'll explain how to use each of these directives throughout the book, but it is also important to remember that these are just a small portion of the vast selection of AngularJS core directives, and while we introduce more directives ahead, it would probably be best for you to explore them yourself using the AngularJS official documentation at http://docs.angularjs.org/api/.
Bootstrapping an AngularJS application means that we tell Angular which DOM element is the root element of the application and when to initiate the Angular application. This could be done either automatically after the page assets are loaded or manually using JavaScript. Manual bootstrapping is usually useful when you'd like to control the bootstrap flow to make sure certain logic is being executed before the AngularJS application is started, while automatic bootstrap is useful in simpler scenarios.
To automatically bootstrap the AngularJS application, you will need to use the ng-app directive. Once the application JavaScript files are loaded, AngularJS will look for DOM elements marked with this directive and will bootstrap an individual application for each element. The ng-app directive can be placed as an attribute without a value or with the name of the module that you'd like to use as the main application module. It is important to remember that you should create this module using the angular.module() method, or AngularJS will throw an exception and won't bootstrap your application.
To manually bootstrap an application, you will need to use the angular.bootstrap(element, [modules], [config]) method, which accepts three arguments:
Usually, we'll call this function in when the page is loaded using the jqLite document-ready event.
After going through this quick overview of the AngularJS key concepts, we can now continue with the implementation of an AngularJS application in our MEAN application. The examples in this Lesson will continue directly from those in previous Lessons, so for this Lesson, copy the final example from Lesson 5, Managing User Authentication Using Passport, and let's start from there.
Since AngularJS is a frontend framework, installing it requires the inclusion of Angular's JavaScript files in the main page of your application. This could be done in various ways, and the easiest one would be to download the files you need and store them in the public folder. Another approach is to use Angular's CDN and load the files directly from the CDN server. While these two approaches are simple and easy to understand, they both have a strong flaw. Loading a single third-party JavaScript file is readable and direct, but what happens when you start adding more vendor libraries to your project? More importantly, how can you manage your dependencies versions? In the same way, the Node.js ecosystem solved this issue by using npm. Frontend dependencies can be managed using a similar tool called Bower.
Bower is a package manager tool, designed to download and maintain frontend, third-party libraries. Bower is a Node.js module, so to begin using it, you will have to install it globally using npm:
$ npm install -g bower
Once you have Bower installed, it's time to learn how to use it. Like npm, Bower uses a dedicated JSON file to indicate which packages and what versions to install. To manage your frontend packages, go to the root folder of your application and create a file named bower.json containing the following lines of code:
{
  name: MEAN,
  version: 0.0.7,
  dependencies: { }
}
As you're already experienced with the package.json file, this structure should already look familiar. Basically, you define your project metadata and describe its frontend packages using the dependencies property. You'll populate this field in a moment, but there is one more detail to notice regarding Bower's configuration.
Note
In order to use Bower, you will also need to install Git. Visit http://git-scm.com/ to download and install Git on your system. If you're using Windows, make sure you enabled Git on the command prompt or use the Git bash tool for all Bower-related commands.
Bower installation process downloads the packages content and automatically place them under a bower_components default folder in the root application folder. Since these are frontend packages that should be served as static files, and considering that our MEAN application only serves static files placed under the public folder, you will have to change the default installation location for Bower packages. Configuring the Bower installation process is done using a dedicated configuration file called .bowerrc.
To install your frontend packages in a different location, go to the root folder of your application and create a file named .bowerrc that contains the following lines of code:
{
  directory: public/lib
}
From now on, when you run the Bower installation process, third-party packages will be placed under the public/lib folder.
Note
You can learn more about Bower's features by visiting the official documentation at http://bower.io.
Once you have Bower installed and configured, it is time to use it and install the AngularJS framework. Go back to your bower.json file and change it as follows:
{
  name: MEAN,
  version: 0.0.7,
  dependencies: {
    angular: ~1.2
  }
}
This will have Bower installing the latest 1.2.x Version of AngularJS. To start the installation process, navigate to the application's folder in your command-line tool and run the following command:
$ bower install
This will fetch the AngularJS package files and place them under the public/lib/angular folder. Once you have AngularJS installed, it is time to add it to your project's main application page. Since AngularJS is a single-page framework, the entire application logic will take place in the same Express application page.
To start using AngularJS, you will need to include the framework JavaScript file in your main EJS view. In our case, we will use the app/views/index.ejs file as the main application page. Go to your app/views/index.ejs file and change it, as follows:
<!DOCTYPE html>
<html xmlns:ng="http://angularjs.org">
<head>
  <title><%= title %></title>
</head>
<body>
  <% if (userFullName) { %>
    <h2>Hello <%=userFullName%> </h2>
    <a href="/signout">Sign out</a>
  <% } else { %>
    <a href="/signup">Signup</a>
    <a href="/signin">Signin</a>
  <% } %>

  <script type="text/javascript" src="/lib/angular/angular.js"></script>
</body>
</html>
Now that you have AngularJS installed and included in the main application page, it is time to understand how to organize your AngularJS application's structure.
As you might remember from Lesson 2, Building an Express Web Application, your application's structure depends on the complexity of your application. We previously decided to use the horizontal approach for the entire MEAN application; however, as we stated before, MEAN applications can be constructed in various ways, and an AngularJS application structure is a different topic, which is often discussed by the community and the AngularJS development team. There are many doctrines for different purposes, some of which are a bit more complicated, while others offer a simpler approach. In this section, we'll introduce a recommended structure. Since AngularJS is a frontend framework, you'll use the public folder of our Express application as the root folder for the AngularJS application so that every file is available statically.
The AngularJS team offers several options to structure your application according to its complexity. A simple application will have a horizontal structure where entities are arranged in modules and folders according to their type, and a main application file is placed at the root folder of the application. An example application structure of that kind can be viewed in the following screenshot:
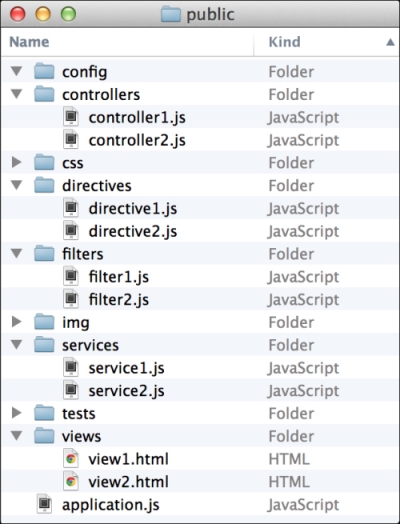
As you can notice, this is a very comfortable solution for small applications with a few entities. However, your application might be more complex with several different features and many more entities. This structure cannot handle an application of that sort since it obfuscates the behavior of each application file, will have a bloated folder with too many files, and will generally be very difficult to maintain. For this purpose, the AngularJS team offers a different approach to organizing your files in a vertical manner. A vertical structure positions every file according to its functional context, so different types of entities can be sorted together according to their role in a feature or section. This is similar to the vertical approach we introduced in Lesson 2, Building an Express Web Application. However, the difference is that only AngularJS sections or logical units will have a standalone module folder structure with a module file placed in the root module folder.
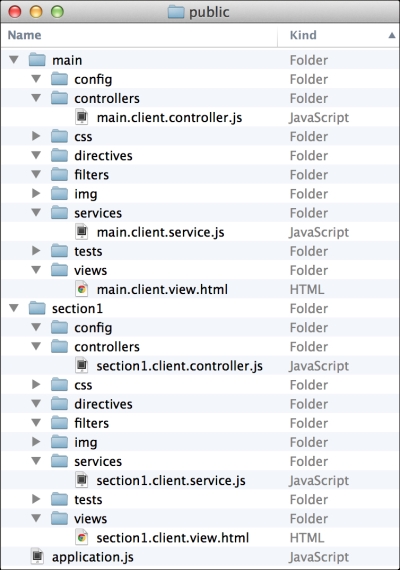
An example of an AngularJS application vertical structure can be seen in the following screenshot:

As you can notice, each module has its own folder structure with subfolders for different types of entities. This allows you to encapsulate each section, but there is still a minor problem with this structure. As you develop your AngularJS application, you will discover that you end up with many files having the same name since they serve different functionalities of the same section. This is a common issue, which can be very inconvenient when using your IDE or text editor. A better approach would be to use the naming convention that we introduced in Lesson 2, Building an Express Web Application. The following screenshot shows a clearer structure:
Each file is placed in a proper folder with a proper filename that usefully describes what sort of code it contains. Now that you know the basic best practices of naming and structuring your application, let's go back to the example project and start building your AngularJS application.
To bootstrap your application and start using AngularJS, we will use the manual bootstrapping mechanism. This will allow you to better control the initialization process of your application. To do so, clear the contents of the public folder except for the Bower lib folder. Then, create a file named application.js inside the public folder, and paste the following code in it:
var mainApplicationModuleName = 'mean';

var mainApplicationModule = angular.module(mainApplicationModuleName, []);

angular.element(document).ready(function() {
  angular.bootstrap(document, [mainApplicationModuleName]);
});
As you can notice, first you created a variable containing the main application's module name, which you then used to create a the main application module following the angular.module() method. Then, you used the angular object jqLite functionality to bind a function to the document-ready event. In that function, you used the angular.bootstrap() method to initiate a new AngularJS application using the main application module.
The next thing you need to do is include this JavaScript file in your index.ejs view. You should also throw in an Angular example code to validate that everything is working properly. Go to the app/views/index.ejs file and change it, as follows:
<!DOCTYPE html>
<html xmlns:ng="http://angularjs.org">
<head>
<title><%= title %></title>
</head>
<body>
<% if (userFullName) { %>
<h2>Hello <%=userFullName%> </h2>
<a href="/signout">Sign out</a>
<% } else { %>
<a href="/signup">Signup</a>
<a href="/signin">Signin</a>
<% } %>
<section>
<input type="text" id="text1" ng-model="name">
<input type="text" id="text2" ng-model="name">
</section>
<script type="text/javascript" src="/lib/angular/angular.js"></script>
<script type="text/javascript" src="/application.js"></script>
</body>
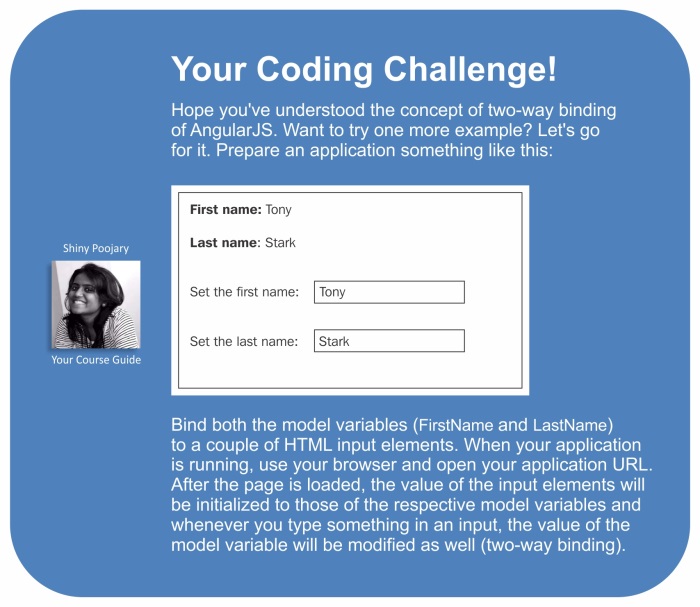
</html>Here, you included the new application JavaScript file and added two text boxes that used the ng-model directive to illustrate Angular's data binding. Once you've made these changes, everything is ready to test your AngularJS application. In your command-line tool, navigate to the MEAN application's root folder, and run your application with the help of the following command:
$ node server
When your application is running, use your browser and open your application URL at http://localhost:3000. You should see two textboxes next to each other. Try typing in one of the text boxes, and you should see Angular's two-way data binding in action. In the next section, you'll learn how to use AngularJS MVC entities.
AngularJS is an opinioned framework that allows you to use the MVC design pattern to create rich and maintainable web applications. In this section, you'll learn about views, controllers, and how the data model is implemented using the scope object. To begin with implementing the MVC pattern, create a module folder named example in your public folder. In the example folder, create two subfolders named controllers and views. Now that you have your example module structured, create a file named example.client.module.js inside the public/example folder. In this file, you're going to create a new AngularJS module using the angular.module() method. In the public/example/example.client.module.js file, paste the following code:
angular.module('example', []);This will create an AngularJS module, but you still need to include the module file in your application page and the module as a dependency of your main application module. Let's begin by removing the two-textboxes code examples and adding a new SCRIPT tag that loads your module file. To do so, change your app/views/index.ejs file as follows:
<!DOCTYPE html>
<html xmlns:ng="http://angularjs.org">
<head>
  <title><%= title %></title>
</head>
<body>
  <% if (userFullName) { %>
    <h2>Hello <%=userFullName%> </h2>
    <a href="/signout">Sign out</a>
  <% } else { %>
    <a href="/signup">Signup</a>
    <a href="/signin">Signin</a>
  <% } %>

  <script type="text/javascript" src="/lib/angular/angular.js"></script>

  <script type="text/javascript" src="/example/example.client.module.js"></script>

  <script type="text/javascript" src="/application.js"></script>
</body>
</html>
Now add the example module as a dependency of the main application module by going to your public/application.js file and changing it, as follows:
var mainApplicationModuleName = 'mean';

var mainApplicationModule = angular.module(mainApplicationModuleName, ['example']);

angular.element(document).ready(function() {
  angular.bootstrap(document, [mainApplicationModuleName]);
});
Once you're done, test your changes by running your MEAN application and verifying that there are no JavaScript errors. You shouldn't witness any changes in your application since we haven't utilized the new example module yet. When you're sure your new module is properly defined, move on to the next section to learn how to use AngularJS views.
AngularJS views are HTML templates rendered by the AngularJS compiler to produce a manipulated DOM on your page. To start with your first view, create a new example.client.view.html file inside your public/example/views folder, and paste the following lines of code:
<section>
  <input type=text id=text1 ng-model=name>
  <input type=text id=text2 ng-model=name>
</section>
To use this template as a view, you'll have to go back to your app/views/index.ejs file and change it again, as follows:
<!DOCTYPE html>
<html xmlns:ng="http://angularjs.org">
<head>
  <title><%= title %></title>
</head>
<body>
  <% if (userFullName) { %>
    <h2>Hello <%=userFullName%> </h2>
    <a href="/signout">Sign out</a>
  <% } else { %>
    <a href="/signup">Signup</a>
    <a href="/signin">Signin</a>
  <% } %>

  <section ng-include="'example/views/example.client.view.html'"></section>

  <script type="text/javascript" src="/lib/angular/angular.js"></script>

  <script type="text/javascript" src="/example/example.client.module.js"></script>

  <script type="text/javascript" src="/application.js"></script>
</body>
</html>
In the preceding code snippet, you used the new ng-include directive, which loads a template from a specified path, compiles it into a view, and then places the rendered result inside the directive DOM element. To test your view, use your command-line tool, and navigate to the MEAN application's root folder. Then run your application by typing the following command:
$ node server
Once your application is running, use your browser, and open the application URL at http://localhost:3000. You should see the two-textboxes example again; try typing in one of the textboxes, and see how the data binding works the same way inside views. Views are great, but what makes them even better are controllers.
Controllers are basically constructor functions, which AngularJS uses to create a new instance of a controller object. Their purpose is to augment data model reference objects called scopes. Therefore, the AngularJS team rightfully defines a scope as the glue between the view and the controller. Using a scope object, the controller can manipulate the model, which automatically propagates these changes to the view and vice versa.
Controller instances are usually created when you use the ng-controller directive. The AngularJS compiler uses the controller name from the directive to instantiate a new controller instance, while utilizing dependency injection to pass the scope object to that controller instance. The controller is then used either to set up the scope initial state or to extend its functionality.
Since DOM elements are arranged in a hierarchical structure, scopes mimic that hierarchy. This means that each scope has a parent scope up until the parentless object called the root scope. This is important, because aside from referencing their own model, scopes can also inherit the model of their parent scopes. So if a model property cannot be found in a current scope object, Angular will look for this property in the parent scope, and so on, until it finds the property or reaches the root scope.
To understand this better, let's use a controller to set an initial model state for our view. Inside your public/example/controllers folder, create a new file called example.client.controller.js containing the following code snippet:
angular.module('example').controller('ExampleController', ['$scope',
  function($scope) {
    $scope.name = 'MEAN Application';
  }
]);
Let's review this for a moment. First, you used the angular.module() method to retrieve your example module. Then, you used the AngularJS module's controller() method to create a new ExampleController constructor function. In your constructor function, you applied the dependency injection to inject the $scope object. Finally, you used the $scope object to define a name property, which will later be used by your view. To use this controller, you'll need to include its JavaScript file in the main application's page and add the ng-controller directive to your view. Start by changing your app/views/index.ejs as follows:
<!DOCTYPE html>
<html xmlns:ng="http://angularjs.org">
<head>
  <title><%= title %></title>
</head>
<body>
  <% if (userFullName) { %>
    <h2>Hello <%=userFullName%> </h2>
    <a href="/signout">Sign out</a>
  <% } else { %>
    <a href="/signup">Signup</a>
    <a href="/signin">Signin</a>
  <% } %>

  <section ng-include="'example/views/example.client.view.html'"></section>

  <script type="text/javascript" src="/lib/angular/angular.js"></script>

  <script type="text/javascript" src="/example/example.client.module.js"></script>
  <script type="text/javascript" src="/example/controllers/example.client.controller.js"></script>

  <script type="text/javascript" src="/application.js"></script>
</body>
</html>
Now change your public/example/views/example.client.view.html file as follows:
<section ng-controller=ExampleController>
  <input type=text id=text1 ng-model=name>
  <input type=text id=text2 ng-model=name>
</section>
That's it! To test your new controller, use your command-line tool, and navigate to the MEAN application's root folder. Then run your application as follows:
$ node server
Once your application is running, use your browser and open your application URL at http://localhost:3000. You should see the two-textboxes example again but with an initial value already set up.
While views, controllers, and scopes are a great way to build your application, AngularJS has much more to offer. In the next section, you'll drop the ng-include directive and learn how to use the ngRoute module to manage your application routing.
An AngularJS MVC implementation would not be complete if it didn't offer some way of controlling the application URL routing. While you could leverage the ng-include directive to offer some routing features, it would be a mess to use it with multiple views. For that purpose, the AngularJS team developed the ngRoute module that allows you to define URL paths and their corresponding templates, which will be rendered whenever the user navigates to those paths.
Since AngularJS is a single-page framework, ngRoute will manage the routing entirely in the browser. This means that instead of fetching web pages from the server, AngularJS will load the defined template, compile it, and place the result inside a specific DOM element. The server will only serve the template as a static file but won't respond to the URL changing. This change will also turn our Express server into a more API-oriented backend. Let's begin by installing the ngRoute module using Bower.
Installing the ngRoute module is easy; simply go to your bower.json file and change it as follows:
{
  name: MEAN,
  version: 0.0.7,
  dependencies: {
    angular: ~1.2,
    angular-route: ~1.2
  }
}
Now use your command-line tool to navigate to the MEAN application root folder, and install the new ngRoute module:
$ bower update
When bower finishes installing the new dependency, you would see a new folder named angular-route in your public/lib folder. Next, you will need to include the module file in your application main page, so edit your app/views/index.ejs file as follows:
<!DOCTYPE html>
<html xmlns:ng="http://angularjs.org">
<head>
  <title><%= title %></title>
</head>
<body>
  <% if (userFullName) { %>
    <h2>Hello <%=userFullName%> </h2>
    <a href="/signout">Sign out</a>
  <% } else { %>
    <a href="/signup">Signup</a>
    <a href="/signin">Signin</a>
  <% } %>

  <section ng-include="'example/views/example.client.view.html'"></section>

  <script type="text/javascript" src="/lib/angular/angular.js"></script>
  <script type="text/javascript" src="/lib/angular-route/angular-route.js"></script>

  <script type="text/javascript" src="/example/example.client.module.js"></script>
  <script type="text/javascript" src="/example/controllers/example.client.controller.js"></script>

  <script type="text/javascript" src="/application.js"></script>
</body>
</html>
Finally, you will need to add the ngRoute module as a dependency for your main application's module, so change your public/application.js file as follows:
var mainApplicationModuleName = 'mean';

var mainApplicationModule = angular.module(mainApplicationModuleName, ['ngRoute', 'example']);

angular.element(document).ready(function() {
  angular.bootstrap(document, [mainApplicationModuleName]);
});
When you're done with these changes, the ngRoute module will be set up and ready to be configured and used.
The ngRoute module's default behavior is to use the URL hash part for routing. Since it is usually used for in-page linking, when the hash part changes, the browser will not make a request to the server. This enables AngularJS to support older browsers while maintaining a decent routing scheme. So, a common AngularJS route would be similar to this one: http://localhost:3000/#/example.
However, single-page applications have one major problem. They are not indexable by search engine crawlers and can suffer from poor SEO. To solve this issue, the major search engine makers offer developers a way to mark their application as a single-page application. That way, the search engine crawlers know your application is using AJAX to render new paths and can wait for the result before it leaves your page. To mark your application routes as single-page application routes, you will need to use a routing scheme called Hashbangs. Hashbangs are implemented by adding an exclamation mark right after the hash sign, so an example URL would be http://localhost:3000/#!/example.
Luckily, AngularJS supports Hashbangs configuration using a module configuration block and the $locationProvider service of AngularJS. To configure your application routing, go to the public/application.js file and make the following changes:
var mainApplicationModuleName = 'mean';

var mainApplicationModule = angular.module(mainApplicationModuleName, ['ngRoute', 'example']);

mainApplicationModule.config(['$locationProvider',
  function($locationProvider) {
    $locationProvider.hashPrefix('!');
  }
]);

angular.element(document).ready(function() {
  angular.bootstrap(document, [mainApplicationModuleName]);
});
Once you're done configuring the application's URL scheme, it's time to use the ngRoute module and configure your first route.
The ngRoute module packs several key entities to manage your routes. We'll begin with the $routeProvider object, which provides several methods to define your AngularJS application routing behavior. To use the $routeProvider object, you will need to create a module configuration block, inject the $routeProvider object, and use it to define your routes. Begin by creating a new folder named config inside the public/example folder. In your new folder, create a file named example.client.routes.js containing the following lines of code:
angular.module('example').config(['$routeProvider',
  function($routeProvider) {
    $routeProvider.
    when('/', {
      templateUrl: 'example/views/example.client.view.html'
    }).
    otherwise({
      redirectTo: '/'
    });
  }
]);
Let's review the preceding code snippet for a moment. You used the angular.module() method to grab the example module and executed the config() method to create a new configuration block. Then, you applied DI to inject the $routeProvider object to your configuration function, and the $routeProvider.when() method to define a new route. The first argument of the $routeProvider.when() method is the route's URL, and the second one is an options object, where you defined your template's URL. Finally, you used the $routeProvider.otherwise() method to define the behavior of the router when the user navigates to an undefined URL. In this case, you simply redirected the user request to the route you defined before.
Another entity that is packed in the ngRoute module is the ng-view directive. The ng-view directive tells the AngularJS router which DOM element to use to render the routing views. When the user navigates to a specified URL, AngularJS will render the template inside the DOM element marked with this directive. So, to finalize your routing configuration, you will need to include the new JavaScript file in your main application page and add an element with the ng-view directive. To do so, change your app/views/index.ejs file as follows:
<!DOCTYPE html>
<html xmlns:ng="http://angularjs.org">
<head>
  <title><%= title %></title>
</head>
<body>
  <% if (userFullName) { %>
    <h2>Hello <%=userFullName%> </h2>
    <a href="/signout">Sign out</a>
  <% } else { %>
    <a href="/signup">Signup</a>
    <a href="/signin">Signin</a>
  <% } %>

  <section ng-view></section>

  <script type="text/javascript" src="/lib/angular/angular.js"></script>
  <script type="text/javascript" src="/lib/angular-route/angular-route.js"></script>

  <script type="text/javascript" src="/example/example.client.module.js"></script>
  <script type="text/javascript" src="/example/controllers/example.client.controller.js"></script>
  <script type="text/javascript" src="/example/config/example.client.routes.js"></script>

  <script type="text/javascript" src="/application.js"></script>
</body>
</html>
Once you're done, everything will be set up to test your routing configuration. Use your command-line tool, and navigate to the MEAN application's root folder. Then, run your application with the help of the following command:
$ node server
Once your application is running, use your browser and navigate to http://localhost:3000. You will notice that the AngularJS router redirects your request to http://localhost:3000/#!/. This means your routing configuration works and you should see the two-textboxes example again.
Note
To learn more about the ngRoute module, it is recommended that you visit its official documentation at http://docs.angularjs.org/api/ngRoute.
AngularJS services are singleton entities that are usually used to share information between different entities of the same AngularJS application. Services can be used to fetch data from your server, share cached data, and inject global objects into other AngularJS components. Since there is a single instance of each service, it is also possible to use two-way data binding between different unrelated entities of your AngularJS application. There are two kinds of services: AngularJS prebundled services and custom services. Let's begin by reviewing the former.
AngularJS comes prebundled with many services to abstract common development tasks. Commonly used services include:
$http: This is an AngularJS service used to handle AJAX requests$resource: This is an AngularJS service used to handle RESTful APIs$location: This is an AngularJS service used to handle URL manipulations$q: This is an AngularJS service used to handle promises$rootScope: This is an AngularJS service that returns the root scope object$window: This is an AngularJS service that returns the browser window object
There are many other services as well as extra module services that the AngularJS team constantly maintains, but one of the most powerful features of AngularJS is the ability to define your own custom services.
Note
You can learn more about AngularJS built-in services by visiting the official documentation at http://docs.angularjs.org/api/.
Whether to wrap global objects for better testability or for the purpose of sharing your code, creating custom services is a vital part of AngularJS application development. Creating services can be done using one of three module methods: provider(), service(),and factory(). Each of these methods allows you to define a service name and service function that serve different purposes:
provider(): This is the most verbose method, which provides the most comprehensive way to define a service.service(): This is used to instantiate a new singleton object from the service function. You should use it when you're defining a service as a prototype.factory(): This is used to provide the value returning from the invoked service function. You should use it when you want to share objects and data across your application.
In your daily development, you'll probably use either the factory() or service() methods since the provider() is usually overkill. An example service created using the factory() method will be as follows:
angular.module('example').factory('ExampleService', [
  function() {
    return true;
  }
]);
An example service created using the service() method will be as follows:
angular.module('example').service('ExampleService', [
  function() {
    this.someValue = true;

    this.firstMethod = function() {

    }
    this.secondMethod = function() {

    }
  }
]);
You'll feel more comfortable using each method when you get further ahead with developing your MEAN application.
Note
You can learn more about creating AngularJS custom services by looking at the official documentation at http://docs.angularjs.org/guide/providers.
Using AngularJS services is very easy since they can be injected into AngularJS components. Your example controller will be able to use ExampleService when you inject it, as follows:
angular.module('example').controller('ExampleController', ['$scope', 'ExampleService',
  function($scope, ExampleService) {
    $scope.name = 'MEAN Application';
  }
]);
This will make ExampleService available to the controller, which can use it to share information or consume shared information. Let's see how you can use the services to solve one of the main pitfalls when developing a MEAN application.
Managing an AngularJS authentication is one of the most discussed issues of the AngularJS community. The problem is that while the server holds the information about the authenticated user, the AngularJS application is not aware of that information. One solution is to use the $http service and ask the server about the authentication status; however, this solution is flawed since all the AngularJS components will have to wait for the response to return causing inconsistencies and development overhead. A better solution would be to make the Express application render the user object directly in the EJS view and then use an AngularJS service to wrap that object.
To render the authenticated user object, you'll have to make several changes. Let's begin by changing the app/controllers/index.server.controller.js file, as follows:
exports.render = function(req, res) {
  res.render('index', {
    title: 'Hello World',
    user: JSON.stringify(req.user)
  });
};
Next, go to your app/views/index.ejs file and make the following changes:
<!DOCTYPE html>
<html xmlns:ng="http://angularjs.org">
<head>
  <title><%= title %></title>
</head>
<body>
  <% if (user) { %>
    <a href="/signout">Sign out</a>
  <% } else { %>
    <a href="/signup">Signup</a>
    <a href="/signin">Signin</a>
  <% } %>

  <section ng-view></section>

  <script type="text/javascript">
    window.user = <%- user || 'null' %>;
  </script>

  <script type="text/javascript" src="/lib/angular/angular.js"></script>
  <script type="text/javascript" src="/lib/angular-route/angular-route.js"></script>

  <script type="text/javascript" src="/example/example.client.module.js"></script>
  <script type="text/javascript" src="/example/controllers/example.client.controller.js"></script>
  <script type="text/javascript" src="/example/config/example.client.routes.js"></script>

  <script type="text/javascript" src="/application.js"></script>
</body>
</html>
This will render the user object as a JSON representation right in your main view application. When the AngularJS application bootstraps, the authentication state will already be available. If the user is authenticated, the user object will become available; otherwise, the user object will be NULL. Let's see how you can use AngularJS services to share the user information.
Before you can create your Authentication service, it would be best to create a specific module that will hold all user-related logic. We'll call this module the users module. In your public folder, create a new folder named users. In this folder, create a folder named services and a file named users.client.module.js. In the users.client.module.js file, create your angular module, as follows:
angular.module('users', []);Now create your service file named authentication.client.service.js inside your public/users/services folder. In your new service file, paste the following code snippet:
angular.module('users').factory('Authentication', [
  function() {
    this.user = window.user;

    return {
      user: this.user
    };
  }
]);
Notice how we referenced the window.user object from the AngularJS service. The last thing you should do is include the module and service files in your main application page. Go to app/views/index.ejs and add your new JavaScript files, as follows:
<!DOCTYPE html>
<html xmlns:ng="http://angularjs.org">
<head>
  <title><%= title %></title>
</head>
<body>
  <% if (user) { %>
    <a href="/signout">Sign out</a>
  <% } else { %>
    <a href="/signup">Signup</a>
    <a href="/signin">Signin</a>
  <% } %>

  <section ng-view></section>

  <script type="text/javascript">
    window.user = <%- user || 'null' %>;
  </script>

  <script type="text/javascript" src="/lib/angular/angular.js"></script>
  <script type="text/javascript" src="/lib/angular-route/angular-route.js"></script>

  <script type="text/javascript" src="/example/example.client.module.js"></script>
  <script type="text/javascript" src="/example/controllers/example.client.controller.js"></script>
  <script type="text/javascript" src="/example/config/example.client.routes.js"></script>

  <script type="text/javascript" src="/users/users.client.module.js"></script>
  <script type="text/javascript" src="/users/services/authentication.client.service.js"></script>

  <script type="text/javascript" src="/application.js"></script>
</body>
</html>
Next, you will need to include your new user module as the main application module dependency. Another important change would be to solve Facebook's redirect bug that adds a hash part to the application's URL after the OAuth authentication round-trip. To do so, modify your public/application.js file as follows:
var mainApplicationModuleName = 'mean';

var mainApplicationModule = angular.module(mainApplicationModuleName, ['ngRoute', 'users', 'example']);

mainApplicationModule.config(['$locationProvider',
  function($locationProvider) {
    $locationProvider.hashPrefix('!');
  }
]);

if (window.location.hash === '#_=_') window.location.hash = '#!';

angular.element(document).ready(function() {
  angular.bootstrap(document, [mainApplicationModuleName]);
});
That's it! Your new user module should now be available as well as its Authentication service. The final step will be to use the Authentication service inside another AngularJS component.
The difficult part is behind you since all you have left to do is inject the Authentication service to your desired AngularJS entity, and you'll be able to use the user object. Let's use the Authentication service inside our example controller. Open your public/example/controllers/example.client.controller.js file and make the following changes:
angular.module('example').controller('ExampleController', ['$scope', 'Authentication',
  function($scope, Authentication) {
    $scope.name = Authentication.user ? Authentication.user.fullName : 'MEAN Application';
  }
]);
In the preceding code snippet, you injected the Authentication service to the controller and used it to reference the model name field to the user fullName field. To test your Authentication service, use your command-line tool and navigate to the MEAN application's root folder. Then run your application:
$ node server
Once your application is running, use your browser and navigate to http://localhost:3000/#!/. Try to sign in, and you should see the user's full name in the two-textboxes example.