In previous Lessons, you learned to build your real-time MEAN application. You went through Express and AngularJS basics and learned to connect all the parts together. However, when your application becomes bigger and more complex, you'll soon find out that it's very difficult to manually verify your code. You will then need to start testing your application automatically. Fortunately, testing a web application, which was once a complicated task, has become much easier with the help of new tools and suitable testing frameworks. In this Lesson, you'll learn to cover your MEAN application code using modern test frameworks and popular tools. We'll cover the following topics:
- Introducing JavaScript TDD and BDD
- Setting up your testing environment
- Installing and configuring the Mocha test framework
- Writing Express model and controller tests
- Installing and configuring the Karma test runner
- Using Jasmine to unit test your AngularJS entities
- Writing and running end-to-end (E2E) AngularJS tests
As you already know, in the past couple of years, JavaScript has evolved dramatically. It was once a simple scripting language made for small web applications, but now it's the backbone for complex architectures, both in the server and the browser. However, this evolution has put developers in a situation where they need to manually manage a large code base that remained uncovered in terms of automated testing. While our fellow Java, .NET, or Ruby developers have been safely writing and running their tests, JavaScript developers remained in an uncharted territory, with the burden of figuring out how to properly test their applications. Lately, this void has been filled with the formation of new tools and testing frameworks written by the talented JavaScript community members. In this Lesson, we'll cover some of these popular tools, but keep in mind that this field is very new and is constantly changing, so you'll also have to keep an eye out for newly emerging solutions.
In this Lesson, we'll discuss two major types of tests: unit tests and E2E tests. Unit tests are written to validate the functionality of isolated units of code. This means a developer should aspire to write each unit test to cover the smallest testable part of the application. For example, a developer might write unit tests to validate that an ORM method works properly and gives the right validation errors as an output. However, quite often a developer will choose to write unit tests that verify bigger code units, mostly because these units perform an isolated operation together. If a developer wants to test a process that includes many of the software components combined, he will write an E2E test. E2E tests are written to validate cross-application functionality. These tests often force the developer to use more than one tool and cover different parts of the application in the same test, including UI, server, and database components. An example would be an E2E test that validates the signup process. Identifying the right tests is one of the crucial steps in writing a proper test suite for your application. However, setting appropriate conventions for the development team can make this process much easier.
Before we begin discussing JavaScript-specific tools, let's first look at a quick overview of the TDD paradigm and how it affects our daily development cycles.
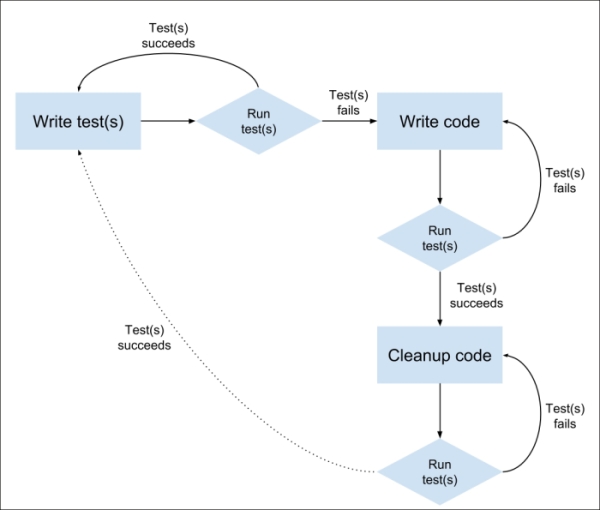
Test-driven development (TDD) is a software development paradigm developed by software engineer and agile methodology advocate Kent Beck. In TDD, the developer starts by writing a (initially failing) test, which defines the requirements expected from an isolated unit of code. The developer is then required to implement the minimum amount of code that passes the test. When the test is successfully passed, the developers clean up the code and verify that all the tests are passing. The following diagram describes TDD cycles in a visual manner:
It is important to remember that although TDD has become a popular approach in modern software development, it is very difficult to implement in its purest form. To ease this process and improve team communication, a new approach was developed on top of TDD, called BDD, or behavior-driven development. The BDD paradigm is a subset of TDD, created by Dan North, which helps developers identify the scope of their unit tests and express their test process in a behavioral terminology. Basically TDD provides the wireframe for writing tests, and BDD provides the vocabulary to shape the way tests are written. Usually a BDD test framework provides the developer with a set of self-explanatory methods to describe the test process.
Although BDD provides us with a mechanism for writing tests, running these tests in a JavaScript environment is still a complicated task. Your application will probably run on different browsers and even different versions of the same browser. So, running the tests you wrote on a single browser will not provide you with proper coverage. To solve this issue, the JavaScript community has developed a various set of tools for writing, evaluating, and properly running your tests.
Although you can start writing your tests using your own library, you'll soon find out that it is not very scalable and requires you to build a complex infrastructure. Fortunately, a respectable effort has been put into solving this issue, which resulted in several popular test frameworks that allow you to write your tests in a structured and common way. These test frameworks usually provide a set of methods to encapsulate tests. It is also very common for a test framework to provide some sort of API that enables you to run tests and integrate the results with other tools in your development cycle.
Though test frameworks provide the developer with a way to create and organize tests, they often lack the ability to actually test a Boolean expression that represents the test result. For instance, the Mocha test framework, which we'll introduce in the next section, doesn't provide the developer with an assertion tool. For this purpose, the community has developed several assertion libraries, which allows you to examine a certain predicate. The developer uses assertion expressions to indicate a predicate that should be true in the test context. When running the test, the assertion is evaluated, and if it turns out to be false, the test will fail.
Test runners are utilities that enable the developer to easily run and evaluate tests. A test runner usually uses a defined testing framework along with a set of preconfigured properties to evaluate test results in different contexts. For instance, a test runner can be configured to run tests with different environment variables or run the same test on different testing platforms (usually browsers). We will present two different test runners in the AngularJS test section.
Now that we overviewed a set of terms associated with testing, we can finally explain how to test the different parts of your MEAN application. Although your code is written entirely in JavaScript, it does run on different platforms with different scenarios. In order to mitigate the testing process, we divided it into two different sections: testing Express components and testing AngularJS components. Let's begin with testing your Express application components.
In the Express part of your MEAN application, your business logic is mostly encapsulated inside controllers; however, you also have Mongoose models that obfuscate many tasks, including data manipulation and validations. So, to properly cover your Express application code, you will need to write tests that cover both models and controllers. In order to do so, you will use Mocha as your test framework, the Should.js assertion library for your models, and the SuperTest HTTP assertion library for your controllers. You will also need to create a new test environment configuration file that will provide you with special configuration options for testing purposes, for example, a dedicated MongoDB connection string. By the end of this section, you will learn to use the Mocha command-line tool to run and evaluate your test results. We'll begin with presenting the Mocha test framework.
Mocha is a versatile test framework developed by Express creator TJ Holowaychuk. It supports both BDD and TDD unit tests, uses Node.js to run the tests, and allows the developer to run both synchronous and asynchronous tests. Since Mocha is minimal by structure, it doesn't include a built-in assertion library; instead, it supports the integration of popular assertion frameworks. It comes packed with a set of different reporters to present the test results and includes many features, such as pending tests, excluding tests, and skipping tests. The main interaction with Mocha is done using the command-line tool provided, which lets you configure the way tests are executed and reported.
The BDD interface for Mocha tests includes several descriptive methods, which enable the developer to easily describe the test scenario. These methods are as follows:
describe(description, callback): This is the basic method that wraps each test suite with a description. The callback function is used to define test specifications or subsuites.it(description, callback): This is the basic method that wraps each test specification with a description. The callback function is used to define the actual test logic.before(callback): This is a hook function that is executed once before all the tests in a test suite.beforeEach(callback): This is a hook function that is executed before each test specification in a test suite.after(callback): This is a hook function that is executed once after all the tests in a test suite are executed.afterEach(callback): This is a hook function that is executed after each test specification in a test-suite is executed.
Using these basic methods will allow you to define unit tests by utilizing the BDD paradigm. However, any test cannot be concluded without including an assertion expression that determines the developer's expectations from the covered code. To support assertions, you will need to use an assertion library.
The Should.js library, also developed by TJ Holowaychuk, aims to help developers write readable and expressive assertion expressions. Using Should.js, you'll be able to keep your test code better organized and produce useful error messages. The Should.js library extends Object.prototype with a non-enumerable getter that allows you to express how that object should behave. One of Should.js' powerful features is that every assertion returns a wrapped object, so assertions can be chained. This means that you can write readable expressions that pretty much describe the assertions associated with the tested object. For example, a chained assertion expression would be as follows:
user.should.be.an.Object.and.have.property('name', 'tj');Note
Notice how each helper property returns a Should.js object, which can be chained using another helper property (be, an, have, and so on) or tested using assertion properties and methods (Object, property()). You can learn more about Should.js features by visiting the official documentation at https://github.com/shouldjs/should.js.
While Should.js does an excellent job in testing objects, it will not help you with testing your HTTP endpoints. To do so, you will need to use a different kind of assertion library. This is where the minimal modularity of Mocha comes in handy.
SuperTest is another assertion library developed by TJ Holowaychuk, which differs from other assertion libraries by providing developers with an abstraction layer that makes HTTP assertions. This means that instead of testing objects, it will help you to create assertion expressions that test HTTP endpoints. In your case, it will help you to test your controller endpoints, thus covering the code that's exposed to the browser. To do so, it will make use of the Express application object and test the responses returned from your Express endpoints. An example SuperTest assertion expression is as follows:
request(app).get('/user')
  .set('Accept', 'application/json')
  .expect('Content-Type', /json/)
  .expect(200, done);
Note
Notice how each method can be chained to another assertion expression. This will allow you to make several assertions on the same response using the expect() method. You can learn more about SuperTest's features by visiting the official documentation at https://github.com/visionmedia/supertest.
In the next section, you will learn how to leverage Mocha, Should.js, and SuperTest to test both your models and your controllers. Let's begin by installing these dependencies and properly configuring the test environment. The examples in this Lesson will continue directly from those in previous Lessons, so copy the final example from Lesson 8, Adding Real-time Functionality Using Socket.io, and let's take it from there.
Mocha is basically a Node.js module that provides command-line capabilities to run tests. The easiest way to use Mocha is to first install it as a global node module using npm. To do so, just issue the following command in your command-line tool:
$ npm install –g mocha
As usual, this will install the latest version of Mocha in your global node_modules folder. When the installation process is successfully finished, you'll be able to use the Mocha utility from your command line. Next, you'll need to install the Should.js and SuperTest assertion libraries in your project.
Before you can start writing your tests, you will need to install both Should.js and SuperTest using npm. To do so, change your project's package.json file as follows:
{
  "name": "MEAN",
  "version": "0.0.10",
  "dependencies": {
    "express": "~4.8.8",
    "morgan": "~1.3.0",
    "compression": "~1.0.11",
    "body-parser": "~1.8.0",
    "method-override": "~2.2.0",
    "express-session": "~1.7.6",
    "ejs": "~1.0.0",
    "connect-flash": "~0.1.1",
    "mongoose": "~3.8.15",
    "passport": "~0.2.1",
    "passport-local": "~1.0.0",
    "passport-facebook": "~1.0.3",
    "passport-twitter": "~1.0.2",
    "passport-google-oauth": "~0.1.5",
    "socket.io": "~1.1.0",
    "connect-mongo": "~0.4.1",
    "cookie-parser": "~1.3.3"
  },
  "devDependencies": {
    "should": "~4.0.4",
    "supertest": "~0.13.0"
  }
}
As you can notice, we used a new property in the package.json file called devDependencies. This npm feature will allow us to configure development-oriented dependencies separately from other application dependencies. It means that when we deploy our application to a production environment, you'll get faster installation time and decreased project size. However, when you run the install command in other environments, these packages will be installed just like any other dependency.
To install your new dependencies, go to your application's root folder and issue the following command in your command-line tool:
$ npm install
This will install the specified versions of Should.js and SuperTest in your project's node_modules folder. When the installation process is successfully finished, you will be able to use these modules in your tests. Next, you'll need to prepare your project for testing by creating a new environment configuration file and setting up your test environment.
Since you're going to run tests that include database manipulation, it would be safer to use a different configuration file to run tests. Fortunately, your project is already configured to use different configuration files according to the NODE_ENV variable. While the application automatically uses the config/env/development.js file, when running in a test environment, we will make sure to set the NODE_ENV variable to test. All you need to do is create a new configuration file named test.js in the config/env folder. In this new file, paste the following code snippet:
module.exports = {
  db: 'mongodb://localhost/mean-book-test',
  sessionSecret: 'Your Application Session Secret',
  viewEngine: 'ejs',
  facebook: {
    clientID: 'APP_ID',
    clientSecret: 'APP_SECRET',
    callbackURL: 'http://localhost:3000/oauth/facebook/callback'
  },
  twitter: {
    clientID: 'APP_ID',
    clientSecret: 'APP_SECRET',
    callbackURL: 'http://localhost:3000/oauth/twitter/callback'
  },
  google: {
    clientID: 'APP_ID',
    clientSecret: 'APP_SECRET',
    callbackURL: 'http://localhost:3000/oauth/google/callback'
  }
};
As you can notice, we changed the db property to use a different MongoDB database. Other properties remain the same, but you can change them later to test different configurations of your application.
You'll now need to create a new folder for your test files. To do so, go to your app folder and create a new folder named tests. Once you're done setting up your environment, you can continue to the next section and write your first tests.
Before you begin writing your tests, you will first need to identify and break your Express application's components into testable units. Since most of your application logic is already divided into models and controllers, the obvious way to go about this would be to test each model and controller individually. The next step would be to break this component into logical units of code and test each unit separately. For instance, take each method in your controller and write a set of tests for each method. You can also decide to test a couple of your controller's methods together when each method doesn't perform any significant operation by itself. Another example would be to take your Mongoose model and test each model method.
In BDD, every test begins by describing the test's purpose in a natural language. This is done using the describe() method, which lets you define the test scenario's description and functionality. Describe blocks can be nested, which enables you to further elaborate on each test. Once you have your test's descriptive structure ready, you will be able to define a test specification using the it() method. Each it() block will be regarded as a single unit test by the test framework. Each test will also include a single assertion expression or multiple assertion expressions. The assertion expressions will basically function as Boolean test indicators for your test assumptions. When an assertion expression fails, it will usually provide the test framework with a traceable error object.
While this pretty much explains most of the tests you'll encounter, you'll also be able to use supportive methods that execute certain functionality in context with your tests. These supportive methods can be configured to run before or after a set of tests, and even before or after each test is executed.
In the following examples, you'll learn to easily use each method to test the articles module that you created in Lesson 7, Creating a MEAN CRUD Module. For the sake of simplicity, we will only implement a basic test suite for each component. This test suite could and should be largely expanded to ultimately provide decent code coverage.
Note
Although TDD clearly states that tests should be written before you start coding features, the structure of this book forces us to write tests that examine an already existing code. If you wish to implement real TDD in your development process, you should be aware that development cycles should begin by first writing the appropriate tests.
In the model's test example, we'll write two tests that verify the model save method. To begin testing your Article Mongoose model, you will need to create a new file named article.server.model.tests.js in your app/tests folder. In your new file, paste the following lines of code:
var app = require('../../server.js'),
    should = require('should'),
    mongoose = require('mongoose'),
    User = mongoose.model('User'),
    Article = mongoose.model('Article');

var user, article;

describe('Article Model Unit Tests:', function() {
  beforeEach(function(done) {
    user = new User({
      firstName: 'Full',
      lastName: 'Name',
      displayName: 'Full Name',
      email: '[email protected]',
      username: 'username',
      password: 'password'
    });

    user.save(function() {
      article = new Article({
        title: 'Article Title',
        content: 'Article Content',
        user: user
      });

      done();
    });
  });

  describe('Testing the save method', function() {
    it('Should be able to save without problems', function() {
      article.save(function(err) {
        should.not.exist(err);
      });
    });

    it('Should not be able to save an article without a title', function() {
      article.title = '';

      article.save(function(err) {
        should.exist(err);
      });
    });
  });

  afterEach(function(done) {
    Article.remove(function() {
      User.remove(function() {
        done();
      });
    });
  });
});
Let's start breaking down the test code. First, you required your module dependencies and defined your global variables. Then, you began your test using a describe() method, which informs the test tool this test is going to examine the Article model. Inside the describe block, we began by creating new user and article objects using the beforeEach() method. The beforeEach() method is used to define a block of code that runs before each test is executed. You can also replace it with the before() method, which will only get executed once, before all the tests are executed. Notice how the beforeEach() method informs the test framework that it can continue with the tests execution by calling the done() callback. This will allow the database operations to be completed before actually executing the tests.
Next, you created a new describe block indicating that you were about to test the model save method. In this block, you created two tests using the it() method. The first test used the article object to save a new article. Then, you used the Should.js assertion library to validate that no error occurred. The second test checked the Article model validation by assigning an invalid value to the title property. This time, the Should.js assertion library was used to validate that an error actually occured when trying to save an invalid article object.
You finished your tests by cleaning up the Article and User collections using the afterEach() method. Like with the beforeEach() method, this code will run after each test is executed, and can also be replaced with an after() method. The done() method is also used here in the same manner.
Congratulations, you created your first unit test! As we stated earlier, you can continue expanding this test suite to cover more of the model code, which you probably will when dealing with more complicated objects. Next, we'll see how you can write more advanced unit tests when covering your controller's code.
In the controller test example, we'll write two tests to check the controller's methods that retrieve articles. When setting out to write these tests, we have two options: either test the controller's methods directly or use the defined controller's Express routes in the tests. Although it is preferable to test each unit separately, we would choose to go with the second option since our routes' definition is quite simple, so we can benefit from writing more inclusive tests. To begin testing your articles controller, you will need to create a new file named articles.server.controller.tests.js in your app/tests folder. In your new file, paste the following code snippet:
var app = require('../../server'),
    request = require('supertest'),
    should = require('should'),
    mongoose = require('mongoose'),
    User = mongoose.model('User'),
    Article = mongoose.model('Article');

var user, article;

describe('Articles Controller Unit Tests:', function() {
  beforeEach(function(done) {
    user = new User({
      firstName: 'Full',
      lastName: 'Name',
      displayName: 'Full Name',
      email: '[email protected]',
      username: 'username',
      password: 'password'
    });

    user.save(function() {
      article = new Article({
        title: 'Article Title',
        content: 'Article Content',
        user: user
      });

      article.save(function(err) {
        done();
      });
    });
  });

  describe('Testing the GET methods', function() {
    it('Should be able to get the list of articles', function(done){
      request(app).get('/api/articles/')
        .set('Accept', 'application/json')
        .expect('Content-Type', /json/)
        .expect(200)
        .end(function(err, res) {
          res.body.should.be.an.Array.and.have.lengthOf(1);
          res.body[0].should.have.property('title', article.title);
          res.body[0].should.have.property('content', article.content);

          done();
        });
    });

    it('Should be able to get the specific article', function(done) {
      request(app).get('/api/articles/' + article.id)
        .set('Accept', 'application/json')
        .expect('Content-Type', /json/)
        .expect(200)
        .end(function(err, res) {
          res.body.should.be.an.Object.and.have.property('title', article.title);
          res.body.should.have.property('content', article.content);

          done();
        });
    });
  });

  afterEach(function(done) {
    Article.remove().exec();
    User.remove().exec();
    done();
  });
});
Just as with your model test, first you required your module dependencies and defined your global variables. Then, you started your test using a describe() method, which informs the test tool this test is going to examine the Articles controller. Inside the describe block, we began by creating new user and article objects using the beforeEach() method. This time, we saved the article before initiating the tests, and then continued with test execution by calling the done() callback.
Next, you created a new describe block indicating that you were about to test the controllers' GET methods. In this block, you created two tests using the it() method. The first test uses the SuperTest assertion library to issue an HTTP GET request at the endpoint that returns the list of articles. It then examines the HTTP response variables, including the content-type header and the HTTP response code. When it verifies the response is returned properly, it uses three Should.js assertion expressions to test the response body. The response body should be an array of articles that includes a single article that should be similar to the article you created in the beforeEach() method.
The second test uses the SuperTest assertion library to issue an HTTP GET request at the endpoint that returns a single article. It then examines the HTTP response variables including the content-type header and the HTTP response code. Once it verifies that the response is returned properly, it uses three Should.js assertion expressions to test the response body. The response body should be a single article object and should be similar to the article you created in the beforeEach() method.
Just as before, you finished your tests by cleaning up the Article and User collections using the afterEach() method. Once you're done setting up the testing environment and creating your tests, all you have left to do is run them using Mocha's command-line tool.
To run your Mocha test, you need to use Mocha's command-line utility that you previously installed. To do so, use your command-line tool and navigate to your project's base folder. Then, issue the following command:
$ NODE_ENV=test mocha --reporter spec app/tests
Windows users should first execute the following command:
> set NODE_ENV=test
Then run Mocha using the following command:
> mocha --reporter spec app/tests
The preceding command will do a few things. First, it will set the NODE_ENV variable to test, forcing your MEAN application to use the test environment configuration file. Then, it will execute the Mocha command-line utility, with the --reporter flag, telling Mocha to use the spec reporter and the path to your tests folder. The test results should be reported in your command-line tool and will be similar to the following screenshot:
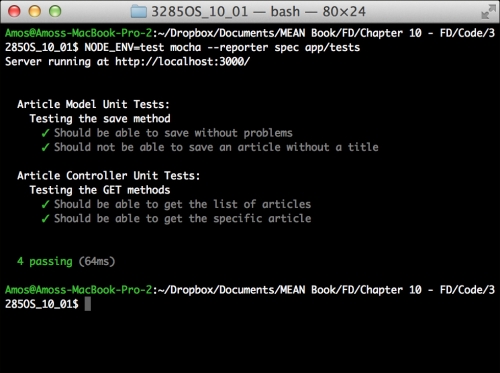
Mocha's test results
This concludes the test coverage of your Express application. You can use these methods to expand your test suite and dramatically improve application development. It is recommended that you set your test conventions from the beginning of your development process; otherwise, writing tests can become an overwhelming experience. Next, you'll learn to test your AngularJS components and write E2E tests.
For years, testing frontend code was a complex task. Running tests across different browsers and platforms was complicated, and since most of the application code was unstructured, test tools mainly focused on UI E2E tests. However, the shift towards MVC frameworks allowed the community to create better test utilities, improving the way developers write both unit and E2E tests. In fact, the AngularJS team is so focused on testing that every feature developed by the team is designed with testability in mind.
Furthermore, platform fragmentation also created a new layer of tools called test runners, which allow developers to easily run their tests in different contexts and platforms. In this section, we'll focus on tools and frameworks associated with AngularJS applications, explaining how to best use them to write and run both unit and E2E tests. We'll start with the test framework that will serve us in both cases, the Jasmine test framework.
Jasmine is an opinionated BDD framework developed by the Pivotal organization. Conveniently, Jasmine uses the same terminology as Mocha's BDD interface, including the describe(), it(), beforeEach(), and afterEach() methods. However, unlike Mocha, Jasmine comes prebundled with assertion capabilities using the expect() method chained with assertion methods called Matchers. Matchers are basically functions that implement a Boolean comparison between an actual object and an expected value. For instance, a simple test using the toBe() matcher is as follows:
describe('Matchers Example', function() {
  it('Should present the toBe matcher example', function() {
    var a = 1;
    var b = a;

    expect(a).toBe(b);
    expect(a).not.toBe(null);
  });
});
The toBe() matcher uses the === operator to compare objects. Jasmine includes plenty of other matchers and even enables developers to add custom matchers. Jasmine also includes other robust features to allow more advanced test suites. In the next section, we'll focus on how to use Jasmine to easily test your AngularJS components.
Note
You can learn more about Jasmine's features by visiting the official documentation at http://jasmine.github.io/2.0/introduction.html.
In the past, web developers who wanted to write unit tests to cover their frontend code had to struggle with determining their test scope and properly organizing their test suite. However, the inherent separation of concerns in AngularJS forces the developer to write isolated units of code, making the testing process much simpler. Developers can now quickly identify the units they need to test, and so controllers, services, directives, and any other AngularJS component can be tested as standalone units. Furthermore, the extensive use of dependency injection in AngularJS enables developers to switch contexts and easily cover their code with an extensive test suite. However, before you begin writing tests for your AngularJS application, you will first need to prepare your test environment beginning with the Karma test runner.
The Karma test runner is a utility developed by the AngularJS team that helps developers with executing tests in different browsers. It does so by starting a web server that runs source code with test code on selected browsers, reporting the tests result back to the command-line utility. Karma offers real test results for real devices and browsers, flow control for IDEs and the command line, and framework-agnostic testability. It also provides developers with a set of plugins that enables them to run tests with the most popular test frameworks. The team also provides special plugins called browser launchers that enable Karma to run tests on selected browsers.
In our case, we will use the Jasmine test framework along with a PhantomJS browser launcher. However, testing real applications will require you to expand Karma's configuration to include more launchers and execute tests on the browsers you intend to support.
Note
PhantomJS is a headless WebKit browser often used in programmable scenarios where you don't need a visual output; that's why it fits perfectly for testing purposes. You can learn more about PhantomJS by visiting the official documentation at http://phantomjs.org/documentation/.
The easiest way to start using Karma is to globally install the command-line tool provided using npm. To do so, just issue the following command in your command-line tool:
$ npm install -g karma-cli
This will install the latest version of Karma's command-line utility in your global node_modules folder. When the installation process is successfully finished, you'll be able to use the Karma utility from your command line. Next, you'll need to install Karma's project dependencies.
Before you can start writing your tests, you will need to install Karma's dependencies using npm. To do so, change your package.json file as follows:
{
  "name": "MEAN",
  "version": "0.0.10",
  "dependencies": {
    "express": "~4.8.8",
    "morgan": "~1.3.0",
    "compression": "~1.0.11",
    "body-parser": "~1.8.0",
    "method-override": "~2.2.0",
    "express-session": "~1.7.6",
    "ejs": "~1.0.0",
    "connect-flash": "~0.1.1",
    "mongoose": "~3.8.15",
    "passport": "~0.2.1",
    "passport-local": "~1.0.0",
    "passport-facebook": "~1.0.3",
    "passport-twitter": "~1.0.2",
    "passport-google-oauth": "~0.1.5",
    "socket.io": "~1.1.0",
    "connect-mongo": "~0.4.1",
    "cookie-parser": "~1.3.3"
  },
  "devDependencies": {
    "should": "~4.0.4",
    "supertest": "~0.13.0",
    "karma": "~0.12.23",
    "karma-jasmine": "~0.2.2",
    "karma-phantomjs-launcher": "~0.1.4"
  }
}
As you can see, you added Karma's core package, Karma's Jasmine plugin, and Karma's PhantomJS launcher to your devDependencies property. To install your new dependencies, go to your application's root folder and issue the following command in your command-line tool:
$ npm install
This will install the specified version of Karma's core package, Karma's Jasmine plugin, and Karma's PhantomJS launcher in your project's node_modules folder. When the installation process is successfully finished, you will be able to use these modules to run your tests. Next, you'll need to configure Karma's execution by adding a Karma configuration file.
In order to control Karma's test execution, you will need to configure Karma using a special configuration file placed at the root folder of your application. When executed, Karma will automatically look for the default configuration file named karma.conf.js in the application's root folder. You can also indicate your configuration file name using a command-line flag, but for simplicity reasons we'll use the default filename. To start configuring Karma, create a new file in your application folder, and name it karma.conf.js. In your new file, paste the following code snippet:
module.exports = function(config) {
  config.set({
    frameworks: ['jasmine'],
    files: [
      'public/lib/angular/angular.js',
      'public/lib/angular-resource/angular-resource.js',
      'public/lib/angular-route/angular-route.js',
      'public/lib/angular-mocks/angular-mocks.js',
      'public/application.js',
      'public/*[!lib]*/*.js',
      'public/*[!lib]*/*[!tests]*/*.js',
      'public/*[!lib]*/tests/unit/*.js'
    ],
    reporters: ['progress'],
    browsers: ['PhantomJS'],
    captureTimeout: 60000,
    singleRun: true
  });
};
As you can see, Karma's configuration file is used to set the way Karma executes tests. In this case, we used the following settings:
frameworks: This tells Karma to use the Jasmine framework.files: This sets the list of files that Karma will include in its tests. Notice that you can use glob patterns to indicate files pattern. In this case, we included all of our library files and module files, excluding our test files.reporters: This sets the way Karma reports its tests results.browsers: This is a list of browsers Karma will test on. Note that we can only use the PhantomJS browser since we haven't installed any other launcher plugin.captureTimeout: This sets the timeout for Karma tests execution.singleRun: This forces Karma to quit after it finishes the tests execution.
These properties are project-oriented, which means it will change according to your requirements. For instance, you'll probably include more browser launchers in real-world applications.
Note
You can learn more about Karma's configuration by visiting the official documentation at http://karma-runner.github.io/0.12/config/configuration-file.html.
While testing an AngularJS application, it is recommended that unit tests execute quickly and separately from the backend server. This is because we want the unit tests to be as isolated as possible and work in a synchronous manner. This means we need to control the dependency injection process and provide mock components that emulate real components' operation. For instance, most of the components that communicate with the backend server are usually using the $http service or some sort of abstraction layer, such as the $resource service. Furthermore, the $http service sends requests to the server using the $httpBackend service. This means that by injecting a different $httpBackend service, we can send fake HTTP requests that won't hit a real server. As we previously stated, the AngularJS team is very committed to testing, so they already created these tools for us, wrapping these mock components in the ngMock module.
The ngMock module is an external module provided by the AngularJS team. It contains several AngularJS mock utilities that can be used mostly for testing purposes. In essence, the ngMock module provides developers with a couple of important mock methods and a set of mock services. There are two ngMock methods that you'll probably use frequently: the angular.mock.module() method, which you'll use to create mock module instances, and the angular.mock.inject() method, which you'll use to inject mock dependencies. Both of these methods are also published on the window object for ease of use.
The ngMock module also provides developers with a set of mock services, including a mock exception service, timeout service, and log service. In our case, we'll use the $httpBackend mock service to handle HTTP requests in our tests.
The $httpBackend service allows developers to define mock responses to HTTP requests. It does so by providing two methods that enable you to determine the response data returned by the mock backend. The first method is $httpBackend.expect(), which is strictly used for unit testing. It allows developers to make assertions about HTTP requests made by the application, and fails the test if these request are not made by the test and even if they're made in the wrong order. A simple usage of the $httpBackend.expect() method is as follows:
$httpBackend.expect('GET', '/user').respond({userId: 'userX'});This will force the AngularJS $http service to return a mock response and will fail the test if a request that fulfill the assertion is not executed. The second method is $httpBackend.when(), which allows developers to loosely define a mock backend without making any assertion about tests requests. A simple usage of the $httpBackend.when() method is as follows:
$httpBackend.when('GET', '/user').respond({userId: 'userX'});However, this time, there isn't any assertion made about the tests requests. It simply tells the $http service to return a certain response for any request fulfilling this definition. We'll start using the ngMock module in a moment, but first we'll explain how to install it.
Installing the ngMock module is easy; simply go to your bower.json file and change it as follows:
{
  "name": "MEAN",
  "version": "0.0.10",
  "dependencies": {
    "angular": "~1.2",
    "angular-route": "~1.2",
    "angular-resource": "~1.2",
    "angular-mocks": "~1.2"
  }
}
Now, use your command-line tool to navigate to the MEAN application's root folder, and install the new ngMock module:
$ bower update
When Bower finishes installing the new dependency, you will see a new folder named angular-mocks in your public/lib folder. If you take a look at your Karma configuration file, you will notice that we already included the ngMock JavaScript file in the files property. Once you're done with the installation process, you can start writing your AngularJS unit tests.
Once you're done configuring your test environment, writing unit tests becomes an easy task. To do so, you will use the ngMock module's supplied tools to test each component. While the general structure is the same, each entity test is a bit different and involves subtle changes. In this section, you'll learn how to test the major AngularJS entities. Let's begin with testing a module.
Testing a module is very simple. All you have to do is check that the module is properly defined and exists in the test context. The following is an example unit test:
describe('Testing MEAN Main Module', function() {
  var mainModule;

  beforeEach(function() {
    mainModule = angular.module('mean');
  });

  it('Should be registered', function() {
    expect(mainModule).toBeDefined();
  });
});
Notice how we use the beforeEach() and angular.module() methods to load the module before we run the test. When the test specification is executed, it will use the toBeDefined() Jasmine matcher to validate that the module was actually defined.
Testing controllers is a bit trickier. In order to test a controller, you will need to use ngMock's inject() method and create a controller instance. So, a unit test that minimally covers your ArticlesController will be as follows:
describe('Testing Articles Controller', function() {
  var _scope, ArticlesController;

  beforeEach(function() {
    module('mean');

    inject(function($rootScope, $controller) {
      _scope = $rootScope.$new();
      ArticlesController = $controller('ArticlesController', {
        $scope: _scope
      });
    });
  });

  it('Should be registered', function() {
    expect(ArticlesController).toBeDefined();
  });

  it('Should include CRUD methods', function() {
    expect(_scope.find).toBeDefined();
    expect(_scope.findOne).toBeDefined();
    expect(_scope.create).toBeDefined();
    expect(_scope.delete).toBeDefined();
    expect(_scope.update).toBeDefined();
  });
});
Again, we used the beforeEach() method to create the controller before test specifications were executed. However, this time, we used the module() method to register the main application module and the inject() method to inject Angular's $controller and $rootScope services. Then, we used the $rootScope service to create a new scope object and the $controller service to create a new ArticlesController instance. The new controller instance will utilize the mock _scope object, so we can use it to validate the existence of controller's properties. In this case, the second spec will validate the existence of the controller's basic CRUD methods.
Testing services will be very similar to testing controllers. It is even simpler since we can directly inject the service into our tests. A unit test that minimally covers your Articles service will be as follows:
describe('Testing Articles Service', function() {
  var _Articles;

  beforeEach(function() {
    module('mean');

    inject(function(Articles) {
      _Articles = Articles;
    });
  });

  it('Should be registered', function() {
    expect(_Articles).toBeDefined();
  });

  it('Should include $resource methods', function() {
    expect(_Articles.get).toBeDefined();
    expect(_Articles.query).toBeDefined();
    expect(_Articles.remove).toBeDefined();
    expect(_Articles.update).toBeDefined();
  });
});
We use the beforeEach() method to inject the service before running the specs. This, validates the service's existence and confirms that the service includes a set of $resource methods.
Testing routes is even simpler. All you have to do is inject the $route service and test the routes collection. A unit test that test for an Articles route will be as follows:
describe('Testing Articles Routing', function() {
  beforeEach(module('mean'));

  it('Should map a "list" route', function() {
    inject(function($route) {
      expect($route.routes['/articles'].templateUrl).toEqual('articles/views/list-articles.view.html');
    });
  });
});
Notice that we're testing a single route and only the templateUrl property, so a real test specification will probably be more extensive.
Although we haven't elaborated on directives, they can still be a vital part of an AngularJS application. Testing directives will usually require you to provide an HTML template and use Angular's $compile service. A basic unit test that tests the ngBind directive will be as follows:
describe('Testing The ngBind Directive', function() {
  beforeEach(module('mean'));

  it('Should bind a value to an HTML element', function() {
    inject(function($rootScope, $compile) {
      var _scope = $rootScope.$new();
      element = $compile('<div data-ng-bind="testValue"></div>')(_scope);

      _scope.testValue = 'Hello World';
      _scope.$digest();

      expect(element.html()).toEqual(_scope.testValue);
    });
  });
});
Let's go over this test code. First, we created a new scope object, and then we used the $compile service to compile the HTML template with the scope object. We set the model testValue property and ran a digest cycle using the $digest() method to bind the model with the directive. We finish our test by validating that the model value is indeed rendered.
Like with directives, we didn't discuss filters too much. However, they too can be a vital part of an AngularJS application. Testing filters is very similar to the way we test other AngularJS components. A basic unit test that tests Angular's lowercase filter will be as follows:
describe('Testing The Lowercase Filter', function() {
  beforeEach(module('mean'));

  it('Should convert a string characters to lowercase', function() {
    inject(function($filter) {
      var input = 'Hello World';
      var toLowercaseFilter = $filter('lowercase');

      expect(toLowercaseFilter(input)).toEqual(input.toLowerCase());
    });
  });
});
As you can see, testing a filter requires the usage of the $filter service to create a filter instance. Then, you just processed your input and validated the filter functionality. In this case, we used JavaScript's toLowerCase() method to validate that the lowercase filter actually works.
While these examples illustrate pretty well the basics of writing AngularJS unit tests, you should keep in mind that the tests can be much more complex. Let's see how we can use the ngMock module to test one of our ArticlesController methods.
A common requirement is testing your controller's methods. Since the ArticlesController methods use the $http service to communicate with the server, it would be appropriate to use the $httpBackend mock service. To begin writing the ArticlesController unit test, you will first need to create a new tests folder inside the public/articles folder. In the public/articles/tests folder, create a new folder for unit tests, called unit. Finally, in your public/articles/tests/unit folder, create a new file named articles.client.controller.unit.tests.js.
In your new file, paste the following code snippet:
describe('Testing Articles Controller', function() {
  var _scope, ArticlesController;

  beforeEach(function() {
    module('mean');

    jasmine.addMatchers({
      toEqualData: function(util, customEqualityTesters) {
        return {
          compare: function(actual, expected) {
            return {
              pass: angular.equals(actual, expected)
            };
          }
        };
      }
    });
    inject(function($rootScope, $controller) {
      _scope = $rootScope.$new();
      ArticlesController = $controller('ArticlesController', {
        $scope: _scope
      });
    });
  });

  it('Should have a find method that uses $resource to retrieve a list of articles', inject(function(Articles) {
    inject(function($httpBackend) {
      var sampleArticle = new Articles({
        title: 'An Article about MEAN',
        content: 'MEAN rocks!'
      });
      var sampleArticles = [sampleArticle];

      $httpBackend.expectGET('api/articles').respond(sampleArticles);

      _scope.find();
      $httpBackend.flush();

      expect(_scope.articles).toEqualData(sampleArticles);
    });
  }));
  it('Should have a findOne method that uses $resource to retreive a single of article', inject(function(Articles) {
    inject(function($httpBackend, $routeParams) {
      var sampleArticle = new Articles({
        title: 'An Article about MEAN',
        content: 'MEAN rocks!'
      });

      $routeParams.articleId = 'abcdef123456789012345678';

      $httpBackend.expectGET(/api/articles/([0-9a-fA-F]{24})$/).respond(sampleArticle);

      _scope.findOne();
      $httpBackend.flush();

      expect(_scope.article).toEqualData(sampleArticle);
    });
  }));
});
Let's break down the test code. First, you required your module dependencies, and defined your global variables. You started your test using a describe() method, which informs the test tool this test is going to examine ArticlesController. Inside the describe block, we began by creating a new controller and scope objects using the beforeEach() method.
Inside the beforeEach() method, we created a new custom Jasmine Matcher, called toEqualData. This matcher will compare a regular object and a $resource wrapped object using the angular.equal() method. We added this matcher because $resource adds quite a few properties to our objects, so the basic comparison matcher will not work.
You then created the first specification that is going to test the controller's find() method. The trick here is to use the $httpBackend.expectGET() method, which sets a new backend request assertion. This means that the test expects an HTTP request that fulfills this assertion, and will respond with a certain response. You then used the controller's find() method, which will create a pending HTTP request. The cycle ends when you call the $httpBackend.flush() method, which will simulate the server's response. You concluded the test by testing your model's values.
The second specification is almost identical to the first one but will test the controller's findOne() method. On top of the $httpBackend service, it also uses the $routeParams service to set the articleId route parameter. Now that you have your first unit test, let's see how you can execute it using Karma's command-line utility.
To run your AngularJS tests, you will need to use Karma's command-line utility you previously installed. To do so, use your command-line tool and navigate to your project's base folder. Then issue the following command:
$ NODE_ENV=test karma start
Windows users should first execute the following command:
> set NODE_ENV=test
Then run Karma using the following command:
> karma start
The preceding command will do a few things. First, it will set the NODE_ENV variable to test, forcing your MEAN application to use the test environment configuration file. Then, it will execute the Karma command-line utility. The test results should be reported in your command-line tool similar to the following screenshot:
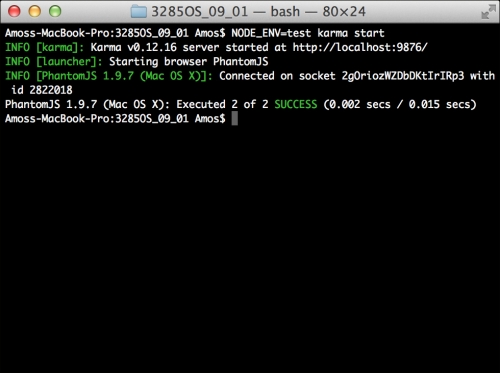
Karma's test results
This concludes the unit test coverage of your AngularJS application. It is recommended that you use these methods to expand your test suite and include more components tests. In the next section, you'll learn about AngularJS E2E testing, and to write and run a cross-application E2E test.
While unit tests serve as a first layer to keep our applications covered, it is sometimes necessary to write tests that involve several components together that react with a certain interface. The AngularJS team often refers to these tests as E2E tests.
To understand this better, let's say Bob is an excellent frontend developer who keeps his Angular code well tested. Alice is also an excellent developer, but she works on the backend code, making sure her Express controllers and models are all covered. In theory, this team of two does a superb job, but when they finish writing the login feature of their MEAN application, they suddenly discover it's failing. When they dig deeper, they find out that Bob's code is sending a certain JSON object, while Alice's backend controller is expecting a slightly different JSON object. The fact is that both of them did their job, but the code is still failing. You might say this is the team leader's fault, but we've all been there at some point or another, and while this is just a small example, modern applications tend to become very complex. This means that you cannot just trust manual testing or even unit tests. You will need to find a way to test features across the entire application, and this is why E2E tests are so important.
To execute E2E tests, you will need some sort of tool that emulates user behavior. In the past, the AngularJS team advocated a tool called Angular scenario test runner. However, they decided to abandon this tool and create a new test runner called Protractor. Protractor is a dedicated E2E test runner that simulates human interactions and runs tests using the Jasmine test framework. It is basically a Node.js tool, which uses a neat library called WebDriver. WebDriver is an open source utility that allows programmable control over a web browser behavior. As we stated, Protractor is using Jasmine by default, so tests will look very similar to the unit tests you wrote before, but Protractor also provides you with several global objects as follows:
browser: This is aWebDriverinstance wrapper, which allows you to communicate with the browser.element: This is a helper function to manipulate HTML elements.by: This is a collection of element locator functions. You can use it to find elements by a CSS selector, their ID, or even by the model property they're bound to.protractor: This is a WebDriver namespace wrapper containing a set of static classes and variables.
Using these utilities, you'll be able to perform browser operations inside your tests' specifications. For instance, the browser.get() method will load a page for you to perform tests on. It is important to remember that Protractor is a dedicated tool for AngularJS applications, so the browser.get() method will throw an error if the page it tries to load doesn't include the AngularJS library. You'll write your first E2E test in a moment, but first let's install Protractor.
Note
Protractor is a very young tool, so things are bound to change rapidly. It is recommended that you learn more about Protractor by visiting the official repository page at https://github.com/angular/protractor.
Protractor is a command-line tool, so you'll need to globally install it using npm. To do so, just issue the following command in your command-line tool:
$ npm install -g protractor
This will install the latest version of Protractor command-line utilities in your global node_modules folder. When the installation process is successfully finished, you'll be able to use Protractor from your command line.
Since Protractor will need a working WebDriver server, you will either need to use a Selenium server or install a standalone WebDriver server. You can download and install a standalone server by issuing the following command in your command-line tool:
$ webdriver-manager update
This will install the Selenium standalone server, which you'll later use to handle Protractor's tests. The next step would be to configure Protractor's execution options.
Note
You can learn more about WebDriver by visiting the official project page at https://code.google.com/p/selenium/wiki/WebDriverJs.
In order to control Protractor's test execution, you will need to create a Protractor configuration file in the root folder of your application. When executed, Protractor will automatically look for a configuration file named protractor.conf.js in your application's root folder. You can also indicate your configuration filename using a command-line flag, but for simplicity reasons, we'll use the default filename. So begin by creating a new file named protractor.conf.js in your application's root folder. In your new file, paste the following lines of code:
exports.config = {
  specs: ['public/*[!lib]*/tests/e2e/*.js']
}
Our Protractor's configuration file is very basic and only includes one property. The specs property basically tells Protractor where to find the test files. This configuration is project-oriented, which means that it will change according to your requirements. For instance, you'll probably change the list of browsers you want your tests to run on.
Note
You can learn more about Protractor's configuration by going over the example configuration file at https://github.com/angular/protractor/blob/master/docs/referenceConf.js.
Since E2E tests are quite complicated to write and read, we'll begin with a simple example. In our example, we'll test the Create Article page and try to create a new article. Since we didn't log in first, an error should occur and be presented to the user. To implement this test, go to your public/articles/tests folder and create a new folder named e2e. Inside your new folder, create a new file named articles.client.e2e.tests.js. Finally, in your new file, paste the following code snippet:
describe('Articles E2E Tests:', function() {
  describe('New Article Page', function() {
    it('Should not be able to create a new article', function() {
      browser.get('http://localhost:3000/#!/articles/create');
      element(by.css('input[type=submit]')).click();
      element(by.binding('error')).getText().then(function(errorText) {
        expect(errorText).toBe('User is not logged in');
      });
    });
  });
});
The general test structure should already be familiar to you; however, the test itself is quite different. We began by requesting the Create Article page using the browser.get() method. Then, we used the element() and by.css() methods to submit the form. Finally, we found the error message element using by.binding() and validated the error text. While this is a simple example, it illustrates well the way E2E tests work. Next we'll use Protractor to run this test.
Running Protractor is a bit different than using Karma and Mocha. Protractor needs your application to run so that it can access it just like a real user does. So let's begin by running the application; navigate to your application's root folder and use your command-line tool to start the MEAN application as follows:
$ NODE_ENV=test node server
Windows users should first execute the following command:
> set NODE_ENV=test
Then run their application using the following command:
> node server
This will start your MEAN application using the test environment configuration file. Now, open a new command-line window and navigate to your application's root folder. Then, start the Protractor test runner by issuing the following command:
$ protractor
Protractor should run your tests and report the results in your command-line window as shown in the following screenshot:
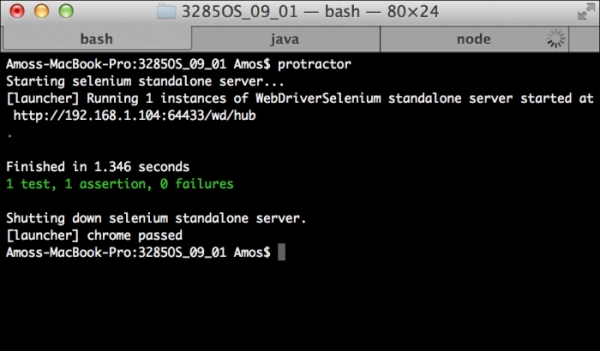
Protractor's test results
Congratulations! You now know how to cover your application code with E2E tests. It is recommended that you use these methods to expand your test suite and include extensive E2E tests.