
PrimeNG was created for enterprise applications. Implementing a CRUD (create, read, update, and delete) scenario is easily done. The example in this section demonstrates such a scenario with employees that are taken as domain model objects. Employees can be fetched, created, updated, and deleted. All CRUD operations happens via Angular's HTTP service, which communicates with a mock backend. We will improve our CRUD implementation later on in the section Introduction to state management with @ngrx/store.
The domain model object Employee is defined using the following interface:
export interface Employee {
  id: string;
  firstName: string;
  lastName: string;
  profession: string;
  department: string;
}
The mock backend is not shown here because it is beyond the scope of this book.
https://github.com/ova2/angular-development-with-primeng/tree/master/chapter9/crud-datatable.
The EmployeeService class with CRUD operations is worth to be listed here. It exposes four methods with Observable as return value so that the component class can invoke subscribe() to receive delivered data:
@Injectable()
export class EmployeeService {
  private static handleError(error: Response | any) {
    // error handling is done as recommended
    //in the official Angular documentation
    // https://angular.io/docs/ts/latest/guide/server-
    //communication.html#!#always-handle-errors
    ...
  }

  constructor(private http: Http) { }

  getEmployees(): Observable<Employee[]> {
    return this.http.get('/fake-backend/employees')
      .map(response => response.json() as Employee[])
      .catch(EmployeeService.handleError);
  }

  createEmployee(employee: Employee): Observable<Employee> {
    return this.http.post('/fake-backend/employees', employee)
      .map(response => response.json() as Employee)
      .catch(EmployeeService.handleError);
  }

  updateEmployee(employee: Employee): Observable<any> {
    return this.http.put('/fake-backend/employees', employee)
      .map(response => response.json())
      .catch(EmployeeService.handleError);
  }

  deleteEmployee(id: string): Observable<any> {
    return this.http.delete('/fake-backend/employees/' + id)
      .map(response => response.json())
      .catch(EmployeeService.handleError);
  }
}
Employees are presented in DataTable when they are fetched from the backend:

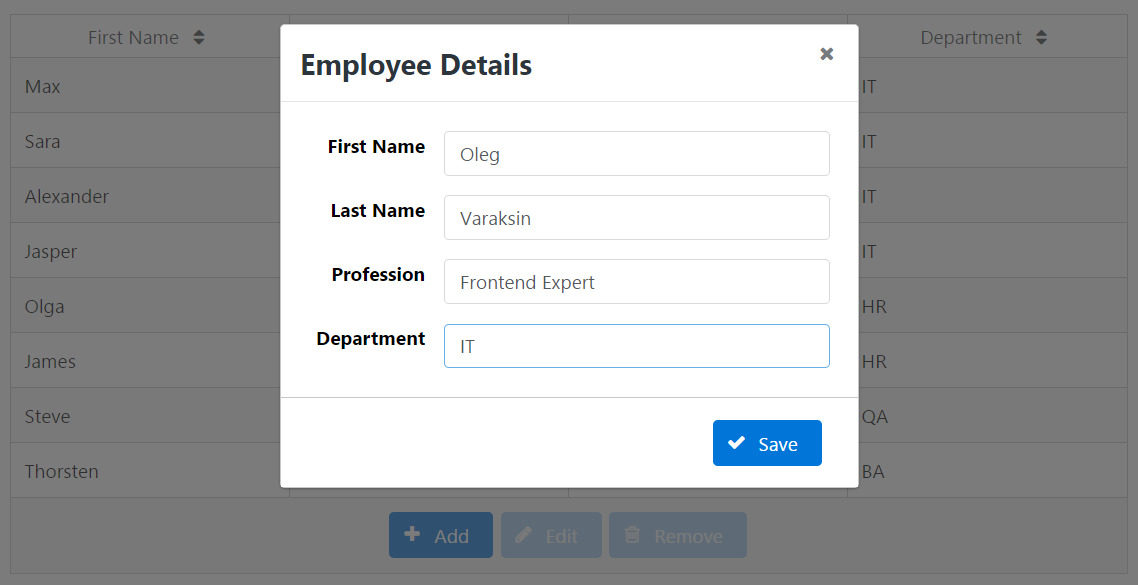
As you can see, only the Add button is enabled when no employee is selected. The Add and Edit buttons trigger displaying a dialog box for employee's personal data. The Save button creates a new or updates an existing employee depending on what you have chosen before--the Add or the Edit button.
Operations triggered by buttons fade in appropriate messages:

The table is implemented with p-dataTable as shown here:
<p-dataTable [value]="employees" selectionMode="single"
             [(selection)]="selectedEmployee"
             [paginator]="true" rows="15"
             [responsive]="true"
             [alwaysShowPaginator]="false">
  <p-column field="firstName" header="First Name" [sortable]="true">
  </p-column>
  <p-column field="lastName" header="Last Name" [sortable]="true">
  </p-column>
  <p-column field="profession" header="Profession" [sortable]="true">
  </p-column>
  <p-column field="department" header="Department" [sortable]="true">
  </p-column>
  <p-footer>
    <button pButton type="button" label="Add" icon="fa-plus"
      (click)="add()"> </button>
    <button pButton type="button" label="Edit" icon="fa-pencil"
      (click)="edit()" [disabled]="!selectedEmployee"></button>
    <button pButton type="button" label="Remove" icon="fa-trash-o"
    (click)="remove()" [disabled]="!selectedEmployee"></button>
  </p-footer>
</p-dataTable>
The value of p-dataTable is bound to the array property employees. An employee can be selected by the click of a row and gets saved in the selectedEmployee property. The buttons Edit and Remove are disabled when selectedEmployee is not set. We will skip the code of the dialog for the sake of brevity. The most interesting part is the component class. The employees are fetched by means of EmployeeService in the ngOnInit() lifecycle callback:
export class DataTableCrudComponent implements OnInit,
  OnDestroy {
  employees: Employee[];
  selectedEmployee: Employee;
  employeeForDialog: Employee;
  displayDialog: boolean;
  msgs: Message[] = [];

  get$: Subscription;
  add$: Subscription;
  edit$: Subscription;
  delete$: Subscription;

  constructor(private employeeService: EmployeeService) { }

  ngOnInit(): void {
    this.get$ = this.employeeService.getEmployees().subscribe(
      employees => this.employees = employees,
      error => this.showError(error)
    );
  }

  ngOnDestroy() {
    this.get$.unsubscribe();
    this.add$.unsubscribe();
    this.edit$.unsubscribe();
    this.delete$.unsubscribe();
  }

  ...

  private showError(errMsg: string) {
    this.msgs = [];
    this.msgs.push({severity: 'error',
                    summary: 'Sorry, an error occurred',
                    detail: errMsg});
  }

  private showSuccess(successMsg: string) {
    this.msgs = [];
    this.msgs.push({severity: 'success', detail: successMsg});
  }
}
Let's explore other CRUD methods in details. The add() method constructs an empty employee instance and the edit() method clones the selected employee. Both are used in the dialog. The property displayDialog is set to true to force displaying the dialog.
add() {
  // create an empty employee
  this.employeeForDialog = {
    id: null, firstName: null, lastName: null, profession: null,
    department: null
  };
  this.displayDialog = true;
}

edit() {
  // create a clone of the selected employee
  this.employeeForDialog = Object.assign({}, this.selectedEmployee);
  this.displayDialog = true;
}
The Save button in the dialog invokes the save() method where we check if the employee exists with the help of id. Only employees that have been saved before contain id because id is assigned in the backend. An existing employee should be updated and the new one should be created:
save() {
  if (this.employeeForDialog.id) {
    // update
    this.edit$ =
      this.employeeService.updateEmployee(this.employeeForDialog)
      .finally(() => {
        this.employeeForDialog = null;
        this.displayDialog = false;
      })
      .subscribe(() => {
          this.employees.some((element: Employee, index: number) => {
            if (element.id === this.employeeForDialog.id) {
              this.employees[index] = Object.assign({},
              this.employeeForDialog);
              this.employees = [...this.employees];
              this.selectedEmployee = this.employees[index];
              return true;
            }
          });
          this.showSuccess('Employee was successfully updated');
        },
        error => this.showError(error)
      );
  } else {
    // create
    this.add$ =
      this.employeeService.createEmployee(this.employeeForDialog)
      .finally(() => {
        this.employeeForDialog = null;
        this.selectedEmployee = null;
        this.displayDialog = false;
      })
      .subscribe((employee: Employee) => {
          this.employees = [...this.employees, employee];
          this.showSuccess('Employee was successfully created');
        },
        error => this.showError(error)
      );
  }
}
The employee will be updated or created in the backend and the employees array:
Note that Observable provides a finally method where we can reset values of properties.
The remove() method gets invoked by the Remove button:
remove() {
  this.delete$ =
  this.employeeService.deleteEmployee(this.selectedEmployee.id)
    .finally(() => {
      this.employeeForDialog = null;
      this.selectedEmployee = null;
    })
    .subscribe(() => {
        this.employees = this.employees.filter(
          (element: Employee) => element.id !==
          this.selectedEmployee.id);
        this.showSuccess('Employee was successfully removed');
      },
      error => this.showError(error)
    );
}
The sequence logic is similar to the other CRUD operations.