
Security is a major concern for organizations when migrating to the cloud, and so organizations are hesitant to move to this form of storage. Microsoft provides strong security protection at the physical, logical, and data layers of Azure services. Microsoft data centers are among the most secure data centers in the world.
Azure SQL Database provides multiple layers of security to control access to the databases using SQL Server or Active Directory ( AD) authentication as well as firewall rules, which limits access to the data through role-based permissions and Row-Level Security.
Azure SQL Database provides proactive security using Dynamic Data Masking, automating auditing, and Threat Detection.
It also provides Transparent Data Encryption to encrypt the data at rest and Always Encrypted to encrypt the data at rest or in motion.
This chapter teaches the students about all of these security mechanisms and how to implement and use them to secure their Azure SQL Database.
By the end of this chapter, you will be able to:
- Configure firewall settings for Azure SQL Server and SQL Database
- Implement audit and threat detection
- Implement encryption, dynamic data masking, and row-level security
- Implement AD authentication for an Azure SQL Database
Azure SQL Database limits access to the database through firewall rules, which are authentication techniques which require users to log in to the database with a valid username and password. Azure SQL Database further controls access to the underlying data through role-based permissions and Row-Level security. We'll now look into different access control methods in detail.
Azure SQL Database uses firewall rules to limit access to authorized IPs and block access to unauthorized IPs. It's the first level of access control provided by Azure SQL Database. The firewall rules can be created at the server-level and at the database-level.
When a SQL database is provisioned, it's inaccessible to everyone. To make it accessible, you would first need to add a server-level firewall rule. A firewall allows an IP or range of IP addresses to connect to an Azure SQL Database. You can then create database firewall rules to enable certain clients to access individual secure databases.
Connection requests to an Azure SQL Database are first validated against the firewall rules, and the computers with IPs as specified in the firewall rules are allowed to connect to the database:

Figure 5.1: Firewall Rules
If a computer attempts to connect to an Azure SQL Database over the internet, then:
- The computer's IP address is validated against the database-level firewall rules. If the IP address is in the IP range, as specified in the database firewall rules, the connection is made.
- If the computer's IP address doesn't fall in the database-level firewall rules, then server-level firewall rules are checked. If the computer's IP is in the server-level firewall rule, the connection is made.
- If the computer's IP address doesn't fall in the database or server-level firewall rules, the connection is terminated with an error.
To allow applications from Azure to connect to an Azure SQL Database, you need to add the IP
0.0.0.0 as the start and end IP address to the server-level firewall rule:
|
Server-Level Firewall Rule |
Database-Level Firewall Rule |
|---|---|
|
Allows clients to access all SQL databases in a given logical Azure SQL Server |
Allows clients to access particular SQL databases within the logical Azure SQL Server |
|
Rules are stored in the master database |
Rules are stored within individual Azure SQL Databases |
|
Can be configured using the Azure portal, PowerShell, and T-SQL |
Can only be configured using T-SQL after configuring the first server-level firewall rule |
In this section, we will learn how to create, delete, or update a server-level firewall rule from the Azure portal:
- Log in to the Azure portal (https://portal.azure.com) using your Azure credentials.
- Find and open the Azure SQL Server you wish to manage the firewall for.
- From the Azure SQL Server overview page, under the Settings section, select Firewall / Virtual Networks:

- On the Firewall/Virtual Networks pane, observe that no firewall rules have been configured:

- To add the client IP address, select the Add client IP button from the top menu:
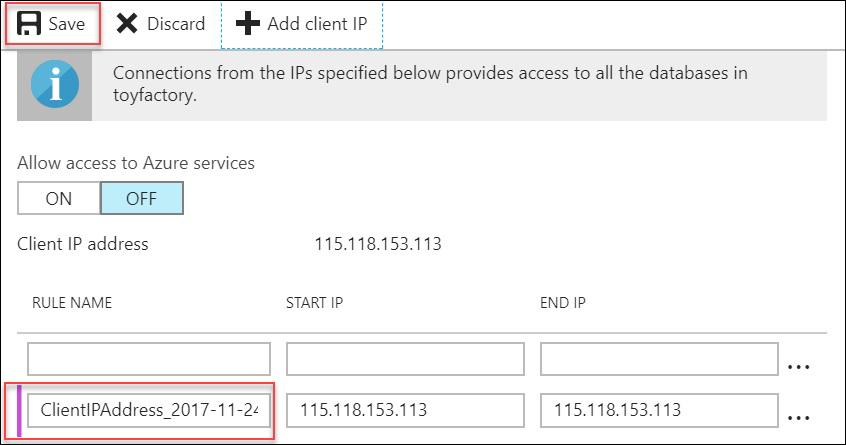
- You can update a firewall by clicking anywhere on the firewall rule row you wish to update.
- To delete a firewall rule, click on the three dots besides the firewall rule row and select Delete. Click Save to save the changes:

- If you don't wish to delete the firewall rule and have accidentally clicked Delete, instead of clicking Save on the top menu, click Discard to undo the changes.
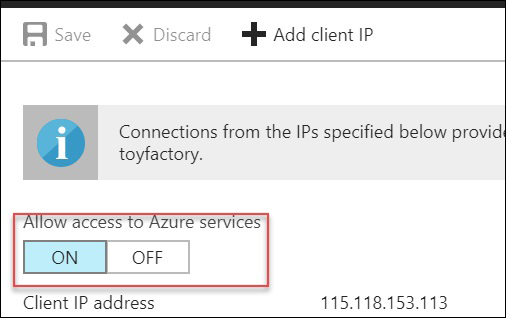
- To open an Azure SQL Database to Azure Applications, switch Allow access to Azure services to ON and click Save to save the configurations:
We can also make use of Transact-SQL instead of the Azure portal to manage server-level firewall rules. In this section, we will learn how to create, delete, or update a server-level firewall rule from Transact-SQL.
- Open SQL Server Management Studio (SSMS) and connect to your Azure SQL Server. You should be able to connect now, since you added a server-level firewall rule.
- In the
Masterdatabase context, run the following query to list out all existing server-level firewall rules:Select * from sys.firewall_rules
The IP address will be different in your case. You should get an output like the one shown in the following screenshot:

- Execute the following command to add a new server-level firewall rule:
Execute sp_set_firewall_rule @name = N'Work', @start_ip_address = '115.118.1.0', @end_ip_address = '115.118.16.255'- A new firewall rule,
Work, is when the Start IP 115.118.0.0 and the End IP 115.118.16.255 is added to the firewall.
- A new firewall rule,
- Execute the following command to verify whether or not the rule has been added:
Select * from sys.firewall_rules
You should get an output like the one shown the following screenshot:

- The firewall rule names are unique. If you wish to update a firewall rule, call the
sp_set_firewall_ruleprocedure with the rule name you wish to update, as well as the updated IP addresses.- The following query updates the firewall rule Work with new IP addresses:
Execute sp_set_firewall_rule @name = N'Work',
    @start_ip_address = '115.118.10.0',
    @end_ip_address = '115.118.16.255'
- The following query updates the firewall rule Work with new IP addresses:
- Execute the following command to verify whether or not the rule has been added:
Select * from sys.firewall_rules
You should get an output like the one shown in the following screenshot:

- Observe that the IP address for the firewall rule Work is updated.
- To delete a firewall rule, run the following query:
Execute sp_delete_firewall_rule @name= N'Work'
- Execute the following command to verify whether or not the rule has been added:
Select * from sys.firewall_rules

Similar to server-level firewall rules, database-level firewall rules can also be managed from Transact-SQL. In this section, we will learn how to create, delete, or update a database-level firewall rule from Transact-SQL.
- Execute the following query to list out the current database-level firewall rule:
SELECT * FROM sys.database_firewall_rules

- Observe that no database-level firewall rule exists.
- Execute the following query to create a new database-level firewall rule:
Exec sp_set_database_firewall_rule @name=N'MasterDB', @start_ip_address='115.118.10.0', @end_ip_address='115.118.16.255' - Execute the following command to verify whether or not the rule has been added:
Select * from sys.database_firewall_rules
- You should get an output like the one shown in the following screenshot:

- A new database-level firewall rule,
MasterDB, is added to the firewall.
- You should get an output like the one shown in the following screenshot:
- To update a firewall rule, call the
sp_set_database_firewall_ruleprocedure with the firewall rule you wish to update and the new start and end IP addresses. Execute the following query to update the MasterDB firewall rule created in the previous step:Exec sp_set_database_firewall_rule @name=N'MasterDB', @start_ip_address='115.118.1.0', @end_ip_address='115.118.16.255' - Execute the following command to verify whether or not the rule has been updated:
Select * from sys.database_firewall_rules
You should get an output like the one shown in the following screenshot:

- Observe that the firewall rule has been updated.
- To delete an existing database-level firewall rule, execute the following query:
Exec sp_delete_database_firewall_rule @name=N'MasterDB'
- Execute the following command to verify whether or not the rule has been deleted:
Select * from sys.database_firewall_rules
- You should get an output like the one shown in the following screenshot:

- The database-level firewall rule has been successfully deleted.
Note
The login details and server-level firewall rules are cached in each SQL database. The cache is periodically refreshed; however, you can run
DBCC FLUSHAUTHCACHEto manually flush the authentication cache:- This statement does not apply to the logical master database, because the master database contains the physical storage for the information about logins and firewall rules.
- The user executing the statement and other currently connected users remain connected.
- Execute the following command to verify whether or not the rule has been deleted:
Authentication refers to how a user identifies themselves when connecting to the database. There are two types of authentication mechanisms: SQL Server Authentication and Azure Active Directory Authentication.
This is similar to
what we have in on-premises SQL Servers, which is that it requires a username and password. When provisioning an Azure SQL Database, you have to provide a Server Admin login with a username and password. This user has admin access on the Azure SQL Server and
dbowner access on all databases in a particular Azure SQL Server.
There can be only one Server Admin account in an Azure SQL Database.
Azure Active Directory ( AD) Authentication allows users to connect to an Azure SQL Database by using the identities stored in the Azure Active Directory.
When you create an Azure account, it creates a default directory for your account. This is where you can add users and give them permissions to access different Azure services as appropriate.
You can add custom domains to the default directory or you can create directories from here.
You can also integrate your on-premises Windows AD to Azure AD using Azure AD Connect.
There are three different ways to authenticate, Active Directory – Universal with MFA Support, Active Directory – Password, and Active Directory – Integrated, as shown in the following screenshot:

This is the easiest way to get started with Azure AD authentication. It works with Azure AD managed domains and federated domains.
The user authenticating to an Azure SQL Database has to provide the Azure AD identity and the password for a successful authentication:

This is similar to the conventional Windows Authentication in on-premises SQL Servers. To authenticate using this method, a user has to provide the domain account which has access to an Azure SQL Database. The user doesn't have to provide the password. It's validated against the Azure AD.
To get this method working, the on-premises Active Directory should be integrated to the Azure AD. This can be done using the free tool Azure AD Connect.
When using SSMS to authenticate using the Azure Directory – Integrated method, it automatically takes the username as the logged—in username, similar to on-premises Windows authentication:

MFA stands for Multi-factor authentication. MFA allows you to provide a code received by a call, SMS, or by any other means. This further secures the authentication process, as the code received is only accessible by the person who has initiated the authentication process:

MFA requires you to provide a username which is pre-populated after you configure MFA.
In this section, we will discuss how to authenticate to an Azure SQL Database using Active Directory–Password. Let’s consider the toy manufacturing company introduced previously. Mike needs to ensure that, if any of his networking workplaces expect access to the database, he gives them access by utilizing Active Directory–Password to authenticate to an Azure SQL Database. He can achieve this by following the below steps:
- Log in to the Azure portal (https://portal.azure.com). From the left-hand navigation pane, find and open Azure Active Directory.
- From the Overview pane, find and click Add a user (under the Quick tasks section):

- In the User pane:
- Provide the name.
- Provide a username (the email is the username in this case). The email should belong to an existing verified domain in the Azure Active directory.
Note
You can use the default domain when providing a user email. For example, if your Microsoft Account email ID is
[email protected], then the default directory would beahmadosama1984.onmicrosoft.com. Therefore, you can provide a username as[email protected].
- You can find your default domain on the upper-right corner of the Azure portal:
- Check the Show Password checkbox and copy the password. You are not allowed to change the password.
- Leave all the other options as default and click Create to create the user:

- Once you have a user created, the next step is to make the user an Azure SQL Server Active Directory Admin:
- In the Azure portal, find and click the
toyfactoryAzure SQL Server. In thetoyfactory, find and select the Active Directory Admin option under the SETTINGS section:

- In the Azure portal, find and click the
- In the Active Directory Admin pane, select Set admin from the top menu:

- In the Add admin pane, type the username under the Select label and select the user you created in step 3 as the Active Directory admin:

- You'll be taken back to the Add admin pane. Select Save to set the selected user as the Active Directory Admin:

- You now have an active directory admin defined for the toyfactory SQL Server. The AD Admin has dbowner access to all the database in the toyfactory server:
- Let's connect to the toyfactory server with the AD Admin account using SSMS.
- Open SSMS, and in the Connect to Server dialog box:
- Under Server Type, select Database Engine
- Under Server name, enter the toyfactory server name
- Under Authentication, select Active Directory – Password
- Under Username, enter the username (email) of the user created in step 3
- Under the password, type to enter the user's password
- Click Connect
- Observe that the object explorer displays the username as
[email protected]:

Note
If you wish to explore Active Directory – Integrated and Active Directory – Universal with MFA, start here: https://docs.microsoft.com/en-us/azure/active-directory/connect/active-directory-aadconnect.

Azure SQL Database will always have two different administrators if Azure AD authentication is used: the original SQL Server administrator (SQL Authentication) and the Azure AD Admin. The Azure AD administrator login can be a user or a group. All users in the Azure AD Admin group will have administrative access to an Azure SQL Server:
You must consider the following factors for Azure SQL Database authentication:
- Create a dedicated Azure AD Group as the Azure SQL Server administrator instead of creating an individual user administrator.
- You can configure either an Azure AD Group or a user as an Azure SQL Server Admin.
bcp.execan't connect to an Azure SQL Database using Azure Active Directory Authentication as it uses an old ODBC driver.- SQLCMD version 13.1 and above supports Azure Active Directory authentication
- To use Azure AD authentication with SSMS, you need to have .Net Framework 4.6 or above installed on your system
Authorization refers to the object-level permission a user has within the SQL database. For example, a user may have access to read a set of tables and read-write on another set of tables.
The Admin accounts, SQL Authentication, and Azure AD Account have
db_owner access to all the databases and are
allowed to do anything within the database.
Members of Database Creators (dbmanager) are allowed to create a new SQL database. To create a new user with the Database Creators role:
- Log in to SSMS with either Azure AD Admin or SQL Server Admin.
- Create a new login in the master database using the following query:
CREATE LOGIN John WITH PASSWORD = 'Very$Stro9gPa$$w0rd';
- Create a new user in the master database mapped to log in John using the following query:
CREATE USER John FROM LOGIN John
- Add the user John to the
dbmanagerrole using the following query:ALTER ROLE dbmanager ADD MEMBER John;
- Open a new query window in SSMS and log in as John.
- Execute the following query to create a new SQL database:
CREATE DATABASE JohnsDB
- John will have
db_owneraccess to all the databases he creates.
- John will have
Login Manager
Members of this role can
create new logins in the
master database. To create a new user with the
loginmanager role, follow the preceding steps to create a user and add them to the
loginmanager role.
Non-administrative users don't have access to the master database and have limited access to required databases and objects.
An example of a non-administrative user is the application user. An application user is the one which is used by an application to connect to the database and perform DML operations.
A non-administrative user can either be an Azure Active Directory user or a SQL Server authentication user.
In this section, we will learn how to create contained database users for Azure AD Authentication for firms such as ToyStore Ltd., where there are many roles that requires access to the database.
- Open SSMS. From the top menu, select File, then select New, and then select Database Engine Query to open a new query window:

- Connect to the Azure SQL Server with Active Directory – Password authentication.
- Execute the following query to create a contained database user (SQL Authentication) and add it to the
db_ownerrole:--Create a contained database user (SQL Authentication) CREATE USER Mike WITH PASSWORD='John@pwd' GO -- Make Mike toystore database owner ALTER ROLE db_owner ADD MEMBER Mike
- Execute the following query to create a contained database user (Azure AD authentication) and add it to the
db_datareaderrole:--Create a contained database user (Azure AD Authentication) CREATE USER [[email protected]] FROM EXTERNAL PROVIDER -- Give read access to John on all tables ALTER ROLE db_datareader ADD Member [[email protected]]
- Press F8 to open the Object Explorer. In the Object Explorer, connect to your Azure SQL Server if you're not already connected:
- Expand the Databases node. In the Databases node, expand the
toystoredatabase node. In thetoystoredatabase, expand the Security node and then expand the Users node. - You should see the Mike and John users listed in the Users section:

- Observe that Mike and John are not mapped to a server login. This is because they are contained database users.
- Expand the Databases node. In the Databases node, expand the
- Press Ctrl + N to open a new query window. Click the Change Connection icon on the top menu besides the database drop-down list:

- In the Connect to Database Engine dialog box:
- Under the Server name, provide the Azure SQL Server name.
- Under the Authentication, select Active Directory – Password.
- Enter the username as
[email protected]. - Enter the password for the aforementioned user.
- Click Connect:

- You will get an error as follows:

- This is because the SSMS tries to connect to the default database which, in this case, is the
masterdatabase. The database master doesn't contains the user[email protected]and therefore the connection fails.
- Click OK on the error dialog box. On the Connect to Database Engine dialog box, select Options from the lower-left corner of the dialog box window.
- Under the Options, select the Connection Properties tab, and under the Connect to database setting, set the database to toystore.
- Click Connect to continue:

- You should now be able to connect to the
toystoredatabase.
You can ask the students to add users to different roles and test out the security. For example, they can add a user in the
db_dbwriter role and then log in using the user and verify that it's only able to write to tables and that it can't do any other database operations such as creating tables, databases, and so on.
Additionally, you can group users with similar sets of permissions in an Azure AD Group or a SQL Database role. You can then assign the permission to the group and add users to the group. If a new user with the same permission arrives, add the user to the group or role.
Authorization controls whether or not a user can read or write one or more tables. Row-level security (RLS) further controls what data in a table the user has access to:

Figure 5.2: Row-Level Security
Let's say we have a customer table in a database and we want users to access only those rows in a table which belong to them, for example, Customer 1 should only have access to rows with customer ID 1, and customer 2 can only access rows with customer ID 2, and so on and so forth.
Row-level security allows you to enable this at the database-level and not the application level. Prior to Row-Level security, such security was only possible by implementing access logic at the application level.
RLS is implemented by writing the row access logic or the security predicates in an inline table-valued function and then creating a security policy on top of the security predicate.
The security predicate defines the criteria to determine whether or not a user has read or write access to a given set of rows in a particular table.
RLS support two types of security predicates:
Dynamic Data Masking or DDM works on top of Row-Level Security and further restricts the exposure of sensitive data by masking it to non-privileged users:

Figure 5.3: Dynamic Data Masking
For example, say users John and Chris can read and write data that belongs to customer 1. The Row-Level Security ensures that they can only read and write data for customer 1 in the customer table. However, Dynamic Data Masking will ensure that John can see Social Security Numbers of the customer and Chris can't, as he's not authorized to see SSN. Chris will see masked data in the SSN column, though he can see data in the rest of the columns.
DDM is implemented by defining masks and applying them to columns as and when required. There isn't any change required at the application level or the query level, as the masks are applied at the column level.
DDM can be used for full, partial, or random masking. For example, call support people need the last four characters of a user's password to identify them. This can be done by masking all characters except the last four characters.
DDM has the following four types of masks to obfuscate the data:
- Default
Implements full masking depending on the data type of the column being masked.
- Email
Partial masking which masks all characters except the first letter and the suffix ".com" of an email address. For example,
[email protected]will be masked as[email protected]. - Random
Masks a column with a numeric data type with a random value within a specified range.
- Custom String
Partial masking, which masks all characters with a custom string, excluding the first and last letters.
DDM has the following limitations:
- Encrypted columns, filestreams, column sets, or a sparse column which is part of a column set can't be masked.
- Computed columns can't be masked, however, if a computed column depends on a masked column, the computed column will return masked values.
- A masked column can't be used as a FULLTEXT index key.
- Mask can't be applied to a column with dependencies. For example, if an index depends on a column, it can only be masked by dropping the index, applying the mask, and then creating the index.