
Azure SQL Database has the following restore options:
- Point-in-Time restore
- Restore a deleted database
- Geo-Restore a database
- Restore a database from Azure Vault
- Import a BACPAC

Figure 4.1: Types of Restore
The restore can be performed using the Azure portal, PowerShell, Azure CLI, or Azure SDK.
This chapter teaches you the differences between the multiple restore types and how to perform a restore.
By the end of this chapter, you will be able to:
- Use Point-in-Time restore to recover from unexpected data modifications
- Restore a deleted database using the Azure portal
- Learn about using Geo-Restore on a database
- Restore an Azure SQL Database by importing BACPAC
This section discusses the different types of restore available in Azure SQL Database.
Point-In-Time Restore (PITR) isn't new in the world of SQL Server. On-premises SQL servers
allow
you to restore a database to a particular point in time by specifying the point in time option when restoring the database using the
restore command.
As you know, the
restore command isn't supported in Azure SQL Database, but the PITR can be performed using the Azure portal, PowerShell, Azure CLI, or Azure SDK. The PITR uses the automatic
Full and Log backup.
The SQL Database can be restored at any time within the retention period, which is a maximum of up to 35 days.
The database can only be restored on the same Azure SQL Server as the original database with a different name. If you are restoring a database using PITR to recover from a corruption issue and wish to use the restored database as the production database, you will have to rename the database accordingly.
PITR is useful for recovering from unexpected data modifications, corrupted databases, or for getting a database state from a previous state for application testing or debugging an issue.
Let's perform a PITR on an Azure SQL Database using the Azure portal:
- Open SQL Server Management Studio (SSMS) and connect to the Azure SQL Server hosting the Azure SQL Database you wish to perform a PITR on.
- Open the
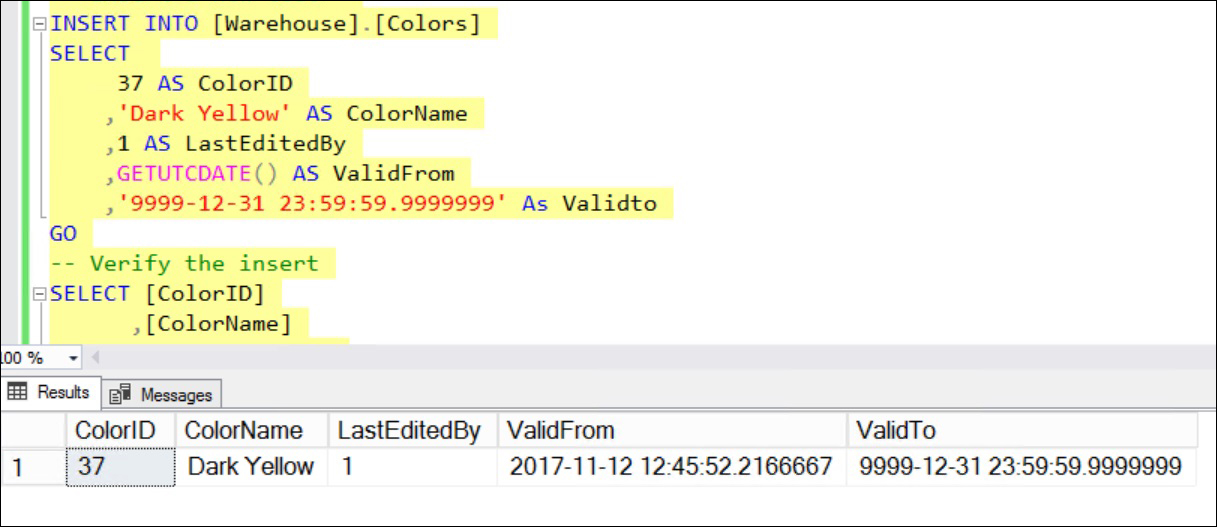
C:CodeLesson04InsertNewColor.sqlfile in SSMS. Make sure that the database's context is set to thetoystoredatabase. - Press F5 or click Execute in the top menu to run the query. The query adds a new row in the
Warehouse.Colortable withColorID=37:-- Insert a new color INSERT INTO [Warehouse].[Colors] SELECT 37 AS ColorID ,'Dark Yellow' AS ColorName ,1 AS LastEditedBy ,GETUTCDATE() AS ValidFrom ,'9999-12-31 23:59:59.9999999' As Validto GO -- Verify the insert SELECT [ColorID] ,[ColorName] ,[LastEditedBy] ,[ValidFrom] ,[ValidTo] FROM [Warehouse].[Colors] WHERE ColorID=37- You should get an output similar to the following screenshot:
- Log in to the Azure portal with your Azure credentials. From the left-hand navigation pane, select All Resources and click on the Azure SQL Database you wish to perform a PITR on:
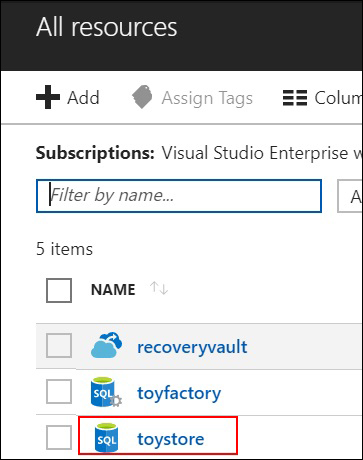
- From the toystore SQL database overview section, click on Restore:

- In the Restore pane:
- Observe that the oldest restore point available is 8 November 2017, 7:21 UTC. This will be different in your case.
- Under the Restore point, specify the date which is when you want to perform the PITR. Observe that the Database Name changes as you change the restore time.
- The database name is
toystore_PITRDate. For example, if we are restoring the database to 11 November, 2017, 12:41 PM, then the database name will betoystore_2017-11-12T12-41Z. - You can change the database if you wish to.
- Observe that the option to select Azure SQL Server is locked. Therefore, the PITR can be only done on the same server as the original database:


- Once the restore is complete, open the All Resource pane and verify that the database is listed there:

- Since the database has been restored and has the same data and schema it had on 11th November 2017, this database shouldn't contain the
ColorID 37, which we added in Step 1:- Switch to SSMS and open
C:CodeLesson04InsertNewColor.sql, if it's not already open. - Change the database context to
toystore_2017-11-11T12-41Z. This will be different in your case.
- Switch to SSMS and open
- Select and execute the following query in SSMS:
-- Verify the insert
SELECT [ColorID]
      ,[ColorName]
      ,[LastEditedBy]
      ,[ValidFrom]
      ,[ValidTo]
  FROM [Warehouse].[Colors]
  WHERE ColorID=37
Observe that none of the rows contain
ColorID 37in theWarehouse.Colorstable.
The long-term database restore allows you to restore a database configured for long-term database backups. The backups are kept in the Azure Recovery Vault.
The long-term database restore uses the same technique as PITR to restore the database; however, here, you can restore a database from the last 10 years.
Let's perform a long-term restore on an Azure SQL Database using the Azure portal:
- Log in to the Azure portal with your Azure Credentials. From the left-hand navigation pane, select All Resources and click on the Azure SQL Database you wish to perform a PITR on:

- From the Toystore SQL database overview section, click on Restore:

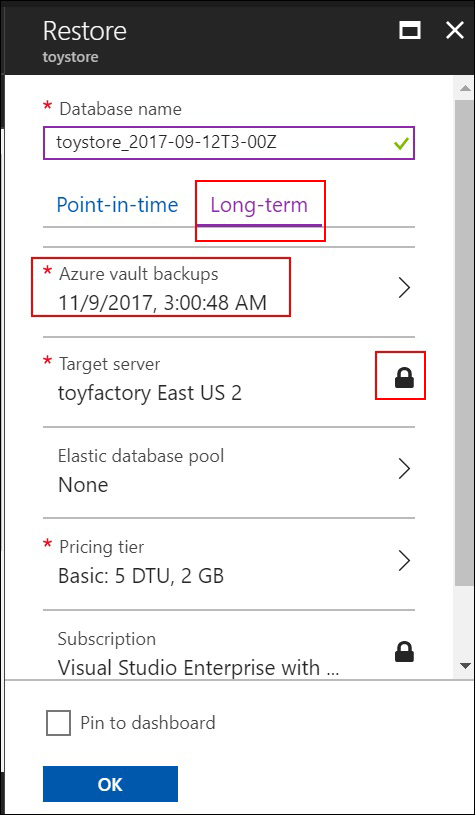
- In the restore pane, select the Long-term tab. In the Long-term tab:
- Click Select a backup, under the Azure vault backup setting.
- The Azure vault backup setting will list all the backups from the vault. Choose a backup date from the Azure Vault backups pane and click Select.
- Observe that the Target Server option is locked and can't be set to any server other than the original database server.
- Change the database name to toystore_2017-09-12T3-00Z.
Click OK to start the restoration process:
The restore time depends on the size of the database being restored.
Wait for the restore to be completed. You can look at the Notification section on the Azure portal to see the progress of the restore:

Observe that the notification says that long-term retention is in progress.
- Once the restore is complete, open the All Resources pane and verify that the database is listed there:

To verify the restore, follow steps 9-10 under the
Point-In-Time Restore section. The database shouldn't have the row for
ColorID 37 in the
Warehouse.Colors table.
Microsoft Azure allows you to restore a deleted database to the time it was deleted or to any time within the retention period. You can select the deleted database you wish to restore from the pool of deleted databases. You are able to restore a deleted database because the automatic backups are saved for a given retention period. The retention period depends on the service tier.
Let's restore the deleted database using the Azure portal:
- Log in to the Azure portal using your Azure credentials. Open All Resources from the left-hand navigation pane.
- From the All Resources pane, open the Azure SQL Server that hosts the deleted database you wish to restore.
- In the Azure SQL Server pane, from the Settings section, select Deleted databases:

- The Deleted databases pane lists out the databases and their deletion times. Select the
toystoredatabase for any deletion date you want to restore it to:
- In the Restore pane:
Click OK to restore the database:

Monitor the database's restoration progress in the Notification section, as mentioned in the previous section.
- Once the database is restored, navigate to the All Resources section from the left-hand navigation pane. Observe that the database is now listed here:

You can use steps 9–10 under the Point-In-Time Restore section to verify the restored database.
Geo-Restore allows you to restore a database from a geo-redundant backup to any of the available Azure SQL servers, irrespective of the region.
The Azure SQL Database's automatic backups are copied to a different region as and when they are taken. There is a maximum delay of one hour when copying the database to a different geographical location. Therefore, in the case of a disaster, there can be up to an hour of data loss:

Figure 4.2: Geo-Replication to a different geographical location
Geo-Restore can be used to recover the database in case an entire region is unavailable because of a disaster:

Figure 4.2: Use of Geo-Restore in case of unavailability of an entire region
The most recent full and differential backups are used to perform the Geo-Restore.
The Geo-Restore doesn't support Point-In-Time restore. The Geo-Restore is the most basic disaster recovery solution with the longest recovery time, which can be up to 12 hours. This may be a reasonable recovery solution for databases using the Basic service tier; however, for Standard and Premium Service tiers, active geo-replication is recommended.
You can import
a database into an Azure SQL Server from a bacpac or a
dacpac file kept in Azure Storage. The import operation will create a new Azure SQL Database from the bacpac file.
The bacpac file can be imported to any of the available Azure SQL Servers in any given region. This can be useful for quickly creating new test environments.
The import can be done through the Azure portal, PowerShell, Azure CLI, or Azure SDK.
Let's understand how to import a database from a BACPAC file kept in Azure storage.
- Open the Azure portal, go to https://portal.azure.com and log in with your Azure credentials:
- From the left-hand navigation pane, open the All Resources section. Select the Azure SQL Server you wish to import the database to.
- In the Azure SQL Server overview pane, select Import database:

- In the Import database pane:
- Under Subscription, select your Azure subscription.
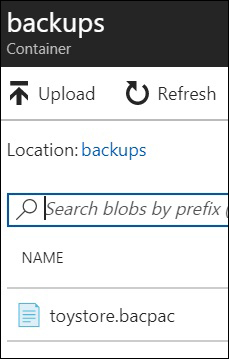
- Select Storage. In the Storage accounts pane, select the Storage account, select the container, and then select the
bacpacfile you wish to import:
- Under the Pricing tier option, choose your pricing tier.
- Under the Database Name option, provide the database name.
- Leave the collation as default.
- Provide the username and password for the Azure SQL Server.
- Select OK to import the database:

Consider the following scenario: Mike is a new DBA, so his trainer is aware that there can be some misses from his end. Therefore, his trainer wants to configure PITR on the databases that Mike is working on. In this section, we will perform a Point-In-Time Restore using PowerShell by following the below steps:
- Press Window + R to open the
Rundialog box. In the run dialog box, typepowershell iseto open a new PowerShell editor window. - In PowerShell ISE, click File from the top menu and then select New to create a new PowerShell script file:

- In the new PowerShell script file, copy the code, as instructed in the following steps.
- Define the PowerShell script parameters. The parameters are self-explanatory:
param( [Parameter(Mandatory=$true)] [string]$sqlserver, [Parameter(Mandatory=$true)] [string]$database, [Parameter(Mandatory=$true)] [string]$sqluser, [Parameter(Mandatory=$true)] [string]$sqlpassword, [Parameter(Mandatory=$true)] [string]$resourcegroupname, [string]$newdatabasename ) - Copy the following code to let the users log in to their Azure subscription by providing Azure credentials in a login window:
#Login to Azure account
Login-AzureRmAccount
- Copy the following code to output the earliest restore point available and let the users provide a point in time to restore the database to:
While (1)
        {
            #Retrieve the distinct restore points from which a SQL Database can be restored
            $restoredetails = Get-AzureRmSqlDatabaseRestorePoints -ServerName $sqlserver -DatabaseName $database -ResourceGroupName $resourcegroupname
            #get the earliest restore date
            $erd=$restoredetails.EarliestRestoreDate.ToString();
            #ask for the point in time the database is to be restored
            $restoretime = Read-Host "The earliest restore time is $erd.'n Enter a restore time between Earliest restore time and current time."
            #convert the input to datatime data type
            $restoretime = $restoretime -as [DateTime]
            #if restore time isn't a valid data, prompt for a valid date
            if(!$restoretime)
            {
…
                break;
            }
        }
Read through the comments to understand what the code does.
- Copy the following code to set the new database name if it hasn't already been provided by the user, and perform the Point-in-Time restore:
#set the new database name
        if([string]::IsNullOrEmpty($newdatabasename))
        {
            $newdatabasename = $database + (Get-Date).ToString("MMddyyyymm")
        }
…
 #restore the database to point in time
        $restore = Restore-AzureRmSqlDatabase -FromPointInTimeBackup -PointInTime $restoretime -ResourceId $db.ResourceId -ServerName $db.ServerName -TargetDatabaseName $newdatabasename -Edition $db.Edition -ServiceObjectiveName $db.CurrentServiceObjectiveName -ResourceGroupName $db.ResourceGroupName
# restore deleted database
        if($rerror -ne $null)
        {
            Write-Host $rerror -ForegroundColor red;
        }
        if($restore -ne $null)
        {
            Write-Host "Database $newdatabasename restored Successfully";
        }
Read through the comments to understand what the code does.
- Save the file as
PITRAzureSQLDB.ps1toC:CodeLesson04, or a location of your choice. - Open a PowerShell console and change the default directory to
C:codeLesson04or to the directory where you have saved the PowerShell script. - Copy the following code and press Enter to start the export. You may have to change the parameter values as per your Azure environment:
.PITRAzureSQLDB.ps1 -sqlserver toyfactory -database toystore -sqluser sqladmin -sqlpassword Packt@pub2 -resourcegroupname toystore -newdatabasename toystorepitr
- The preceding command will restore the
toystoredatabase to a specified point in time on thetoyfactory sqlserver in thetoystoreresource group. The database will be restored astoystorepitr. - Once the script finishes, you should get a similar output to the following screenshot:

- The preceding command will restore the
Let us once again consider our example of ToyStore Ltd. Mike is aware that, although on cloud, his data is still physically stored in servers. Hence, there is a possibility of data loss due to natural disasters. Therefore, he has to perform a Geo-Restore operation to take care of this bit. This section makes use of PowerShell to perform a Geo-Restore:
- Press Window + R to open the run dialog box. In the run dialog box, type
powershell iseto open a new PowerShell editor window. - In PowerShell ISE, click File from the top menu and then select New to create a new PowerShell script file:

- In the new PowerShell script file, copy the code as instructed in the following steps:
- Define the PowerShell script parameters. The parameters are self-explanatory:
param( [Parameter(Mandatory=$true)] [string]$sqlserver, [Parameter(Mandatory=$true)] [string]$database, [Parameter(Mandatory=$true)] [string]$sqluser, [Parameter(Mandatory=$true)] [string]$sqlpassword, [Parameter(Mandatory=$true)] [string]$resourcegroupname, [string]$newdatabasename ) - Copy the following code to open a login dialog box to log in to Microsoft Azure:
#Login to Azure subscription
Login-AzureRmAccount
- Copy the following code to get the database details which are to be Geo-Restored in a PowerShell object and display the details on the console:
# get the geo database backup to restore

$geodb = Get-AzureRmSqlDatabaseGeoBackup -ServerName $sqlserver -DatabaseName $database -ResourceGroupName $resourcegroupname

#Display Geo-Database properties
$geodb | Out-Host
- Copy the following code to retrieve the database name which is to be restored:
#get the database name from the geodb object
$geodtabasename = $geodb.DatabaseName.ToString()
- Copy the following code to set the new database name if it hasn't already been provided by the user:
#set the new database name if([string]::IsNullOrEmpty($newdatabasename)) { $newdatabasename = $database + (Get-Date).ToString("MMddyyyymm") } - Copy the following code to perform the Geo-Restore:
Write-Host "Restoring database $geodtabasename from geo backup" -ForegroundColor Green

# perform the geo restore
$restore = Restore-AzureRmSqlDatabase -FromGeoBackup -ResourceId $geodb.ResourceID -ServerName $sqlserver -TargetDatabaseName $newdatabasename -Edition $geodb.Edition -ResourceGroupName $resourcegroupname -ServiceObjectiveName $serviceobjectivename

if($rerror -ne $null)
{
    Write-Host $rerror -ForegroundColor red;
}

if($restore -ne $null)
{
    $restoredb = $restore.DatabaseName.ToString()
    Write-Host "Database $database restored from Geo Backup as database $restoredb" -ForegroundColor Green
}
The new database has the same edition and performance level as the original database. You can change this by specifying different values in the
Restore-AzureRmSqlDatabase cmdlet. - Define the PowerShell script parameters. The parameters are self-explanatory:
- Save the file as
GeoRestoreAzureSQLDB.ps1toC:CodeLesson04or a location of your choice. - Open a PowerShell console and change the default directory to
C:codeLesson04or to the directory where you have saved the PowerShell script.Copy the following code and press Enter to start the export. You may have to change the parameter values as per your Azure environment:
.GeoRestoreAzureSQLDB.ps1 -sqlserver toyfactory -database toystore -sqluser sqladmin -sqlpassword Packt@pub2 -resourcegroupname toystore -newdatabasename toystorepitr
The preceding command will restore the
toystoredatabase to a specified point in time on the toyfactory sql server in thetoystoreresource group. The database will be restored astoystoregeorestore. - Once the script finishes, you should get an output similar to what is shown in the following screenshot:
