
Azure SQL Database provides Auditing and Threat detection to proactively protect it from malicious attacks.
Auditing tracks and records database events to an audit log in a given Azure Storage account. Auditing can help you to:
- Maintain regulatory compliance
- Understand database activity
- Catch discrepancies or anomalies indicating a security violation
Auditing allows you to:
- Define what database actions are to be audited
- Find unusual activity or trends by using preconfigured reports and dashboards to understand and analyze the audit log
Auditing can be configured at the server-level and database-level. If auditing is configured at the server level, it'll automatically apply to all of the databases in the server. Auditing configured at the database will only apply to a particular database.
It's recommended to audit the server instead of auditing individual databases.
In this section, we’ll configure auditing for the
toyfactory Azure SQL Server to take care of unusual activities and trends, and enable analysis of the audit log.
- Open the Azure portal (https://portal.azure.com). From the left navigation of Azure portal, select All Resources. In the All Resources pane, find and open the
toyfactoryAzure SQL Server. - In the
toyfactoryAzure SQL Server pane, under the Settings section, find and select Auditing & Threat Detection:
- In the Auditing & Threat Detection pane, switch on the Auditing. Observe that the Storage details section gets enabled when auditing is switched on:

- In the Audit logs storage pane, select Storage account. In the Choose storage account pane, select the
toyfactorystorageaccount created in a previous chapter:
- You can also choose to create a new storage account if you don't have an existing one.
- Once you select an Azure Storage account, you'll be taken back to the Audit logs storage pane. Select the Retention days. This specifies how many days an audit log will be retained for in the Azure Storage account. Choose wisely, as higher retention days will incur higher storage costs:

Click OK to continue.
- You'll be taken back to the Audit & Threat detection pane. Observe that the specified storage account now shows up under the Storage details section:

- Click Save to enable Auditing
- To view how the logs are being stored in the specified storage account, open the
toyfactorystorageAzure storage:- All audit logs are saved in the
sqldbauditlogscontainer. Thesqldbauditlogsfolder contains one folder for every Azure SQL Server that is configured for auditing. - The Azure SQL Server folder has a subfolder for each database within the server. The database folder has folders for each day, which have the actual audit log files:
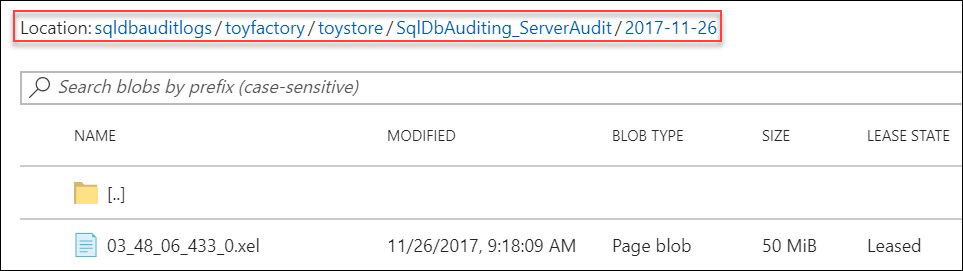
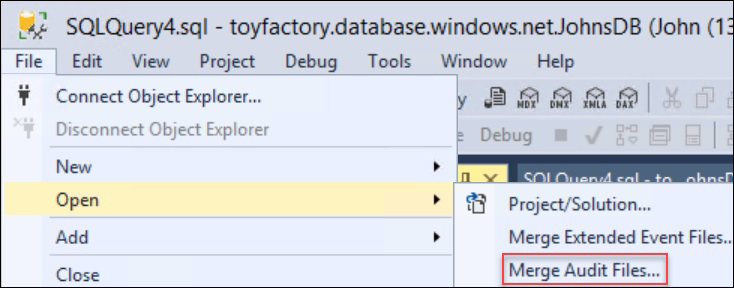
- You can download and analyze the files individually, or you can analyze all of the files at once by merging them using the SSMS Merge Audit Files feature:
- All audit logs are saved in the
- Audit logs can also be viewed from the Azure portal. In the Azure portal, open the database whose logs you want to review. In the database overview pane, select Auditing & Threat Detection under the settings section.
- In the Auditing & Threat Detection pane, select View audit logs from the top menu:

- Observe that an event, DATABASE AUTHENTICATION FAILED, has been captured into the audit logs:

Threat detection provides an extra layer of security on top of Auditing by automatically detecting unusual activities and potentially harmful attempts to access or exploit databases. For example, it can detect and alert you about SQL injection attacks.
Users can set up email alerts so that they are notified by an email whenever any such activity is detected.
Unlike Auditing, Threat Detection is a paid service and is charged at $15/node/month. It's free for the first 60 days.
In this section, we’ll configure Threat Detection for the
toyfactory Azure SQL Server to protect the database from malicious attacks.
- Open the Azure portal (https://portal.azure.com). From the left navigation pane, select All Resources. In the All Resources pane, find and open the
toyfactoryAzure SQL Server. - In the
toyfactoryAzure SQL Server pane, under the Settings section, find and select Auditing & Threat Detection:
- In the Auditing & Threat Detection pane, switch on Thread Detection by clicking the ON toggle button under the Threat Detection section:

- There are three threat detection types which you can configure: SQL injection, SQL injection vulnerability, and Anomalous client login. Select Threat Detection types to get a list of the types:

- Choose ALL (default) and click OK.
- Provide your email address to get alerts in case any threat is detected. You can specify several email addresses, separated by semicolons, or you can specify an Azure AD group email:

- Click Save from the top menu to save the settings and enable threat detection.
In this section, we will understand how to implement row-level security using our example of ToyStore Ltd. Mike has been asked to implement row-level security so that every customer is able to view and edit their records only. The
CustomerAdmin user, however, should be allowed to view and edit all customer records. Follow these steps to complete the activity:
- Execute the following query to create the
dbo.Customerstable and populate it with sample records:CREATE TABLE Customers ( CustomerID int identity, Name sysname, CreditCardNumber varchar(100), Phone varchar(100), Email varchar(100) ) Go INSERT INTO Customers VALUES ('Mike',0987654312345678,9876543210,'[email protected]'), ('Mike',0987654356784567,9876549870,'[email protected]'), ('Mike',0984567431234567,9876567210,'[email protected]'), ('[email protected]',0987654312345678,9876246210,'[email protected]'), ('[email protected]',0987654123784567,9876656870,'[email protected]'), ('[email protected]',09856787431234567,9876467210,'[email protected]'), ('CustomerAdmin',0987654312235578,9873456210,'[email protected]'), ('CustomerAdmin',0984564123784567,9872436870,'[email protected]'), ('CustomerAdmin',0945677874312367,9872427210,'[email protected]') - Execute the following query to create a new user,
CustomerAdmin:CREATE USER CustomerAdmin WITHOUT LOGIN
- Execute the following query to grant read access to Mike, John, and the
CustomerAdminon thedbo.Customerstable:GRANT SELECT ON dbo.Customers TO Mike GO GRANT SELECT ON dbo.Customers TO [[email protected]] GO GRANT SELECT ON dbo.Customers TO CustomerAdmin
- Create a security predicate to filter out the rows based on the logged-in username:
CREATE SCHEMA Security; GO CREATE FUNCTION Security.fn_securitypredicate(@Customer AS sysname) RETURNS TABLE WITH SCHEMABINDING AS RETURN SELECT 1 AS predicateresult WHERE @Customer = USER_NAME() OR USER_NAME() = 'CustomerAdmin';- The preceding query first creates a schema, Security. It then creates an inline table-valued function,
fn_securitypredicate, which will return 1 (True) when the logged-in username is equal to the@Customerparameter, or when the logged-in user isCustomerAdmin.
- The preceding query first creates a schema, Security. It then creates an inline table-valued function,
- Create a security policy for the preceding security predicate:
CREATE SECURITY POLICY CustomerFilter
ADD FILTER PREDICATE Security.fn_securitypredicate(Name)
ON dbo.Customers,
ADD BLOCK PREDICATE Security.fn_securitypredicate(Name)
ON dbo.Customers AFTER INSERT
WITH (STATE = ON);
- The preceding query adds the filter predicate created in step 4 to the security policy and sets the status to ON.
- The policy also implements an AFTER INSERT block predicate. Afterwards, the Insert predicate will stop inserts which don't comply with the security policy and will show an error message for the same.
- The inline table-valued functions will take the Customer Name (Name column) as the parameter and will return true if the passed parameter value is equal to the value returned by the
USER_NAME()function.
- Let's test the policy by executing the following query to switch the user context to Mike and return all the data from the
dbo.Customerstable:EXECUTE AS USER='Mike' GO SELECT USER_NAME() GO SELECT * FROM dbo.Customers
You should get the following output:

- The query returns the records where the Customer Name is Mike. This is because the query is executed in the context of Mike.
- Execute the following query to update John's record from Mike's security context:
EXECUTE AS USER='Mike'
GO
SELECT USER_NAME()
GO
-- CustomerID 4 belongs to John
UPDATE dbo.Customers SET Email='[email protected]' WHERE
CustomerID=4
GO
-- Switch User context to John
EXECUTE AS USER='[email protected]'
GO
SELECT USER_NAME()
GO
-- Verify if email is updated or not
SELECT * FROM dbo.Customers WHERE CustomerID=4
Mike can't update
CustomerID 4as it belongs to John. You won't get any error, however, the value isn't updated.You should get the following output:

- Execute the following query under Mike's security context to insert a record with a customer name of
[email protected]:EXECUTE AS USER='Mike' GO SELECT USER_NAME() GO INSERT INTO dbo.Customers VALUES('[email protected]',9876543445345678,65412396852,'[email protected]')The After Insert block predicate will block the insert, as defined by the security policy, and will show the following error:

- Execute the following query in the
CustomerAdminsecurity context to return all rows from thedbo.Customerstable:REVERT; GO EXECUTE AS USER='CustomerAdmin' GO SELECT USER_NAME() GO SELECT * FROM dbo.Customers
- You'll get all of the rows as defined in the security predicate:

- Execute the following query to switch off the security policy:
ALTER SECURITY POLICY CustomerFilter
WITH (STATE = OFF);
With row-level security implemented in the previous activity, Mike has ensured that the customer can only view his own data; however, to take the security of data to the next level, he wants to mask some of the sensitive data that is shared by the customer. In order to do this, he has to implement Dynamic Data Masking. In this activity, we'll implement Dynamic Data Masking to mask the credit card number, phone number, and email id of a customer.
- Execute the following query to create a new user and grant select access to the user on the
dbo.Customerstable:CREATE USER TestUser WITHOUT LOGIN; GO GRANT SELECT ON dbo.Customers TO TestUser
- Execute the following query to mask the
creditcardnumber,phone, andemailcolumn using different masking functions:ALTER TABLE dbo.Customers ALTER COLUMN Phone VARCHAR(100) MASKED WITH (FUNCTION = 'default()') GO ALTER TABLE dbo.Customers ALTER COLUMN Email VARCHAR(100) MASKED WITH (FUNCTION = 'email()') GO ALTER TABLE dbo.Customers ALTER COLUMN CreditCardNumber VARCHAR(100) MASKED WITH (FUNCTION = 'partial(0,"XXX-XX-",4)')
- The preceding query masks the phone number using the default masking function, the email with the email masking function, and the
CreditCardNumberwith the partial masking function that masks all characters excluding the last four characters.
- The preceding query masks the phone number using the default masking function, the email with the email masking function, and the
- Execute the following query in the context of
TestUserto return all rows from thedbo.Customerstable:EXECUTE AS USER='TestUser' GO SELECT * FROM dbo.Customers;
- Observe that the phone number, email, and credit card number columns are masked as follows:

- Observe that the phone number, email, and credit card number columns are masked as follows:
- Execute the following query to list out the masked columns and the functions for the
Customertable:REVERT; GO SELECT mc.name, t.name as table_name,mc.masking_function FROM sys.masked_columns AS mc JOIN sys.tables AS t ON mc.[object_id] = t.[object_id] WHERE is_masked = 1 and t.name='Customers'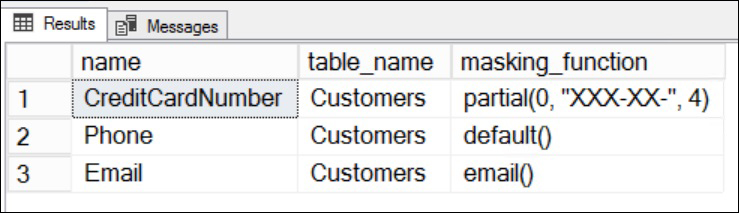
- Execute the following query to allow the
TestUserto see the masked data:GRANT UNMASK TO TestUser; GO EXECUTE AS USER='TestUser' GO SELECT * FROM dbo.Customers; GO
- The
UNMASKpermission allows theTestUserto see the masked data. - You should get the following output:

- The
- To mask the data again, run the following query:
REVERT;
REVOKE UNMASK TO TestUSER