
Horizontal scaling
or sharding refers to partitioning the data from one single big table in a database, across multiple independent databases based on
a sharding or partitioning key. For example, a customer table is partitioned across multiple independent databases on
CustomerID. Each independent database stores data for one or more customers.
Horizontal scaling can be helpful when:
- The data is too big to fit in one single database.
- The data is to be distributed to different locations for improved performance or for compliance. For example, European customers will get improved performance if their data is in a European data center rather than an Asian data center.
- Isolating tenants or customers to a database of their own for better management and performance. If all of the customer data is in a single database and there is a blocking in the database because of a transaction made for a customer, say X, then all of the other customer queries will have to wait for the blocking to get resolved, causing bad performance experience to the rest of the customers.
- A single database requires a premium service tier to manage one big table. Dividing customer data across multiple independent Standard service tier databases will reduce cost.
- All (or most) of the queries made to the database filter on the shading key.
Sharding is supported natively in Azure SQL Databases, so we don't have to implement the sharding mechanism from scratch. However, we do need to create and manage shards. This can be easily done using the Elastic Database Tools.

Figure 6.3: Horizontal Partitioning
This diagram represents a generic sharded environment. The customer table is horizontally partitioned across three shards, Shard 1, Shard 2, and Shard 3. Let's understand each of these components in detail:
- Shard: A shard is an individual database that stores a subset of rows of the sharded table. Shard 1, Shard 2, and Shard 3 are the shards, each storing different rows of the customer table as defined by the mappings.
- Shard Set: A group of shards that contains data for one single partitioned table is called a Shard Set. Shard 1, Shard 2, and Shard 3 are together called a Shard Set.
- Sharding Key: A sharding key is the column name based on which the data is partitioned between the shards. In our example,
CustomerIDis the sharding key. Each shard stores data for a different customer ID. You can also define a composite sharding key. - Shard Map Manager: A special database that stores global mapping information about all available shards in a shard set. The application uses the mapping information to connect to the correct shard based on the sharding key.
- Shard Maps: Shard maps define the data distribution between different shards based on the sharding key. There are two types of shard map:
- List Shard Map: This is a key-value pair with one-to-one mapping between a sharding key and the shard. The key is the sharding key and the value is the shard (SQL Database):
Key (Sharding Key - CustomerID)
Value (Shard/database)
1
Shard 1
2
Shard 2
3
Shard 3
4
Shard 1
- This list shard map defines that Shard 1 will store the data for CustomerID 1 and 4, Shard 2 will store the data for CustomerID 2 and shard 3 will store the data for Customer ID 3.
- Range Shard Map: This is a key-value pair where the key (Sharding Key) is the range of values defined as (Low Value, High Value).
Key (Sharding Key - CustomerID)
Value (Shard/database)
1 - 100
Shard 1
100 - 200
Shard 2
200 - 300
Shard 3
300 - 400
Shard 1
- This range shard map defines that Shard 1 will store the data for CustomerIDs from 1-99 and 300-399. Shard 2 will store the data for CustomerIDs from 100-199 and Shard 3 will store the data for CustomerIDs 200-299.
- List Shard Map: This is a key-value pair with one-to-one mapping between a sharding key and the shard. The key is the sharding key and the value is the shard (SQL Database):
- Global Shard Maps (GSM): GSM are stored in the Shard Map Manager database and record all the shard maps globally. This information is stored and managed by special tables and stored procedures created automatically under the
_ShardManagementschema in the Shard Map Manager database. - Local Shard Maps (LSM): Also referred to as Shardlets, these are the shard maps that track the local shard data within individual shards. The local shard maps or the shardlets are stored in individual shards and not in the Shard Map Manager database. This information is stored and managed by special tables and stored procedures created automatically under the
_ShardManagementschema. - Reference Tables: These are tables that aren't sharded and are available in all shards. These can also be stored in another database, say, Reference database, instead of storing the same data in individual shards, for example, a table with a list of countries or cities, which contains master data common to all shards.
- Application Cache: Applications accessing the Shard Map Manager cache the mappings in a local in-memory application cache. Applications use the cached mappings to route requests to correct shards, instead of accessing the Shard Map Manager for every request.
As discussed
earlier, a Shard Map Manager is a special database that maintains the global mapping information of a shard set. The mappings are maintained in tables that are automatically created under the
_ShardManagement schema:

Figure 6.4: Shard Map Manager
The global shard maps are maintained in three tables, as shown in the preceding diagram:
- Shardmaps_global: This table stores the type of shard map, List or Range shard map. In our example, we have a
RangeShardMap. - Shards_global: This table maps the shards (SQL Databases) to the shard maps defined in the
Shardmaps_globaltable. In our example, theRangeShardMaphas two shards, Shard 1 and Shard 2. The table also stores the Server Name the shard belongs to. This information is used when connecting to the shards. - Shard_mappings_global: This is the global shared map that stores the sharding key to shard mapping. In our example, the customerIDs 1-99 are mapped to Shard 1 and 100-199 are mapped to Shard 2.
The information in the Shard Map Manager is used by the client application to redirect requests to the correct SQL Database based on the sharding key.
Data dependent routing refers to routing the query to the correct database (shard) based on the sharding key specified in the query. This is the fundamental way of querying a sharded environment. The application doesn't maintain connection strings to the different shards. The application doesn't even implement the logic of selecting the shards based on the sharding key. This is done natively by using the functions provided in the elastic client library.
The application defines a single connection using the
OpenConnectionForKey method defined in the Elastic Database Client Library. The syntax for
OpenConnectionForKey is given in the following snippet:
public SqlConnection OpenConnectionForKey<TKey>(
TKey key,
string connectionString,
ConnectionOptions options
)
It accepts three parameters, which are:
TKey: This is the sharding key used to determine which shard or SQL Database in a shard set the query is to be made on.connectionString: The connection string only contains the credentials. The database and the server name are decided from the Shard Map Manager System tables, based on the sharding key.ConnectionOptions: A connection option can be either none or validate. When it's set to validate, it queries the local shard map or the shardlet to validate that the shard key exists in the databases specified in the cached maps (in the application). This is important in an environment where shard maps change frequently.If the validation fails, then the shard map manager queries the global shard maps for the correct values and updates the application cache.
If the parameters specified are correct,
OpenConnectionForKey returns a database connection that can be used to query the correct shard.
Multi-tenant data models refer to how the tenants are placed in a sharded environment. There are two distinct models for placing the tenants, database-per-tenant (single tenant model) and shared database – sharded (multi-tenant model):

Figure 6.5: Multi-Tenant Data Models
As the name suggests, each tenant gets its own database. The tenant-specific data is limited to the tenant's database and isolated from other tenants and their data.
As the name suggests, a single shard or database is shared among multiple tenants. The tenants can either be mapped to shards or databases by using either Range or List mappings, as discussed earlier.
Choosing between the two models depends on the following factors:
- Isolation: A single-tenant, or database-per tenant, offers a higher degree of isolation than the Shared database – Sharded model.
- Maintenance: A single-tenant model will have as many databases as the tenants such as customers or employees. For example, 100 customers would mean 100 databases in a single-tenancy model, but in a Shared database – Sharded model, you can have five databases with 20 tenants each. Maintaining five databases would be easier than maintaining 100 databases.
- Cost: The cost depends on the amount of resource sharing between tenants. The more the resource sharing (resource here refers to a shard – SQL Database), the lower the cost. A single-tenant model is good if all tenants have predictable workloads. This allows you to select an appropriate service tier for each tenant or shard. However, if the workload isn't predictable, which often is the case, the databases can be either oversized or undersized. On the other hand, a Shared database – Sharded model with a higher degree of resource sharing offers a more cost-effective solution.
- DevOps: DevOps refers to deploying new changes to databases, to resolve issues or when new features are added to the application. The single-tenant model has a higher cost to deploy and maintain the application, as each change has to be applied to all of the single-tenant databases. For example, if an application adds a new feature that allows customers to generate sales reports, and there are 100 customers, then this change has to be deployed on 100 databases. However, it'll take less time and cost to roll out the same feature in the shared databases – sharded model because of the smaller number of databases.
- Business Model: The application's business model is an important factor when choosing between the two multi-tenant models. If application per-tenant revenue is small, then Shared databases – sharded makes sense. A shared database model will offer less isolation but it'll have lower deployment and resource costs. On the other hand, if per-tenant revenue is high, then it'll make sense to have a single-tenant model.
In this section, we’ll learn how to create an Azure SQL Database Alert. Consider the following scenario from ToyStore Ltd.: Mike has an Azure SQL Database in the Basic Service Tier and has been asked to configure auto scaling to change the Service Tier to Standard S0 when the DTU is greater than 70%. For this purpose, he needs to first create an Azure SQL Database Alert, which is triggered when the DTU is greater than 70%. Let’s see how this can be done.
Create Azure Automation Account and Configure Runbook:
Azure Automation is an Azure Service that allows you to automate Azure Management tasks through Runbooks.
A Runbook is a job that accepts PowerShell or Python code and executes it as and when scheduled, or when invoked from an external program through a webhook:
- Open the Azure portal, https://portal.azure.com, and log in with your Azure credentials.
- In the left-hand navigation menu, select More services. In the More services pane search box, type Automation. Select the Automation Accounts option that appears as a search result:

- In the Automation Accounts pane, click the Create Automation Accounts button:

- In the Add Automation Account pane, provide the following values:
- Name of the automation account
- Select your Azure Subscription
- Select the Resource Group as
toystore - Select location as East US 2
- Select "Create Azure Run As account" as Yes (default value)
Click Create to provision the Automation Account:

- Navigate to the overview pane of the newly created
toystorejobsAutomation Account. Locate and select Runbooks under the Process Automation section:
- In the Runbooks pane, select Add a runbook from the top menu:

- On the Add Runbook pane, select Import an existing runbook:

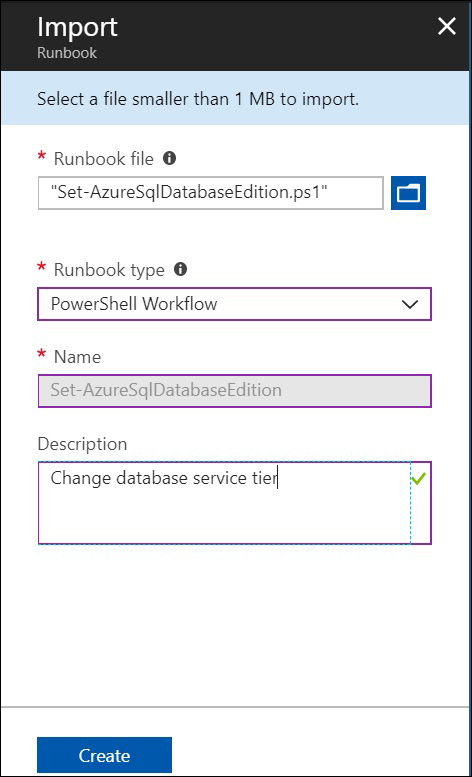
- In the Import pane:
- Under the Runbook file, navigate to
C:CodeLesson6VerticalScalingand select theSet-AzureSqldatabaseEdition.ps1file. - Provide a Description (Optional).
Click Create to import the PowerShell runbook:
Once the Runbook is imported, it'll be listed on the
toystorejobs – Runbooks pane. - Under the Runbook file, navigate to
- In the
toystorejobs – Runbooks pane, find and select Set-AzureSqldatabaseEdition, as shown in the following screenshot:
- The Set-AzureSqldatabaseEdition Runbook page provides options to Start, View, Edit, Schedule, and Export the Runbook. It also has an option to create a Webhook. Click on Edit to view the content of the PowerShell file you just imported:
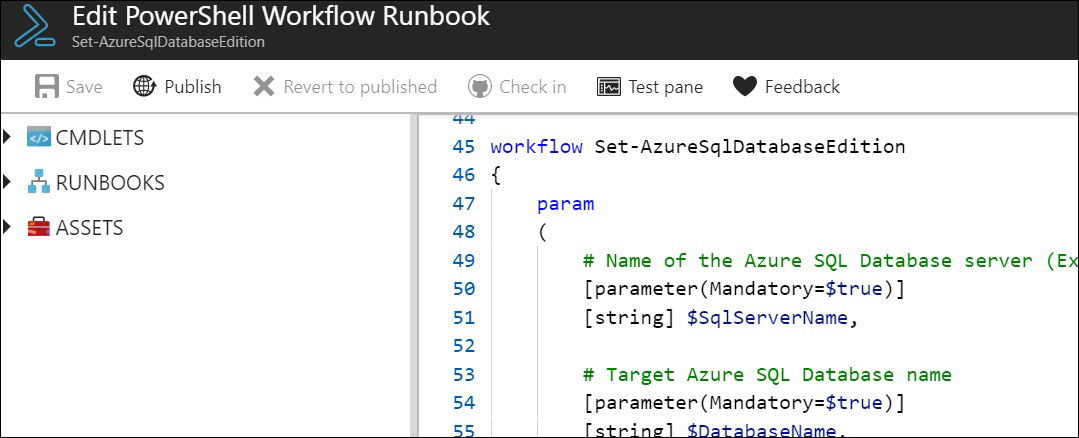
The Edit pane has the option to further edit the workflow. The PowerShell script is wrapped in a workflow tag specifying that it's a PowerShell Runbook workflow:
- The left-hand side of the window has three options:
- CMDLETS, which has all the PowerShell commands you can use to write a PowerShell Runbook workflow.
- RUNBOOKS lists all existing PowerShell runbooks.
- ASSETS are the Variables, Connections, Credentials, and Certificates that are required by a Runbook to run.
- The PowerShell script is self-explanatory. It takes four parameters:
- SqlServerName: This is the logical Azure SQL Server that hosts the Azure SQL Database.
- databaseName: The Azure SQL Database name whose service tier is to be modified.
- Edition: This desired Azure SQL Database Edition. The Azure SQL Database will be on this edition after script execution.
- PerfLevel: The desired Service Objective (S0, S1 and so on).
- Credential: This is the name of the Runbook Credential asset that contains the username and password to connect to the Azure SQL Database.
The PowerShell script connects to the given Azure SQL Database and uses the
Set-AzureSqldatabasecommand to change the database edition.Once you are familiar with the script, select Publish in the top menu to publish the Runbook.
- The next step is to create the Credential asset to be used by the script to connect to the Azure SQL Database. Close the Set-AzureSqldatabaseEdition runbook pane.
Navigate to the
toystorejobs Runbookpane, and find and select Credentials under the Shared Resources section:
- Select Add a credential from the top menu:

- In the New Credential pane, provide:
- The credential name under the Name section.
- The description under the Description section. This is optional.
- Your Azure SQL Server username.
- Your Azure SQL Server password.
Click Create to create the credentials:

The credentials are shared assets and can be used in multiple runbooks.
- Select Add a credential from the top menu:
- The next step is to create the
webhookfor this runbook. Navigate to theSet-AzureSqldatabaseEditionRunbook overview pane and select the Webhook:
- In the Add Webhook pane, select Create new webhook. In the Create a new webhook pane:
- Enter the webhook name.
- The Enabled toggle is set to Yes by default. Leave it as it is.
- The Expires data is set to one year. Leave it as it is.
- Copy the webhook URL by clicking on the copy icon besides the URL textbox. It's important to copy and paste the URL before you click OK as the URL is inaccessible once the webhook is created.
- Click OK to create the webhook:

- The webhook will be created. The next step is to provide the PowerShell Runbook parameters to the webhook. These parameters will be used to run the
Set-AzureSqldatabaseEditionPowerShell runbook.
- On the Add Webhook pane, select Configure parameters and run settings. On the Parameters pane, provide the Azure SQL Server, databaseName, Edition, PerfLevel, and the Credential. The Credential used here is the one created in step 16:

Click OK to continue. On the Add Webhook pane, select Create to create the webhook and set the parameter values:

Now you have created and configured a PowerShell runbook, which runs a PowerShell command when triggered by a webhook.
The next step is to create an Azure SQL Database alert that is triggered when the DTU percentage is greater than 70%. The alert, when triggered, will call the webhook created earlier.
- On the Azure portal, navigate to the
toystoreAzure SQL Database. In the overview pane, find and click on Alert rules, then select Add alert:
In the Add an alert rule pane:
- Leave the Resource field as default.
- Provide the alert name.
- Provide the alert description. This is optional.
- Set the Metric to DTU percentage.
- Set the Condition to "greater than or equal to".
- Set the Threshold to 70.
- Set the Period to "Over the last 5 minutes".
- Leave the Email owners checkbox unchecked. If you enable email, you'll get email notification whenever the alert threshold is reached.
- Set the Webhook to the webhook URL you saved in step 17:

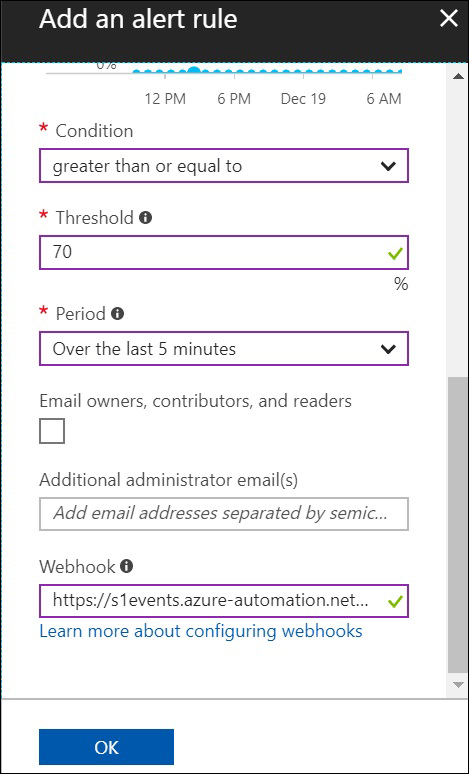
Click OK to create the Alert.
This completes the auto scale setup. The next step is to run the workload and see auto scaling in action:
- Navigate to
C:CodeLesson6VerticalScaling, right-click theStart-Workload.ps1folder and select Run with PowerShell:
A new PowerShell console window will open. Provide the following parameters to the script:
- Sqlserver: The logical Azure SQL Server name
- database: The Azure SQL Database name on which you created an alert earlier in this activity
- Sqluser: The Azure SQL Server admin username
- Sqlpassword: The Azure SQL Server admin password
Press Enter to continue. You should see similar output to that shown here:

The scripts start an instance of the ostress utility. The ostress utility runs 25 threads in parallel, executing the
workload.sqlfile 30 times each. - While the workload is running, monitor the DTU usage percentage on the
toystoreoverview page in the Azure portal:
The alert status is in the Alert rules page under the Monitoring section on the
toystoredatabase pane. Once the alert is triggered, the Last Active column value will be changed to Just Now:
- Once the alert is active, navigate to the Set-AzureSqldatabaseEdition runbook pane on the Azure portal. Select Jobs under the Resources section. You should see the job status as shown here:

Click Completed to further check the job status:

You can verify the parameters passed to the job by clicking on Input, and review the output from the PowerShell script by selecting the Output box.
The status indicates that the job has run successfully.
Switch to the
toystoreoverview page and observe that the database edition is now Standard (S0).This completes the activity.
In this activity, we’ll discuss how to shard our
toystore database. Consider the following scenario: Mike has been asked to implement sharding to improve the application performance of the
toystore database. For this purpose, he can shard the
Sales.Customers and
Sales.Orders tables into two shards,
toystore_1_100 (with values of customerid from 1-100) and
toystore_200 (with values from 100-200). The steps below describe how this can be done:
- Download the Elastic DB Tool scripts.
- Provision the Shard Map Manager database
toystore_SMM. - Rename the
toystoredatabase totoystore_shard_1_100. - Provision the
toystore_shard_200Azure SQL Database. - Promote
toystore_SMMto Shard Map Manager. This will create the shard management tables and procedures in thetoystore_SMMdatabase: https://www.amazon.in/b?ie=UTF8&node=14072630031&pf_rd_p=bb15c10e-5e2c-47e5-848f-52131f35146f&pf_rd_r=CQGPKFAXBS7QKABXWGMP. - Create the Range Shard Map in the Shard Map Manager database.
- Add Shards to the Shard Map.
- Add the sharded table and reference table schema to the Shard Map Manager database.
- Verify sharding by reviewing the Shard Map Manager tables.
Elastic DB Tool Scripts
The Elastic DB Tool scripts are a set of PowerShell modules and scripts provided by Microsoft to easily create and manage Azure SQL Database shards. They use the functions exposed by the Elastic database Client library to provide helper PowerShell cmdlets to easily create and manage shards.
Note
The Elastic DB Tool scripts
are available at
C:codeLesson06 Elastic DB tool scripts.
You can download the latest version from here: https://gallery.technet.microsoft.com/scriptcenter/Azure-SQL-DB-Elastic-731883db
Navigate to
C:CodeLesson06Elastic DB tool scriptsShardManagement and open
ShardManagement.psm1.
ShardManagement.psm1 contains functions such as
New-ShardMapManager,
Get-ShardMapManager,
New-RangeShardMap, and
Add-Shard. Each function has a Synopsis section that briefly describes the function's purpose.
Note
We won't use all of the functions listed in
ShardManagement.psm1. However, you are free to explore them once you complete the activity.
When you first import the
ShardManagement module, it checks for the Elastic Client libraries' DLLs (in the folder from where the PowerShell script is executed), and downloads and registers them if not found.
Save Azure Profile Details to a File
Saving your Azure profile details to a file enables you to log in to your Azure account from PowerShell using the saved profile information. Otherwise, you would have to provide your Azure credentials in the authentication dialog box every time you run the Azure command from PowerShell.
- Press Windows + R to open the run command window. In the run command window, type
powershelland hit Enter. This will open a new PowerShell console window:
- In the PowerShell console, execute the following command:
Add-AzureRmAccount
You'll have to enter your Azure credentials into the pop-up dialog box. After a successful login, control will return to the PowerShell window.
Run the following command to save the profile details to a file:
Save-AzureRmProfile -Path C:codeMyAzureProfile.json
- The Azure subscription details will be saved in the
MyAzureProfile.jsonfile in JSON format.If you wish to explore the
profile.jsonfile, you can open it in any editor to review its contents:
Sharding
ToystoredatabaseWe'll now learn to write PowerShell commands using the Elastic DB Tool scripts to shard the existing
toystoredatabase.
- Press Window + R to open the Run command window. Type
PowerShell_ISE.exein the run command window and hit Enter. This will open a new PowerShell ISE editor window. This is where you'll write the PowerShell commands:
- In the PowerShell ISE, select File from the top menu and click Save. Alternatively, you can press Ctrl + S to save the file. In the File Save Dialog box, browse to the
C:CodeLesson06Shardingdirectory. In the file name textbox, typeShard-toystore.ps1and press Save to save the file: - Copy and paste the following code into the shard-
toystore.ps1file one after another to implement sharding. The code explanation, wherever required, is given in the following code snippet and in the comments within the code snippet. - Copy and paste the following code to define the script parameters:
param
(
    [parameter(Mandatory=$true)]
    [String] $ResourceGroup,
    [parameter(Mandatory=$true)]
    [String] $SqlServer,
    [parameter(Mandatory=$true)]
    [String] $UserName,
    [parameter(Mandatory=$true)]
    [String] $Password,
    [parameter(Mandatory=$true)]
    [String] $ShardMapManagerdatabase,
    [parameter(Mandatory=$true)]
    [String] $databaseToShard,
    [parameter(Mandatory=$false)]
    [String] $AzureProfileFilePath
 )
The script accepts seven parameters:
ResourceGroup: This is the Azure resource group that contains the Azure SQL Server and the database. This should be the same as the one you provided when creating thetoystoredatabase in Chapter 1, Microsoft Azure SQL Database Primer.SqlServer: This is the logical Azure SQL Server name that hosts thetoystoredatabase.UserNameandPassword: The Azure SQL Server admin username and password.ShardMapManagerdatabase: The name of the Shard Map Manager database. Prefix _SMM against thetoystoredatabase to name the shard map manager database.databaseToShard: The database you wish to shard;toystorein our case.AzureProfileFilePath: The path of the JSON file that contains your Azure profile details. If not yet created, follow the steps in the Save Azure Profile Details to a File section to create one.
- Copy and paste the following code to set the Azure context to your Azure Profile:
# log the execution of the script
Start-Transcript -Path ".LogShard-
toystore.txt" -Append
…
…
}

#Login to Azure Account
if((Test-Path -Path $AzureProfileFilePath))
{
    $profile = Select-AzureRmProfile -Path $AzureProfileFilePath
    $SubscriptionID = $profile.Context.Subscription.SubscriptionId
…
…
    # Provide your Azure Credentials in the login dialog box
    $profile = Login-AzureRmAccount
    $SubscriptionID =  $profile.Context.Subscription.SubscriptionId
…
…
#Set the Azure Context
Set-AzureRmContext -SubscriptionId $SubscriptionID | Out-Null
This script does the following things:
- Logs the script execution in the Sharding.txt file in the
C:CodeLesson06ShardingLogfolder. - Sets the
AzureProfileFilePathparameter to the Azure Profile JSON file if the path isn't provided as the parameter. - Logs into Azure account using the Azure Profile JSON file. If the JSON path provided isn't valid, then it uses the
Login-AzureRmAccountcommand. In this case, you will have to provide your Azure subscription username and password in the pop-up windows. - Sets the default Azure profile to your profile using
Set-AzureRmContext cmdlet. This tells PowerShell to create and manage objects in your Azure Profile.
Press Ctrl + S to save your work before moving further.
- Logs the script execution in the Sharding.txt file in the
- Copy and paste the following code to import the
shardmanagementmodule. This will allow us to use the functions inshardmanagement.psm1in our PowerShell script:# Import the ShardManagement module Import-Module '..Elastic DB tool scriptsShardManagementShardManagement.psm1'
Observe the
shardmanagement.psm1file path. It is relative to the directory from where you are executing theshard-toystore.ps1script. Therefore, you will need to make sure that the Elastic DB tool scripts folder is available in the~Lesson06Shardingfolder. - Copy and paste the following script to set the
SQLServerFQDNvariable:$SQLServerFQDN = "$SqlServer.database.windows.net"
The
SQLServerFQDNvariable has a fully qualified name logical Azure SQL Server Name. This is required later in the script. - Copy and paste the following code to provision a new Azure SQL Database to act as the Shard Map Manager:
# Provision a new Azure SQL database
# call ProvisionAzureSQLdatabase.ps1 created in chapter 1 to create a new Azure SQL database to act as Shard Map Manager

$command = "....Lesson01ProvisionAzureSQLdatabase.ps1 -ResourceGroup $ResourceGroup -SQLServer $SqlServer -UserName $UserName -Password $Password -SQLdatabase $ShardMapManagerdatabase -Edition Standard"
Invoke-Expression -Command $command
The command variable specifies the
ProvisionAzureSQLdatabase.ps1file and the required parameters. You can check Chapter 1, Microsof Azure SQL Database Primer to find out how to run theProvisionAzureSQLdatabase.ps1PowerShell script.Observe the relative path of
ProvisionAzureSQLdatabase.ps1. You will have to change the path ifLesson01andLesson06are not in the same parent directory.The
Invoke-Expression cmdletruns the command specified in the command variable. - Copy and paste the following code to set up the individual shards:
# Setup the shards # Rename existing
toystoredatabase totoystore_shard1 $Shard1 = $databaseToShard + "_Shard_1_100" $Shard2 = $databaseToShard + "_Shard_200" # Establish credentials for Azure SQL database server $SqlServercredential = new-object System.Management.Automation.PSCredential($UserName, ($Password | ConvertTo-SecureString -asPlainText -Force)) … … # Create tables to be sharded in Shard2 $files = Get-ChildItem -Path ".TableScripts" ForEach($file in $files) { Write-Host "Creating table $file in $shard2" -ForegroundColor Green Invoke-Sqlcmd -ServerInstance $SQLServerFQDN -Username $UserName -Password $Password -database $shard2 -InputFile $file.FullName | out-null }The preceding code does the following things:
- Declares two variables, Shard1 and Shard2. If the value of the
databaseToShardvariable istoystore, thenShard1 = toystore_Shard_1_100andShard2 = toystore_Shard_200. - Renames the existing
toystoredatabase toShard1, that is,toystore_Shard_1_100. TheSet-AzureSqldatabase cmdletis used to rename the database. - Provisions the Shard2 database,
toystore_Shard_200. It usesProvisionAzureSQLdatabase.ps1as described in step 8 to provision a new database. - Creates the required tables,
Sales.Customer,Sales.Orders, andApplication.Countries, in the newly provisionedshard2database. - The create scripts for the tables are kept at
C:CodeLesson06ShardingTableScripts. TheGet-ChildItem cmdletgets all of the files present in theTableScriptsdirectory. - The
Invoke-Sqlcmd cmdletexecutes the scripts file on the Shard2 database.
- Declares two variables, Shard1 and Shard2. If the value of the
- Copy and paste the following code to register the database created in step 8 as the shard map manager:
# Register the database created previously as the Shard Map Manager

Write-host "Configuring database $ShardMapManagerdatabase as Shard Map Manager" -ForegroundColor Green
$ShardMapManager = New-ShardMapManager -UserName $UserName -Password $Password -SqlServerName $SQLServerFQDN  -SqldatabaseName $ShardMapManagerdatabase  -ReplaceExisting $true
This code uses the
New-ShardMapManager cmdletfrom theShardManagement.psm1module to register the newly created database in step 8 as the Shard Map Manager.This creates the database objects required for shard management in the shard map manager database under the
ShardManagementschema. - Copy and paste the following code to create a new shard map in the shard map manager database:
# Create Shard Map for Range Mapping
$ShardMapName = "
toystorerangemap"
$ShardMap = New-RangeShardMap -KeyType $([int]) -ShardMapManager $ShardMapManager -RangeShardMapName $ShardMapName
This code uses the
New-RangeShardMapfunction from theShardManagementmodule to create a new range shard map in the shard map manager database.The
keytypeparameter defines the data type of theshardingkey. In our case, theshardingkey iscustomerid, which is of the integer data type.ShardMapManageris the shard map manager object assigned to the$ShardMapManagervariable in step 10. This tells the function to create the shard map in this particular shard map manager.The
RangeShardMapNamevariable is the name of the shard map,toystorerangemap. - Copy and paste the following code to add the shards to the shard map created in step 11:
# Add shards (databases) to shard maps
Write-host "Adding $Shard1 and $Shard2 to the Shard Map $ShardMapName" -ForegroundColor Green
$Shards = "$Shard1","$shard2"
foreach ($Shard in $Shards)
{
    Add-Shard -ShardMap $ShardMap -SqlServerName $SQLServerFQDN -SqldatabaseName $Shard
}
This code uses the
Add-Shardfunction from theShardManagementmodule, and adds the individual shards Shard1 (toystore_Shard_1_100) and Shard2 (toystore_Shard_200) to thetoystorerangemapcreated in step 11.ShardMapis the shard map object assigned to the$ShardMapvariable in step 11. This tells the function the shard map in which the shards are to be added.SqlServerNameandSqldatabaseNameare the logical server name and the database name of the shards to be added to the shard map.This step will create the local shard management objects in the individual shards under the
__ShardManagementdatabase. - Copy and paste the following code to add the low and high range key mappings on Shard1 (
toystore_Shard_1_100):# Add Range Key Mapping on the first Shard # Mapping is only required on first shard currently it has all the data. $LowKey = 0 $HighKey = 200 Write-host "Add range keys to $Shard1 (Shard1)" -ForegroundColor Green Add-RangeMapping -KeyType $([int]) -RangeShardMap $ShardMap -RangeLow $LowKey -RangeHigh $HighKey -SqlServerName $SQLServerFQDN -SqldatabaseName $Shard1
This code uses the
Add-RangeMappingfunction from theShardManagementmodule to specify the key range for the first shard only. It takes the following parameters:Keytype: The data type of the sharding key column. It is Integer in our case.RangeShardMap: The range shard map object. This is assigned to the$ShardMapvariable in step 11.RangeLow: The lower boundary of the range mapping. 0 in our case.RangeHigh: The higher boundary of the range mapping. 200 in our case.SqlServerName: The logical Azure SQL Server name that hosts the shards.SqldatabaseName: The name of the shard.
Mappings are added only to the first shard because it has all of the customer records (200 customers) at the moment.
In the next activity, you'll split the records between the shards using the Split-Merge utility.
- Copy and paste the following code to add the sharded and reference table schema to the Shard Map Manager database:
# Add Schema Mappings to the $shardMap
# This is where you define the sharded and the reference tables
Write-host "Adding schema mappings to the Shard Map Manager database" -ForegroundColor Green
$ShardingKey = "Customerid"
$ShardedTableName = "Customers","Orders"
$ReferenceTableName = "Countries"
…
…
# Get the schema info collection for the shard map manager
$SchemaInfoCollection = $ShardMapManager
GetSchemaInfoCollection()
# Add the SchemaInfo for this Shard Map to the Schema Info Collection
if ($($SchemaInfoCollection | Where Key -eq $ShardMapName) -eq $null)
{
    $SchemaInfoCollection.Add($ShardMapName, $SchemaInfo)
}
else
{
    $SchemaInfoCollection.Replace($ShardMapName, $SchemaInfo)
}

Write-host "$databaseToShard is now Sharded." -ForegroundColor Green
This code adds the schema information of the sharded and reference table in the
shardmap manager database. The schema information includes schema name, table name, and key column.This is done by initializing a schema info object of type
Microsoft.Azure.Sqldatabase.ElasticScale.ShardManagement.Schema.SchemaInfo, and then adding the table details to this object using theAddfunction.The
Schemainfo.Addfunction takes three arguments, schema name, table name, and key column name.The
SchemaInfoCollectionvariable gets the shard map manager schema info collection object.The schema is then added to the shard map manager by a
SchemaInfoCollection.Addfunction call that takes two arguments, the shard map to add the schema details to and the schema details as defined in the schema info object. - This completes the script. Press Ctrl + S to save the script. Before you run the script:
- Make sure you have configured the file paths wherever required correctly
- If you don't have a ready
toystoredatabase, you can restore it using the bacpac file provide with the code files:C:Code�_databaseBackup oystore.bacpac.
Executing PowerShell Script
To
execute the
shard-toystore.ps1:
- Press Window + R to open the Run command window. Type PowerShell and hit Enter to open a new PowerShell console window.
- Change the directory to the folder that has the
shard-toystore.ps1script. For example, if the script is in theC:CodeLesson06Shardingdirectory, then run the following command to switch to this directory:cd C:CodeLesson06Sharding
- In the following command, change the parameter values as per your environment. You can also copy the command from the
C:CodeLesson06Executions.txtfile:.shard-
toystore.ps1 -ResourceGrouptoystore-SqlServer toyfactory -UserName sqladmin -Password Packt@pub2 -ShardMapManagerdatabasetoystore_SMM -databaseToShardtoystore-AzureProfileFilePath C:CodeMyAzureProfile.jsonNote
You may get the following warning during script execution. Ignore such warnings:
WARNING: Could not obtain SQL Server Service information. An attempt to connect to WMI on 'Microsoft.WindowsAzure.Commands.Sqldatabase.dll' failed with the following error: The RPC server is unavailable. (Exception from HRESULT: 0x800706BA)
- Refer to step 4 of the Sharding Toystore Database section for parameter details:
Once you have changed the parameter values, hit Enter to run the command. This command will:
- Create a Shard-
toystore.txtfile in the Log folder. Use this file for troubleshooting script errors. - Create a Shard Map Manager database,
toystore_SMM - Rename the
toystoredatabase totoystore_Shard_1_100 (shard1) - Create a new database,
toystore_Shard_200 (shard2) - Create shard management objects in the
toystore_SMMdatabase under the __ShardManagementschema - Create a new range shard map,
toystorerangemap - Add
toystore_Shard_1_100 (shard1)andtoystore_Shard_200 (shard2)to the range shard map - Add the key range mappings in
toystore_Shard_1_100 (shard1) - Add the table schema for
Sales.Customers,Sales.Orders, andApplication.Countriesin the shard map manager databaseYou should get the following output after successful execution of the script:
Configuring database
toystore_SMM as Shard Map Manager Addingtoystore_Shard_1_100 to the Shard Maptoystorerangemap Addingtoystore_Shard_200 to the Shard Maptoystorerangemap Add range keys totoystore_Shard_1_100 (Shard1) Adding schema mappings to the Shard Map Manager databasetoystoreis now Sharded.
- Create a Shard-
Reviewing the Shard Configuration
You'll now review the shard configuration the PowerShell script performed:
- Open SQL Server Management Studio on your local machine and connect to the
toyfactoryAzure SQL Server. - Connect to Object Explorer (if Object Explorer isn't open, press F8 to connect to it). You should see the following databases:

toystore_Shard_1_100is thetoystoredatabase renamed.toystore_Shard_200is the new Shard 2 database.toystore_SMMis the Shard Map Manager database. - In the Object Explore, right-click
toystore_SMMand select New Query from the context menu. - Execute the following query in the new query window:
SELECT
st.Name As ShardTables
FROM sys.tables st JOIN sys.schemas ss
on st.schema_id=ss.schema_id
WHERE ss.Name='__ShardManagement'
You should get the following output:

Observe that six tables are added to the
toystore_SMMdatabase. - Execute the following query to view the data for the
ShardMapsGlobaltable:SELECT * FROM __ShardManagement.ShardMapsGlobal
You should see the following output:

The
ShardMapsGlobaltable will have one row for each shard map you create. Observe that it contains thetoystorerangemapthat was created by theShard-toystore.ps1script. Each shard map is assigned a uniqueShardMapId. - Execute the following query to view the data for the
ShardsGlobaltable:SELECT ShardId,ShardMapId,ServerName,databaseName FROM __ShardManagement.ShardsGlobal
You should get the following output:

The
ShardsGlobaltable contains one row for each shard in the sharded environment. Observe that it has two rows, one for each shard,toystore_shard_1_100 and toystore_Shard_200.The
ShardMapIdcolumn is used to map the shard with its corresponding Shard Map in theShardsMapGlobaltable.The table also stores the
ServerNamefor each of the shards (databases). This table is used to route the requests to the correct shard based on the sharding key when a request is received from an application. - Execute the following query to view data for the
ShardMappingsGlobaltable:SELECT MappingId,ShardId,ShardMapId,MinValue,MaxValue FROM __ShardManagement.ShardMappingsGlobal
You should get the following output:

ShardMappingsGlobalstores the low and high key-value mapping for each shard in theShardsGlobaltable.The
ShardIdandShardMapIdcolumns map the rows with their corresponding Shards and Shard Map in theShardsGlobalandShardMapsGlobaltables respectively. - Execute the following query to view the data for the
ShardeddatabaseSchemaInfosGlobaltable:select * from __ShardManagement.ShardeddatabaseSchemaInfosGlobal
You should get the following output:

The
ShardeddatabaseSchemaInfosGlobaltable stores the schema info for each shard map defined in theShardsMapGlobaltable.These are the same schema details as provided in step 14 of the
Sharding toystore databasesection in theshard-toystore.ps1script.In the results pane in SSMS, click the XML under the
Schemainfocolumn. You should see the following XML:<Schema xmlns:i="http://www.w3.org/2001/XMLSchema-instance"> <ReferenceTableSet i:type="ArrayOfReferenceTableInfo"> <ReferenceTableInfo> <SchemaName>Application</SchemaName> <TableName>Countries</TableName> </ReferenceTableInfo> </ReferenceTableSet> <ShardedTableSet i:type="ArrayOfShardedTableInfo"> <ShardedTableInfo> <SchemaName>Sales</SchemaName> <TableName>Customers</TableName> <KeyColumnName>Customerid</KeyColumnName> </ShardedTableInfo> <ShardedTableInfo> <SchemaName>Sales</SchemaName> <TableName>Orders</TableName> <KeyColumnName>Customerid</KeyColumnName> </ShardedTableInfo>Observe that it contains the schema, table, and sharding key column values for the
Sales.Customer,Sales.Orders, andApplication.Countriestables. - In Object Explorer, expand
toystore_Shard_1_100and then expand Tables:
Observe that as
toystore_SMMhas global shard management tables,toystore_Shard_1_100has local shard map management tables.toystore_shard_200will also have local shard management tables.The local shard management tables store shard metadata specific to the particular shard. You can query the tables to review the data for a better understanding.
This completes the activity.
In the previous activity, Mike created two shards,
toystore_Shard_1_100 and
toystore_Shard_200. However, all of the data is available in the
toystore_Shard_1_100 database and he has been requested to split the data between
toystore_Shard_1_100 and
toystore_Shard_200. Therefore, he can use the split service to split the data.
In this activity, you'll use the split-merge service to split the data between
toystore_Shard_1_100 and
toystore_Shard_200.
The split-merge tool is an Azure Web service deployed to your Azure environment. Once deployed, you can either invoke the web service from the web service URL or from PowerShell.
To deploy the split-merge cloud service in your Azure environment and then call the cloud service function to split the data, follow these steps:
Deploying Split-Merge Cloud Service:
- Open a browser and navigate to the following URL: https://docs.microsoft.com/en-us/azure/sql-database/sql-database-elastic-scale-configure-deploy-split-and-merge.
Follow the instructions listed at this URL to deploy the split-merge service.
In addition to the steps mentioned in the URL, make the following additional changes before deploying the web service:
- In the
ServiceConfiguration.cscfgfile, set the value of the following settings tofalse:<Setting name="SetupWebAppForClientCertificates" value="false" /> <Setting name="SetupWebserverForClientCertificates" value="false" />
- Deploy the cloud service in a production environment, and not staging as mentioned in the URL.
- In the
- If you get an error when deploying the web service, refer to the
C:CodeLesson06Splittingfolder for the sample files:Serviceconfigurtion.cscfg:C:CodeLesson06SplittingSplitMergeLibrariesMicrosoft.Azure.Sqldatabase.ElasticScale.Service.SplitMerge.1.2.0contentsplitmergeserviceSplitMergeService.cspkg:C:CodeLesson06SplittingSplitMergeLibrariesMicrosoft.Azure.Sqldatabase.ElasticScale.Service.SplitMerge.1.2.0contentsplitmergeservice
- Self-signed certificates:
C:CodeLesson06SplittingCertificate. - Right-click on
toyfactory.cerand select Install to install the certificate on your local machine. - Upload the
toyfactory.pfxfile on Azure Cloud as per instructions at the URL given previously. - Make sure you have enabled the
toyfactoryAzure SQL Server firewall to allow connections from services within Azure. - You can do this by switching ON the Allow Access to Azure services toggle button in the firewall section of the toyfactory server:

Once your web service is deployed, you should see this output in the Azure portal cloud service overview section:

- Copy the web service URL, http://splitmerge.cloudapp.net, change http to https, and open the URL in a browser. If the web service is deployed successfully, you should see the following page on the web browser:

You can split the data by either filling out the web form or by calling the web service using PowerShell.
Call Split-Merge Cloud Service Using PowerShell
- Press Window + R to open the Run command window. Type
PowerShell_ISE.exein the run command window and hitEnter. This will open a new PowerShell ISE editor window. This is where you'll write the PowerShell commands:
In the PowerShell ISE, select File from the top menu and click Save. Alternatively, you can press Ctrl + S to save the file. In the File Save Dialog box, browse to the
C:CodeLesson06Splittingdirectory. In the File name text box, typeSplit-toystore-shard.ps1and click Save to save the file:
- Copy and paste the following code into the
Split-toystore-shard.ps1file one after another to implement the split operation. The code explanation, wherever required, is given in the following code snippet and in the comments within the code snippet. - Copy and paste the following code to define the parameters:
param
(
    [parameter(Mandatory=$true)]
    [String] $ResourceGroup,
    [parameter(Mandatory=$true)]
    [String] $SqlServer,
    [parameter(Mandatory=$true)]
    [String] $UserName,
    [parameter(Mandatory=$true)]
    [String] $Password,
…
…
    [String] $SplitRangeHigh,
   [parameter(Mandatory=$true)]
    [String] $SplitValue,
    [bool] $CreateSplitMergedatabase = $false

)
Most of the parameters have been described in the previous activity. The following are the descriptions of the additional parameters:
SplitMergedatabase: This is the split-merge database you will have created as part of the split-merge cloud service deployment.SplitMergeServiceEndpoint: The split-merge cloud service URL copied in step 2 of the Deploy Split-Merge Cloud Service sectionShardMapManagerdatabaseName: The shard map manager database you created in a previous Activity.- Shard2: The shard2 database (
toystore_Shard_200) you created in a previous Activity. ShardMapName: The shard map name (toystorerangemap) you created in a previous Activity.SplitRangeLow: The lower value for the range mapping. This is 0 in our case.SplitRangeHigh: The higher value for the range mapping. This is 200 in our case.SplitValue: The value at which the split will take place. This is 100 in our case.CreateSplitMergedatabase: This is a Boolean value which, when set to true, will provision a new database to be used as the split-merge database. You can use this to provision the database if you haven't created it yet.
- Copy and paste the following code to set the login to the Azure subscription:
Start-Transcript -Path "$ScriptPathLogSplit
ToyStoreShard.txt" -Append

$CertificateThumbprint = $null
# Get the parent directory of the script.
$ScriptPath = split-path -parent $MyInvocation.MyCommand.Definition
# set the AzureProfileFilePath
$AzureProfileFilePath = "....MyAzureProfile.json"

#Login to Azure Account
if((Test-Path -Path $AzureProfileFilePath))
{
    $profile = Select-AzureRmProfile -Path $AzureProfileFilePath
    $SubscriptionID = $profile.Context.Subscription.SubscriptionId
}
…
…
#Create a database to store split merge status
$command = "....Lesson01ProvisionAzureSQLdatabase.ps1 -ResourceGroup $ResourceGroup -SQLServer $SqlServer -UserName $UserName -Password $Password -SQLdatabase $SplitMergedatabase -Edition Basic"
Invoke-Expression -Command $command
Exit;

}
This code calls the
ProvisionAzureSQLdatabase.ps1PowerShell script to create a new Azure SQL database to store the split-merge cloud service status.The database is created only if
CreateSplitMergedatabaseis set to true. - Copy and paste the following code to import the split-merge PowerShell module:
# Import SplitMerge module
$ScriptDir = Split-Path -parent $MyInvocation.MyCommand.Path
Import-Module $ScriptDirSplitMerge -Force
The split-merge PowerShell module has helper functions to call the split-merge cloud service.
- Copy and paste the following code to submit a split request:
Write-Output 'Sending split request'
$splitOperationId = Submit-SplitRequest '
    -SplitMergeServiceEndpoint $SplitMergeServiceEndpoint '
    -ShardMapManagerServerName "$SqlServer.database.windows.net" '
    -ShardMapManagerdatabaseName $ShardMapManagerdatabaseName '
    -TargetServerName "$SqlServer.database.windows.net" '
    -TargetdatabaseName $Shard2 '
    -UserName $UserName '
    -Password $Password '
    -ShardMapName $ShardMapName '
    -ShardKeyType 'Int32' '
    -SplitRangeLowKey $SplitRangeLow '
    -SplitValue $SplitValue '
    -SplitRangeHighKey $SplitRangeHigh '
    -CertificateThumbprint $CertificateThumbprint
This code calls the
Submit-SplitRequestfunctions defined in theSplitMergemodule. TheSubmit-SplitRequestfunction submits the split request by specifying the different parameter values.The
SplitMergemodule contains helper functions for Merge requests as well. Merge refers to merging two range mappings into a single shard.The
Submit-SplitRequestreturns the operationidvalue. The operation id is assigned to the$splitOperationIdvariable and is used to get the split request status. - Copy and paste the following code to wait on the split request until it completes:
# Get split request output
Wait-SplitMergeRequest -SplitMergeServiceEndpoint $SplitMergeServiceEndpoint -OperationId $splitOperationId -CertificateThumbprint $CertificateThumbprint
This code calls the
Wait-SplitMergeRequesthelper function defined in the SplitMerge PowerShell module. The function checks for the split operation status for the operation id$splitOperationIdand writes the status to the console.
Executing PowerShell Script
- Press Window + R to open the run command window. Type PowerShell and hit Enter to open a new PowerShell console window.
- Change directory to the folder that has the shard-
toystore.ps1 script. For example, if the script is in theC:CodeLesson06Shardingdirectory, then run the following command to switch to this directory:cd C:CodeLesson06Splitting
- In the following command, change the parameter values as per your environment. You can also copy the command from the
C:CodeLesson06Executions.txtfile:.Split-
toystore-shard.ps1 -ResourceGrouptoystore-SqlServer toyfactory -UserName sqladmin -Password Packt@pub2 -SplitMergedatabasetoystore_splitmerge -SplitMergeServiceEndpoint "https://splitmerge.cloudapp.net/" -ShardMapManagerdatabaseNametoystore_SMM -Shard2toystore_Shard_200 -ShardMapNametoystorerangemap -SplitRangeLow 0 -SplitRangeHigh 200 -SplitValue 100 -AzureProfileFilePath C:CodeMyAzureProfile.jsonOnce you have changed the parameter values, copy and paste the command in the PowerShell console window opened in step 1 and hit Enter.
If the script executes successfully, you should get the following output:
Sending split request
Polling request status. Press Ctrl-C to end
Progress: 0% | Status: Queued | Details: [Informational] Operation has been queued.
Progress: 5% | Status: Starting | Details: [Informational] Starting Split-Merge state machine for request.
Progress: 5% | Status: Starting | Details: [Informational] Performing data consistency checks on target shards.
Progress: 20% | Status: CopyingReferenceTables | Details:
[Informational] Successfully copied reference table [Applicati
on].[Countries].
…
…
Progress: 80% | Status: CopyingShardedTables | Details: [Informational] Successfully copied key range [190:200) for shar
ded table [Sales].[Orders].
Progress: 90% | Status: Completing | Details: [Informational] Deleting any temp tables that were created while processin
g the request.
Progress: 100% | Status: Succeeded | Details: [Informational] Successfully processed request.
- If you get an error in this command and your split-merge service is deployed correctly, then you can troubleshoot it by checking the
RequestStatustable in the split-merge database.The
RequestStatustables has one row for each split-merge request. The Details column contains the XML with the error details if the request fails.
Verify the Split Operation
To review that the split request has correctly moved the data:
- Open SQL Server Management Studio on your local machine and connect to the toyfactory Azure SQL Server.
- In the Object Explorer, right-click on the
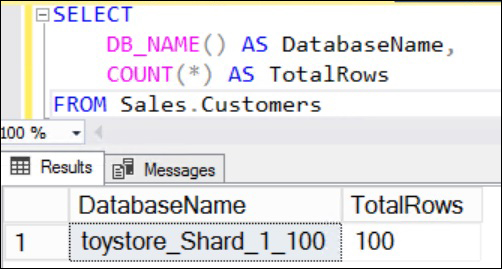
toystore_Shard_1_100database and select New Query from the context menu. - In the New Query window, execute the following query:
SELECT DB_NAME() AS databaseName, COUNT(*) AS TotalRows FROM Sales.Customers
You should get the following output:
- In the Object Explorer, right-click on the
toystore_Shard_200database and select New Query from the context menu. - In the New Query window, execute the following query:
SELECT DB_NAME() AS databaseName, COUNT(*) AS TotalRows FROM Sales.Customers
You should get the following output:

This validates that the Split-Merge operation has successfully split 200 rows between the two shards,
toystore_Shard_1_100 (100 rows)andtoystore_Shard_200 (100 rows). - In the Object Explorer, right-click on the
toystore_SMMdatabase and select New Query from the context menu. Execute the following query in the new query window:SELECT sg.databaseName AS ShardName ,sg.ServerName AS ServerName ,smg.Name AS ShardMapName ,smg.KeyType ,CAST(MinValue AS SMALLINT) AS RangeLowKey ,CAST(MaxValue AS SMALLINT) AS RangeHighKey FROM [__ShardManagement].[ShardMapsGlobal] smg JOIN [__ShardManagement].[ShardsGlobal] sg ON sg.ShardMapID = smg.ShardMapId JOIN [__ShardManagement].[ShardMappingsGlobal] smng ON smg.ShardMapID=smng.ShardMapID AND sg.ShardId=smng.ShardIdYou should get the following output:

The
MinValueandMaxValuecolumns arevarbinarycolumns and are therefore converted toSmallInt.If you remember the first activity of this chapter, the table
ShardMappingsGlobalhad only one mapping, which was added as the part of sharding configuration.However, it now has two rows, and the second row for the shard
toystore_Shard_200is added as part of the split operation.This completes the activity.
In this activity, we will use elastic or cross-database queries to query the sharded tables (created in previous activities) across the shards as a single table.
To query multiple shards as a single table using elastic queries, follow these steps:
- Open SQL Server Management Studio on your local machine and connect to the toyfactory Azure SQL Server.
- In Object Explorer, right-click on the Master database and select New Query from the context menu. In the new query window, execute the following query to create the
toystorereportingdatabase:CREATE DATABASE toystorereporting;
- Once the database is provisioned, navigate to Object Explorer, right-click on the
toystorereportingdatabase, and select New Query from the context menu. - Execute the following query to create a master key:
CREATE MASTER KEY ENCRYPTION BY PASSWORD = 'Packt@pub2';
You may get the following error if a master key already exists in the database:
Msg 15578, Level 16, State 1, Line 3
There is already a master key in the database. Please drop it before performing this statement.
Ignore the error and proceed to the next step.
- Execute the following query to create a database-scoped credential:
CREATE DATABASE SCOPED CREDENTIAL toystore_creds WITH IDENTITY = 'sqladmin', SECRET = 'Packt@pub2'
The identity and secret should be the same as your Azure SQL Server administrator username and password.
- Execute the following query to create the external data source. The external data source is essentially the connection details or the connection string of the external data source. In our case, the external data source is the Shard Map Manager database:
CREATE EXTERNAL DATA SOURCE toystore_dsrc
WITH
(
TYPE=SHARD_MAP_MANAGER,
LOCATION='toyfactory.database.windows.net',
DATABASE_NAME='toystore_SMM',
CREDENTIAL= toystore_creds,
SHARD_MAP_NAME='toystorerangemap'
);
This query creates an external data source
toystore_dsrcof typeShard_Map_Manager, which connects to the shard map manager databasetoystore_SMMusing thetoystore_credsdatabase scoped credentials created in step 5.The shard map name in the external data source will help resolve the individual shards to get the data from.
We didn't specify individual shards as the external data source
database_Namebecause it'll return the data of individual shards. However, our goal is to get data for a table from all shards.Note
The external data source type can be Hadoop, RDBMS, or Blob Storage. For more details on external data sources, refer to this link: https://docs.microsoft.com/en-us/sql/t-sql/statements/create-external-data-source-transact-sql.
- Execute the following query to create the
customerstable in thetoystorereportingdatabase. Observe that the table is created with the External keyword and on the external data sourcetoystore_dsrccreated in step 6:CREATE EXTERNAL TABLE [dbo].[Customers]( [CustomerID] [int] NOT NULL, [CustomerName] [nvarchar](100) NOT NULL, [BillToCustomerID] [int] NOT NULL, [CustomerCategoryID] [int] NOT NULL, [BuyingGroupID] [int] NULL, [PrimaryContactPersonID] [int] NOT NULL, [AlternateContactPersonID] [int] NULL, ... ... );dbo.Customersis an external table that gets its data from thetoystore_dsrcexternal data source, theSales.Customerstable.The Distribution parameter specifies how the data is distributed for this table. In our case, the table is horizontally partitioned, hence the distribution used is sharded with
customerid(sharding key). The other available distributions are:- Replicated: This means that each database has identical copies of the table.
- Round-Robin: This means that the table is horizontally partitioned, with partition logic specified in the application tier and the sharding method we discussed.
- Execute the following query to return all rows from the customer table:
SELECT * FROM dbo.Customers
You should get all 200 rows.
The database engine uses the information specified in the
toystore_dsrcexternal data source to connect and return data from all the shards. - Execute the following queries to get the existing external data source and external tables:
-- Get Existing External Data sources
SELECT * FROM sys.external_data_sources;
-- Get Existing External Tables
SELECT * FROM sys.external_tables
This completes the activity.