
Disaster recovery refers to having business continuity in case of a natural disaster or hacking that terminates an entire Azure region.
There are two ways to implement disaster recovery: Standard Geo-replication and Active Geo-replication.
Standard Geo-replication asynchronously replicates committed transactions from an online primary to an offline secondary in a predefined Azure region:

Figure 8.4: Standard Geo-Replication
In standard geo-replication:
- Only one secondary is allowed in a DR paired region. Each region has a DR pair that can only host the secondary database. The list of DR paired regions is here: http://blogs.msdn.com/b/windowsazurestorage/archive/2013/12/11/introducing-read-access-geo-replicated-storage-ra-grs-for-windows-azure-storage.aspx.
- The secondary database is offline and is unreadable. However, it is visible in the master database. The secondary database is readable when failover is done.
- The secondary database is priced at discounted rates as it's unreadable.
- The secondary replica is supported across all service tiers.
The standard geo-replication is designed for environments where the only purpose of having geo-replication is to implement disaster recovery and not to offload reads to the readable secondaries.
If an Azure region fails, you will get an alert on the Azure Portal about the region failure. The state of the Azure SQL Server on that region is set to degraded. You have two options from here:
- Immediately perform a manual failover to the secondary database. The standard geo-replication has a Recovery Point Objective (RPO) of less than five seconds. RPO is the maximum duration in which data might be lost from an outage. Therefore, if your application can survive a data loss of less than five seconds or you have a way of managing the data loss in the application code, then it's advised to fail over to the secondary.
- Once the failover is done, you will have to ensure that the application is correctly configured to connect to the new primary correctly. You will also have to protect the new primary by geo-replicating it to a different Azure DR pair.
- Wait for the Azure Region to recover. If your application is sensitive to data loss and there isn't any logic at the application end to control the data loss, you should opt to wait for the region to recover.
- However, if the outage is for more than 24 hours and Microsoft finds out that, then it will take a long time to recover the region. Microsoft will force the failover of primary databases to the secondary databases.
- Therefore, if you decide to wait for the region to recover and Microsoft decides to force the failover after 24 hours, then you'll have data loss and the 24 hours of availability loss:

Figure 8.5: Database Failover
Let's say that the East US region fails, and after the failover in the environment, it will be like what is shown in the preceding. The West US will act as the primary, with the East US acting as the new secondary once the region comes back online. However, you can use a different region other than East US to create a secondary database instead of waiting for the East US to come online.
Active Geo-replication uses Always On technology to asynchronously replicate data to a maximum of four readable secondaries in the same or any other Azure region.
Active Geo-replication is available across all performance tiers.
A typical Active Geo-replication environment is shown in the following diagram:

Figure 8.6: Typical Active Geo-Replication Environment
The database DB1 is primarily stored in the South Central US region, with two readable secondaries at US West and US East.
The manual failover is similar to what was explained under the Standard Geo-Replication section. However, when you fail over to the secondary database, the endpoint or the connection string is changed and you will have to make changes in the application so that you can connect to the new primary.
Once the failover is complete, all secondary databases automatically point to the new primary.
In addition to manual failover, Active Geo-replication also supports automatic failover using auto failover groups.
The
default replication in Active Geo-replication
is asynchronous. However, if the application's need is to have synchronous replication, then you can do so by calling
sp_wait_for_database_copy_sync immediately after committing the transaction. This will block the calling thread until all of the committed transactions have been replicated to the secondary.
The procedure can add significant delay to the calling thread if the size of the transaction log is being replicated.
It's advised to use this procedure to prevent the loss of critical data and not all data.
Auto-failover groups allow you to automatically recover one or more groups of SQL Databases in case of a region failure.
All databases in an auto-failover group should belong to a single server, and they will fail over to a single server as well.
Failover Group
A group of databases between the primary server and the secondary server which are to be recovered as a unit if there is an outage in the primary region.
Note
The primary server is the one that hosts the primary databases. The application can read and write on the primary database.
The secondary server is the one which has the secondary databases. An application can only read from the secondary databases. The data is asynchronously replicated from the primary databases to the secondary databases.
Primary and secondary servers can't be on the same region.
Adding Databases to the Failover Group
When a database within a server or an elastic pool is added to the failover group, a secondary database with a performance level similar to that of the primary database is automatically created on the secondary server. If the primary database is in an Elastic Pool, then an elastic pool with the same name is automatically created on the secondary server.
When adding a database which already exists in the secondary database server however, it's not part of the failover group, and so a new secondary database is created in the secondary server.
Read-Write Listener
This is a DNS CNAME record that points to the primary server URL. It allows the application to transparently connect to the available primary server in case of a failover. This is similar to AG listener in an on-premises Always On configuration.
The application didn't connect to the primary or the secondary server URL. Instead, it connected to the Read-Write listener. In case of a failover, the read-write listener automatically points to the new primary (secondary) server. Therefore, unlike manual failover, the user doesn't have to change the application connection string in case of a failover.
Read-Only Listener
This is a DNS CNAME record that points to the secondary server. It allows the application to transparently connect to the secondary for read-only queries. If you want to offload the read workload to the secondary server automatically, you can do so by adding ApplicationIntent=ReadOnly in the application connection string. However, the read workload should be tolerant to a certain staleness of data. This is because of the fact that the replication is asynchronous and the secondary database will be some data behind the primary database.
Failover Policy
The default failover policy is set to automatic, however, this can be turned off if the failover process is controlled by the application.
The manual failover is required if automatic failover is turned off and the failover process isn't controlled by the application.
The manual failover can also be initiated any time if required, independent of the automatic failover policy. An example of manual failover is switching back to the primary region once the region recovers from the outage and is available to host resources.
Grace Period with Data Loss Hours
This setting controls the duration the system fails for before initiating the automatic failover. For example, if the grace period with data loss hours is set to two hours, then in case of an outage in the primary region, the failover will take place after two hours. However, if the outage is resolved before the grace period expires, the failover isn't performed.
Friendly Failover
If there is an outage in the primary region which has not yet impacted the databases (but may impact the databases in the near future) and the databases are still online, a friendly failover with full synchronization is immediately initiated, bypassing the grace period with the data loss hours value. There is no data loss in a friendly failover. The grace period setting is only effective when friendly failover isn't possible.
Upgrading the Primary Database Service Tier
The service tier and performance level of the primary database can be modified as and when required. The performance level within the same service tier can be modified without disconnecting the secondary database, in other words, you can upgrade the primary database from Standard S0 to Standard S1 without disconnecting the corresponding secondary database connection.
However, if you are switching between service tiers, then it's recommended (and enforced) to first upgrade the secondary database and then the primary database so as to avoid the termination of the secondary database connection.
If the secondary database is part of an auto-failover group, then it's advised not to downgrade the secondary database service tier. This is to avoid performance degradation in case of a failover.
Let us consider a scenario, wherein Mike needs to ensure that the data of Toystore Ltd. is shielded from disaster or failure of an entire region. For this, Mike can configure Active Geo-replication using the Azure portal to recover data and maintain business continuity. He can also take precautions by performing a manual failover from the primary server to the secondary server. This activity has the following aims:
- To configure Active Geo-replication using the Azure portal for the toyfactory database.
- To perform a manual failover from the primary server to the secondary server.
The following section explains how to configure Active Geo-replication for a standalone Azure SQL Database:
- Open the Azure portal in a web browser (https://portal.azure.com) and navigate to the
toyfactorydatabase overview blade. - Under the settings menu, find and select the Geo-Replication option:

- In the Geo-Replication blade, you will see a world map with hexagons denoting Azure Regions:

The blue hexagon with a tick mark inside it is the current region that has the primary database. The highlighted (in red) purple-outlined hexagon is the recommended Azure region for the secondary database. The green-outlined hexagons represent other Azure regions across the globe.
- Click on the purple outlined hexagon to open the Create secondary blade. It has the following pre-set options:
- Region: This shows you the region you selected to create the secondary server.
- Database name: The name of the database which is to be replicated.
- Secondary type: The type of the secondary database – readable or offline.
- Elastic database pool: The elastic pool the database is part of. It displays none if the database is not part of any elastic pool.
- Pricing tier: The secondary database pricing tier. This is inherited from the primary database.
- Click on the Target server option to create a new target server in the secondary region.
- In the New server blade, provide the Server name, Server admin login, and Password, as shown in the following screenshot:

- Click the Select button to continue.
- You'll be taken back to the Create secondary blade:


- To verify this, open SQL Server Management Studio and log in to the new secondary server.
Note
When connecting to the secondary server, you'll have to add the firewall rule. It is therefore advised to use the database-level firewall at the primary server. This makes sure that the firewall rules are also copied to the secondary database during the Active Geo-replication setup so that you can log in easily.
It's also advised to use contained users so that you don't have to move server logins to the secondary server.
- In the Object Explorer window, expand Server, and then expand Databases. You should see the
toystoredatabase. Expand thetoystoredatabase. You should see all the objects in thetoystoredatabase:
- Press Ctrl + N to open a new query window. Execute the following query in the new query window:
SELECT COUNT(*) FROM Sales.Customers
GO
INSERT INTO Warehouse.Colors
VALUES(100,'Light Green',1,Getdate(),Getdate()+10);
- In the same SSMS window, connect to the primary server and execute the following query against the
toystoredatabase in the primary server. Do not close the secondary server query window:INSERT INTO Warehouse.Colors VALUES(100,'Magenta',1,Getdate(),Getdate()+10);- One row will be inserted into the Colors table.
- Switch over to the query window with the secondary database connection. Execute the following query to verify whether the newly inserted value is properly replicated to the secondary database or not:
SELECT @@ServerName As SecondaryServerName,*
    FROM Warehouse.Colors
WHERE ColorName='Magenta'
- You should get the following output:
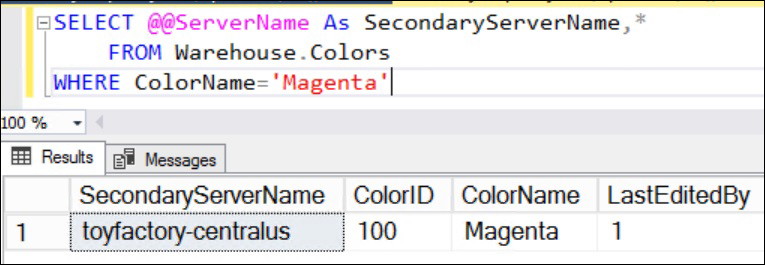
- The data is correctly replicated to the secondary database.

Performing Manual Failover
- In the toystore geo-replication blade, scroll down and locate the primary and secondary databases:

- Select the three dots (highlighted in the red rectangle). In the context menu, select Forced Failover:

- Click Yes on the failover message pop-up window to start the failover:

The failover request will be submitted and the failover will be initiated.
- To monitor the failover, scroll up to the top of the Geo-Replication blade. You'll see a dotted blue line animation denoting the failover:

- Once the failover is complete, the dotted blue line will change to a solid blue line:

Observe that the region color is also reversed. The blue hexagon, which denotes that the primary region is now the Central US region, and the green hexagon, which denotes that the secondary region is now East US 2.
Additionally, you can perform steps 5–8 to verify the failover.
This section covers configuration of auto-failover groups for a standalone Azure SQL Database. Consider the following scenario from ToyStore Ltd. Mike wants to ensure that whenever there is a disaster or failure of an entire region, there is no effect to the business of Toystore Ltd., so he configures auto-failover groups that allow him to automatically recover one or more groups of SQL Databases. To configure the auto-failover group for a standalone Azure SQL Database, the below steps need to be followed.
Adding databases to an existing failover group hasn't been supported in Azure Portal until now.
- Log in to the Azure portal (https://portal.azure.com) and open the
toystore_Shard_1_50database overview blade. - In the Overview blade, select Geo-Replication from the Settings section.
- In the
toystore_Shard_1_50 Geo-Replicationblade, click on the information icon above the world map:
- In the Failover group blade, configure the following settings:
- Secondary Server: The Azure SQL Server on another region that will host the secondary databases. You'll have to create a new server if you don't have one already.
- Failover group name: The name of the failover group.
- Read/Write failover policy: The default value is Automatic. Leave it as it is.
- Read/Write grace period (hours): The default value is 1 hour. Leave it as it is:

In the Summary section, observe that we only have one database in the failover group, which is
toystore_Shard_1_50.Click Create to provision the secondary server and the failover group.
Each failover group has a monthly cost associated with it. This cost is separate from the cost of the secondary database.
Once created, you can follow the steps from the previous section to fail over and verify the replication.
In this activity, we will configure Active Geo-Replication for the
toystore database using PowerShell.
- Press Window + R to open the Run command window. Type
PowerShell_ISE.exein the run command window and hit Enter. This will open a new PowerShell ISE editor window. This is where you'll write the PowerShell commands:
- In the PowerShell ISE, select File from the top menu and click Save. Alternatively, you can press Ctrl + S to save the file. In the File Save Dialog box, browse to the
C:CodeLesson08directory. In the file name textbox, typeManage-ActiveGeoReplicationand press Save to save the file:

- In the PowerShell ISE, select File from the top menu and click Save. Alternatively, you can press Ctrl + S to save the file. In the File Save Dialog box, browse to the
- Copy and paste the following code into the
Manage-ElasticPool.ps1file, one after the other. The code explanation, wherever required, is given below the code snippet and in the comments within the code snippet. - Copy and paste the following code to define script parameters:
param
(
    [parameter(Mandatory=$true)]
    [String] $ResourceGroup,
    [parameter(Mandatory=$true)]
    [String] $PrimarySqlServer,
    [parameter(Mandatory=$true)]
    [String] $UserName,
    [parameter(Mandatory=$true)]
    [String] $Password,
    [parameter(Mandatory=$true)]
    [String] $SecondarySqlServer,
    [parameter(Mandatory=$true)]
   [String] $SecondaryServerLocation,
    [parameter(Mandatory=$false)]
    [bool] $Failover = $false,
    [parameter(Mandatory=$false)]
    [String] $DatabasesToReplicate,
    [parameter(Mandatory=$false)]
    # Add/Remove database to/from secondary server
    [String] $Operation = "none",
    [parameter(Mandatory=$false)]
    [String] $AzureProfileFilePath
    )
The parameter description is as follows:
- ResourceGroup: The resource group that hosts the primary Azure SQL Server and databases.
- PrimarySqlServer: The name of the primary Azure SQL Server.
- UserName: The primary and secondary Azure SQL Server admin username.
- Password: The primary and secondary Azure SQL Server admin password.
- SecondarySqlServer: The secondary Azure SQL Server name.
- SecondaryServerLocation: The secondary Azure SQL Server location.
- Failover: A Boolean value set to false by default. When true, the script does the failover from the primary Azure SQL Server to the secondary SQL Server.
- DatabasesToReplicate: A comma-delimited list of Azure SQL Databases to be replicated.
- Operation: Accepts two values: Add and Remove. When set to Add, the Active Geo-replication link is established for the databases. When set to Remove, the Active Geo-replication link is removed for the databases.
- AzureProfileFilePath: The full path of the Azure profile JSON file used for logging in to an Azure Subscription.
- Copy and paste the following code to log in to Microsoft Azure, and set the Azure context to your Subscription:
# log the execution of the script Start-Transcript -Path ".LogManage-ElasticPool.txt" -Append # Set AzureProfileFilePath relative to the script directory if it's not provided as parameter if([string]::IsNullOrEmpty($AzureProfileFilePath)) { $AzureProfileFilePath="....MyAzureProfile.json" } #Login to Azure Account … # Provide your Azure Credentials in the login dialog box $profile = Login-AzureRmAccount $SubscriptionID = $profile.Context.Subscription.SubscriptionId } #Set the Azure Context Set-AzureRmContext -SubscriptionId $SubscriptionID | Out-Null- The preceding code starts by logging into the
Manage-ElasticPool.txtfile created under theLogdirectory within the parent directory of theManage-ElasticPool.ps1script. - It then checks for the profile information in the JSON file provided by the variable
AzureProfileFilePath. If found, it then sets the PowerShell context to the subscription ID, as specified in the profile file; otherwise, it asks to manually log in to the Azure account to set the context.
- The preceding code starts by logging into the
- Copy and paste the following code to provision the secondary Azure SQL Server if it doesn't already exist:
if($Operation -eq "Add")
{
     # Check if Azure SQL Server Exists
    # An error is returned and stored in notexists variable if resource group exists
    Get-AzureRmSqlServer -ServerName $SecondarySqlServer -ResourceGroupName $ResourceGroup -ErrorVariable notexists -ErrorAction SilentlyContinue

    # provision the secondary server if it doesn't exists

    if($notexists)
        {
            Write-Host "Provisioning Azure SQL Server $SecondarySqlServer" -ForegroundColor Green
            $credentials = New-Object -TypeName System.Management.Automation.PSCredential -ArgumentList $UserName, $(ConvertTo-SecureString -String $Password -AsPlainText -Force)
            $_SecondarySqlServer = @{
             ResourceGroupName = $ResourceGroup;
             ServerName = $SecondarySqlServer;
             Location = $SecondaryServerLocation;
             SqlAdministratorCredentials = $credentials;
             ServerVersion = '12.0';
…
             {
Write-Host $notexits -ForegroundColor Yellow
}
The preceding code will provision a new secondary Azure SQL Server if the
$Operationparameter is set to Add. The SQL Server creation code is similar to what was used in Chapter 1, Microsoft Azure SQL Database Primer. - Copy and paste the following code to configure Active Geo-replication for the individual databases:
# Configure Active Geo-Replication for individual databases if(![string]::IsNullOrEmpty($DatabasesToReplicate.Replace(',','')) -and $Operation -eq "Add") { $dbname = $DatabasesToReplicate.Split(','); foreach($db in $dbname) { Write-Host "Replicating database $db to $SecondarySqlServer " -ForegroundColor Green #Get the database object for the given database name $database = Get-AzureRmSqlDatabase -DatabaseName $db -ResourceGroupName $ResourceGroup -ServerName $PrimarySqlServer #pipe the database object to New-AzureRmSqlDatabaseSecondary cmdlet $database | New-AzureRmSqlDatabaseSecondary -PartnerResourceGroupName $ResourceGroup -PartnerServerName $SecondarySqlServer -AllowConnections "All" } }- The preceding code first checks whether the
$DatabaseToReplicateparameter isn't empty. If it's not and the$operationparameter is set toAdd, it splits the comma -delimited list of the databases and configures Active Geo-replication for each one of them using theNew-AzureRmSqlDatabaseSecondarycmdlet. - The
New-AzureRmSqlDatabaseSecondarytakes three parameters: PartnerResourceGroupName: The resource group name that contains the secondary SQL Server. The primary and secondary resource groups are assumed to be the same in this script.PartnerServerName: The name of the secondary Azure SQL Server.Allowconnections: This specifies the read intent of the secondary database. It's set to All.
- The preceding code first checks whether the
- Copy and paste the following code to remove Active Geo-replication for the individual Azure SQL Databases:
if($Operation -eq "Remove") { $dbname = $DatabasesToReplicate.Split(','); foreach($db in $dbname) { Write-Host "Removing replication for database $db " -ForegroundColor Green $database = Get-AzureRmSqlDatabase -DatabaseName $db -ResourceGroupName $ResourceGroup -ServerName $PrimarySqlServer $database | Remove-AzureRmSqlDatabaseSecondary -PartnerResourceGroupName $ResourceGroup -ServerName $PrimarySqlServer -PartnerServerName $SecondarySqlServer } }- The preceding code runs when
$Operationis set to Remove. It first splits the comma-separated database list in the$DatabaseToReplicateparameter. It then removes the replication link for each database using theRemove-AzureRmSqlDatabaseSecondarycmdlet. - The
Remove-AzureRmSqlDatabaseSecondaryaccepts three parameters: PartnerResourceGroupName: The resource group of the secondary SQL Server. The script assumes that it's the same as the primary SQL Server.ServerName: The primary SQL Server name.PartnerServerName: The secondary SQL Server name.- This only stops the replication between the primary and the secondary databases; it doesn't delete the secondary databases. The database and server can be removed separately if required.
- The preceding code runs when
- Copy and paste the following code to fail over individual databases to the secondary SQL Server:
# failover individual databases from primary to secondary if($Failover -eq $true) { $dbname = $DatabasesToReplicate.Split(','); foreach($db in $dbname) { Write-Host "Failover $db to $SecondarySqlServer..." -ForegroundColor Green $database = Get-AzureRmSqlDatabase -DatabaseName $db -ResourceGroupName $ResourceGroup -ServerName $SecondarySqlServer $database | Set-AzureRmSqlDatabaseSecondary -PartnerResourceGroupName $ResourceGroup -Failover } }- The preceding code executes if the
$Failoverparameter is set to true. It first splits the comma delimited list of the databases in$DatabaseToReplicateand then performs a manual failover from the primary server to the secondary server usingSet-AzureRmSqlDatabaseSecondary. - The
Set-AzureRmSqlDatabaseSecondaryaccepts two parameters: PartnerResourceGroupName: The resource group of the secondary SQL Server. The script assumes that it's the same as the primary SQL Server.Failover: Initiates the failover.- The database to fail over is piped to the
Set-AzureRmSqlDatabaseSecondarycmdlet. - This completes the script. Press Ctrl + S to save the file.
- The preceding code executes if the
- Press Window + R to open the run command window. Type PowerShell and hit enter to open a new PowerShell console window.
- Change the directory to the folder that has the
Manage-ActiveGeoReplication.ps1script inside of it. For example, if the script is at theC:CodeLesson08directory, then run the following command to switch to this directory:cd C:CodeLesson08ActiveGeoReplication
- In the PowerShell console, execute the following command to establish Active Geo-replication for the
toystore_Shard_1_50andtoystore_Shard_50_100databases:.Manage-ActiveGeoReplication.ps1 -ResourceGroup toystore -PrimarySqlServer toyfactory -UserName sqladmin -Password Packt@pub2 -SecondarySqlServer toyfactory-centralus -SecondaryServerLocation "Central US" -DatabasesToReplicate "toystore_Shard_1_50,toystore_Shard_50_100" -Operation "Add" -AzureProfileFilePath C:CodeMyAzureProfile.json
- The preceding command will call
Manage-ActiveGeoReplication.ps1to start Active Geo-replication for thetoystore_Shard_1_50andtoystore_Shard_50_100databases ontoyfactorydatabases to thetoyfactory-centralussecondary Azure SQL Server. - You will have to modify the command to provide the relevant parameter values.
- The preceding command will call
- In the PowerShell console window, execute the following command to fail over the databases to the secondary SQL Server:
.Manage-ActiveGeoReplication.ps1 -ResourceGroup toystore -PrimarySqlServer toyfactory -UserName sqladmin -Password Packt@pub2 -SecondarySqlServer toyfactory-centralus -SecondaryServerLocation "Central US" -DatabasesToReplicate "toystore_Shard_1_50,toystore_Shard_50_100" -failover $true -AzureProfileFilePath C:CodeMyAzureProfile.json
- The preceding command will fail over the databases from the primary server to the secondary server, in other words, the primary becomes the secondary and vice versa.
- In the PowerShell console window, execute the following command to remove Active Geo-replication:
.Manage-ActiveGeoReplication.ps1 -ResourceGroup toystore -PrimarySqlServer toyfactory -UserName sqladmin -Password Packt@pub2 -SecondarySqlServer toyfactory-centralus -SecondaryServerLocation "Central US" -DatabasesToReplicate "toystore_Shard_1_50,toystore_Shard_50_100" -Operation "Remove" -AzureProfileFilePath C:CodeMyAzureProfile.json
- The preceding command will remove the replication link between the primary and the secondary servers, though please note that the secondary server and the databases are not removed.
This completes the activity.
In this activity, we will configure auto failover groups using PowerShell for ToyStore Ltd.
- Press Window + R to open the run command window. Type
PowerShell_ISE.exein the run command window and hit enter. This will open a new PowerShell ISE editor window. This is where you'll write the PowerShell commands:

- Copy and paste the code below into the
Manage-ElasticPool.ps1file, one after the other. The code explanation, wherever required, is given below the code snippet and in the comments within the code snippet. - Copy and paste the following code to define the script parameters:
param ( [parameter(Mandatory=$true)] [String] $ResourceGroup, [parameter(Mandatory=$true)] [String] $PrimarySqlServer, [parameter(Mandatory=$false)] [String] $UserName, [parameter(Mandatory=$false)] [String] $Password, [parameter(Mandatory=$true)] [String] $SecondarySqlServer, [parameter(Mandatory=$false)] [String] $SecondaryServerLocation, [parameter(Mandatory=$false)] [bool] $Failover = $false, [parameter(Mandatory=$false)] [String] $DatabasesToReplicate, [parameter(Mandatory=$true)] [String] $FailoverGroupName, [parameter(Mandatory=$false)] [String] $Operation = "none", [parameter(Mandatory=$false)] [String] $AzureProfileFilePath ) - Copy and paste the following code to log in to Microsoft Azure and set the Azure context to your subscription:
# log the execution of the script Start-Transcript -Path ".LogManage-ElasticPool.txt" -Append # Set AzureProfileFilePath relative to the script directory if it's not provided as parameter if([string]::IsNullOrEmpty($AzureProfileFilePath)) { $AzureProfileFilePath="....MyAzureProfile.json" } #Login to Azure Account #Login to Azure Account if((Test-Path -Path $AzureProfileFilePath)) { $profile = Select-AzureRmProfile -Path $AzureProfileFilePath $SubscriptionID = $profile.Context.Subscription.SubscriptionId … } #Set the Azure Context Set-AzureRmContext -SubscriptionId $SubscriptionID | Out-Null- The preceding code starts by logging into the
Manage-ElasticPool.txtfile, created under the Log directory within the parent directory of theManage-ElasticPool.ps1script. - It then checks for the profile information in the JSON file provided by the
AzureProfileFilePathvariable. If found, then it sets the PowerShell context to the subscription ID, as specified in the profile file; otherwise, it asks to manually log in to the Azure account to set the context.
- The preceding code starts by logging into the
- Copy and paste the following code to provision a new secondary SQL Server, if it doesn't already exist:
IF($Operation -eq "Create")
{
# An error is returned and stored in notexists variable if resource group exists
Get-AzureRmSqlServer -ServerName $SecondarySqlServer -ResourceGroupName $ResourceGroup -ErrorVariable notexists -ErrorAction SilentlyContinue
# provision the secondary server if it doesn't exists
if($notexists)
{
 Write-Host "Provisioning Azure SQL Server $SecondarySqlServer" -ForegroundColor Green
              …
        }
        New-AzureRmSqlServer @_SecondarySqlServer;
}
else
{
Write-Host $notexits -ForegroundColor Yellow
}
The preceding code is the same as what explained in Chapter 1, Microsoft Azure SQL Database Primer to provision a new SQL Server. The new server is provisioned only when
$Operationis set to Create. - Copy and paste the following code to create the failover group:
# Create the failover group Write-Host "Creating the failover group $FailoverGroupName " -ForegroundColor Green $failovergroup = New-AzureRMSqlDatabaseFailoverGroup ' –ResourceGroupName $ResourceGroup ' -ServerName $PrimarySqlServer ' -PartnerServerName $SecondarySqlServer ' –FailoverGroupName $FailoverGroupName ' –FailoverPolicy Automatic ' -GracePeriodWithDataLossHours 1 }- The preceding code creates a new failover group if the
$Operationparameter is set to Create. The New-AzureRMSqlDatabaseFailoverGroup cmdlet accepts the following parameters: ResourceGroupName: The name of the resource group that contains the primary SQL ServerServerName: The primary SQL Server namePartnerServerName: The secondary SQL Server nameFailoverGroupName: The name of the failover group to be createdFailoverPolicy: The failover policy, Automatic or ManualGracePeriodWithDataLossHours: The value in hours for the duration the automatic failover should wait after a region outage- The failover group is created at the primary server location.
- The preceding code creates a new failover group if the
- Copy and paste the following code to add the databases to the failover group:
# Add databases to the failover group if(![string]::IsNullOrEmpty($DatabasesToReplicate.Replace(',','')) -and $Failover -eq $false -and $Operation -eq "Create") { $dbname = $DatabasesToReplicate.Split(','); foreach($db in $dbname) { Write-Host "Adding database $db to failover group $FailoverGroupName " -ForegroundColor Green $database = Get-AzureRmSqlDatabase -DatabaseName $db -ResourceGroupName $ResourceGroup -ServerName $PrimarySqlServer Add-AzureRmSqlDatabaseToFailoverGroup -ResourceGroupName $ResourceGroup -ServerName $PrimarySqlServer -FailoverGroupName $FailoverGroupName -Database $database } }- The preceding code splits the comma delimited database names in the
$DatabasesToReplicateparameter and adds them to the group. - The Add-AzureRmSqlDatabaseToFailoverGroup cmdlet adds the databases to the group and accepts the following parameter values:
ResourceGroupName: The name of the primary SQL Server resource group.ServerName: The primary SQL Server name.FailoverGroupName: The name of the failover group the databases are to be added to.Database: The database object of the database to be added. This is set by calling theGet-AzureRMSqlDatabasecmdlet.- The databases are added to the failover group and replication sync is started.
- The preceding code splits the comma delimited database names in the
- Copy and paste the following code to manually fail over all the failover groups to the secondary server:
# failover to secondary if($Failover) { Write-Host "Failover to secondary server $SecondarySqlServer " -ForegroundColor Green Switch-AzureRMSqlDatabaseFailoverGroup -ResourceGroupName $ResourceGroup -ServerName $SecondarySqlServer -FailoverGroupName $FailoverGroupName } - Copy and paste the following code to remove the failover group and stop Active Geo-replication between the primary and secondary servers:
if($Operation -eq "Remove") { Write-Host "Deleting the failover group $FailoverGroupName " -ForegroundColor Green Remove-AzureRmSqlDatabaseFailoverGroup -ResourceGroupName $ResourceGroup -ServerName $PrimarySqlServer -FailoverGroupName $FailoverGroupName # remove the replication link $dbname = $DatabasesToReplicate.Split(','); foreach($db in $dbname) { Write-Host "Removing replication for database $db " -ForegroundColor Green $database = Get-AzureRmSqlDatabase -DatabaseName $db -ResourceGroupName $ResourceGroup -ServerName $PrimarySqlServer $database | Remove-AzureRmSqlDatabaseSecondary -PartnerResourceGroupName $ResourceGroup -ServerName $PrimarySqlServer -PartnerServerName $SecondarySqlServer } }- The preceding code is executed when the $Operation parameter is set to Remove. The
Remove-AzureRmSqlDatabaseFailoverGroupdeletes the failover group. It accepts the following parameters: ResourceGroupName: The failover group resource group nameServerName: The primary SQL Server nameFailoverGroupName: The name of the failover group which is to be deleted
- Removing the failover group doesn't stop replication sync. The databases are still being replicated and are not part of any failover group. The databases can still fail to the secondary server individually, as shown in the previous activity.
- The
Remove-AzureRmSqlDatabaseSecondaryremoves or stops the replication, as explained in the previous activity. - This completes the script. Press Ctrl + S to save the script.
- The preceding code is executed when the $Operation parameter is set to Remove. The
- Press Window + R to open the run command window. Type PowerShell and hit enter to open a new PowerShell console window.
- Change the directory to the folder that has the
Manage-ActiveGeoReplication.ps1script in it. For example, if the script is at theC:CodeLesson08directory, then run the following command to switch to this directory:cd C:CodeLesson08
- In the PowerShell console window, execute the following command to create a new failover group and add databases to it:
.Manage-FailoverGroup.ps1 -ResourceGroup toystore -PrimarySqlServer toyfactory -UserName sqladmin -Password Packt@pub2 -SecondarySqlServer toyfactory-centralus -SecondaryServerLocation "Central US" -DatabasesToReplicate "toystore_Shard_100_150,toystore_Shard_150_200" -Operation "Create" -FailoverGroupName toyfactoryfailovergroup -AzureProfileFilePath c:CodeMyAzureProfile.json
- The preceding command will create a new failover group,
toyfactoryfailovergroup, and add thetoystore_Shard_100_150andtoystore_150_200databases to the newly created failover group. - The failover group name is the new endpoint to be used by the application to connect to the failover group, in other words, the application connects to
toyfactoryfailovergroup.database.windows.netand not individual primary or secondary database endpoints. - This is similar to the AG listener in an Always ON configuration.
- The Azure SQL Server the failover group points to is transparent to the user. In case of a failover, the failover group endpoint points to the new primary. Therefore, unlike Active Geo-replication, you don't need to manage the database connection string (endpoint) within the application when the failover occurs.
- The preceding command will create a new failover group,
- In the PowerShell console window, execute the following code to perform the manual failover:
.Manage-FailoverGroup.ps1 -ResourceGroup toystore -SecondarySqlServer toyfactory-centralus -FailoverGroupName toyfactoryfailovergroup -Failover $true -AzureProfileFilePath c:CodeMyAzureProfile.json
The preceding command will fail over all the databases in the failover group
toyfactoryfailovergroupto the secondary server and make it the new primary server.You can verify this from the Azure Portal, as explained in this chapter's section.
- Copy and paste the following command to remove the failover group and stop the replication between the primary and secondary servers:
# delete failover group and stop the replication
.Manage-FailoverGroup.ps1 -ResourceGroup toystore -PrimarySqlServer toyfactory-centralus -UserName sqladmin -Password Packt@pub2 -SecondarySqlServer toyfactory -SecondaryServerLocation "Central US" -DatabasesToReplicate "toystore_Shard_100_150,toystore_Shard_150_200" -Operation "Remove" -FailoverGroupName toyfactoryfailovergroup -AzureProfileFilePath c:CodeMyAzureProfile.json
- The preceding command will remove the failover group
toyfactoryfailovergroupand break the replication link between the primary and secondary databases. However, the secondary server and the databases aren't deleted. - Observe that the
PrimarySqlServerparameter value istoyfactory-centralusand that theSecondarySqlServerparameter value istoyfactory, which is the reverse of what we provided in step 1 when creating the failover group. - This is because, when we did a manual failover, the primary and secondary server roles were reversed. As mentioned earlier, the failover group is maintained at the primary database, so, to delete the failover group, the primary is now the secondary and the secondary is the new primary.
- This completes the activity.
- The preceding command will remove the failover group