
Using the Speaker Recognition API, we can identify who is speaking. By defining one or more speaker profiles with corresponding samples, we can identify whether any of them are speaking at any time.
To be able to utilize this feature, we need to go through a few steps:
- We need to add one or more speaker profiles to the service.
- Each speaker profile enrolls several spoken samples.
- We call the service to identify a speaker based on audio input.
If you have not already done so, sign up for an API key for the Speaker Recognition API at https://portal.azure.com.
Start by adding a new NuGet package to your smart-house application. Search for and add Microsoft.ProjectOxford.SpeakerRecognition.
Add a new class called SpeakerIdentification to the Model folder of your project. This class will hold all of the functionality related to speaker identification.
Beneath the class, we will add another class, containing EventArgs for status updates:
    public class SpeakerIdentificationStatusUpdateEventArgs : EventArgs
    {
        public string Status { get; private set; }
        public string Message { get; private set; }
        public Identification IdentifiedProfile { get; set; }

        public SpeakerIdentificationStatusUpdateEventArgs (string status, string message)
       {
           Status = status;
           Message = message;
       }
    }
The two first properties should be self-explanatory. The last one, IdentificationProfile, will hold the results of a successful identification process. We will look at what information this contains presently.
We also want to send events for errors, so let's add an EventArgs class for the required information:
    public class SpeakerIdentificationErrorEventArgs : EventArgs {
        public string ErrorMessage { get; private set; }

        public SpeakerIdentificationErrorEventArgs(string errorMessage)
        {
            ErrorMessage = errorMessage;
        }
    }
Again, the property should be self-explanatory.
In the SpeakerIdentification class, add two events and one private member at the top of the class:
    public event EventHandler <SpeakerIdentificationStatusUpdateEventArgs>
        OnSpeakerIdentificationStatusUpdated;
    public event EventHandler <SpeakerIdentificationErrorEventArgs>
        OnSpeakerIdentificationError;

    private ISpeakerIdentificationServiceClient _speakerIdentificationClient;
The events will be triggered if we have any status updates, a successful identification, or errors. The ISpeakerIdentificationServiceClient object is the access point for the Speaker Recognition API. Inject this object through the constructor.
To make it easier to raise events, add two helper functions, one for each event. Call these RaiseOnIdentificationStatusUpdated and RaiseOnIdentificationError. They should accept the corresponding EventArgs object as a parameter and trigger the corresponding event.
To be able to identify speakers, we need to add profiles. Each profile can be seen as a unique person who we can identify later.
At the time of writing, each subscription allows for 1,000 speaker profiles to be created. This also includes profiles that are created for verification, which we will look at presently.
To facilitate creating profiles, we need to add some elements to our AdministrationView and AdministrationViewModel properties, so open these files.
In the View, add a new button for adding speaker profiles. Also, add a list box, which will show all of our profiles. How you lay out the UI is up to you.
The ViewModel will need a new ICommand property for the button. It will also need an ObservableObject property for our profile list; make sure it is of type Guid. We will also need to be able to select a profile, so add a Guid property for the selected profile.
Additionally, we need to add a new member to the ViewModel:
private SpeakerIdentification _speakerIdentification;
This is the reference to the class we created earlier. Create this object in the constructor, passing on an ISpeakerIdentificationServiceClient object, which you inject via the ViewModel's constructor. In the constructor, you should also subscribe to the events we created:
    _speakerIdentification.OnSpeakerIdentificationError += OnSpeakerIdentificationError;
    _speakerIdentification.OnSpeakerIdentificationStatusUpdated += OnSpeakerIdentificationStatusUpdated;
Basically, we want both event handles to update the status text with the message they carry:
    Application.Current.Dispatcher.Invoke(() =>
    {
        StatusText = e.Message;
    });
The preceding code is for OnSpeakerIdentificationStatusUpdated. The same should be used for OnSpeakerIdentificationError, but set StatusText to be e.ErrorMessage instead.
In the function created for our ICommand property, we do the following to create a new profile:
    private async void AddSpeaker(object obj)
    {
        Guid speakerId = await _speakerIdentification.CreateSpeakerProfile();
We make a call to our _speakerIdentification object's CreateSpeakerProfile function. This function will return a Guid, which is the unique ID of that speaker. In our example, we do not do anything further with this. In a real-life application, I would recommend mapping this ID to a name in some way. As you will see presently, identifying people through GUIDs is for machines, not people:
        GetSpeakerProfiles();
    }
We finish this function by calling a GetSpeakerProfile function, which we will create next. This will fetch a list of all the profiles we have created so that we can use these throught the further process:
    private async void GetSpeakerProfiles()
    {
        List<Guid> profiles = await _speakerIdentification.ListSpeakerProfiles();

        if (profiles == null) return;
In our GetSpeakerProfiles function, we call ListSpeakerProfiles on our _speakerIdentification object. This will, as we will see presently, fetch a list of GUIDs, containing the profile IDs. If this list is null, there is no point in moving on:
        foreach(Guid profile in profiles)
        {
            SpeakerProfiles.Add(profile);
        }
    }
If the list does contain anything, we add these IDs to our SpeakerProfiles, which is the ObservableCollection property. This will show all of our profiles in the UI.
This function should also be called from the Initialize function, so we populate the list when we start the application.
Back in the SpeakerIdentification class, create a new function called CreateSpeakerProfile. This should have the return type Task<Guid> and be marked as async:
    public async Task<Guid> CreateSpeakerProfile()
    {
        try
        {
            CreateProfileResponse response = await _speakerIdentificationClient.CreateProfileAsync("en-US");
We will then make a call to CreateProfileAsync on the API object. We need to specify the locale, which is used for the speaker profile. At the time of writing, en-US is the only valid option.
If the call is successful, we get a CreateProfileResponse object in response. This contains the ID of the newly created speaker profile:
       if (response == null)
      {
         RaiseOnIdentificationError(
            new SpeakerIdentificationErrorEventArgs
               ("Failed to create speaker profile."));
         return Guid.Empty;
      }

      return response.ProfileId;
   }
If the response is null, we raise an error event. If it contains data, we return the ProfileId to the caller.
Add the corresponding catch clause to finish the function.
Create a new function called ListSpeakerProfile. This should return Task<List<Guid>> and be marked as async:
    public async Task<List<Guid>> ListSpeakerProfiles()
    {
        try
        {
            List<Guid> speakerProfiles = new List<Guid>();

            Profile[] profiles = await _speakerIdentificationClient.GetProfilesAsync();
We will then create a list of type Guid, which is the list of speaker profiles we will return. Then, we call the GetProfilesAsync method on our _speakerIdentificationClient object. This will get us an array of type Profile, which contains information on each profile. This is information such as creation time, enrollment status, last modified, and so on. We are interested in the IDs of each profile:
            if (profiles == null || profiles.Length == 0)
            {
                RaiseOnIdentificationError(new SpeakerIdentificationErrorEventArgs("No profiles exist"));
                return null;
            }

            foreach (Profile profile in profiles)
            {
                speakerProfiles.Add(profile.ProfileId);
            }

            return speakerProfiles;
        }
If any profiles are returned, we loop through the array and add each profileId to the previously created list. This list is then returned to the caller, which in our case will be the ViewModel.
End the function with the corresponding catch clause. Make sure that the code compiles and executes as expected before continuing. This means that you should now be able to add speaker profiles to the service and get the created profiles displayed in the UI.
To delete a speaker profile, we will need to add a new function to SpeakerIdentification. Call this function DeleteSpeakerProfile, and let it accept a Guid as its parameter. This will be the ID of the given profile we want to delete. Mark the function as async. The function should look as follows:
public async void DeleteSpeakerProfile(Guid profileId)
{
   try
   {
      await _speakerIdentificationClient.DeleteProfileAsync(profileId);
   }
   catch (IdentificationException ex)
   {
      RaiseOnIdentificationError(new SpeakerIdentificationErrorEventArgs($"Failed to
      delete speaker profile: {ex.Message}"));
   }
   catch (Exception ex)
   {
      RaiseOnIdentificationError(new SpeakerIdentificationErrorEventArgs($"Failed to
      delete speaker profile: {ex.Message}"));
   }
}
As you can see, the call to the DeleteProfileAsync method expects a Guid type, profileId. There is no return value and, as such, when we call this function, we need to call the GetSpeakerProfile method in our ViewModel.
To facilitate the deletion of speaker profiles, add a new button to the UI and a corresponding ICommand property in the ViewModel.
With a speaker profile in place, we need to associate spoken audio with the profile. We do this through a process called enrolling. For speaker identification, enrolling is text-independent. This means that you can use whatever sentence you want for enrollment. Once the voice is recorded, a number of features will be extracted to form a unique voice-print.
When enrolling, the audio file you are using must be 5 seconds at least and 5 minutes at most. Best practice states that you should accumulate at least 30 seconds of speech. This is 30 seconds after silence has been removed, so several audio files may be required. This recommendation can be avoided by specifying an extra parameter, as we will see presently.
How you choose to upload the audio file is up to you. In the smart-house application, we will use a microphone to record live audio. To do so, we will need to add a new NuGet package called NAudio. This is an audio library for .NET, which simplifies audio work.
We will also need a class to deal with recording, which is out of the scope of this book. As such, I recommend you copy the Recording.cs file, which can be found in the sample project in the Model folder.
In the AdministrationViewModel ViewModel, add a private member for the newly copied class. Create the class and subscribe to the events defined in the Initialize function:
    _recorder = new Recording();
    _recorder.OnAudioStreamAvailable += OnRecordingAudioStreamAvailable;
    _recorder.OnRecordingError += OnRecordingError;
We have an event for errors and one for available audio stream. Let OnRecordingError print the ErrorMessage to the status text field.
In OnAudioStreamAvailable, add the following:
    Application.Current.Dispatcher.Invoke(() =>
    {
        _speakerIdentification.CreateSpeakerEnrollment(e.AudioStream, SelectedSpeakerProfile);
    });
Here, we call CreateSpeakerEnrollment on the _speakerIdentification object. We will cover this function presently. The parameters we pass on are the AudioStream, from the recording, as well as the ID of the selected profile.
To be able to get audio files for enrollment, we need to start and stop the recording. This can be done by simply adding two new buttons, one for start and one for stop. They will then need to execute one of the following:
    _recorder.StartRecording();
    _recorder.StopRecording();
Back in the SpeakerIdentification.cs file, we need to create a new function, CreateSpeakerEnrollment. This should accept Stream and Guid as parameters, and be marked as async:
    public async void CreateSpeakerEnrollment(Stream audioStream, Guid profileId) {
        try {
            OperationLocation location = await _speakerIdentificationClient.EnrollAsync(audioStream, profileId);
In this function, we call the EnrollAsync function on _speakerIdentificationClient. This function requires both the audioStream and profileId as parameters. An optional third parameter is a bool type variable, which lets you decide whether or not you would like to use the recommended speech length or not. The default is false, meaning that you use the recommended setting of at least 30 seconds of speech.
If the call is successful, we get an OperationLocation object back. This holds a URL that we can query for the enrollment status, which is precisely what we will do:
        if (location == null) {
            RaiseOnIdentificationError(new SpeakerIdentificationErrorEventArgs("Failed to start enrollment process."));
            return;
        }

        GetEnrollmentOperationStatus(location);
    }
First, we make sure that we have the location data. Without it, there is no point in moving on. If we do have the location data, we call a function, GetEnrollmentOperationStatus, specifying the location as the parameter.
Add the corresponding catch clause to finish the function.
The GetEnrollmentOperationStatus method accepts OperationLocation as a parameter. When we enter the function, we move into a while loop, which will run until the operation completes. We call CheckEnrollmentStatusAsync, specifying the location as the parameter. If this call is successful, it will return an EnrollmentOperation object, which contains data such as status, enrollment speech time, and an estimation of the time of enrollment left:
    private async void GetEnrollmentOperationStatus(OperationLocation location) {
        try {
            while(true) {
                EnrollmentOperation result = await _speakerIdentificationClient.CheckEnrollmentStatusAsync(location);
When we have retrieved the result, we check to see if the status is running or not. If it isn't, the operation has either failed, succeeded, or not started. In any case, we do not want to check any further, so we send an update with the status and break out of the loop:
                if(result.Status != Status.Running)
                {
                    RaiseOnIdentificationStatusUpdated(new SpeakerIdentificationStatusUpdateEventArgs(result.Status.ToString(),
                    $"Enrollment finished. Enrollment status: {result.ProcessingResult.EnrollmentStatus.ToString()}"));
                    break;
                }

                RaiseOnIdentificationStatusUpdated(new SpeakerIdentificationStatusUpdateEventArgs(result.Status.ToString(), "Enrolling..."));
                await Task.Delay(1000);
            }
        }
If the status is still running, we update the status and wait for 1 second before trying again.
With enrollment completed, there may be times when we need to reset the enrollment for a given profile. We can do so by creating a new function in SpeakerIdentification. Name it ResetEnrollments, and let it accept a Guid as a parameter. This should be the profile ID of the speaker profile to reset. Execute the following inside a try clause:
await _speakerIdentificationClient .ResetEnrollmentsAsync(profileId);
This will delete all audio files associated with the given profile and also reset the enrollment status. To call this function, add a new button to the UI and the corresponding ICommand property in the ViewModel.
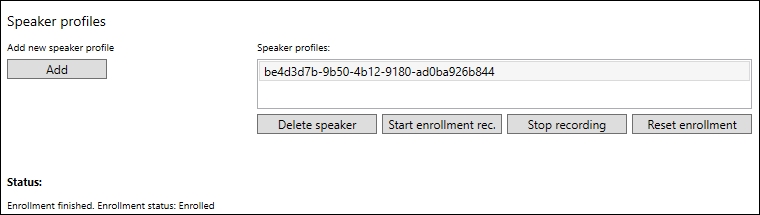
If you compile and run the application, you may get a result similar to the following screenshot:
The last step is to identify the speaker, which we will do in the HomeView and corresponding HomeViewModel. We do not need to modify the UI much, but we do need to add two buttons in order to start and stop the recording. Alternatively, if you are not using a microphone, you can get away with one button for browsing an audio file. Either way, add the corresponding ICommand properties in the ViewModel.
We also need to add private members for the Recording and SpeakerIdentification classes. Both should be created in the constructor, where we should inject ISpeakerIdentificationServiceClient as well.
In the Initialize function, subscribe to the required events:
    _speakerIdentification.OnSpeakerIdentificationError += OnSpeakerIdentificationError;
    _speakerIdentification.OnSpeakerIdentificationStatusUpdated += OnSpeakerIdentificationStatusReceived;

    _recording.OnAudioStreamAvailable += OnSpeakerRecordingAvailable;
    _recording.OnRecordingError += OnSpeakerRecordingError;
For both of the error event handlers, OnSpeakerRecordingError and OnSpeakerIdentificationError, we do not wish to print the error message here. For simplicity, we just output it to the debug console window.
The OnSpeakerRecordingAvailable event will be triggered when we have recorded some audio. This is the event handler that will trigger an attempt to identify the person speaking.
The first thing we need to do is get a list of speaker profile IDs. We do so by calling ListSpeakerProfiles, which we looked at earlier:
    private async void OnSpeakerRecordingAvailable(object sender, RecordingAudioAvailableEventArgs e)
    {
        try
        {
            List<Guid> profiles = await _speakerIdentification.ListSpeakerProfiles();
With the list of speaker profiles, we call the IdentifySpeaker method on the _speakerIdentification object. We pass on the recorded audio stream and the profile list, as an array, as parameters to the function:
            _speakerIdentification.IdentifySpeaker(e.AudioStream, profiles.ToArray());
        }
Finish the event handler by adding the corresponding catch clause.
Back in the SpeakerIdentification.cs file, we add the new function, IdentifySpeaker:
    public async void IdentifySpeaker(Stream audioStream, Guid[] speakerIds)
    {
        try
        {
            OperationLocation location = await _speakerIdentificationClient.IdentifyAsync(audioStream, speakerIds);
The function should be marked as async and accept a Stream and an array of Guid as parameters. To identify a speaker, we make a call to the IdentifyAsync function on the _speakerIdentificationClient object. This requires an audio file, in the form of a Stream, as well as an array of profile IDs. An optional third parameter is a bool, which you can use to indicate whether or not you want to deviate from the recommended speech length.
If the call succeeds, we get an OperationLocation object back. This contains a URL that we can use to retrieve the status of the current identification process:
        if (location == null)
        {
            RaiseOnIdentificationError(new SpeakerIdentificationErrorEventArgs ("Failed to identify speaker."));
            return;
        }
        GetIdentificationOperationStatus(location);
    }
If the resulting data contains nothing, we do not want to bother doing anything else. If it does contain data, we pass it on as a parameter to the GetIdentificationOperationStatus method:
     private async void GetIdentificationOperationStatus (OperationLocation location)
     {
         try
         {
             while (true)
             {
                 IdentificationOperation result = await _speakerIdentificationClient.CheckIdentificationStatusAsync(location);
This function is quite similar to GetEnrollmentOperationStatus. We go into a while loop, which will run until the operation completes. We call CheckIdentificationStatusAsync, passing on the location as a parameter, getting IdentificationOperation as a result. This will contain data, such as a status, the identified profiles ID, and the confidence of a correct result.
If the operation is not running, we raise the event with the status message and the ProcessingResult. If the operation is still running, we update the status and wait for 1 second before trying again:
            if (result.Status != Status.Running)
            {
                RaiseOnIdentificationStatusUpdated(new SpeakerIdentificationStatusUpdateEventArgs(result.Status.ToString(), $"Enrollment finished with message:{result.Message}.") { IdentifiedProfile = result.ProcessingResult });
                break;
            }

            RaiseOnIdentificationStatusUpdated(new SpeakerIdentificationStatusUpdateEventArgs(result.Status.ToString(), "Identifying..."));

            await Task.Delay(1000);
        }
    }
Add the corresponding catch clause before heading back to the HomeViewModel.
The last piece in the puzzle is to create OnSpeakerIdentificationStatusReceived. Add the following code inside HomeViewModel:
    Application.Current.Dispatcher.Invoke(() =>
    {
        if (e.IdentifiedProfile == null) return;

        SystemResponse = $"Hi there,{e.IdentifiedProfile.IdentifiedProfileId}";
    });
We need to check to see whether or not we have an identified profile. If we do not, we leave the function. If we have an identified profile, we give a response to the screen, stating who it is.
As with the administrative side of the application, this is a place where it would be convenient to have name-to-profile ID mapping. As you can see from the following resulting screenshot, recognizing one GUID among many is not that easy:
