
The Face API has two main features. The first one is face detection and the other is face recognition.
Face detection allows us to detect up to 64 faces in one image. We have already seen the basic usage. The features of face recognition are implied in its name: using it, we can detect whether two faces belong to the same person. We can find similar faces, or one in particular, and we can group similar faces. We will learn how to do all of this in the following sections.
When calling any of the APIs, it will respond with one of the following responses:
|
Code |
Description |
|---|---|
|
|
Successful call. It returns an array containing data related to the API call. |
|
|
Request body is invalid. This can be a number of errors, depending on the API call. Typically, the request code is invalid. |
|
|
Access denied because of an invalid subscription key. The key may be wrong or the account/subscription plan may be blocked. |
|
|
Out of call volume data. You have made all the available calls to the API for this month. |
|
|
Invalid media type. |
|
|
Rate limit is exceeded. You will need to wait a period of time (less than one minute in the free preview) before you try again. |
In Chapter 1, Getting Started with Microsoft Cognitive Services, we learned the very basic form of face detection. In the example, we retrieved a Face array. This contained information on all faces that were found in an image. In that specific example, we obtained information about the face rectangle, face ID, face landmarks, and age.
When calling the API, there are four request parameters, as shown in the following table:
|
Parameter |
Description |
|---|---|
|
|
|
|
|
Boolean value. This specifies whether the response should include the face ID or not. |
|
|
Boolean value. This specifies whether the response should include |
|
|
|
If a face is successfully discovered, it will expire in 24 hours. When calling other parts of the Face API, you are often required to have a face ID as an input. In those cases, we need to detect a face first, followed by the call to the API we wish to use, using the detected face as a parameter.
Using this knowledge, I challenge you to play around with the example in Chapter 1, Getting Started with Microsoft Cognitive Services. Draw a rectangle around the face. Mark the eyes in the image.
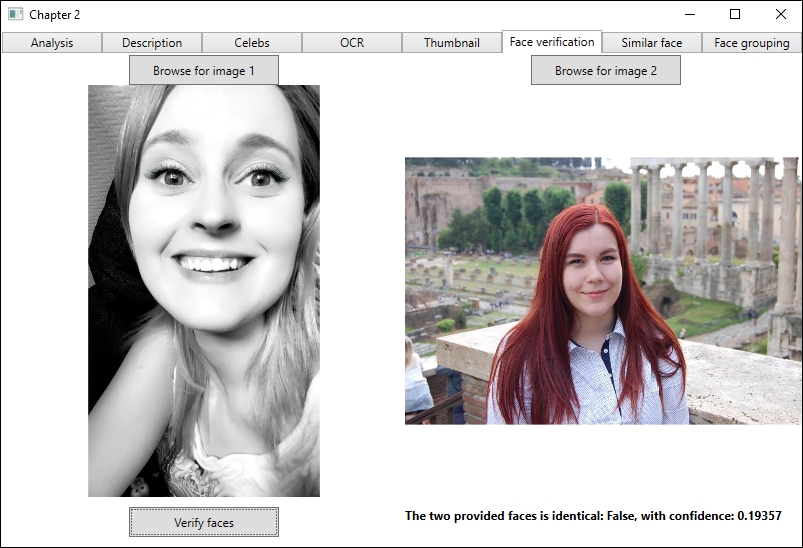
To decide whether two faces belong to the same person, we are going to call the Verify function of the API. The API allows us to detect when two faces are of the same person, which is called face-to-face verification. Detecting whether a face belongs to a specific person is called face-to-person verification.
The UI will consist of three button elements, two image elements, and one text block element. Two of the buttons will be used to browse for images, which are then shown in each image element. The last button will run the verification. The text block will output the result.
Lay out the UI how you want and bind the different elements to properties in the ViewModel, as we have done previously. In the ViewModel, there should be two BitmapImage properties for the image elements. There should be one string property, containing the verification result. Finally, there should be three ICommand properties, one for each of our buttons.
Remember to add the UI to the MainView.xaml file as a new TabItem. In addition, add the ViewModel to the MainViewModel.cs file, where you will also need to add a new variable for the FaceServiceClient variable. This should be created with the Face API key, which we signed up for in Chapter 1, Getting Started with Microsoft Cognitive Services.
In the ViewModel, we need to declare the following three private variables:
    private FaceServiceClient _faceServiceClient;
    private Guid _faceId1 = Guid.Empty;
    private Guid _faceId2 = Guid.Empty;
We have seen the first one before; it will access the Face API. The two Guid variables will be assigned when we have run the face detection.
The constructor accepts one parameter, which is our FaceServiceClient object. This is assigned to the previously created variable, as shown in the following code:
    public FaceVerificationViewModel (FaceServiceClientfaceServiceClient)
    {
        _faceServiceClient = faceServiceClient;
        Initialize();
    }
From the constructor, we call the Initialize function to create the DelegateCommand properties, as follows:
    private void Initialize()
    {
        BrowseImage1Command = new DelegateCommand(BrowseImage1);
        BrowseImage2Command = new DelegateCommand(BrowseImage2);
        VerifyImageCommand = new DelegateCommand(VerifyFace, CanVerifyFace);
    }
The browse commands do not need to be disabled at any point, so we just pass on the command function, as follows:
    private async void BrowseImage1(object obj) {
        Image1Source = await BrowseImageAsync(1);
    }
Both functions will look similar. We call another function to browse for an image and detect a face. To separate each image, we pass on the image number.
The BrowseImageAsync function will accept an int type as a parameter. It returns a BitmapImage object, which we assign to the BitmapImage property bound to our UI. The first part opens a browse dialog and returns the selected image. We will jump in when we have the image and the path to that image.
We open the image as a Stream object. The Stream object is used in the API call to detect faces. When we call the API, we can use the default call, as it will return the value we are interested in, as shown in the following code:
    try {
        using (Stream fileStream = File.OpenRead(filePath)) {
            Face[] detectedFaces = await  _faceServiceClient.DetectAsync(fileStream);
When the detection process has completed, we check to see which image this is and assign the FaceId parameter to the correct Guid variable using the following code. For this example, we are assuming that there will be only one face per image:
            if (imagenumber == 1)
                _faceId1 = detectedFaces[0].FaceId;
            else
                _faceId2 = detectedFaces[0].FaceId;
        }
    }
Finish off the function by adding catch clauses as you see fit. You also need to create and return a BitmapImage parameter from the selected image.
Before the button for the face verification is enabled, we perform a check to see if both face IDs have been set using the following code:
    private bool CanVerifyFace(object obj)
    {
        return !_faceId1.Equals(Guid.Empty) &&! _faceId2.Equals(Guid.Empty);
    }
The VerifyFace function is not a complex one, as you can see in the following code:
    private async void VerifyFace(object obj) {
        try {
            VerifyResultverificationResult = await  _faceServiceClient.VerifyAsync(_faceId1, _faceId2);
With the face IDs set, we can make a call to the VerifyAsync function of the API. We pass on the face IDs as parameters and get a VerifyResult object in return. We use this object to provide the output, as follows:
            FaceVerificationResult = $"The two provided faces is identical: {verificationResult.IsIdentical}, with confidence: {verificationResult.Confidence}";
        }
A successful call will return a code 200 response. The response data is a bool type variable, isIdentical, and a number, confidence:
At the time of writing, the NuGet package for the Face API only allows for face-to-face verification. If we were calling directly to the REST API, we could have utilized face-to-person verification as well.
To use face-to-person verification, only one image is required. You will need to pass on the face ID for that image. You will also need to pass on a person group ID, and a person ID. These are to specify a specific person group to search in and a certain person within that group. We will cover person groups and persons later in this chapter.
Using the Face API, you can find faces similar to a provided face. The API allows for two search modes. Match person mode is the default mode. This will match faces to the same person, according to an internal same-person threshold. The other is match face mode, which will ignore the same-person threshold. This returns matches that are similar, but the similarity may be low.
In the example code provided, we have three buttons in our UI: one for generating a face list, another for adding faces to the list, and, finally, one to find similar faces. We need a textbox to specify a name for the face list. For convenience, we add a list box, outputting the persisted face IDs from the face list. We also add an image element to show the image we are checking, and a textbox outputting the result.
In the corresponding ViewModel, we need to add a BitmapImage property for the image element. We need two string properties: one for our face-list name and one for the API call result. To get data to our list box, we need an ObservableCollection property containing Guids. The buttons need to be hooked up to individual ICommand properties.
We declare two private variables at the start of the ViewModel, as shown in the following code. The first one is a bool variable to indicate whether or not the face list already exists. The other is used to access the Face API:
    private bool _faceListExists = false;
    private FaceServiceClient _faceServiceClient;
The constructor should accept the FaceServiceClient parameter, which it assigns to the preceding variable. It will then call an Initialize function, as follows:
    private async void Initialize()
    {
        FaceListName = "Chapter2";

        CreateFaceListCommand = new DelegateCommand(CreateFaceListAsync, CanCreateFaceList);
        FindSimilarFaceCommand = new DelegateCommand(FindSimilarFace);
        AddExampleFacesToListCommand = new DelegateCommand(AddExampleFacesToList, CanAddExampleFaces);
First, we initialize the FaceListName property to Chapter2. Next, we create the command objects, specifying actions and predicates.
We finish the Initialize function by calling two functions, as shown in the following code. One checks whether the face list exists, while the second updates the list of face IDs:
        await DoesFaceListExistAsync();
        UpdateFaceGuidsAsync();
    }
To check whether a given face list exists, we first need to get a list of all face lists. We do this by calling the ListFaceListsAsync method, which will return a FaceListMetadata array. We make sure that the result has data before we loop through the array, as shown in the following code:
    private async Task DoesFaceListExistAsync()
    {
        FaceListMetadata[] faceLists = await _faceServiceClient.ListFaceListsAsync();
Each FaceListMetadata array, from the resultant array, contains a face-list ID, a name of the face list, and user-provided data. For this example, we are just interested in the name. If the face-list name that we have specified is the name of any face list returned, we set the _faceListExists parameter to true, as shown in the following code:
    foreach (FaceListMetadatafaceList in faceLists) {
        if (faceList.Name.Equals(FaceListName)) {
            _faceListExists = true;
            break;
        }
    }
If the face list exists, we can update the list of face IDs.
To get the faces in a face list, we need to get the face list first. This is done with a call to the Face API's function, the GetFaceListAsync method. This requires the face-list ID to be passed as a parameter. The face-list ID needs to be in lowercase or digits, and can contain a maximum of 64 characters. For the sake of simplicity, we use the face-list name as the face ID, as follows:
    private async void UpdateFaceGuidsAsync() {
        if (!_faceListExists) return;

        try {
            FaceListfaceList = await _faceServiceClient.GetFaceListAsync(FaceListName.ToLower());
The result of this API call is a FaceList object, containing the face-list ID and face-list name. It also contains user-provided data and an array of persisted faces.
We check whether we have any data and then get the array of persisted faces. Looping through this array, we are able to get the PersistedFaceId parameter (as a guid variable) and user-provided data of each item. The persisted face ID is added to the FaceIds ObservableCollection, as shown in the following code:
        if (faceList == null) return;

        PersonFace[] faces = faceList.PersistedFaces;

        foreach (PersonFace face in faces) {
            FaceIds.Add(face.PersistedFaceId);
        }
Finish the function by adding the corresponding catch clause.
If the face list does not exist and we have specified a face-list name, then we can create a new face list, as follows:
    private async void CreateFaceListAsync(object obj) {
        try {
            if (!_faceListExists) {
                await _faceServiceClient.CreateFaceListAsync (
FaceListName.ToLower(), FaceListName, string.Empty);
                await DoesFaceListExistAsync();
            }
        }
First, we check to see that the face list does not exist. Using the _faceServiceClient parameter, you are required to pass on a face-list ID, a face-list name, and user data. As seen previously, the face-list ID needs to be lowercase characters or digits.
Using the REST API, the user parameter is optional, and as such, you would not have to provide it.
After we have created a face list, we want to ensure that it exists. We do this by a call to the previously created DoesFaceListExistAsync function. Add the catch clause to finish the function.
If the named face list exists, we can add faces to this list. Add the AddExampleFacesToList function. It should accept object as a parameter. I will leave the details of adding the images up to you. In the provided example, we get a list of images from a given directory and loop through it.
With the file path of a given image, we open the image as a Stream. To optimize it for our similarity operation, we find the FaceRectangle parameter in an image. As there should be only one face per image in the face list, we select the first element in the Face array, as follows:
    using (StreamfileStream = File.OpenRead(image))
    {
        Face[] faces = await _faceServiceClient.DetectAsync(fileStream);
        FaceRectanglefaceRectangle = faces[0].FaceRectangle;
Adding the face to the face list is as simple as calling the AddFaceToFaceListAsync function. We need to specify the face-list ID and the image. The image may come from a Stream (as in our case) or a URL. Optionally, we can add user data and the face rectangle of the image, as follows:
AddPersistedFaceResult addFacesResult = await _faceServiceClient.AddFaceToFaceListAsync(FaceListName.ToLower(), fileStream, null, faceRectangle);
UpdateFaceGuidsAsync();
The result of the API call is an AddPersistedFaceResult variable. This contains the persisted face ID, which is different from a face ID in the DetectAsync call. A face added to a face list will not expire until it is deleted.
We finish the function by calling the UpdateFaceGuidsAsync method.
Finally, we create our FindSimilarFace function, also accepting object as a parameter. To be able to search for similar faces, we need a face ID (the Guid variable) from the DetectAsync method. This can be called with a local image or from a URL. The example code opens a file browser and allows the user to browse for an image.
With the face ID, we can search for similar faces, as shown in the following code:
    try {
        SimilarPersistedFace[] similarFaces = await _faceServiceClient.FindSimilarAsync (findFaceGuid, FaceListName.ToLower(), 3);
We call the FindSimilarAsync function. The first parameter is the face ID of the face we specified. The next parameter is the face-list ID, and the final parameter is the number of candidate faces returned. The default for this is 20, so it is often best to specify a number.
Instead of using a face list to find similar faces, you can use an array of the Guid variable. That array should contain face IDs retrieved from the DetectAsync method.
At the time of writing, the NuGet API package only supports match person mode. If you are using the REST API directly, you can specify the mode as a parameter.
Depending on the mode selected, the result will contain either the face ID or the persisted face ID of similar faces. It will also contain the confidence of the similarity of the given face.
To delete a face from the face list, call the following function in the Face API:
DeleteFaceFromFaceListAsync(FACELISTID, PERSISTEDFACEID)
To delete a face list, call the following function in the Face API:
DeleteFaceListAsync(FACELISTID)
To update a face list, call the following function in the Face API:
UpdateFaceListAsync(FACELISTID, FACELISTNAME, USERDATA)
If you have several images of faces, one thing you may want to do is group the faces. Typically, you will want to group faces based on similarity, which is a feature the Face API provides.
By providing the API with a list of face IDs, it will respond with one or more groups. One group consists of faces that are similar looking. Usually, this means that the faces belong to the same person. Faces that cannot find any similar counterparts are placed in a group we'll call MessyGroup.
Create a new View called FaceGroupingView.xaml. The View should have six image elements, with corresponding titles and textboxes for face IDs. It should also have a button for our group command and a textbox to output the grouping result.
In the corresponding FaceGroupingViewModel.xaml View model, you should add the BitmapImage properties for all images. You should also add the string properties for the face IDs and one for the result. There is also a need for an ICommand property.
At the start of the ViewModel, we declare some private variables, as follows:
    private FaceServiceClient _faceServiceClient;
    private List<string> _imageFiles = new List<string>();
    private List<Guid> _faceIds = new List<Guid>();
The first one is used to access the Face API. The second one contains a list of strings that in turn contain the location of our images. The last list contains the detected face IDs.
The constructor accepts a parameter of the FaceServiceClient type. It assigns it to the corresponding variable and calls the Initialize function. This creates our ICommand object and calls a function to add our images to the application.
In the function that adds images, we add hardcoded image paths to our _imageFiles list. For this example, we add six. Using a for loop, we generate each BitmapImage property. When we have an image, we want to detect faces in it:
    try {
        using (Stream fileStream = File.OpenRead(_imageFiles[i])) {
            Face[] faces = await
            _faceServiceClient.DetectAsync(fileStream);
We do not need any more data than the generated face ID, which we know is stored for 24 hours after detection:
            _faceIds.Add(faces[0].FaceId);
            CreateImageSources(image, i, faces[0].FaceId);
        }
    }
Assuming that there is only one face per image, we add that face ID to our _faceIds list. The image, face ID, and current iteration number in the loop are passed on to a new function, CreateImageSources. This function contains a switch case based on the iteration number. Based on the number, we assign the image and face ID to the corresponding image and image ID property. This is then shown in the UI.
We have a button to group the images. To group the images, we call the Face API's GroupAsync method, passing on an array of face IDs, as shown in the following code. The array of face IDs must contain at least two elements, and it cannot contain more than 1,000 elements:
    private async void GroupFaces(object obj) {
        try {
            GroupResultfaceGroups = await _faceServiceClient.GroupAsync(_faceIds.ToArray());
The response is a GroupResult type, which may contain one or more groups, as well as the messy group. We check to see whether there is a response and then we parse it, as shown in the following code:
            if (faceGroups != null)
                FaceGroupingResult = ParseGroupResult(faceGroups);
        }
Before looking at the ParseGroupResult method, add the corresponding catch clause and close-up GroupFaces function.
When parsing the results, we first create a StringBuilder class to hold our text. Then we get the groups from the result. A group is an array of face IDs of the images in that group. All groups are stored in a list, and we append the number of groups to the StringBuilder class, as shown in the following code:
private string ParseGroupResult(GroupResultfaceGroups) {
   StringBuilder result = new StringBuilder();
   List<Guid[]>groups = faceGroups.Groups;
   result.AppendFormat("There are {0} group(s)
", groups.Count);
We loop through the list of groups. Inside this loop, we loop through each item in the group. For the sake of readability, we have a helper function to find the image name from the ID. It finds the index in our _faceIds list. This is then used in the image name, so if the index is 2, the image name would be Image 3. For this to give the intended effect, you must have placed the images in a logical order, as follows:
            result.Append("Groups:	");

            foreach(Guid[] guid in groups)
            {
                foreach(Guid id in guid)
                {
                    result.AppendFormat("{0} - ", GetImageName(id));
                }
                result.Append("
");
            }
The GroupResult method may also contain a MessyGroup array. This is an array of Guid variables containing the face IDs in that group. We loop through this array and append the image name, the same way we did with the regular groups, as shown in the following code:
            result.Append("Messy group:	");

            Guid[] messyGroup = faceGroups.MessyGroup;
            foreach(Guidguid in messyGroup)
            {
                result.AppendFormat("{0} - ", GetImageName(guid));
            }
We end the function by returning the StringBuilder function's text, which will output it to the screen, as follows:
            return result.ToString();
        }
Make sure that the ViewModel instances have been created in the MainViewModel.cs file. Also, make sure that the View has been added as a TabItem property in the MainView.xaml file. Compile and test the application.
If you are using the sample images provided, you may end up with something like the following:
