Chapter 3: Recording Audio
The good news is that Logic Pro X gives you a bunch of ways to record audio, using your voice, guitar, saxophone, or any other "real" source. The bad news is that Logic Pro X gives you a bunch of ways to record audio, like your voice, guitar, saxophone, or any other "real" source. Seriously though, there are advantages to each method, and you may very well take advantage of several different workflows.
Specifically, this chapter covers the following topics:
- The Project Templates
- Setting Preferences
- Project settings
- Cycle recording options
- Recording without cycling
- Saving a template
This is the first chapter in which you will want to use one of my projects that I have provided for you, Chapter 3.logicx. For now, though, let's begin by opening one of the included templates.
NOTE:
The project and media files for the chapters are available at this link, https://github.com/PacktPublishing/Jumpstart-Logic-Pro-X-10.5
Instructions on how to download the files are added in the preface.
The Project Templates
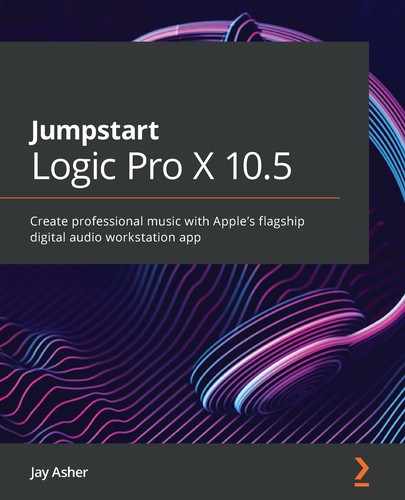
If you have set your default action for opening Logic to Ask, as I suggested in Chapter 1, Beginning with Logic Pro X 10.5. you will see you have the option of New from Template. In Project Templates, you see Hip Hop, Electronic, Songwriter, Orchestral, Multi-Track, and Music for Picture. Each has a description and if you open the Details disclosure triangle, you see even more options to tweak before you open it:
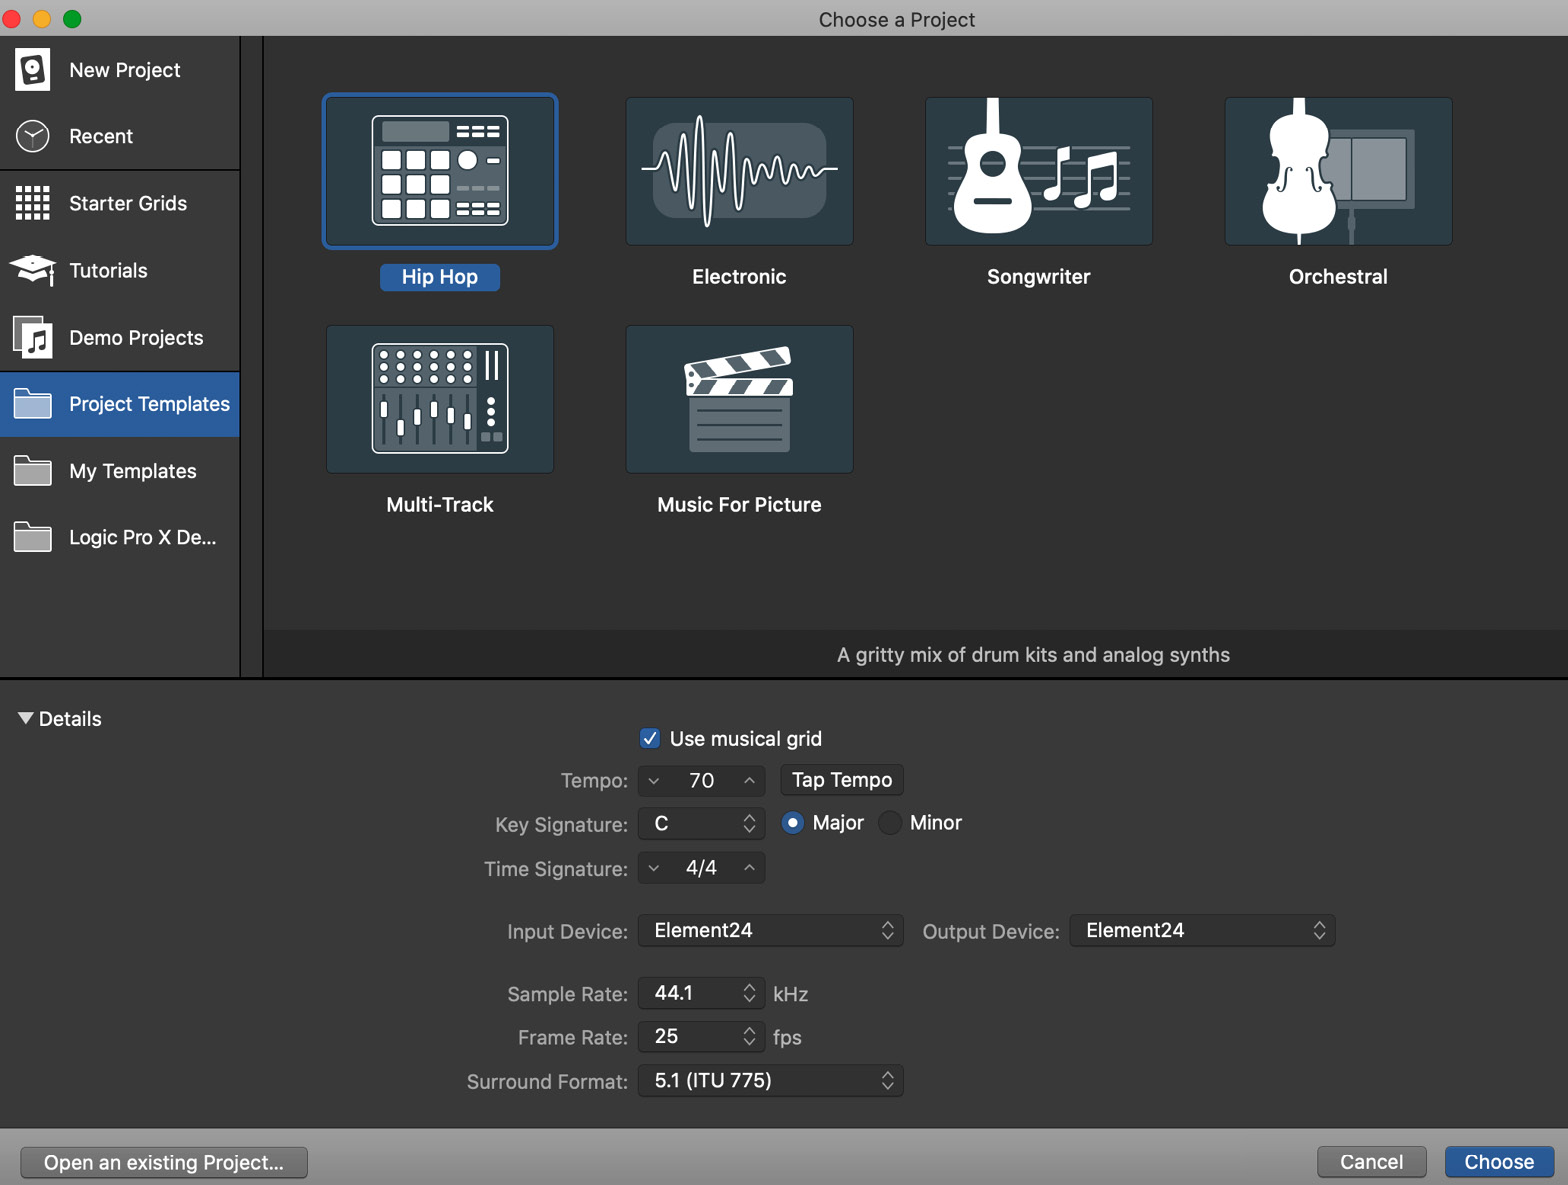
Figure 3.1 – Project Templates
I recommend you eventually take the time to explore all the templates. I think for teaching you about recording audio, Songwriter is the way to go:
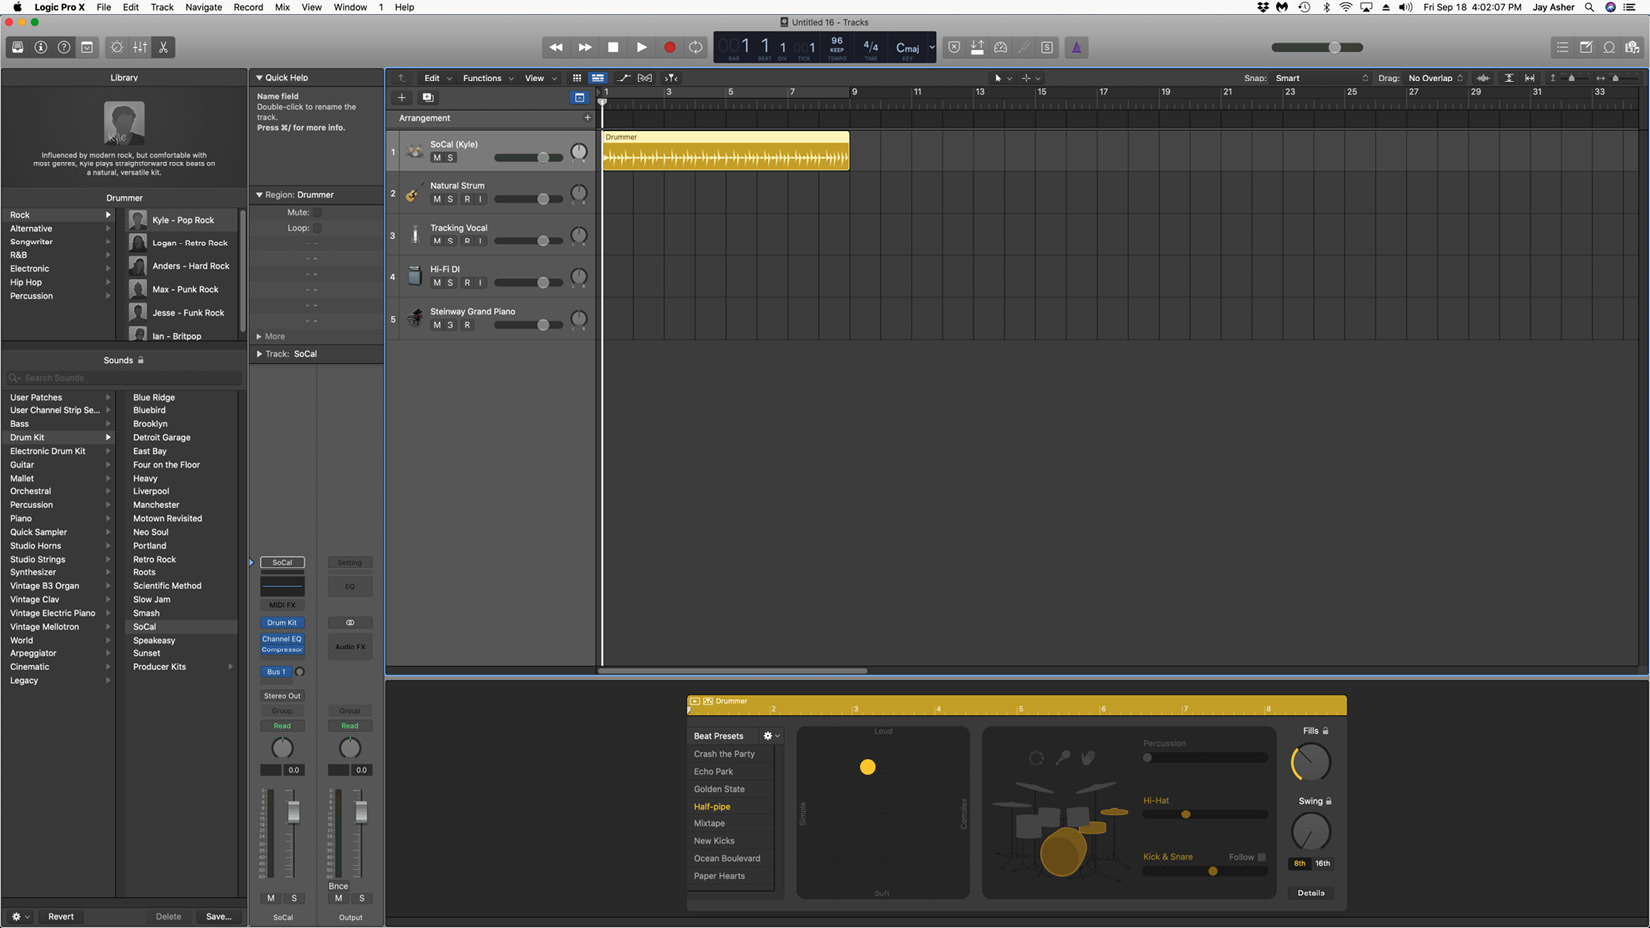
Figure 3.2 – The Songwriter project template
As you can see, the template creates a Drummer track with a Drummer region, a sampler software instrument with a Steinway Grand Piano sound, three audio tracks for the task of recording vocals or guitars, and a bunch of plug-ins, with the Library open. The only two I will use for this chapter at the beginning are the two named Tracking Vocal and the piano, so I can select the others and delete them with the Delete key on my computer keyboard.
I can change the default tempo by holding down either the down or up arrow, double-clicking the number, and typing in my desired tempo, or rhythmically pressing the Tap Tempo button multiple times. I can also change the default key, time signature, input and output devices (audio interface), sample rate, frame rate (for video), and surround format, if I am set up with 5.1 or 7.1. All of these are Project Settings, except for the input and output device choices, which are Preferences.
Let's talk about sample rates, because it can be a complicated issue and there are lots of opinions out there, and my opinions are precisely that, my opinions.
This is what is simply factual:
- Most of the recordings you have heard and loved were recorded at 44.1 kHz, and that is the sample rate required for CDs.
- 48 kHz is the sample rate required for DVDs and most video editing programs, such as Final Cut Pro, will want your audio files to be at that sample rate.
- Higher sample rates are more demanding on your CPU, and the files are bigger and therefore take up more space on your hard drive. 88.2 kHz will be twice as big as 44.1 kHz, and 96 kHz will be twice as big as 48 kHz.
- Files at higher sample rates can be down-sampled with little harm. Up-sampling has no sonic benefit, only possible compatibility with project sample rates.
This is a matter of debate:
- Audio recorded at higher sample rates sound better.
Many, perhaps even most, think FX plug-ins sound better because they have less "aliasing" at, for example, 96 kHz than 44.1 kHz, but not everybody agrees. Some folks maintain that they can identify, in a blind listening test, an identical recording done at the higher and the lower sample rates and that they prefer one or the other. Everybody concedes that it is a trade-off because of the demands on your computer.
Personally, I am not sure. If I am recording a very important project with first-rate microphones, and mic pres, maybe I go with 96 kHz. Most of the time, I use 48 kHz, because I compose music to picture a lot and it is the most utilized sample rate in the video world. If you don't, 44.1 kHz is just fine.
Now that I have loaded the Songwriter template, I can see that it includes Logic's Drummer with an auto-created Drummer region and three Audio channel strips set up with plug-ins for acoustic guitar, a vocal, a bass guitar, and a Sampler-sampled piano, which is of course MIDI. Also, there are four reverb instances being bussed to aux tracks. If you don't understand the concepts of auxes and bussing, don't worry, I will explain later in the chapter.
Let's set up some Preferences.
Setting Preferences
Remember, any changes you make to these are global to Logic Pro X and therefore affect past, present, and future projects.
Audio Preferences
Under the Logic Pro X menu, navigate to Preferences | Audio | Devices. If you have not already selected an audio interface, as we did when opening the template, this is where you will assign it. Core Audio should be checked, and if you make any changes in this tab, you need to click the Apply button to apply the changes:
Figure 3.3 – Enabling a Core Audio Device in the Audio Preferences
The I/O Buffer Size (In/Out) has a range of choices, from a low of 32 to a high of 1024. The lower the size you choose, the lower the latency. Latency is the amount of delay you hear when playing a software instrument or recording an audio part through plug-ins. So why not just choose the lowest number, 32, because who wants more latency?
The answer is that the lower the buffer size the harder your computer has to work, and some audio interfaces have their own drivers rather than just core audio that can be more or less efficient than others. The power of your computer and the efficiency of your audio device's driver will determine how low a buffer setting you can get away with without getting error messages or hearing pops and clicks. If you have a computer that's new enough to run Logic Pro X 10.5 and the necessary macOS, unless you are using very resource-demanding third-party orchestral libraries, you probably will find 128 a nice compromise to start with. All the other settings you can leave set to the defaults.
Recording Preferences
By default, Logic records audio as Apple's AIFF format, but there are two other choices, Wave (originally a PC format) and CAF.
Unless you are recording exceptionally long times, such as a half day or more, you can rule out CAF because it is not universally supported. So, now we have AIFF and Wave (BWF). Which sounds better?
They sound the same! I recommend that Apple's default notwithstanding, you go with Wave, because it has become an industry standard.
While there is controversy about sample rates, there is none about 16 versus 24 bit rates. A higher bit rate allows you to record at a lower signal and raise the gain later because of all the thousands of extra bits. Yes, the audio files are larger, but hard drives are cheap now. You want 24-Bit Recording checked.
Below that, you can see the choices of how overlapping track recordings are handled:
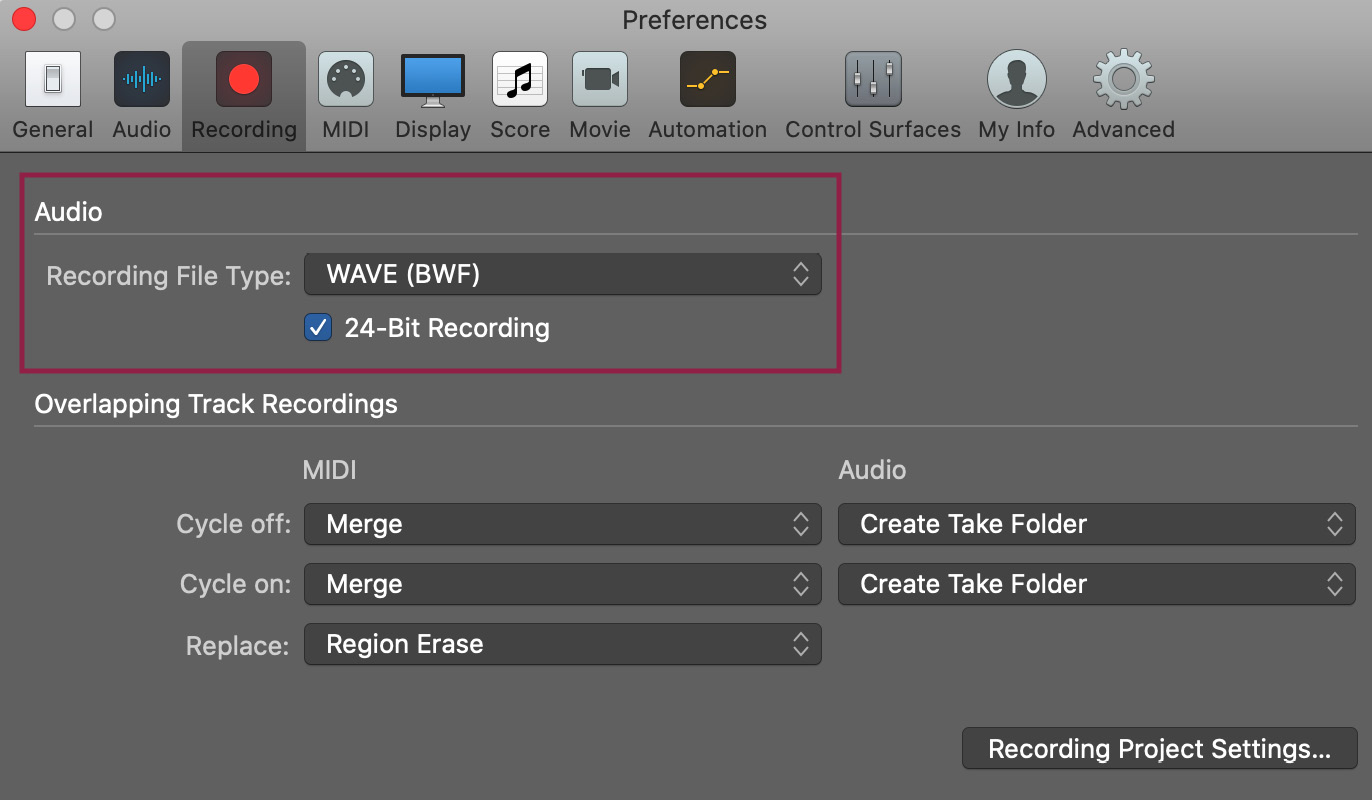
Figure 3.4 – Recording Preferences
While if I am creating a pop song, I may want different behavior than if I am doing an orchestral piece for film/TV, for now, leave these with the default.
Two Preferences that I recommend you disable are in the Audio tab. Although they are designed to be helpful with the Input button, which is represented by the letter I you see on the Track Reader, experience has led me to conclude that they cause confusion more than they help:
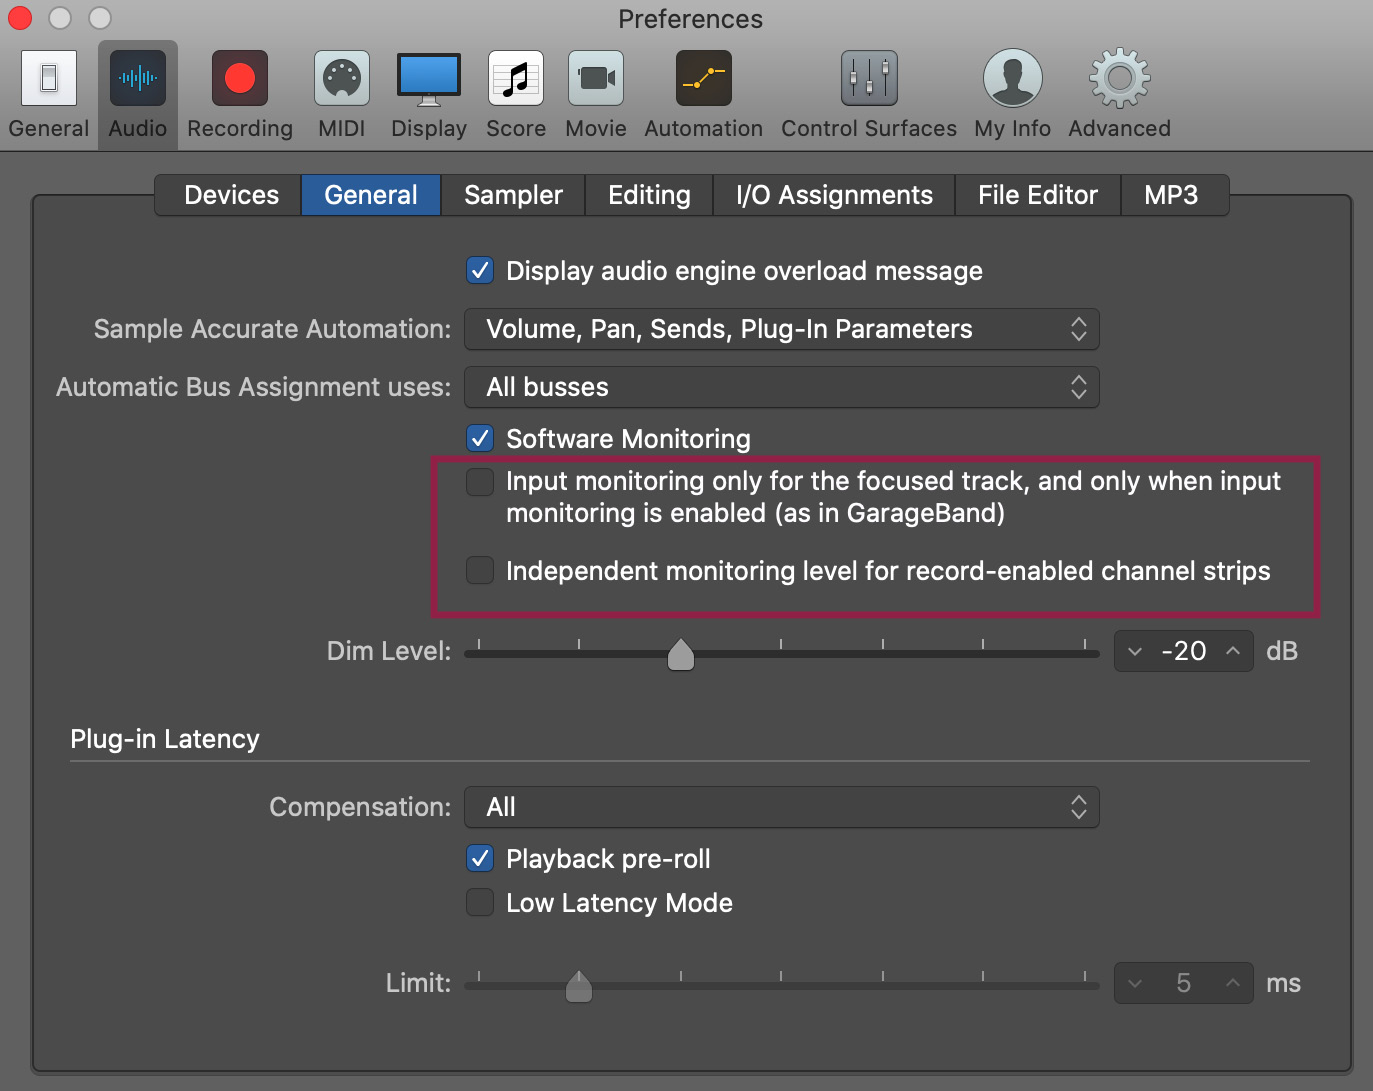
Figure 3.5 – Recording Preferences I recommend you uncheck
Display Preferences
Moving on to these, you may find you don't need to change a thing in the General tab, but I have a high-resolution second display and my eyesight is not so great, so I find checking the Large local windows, Large Inspectors, Wide playhead, and Show default values all helpful.
NOTE
If you change the language, you will need to quit Logic and restart it.
As I explained earlier in the book, Preferences are global to Logic Pro X. Any changes you make affect past, present, and future projects.
Project Settings
Under the File menu, navigate to Project Settings | General.
There is a new project setting for dynamic loading of plugins as you need them, which you may find helpful for large projects, and it is on by default. If you don't want this, go to General | Opening Project | Only load plug-ins needed for project playback, and uncheck it. Unless you save it as a template though, you will have to keep doing this, which, frankly, I wish were not the case.
For now, we can leave the Project Settings. Because I am just going to record a vocal and a MIDI piano part, I will delete the other tracks from my Track List.
Setting levels
I am going to get a bit geeky here for a minute and talk about how Logic handles incoming signals. Logic has a floating point architecture, which means it adjusts its headroom automatically to incoming signal, so that any channel strip can go into the red without creating digital distortion, except the Stereo Output.
When you are setting your levels to record audio, if it is going into the red you are recording it at a distorted level, and that is not good. In the analog world, we generally tried to record as "hot" as possible so as to eliminate the inherent noise, but with digital 24-bit recording it is not necessary to do this. As long as the level is even a little way into the meter reading, it is OK.
I will be singing into a microphone to demonstrate. On your Input on the Audio channel strip, you must make sure it is set to the correct input of your audio interface that your microphone (or instrument) is plugged in to. In my example, it is Input 1:
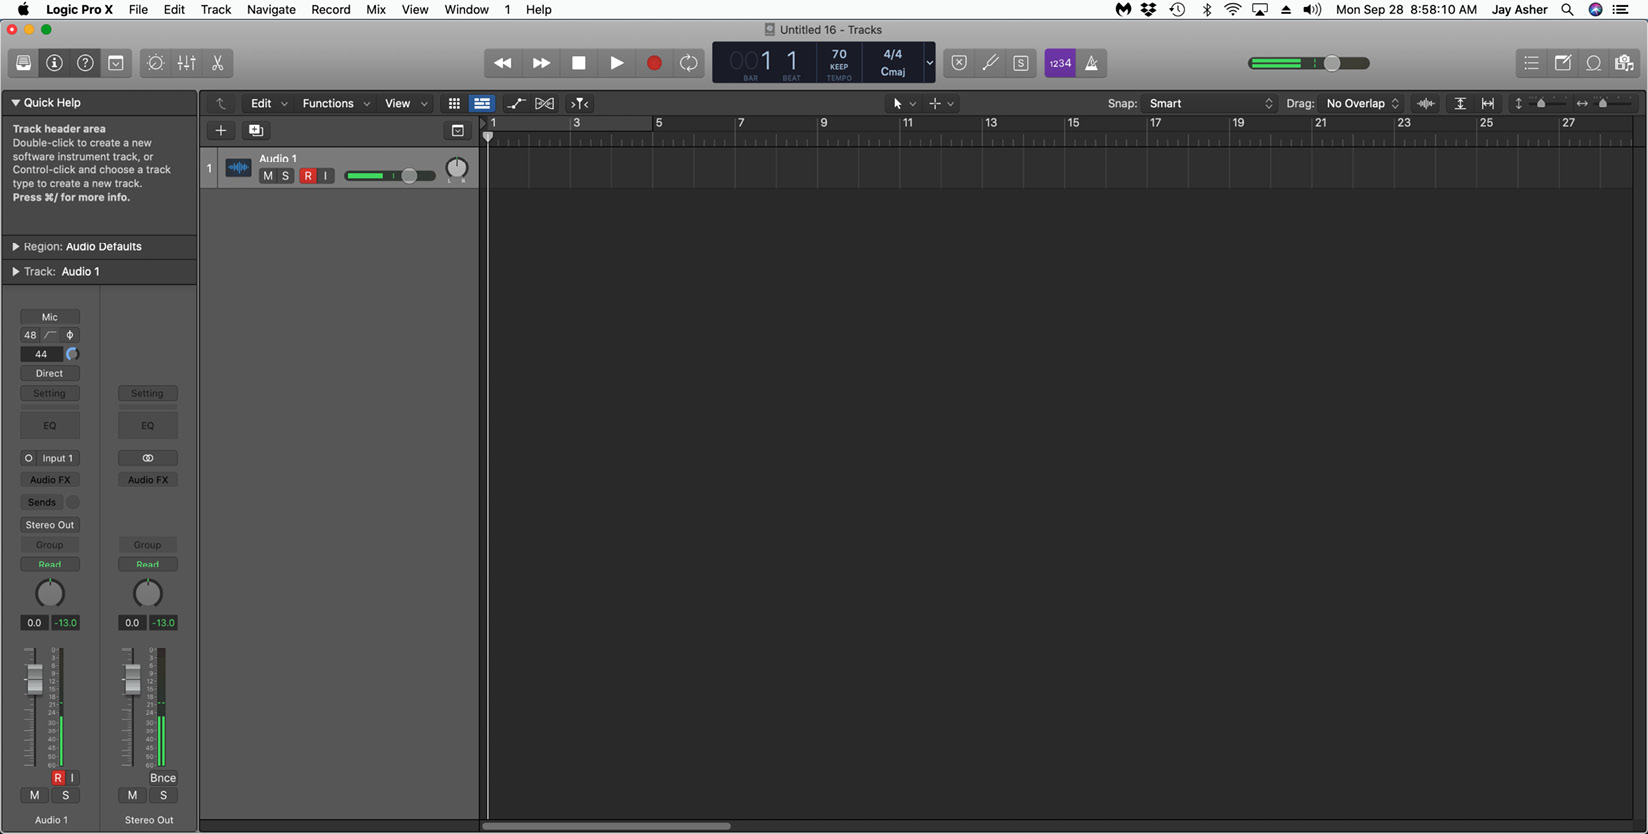
Figure 3.6 – An armed Audio Track with Input 1 receiving level
Note
If you see Input 1-2 to the left of the Input assignment field, that means you have a stereo channel strip, indicated by two circles, unlike the one you see in my picture. Simply click on it and it turns to mono.
How you set the incoming levels will depend on the audio interface you own. Most have physical gain knobs that you turn, like the Focusrite Scarlett series. Some have a software control panel and/or knobs to adjust the gain. If you own an Apogee audio interface, as I do, you can set the incoming level directly on the Audio channel strip's Audio Device Controls.
Whatever level you set the gain at, if your signal is registering on the channel strip, even in the lower third, you are fine.
You can, of course, set it higher if you like, as long as you don't see the red clip light come on.
I am ready to record a short vocal for Mary Had A Little Lamb to a simple piano accompaniment I have played in. Hooray!
Note
You will want to record listening through headphones with your speakers off so that you don't get feedback or record the sound of the other tracks playing through the speakers.
On the Audio channel strip, I see a number of FX plug-ins that change the sound. You needn't worry that they will be recorded as part of the performance. You are only monitoring through them and can change their settings, delete them, and replace them to your heart's content. To turn them off, simply drag the mouse or trackpad over the left side of them where you will see power buttons. As you do so, they will then be grayed out, as the DeEsser 2 and Echo FX are in this picture, and bypassed so you do not hear them:
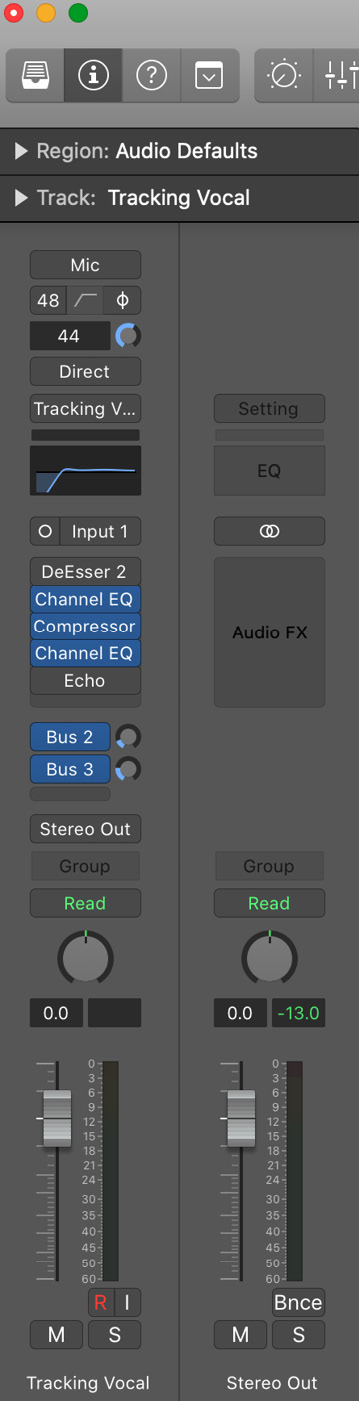
Figure 3.7 – Bypassed plug-ins
Note
If I want to create a second audio track for doubling or harmony, I can, either by clicking the + at the top of the track list or by navigating to the Track menu and choosing New Tracks.
You may or may not want to record listening to a click, played by Logic's metronome.
Go to Project Settings | Metronome or hold the mouse or trackpad down on the metronome icon for your choices.
In the nearby Recording Project Settings, you can choose how many bars you want for a Count-in. Since my song begins with a three-beat piano introduction, I don't need a count-in.
Note
From now on, when I describe performing an action using a mouse, know that on a laptop it will be a trackpad.
Recording with a Cycle
Cycle recording is recording the same bars over and over without pausing in between attempts. Logic gives you several options for a cycle recording workflow.
Cycle recording with Take Folders
Take Folders was the default choice for overlapping recordings in Cycle mode in our Recording Preferences, so there's nothing I need to change now. To set the cycle, I select my piano region and press U and I am ready to go.
I am going to sing Mary Had A Little Lamb three times without stopping, each time a bit differently. I make sure that the track is armed by clicking the R button on the track header or at the bottom of the channel strip in the Inspector (the flashing R in the track header) and I either press the Record button in the transport or press R on my keyboard, and away I go! If you have downloaded the Chapter 3.logicx project, you can see and hear what I have described.
What I have now created is called a Take Folder. I will be able to use any one of them or drag over sections of each to make a comp, which is how musicians and engineers have always referred to a composite. You see the three takes and at the top of the Take Folder, the composite. In this picture, it entirely comprises take 1; the other two takes are muted, and the comp is named Comp A:
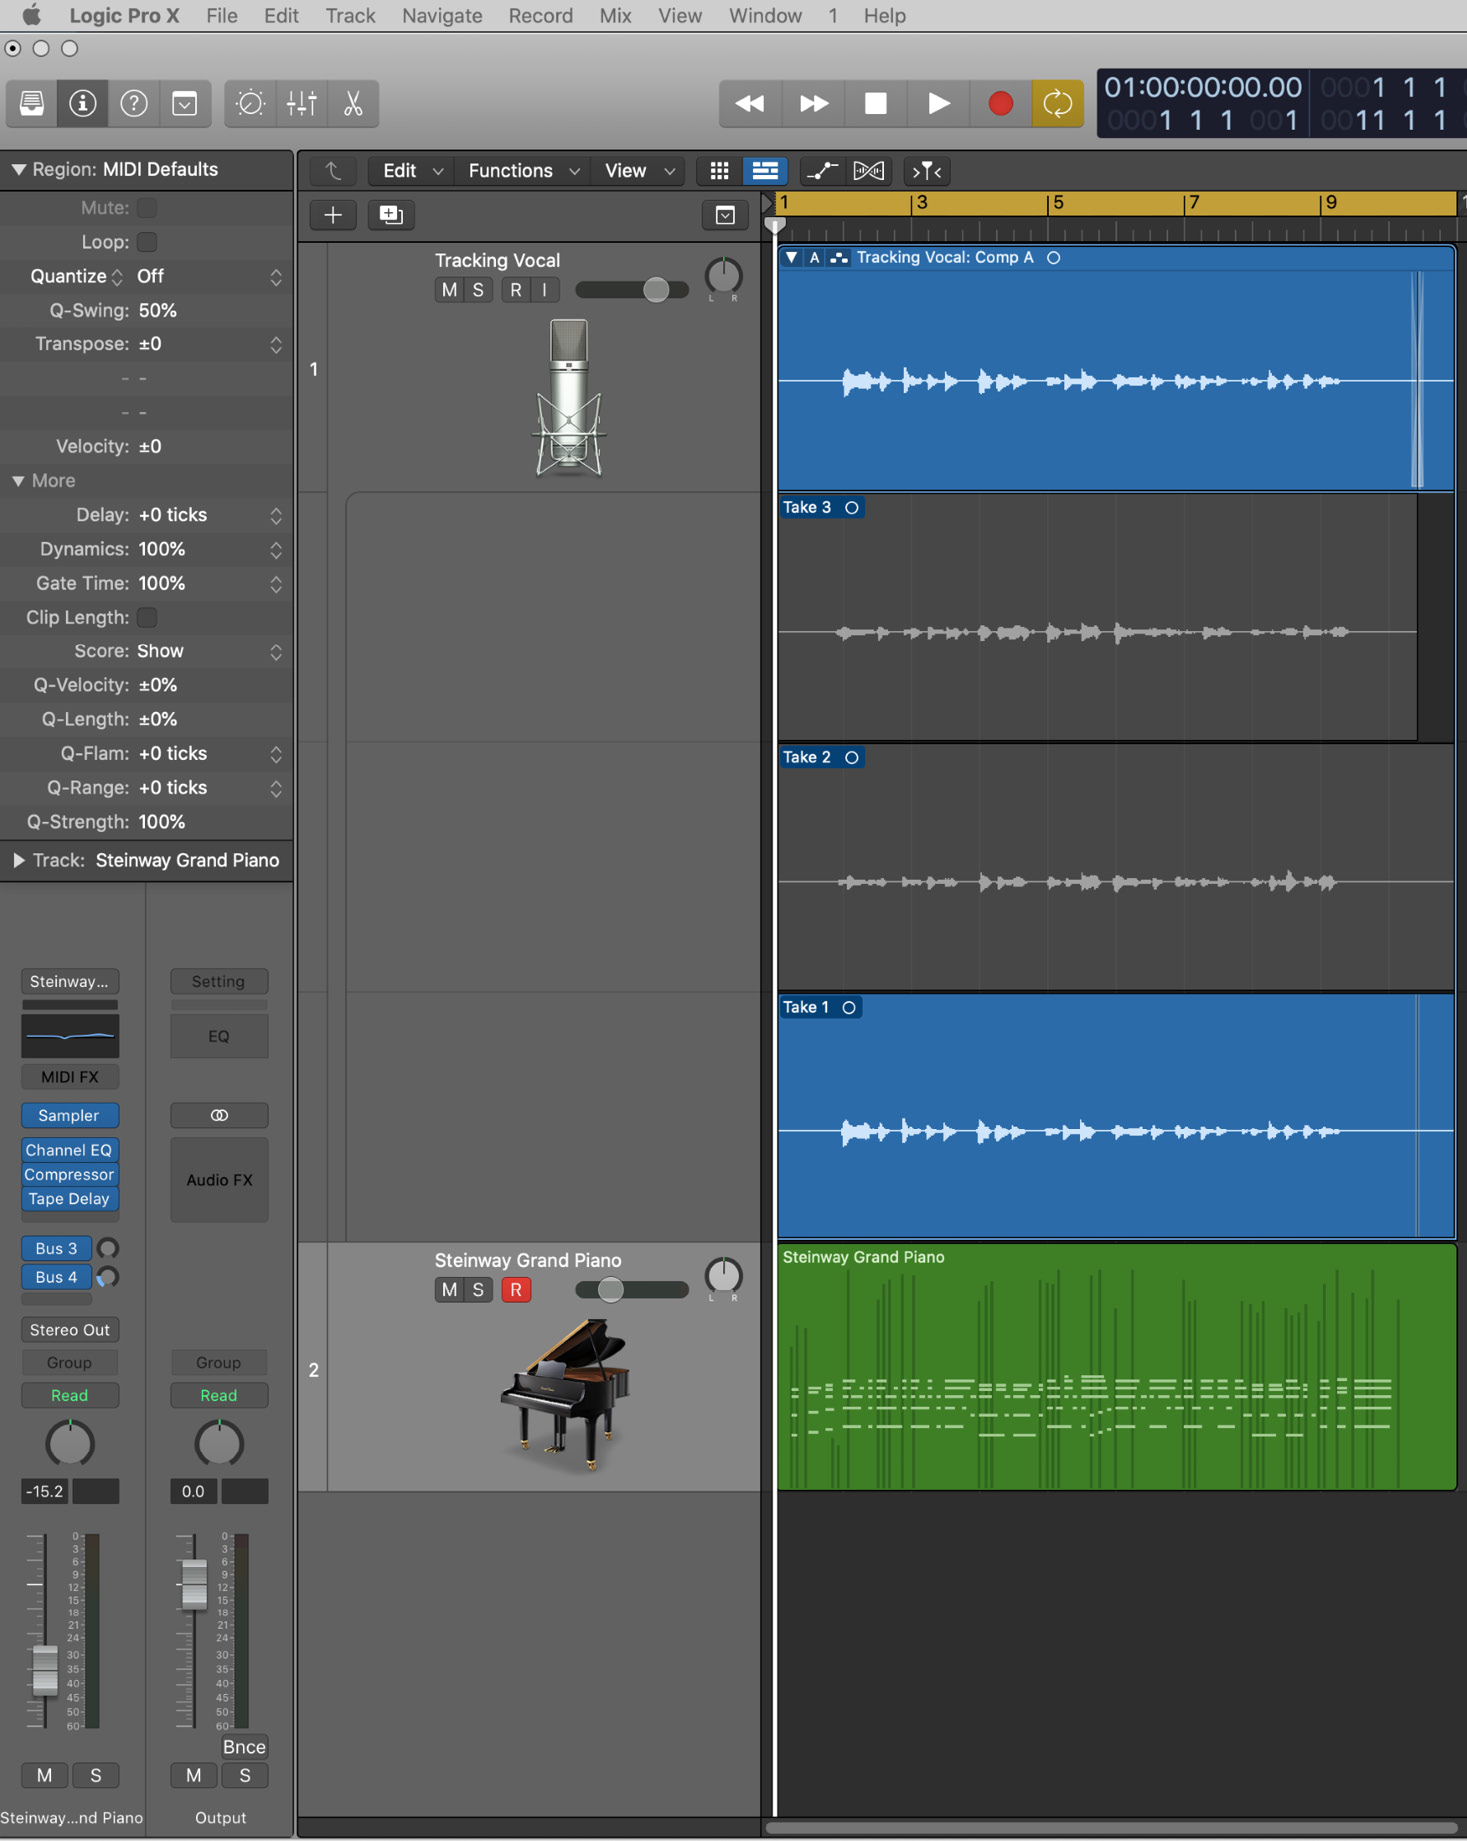
Figure 3.8 – A Take Folder
The next steps I am going to perform could just as easily be in the next chapter on audio editing, but I think it makes sense to do it now. To make it easier to distinguish between the takes, I am going to give each the gift of color.
Note
There is an auto-colorize option in the Recording tab of the Project Settings, but for this purpose I recommend you take matters into your own hands.
Pressing Option + C on your computer keyboard opens the color palette:

Figure 3.9 – The Color Palette
I select each take and give it a different color, then zoom in by selecting the regions and pressing Z. Alternatively, I can hold the Command key and press the right arrow and the down arrow for the view I want.
I decide to select the first half of take 1 and the second half of take 2 with a method called Quick Swipe Comping.
Quick Swipe Comping
With take 1 selected, I position my Pointer tool over the middle of take 2 and simply drag it to the right. Fantastic, smooth as a baby's bottom, and Logic even creates a crossfade where I switched takes so that there is no audible click. This is a definite candidate for my final choice, but I may want to try other comps.
Comp A is not very descriptive, is it? Holding the mouse down on the A at the top left of the Take Folder or pressing Shift + T allows me to rename it. I rename it pretty darned good.
Time to try another one. Although you don't have to, I recommend holding the mouse down on the A in the Take Folder header and duplicating the comp. I just find it quicker and easier.
I now have Comp B to manipulate. This time, I begin with take 2 and then switch to take 1. Again, not bad, so I rename it Also doesn't suck.
I can go on creating more if I want to, but I am pretty happy with my choices. I can leave it in this state, or I can flatten it by pressing down on the A and choosing that or using the key command, which will lay the regions out with the crossfades on the track, eliminating the take folder. This gives me the ability later on to edit the regions, including the crossfades. I can also do Flatten and Merge, which will create a new audio file, incorporating the crossfades, eliminating the Take Folder as well while still leaving the original audio file, consisting of the three take regions, intact on my drive.
I am by nature a cautious man, so before I decide what to do next, I want to always be able to return to my project at this stage of its development. The answer to this is to create a Project Alternative.
Project Alternatives
Under the File menu, navigate to Project Alternatives | New Alternative. A dialog box appears to give you the chance to name it. For now, I will leave it as its default name. I suggest you perhaps name it by date and time.
I decide to flatten and merge the take folder and save the project. I am now free to continue, secure in the knowledge that if anything goes awry, I can always return to its previous state by again going to the File menu to Project Alternatives and simply choosing the original version.
Region Gain
Remember that I told you that with 24-bit recording, you did not have to record hot? Well, sure enough, my recording is not very loud and, looking at the waveform, I see that it isn't that big.
No worries, because if I select the region and look in the Region inspector, there is a Gain field that I can either drag up or type in a decibel amount and it will be louder, and the waveform will be bigger.
Other Cycle audio recording options
Take Folders are the most user-friendly method for people new to audio recording, but there are other options.
If in Recording Preferences | Audio you change the choice to Create Tracks and Mute, it behaves similarly but creates new tracks flowing through the same Audio channel strip, muting the previous one so that while you are recording, you don't hear the previous passes. (You can later select them and pack them into a take folder, but if you want to end up with a take folder, why not just use that preference?)
Another choice is Create Track Alternatives, but I am going to wait until we get to recording MIDI in Chapter 5, Recording MIDI, to demonstrate this choice because I find it more useful for MIDI than audio.
Recording without a Cycle
All three options, Create Take Folder, Create New Track, and Create Track Alternative, are the same as with cycle recording, but you stop in between takes.
Let's say that you are now pretty happy with your audio recording, whichever method you used, but there is a specific section you are not happy with that you would like to replace and have Logic help you with it automatically. For this task, Autopunch is your friend.
Return to Customize Control and Display and under Modes and Functions, check both Autopunch and Replace. You will now see two buttons to the right of the LCD. The X toggles Replace on and off and the up and down arrows toggle Autopunch:

Figure 3.10 – Autopunch and Replace buttons in the control bar
Now you will understand one of the reasons I recommended in the previous chapter enabling Sample Rate or Punch Locators in the LCD. You can see the red bar that shows in the punch locators, and you can either drag it to the section you want and adjust the length or double-click on the numbers and type in your locators.
You can now record and Logic will Autopunch your new audio recording within the locators. (If you like, you can turn on Cycle, but unfortunately it will only Autopunch during the first pass of the Cycle.):
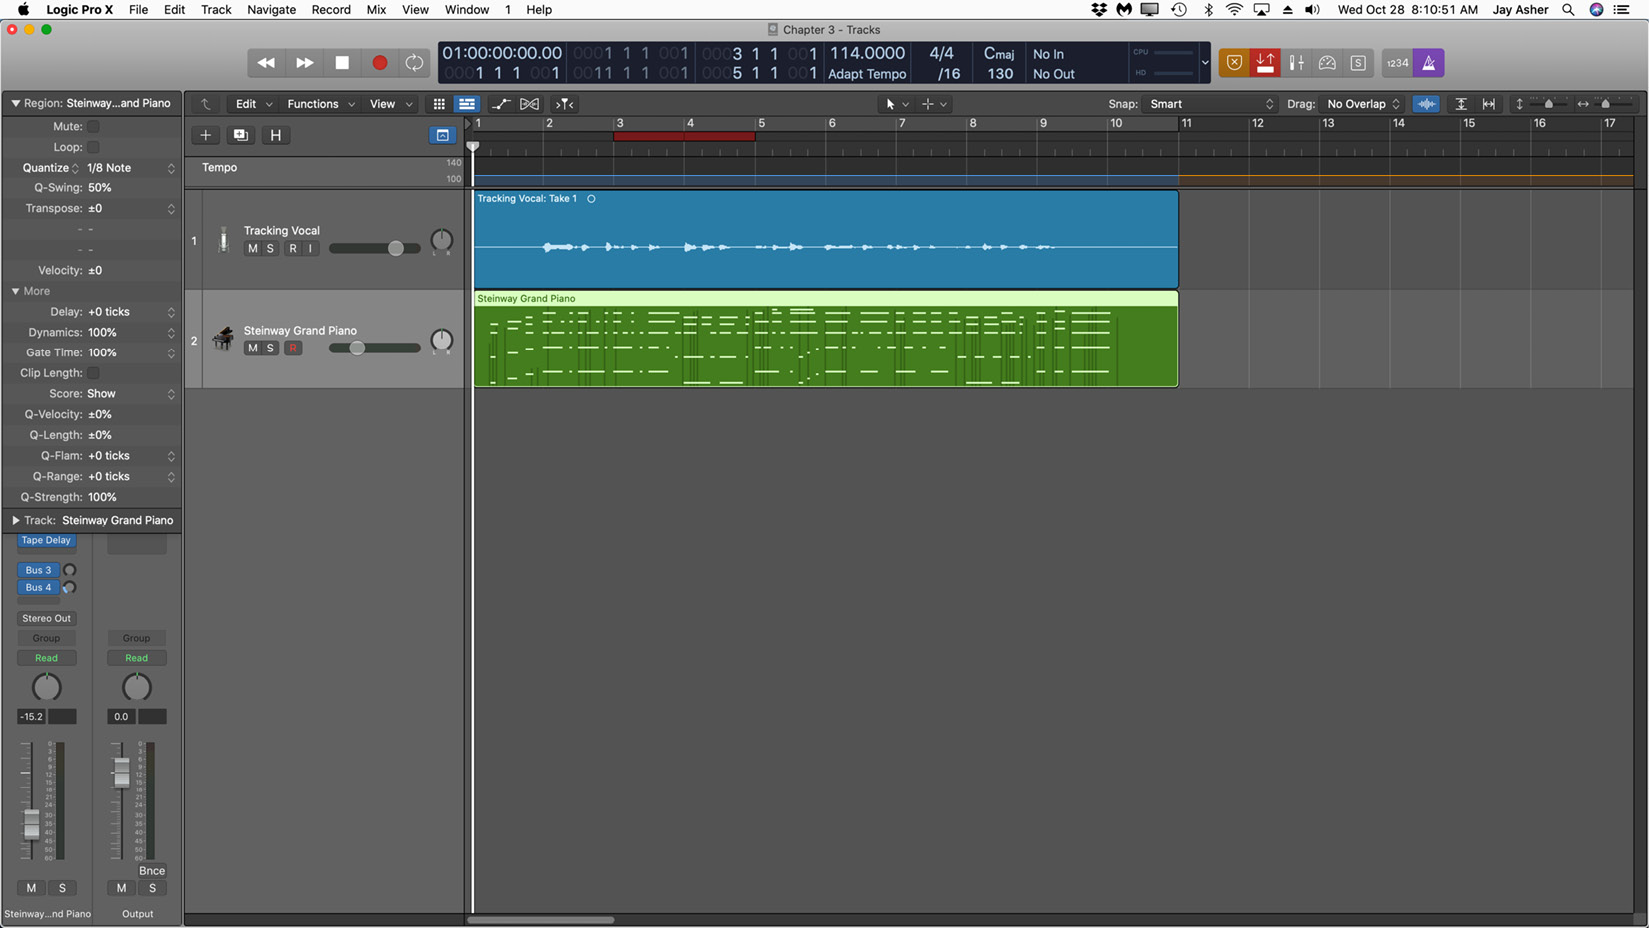
Figure 3.11 – Autopunch
Uh-oh, what if I am not happy with that punch? Did I ruin my original recording? No! This is a non-destructive process. Press Command + Z to undo, and you are back to where you were.
Tape recorder style punching in/out
Many of us who come from the world of tape recorders still like recording along and simply punching in and punching out when we deem it necessary, without stopping. In Logic Pro X, we do this with Quick Punch and using Record Toggle.
Hold the mouse down on the Record button, check Allow Quick Punch-in, and switch to Record/Record Toggle. Or, with Quick Punch-in enabled, instead of pressing R to go in and out of record, press the asterisk key. This method is still especially helpful when you are running Logic but someone else is performing.
Recording without a click with Smart Tempo
While it certainly is possible to record to a click without the result sounding mechanical, it is freeing to record without one. Musicians refer to this technique as Rubato, the traditional Italian name.
You can record both audio and MIDI with software instruments freely, but let's try it here with audio with a Logic Pro X feature that I believe is simply amazing:
- Set your project tempo to approximately what you want it to be.
- In the Control bar's LCD, change the setting from Keep Tempo to Adapt Tempo.
- Record!
I recorded the first phrase of the Battle Hymn of the Republic because it's public domain and has strong downbeats, which really helps Smart Tempo's analysis. Here, you can see the result:
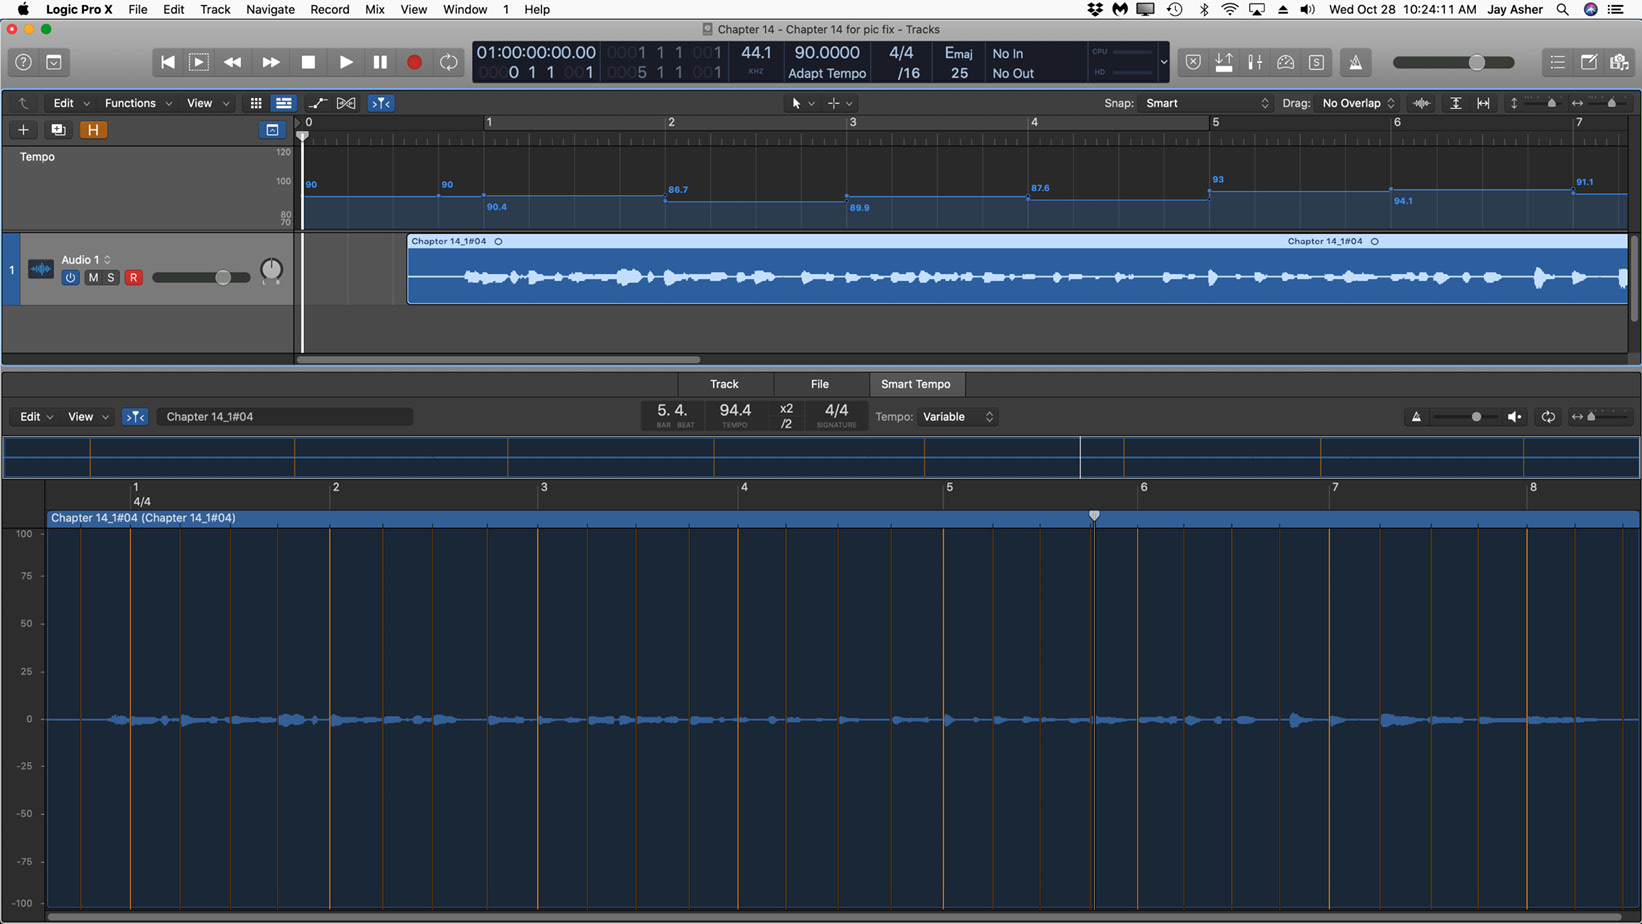
Figure 3.12 – A Rubato vocal recording
Smart Tempo has correctly analyzed the tempo I sang and created a tempo map. Now I can play subsequent parts and hear the tempo so that they will work together. Amazing!
As we have learned, Project Settings are not global, so we may now want to save this project as a template to begin with in the future.
Saving a template
To save a template, follow these steps:
- Save your project.
- Press Command + A to select all the regions and delete them.
- Press F to open the browser and in the Project tab, select all the audio regions and delete them. This will not delete them from your drive.
- Under the File menu, choose Save as Template and name it.
- Close the project without saving it again so that the project will remember the audio files' locations that are in the project.
The next time you open Logic Pro X, you will see a folder named My Templates, and there it will be.
Summary
You have now been introduced to Logic Pro X's included Project Templates, with some recommendations for your Preferences. As you discovered, there are also Project Settings for you to choose from that will affect how you record audio. Setting levels properly is important. Finally, you can record with or without cycling with different workflows, as explained, and fix takes with Autopunch and old-fashioned tape-recorder-style punch in/out. When you have Project Settings and track choices that you like, you may well want to save them as a template.
In the next chapter, we will explore the options for soloing and muting tracks and regions, as well as renaming them. We will learn how to copy and repeat regions, and the effect the Snap and Drag settings have on the behavior. We will also learn about the Audio Track Editor and Audio File Editor, how they differ, and where they are useful.