Chapter 2: Getting to Know the Logic Pro X Interface
Part of learning to effectively use any software is to have a clear understanding of its interface and its terminology, and this is especially true with powerful software such as Logic Pro X. Also, Logic Pro X comes with a ton of content that you will find in both the Library and the Loop Browser. Once you have gained a solid understanding of it, you will be on your way to a great time creating music with Logic Pro X.
This chapter consists of the following main topics:
- Logic Pro X windows, menus, and terminology
- The Logic Pro X Library
- The Browser
- Apple Loops and the Loop Browser
Logic Pro X windows, menus, and terminology
We will begin by explaining the Logic Pro windows, exploring its menus, and mastering its terminology so that we are clear on what we are discussing as we learn to use Logic Pro X.
The Main Window
Shockingly the main window you see when you open a new Logic Pro X project is called … wait for it … the Main Window!
You may hear some long-time Logic Pro users refer to it as the Arrange window because for many, many years that was indeed what the window was named.
Most of what you need to do in Logic Pro X can indeed be done in only this window, but as you will learn, there are other options. By default, Quick Help will be turned on and it is very helpful for beginners.

Figure 2.1 – Quick Help in the Main Window
You can toggle it on/off by clicking the question mark button in the top left of the Control bar, which is the light gray area running across the Graphical User Interface of the Main Window, hereafter referred to as the GUI. As you hold your mouse or trackpad down on each button, Quick Help will tell you what it is. I recommend that you click each one and see how they behave when toggled on and off.
Important note
If when you open a new project, your only track creation option is External MIDI, then create that. The problem is that Logic Pro cannot see an audio interface. If you do not have one hooked up, Logic Pro should default to your built-in audio with a laptop or iMac. If it isn't seeing that or your audio interface, go under the Logic Pro X menu to Preferences | Audio and in the Devices tab, select the audio interface or built-in options and click Apply Changes. Don't worry about the other settings for now.
The Control bar is one of the three main areas of the Main Window and it is very important to your workflow and extremely customizable, which will be especially helpful for laptop users who are screen real estate challenged.
Directly below the Control bar is the Bar Ruler, which displays bars and beats. The vertical white line you see is called the Playhead and if you press the play button, you will see it start to move throughout the project until you press the stop button. Pressing the rewind button brings you back to the beginning.
Below the bar ruler is the second important area in the main window, the Tracks area. It contains the Track List and the grid where you will record and edit all your regions, called the Tracks Area (although the Quick Help refers to it as the Workspace.)
On the left side of the GUI, you see the third important area – it's called the Inspector.
If you have Quick Help toggled on, you will see an area at the top with the description Quick Help. You will also see a disclosure triangle that closes it.
Below it is the part of the Inspector that affects the region, called the Region Inspector. Settings there will affect any regions you select, whether they are on the same track or different tracks. It too has a disclosure triangle to close it, but also another to show more within it.
The next area in the Inspector has settings that control the entire track and is called the Track Inspector.
Below that are two faders, similar to what you might see on a recording console. The one on the left pertains to the Channel Strip of the selected track while the one on the right of it shows the Stereo Output, where all signal goes to if you are working "in the box" and then going out of your audio interface with outputs going to hardware mixers, or a tape recorder, or another hardware device.
Tracks versus Channel Strips
There is some Logic Pro X terminology that often confuses newcomers, and for a very good reason – it is confusing.
I will now create a second track either by clicking the + at the top of the track list or by navigating to the Track menu and choosing New Tracks…. As before, we see choices for creating new tracks:

Figure 2.2 – Creating new tracks
The truth is, we are creating tracks, but we are also creating channel strips, each with a single track flowing through it. But it is possible to have multiple tracks flowing through the same channel strip, and there are times that you will want to.
For now, create a Software Instrument track with Details showing. Create it as an Empty Channel Strip with Open Library checked.
Note
In addition to the choices of Audio, Software Instrument, and Drummer tracks, you also will see External MIDI and Guitar or Bass. External MIDI is for recording sounds from a keyboard or tone module while Guitar or Bass is actually also an audio track with different plugin choices.
Next, we will examine the Library in Logic Pro X, where we find helpful combinations of Software Instruments and FX plugins.
The Logic Pro X Library
The Library has a collection of already created patches. A patch is a collection of plugins designed to help you achieve a certain sound. You can also create your own and save them to the library.
The Library's visible content is related to the kind of channel strip you choose in the Track List. If it's an Audio channel strip, you will see various kinds of FX plugins. If it is a Software Instrument channel strip, you will see Software Instrument and FX plugin combinations. If it's a Drummer channel strip, you will see drummers and drum kits:
- Select the Audio track and see the choices.
- Then select the Software Instrument track and notice that they change. If you select a patch in the Library, it will automatically load the plugins to the channel strip.
- With the Software Instrument track selected in the Track List, select the Steinway Grand Piano patch and you will see that it loads Logic Pro X's Sampler software instrument (before 10.5, it was called EXS 24) and an EQ, Compressor, and a Tape Delay. There are also two Sends. The sends control the level being sent to two busses, each assigned as the input on an aux, that have reverbs instantiated on them. Don't worry if you don't understand what all those are and do. I will teach you about them when we get to learn about mixing in Chapter 13, Organizing for the Mix.
- If you have a MIDI controller hooked up to your computer, you will be able to play notes and hear the sound. If not, press Command + K to open a virtual keyboard. Play notes on it and in the LCD section of the Control bar, you will see a little dot appear that shows that it is receiving MIDI input.
- You can now close the Library. There are two ways to do so. You can click the Library button on the Control bar or simply press the letter Y on your computer keyboard.
Congratulations, you have just learned your first key command. I will be showing you some more, and I encourage you to keep a list or memorize them. My personal motto is "never do by dragging the mouse or trackpad around what you can do with a keystroke."
While we are at it, press the letter I and notice that you can toggle the Inspector open and hidden.
If those do not work, then the key command sets are not assigned properly. They should be set correctly by default but I occasionally have seen Logic default to a Pro Tools compatible set seemingly for no reason.
Important note
If the key commands are not working, go to the Logic Pro X menu to Key Commands | Presets and choose the ones appropriate for your language.
The Toolbar
If you either click the Toolbar button on the Control bar or under the LCD display, grab the blue line, and drag down, you will see the Toolbar. When Logic Pro went from Logic Pro 9 to Logic Pro X, the whole paradigm of the Toolbar was changed into the present Control bar, so the Toolbar has been deemphasized in Logic Pro X. Many users still find it useful, and like the Control bar, it is customizable:
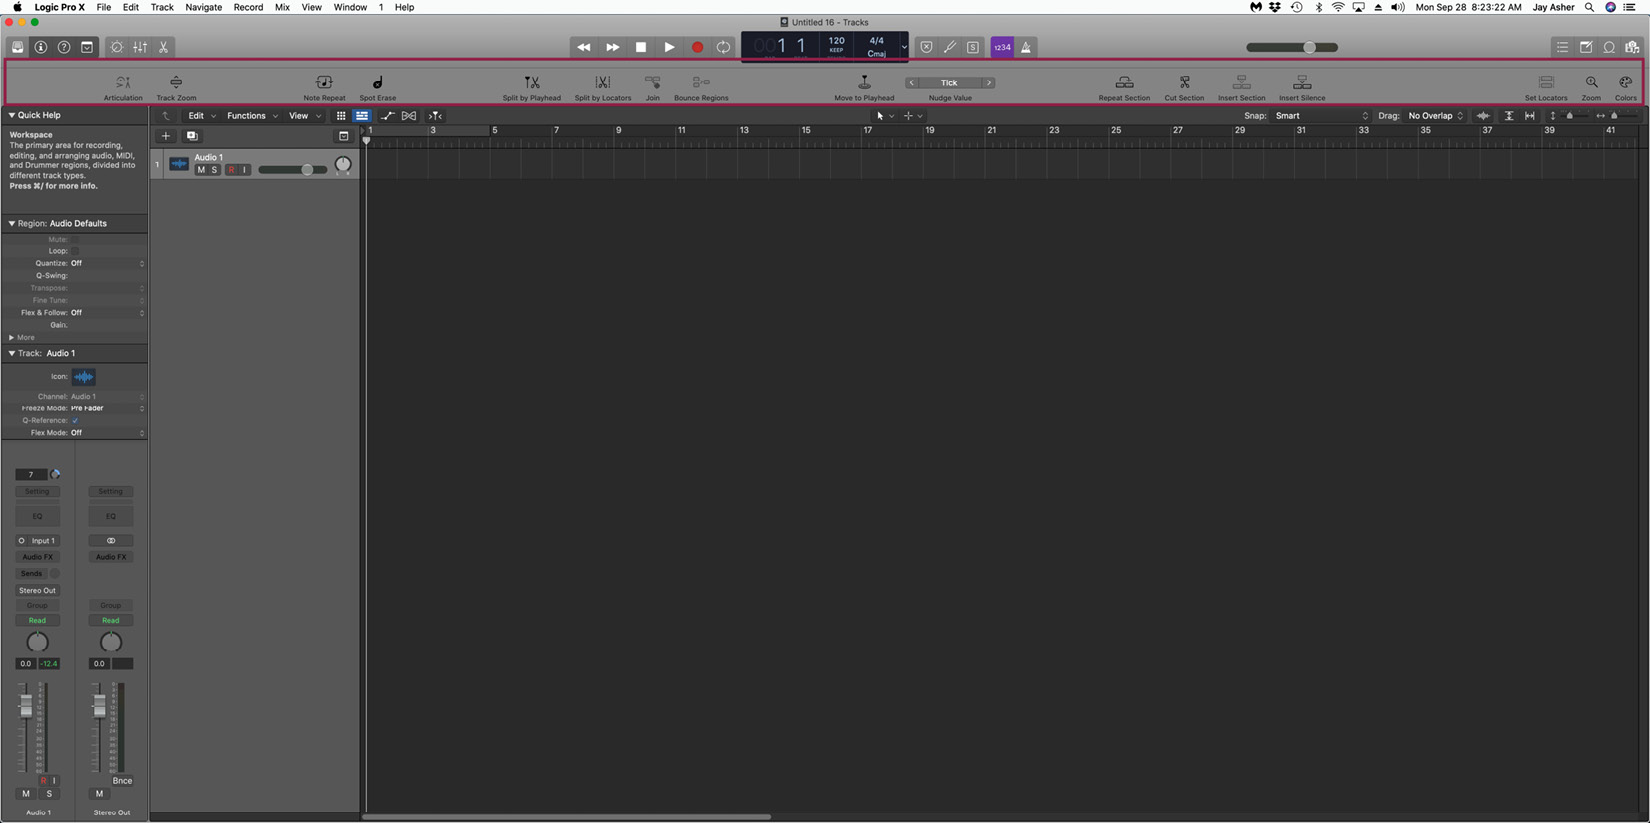
Figure 2.3 – Logic Pro X Toolbar
Customizing the Control bar and Toolbar
If you are using a laptop with a small display, it is entirely possible that you will not see everything included by default and will see some arrows that you can hold down on to see more. Even on a large display or two displays, however, the default is not optimal for working with Logic Pro X in my opinion, so I will show you how to customize it to your specific needs now.
On the right side of the LCD in the center of the Control bar, if you hold down your mouse or trackpad, you will see some options for the Control bar display:

Figure 2.4 – Control bar display options
- Choose Customize Control bar and Display.
- Hold down your mouse or trackpad and change from Beats & Project to Custom, and wow – you will see it has changed greatly. On a small screen, you see even less!
No worries, this is where customizing is powerful. Look at the default Views that are checked:

Figure 2.5 – Selected default Views
If you memorize the relevant key commands, most of these are unnecessary. In fact, I have already mentioned a couple, but now I will give you a list:
- Y toggles the Library.
- I toggles the Inspector
- Left Shift + forward slash toggles Quick Help.
- Control + Option + Command + T toggles the Toolbar.
- B toggles the Smart Controls.
- X toggles the Mixer
- E toggles the Editors.
- D toggles the List Editors.
- Option + Command + P toggles the Note Pad.
- O toggles the Loop Browser.
- F toggles the File Browser.
If you memorize some or all of these, you can uncheck them here and free up space in the Control bar. I recommend that you uncheck all but the more complicated ones.
Under the Transport menu, you can check or uncheck what you would like to see. Since I know that the spacebar puts Logic Pro into play mode, while pressing it again stops playback, and the Enter key returns to the beginning, I don't need many of these, but for you, you may feel more comfortable leaving it as it is.
Under LCD, notice that I have checked Sample Rate or Punch Locators. When we visit audio recording in the next chapter, you will understand why. I have also made some changes that suit me in Modes and Functions, but frankly, I change these often.
Once you have made your choices, you can then click Save As Default. While these are Project Settings and not Preferences, they are not global to Logic, but they will now ensure that every new Logic project will default to them. When you open an earlier Logic project, if you open your customizing window again, you can choose Apply Defaults and then resave the project.
Right-clicking or clicking on the Toolbar while holding the Control key gives you a similar menu of choices to what you see on the Toolbar. I rarely use the Toolbar so I have no specific recommendations, but you may reach a very different conclusion and that is fine.
Logic Pro X's included content
Logic comes with a ton of content, including software instruments, FX, and Apple loops. You will want to make sure you have downloaded it all to your main hard drive. Later, you can move the content to another drive quite easily (you will see Relocate Sound Library… in the following screenshot):
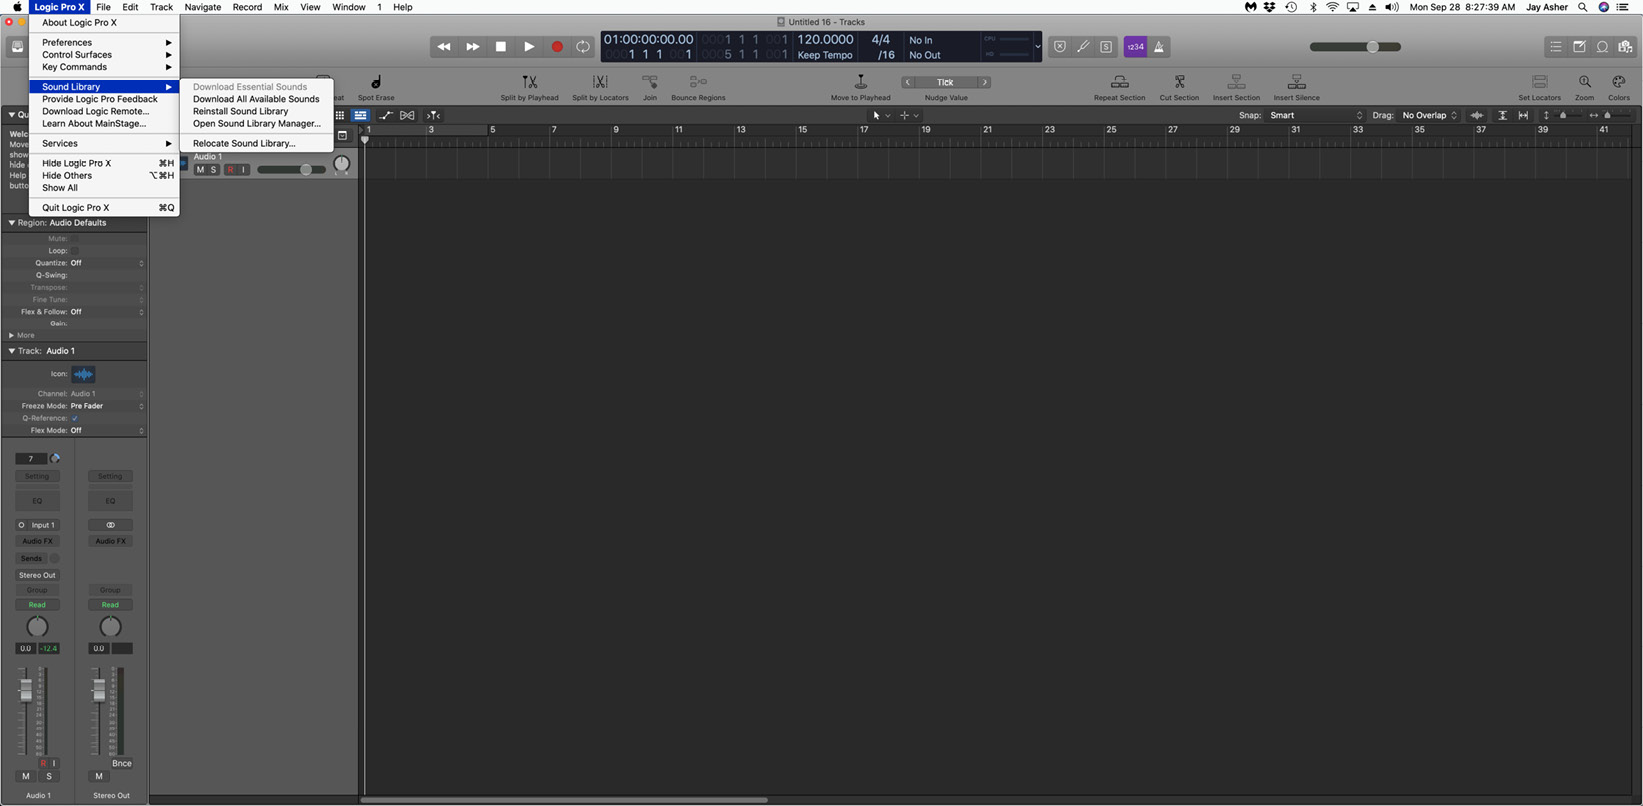
Figure 2.6 – Opening Sound Library to download content
If you choose Open Sound Library Manager…, you will see whether they are all installed. If not, choose Select all unfinished and they will download. You will see a thin blue progress bar below the Control bar. You can download in the background while you continue to work in Logic Pro X.
The Browser is the area where you can see audio files that are in your project, in other projects, and in iTunes or your Movies folder.
Exploring the Browser
There are three browsers that are included: the Project Browser, the Media Browser, and the All Files browser.
You open the Browser by clicking the icon in the Control bar or by pressing the letter F on your computer keyboard.
Note
Some of this may be a little over your head at this point but don't worry. You can always come back and review it later when you are more comfortable with Logic Pro, but since it is one of the main areas in Logic, I feel it is important to explain the Browser to you.
The Project Browser
The Project Browser shows you your project audio without the necessity of opening the Project Audio window:

Figure 2.7 – The Project Browser
In this window, it is easy to drag audio files into the workspace that are not in the workspace. Select Used or Unused to see which are in the workspace and which are not, or delete those you are not using.
The Media Browser
This browser provides you with a view of music in the music app or movies you have so that you can import them into your project. I hardly ever use it, frankly:
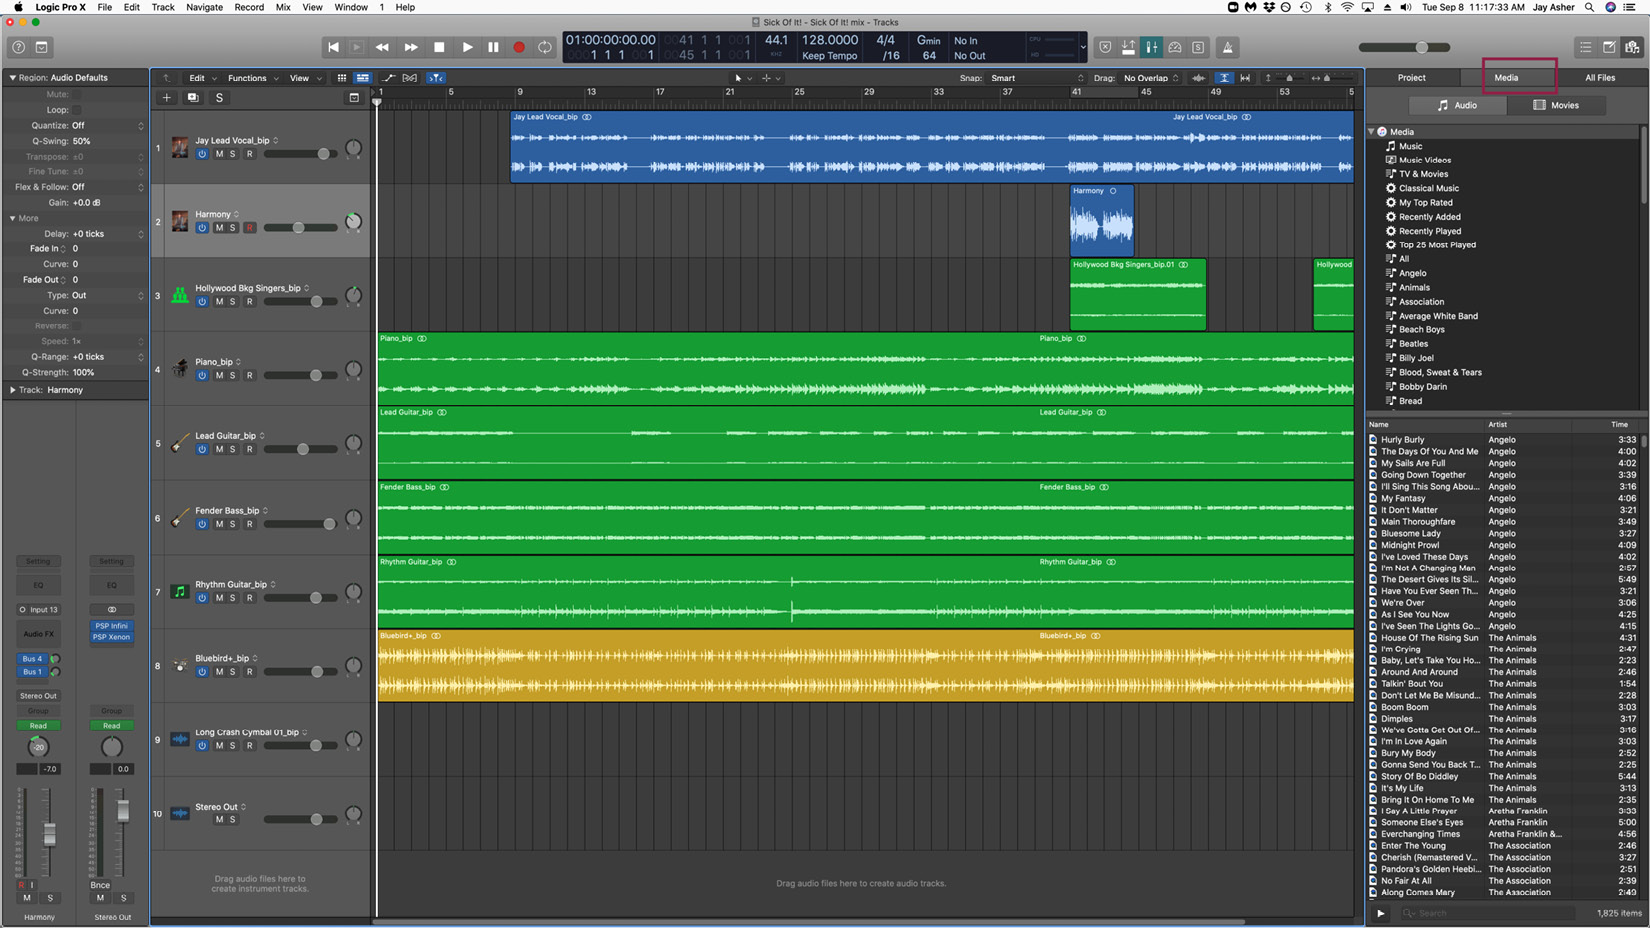
Figure 2.8 – The Media Browser
The All Files Browser
There are three buttons at the top: Computer, Home, and Project. In the following screenshot, Computer is chosen:

Figure 2.9 – The All FIles Browser
In the Computer view, you see all your storage devices to search for files you might want to add to your project.
The Home button shows the contents of your home directory.
The Project button shows all the projects in your Project folder, which is where Logic Pro saves projects by default. This is the most useful browser area in my opinion, as it allows you to import Global settings, tracks, and content.
When you select a project in this window, you can click on Import Project Settings at the bottom-right of the window and you then have the ability to choose exactly what you wish to import into your project. With the tabs at the top, you can filter what you wish to see, for greater ease of viewing. There is a slider at the bottom that allows you to see more things you can import, such as Sends:
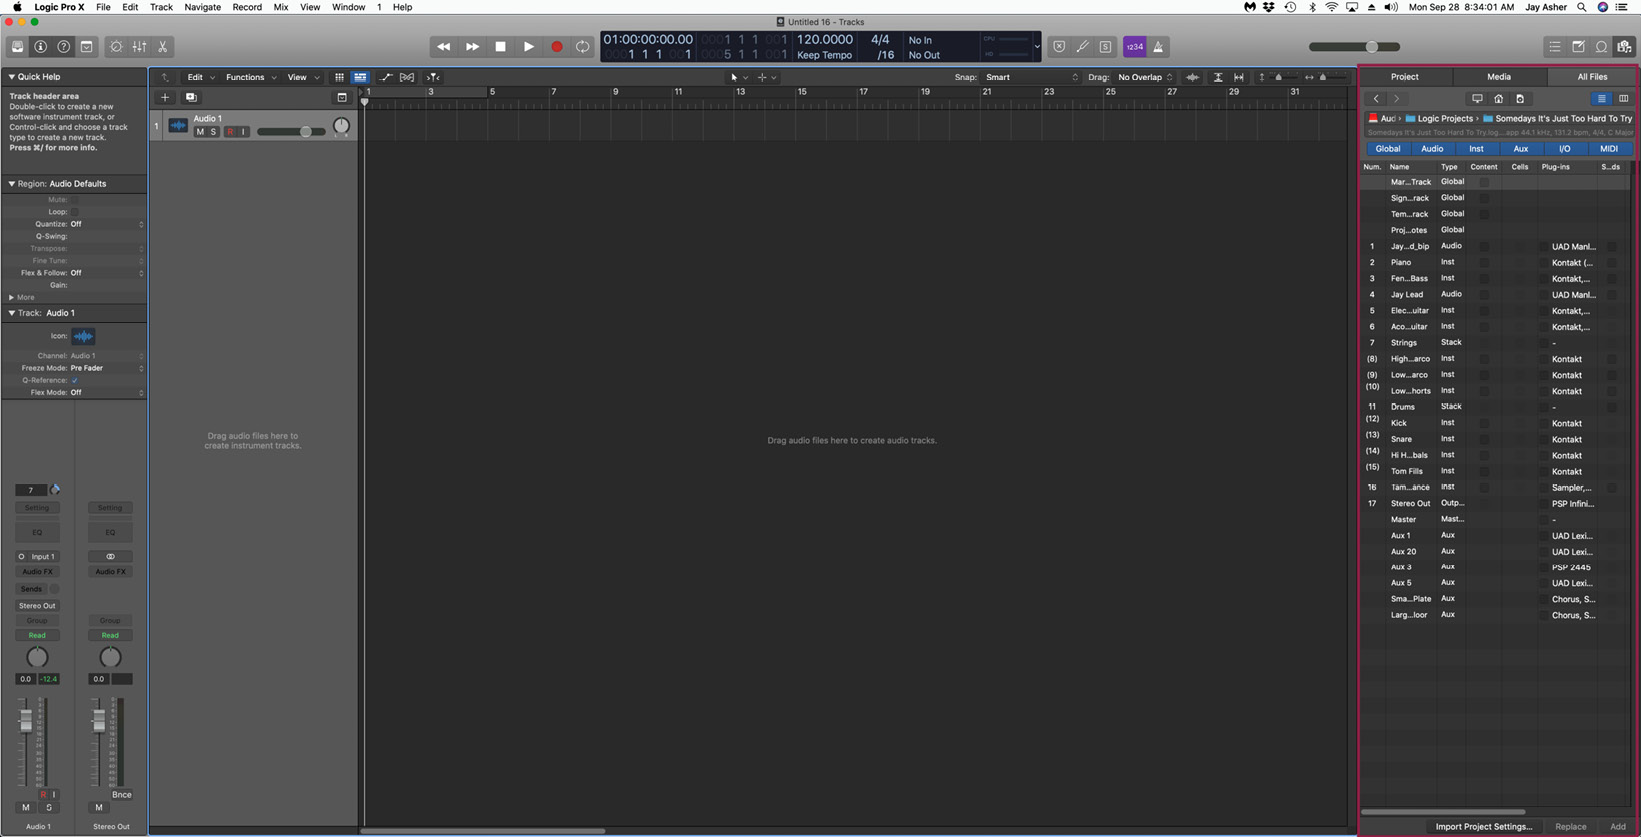
Figure 2.10 – Importing from another project into the All Files Browser
We'll explore how we can use Apple loops in the next section.
Apple Loops and the Loop Browser
The Loop Browser is where you will find a massive bunch of royalty-free Apple Loops that you may use in your musical projects. You probably have heard many of them already. If, for instance, you have heard Rihanna's big hit "Umbrella," you have heard Apple Loops on a commercial recording.
Apple loops have the virtue of adapting to any tempo or key. There are Audio loops, Software Instrument loops, Drummer loops, and 10.5 Pattern loops.
You can open the Loop Browser by clicking on the button that looks like a loop on the right-hand side of the Control bar, but heck, why not just press the letter O?
Logic defaults to a tempo of 120 beats per minute (bpm) and the key of C major. Loops are categorized by Instruments, Genre, Descriptors, and even Moods. You won't see Moods in the default Button view but if you click on the icon next to it, it changes to Column view, and then you do. You can also tag some as Favorites. You can sort them by name (the default) or the number of beats, or tempo, or key, just by clicking on any one of those above the loops list. There are also loop packs that you can access by holding the mouse or trackpad down where you see All Packs.
You can also view or hide specific types of loops from view:
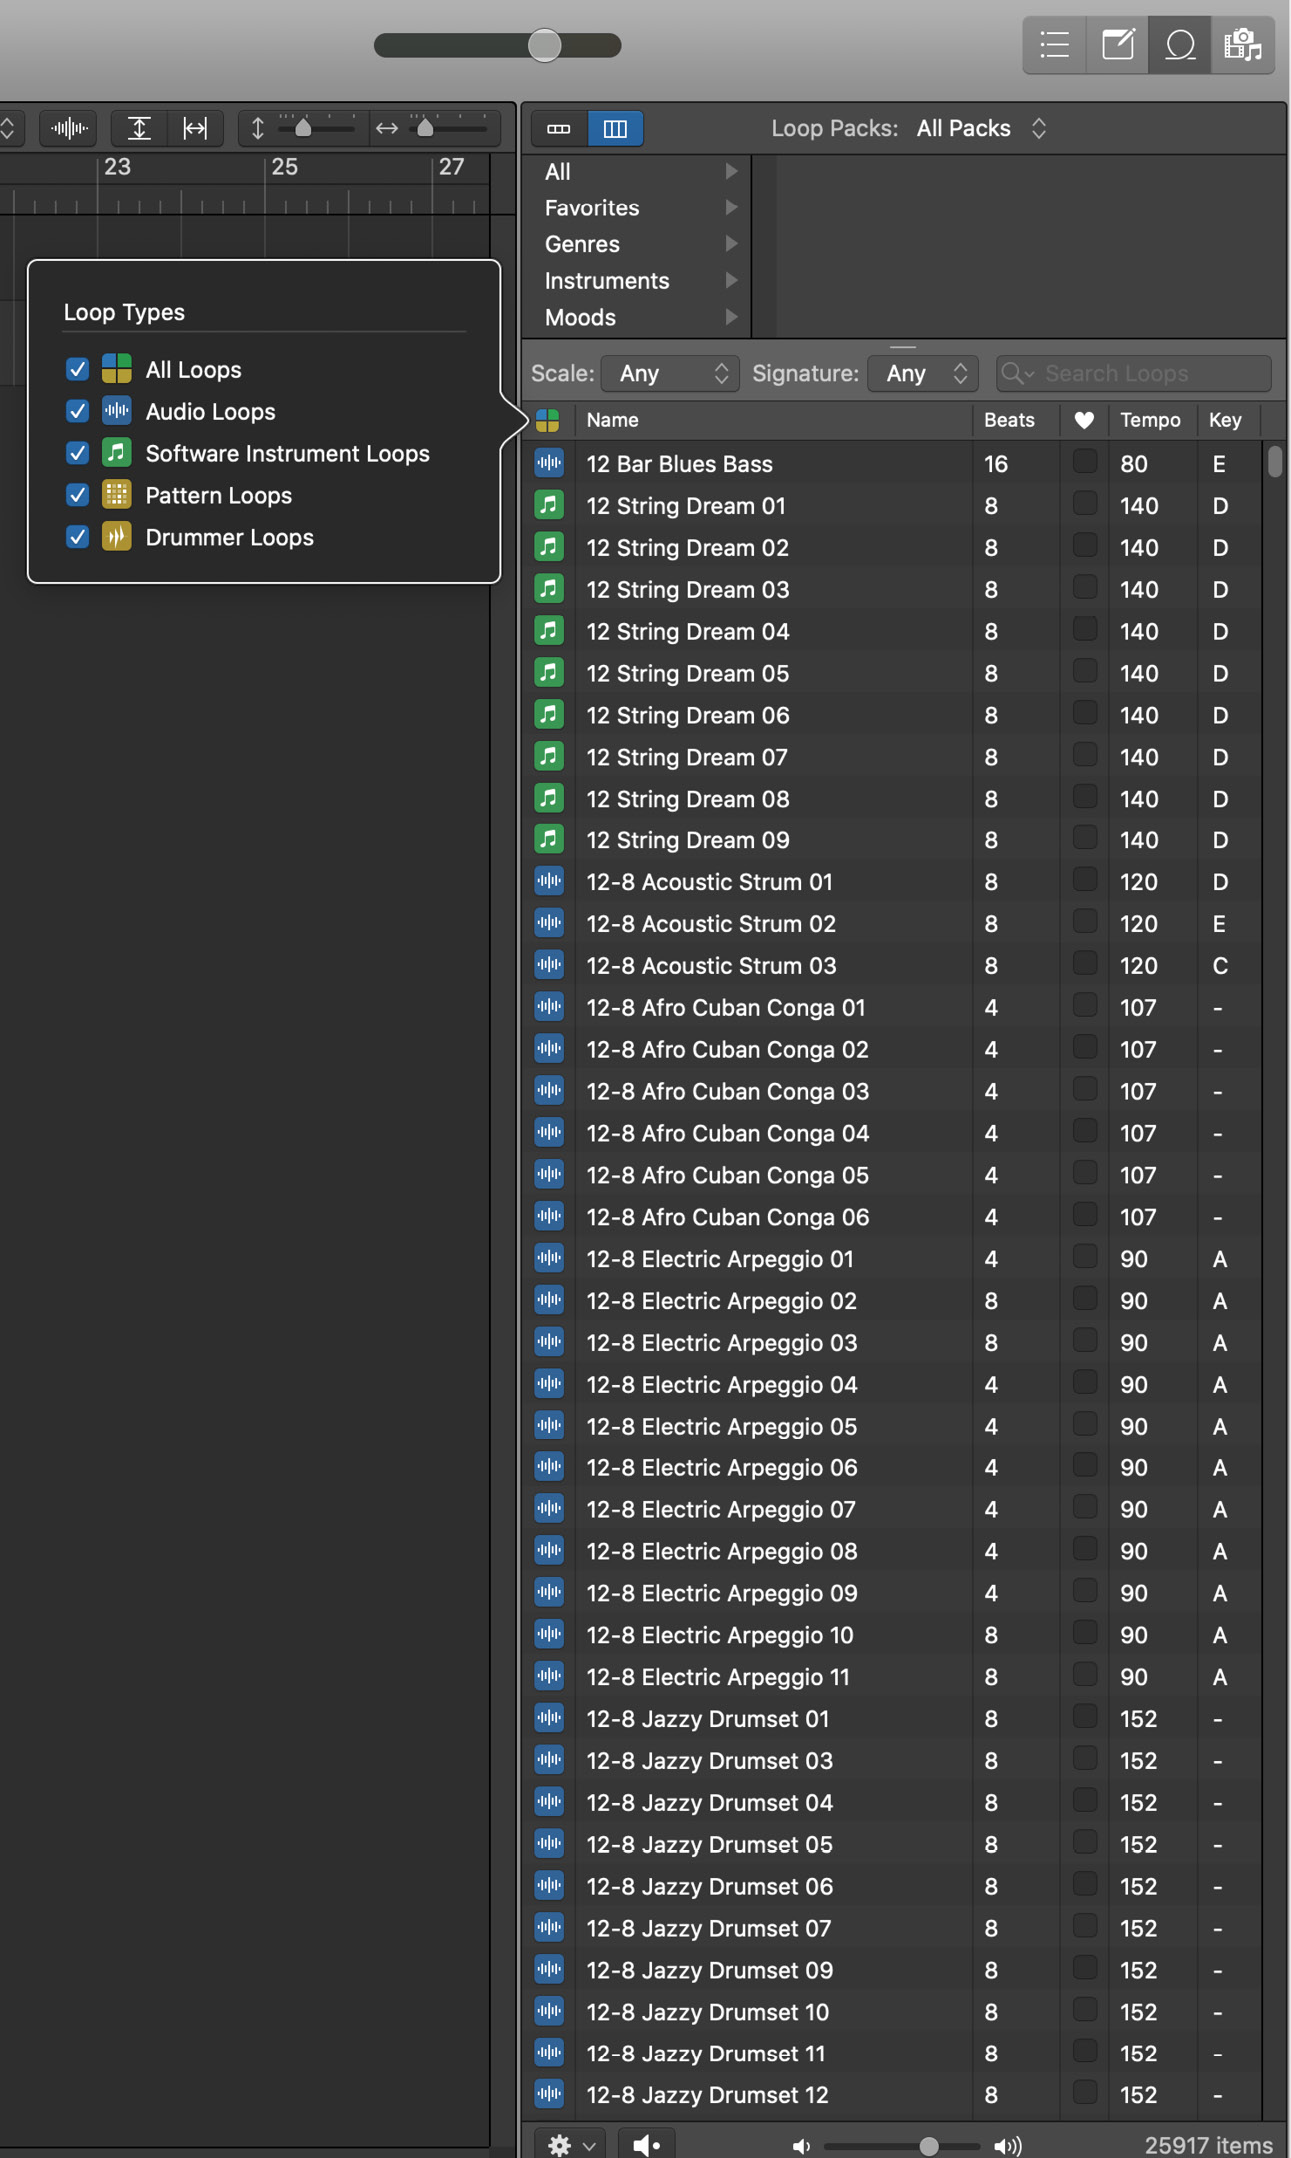
Figure 2.11 – Loop types in Logic Pro X
Let's have some fun, shall we?
- Click on Instrument | All Drums.
- Click on Genre and choose Modern R&B.
- Click on Descriptors and choose Single, Processed, and Grooving.
We have narrowed down the choices a bit. You can listen to a loop to audition it just by clicking on it, and you will hear it at the tempo, and key if it is melodic or harmonic, of the Logic project. I kind of dig Light The Fuse Beat 01. I see that it is an Audio loop because of the blue wave symbol, that it is four measures long (16 beats), and that was originally at 140 bpm, but it sounds fine at 120.
If I drag it to the workspace below the two already existing tracks, it will create an audio track, but since we already have one, I will drag it to that. Look at what we see as we do so. The numbers tell us the position in the timeline we are dragging it to and its length. If we position it right at the beginning, it is at 1 1 1 1. What does that mean?
The first number is the bar. The second number is the beat (a quarter note in 4/4) and the third number is the sixteenth note in the quarter note. The last number is ticks. There are 240 ticks per sixteenth note. So, this is positioned at the first bar, first beat, the first sixteenth in the beat, and the first tick. The length is 4 0 0 0, four bars long. If it were 4 ½, it would read 4 2 0 0.
Notice that when we drag it in, it changes the Logic project tempo to 140 bpm. If we either pull down on 140 in the LCD, until we reach 120, or better yet, double-click on it and type 120, we are back to 120 bpm. Let's decide on 130 and, as you hear, the loop chases the tempo perfectly.
A good start, but now we want other loops to play with it. To audition them while hearing this one, we want to create a four-bar cycle. We can simply drag our mouse or trackpad in the bar ruler from bar 1 to bar 5 and create it, and when we hit play, it will continuously repeat those four bars, with the Playhead never advancing past bar 5. But that is not as easy as simply selecting the region and pressing the U key to set the cycle by the region locators.
Now let's add bass with the following steps:
- In the Loop Browser, click the X to reset it.
- Choose Instrument, Bass, then Genre Modern R&B, and Descriptors Single, Processed, and Grooving.
- Either press the Play button in the Transport in the Control bar or press the spacebar on the computer keyboard, and it begins to play the beat loop over and over.
- Select Loops in the Loop Browser to hear how they sound with the beat loop until you hear a loop you like.
Flip The Switch Bass works for me. Try to drag it to the Software Instrument track that already exists, and you get a warning that it isn't an Audio track and that green Apple loops, not blue Apple loops, work on those. No problem – just drag it into the workspace below the other two tracks and it creates a track for you.
Play and listen, and it's already pretty cool.
Maybe we now want an electric guitar, but when we use the same genre and descriptors, we may conclude that we are not finding any that work with the existing material to our satisfaction. But we are creative people, so go to the Loop Pack called Chillwave, and select Guitars and audition some, and sure enough, there is one that I like, called Digital Riff Guitar. It was originally in the key of D major and we are in C major – not very far from the original, which means that it should sound pretty good, and I think it does. (If you don't, choose another.)
Into the workspace, below the others, it goes. It is, however, only 8 beats long, not 16 like the others. So now we'll learn about looping, which is different than cycling.
Let's explore looping techniques:
- Press C to turn off the cycle.
- Drag over all three loops with the mouse or trackpad (this is known as rubber-banding) or press Command + A, which in most Apple applications is Select All and all the regions are selected.
- In the Region Inspector, you will see 3 selected and if you check the Loop checkbox, they will all loop for the length of the project. Alternatively, when they are selected, just press L.
In this manner, I can continue to add Apple loops to my heart's content.
At this point, you may well have decided that this project is a keeper and you don't want to run the risk of losing your work. The most important thing in creating music on a computer is… saving your project!
Saving your project
Press Command + S, or go to the File menu and choose Save As. You can save your project either as a GarageBand style package, where any of the files you save with it are embedded, or as a Folder, which will have separate sub-folders. Normally, I prefer the latter, but because I don't need to check any of those as we are only using Loop Browser loops, I will choose Package with all those unchecked.
Whew, glad we did that! Now let's work some more with what we have. It's time to learn about our Main Window tools.
The Left-click and Command-click tools
The Left-click tool is the primary tool and it defaults to the Pointer tool, but as you can see in this screenshot, it can be assigned to any of a number of different tools:
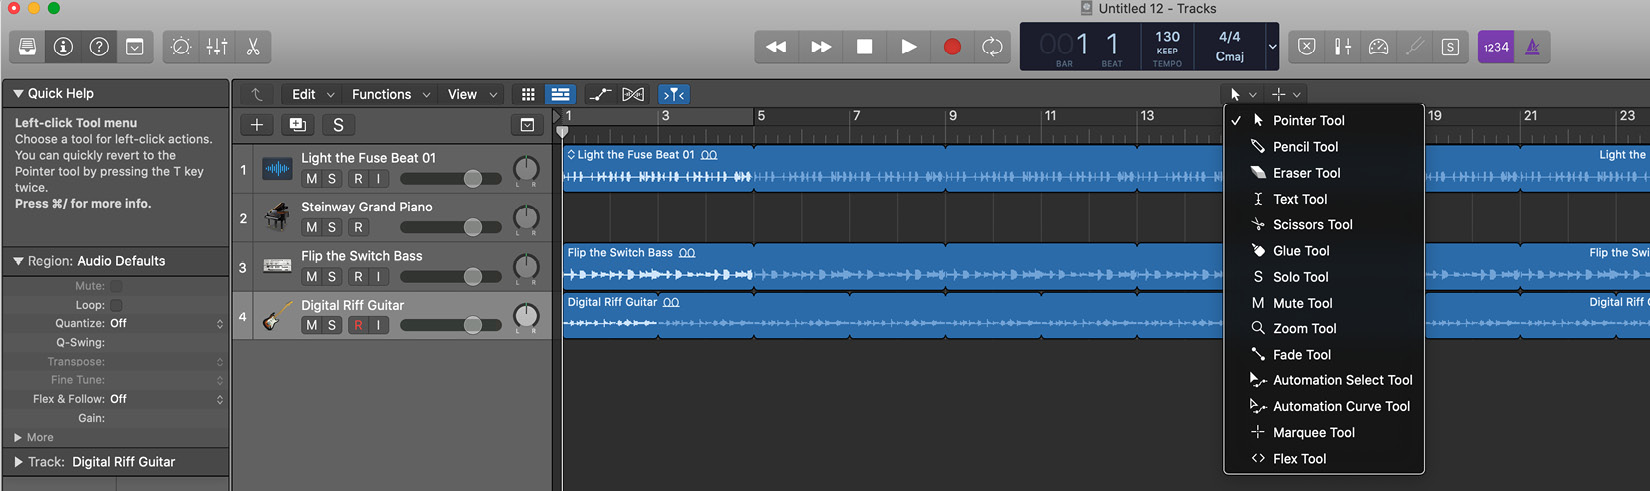
Figure 2.12: The Left-click Tool
The Pointer tool can behave differently depending on where in the region you position it.
Here are some examples that will illustrate the behaviors:
- Select the Steinway Grand Piano track and press delete or hold the Track Header, and it turns into a hand, and to the left and it goes – poof!
- Select the three regions and press L to turn off looping.
- Select the bass and guitar regions, and while keeping an eye on the help tag, drag them to begin at bar 3.
- Select all three again and if you position the Pointer tool in the upper-right corner of the regions, it turns into the Loop tool. You can then drag them to the right to end at bar 15.
- But the bass was longer than the guitar, so it extends an extra two bars. No problem. Click in an empty area of the workspace to deselect the regions.
- Position the Pointer on the bass region at bar 15, where it turns into the Loop tool, and just press down.
I'm loving it, but I think I would like to have the bass play the last three notes of the loop to lead into its entrance. This is where we can use the Command-click tool.
It defaults to the Marquee tool, but like the Left-click tool, it can be assigned to any one of the others.
This is the most useful tool for moving or copying sections of a region. Let's see how it can work for us:
- With the bass region selected, press L to turn off the loop.
- Press Z for zoom to fit selection and then press S to solo it, or press the S in the track header.
- Hold the Command key and notice that the Pointer tool turns into the Marquee tool. Now drag it over the last three notes of the bass region and press the spacebar to hear it.
That will work great. If I press down with the mouse, it splits the region so that the last three notes are now a separate region. I want to copy it to the right place, but I want to be precise, and the Snap menu can be set to help me.
Snap
If I hold down on the Snap menu, I have a lot of choices as to the behavior when I copy a region:
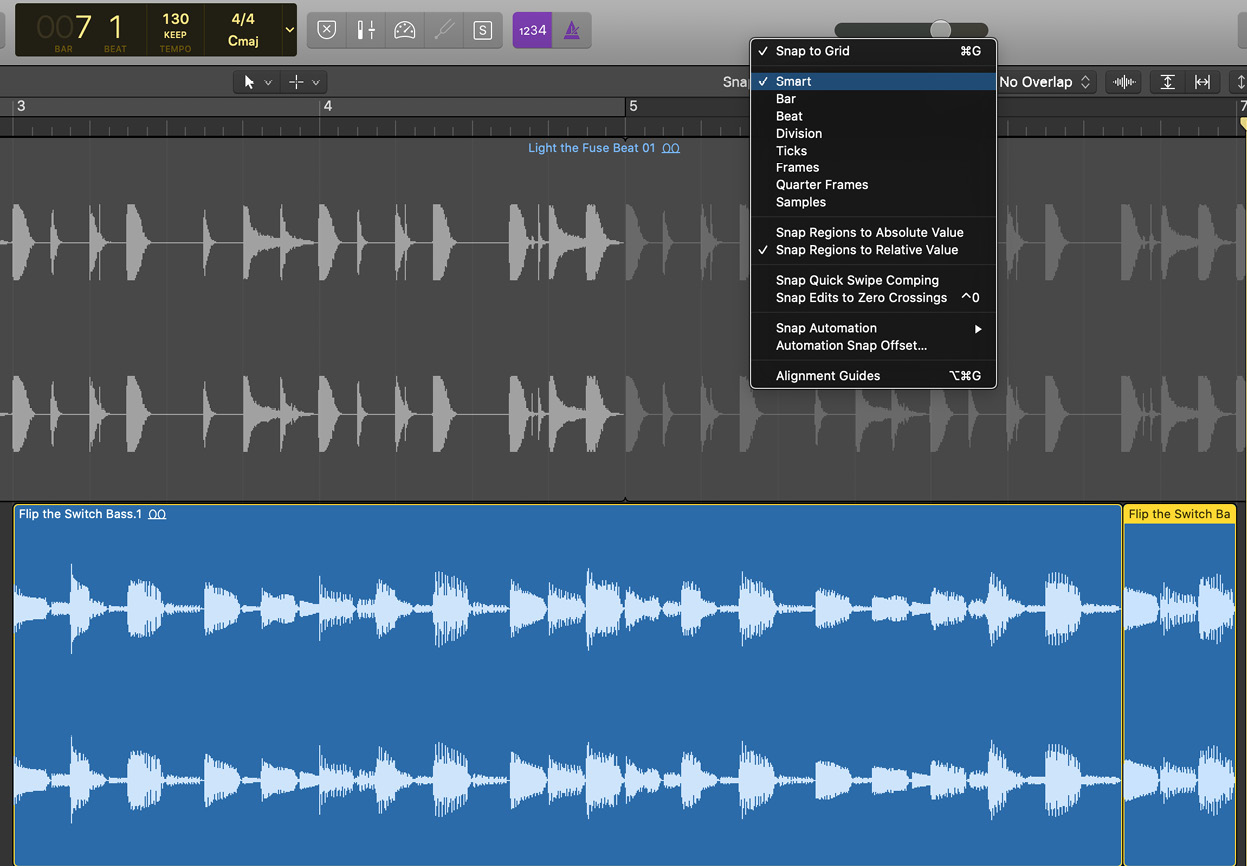
Figure 2.13 – Snap settings
My newly created region is at 6 3 3 1, so exactly at the third beat and third sixteenth note of the beat. So, if we want to snap to a division, an eighth note in this instance, and exactly on the division, an absolute value is the right choice. Follow these steps to achieve this:
- Press S to turn off Solo.
- Set the Snap settings to those I described.
- While holding the Option key, drag the new bass region to 2 3 3 1, remembering to first release the mouse or trackpad before releasing the Option key. Otherwise, you will move it, rather than copying it.
- You now have three bass regions. Select the last two and press Command + J to merge them.
- Select the merged region and position the Pointer tool so that it becomes the Loop tool and loop until bar 15 again.
Play it and wow – it's really getting somewhere. But I want to hear the bass more clearly when it enters. Again, the Marquee tool is my friend and it's time to introduce you to my favorite key command!
If you press the forward slash key next to the right Shift key, it opens up the Go To Position dialog box. To go to the place in the timeline where the bass now enters, type 2, press the spacebar, type 3, press the spacebar, and either type 1 or leave it alone since it defaults to 1 tick. Press OK, or the Return key and the Playhead advances to that position. This is my favorite way to go precisely to any place in my project.
Now that the Playhead is exactly where we want it, we can use the Marquee tool to delete or mute part of the region:
- Hold the Command key so that the Marquee tool appears and drag it over the beat region from 2 3 3 1 to 3 1 1 1.
- Either press delete or Control + M to mute it – your choice.
Press Command + S to save your work.
Changing the key and transposing regions
I am singing along with this, improvising, and it feels just a little low to me. I wish it were in Db major rather than C major.
These are Apple loops, so no problem, right? In the top right of the Control bar, the first button opens the List Editors. Or, I can simply press D. I want the Signature tab.
Sure enough, I see that it is in 4/4 and the key of C major, as expected. I hold down the mouse or trackpad and change it to Db major and voila – when I hit play, it's in the key I want.
Maybe though I want to start in C and modulate up to Db. To achieve this, you can follow these steps:
- In the Signature list editor, I go back to C Major and exit the Signature list editor.
- Using the Go To Position key command, I set the Playhead to bar 7.
- With the bass and guitar regions selected, I either go to the Edit menu in the main menus and choose Split | Regions at Playhead or better yet, press Command + T.
- With the two newly created regions that begin at bar 7 selected, in the Region Inspector next to the word Transpose, I either drag up or double-click and type +1.
When I play my project back, sure enough, I hear the regions playing in the key of C and then at bar 7, modulating up a half step to Db major.
Remember to save your project now!
Summary
You have now been introduced to the three main areas of the main window. The Control bar and Toolbar are important for your workflow, and you can customize them greatly. You have learned about the Library and its Channel Strip settings. Hopefully, you enjoyed choosing Apple loops from the Loop Browser. As you now know, the Snap setting and Left-click and Command-click tool choices are critical to what you are trying to accomplish in the workspace. Changing the key in Logic Pro X can be done in the Signature List and Transposing regions, in the Region Inspector.
In Chapter 3, Recording Audio, we will become familiar with considerations for preparing for recording audio. You will explore the many workflow choices to record audio in Logic Pro X and the advantages of each. You will learn how to then improve a recording by adding takes and punching in and out automatically or manually. Also, you will learn the value of having alternative versions of a project and saving a project as a template.