Chapter 4: Structuring Code with Java Methods
As we are starting to become comfortable with Java programming, in this chapter, we will take a closer look at methods. Although we know that we can call them to make them execute their code, there is more to them that hasn't been discussed so far.
In this chapter, we will cover the following topics:
- The structure of methods
- Method overloading versus overriding
- How methods affect our variables
- Method recursion
- Using our knowledge of methods to progress the Sub' Hunter game
First, let's go through a quick method recap.
Methods
Tip
A fact about methods: almost all our code will be inside a method!
Clearly, methods are important. While this book will typically focus on the practical- getting-things-done aspect of programming, it is also important to cover the necessary theory as well so that we can make fast progress and end up with a full understanding at the end.
Having said this, it is not necessary to master or memorize everything about method theory before moving on with the project. If something doesn't quite make sense, the most likely reason is that something else later in this book will make things come more into focus.
Tip
Thoroughly read everything about methods but don't wait until you are 100% confident with everything in this section before moving on. The best way to master methods is to go ahead and use them.
Methods revisited and explained further
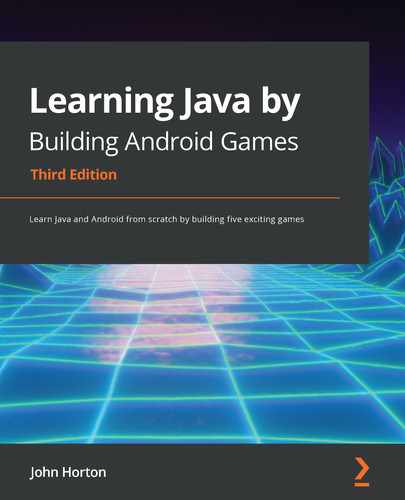
As a refresher, the following diagram roughly sums up where our understanding of methods is now. The ticks indicate where we have discussed an aspect related to methods, while the crosses indicate what we have not explored yet:
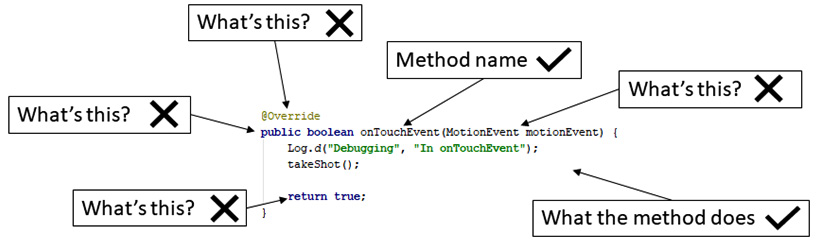
Figure 4.1 – Methods refresher
As we can see, there are many more crosses than ticks around methods. We will totally take the lid off the methods and see how they work, and what exactly the other parts of the method are doing for us, in this chapter. In Chapter 8, Object-Oriented Programming, we will clear up the last few parts of the mystery of methods.
So, what exactly are Java methods? A method is a collection of variables, expressions, and other code bundled together inside an opening curly brace, {, and closing curly brace, }, preceded by a name and some more method syntax too. We have already been using lots of methods, but we just haven't looked very closely at them yet.
Let's start with the signatures of methods.
The method signature
The first part of a method that we write is called the signature. And as we will soon see, the signature can be further broken down into other parts. Here is a hypothetical method signature:
public boolean shootAlien(int x, int y, float velocity)
If we add an opening and closing pair of curly braces, {}, with some code that the method executes, then we have a complete method – a definition. Here is another hypothetical, yet syntactically correct, method:
private void setCoordinates(int x, int y){
// code to set coordinates goes here
}
We can then use our new method from another part of our code, like this:
…
// I like it here
// but now I am going off to the setCoordinates method
setCoordinates(4,6);
// Phew, I'm back again - code continues here
…
At the point where we call setCoordinates, the execution of our program would branch to the code contained within that method. The method would execute all the statements inside it, step by step, until it reaches the end and returns control to the code that called it, or sooner if it hits a return statement. Then, the code would continue running from the first line after the method call.
Here is another example of a method, complete with the code to make the method return to the code that called it:
int addAToB(int a, int b){
int answer = a + b;
return answer;
}
The call to use the preceding method could look like this:
int myAnswer = addAToB(2, 4);
We don't need to write methods to add two int variables together, but this example helps us look at the inner workings of methods. This is what is happening step by step:
- First, we pass in the values 2 and 4.
In the method signature, the value 2 is assigned to int a and the value 4 is assigned to int b.
- Within the method body, the a and b variables are added together and used to initialize the new variable, int answer.
- The return answer line returns the value stored in answer to the calling code, causing myAnswer to be initialized with the value 6.
Look back at all the hypothetical method examples and notice that each of the method signatures varies a little. The reason for this is the Java method signature is quite flexible, allowing us to build exactly the methods we need.
Exactly how the method signature defines how the method must be called and how the method must return a value, deserves further discussion.
Let's give each part of the signature a name so that we can break it into chunks and learn about them.
Here is a method signature with its parts labeled up, ready for discussion. Also, have a look at the following table to further identify which part of the signature is which. This will make the rest of our discussions on methods straightforward. Look at the following diagram, which shows the same method as the one we used in the previous diagram, but this time, I have labeled all the parts:
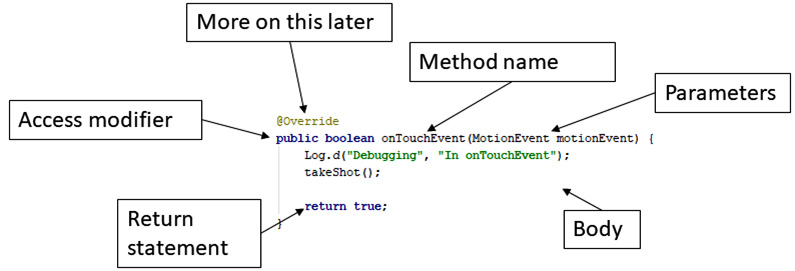
Figure 4.2 – Method signature parts
Note that I have not labeled the @Override part. We already know that this method is provided by the class we are working in and that by using @Override. We are adding our own code to what happens when it is called by the operating system. We will also discuss this further in the Method overloading and overriding confusion section, later in this chapter. In summary, here are the parts of the method signature and their names:
Access Modifier, Return-type, Name of method (Parameters)
The following table shows a few examples – some that we have used so far, as well as some more hypothetical examples – laid out in a table so that we can explain them further. We will then look at each in turn:

Access modifier
In our earlier examples, we only used an access modifier a couple of times – partly because the method doesn't have to use the modifier. The modifier is a way of specifying what code can use (call) your method. We can use modifiers such as public and private for this. Regular variables can have modifiers too; for example:
// Most code can see me
public int a;
// Code in other classes can't see me
private String secret = "Shhh, I am private";
Modifiers (for methods and variables) are an essential Java topic, but they are best dealt with when we discuss another vital Java topic that we have skirted around a few times already: classes. We will do so in Chapter 8, Object Oriented Programming. It helps to have an initial understanding of modifiers at this stage.
Return type
Next up is the return type. Unlike an access modifier, a return type is not optional. So, let's look a bit closer at these. We have seen that our methods "do stuff"; they execute code. But what if we need the results from what they have done? The simplest example of a return type we have seen so far is as follows:
int addAToB(int a, int b){
int answer = a + b;
return answer;
}
Here, the return type in the signature is highlighted in the preceding code. So, the return type is an int. This means the addAToB method must send back (return) a value to the code that called it that will fit in an int variable. As shown in the second highlighted part of the code, this is exactly what happens:
return answer;
The answer variable is of the int type. The return type can be any Java type we have seen so far.
The method does not have to return a value at all, however. When the method returns no value, the signature must use the void keyword as the return type.
When the void keyword is used, the method body must not attempt to return a value as this will cause a compiler error:
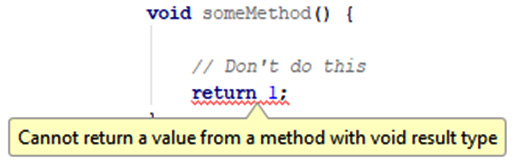
Figure 4.3 – Error shown due to the return value
It can, however, use the return keyword without a value. Here are some combinations of the return type and use of the return keyword that are valid:
void doSomething(){
// our code
// I'm done going back to calling code here
// no return is necessary
}
Another combination is as follows:
void doSomethingElse(){
// our code
// I can do this provided I don't try and add a value
return;
}
The following code is yet another combination:
String joinTogether(String firstName, String lastName){
return firstName + lastName;
}
We could call each of these methods in turn, like this:
// OK time to call some methods
doSomething();
doSomethingElse();
String fullName = joinTogether("Alan ","Turing")
// fullName now = Alan Turing
// Continue with code from here
The preceding code would execute all the code in each method in turn.
A closer look at method names
The method name we use when we design our own methods is arbitrary. But it is a convention to use verbs that make what the method will do clearer. Also, we should use the convention of the first letter of the first word of the name being lowercase and the first letter of later words being uppercase. This is called camel case, as we learned while learning about variable names. This following is an example:
void XGHHY78802c(){
// code here
}
The preceding method is perfectly legal and will work. However, what does it do? Let's look at some examples (slightly contrived) that use this convention:
void doSomeVerySpecificTask(){
// code here
}
void startNewGame(){
// code here
}
void drawGraphics(){
// code here
}
This is much clearer. All the names make it obvious what a method should do and helps us avoid confusion. Let's have a closer look at the parameters in these methods.
Parameters
We know that a method can return a result to the calling code. But what if we need to share some data values from the calling code with the method? Parameters allow us to share values with the method. We have already seen an example of parameters when we looked at return types. We will look at the same example but a little more closely at the parameters:
int addAToB(int a, int b){
int answer = a + b;
return answer;
}
In the preceding code, the parameters are highlighted. Parameters are contained in parentheses, (parameters go here), right after the method name. Notice that, in the first line of the method body, we use a + b:
int answer = a + b;
We use them as if they are already declared and initialized variables. That is because they are. The parameters of the method signature are their declaration and the code that calls the method initializes them, as highlighted in the following line of code:
int returnedAnswer = addAToB(10,5);
Also, as we have partly seen in previous examples, we don't have to just use int in our parameters. We can use any Java type, including types we design ourselves (classes). What's more, we can mix and match types as well. We can also use as many parameters as it is necessary to solve our problem. An example might help:
void addToHighScores(String name, int score){
/*
all the parameters
name
score
are now living, breathing,
declared and initialized variables.
The code to add the details
would go next.
*/
…
…
}
Of course, none of this matters if our methods don't actually do anything. It is time to talk about method bodies.
Doing things in the method body
The body is the part we have been avoiding and contains comments such as the following:
// code here
or
// some code
We know exactly what to do in the body already.
Any Java syntax we have learned so far will already work in the body of a method. In fact, if we think back, almost all the code we have written so far has been inside a method.
The best thing we can do next is write a few methods that do something in the body. We will do just that in the Sub' Hunter game, once we have covered a few more method-related topics.
What follows next is a demo app that explores some more issues around methods, as well as reaffirming what we already know.
Specifically, we will also look at the concept of method overloading because it is sometimes better to show than to tell. You can implement this mini-app if you wish or just read the text and study the code presented.
Method overloading by example
Let's create another new project to explore the topic of method overloading. Notice that I didn't say overriding. We will discuss the subtle but significant difference between overloading and overriding shortly.
Creating a new project
Create a new project in the same way as we did for Sub Hunter but call it Exploring Method Overloading.
Important note
The complete code for this mini-app can be found on the GitHub repository, in the Chapter 4/Method overloading folder.
If you have the Sub' Hunter project open now, you can select File | New Project and create a project using the following options:

As we did previously, be sure the Empty Activity option is selected. Don't worry about refactoring the Activity, as this is just a mini app to play around with – we will not be returning to it.
Next, we will write three methods but with a slight twist.
Coding the method overloading mini-app
As we will now see, we can create more than one method with the same name, provided that the parameters are different. The code in this project is very simple. It is how it works that might appear slightly curious until we analyze it after.
For the first method, we will simply call it printStuff and pass in an int variable via a parameter to be printed. Insert this method after the closing } of the onCreate method, but before the closing } of MainActivity:
void printStuff(int myInt){
Log.d("info", "This is the int only version");
Log.d("info", "myInt = "+ myInt);
}
Notice that the code that starts with Log… contains an error. This is because we have not added an import statement for the Log class. We could refer to the Sub' Hunter game (or go back to Chapter 2, Java – First Contact) to find out what to type, but Android Studio can make this easier for us. You might have noticed that Android Studio flashes up messages, as shown in the following screenshot:
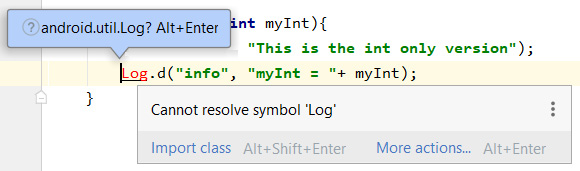
Figure 4.4 – Error message due to Log class
Android Studio gives us two ways to resolve the problem. Hover the mouse cursor over one of the red-highlighted Log codes and the messages will appear. You can either hold the Alt key and then tap the Enter key or simply click on the Import class text. Scroll to the top of the code file and notice that the following code has been added:
import android.util.Log;
Tip
As this book progresses, I will sometimes suggest using this method to add a class and occasionally, I will specifically show you the import… code to type.
Now, we can finish coding the methods.
In this second method, we will also call this method printStuff, but pass in a String variable to be printed. Insert this method after the closing } of the onCreate method but before the closing } of MainActivity. Note that it doesn't matter which order we define the methods in:
void printStuff(String myString){
Log.i("info", "This is the String only version");
Log.i("info", "myString = "+ myString);
}
In this third method, we will also call it printStuff but pass in a String variable and an int to be printed. Insert this method after the closing } of the onCreate method but before the closing } of MainActivity:
void printStuff(int myInt, String myString){
Log.i("info", "This is the combined int and String
version");
Log.i("info", "myInt = "+ myInt);
Log.i("info", "myString = "+ myString);
}
To demonstrate that although we can have methods with the same name, we can't have methods with the same name and the same parameters, add the previous method again. Notice the already defined error:

Figure 4.5 – Error due to methods with the same name and same parameters
Remove the offending method; we will write some code so that we can see the methods in action shortly.
Now, insert this code just before the closing } of the onCreate method to call the methods and print some values to the logcat window:
// Declare and initialize a String and an int
int anInt = 10;
String aString = "I am a string";
// Now call the different versions of printStuff
// The name stays the same, only the parameters vary
printStuff(anInt);
printStuff(aString);
printStuff(anInt, aString);
Running the method overloading mini-app
Now, we can run the app on the emulator or a real device. Nothing will appear on the emulator screen, but here is the logcat output:
info : This is the int only version
info : myInt = 10
info : This is the String only version
info : myString = I am a string
info : This is the combined int and String version
info : myInt = 10
info : myString = I am a string
As you can see, Java has treated three methods with the same name as different methods. This, as we have just proved, can be useful. As a reminder, this is called method overloading.
Method overloading and overriding confusion
Overloading is when we have more than one method with the same name but different parameters.
Overriding is when we replace a method with the same name and the same parameter list, as we have done with onCreate. Note that when you override, you also have the option to call the overridden version of the method, as we did with onCreate using super.onCreate().
We know enough about overloading and overriding to complete this book; however, if you are brave and your mind is wandering, know that yes, you can override an overloaded method, but that is something for another time.
How it works
This is how the code works. In each of the steps where we wrote code, we created a method called printStuff. But each printStuff method has different parameters, so each is a different method that can be called individually:
void printStuff(int myInt){
...
}
void printStuff(String myString){
...
}
void printStuff(int myInt, String myString){
...
}
The body of each of the methods is trivial and just prints out the passed in parameters and confirms which version of the method is being called currently.
The next important part of our code is when we make it plain, which we do by using the appropriate arguments that match the parameters in the different signatures. We call each, in turn, using the appropriate parameters so that the compiler knows the exact method required:
printStuff(anInt);
printStuff(aString);
printStuff(anInt, aString);
Let's explore methods a little further and look at the relationship between methods and variables.
Scope – methods and variables
If you declare a variable in a method, whether that is one of the Android methods such as onCreate or one of our own methods, it can only be used within that method.
It is no use doing this in the onCreate method:
int a = 0;
And then after, trying to do this in the newGame method or some other method:
a++;
We will get an error because a is only visible in the method it was declared in. At first, this might seem like a problem but perhaps surprisingly, it is actually very useful.
That is why we declared those variables outside of all the methods, just after the class declaration. Here they are again, as a reminder:
public class SubHunter extends Activity {
// These variables can be "seen"
// throughout the SubHunter class
int numberHorizontalPixels;
int numberVerticalPixels;
int blockSize;
…
…
When we do this, the variables can be used throughout the code file. As this and other projects progress, we will declare some variables outside of all the methods when they are needed in multiple methods, and then declare some variables inside methods when they are needed only in that method.
It is good practice to declare variables inside a method when possible. You can decrease the number of variables coded outside of all methods by using method parameters to pass values around. When you should use each strategy is a matter of design and as this book progresses, we will look at different ways to handle different situations properly.
The term used to describe this topic of whether a variable is usable is scope. A variable is said to be in scope when it is usable and out of scope when it is not. The topic of scope will also be discussed further, along with classes, in Chapter 8, Object-Oriented Programming.
When we declare variables inside a method, we call them local variables. When we declare variables outside of all methods, we call them member variables or fields.
Important note
A member of what?, you might ask. The answer is a member of the class. In the case of the "Sub' Hunter" project, all those variables are a member of the SubHunter class, as defined by this line of code:
public class SubHunter extends Activity {
Let's look at one more method related topic before we get back to the Sub' Hunter project. We already know that methods can call other methods and that the Android OS can call methods, but what happens if a method calls itself?
Method recursion
Method recursion is when a method calls itself. This might seem like something that happens by mistake, but is an efficient technique for solving some programming problems.
Here is some code that shows a recursive method in its most basic form:
void recursiveMethod() {
recursiveMethod();
}
If we call the recursiveMethod method, its only line of code will then call itself. This will then call itself, which will then call itself, and so on. This process will go on forever until the app crashes, giving the following error in the logcat window:
java.lang.StackOverflowError: stack size 8192KB
When the method is called, its instructions are moved to an area of the processor called the stack, and when it returns, its instructions are removed. If the method never returns and yet more and more copies of the instructions are added, eventually, the stack will run out of memory (or overflow) and we get StackOverflowError.
We can attempt to visualize the first four method calls using the following screenshot. I have also crossed out the call to the method in the fourth iteration to show how, if we were able to prevent the method call, all the methods would eventually return and be cleared from the stack:
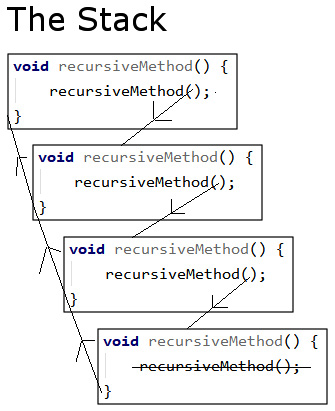
Figure 4.6 – Stack visualization
To make our recursive methods worthwhile, we need to enhance two aspects. We will look at the second aspect shortly. First and most obviously, we need to give it a purpose. How about we ask our recursive method to sum (add up) the values of numbers in a range from zero to a given target value, say 10, 100, or more? Let's modify the preceding method by giving it this new purpose and renaming it accordingly. We will also add a variable with a global scope (outside the method) called answer:
int answer = 0;
void computeSum(int target) {
answer += target
computeSum(target-1);
}
Now, we have a method called computeSum that takes an int as a parameter. If we wanted to compute the sum of all the digits between 0 and 10, we could call the method like this:
computeSum(10);
Here are the values of the target variable at each function call:
- 1st call of computeSum: answer = 10
- 2nd call of computeSum: answer = 19
- …more lines here
- 10th call of computeSum: answer = 55
This is apparently a success until you realize that the method continues to call itself beyond the target variable reaching zero. In fact, we still have the same problem as our first recursive method and after tens of thousands of calls, the app will crash with StackOverflowError again.
What we need is a way to stop the method calling itself once target is equal to zero. The way we solve this problem is to check whether the value of target is zero and if it is, we quit calling the method. Have a look at the additional highlighted code shown here:
void computeSum( int target ) {
answer += target;
if(target > 0) {
Log.d("target = ", "" + target);
computeSum(target - 1);
}
Log.d("answer = ", "" + answer);
}
In the preceding code, we are peeking ahead at Chapter 6, Repeating Blocks of Code with Loops and 7, Making Decisions with Java If, Else,and Switch, which explore some more Java operators for checking conditions and the Java if statement for making decisions.
We also have an additional Log.d to output the value of answer when the method has been called for the last time. See if you can work out what is happening before reading the explanation provided after the following output.
The output of calling computeSum(10) will be as follows:
target =: 10
target =: 9
target =: 8
target =: 7
target =: 6
target =: 5
target =: 4
target =: 3
target =: 2
target =: 1
answer =: 55
if(target > 0) tells the code to check whether the target variable is above zero. If it is, only then should it call the method again and pass in the value of target – 1. If it isn't, then stop the whole process. Chapter 6, Repeating Blocks of Code with Loops and 7, Making Decisions with Java If, Else,and Switch will also explore how the conditional code is wrapped in a pair of curly braces {…} and indented for clarity.
Important note
We won't be using method recursion in this book, but it is an interesting concept to understand.
Now, we can take a closer look at the methods, especially the signatures and return types, that we have already written in the Sub' Hunter game.
Revisiting the code and methods we have used already
At this point, it might be worth revisiting some of the code we have seen in this book so far where we settled for a cursory explanation. We are now able to understand everything we have written. However, don't be concerned if there are still a few areas of confusion as the more you use this OOP stuff, the more it will sink into your mind. I imagine that, if you continue with this book and game coding, over the next 1-2 years, you will have multiple "Oh!! Now I get it" moments when OOP and Android concepts finally click into place.
To help these moments arrive, let's revisit some old code and take a very quick look at what's happening.
In the onCreate method, we saw this signature:
protected void onCreate(Bundle savedInstanceState) {
The method receives an object of the Bundle type named savedInstanceState. The Bundle class is a big deal in GUI-based Android apps that often use more than one Activity class. However, we will only need one Activity for our game projects, and we won't need to explore the Bundle class any further in this book.
In the onTouchEvent method, we saw this signature:
public boolean onTouchEvent(MotionEvent motionEvent) {
The previous signature indicates that the method returns a boolean and receives an object called motionEvent, which is of the MotionEvent type. We will explore the MotionEvent class in Chapter 7, Making Decisions with Java If, Else,and Switch and we will fully reveal classes and objects in Chapter 8, Object-Oriented Programming.
The following line is the method's line of code and returns a boolean, as required:
return true;
Let's spawn the enemy sub'.
Generating random numbers to deploy a sub
We need to deploy a sub' in a random position at the start of each game. There are, however, many possible uses for random numbers, as we will see throughout this book. So, let's take a close look at the Random class and one of its methods, nextInt.
The Random class and the nextInt method
Let's have a look at how we can create random numbers. Then, later in this chapter, we will put it to practical use to spawn our sub'. All the demanding work is done for us by the Random class.
Important note
The Random class is part of the Java API, which is why there is a slightly different import statement to get access to it. Here is the line we added in Chapter 2, Java – First Contact:
import java.util.Random;
Note that this is the only import statement (so far) that starts with java… instead of android….
First, we need to create and initialize an object of the Random type. We can do so like this:
Random randGenerator = new Random();
Then, we can use our new object's nextInt method to generate a random number between a certain range.
This line of code generates the random number using our Random object and stores the result in the ourRandomNumber variable:
int ourRandomNumber = randGenerator.nextInt(10);
The number that we enter as the range starts from zero. So, the preceding line will generate a random number between 0 and 9. If we want a random number between 1 and 10, we just do this:
int ourRandomNumber = randGenerator.nextInt(10) + 1;
We can also use the Random object to get other random number types using the nextLong, nextFloat, and nextDouble methods.
Important note
You can even get random booleans or whole streams of random numbers. You can explore the Random class in detail here: https://developer.android.com/reference/java/util/Random.html.
Now, we are ready to spawn the sub'.
Adding Random-based code to the newGame method
Add the following highlighted code to the newGame method:
/*
This code will execute when a new
game needs to be started. It will
happen when the app is first started
and after the player wins a game.
*/
public void newGame(){
Random random = new Random();
subHorizontalPosition = random.nextInt(gridWidth);
subVerticalPosition = random.nextInt(gridHeight);
shotsTaken = 0;
Log.d("Debugging", "In newGame");
}
In the previous code, we declared and initialized a new Random object called random with this line of code:
Random random = new Random();
Then, we used the nextInt method to generate a random number and assigned it to subHorizontalPosition. Look closely at the following line of code; specifically, look at the argument that was passed into nextInt:
subHorizontalPosition = random.nextInt(gridWidth);
The gridWidth variable is exactly the required value. It generates a number between 0 and gridWidth-1. When we handle collision detection between the sub' and the player's tap (shot) in Chapter 7, Making Decisions with Java If, Else, and Switch, you will see that this is just what we need.
Important note
If we had needed non-zero numbers to be generated, we could have added + 1 to the end of the previous line of code.
The following line of code is as follows:
subVerticalPosition = random.nextInt(gridHeight);
This works the same way as the previous line of code, except that the random value is assigned to subVerticalPosition and the argument that's passed to the nextInt method is gridHeight.
Our subposition variables are now ready for use.
The final line of code that we added simply initializes shotsTaken to zero. It makes sense that when we start a new game, we want to do this so that the number of shots taken, as displayed to the player, is not accumulated over multiple games.
Testing the game
Now, we can run the game in the usual way. Notice the subHorizontalposition and subVerticalPosition variables in the following abbreviated logcat output:
subHorizontalPosition: 30
subVerticalPosition: 13
Try running the game again; you will get different positions, demonstrating that our Random-based code is working and that we can confidently call newGame whenever we want to start a new game:
subHorizontalPosition: 14
subVerticalPosition: 7
Important note
It is possible but very unlikely that you can call the newGame method and get a sub' in the same position.
That's it – now, we can spawn our sub' each new game!
Summary
Now, we know almost everything there is to know about methods, including parameters versus arguments, signatures, bodies, access specifiers, and return types. The one missing link is how methods relate to classes. The class-method relationship will be blown wide open in the much-trailed Chapter 8, Object-Oriented Programming, which is drawing ever closer. For now, there is a more pressing problem that needs solving.
Before we congratulate ourselves too much, we need to address the huge, elephant in the room – see the following screenshot:

Figure 4.7 – Blank game screen
There is nothing on the screen! Now we have had a full lesson on variables, an introduction to classes, and a thorough dip into methods, we can begin to put this right. In the next chapter, we will start to draw the graphics of the Sub' Hunter game on the screen.