Chapter 16: Collections and Enumerations
This chapter will be part practical and part theory. First, we will code and use the Apple class and get our apple spawning ready for dinner. Afterward, we will spend a little time getting to know two new Java concepts, the ArrayList class and enumerations (enum for short). These two new topics will give us the extra knowledge we will need to finish the Snake game (mainly in the Snake class) in the next chapter. In this chapter, we will cover the following topics:
- Adding graphics to the project
- Coding and using the Apple class
- Java Collections and the ArrayList class
- The enhanced for loop
Let's go ahead with the project.
Adding the graphics
Grab the project's graphics on the GitHub repo; they are in the Chapter 16/drawable folder. Highlight the contents of this folder and copy them. Select the drawable folder in the Android Studio Solution Explorer. Now right-click the drawable folder and select Paste. You will be prompted to left-click OK twice to paste the files. These files are the snake's head and body segments as well as the apple. We will look closely at each of the graphics as we use them.
Coding the Apple class
Let's start with the Apple class as we often do by adding the required import statements and the member variables. Add the code and study it and then we will discuss it:
import android.content.Context;
import android.graphics.Bitmap;
import android.graphics.BitmapFactory;
import android.graphics.Canvas;
import android.graphics.Paint;
import android.graphics.Point;
import java.util.Random;
class Apple {
// The location of the apple on the grid
// Not in pixels
private Point mLocation = new Point();
// The range of values we can choose from
// to spawn an apple
private Point mSpawnRange;
private int mSize;
// An image to represent the apple
private Bitmap mBitmapApple;
}
The Apple class has a Point object that we will use to store the horizontal and vertical location of the apple. Note that this will be a position on our virtual grid and not a specific pixel position.
There is a second Point variable called mSpawnRange as well, which will eventually hold the maximum values for the possible horizontal and vertical positions at which we can randomly spawn an apple each time a new one is required.
There is also an int called mSize, which we will initialize in a moment and will hold the size in pixels of an apple. It will correspond to a single block on the grid.
Finally, we have a Bitmap called mBitmapApple, which will hold the graphic for the apple.
The Apple constructor
Add the constructor for the Apple class and then we will go through it:
// Set up the apple in the constructor
Apple(Context context, Point sr, int s){
// Make a note of the passed in spawn range
mSpawnRange = sr;
// Make a note of the size of an apple
mSize = s;
// Hide the apple off-screen until the game starts
mLocation.x = -10;
// Load the image to the bitmap
mBitmapApple = BitmapFactory
.decodeResource(context.getResources(),
R.drawable.apple);
// Resize the bitmap
mBitmapApple = Bitmap
.createScaledBitmap(mBitmapApple, s, s, false);
}
In the constructor code, we set the apple up ready to be spawned. First of all, note that we won't create a brand new apple (that is, calling new Apple()) every time we want to spawn an apple. We will simply spawn one at the start of the game and then move it around every time the snake eats it. He'll never know.
The first line of code uses the passed-in Point reference to initialize mSpawnRange.
Tip
An interesting thing going on here, related to our earlier discussion about references, is that the code doesn't copy the values passed in; it copies the reference to the values. So, after the first line of code, mSpawnRange will refer to the exact same place in memory as the reference that was passed in. If either reference is used to alter the values, then they will both then refer to these new values. Note that we didn't have to do it this way, we could have passed in two int values and then assigned them individually to mSpawnRange.x and mSpawnRange.y. There is a benefit to doing it this slightly more laborious way because the original reference and its values would be encapsulated. I just thought it would be interesting to do it this way and point out this subtle but sometimes significant anomaly.
Next, mSize is initialized to the passed-in value of s.
Just as an interesting point of comparison to the previous tip, this is very different to the relationship between mSpawnRange and sr. The s parameter holds an actual int value – not a reference or any connection whatsoever to the data of the class that called the method.
Next, the horizontal location of the apple, mLocation.x, is set to -10 to hide it away from view until it is required by the game.
Finally, for the Apple constructor, two lines of code prepare the Bitmap instance ready for use. First, the Bitmap is loaded from the apple.png file and is then neatly resized using the createScaledBitmap method to set both the width and height of s.
Now code the spawn and getLocation methods, then we will talk about them:
// This is called every time an apple is eaten
void spawn(){
// Choose two random values and place the apple
Random random = new Random();
mLocation.x = random.nextInt(mSpawnRange.x) + 1;
mLocation.y = random.nextInt(mSpawnRange.y - 1) + 1;
}
// Let SnakeGame know where the apple is
// SnakeGame can share this with the snake
Point getLocation(){
return mLocation;
}
The spawn method will be called each time the apple is placed somewhere new, both at the start of the game and each time it is eaten by the snake. All the method does is generate two random int values based on the values stored in mSpawnRange and assigns them to mLocation.x and mLocation.y. The apple is now in a new position ready to be navigated to by the player.
The getLocation method is a simple getter method that returns a reference to mLocation. The SnakeGame class will use this for collision detection. We will code the collision detection in the next chapter.
Now for something new. As promised, the game objects will handle drawing themselves. Add the draw method to the Apple class:
// Draw the apple
void draw(Canvas canvas, Paint paint){
canvas.drawBitmap(mBitmapApple,
mLocation.x * mSize, mLocation.y * mSize,
paint);
}
When this method is called from the SnakeGame class, the Canvas and Paint references will be passed in for the apple to draw itself. The advantages of doing it this way are not immediately obvious from the simple single line of code in the draw method. You might think it would have been slightly less work to just draw the apple in the SnakeGame class's draw method; however, when you see the extra complexity involved in the draw method in the Snake class (in the next chapter), you will better appreciate how encapsulating the responsibility in the classes to draw themselves makes SnakeGame a much more manageable class.
Now we can spawn an apple ready for dinner.
Using the Apple class
The Apple class is done, and we can now put it to work.
Add the code to initialize the apple object in the SnakeGame constructor at the end, as shown in the following code:
// Call the constructors of our two game objects
mApple = new Apple(context,
new Point(NUM_BLOCKS_WIDE,
mNumBlocksHigh),
blockSize);
Notice we pass in all the data required by the Apple constructor so it can set itself up.
We can now spawn an apple, as shown next, in the newGame method by calling the spawn method that we added when we coded the Apple class previously. Add the highlighted code to the newGame method:
// Called to start a new game
public void newGame() {
// reset the snake
// Get the apple ready for dinner
mApple.spawn();
// Reset the mScore
mScore = 0;
// Setup mNextFrameTime so an update can triggered
mNextFrameTime = System.currentTimeMillis();
}
Next, we can draw the apple by calling its draw method from the draw method of SnakeGame, as highlighted in the following code:
// Draw the score
mCanvas.drawText("" + mScore, 20, 120, mPaint);
// Draw the apple and the snake
mApple.draw(mCanvas, mPaint);
// Draw some text while paused
As you can see, we pass in references to the Canvas and Paint objects. Here we see how references are very useful, because the draw method of the Apple class uses the exact same Canvas and Paint as the draw method in the SnakeGame class, because when you pass a reference, you give the receiving class direct access to the very same instances in memory.
Anything the Apple class does with mCanvas and mPaint is happening to the same mCanvas and mPaint instances in the SnakeGame class. So, when the unlockCanvasAndPost method is called (at the end of draw in SnakeGame) the apple drawn by the Apple class will be there. The SnakeGame class doesn't need to know how.
Running the game
Run the game and an apple will spawn. Unfortunately, without a snake to eat it, we have no way of doing anything else:
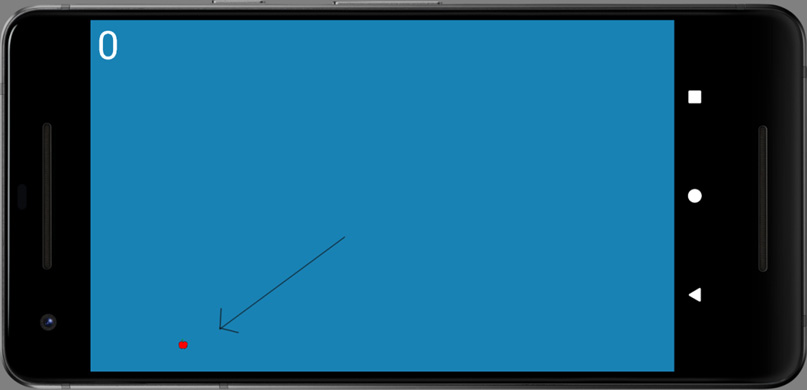
Figure 16.1 – Running the Snake game
Next, we will learn a few new Java concepts, so we can handle coding a snake in the next chapter.
Using arrays in the Snake game
In the Bullet Hell game, we declared an arbitrarily sized array of bullets, hoping that the player would never spawn too many. We could have used an array so big it would have been impossible to go out of bounds (but that would be a waste of memory), or we could have restricted the number of bullets, but that wouldn't have been fun.
With the Snake game, we don't know how many segments there will be, so we need a better solution. The ArrayList class is the solution we will use.
Understanding ArrayList class
An ArrayList is like a regular Java array on steroids. It overcomes some of the shortfalls of arrays, such as having to predetermine their size. It adds some useful methods to make its data easy to manage and it uses an enhanced version of a for loop, which is easier to use than a regular for loop. You can also use ordinary for loops with the ArrayList class too.
We will learn about enhanced for loops now as it is convenient. We will get to use enhanced for loops in the next project that starts in Chapter 18, Introduction to Design Patterns and Much More!.
Important note
The ArrayList class is part of the wider Java Collections, which are a range of classes for handling data.
Let's look at some code that uses the ArrayList class:
// Declare a new ArrayList called
// myList to hold int variables
ArrayList<int> myList;
// Initialize myList ready for use
myList = new ArrayList<int>();
In the previous code, we declared and initialized a new ArrayList called myList. We can also do this in a single step, as the following code shows:
ArrayList<int> myList = new ArrayList<int>();
Nothing especially interesting so far, but let's take a look at what we can actually do with ArrayList. Let's use a String ArrayList this time:
// declare and initialize a new ArrayList
ArrayList<String> myList = new ArrayList<String>();
// Add a new String to myList in
// the next available location
myList.add("Donald Knuth");
// And another
myList.add("Rasmus Lerdorf");
// And another
myList.add("Richard Stallman");
// We can also choose 'where' to add an entry
myList.add(1, "James Gosling");
// Is there anything in our ArrayList?
if(myList.isEmpty()){
// Nothing to see here
}else{
// Do something with the data
}
// How many items are in our ArrayList?
int numItems = myList.size();
// Now where did I put James Gosling?
int position = myList.indexOf("James Gosling");
In the previous code, we saw that we can use some useful methods of the ArrayList class on our ArrayList object. We can add an item (myList.add), add at a specific location (myList.add(x, value)), check if ArrayList is empty (myList.isEmpty), see how big it is (myList.size()), and get the current position of a given item (myList.indexOf).
Important note
There are even more methods in the ArrayList class, which you can read about at http://docs.oracle.com/javase/7/docs/api/java/util/ArrayList.html. What we have seen so far is enough to complete the tasks in this book, however.
With all this functionality, all we need now is a way to handle the data inside an ArrayList instance dynamically.
The enhanced for loop
This is what the condition of an enhanced for loop looks like:
for (String s : myList)
The previous example would iterate (step through) all the items in myList one at a time. At each step, s would hold the current String.
So, this code would print to the console all the eminent programmers from the previous section's ArrayList code sample:
for (String s : myList){
Log.i("Programmer: ","" + s);
}
We can also use the enhanced for loop with regular arrays too:
// We can initialize arrays quickly like this
String [] anArray = new String []
{"0", "1", "2", "3", "4", "5"};
for (String s : anArray){
Log.i("Contents = ","" + s);
}
The preceding code declares and initializes an array that holds String values with the values 0, 1, 2, 3, 4, and 5, and then uses an enhanced for loop to print those values to the logcat window.
There's another incoming news flash!
Arrays and ArrayLists are polymorphic
We already know that we can put objects into arrays and ArrayList instances. But being polymorphic means they can handle objects of multiple distinct types as long as they have a common parent type all within the same array or ArrayList.
In Chapter 8, Object-Oriented Programming, we learned that polymorphism approximately means different forms. But what does it mean to us in the context of arrays and ArrayList?
Boiled down to its simplest: any subclass can be used as part of the code that uses the superclass.
For example, if we have an array of Animals, we could put any object of a type that is a subclass of Animal, in the Animal array. Perhaps Cats and Dogs.
This means we can write code that is simpler and easier to understand, modify, and change:
// This code assumes we have an Animal class
// And we have a Cat and Dog class that extends Animal
Animal myAnimal = new Animal();
Dog myDog = new Dog();
Cat myCat = new Cat();
Animal [] myAnimals = new Animal[10];
myAnimals[0] = myAnimal; // As expected
myAnimals[1] = myDog; // This is OK too
myAnimals[2] = myCat; // And this is fine as well
Also, we can write code for the superclass and rely on the fact that no matter how many times the superclass is sub-classed, within certain parameters the code will still work. Let's continue our previous example:
// 6 months later we need elephants
// with its own unique aspects
// As long as it extends Animal we can still do this
Elephant myElephant = new Elephant();
myAnimals[3] = myElephant; // And this is fine as well
But when we remove an object from a polymorphic array, we must remember to cast it to the type we want:
Cat newCat = (Cat) myAnimals[2];
Everything we have just discussed is true for ArrayList instances as well. Armed with this new toolkit of arrays, ArrayList, and the fact that they are polymorphic, we can move on to learn about some more Android classes that we will soon use in the next game, Scrolling Shooter.
Important note
In the Scrolling Shooter game that starts in Chapter 18, Introduction to Design Patterns and Much More! we will handle half a dozen different-looking and differently behaving objects as generic GameObject instances. This will make our code much cleaner (and shorter). For now, let's move along to a gentler introduction to the ArrayList class and finish the Snake game.
Now we can talk about another Java concept that we will use in our game.
Introducing enumerations
An enumeration is a list of all the possible values in a logical collection. The Java enum is a great way of, well, enumerating things. For example, if our game uses variables that can only be within a specific range of values, and if those values could logically form a collection or a set, then enumerations would probably be appropriate to use. They will make your code clearer and less error-prone.
To declare an enumeration in Java we use the keyword, enum, followed by the name of the enumeration, followed by the values the enumeration can have, enclosed in a pair of curly braces {...}.
As an example, examine this enumeration declaration. Note that it is a convention to declare the values from the enumeration in all-uppercase characters:
private enum zombieTypes {
REGULAR, RUNNER, CRAWLER, SPITTER, BLOATER, SNEAKER
};
Note at this point we have not declared any instances of zombieTypes, just the type itself. If that sounds odd, think about it like this. We created the Apple class, but to use it, we had to declare an object/instance of the class.
At this point we have created a new type called zombieTypes, but we have no instances of it. So, let's fix that now:
zombieTypes emmanuel = zombieTypes.CRAWLER;
zombieTypes angela = zombieTypes.SPITTER;
zombieTypes michelle = zombieTypes.SNEAKER;
/*
Zombies are fictional creatures and any resemblance
to real people is entirely coincidental
*/
We can then use ZombieTypes in if statements like this:
if(michelle == zombieTypes.CRAWLER){
// Move slowly
}
Next is a sneak preview of the type of code we will soon be adding to the Snake class in the next chapter. We will want to keep track of which way the snake is heading, so we will declare this enumeration:
// For tracking movement Heading
private enum Heading {
UP, RIGHT, DOWN, LEFT
}
Don't add any code to the Snake class yet. We will do so in the next chapter.
We can then declare an instance and initialize it as follows:
Heading heading = Heading.RIGHT;
We can change it when necessary with code like this:
heading = Heading.UP;
We can even use an enum type as the condition of a switch statement (and we will), as follows:
switch (heading) {
case UP:
// Going up
break;
case RIGHT:
// Going right
break;
case DOWN:
// Going down
break;
case LEFT:
// Going left
break;
}
Don't add any code to the Snake class yet. We will do so in the next chapter.
Summary
The Snake game is taking shape. We now have an apple that spawns ready to be eaten, although we have nothing to eat it yet. We have also learned about the ArrayList class and how to use it with the enhanced for loop, and we have also seen the Java enum keyword and how it is useful for defining a range of values along with a new type. We have also seen approximately how we will use an enum to keep track of which direction the snake is currently moving.
In the next chapter, we will code the Snake class, including using an ArrayList instance and an enumeration, to finish the Snake game.