Chapter 18: Introduction to Design Patterns and Much More!
Since the second project, we have been using objects. You might have noticed that many of the objects have things in common, things such as variables for speed and direction, a RectF for handling collisions, and more besides.
As our objects have more in common, we should start taking more advantage of OOP, inheritance, polymorphism, and another concept we will now introduce, design patterns.
Inheritance, polymorphism, and design patterns will enable us to fashion a suitable hierarchy to try and avoid writing duplicate code and avoid sprawling classes with hundreds of lines. This type of disorganized code is hard to read, debug, or extend. The bigger the game project and the more object types, the more of a problem this would become.
This project and the next will explore many ways that we can structure our Java code to make our code efficient, reusable, and less buggy. When we write code to a specific, previously devised solution/structure, we are using a design pattern.
Don't worry, in the remaining chapters, we will also be finding out about more game development techniques to write better, more advanced games. In this chapter, we will start the Scrolling Shooter project.
To begin to create the Scrolling Shooter project, in this chapter, we will do the following:
- Introduce the Scrolling Shooter project.
- Discuss the structure of the Scrolling Shooter project.
- Manage the game's state with a GameState class.
- Code our first interface to communicate between different classes.
- Learn how to persist high scores even when the game is over and the device has been turned off.
- Code a class called SoundEngine that will enable different parts of the project to trigger sound effects to play.
- Code a HUD class to control the drawing and position of text and control buttons.
- Code a Renderer class that will handle drawing to the screen.
Tip
From this chapter on, I will not mention when you need to import a new class. If you are using a class from another package (any class provided by Android or Java), you need to add the appropriate import, either by copying it from the pages of this book, typing it manually, or highlighting the class with an error and using the Alt + Enter key combination.
Let's see what Scrolling Shooter will do when we have finished it by the end of Chapter 21, Completing the Scrolling Shooter Game.
Introducing the Scrolling Shooter project
The player's objective in this game is simply to destroy as many aliens as possible. Let's look into some more details about the features the game will have. Look at the starting screen for the Scrolling Shooter project in the next figure:

Figure 18.1 – Scrolling Shooter game screen
You can see there is a background of silhouetted skyscrapers. This background will smoothly and speedily scroll in the direction the player is flying. The player can fly left or right, and the background will scroll accordingly. However, the player cannot stay still horizontally. You can see that when the game is over (or has just been launched by the player), the message PRESS PLAY is displayed.
I have numbered some items of interest in the previous figure; let's run through them:
- There is a high score feature and for the first time, we will make the high score persistent. When the player quits the game and restarts later, the high score will still be there. The player can even turn their device off and come back the next day to see their high score. Below the high score is the current score and below that is the number of lives remaining before the end of the game. The player will get three lives, which are exceptionally easy to lose. When they lose the third life, the PRESS PLAY screen will be displayed again and if a new high score is achieved, then the high score will be updated.
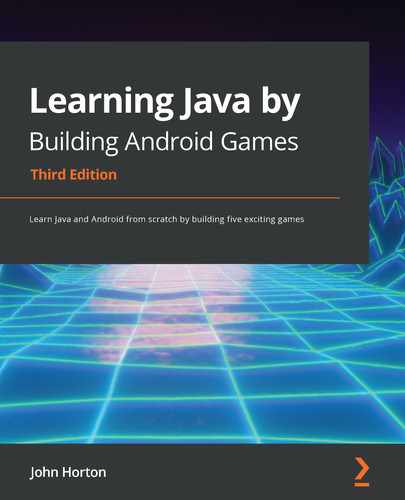
- The gray rectangles in the three remaining corners of the screen are the buttons that control the game. Number 2 in the figure is the play/pause button. Press it on the start screen and the game will begin, press it while the game is playing and the pause screen will be shown (see the next screenshot).
- The two rectangles at the corner marked 3 are for shooting and flipping direction. The top button shoots a laser and the bottom button changes the horizontal direction that the ship is headed in.
- The buttons at the corner labeled 4 in the preceding screenshot are for flying up and down to avoid enemy ships and lasers or to line up for taking a shot.Take a look at the next screenshot:
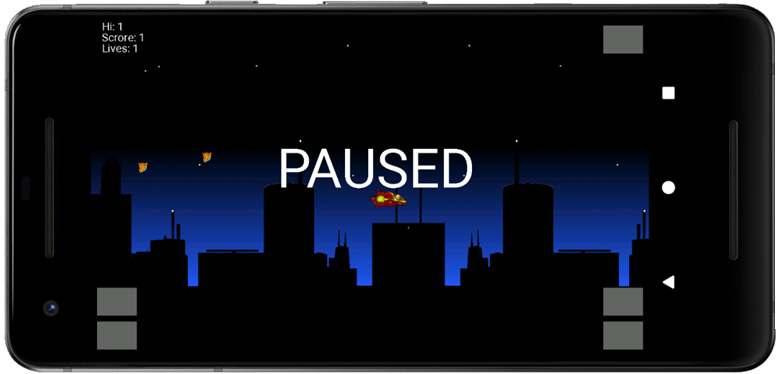
Figure 18.2 – Features of the game
The next figure shows a particle effect explosion. These occur when an enemy ship is hit by one of the player's lasers. I opted to not create a particle effect when the player is destroyed because refocusing on the ship after a death is quite important and a particle effect distracts from this:

Figure 18.3 – Explosion effect in the game
This next screenshot (which wasn't easy to capture) shows almost every game object in action. The only missing item is the enemy lasers, which are the same in appearance as the player's lasers except they are red instead of green. The wide range of enemies is one of the features of this game. We will have three different enemies with different appearances, different properties, and even different behaviors.
How we handle this complexity without our code turning into a maze of spaghetti-like text will be one of the key learning points. We will use some design patterns to achieve this.
Examine the next screenshot and then look at the brief explanation for each object:

Figure 18.4 – Objects of the game
- Label 1: This type of alien ship is called a Diver. They spawn just out of sight at the top of the screen and dive down randomly with the objective of crashing into the player and taking one of their lives. We will create the illusion of having loads of these Divers by respawning them again each time they are either destroyed (by being shot or crashing into the player) or they pass harmlessly off the bottom of the screen.
- Label 2: The alien (actually there are two in the screenshot), labeled as number 2, is a Chaser. It will constantly try and home in on the player both vertically and horizontally, then take a shot with a laser. The player is slightly faster than the Chasers, so the player can outrun them, but at some point, they will need to flip direction and shoot the Chasers down. In addition, the player will not be able to outrun the enemy lasers. When a Chaser is destroyed, they will randomly respawn off screen to the left or right and begin chasing all over again.
- Label 3: The object at number 3 is the player's ship. We have already discussed what it can do.
- Label 4: This alien is a Patroller. It flies left to right, up and down and turns around and flies right to left when it reaches a predetermined distance from the player. These ships make no attempt to home in on the player, but they will frequently get in the way or fire a laser when in a good position with a chance to hit the player.
- Label 5: This is the green player laser. The player will have enough lasers to create a satisfying rapid-fire effect but not so many that they can simply spam the fire button and be invincible.
Perhaps surprisingly, this project will have only a few new, specifically Java lessons in it. What is going to be most notable and new is how we structure our code to make all this work. So, let's talk about that now.
Game programming patterns and the structure of the Scrolling Shooter project
Before we dive in too deeply, it is probably worth stating exactly what a design pattern is.
A design pattern is a solution to a programming problem. More specifically, a design pattern is a tried and tested solution to a programming problem.
What makes design patterns special is that the solutions have already been found by someone else, documented in books and other media (such as websites), and they even have names, so they can be readily discussed.
There are lots of design patterns. We will be learning about the Observer, Strategy/Entity-Component, Singleton, and Factory design patterns.
Design patterns are already-proven ways of enabling the ideas we have already discussed, such as reusing code, encapsulating code, and designing classes that represent things. Patterns often amount to a best-practice way of encapsulating, allowing reuse, and allowing a group of classes to interact.
Tip
As we will see throughout the rest of the book, design patterns are much more to do with the structure of your classes and the objects of your code than they are to do with the specific lines of code or methods.
Design patterns are used in all languages and across all types of software development. The key to design patterns is to simply know that they exist and roughly what problem(s) each of them solves. Then, when you see a flaw in the structure of your code, you can go and investigate a particular pattern.
Tip
The other great thing about design patterns is that by learning and then using common solutions to common problems, a design pattern also becomes a means of communication between developers. "Hey, Fred, why don't we try implementing an Observer-based solution to that communication problem on the Widget project?"
Throughout the rest of the book, as we are introduced to design patterns, we will also examine the problem that caused us to need the pattern in the first place.
Starting the project
Create a new project and call it Scrolling Shooter. Use the Empty Activity template as usual.
As we have done before, we will edit the Android manifest, but first, we will refactor the MainActivity class to something more appropriate.
Refactoring MainActivity to GameActivity
As in the previous projects, MainActivity is a bit vague, so let's refactor MainActivity to GameActivity.
In the project panel, right-click the MainActivity file and select Refactor | Rename. In the pop-up window, change MainActivity to GameActivity. Leave all the other options at the defaults and left-click the Refactor button.
Notice the filename in the project panel has changed as expected but also multiple occurrences of MainActivity have been changed to GameActivity in the AndroidManifest.xml file, as well as an instance in the GameActivity.java file.
Let's set the screen orientation.
Locking the game to fullscreen and landscape orientation
As with previous projects, we want to use every pixel that the device has to offer, so we will make changes to the AndroidManifest.xml file that allow us to use a style for our app that hides all the default menus and titles from the user interface.
Make sure the AndroidManifest.xml file is open in the editor window.
In the AndroidManifest.xml file, locate the following line of code: android:name=".GameActivity">.
Place the cursor before the closing > shown previously. Tap the Enter key a couple of times to move the > a couple of lines below the rest of the line shown previously.
Immediately below ".GameActivity" but before the newly positioned >, type or copy and paste this next line of code to make the game run without any user interface:
android:theme=
"@android:style/Theme.Holo.Light.NoActionBar.Fullscreen"
Your code should look like this next code:
…
<activity android:name=".GameActivity"
android:theme=
"@android:style/Theme.Holo.Light.NoActionBar.Fullscreen"
>
<intent-filter>
<action android:name="android.intent.action.MAIN" />
<category android:name= "android.intent.category.LAUNCHER" />
</intent-filter>
</activity>
…
Now our game will use all the screen space the device makes available without any extra menus.
Coding the GameActivity class
Here we will code the GameActivity class, which is the entry point to the game. As usual, it grabs the screen size and creates an instance of the main controlling class, in this project, GameEngine. There is nothing new in this code apart from a very small name change I will explain in a moment. Here it is in full for your reference/copy and paste. Edit the code of the GameActivity class to match the following, including using the standard Activity (not AppCompatActivity) class and the matching import directive:
import android.app.Activity;
import android.graphics.Point;
import android.os.Bundle;
import android.view.Display;
import android.view.Window;
public class GameActivity extends Activity {
GameEngine mGameEngine;
@Override
protected void onCreate(Bundle savedInstanceState) {
super.onCreate(savedInstanceState);
requestWindowFeature(Window.FEATURE_NO_TITLE);
Display display = getWindowManager()
.getDefaultDisplay();
Point size = new Point();
display.getSize(size);
mGameEngine = new GameEngine(this, size);
setContentView(mGameEngine);
}
@Override
protected void onResume() {
super.onResume();
mGameEngine.startThread();
}
@Override
protected void onPause() {
super.onPause();
mGameEngine.stopThread();
}
}
Tip
If copy and pasting, remember not to delete your package declaration at the top. This is true for every class, but I will stop leaving these tips from this point on.
There is a minor cosmetic change in the onResume and onPause methods. They call the startThread and stopThread methods instead of the resume and pause methods we have called in all the previous projects. The only difference is the names. We will name these methods differently in the GameEngine class to reflect their slightly more refined role in this more advanced project.
Note that there will obviously be errors until we code the GameEngine class. Let's do that now.
Getting started on the GameEngine class
As we have already discussed, our game's classes are very tightly interwoven and dependent upon one another. We will, therefore, need to revisit many of the classes multiple times as we build the project.
Create a new class called GameEngine. The first part of the GameEngine class that we will code is some member variables and the constructor. There is not much to it at first, but we will be adding to it and the class more generally throughout the project. Add the highlighted code, including extending the SurfaceView class and implementing the Runnable interface:
import android.content.Context;
import android.graphics.Point;
import android.util.Log;
import android.view.MotionEvent;
import android.view.SurfaceView;
class GameEngine extends SurfaceView implements Runnable {
private Thread mThread = null;
private long mFPS;
public GameEngine(Context context, Point size) {
super(context);
}
}
Note how few members we have declared: just a Thread (for the game thread) and a long variable, to measure the frames per second. We will add quite a few more before the end of the project but there will be nowhere near as many as in the previous project. This is because we will be abstracting tasks to other, more task-specific classes to make the project more manageable.
Let's add some more code to the GameEngine class to flesh it out a bit more and get rid of the errors in this class and GameActivity. Code the run method shown next. Place it after the constructor we added previously:
@Override
public void run() {
long frameStartTime = System.currentTimeMillis();
// Update all the game objects here
// in a new way
// Draw all the game objects here
// in a new way
// Measure the frames per second in the usual way
long timeThisFrame = System.currentTimeMillis()
- frameStartTime;
if (timeThisFrame >= 1) {
final int MILLIS_IN_SECOND = 1000;
mFPS = MILLIS_IN_SECOND / timeThisFrame;
}
}
The run method, as you probably remember, is required because we implemented the Runnable interface. It is the method that will execute when the thread is started. The first line of code records the current time, and then there are a bunch of comments that indicate that we will update and then draw all the game objects—but in a new way.
The final part of the run method so far calculates how long all the updating and drawing took and assigns the result to the mFPS member variable in the same way we have done in the previous projects (except the first one).
Once we have written some more code and classes, mFPS can then be passed to each of the objects in the game so that they can update themselves according to how much time has passed.
We will quickly add three more methods and we will then be error-free and ready to move on to the first of the new classes for this project.
Add these next three methods, which should all look quite familiar:
@Override
public boolean onTouchEvent(MotionEvent motionEvent) {
// Handle the player's input here
// But in a new way
return true;
}
public void stopThread() {
// New code here soon
try {
mThread.join();
} catch (InterruptedException e) {
Log.e("Exception","stopThread()"
+ e.getMessage());
}
}
public void startThread() {
// New code here soon
mThread = new Thread(this);
mThread.start();
}
The first of the three methods we just added was the overridden onTouchEvent method, which receives the details of any interaction with the screen. For now, we don't do anything except return true as is required by the method.
The second and third methods are the stopThread and startThread methods, which, as their names strongly hint at, start and stop the thread that controls when the run method executes. Notice, as with all the methods so far, that there is a comment promising more code soon. Specifically, regarding the stopThread and startThread methods, we have no variables yet that control when the game is running and when it is not. We will get to that next.
Tip
At this point, you could run the game error-free and see an exciting blank screen. You might like to do so just to confirm that you have no errors or typos.
Let's learn about controlling the state of the game.
Controlling the game with a GameState class
As the code for this game is spread over many classes to keep each class manageable, it raises the problem of what happens when one of these classes needs to know what is going on inside another of the classes. At least when we crammed everything into the main game engine class all the required variables were in scope!
Tip
My estimate is that if we continued with our usual pattern (where we cram everything into the game engine) for this project, then the GameEngine class would have around 600 lines of code! By the end of this project, doing things a little differently, it will have barely 100 lines of code. Each code file/class will be much simpler. We will, however, need to spend more time understanding how all the different classes interact with each other—and we will. Now we will move on to the GameState class.
There are many ways of dealing with this common issue and the solution(s) you use will be dependent upon the specific project you are working on. I am going to introduce a few of the different ways you can deal with the issue in this project and the next.
The way that we will deal with the different classes being aware of the state (paused, game over, player lost a life, score increased, and so on) of the game is to create a class (GameState) that holds all those states, and then share that class by passing it into the required methods of other classes.
Passing GameState from GameEngine to other classes
As we will see as we progress, the GameEngine class will instantiate an instance of GameState and be responsible for sharing a reference to it when it is required.
Now we know that the GameState class will be usable by GameEngine and any other classes a reference is passed to, but what about if the GameState class needs to trigger actions in the GameEngine class (and it will)?
Communicating from GameState to GameEngine
We will need the GameState class to be able to trigger the clearing (de-spawning) of all the game objects and then respawn them again at the start of every game. GameEngine has access to all the game objects but GameState will have access to the information about when this must happen.
As we have already discussed, the GameEngine class can certainly take full advantage of much of the data in the GameState class by simply declaring an instance of GameState, but the reverse isn't true. The GameState class cannot trigger events in the GameEngine class except when GameEngine specifically asks for it, for example, when it can use its GameState instance to ask questions about state and then act. For example, here is a snippet of code we will add soon to the GameEngine class:
…
if (!mGameState.getPaused()){
…
In the code snippet, mGameState is an instance of GameState and is using the instance to query whether the game is paused or not. The code uses a simple getter method provided by GameState similar to how we have done in other projects already for various reasons. Nothing new to see there then.
As we have been discussing, however, we also need the GameState class to be able to trigger, whenever it wants to, the start of a new game. This implies that GameState could do with a reference to the GameEngine class but exactly how this will work requires some further discussion.
Here is what we will do. We will discuss the solution that allows GameState to directly trigger actions on GameEngine, and then we will implement this solution along with the GameState class and another class, SoundEngine, that will also be passed to multiple parts of the project to make playing sound possible wherever it is needed.
Let's talk about interfaces.
Giving partial access to a class using an interface
The solution is an interface. While it is possible to pass a reference of GameEngine from GameEngine to GameState, this isn't desirable. What we need is a way to give GameState direct but limited control. If it had a full reference to GameEngine, it is likely that as the project progressed, it would end up creating problems because GameState has too much access to GameEngine. For example, what if GameState decided to pause the game at the wrong time?
Interface refresher
If you think back to Chapter 8, Object-Oriented Programming, an interface is a class without any method bodies. A class can implement an interface and when it does, it must provide the body (including the code) for that method or methods. Furthermore, when a class implements an interface, it is an object of that type. When a class is a specific type, it can be used polymorphically as that type even if it is other types as well. Here are some examples of this phenomenon that we have already seen.
Example a
Think back to when we first discussed threads. How do we manage to initialize a Thread object like this?
mThread = new Thread(this);
The reason we can pass this into the Thread class's constructor is that the class implements Runnable and therefore our class is a Runnable. This is exactly what is required by the Thread class.
Example b
Another example is the onTouchEvent method that we have used in every project. Our main class simply extends SurfaceView, which extends View, which implements the interface, which allows us to override the OnTouchListener method. The result: Android then has a method it can call whenever there is an update on what the player is doing with the device's screen.
These are similar but different solutions solved by interfaces. In example a, the interface allows a class that wasn't the "correct" type to be used polymorphically. In example b, an interface written and used elsewhere but added by extending SurfaceView gives us access to data and the chance to respond to events that we wouldn't have otherwise had.
What we will do to implement the interface solution
Our solution to GameState telling GameEngine what to do but in a very restricted way involves these steps:
- Coding the interface
- Implementing the interface
- Passing a reference (of GameEngine, from GameEngine but cast to the interface) into the class (GameState) that needs it
- Calling the method in GameEngine from GameState via the interface
Seeing this in action is the best way to understand it. The first thing we need to do is to code a new interface.
Coding the new interface
Create a new interface by right-clicking the folder with our package name that contains our Java classes and selecting New | Java Class. In the Name section, type GameStarter. In the Type section, choose Interface and press Enter.
Finally, for step 1, edit the code and add the deSpawnReSpawn method without any body, as required by all interfaces. The new code is shown next, highlighted among the code that was auto-generated:
interface GameStarter {
// This allows the State class to
// spawn and despawn objects via the game engine
public void deSpawnReSpawn();
}
An interface is nothing if it isn't implemented, so let's do that next.
Implementing the interface
Add the highlighted code to the GameEngine class declaration to begin implementing our new interface:
class GameEngine extends SurfaceView
implements Runnable, GameStarter {
The error in the previous line of code will disappear when we implement the required method.
Now, GameEngine is a GameStarter; to properly implement it, we must add the overridden deSpawnReSpawn method. Add the deSpawnReSpawn method to the GameEngine class as shown next:
public void deSpawnReSpawn() {
// Eventually this will despawn
// and then respawn all the game objects
}
The method doesn't have any code in it yet, but it is sufficient at this stage. Now we need to pass an instance of the interface (this) into the GameState class.
Passing a reference to the interface into the class that needs it
We haven't coded the GameState class yet; we will do that next. However, let's write the code in GameEngine that initializes an instance of GameState because it will give us some insight into the upcoming GameState class and show the next part of our GameStarter interface in action.
Add an instance of GameState to GameEngine as shown highlighted next:
class GameEngine extends SurfaceView implements Runnable, GameStarter {
private Thread mThread = null;
private long mFPS;
private GameState mGameState;
…
Next, initialize the GameState instance in the GameEngine constructor using this line of code highlighted next:
public GameEngine(Context context, Point size) {
super(context);
mGameState = new GameState(this, context);
}
Notice we pass this as well as a reference to Context into the GameState constructor. There will obviously be errors until we code the GameState class.
Important note
You might wonder what exactly this is. After all, GameEngine is many things. It's a SurfaceView, a Runnable, and now a GameStarter as well. In the code we write for the GameState class, we will cast this to a GameStarter giving access only to deSpawnReSpawn and nothing else.
Now we can code GameState and see the interface get used (step 4: calling the method of the interface) as well as the rest of the GameState class.
Coding the GameState class
Create a new class called GameState in the same way we have done so often throughout this book.
Edit the class declaration to add the final keyword, remove the public access specifier that was auto-generated, and add the following member variables to the GameState class:
import android.content.Context;
import android.content.SharedPreferences;
final class GameState {
private static volatile boolean mThreadRunning = false;
private static volatile boolean mPaused = true;
private static volatile boolean mGameOver = true;
private static volatile boolean mDrawing = false;
// This object will have access to the deSpawnReSpawn
// method in GameEngine- once it is initialized
private GameStarter gameStarter;
private int mScore;
private int mHighScore;
private int mNumShips;
// This is how we will make all the high scores persist
private SharedPreferences.Editor mEditor;
}
At first glance, the previous member variables are simple, but a closer look reveals several static volatile members. Making these four boolean variables static guarantees they are variables of the class and not a specific instance, and making them volatile means we can safely access them from both inside and outside the thread. We have a static volatile member to track the following:
- Whether the thread is running
- Whether the game is paused
- Whether the game is finished (over)
- Whether the engine should currently be drawing objects in the current frame
This extra information (compared to previous projects) is necessary because of the pause feature and starting/restarting the game.
Next, we declare an instance of our interface, GameStarter, followed by three simple int variables to monitor score, high score, and the number of ships (lives) the player has left.
Finally, for our list of member variables, we have something completely new. We declare an instance of SharedPreferences.Editor called mEditor. This is one of the classes that will allow us to make the high score persist beyond the execution time of the game.
Next, we can code the constructor for the GameState class.
Saving and loading the high score forever
The first thing to point out about the GameState constructor that follows is the signature. It matches the initialization code we wrote in the GameEngine class.
It receives a GameStarter reference and a Context reference. Remember that we passed in this as the first parameter. By using the GameStarter type as a parameter (and not GameEngine, SurfaceView, or Runnable, which would also have been syntactically allowable), we specifically get hold of the GameStarter functionality, that is, the deSpawnReSpawn method.
Add the code for the GameState constructor and then we will discuss it:
GameState(GameStarter gs, Context context){
// This initializes the gameStarter reference
gameStarter = gs;
// Get the current high score
SharedPreferences prefs;
prefs = context.getSharedPreferences("HiScore",
Context.MODE_PRIVATE);
// Initialize the mEditor ready
mEditor = prefs.edit();
// Load high score from a entry in the file
// labeled "hiscore"
// if not available highscore set to zero 0
mHighScore = prefs.getInt("hi_score", 0);
}
Inside the constructor body, we initialize our GameStarter member with gs. Remember that it was a reference (gs) that was passed in, so now gameStarter.deSpawnReSpawn() has access to the exact same place in memory that contains the deSpawnReSpawn method in GameEngine.
Tip
You can think of gameStarter.deSpawnReSpawn() as a special button that when pressed offers remote access to the method we added to the GameEngine class. We will make quite a few of these special buttons with remote access over the final two projects.
Following on from this, we see another new class called SharedPreferences and we create a local instance called prefs. We immediately initialize prefs and make use of it. Here is the line of code that comes next, repeated for ease of discussion:
prefs = context.getSharedPreferences("HiScore",
Context.MODE_PRIVATE);
The previous code initializes prefs by assigning it access to a file. The file is called HiScore as indicated by the first parameter. The second parameter specifies private access. If the file does not exist (which it won't the first time it is called), then the file is created. So now we have a blank file called HiScore that is private to this app.
Remember the mEditor object, which is of the SharedPreferences.Editor type? We can now use prefs to initialize it as an editor of the HiScore file. This line of code is what achieved this:
// Initialize the mEditor ready
mEditor = prefs.edit();
Whenever we want to edit the HiScore file, we will need to use mEditor, and whenever we need to read the HiScore file, we will use prefs.
The next line of code (the last of the constructor) reads the file and we will only need to do this once per launch of the game. The instance, mEditor, on the other hand, will be used every time the player gets a new high score. This is the reason we made mEditor a member (with class scope) and kept prefs as just a local variable. Here is the line of code that uses prefs so you can see it again without flipping/scrolling back to the full constructor code:
mHighScore = prefs.getInt("hi_score", 0);
The code uses the getInt method to capture a value (stored in the HiScore file) that has a label of hi_score. You can think of labels in the files as variable names. If the label does not exist (and it won't the first time the game is ever run), then the default value of 0 (the second parameter) is returned and assigned to mHighScore.
Now we can see the mEditor object in action in the endGame method that will be called at the end of every game. Add the endGame method:
private void endGame(){
mGameOver = true;
mPaused = true;
if(mScore > mHighScore){
mHighScore = mScore;
// Save high score
mEditor.putInt("hi_score", mHighScore);
mEditor.commit();
}
}
The endGame method sets mGameover and mPaused to true so that any parts of our code that query to find out these states can know the current state as well.
The if block tests whether mScore is higher than mHighScore, which would mean the player achieved a new high score. If they have, then the value of mScore is assigned to mHighScore.
We use the putInt method from the mEditor object to write the new high score to the HiScore file. The code uses the label of hi_score and the value from mHighScore. The line mEditor.commit() actually writes the change to the file. The reason the putInt and commit stages are separate is that it is quite common to have a file with multiple labels and you might want to use multiple put… calls before calling commit.
Important note
Note that SharedPreferences.Editor also has putString, putBoolean, and more methods too. Also, note that SharedPreferences has corresponding get… methods as well.
The next time the constructor runs, the high score will be read from the file and the player's high score is preserved for eternity like a Pharaoh's soul—unless they uninstall the game.
Pressing the "special button" – calling the method of the interface
This is the fourth and last step on our list of things to do from the What we will do to implement the interface solution section.
Add the startNewGame method to the GameState class and then we will analyze it:
void startNewGame(){
mScore = 0;
mNumShips = 3;
// Don't want to be drawing objects
// while deSpawnReSpawn is
// clearing them and spawning them again
stopDrawing();
gameStarter.deSpawnReSpawn();
resume();
// Now we can draw again
startDrawing();
}
As you might have guessed, the method sets mScore and mNumShips to their starting values of 0 and 3, respectively. Next, the code calls the stopDrawing method, which we will code soon. And at last, we get to press the "special button" and call gameStarter.deSpawnReSpawn. This triggers the execution of the deSpawnReSpawn method in the GameEngine class.
Currently, the deSpawnReSpawn method is empty but by the end of the project, it will be deleting and rebuilding all the objects from the game. By calling stopDrawing first, we have a chance to set the correct state before allowing this significant operation.
Imagine if one part of our code tried to draw a ship just after it had been deleted. Ouch. That doesn't sound good. In fact, it would crash the game.
After the call to deSpawnReSpawn, the code calls the soon-to-be-written resume and startDrawing methods, which change state back to all-systems-go again.
Finishing off the GameState class
Next, we will finish off the GameState class, including the stopDrawing, startDrawing, and resume methods.
Add the loseLife method:
void loseLife(SoundEngine se){
mNumShips--;
se.playPlayerExplode();
if(mNumShips == 0){
pause();
endGame();
}
}
This method will be called each time the player loses a life and it simply deducts 1 from mNumShips. The if block checks whether this latest catastrophe leaves mNumShips at 0 and if it does, it pauses and then ends the game by calling the pause and endGame methods.
There is another line of code in the endGame method that we haven't discussed yet. I highlighted it for clarity. The se variable is an instance of the SoundEngine class, which was passed in as a parameter to the loseLife method (also highlighted). The code playPlayerExplode() method will play a nice explosion sound effect. We will code SoundEngine right after we finish the GameState class, so there will temporarily be an error for all the code referring to SoundEngine or the instance of SoundEngine.
What follows is lots of code, but it is very straightforward. Having said this, be sure to make a note of the method names and the variables they set or return. Add the following methods to the GameState class:
int getNumShips(){
return mNumShips;
}
void increaseScore(){
mScore++;
}
int getScore(){
return mScore;
}
int getHighScore(){
return mHighScore;
}
void pause(){
mPaused = true;
}
void resume(){
mGameOver = false;
mPaused = false;
}
void stopEverything(){
mPaused = true;
mGameOver = true;
mThreadRunning = false;
}
boolean getThreadRunning(){
return mThreadRunning;
}
void startThread(){
mThreadRunning = true;
}
private void stopDrawing(){
mDrawing = false;
}
private void startDrawing(){
mDrawing = true;
}
boolean getDrawing() {
return mDrawing;
}
boolean getPaused(){
return mPaused;
}
boolean getGameOver(){
return mGameOver;
}
All the previous methods are just getters and setters that other parts of the code can use to set and retrieve the various states the game will require.
Using the GameState class
We have already declared and initialized an instance called mGameState. Let's put it to use. Update the run method in the GameEngine class by adding the following highlighted code:
@Override
public void run() {
while (mGameState.getThreadRunning()) {
long frameStartTime = System.currentTimeMillis();
if (!mGameState.getPaused()) {
// Update all the game objects here
// in a new way
}
// Draw all the game objects here
// in a new way
// Measure the frames per second in the usual way
long timeThisFrame = System.currentTimeMillis()
- frameStartTime;
if (timeThisFrame >= 1) {
final int MILLIS_IN_SECOND = 1000;
mFPS = MILLIS_IN_SECOND / timeThisFrame;
}
}
}
Notice the entire inside of the run method is wrapped in a while loop that will only execute when the GameState class informs us that the thread is running. Also, look at the new if block, which checks that GameState is not paused before allowing the objects to be updated. Obviously, the code inside this if block doesn't do anything yet.
Next, add this new, highlighted code to the stopThread and startThread methods:
public void stopThread() {
// New code here soon
mGameState.stopEverything();
try {
mThread.join();
} catch (InterruptedException e) {
Log.e("Exception","stopThread()" + e.getMessage());
}
}
public void startThread() {
// New code here soon
mGameState.startThread();
mThread = new Thread(this);
mThread.start();
}
This new code calls the stopEverything method when the GameActivity class calls the stopThread method. And when the GameActivity class calls the startThread method, the startThread method calls the corresponding method from GameState. If necessary, look back slightly in the text to see which member variables of GameState are affected by stopEverything and startThread.
Let's implement the sound.
Building a sound engine
This is a bit different from how we have previously handled the sound but still should seem familiar. We will be writing code that prepares a SoundPool instance and plays some sound. It will be nearly identical to the sound code we have written in the other projects with the exception that there will be a method that plays each sound effect.
This means that any part of our code that has an instance of SoundEngine will be able to play whatever sound effect it needs, yet at the same time, all the sound code will be encapsulated.
Important note
We have already seen in the GameState class that the loseLife method receives an instance of SoundEngine and calls the playPlayerExplode method.
Adding the sound files to the project
Before we get to the code, let's add the actual sound files to the project. You can find all the files in the assets folder of the Chapter 18 folder on the GitHub repo. Copy the entire assets folder, then using your operating system's file browser, go to the ScrollingShooter/app/src/main folder of the project and paste the folder along with all the files. The sound effects are now ready for use.
Coding the SoundEngine class
To prepare to code the SoundEngine class, create a new class called SoundEngine in the usual way. Edit the class declaration, add the required import directives, and add the following member variables:
import android.content.Context;
import android.content.res.AssetFileDescriptor;
import android.content.res.AssetManager;
import android.media.AudioAttributes;
import android.media.AudioManager;
import android.media.SoundPool;
import android.os.Build;
import java.io.IOException;
class SoundEngine {
// for playing sound effects
private SoundPool mSP;
private int mShoot_ID = -1;
private int mAlien_Explode_ID = -1;
private int mPlayer_explode_ID = -1;
}
Add a constructor that uses the now-familiar code to prepare SoundPool:
SoundEngine(Context c){
// Initialize the SoundPool
if (Build.VERSION.SDK_INT >=
Build.VERSION_CODES.LOLLIPOP) {
AudioAttributes audioAttributes =
new AudioAttributes.Builder()
.setUsage(AudioAttributes.USAGE_MEDIA)
.setContentType(AudioAttributes
.CONTENT_TYPE_SONIFICATION)
.build();
mSP = new SoundPool.Builder()
.setMaxStreams(5)
.setAudioAttributes(audioAttributes)
.build();s
} else {
mSP = new SoundPool(5, AudioManager.STREAM_MUSIC, 0);
}
try {
AssetManager assetManager = c.getAssets();
AssetFileDescriptor descriptor;
// Prepare the sounds in memory
descriptor = assetManager.openFd("shoot.ogg");
mShoot_ID = mSP.load(descriptor, 0);
descriptor = assetManager.openFd(
"alien_explosion.ogg");
mAlien_Explode_ID = mSP.load(descriptor, 0);
descriptor = assetManager.openFd(
"player_explosion.ogg");
mPlayer_explode_ID = mSP.load(descriptor, 0);
} catch (IOException e) {
// Error
}
}
These are the methods that play each of the sound effects; simply add them to the SoundEngine class:
void playShoot(){
mSP.play(mShoot_ID,1, 1, 0, 0, 1);
}
void playAlienExplode(){
mSP.play(mAlien_Explode_ID,1, 1, 0, 0, 1);
}
void playPlayerExplode(){
mSP.play(mPlayer_explode_ID,1, 1, 0, 0, 1);
}
Notice that the code is nothing new. The only thing that is different is where the code is placed. That is, each call to the play method is wrapped in its own related method. Note that the errors in the loseLife method of the GameState class should now be gone.
Using the SoundEngine class
Declare an instance of the SoundEngine class as a member of the GameEngine class as highlighted next:
class GameEngine extends SurfaceView implements Runnable, GameStarter {
private Thread mThread = null;
private long mFPS;
private GameState mGameState;
private SoundEngine mSoundEngine;
…
Initialize it in the constructor as highlighted next:
public GameEngine(Context context, Point size) {
super(context);
mGameState = new GameState(this, context);
mSoundEngine = new SoundEngine(context);
}
The SoundEngine class and all its methods are now ready to make some noise.
Testing the game so far
Running the game still produces a blank screen but it is well worth running it to see whether there are any problems before you proceed. Just for fun, you could test SoundEngine by adding this temporary line of code to the onTouchEvent method:
@Override
public boolean onTouchEvent(MotionEvent motionEvent) {
// Handle the player's input here
// But in a new way
mSoundEngine.playShoot();
return true;
}
Every time you tap the screen, it will play the shooting sound effect. Delete the temporary line of code and we will move on to making our game engine begin to draw things too.
Building a HUD class to display the player's control buttons and text
The HUD, as usual, will display all the onscreen information to the player. The HUD for this game (as we saw at the start of the chapter) is a bit more advanced and as well as regular features such as the score and the player's lives, it has the control buttons.
The control buttons are basically slightly transparent rectangles drawn on the screen. It is important that when we detect the player's touches, we determine accurately whether a touch happened within one of these rectangles as well as in which rectangle.
An entire class dedicated to these rectangles (as well as the usual text) seems like a good idea.
Furthermore, as we did with the Snake and Apple classes in the previous project, the HUD class will also be responsible for drawing itself when requested. Create a class called HUD, add the import directives, and edit its code to match the following, including adding the member variables and the constructor shown next:
import android.graphics.Canvas;
import android.graphics.Color;
import android.graphics.Paint;
import android.graphics.Point;
import android.graphics.Rect;
import java.util.ArrayList;
class HUD {
private int mTextFormatting;
private int mScreenHeight;
private int mScreenWidth;
private ArrayList<Rect> controls;
static int UP = 0;
static int DOWN = 1;
static int FLIP = 2;
static int SHOOT = 3;
static int PAUSE = 4;
HUD(Point size){
mScreenHeight = size.y;
mScreenWidth = size.x;
mTextFormatting = size.x / 50;
prepareControls();
}
}
The first three member variables are of the int type. They will be used to remember useful values such as a consistent value for scaling text (mTextFormatting) as well as the width and height of the screen in pixels.
We have declared an ArrayList of Rect objects. This will hold a bunch of Rect objects that will represent each of the buttons of the HUD.
Next, in the code under discussion, we declare five static int variables called UP, DOWN, FLIP, SHOOT, and PAUSE and initialize them with values from 0 through 4. As these variables are package-private and static, they will be easy to refer to directly from the class name and without an instance. And you have probably spotted that each of the names of the variables refers to one of the button functions.
The HUD constructor that follows the member declarations initializes the member variables to remember the screen width and height. There is also a calculation to initialize mTextFormatting (size.x / 50). The value 50 is a little arbitrary but seemed to work well with varying screen sizes during testing. It is useful to have mTextFormatting as it is now relative to the screen width and can be used when scaling parts of the HUD in other parts of the class.
The final line of code in the constructor calls the prepareControls method, which we will code now.
Coding the prepareControls method
Add and study the code for the prepareControls method and then we can discuss it:
private void prepareControls(){
int buttonWidth = mScreenWidth / 14;
int buttonHeight = mScreenHeight / 12;
int buttonPadding = mScreenWidth / 90;
Rect up = new Rect(
buttonPadding,
mScreenHeight - (buttonHeight * 2)
- (buttonPadding * 2),
buttonWidth + buttonPadding,
mScreenHeight - buttonHeight -
(buttonPadding *2));
Rect down = new Rect(
buttonPadding,
mScreenHeight - buttonHeight -
buttonPadding,
buttonWidth + buttonPadding,
mScreenHeight - buttonPadding);
Rect flip = new Rect(mScreenWidth -
buttonPadding - buttonWidth,
mScreenHeight - buttonHeight -
buttonPadding,
mScreenWidth - buttonPadding,
mScreenHeight - buttonPadding);
Rect shoot = new Rect(mScreenWidth -
buttonPadding - buttonWidth,
mScreenHeight - (buttonHeight * 2) -
(buttonPadding * 2),
mScreenWidth - buttonPadding,
mScreenHeight - buttonHeight -
(buttonPadding *2));
Rect pause = new Rect(
mScreenWidth - buttonPadding -
buttonWidth,
buttonPadding,
mScreenWidth - buttonPadding,
buttonPadding + buttonHeight);
controls = new ArrayList<>();
controls.add(UP,up);
controls.add(DOWN,down);
controls.add(FLIP, flip);
controls.add(SHOOT, shoot);
controls.add(PAUSE, pause);
}
The first thing we do in the prepareControls method is to declare and initialize three int variables that will act as the values to help us size and space out our buttons. They are called buttonWidth, buttonHeight, and buttonPadding. If you haven't already, note the formulas used to initialize them. All the initialization formulas are based on values relative to the screen size.
We can now use the three variables when scaling and positioning the Rect instances, which represent each of the buttons. It is these Rect instances that get initialized next.
Five new Rect instances are declared. They are appropriately named up, down, flip, shoot, and pause. The key to understanding the code that initializes them is that they each take four parameters and those parameters are for the left, top, right, and bottom positions, in that order.
The formulas used to calculate the values of each corner of each Rect all use mScreenWidth, mScreenHeight, and the three new variables we have just discussed as well. For example, the up Rect instance, which needs to be in the bottom-left corner above down Rect, is initialized like this:
buttonPadding,
The buttonPadding variable as the first argument means the top-left corner of the rectangle will be buttonPadding (the width of the screen divided by 90) pixels away from the left-hand edge of the screen.
mScreenHeight - (buttonHeight * 2)- (buttonPadding * 2),
The preceding formula in the second argument position means the top of the button will be positioned (the height of two buttons added to two button paddings) up from the bottom of the screen.
buttonWidth + buttonPadding,
The preceding formula in the third argument position means the right-hand side of the button will be the end of a button's width and a button's padding away from the left-hand side of the screen. If you look back to how the first parameter was calculated, this makes sense.
mScreenHeight - buttonHeight - (buttonPadding *2));
The preceding fourth and final parameter is one button's height added to two buttons' padding up from the bottom of the screen. This leaves exactly the right amount of space for down Rect including padding above and below.
All the Rect position calculations were worked out manually. If you want to understand the formulas totally, go through each parameter a Rect instance at a time or you can just accept that they work and carry on with the next part of the prepareControls method.
The final part of the prepareControls method initializes the controls ArrayList instance and then adds each of the Rect objects using the ArrayList class's add method.
Coding the draw method of the HUD class
Now we can write the code that will draw the HUD. First of all, notice the signature of the draw method, especially the parameters. It receives a reference to a Canvas and a Paint just like the Apple and Snake classes' draw methods did in the previous project. In addition, the draw method receives a reference to the GameState instance and we will see how we use GameState shortly.
Code the draw method and then we will dissect it:
void draw(Canvas c, Paint p, GameState gs){
// Draw the HUD
p.setColor(Color.argb(255,255,255,255));
p.setTextSize(mTextFormatting);
c.drawText("Hi: " + gs.getHighScore(),
mTextFormatting,mTextFormatting,p);
c.drawText("Scrore: " + gs.getScore(),
mTextFormatting,mTextFormatting * 2,p);
c.drawText("Lives: " + gs.getNumShips(),
mTextFormatting,mTextFormatting * 3,p);
if(gs.getGameOver()){
p.setTextSize(mTextFormatting * 5);
c.drawText("PRESS PLAY",
mScreenWidth /4, mScreenHeight /2 ,p);
}
if(gs.getPaused() && !gs.getGameOver()){
p.setTextSize(mTextFormatting * 5);
c.drawText("PAUSED",
mScreenWidth /3, mScreenHeight /2 ,p);
}
drawControls(c, p);
}
The draw method starts off simply:
- The color to draw with is chosen with the setColor method.
- The size of the text is set with the setTextSize method and the mFormatting variable is used as the size.
- Three lines of text are drawn using the drawText method to display the high score, score, and the number of lives the player has. Notice how the mTextFormatting variable is used repeatedly to space out the lines of text from each other and how the GameState reference (gs) is used to access the high score, score, and the number of the player's lives remaining.
Next in the code, there are two if blocks. The first executes when the game is over (if(gs.getGameOver)) and inside, the text size and position are reformatted and the PRESS PLAY message is drawn to the screen.
The second if block executes when the game is paused but not over. This is because we pause the game when the game is over (to stop updates) but we also pause the game when the game is not over (because the player has pressed the pause button and intends to resume eventually). Inside this if block, the text size and position are reformatted and the PAUSED text is drawn to the screen.
The final line of code in the draw method calls the drawControls method, where we will draw all the buttons. The drawControls method's code could have been added directly to the draw method but it would have made it more unwieldy. Notice the call to the drawControls method also passes a reference to Canvas and Paint as it will need it to draw the Rect objects that are the player's controls.
Coding drawControls and getControls
Add the code for the final two methods of the HUD class and then we will talk about what they do:
private void drawControls(Canvas c, Paint p){
p.setColor(Color.argb(100,255,255,255));
for(Rect r : controls){
c.drawRect(r.left, r.top, r.right, r.bottom, p);
}
// Set the colors back
p.setColor(Color.argb(255,255,255,255));
}
ArrayList<Rect> getControls(){
return controls;
}
The drawControls method changes the drawing color with the setColor method. Look at the first argument sent to the Color.argb method as it is different from all the times we have used it so far. The value of 100 will create a transparent color. This means that any spaceships and the scrolling background will be visible beneath it.
Important note
A value of 0 would be an invisible button and a value of 255 would be a full-opacity (not transparent at all) button.
Next, in the drawControls method, we use an enhanced for loop to loop through each Rect instance in turn and use the drawRect method of the Canvas class to draw our transparent button in the position decided in the prepareControls method.
If you are unsure about the enhanced for loop, look back to Chapter 16, Collections and Enumerations, The enhanced for Loop section.
Outside the for loop of the drawControls method, there is one more line of code that sets the color back to full opacity. This is a convenience so that every single class that uses the Paint reference after it does not need to bother doing so.
The getControls method returns a reference to controls ArrayList. controls ArrayList will also be useful when we are calculating the player's touches because later in the project, we can compare the position of the Rect objects to the position of the screen touches to decipher the player's intentions.
We are nearly able to run the game engine so far and draw the HUD to the screen. Just one more class.
Building a Renderer class to handle the drawing
The Renderer class will oversee controlling the drawing. As the project evolves, it will have multiple types of classes that it will trigger to draw at the appropriate time. As a result, we will regularly add code to this class, including adding extra parameters to some of the method signatures.
For now, the Renderer class only needs to control the drawing of the HUD and we will now code it accordingly.
Create a new class called Renderer and edit it to match this code:
import android.graphics.Canvas;
import android.graphics.Color;
import android.graphics.Paint;
import android.view.SurfaceHolder;
import android.view.SurfaceView;
import java.util.ArrayList;
class Renderer {
private Canvas mCanvas;
private SurfaceHolder mSurfaceHolder;
private Paint mPaint;
Renderer(SurfaceView sh){
mSurfaceHolder = sh.getHolder();
mPaint = new Paint();
}
}
As you can see from the code you just added, the Renderer class will hold the instances of Canvas, SurfaceHolder, and Paint and therefore will be responsible for passing the references of Canvas and Paint to the HUD class's draw method. The Renderer class will also call the draw methods of all the other classes (when we have coded them).
The constructor that follows initializes the SurfaceHolder and Paint objects in the usual way using the SurfaceView reference that gets passed in from the GameEngine class (we will add this code when we have finished the Renderer class).
Next, add the draw method to the Renderer class. It is mainly full of comments and a few empty if blocks in preparation for its evolution throughout the rest of the project. Notice that a GameState reference and a HUD reference are received as parameters:
void draw(GameState gs, HUD hud) {
if (mSurfaceHolder.getSurface().isValid()) {
mCanvas = mSurfaceHolder.lockCanvas();
mCanvas.drawColor(Color.argb(255, 0, 0, 0));
if (gs.getDrawing()) {
// Draw all the game objects here
}
if(gs.getGameOver()) {
// Draw a background graphic here
}
// Draw a particle system explosion here
// Now we draw the HUD on top of everything else
hud.draw(mCanvas, mPaint, gs);
mSurfaceHolder.unlockCanvasAndPost(mCanvas);
}
}
The two empty if blocks will eventually handle the two possible states of drawing (gs.getDrawing()) and game over (gs.getGameOver()). The call to hud.draw is made regardless because it always needs to be drawn; however, as you might recall, the HUD draws itself slightly differently depending upon the current state of the game.
That's it for the Renderer class for now. We can at last put all these new classes to work and see the game in action.
Using the HUD and Renderer classes
Declare an instance of the HUD and Renderer classes as members of the GameEngine class as highlighted in this next code:
class GameEngine extends SurfaceView implements Runnable,
GameStarter {
private Thread mThread = null;
private long mFPS;
private GameState mGameState;
private SoundEngine mSoundEngine;
HUD mHUD;
Renderer mRenderer;
Initialize the instances of the HUD and Renderer classes in the GameEngine constructor as highlighted next:
public GameEngine(Context context, Point size) {
super(context);
mGameState = new GameState(this, context);
mSoundEngine = new SoundEngine(context);
mHUD = new HUD(size);
mRenderer = new Renderer(this);
}
Now we can add a call to the draw method of the Renderer class in the run method as highlighted next:
@Override
public void run() {
while (mGameState.getThreadRunning()) {
long frameStartTime = System.currentTimeMillis();
if (!mGameState.getPaused()) {
// Update all the game objects here
// in a new way
}
// Draw all the game objects here
// in a new way
mRenderer.draw(mGameState, mHUD);
// Measure the frames per second in the usual way
long timeThisFrame = System.currentTimeMillis()
- frameStartTime;
if (timeThisFrame >= 1) {
final int MILLIS_IN_SECOND = 1000;
mFPS = MILLIS_IN_SECOND / timeThisFrame;
}
}
}
The project should now run without any errors.
Running the game
You can now run the game and see the fruits of your labor:
Figure 18.5 – Running the game
As you can see, for the first time, we have actual button positions marked out on the screen: move up and down in the bottom-left corner and fire and flip direction in the bottom-right corner. The button in the top-right corner will start the game when it is game over and it will pause and resume the game when it is in play. At the moment, the buttons don't do anything, but we will fix that soon.
In addition, we have text being drawn to the screen to show the lives, score, and high score. There is also a message to the player to advise them on how to start the game.
Summary
This was quite a chunky chapter but we have learned a huge amount. We have learned how we can subdivide this project into more classes than ever before to keep the code simple but at the expense of a more complicated structure. We have also coded our first interface to enable controlled communication between different classes.
In the next chapter, we will learn about and implement the Observer pattern, so we can handle the player's interaction with the HUD without cramming all the code into the GameEngine class. In addition, we will also code a cool exploding star-burst particle system effect that can be used to make shooting an alien a much more interesting event.