
10
Secure Your API
In the previous chapter, we have learned how to deploy a Mule application, what the different deployment environments are, and how to choose your deployment environment.
There are several factors that need to be considered while choosing a deployment model; hence, it’s an important decision while building your application network.
We are also aware that APIs are responsible for carrying data/metadata and communicating with several end systems and, hence, are at a potentially high risk of being attacked. It’s important to secure your API and thereby protect your integration ecosystem. In this chapter, we shall learn about API security and the need for securing your API and Mule application.
We shall also focus on how to implement API security using MuleSoft and study several techniques with which you can secure your APIs.
We will cover the following topics in this chapter:
- The need for API security
- API security with MuleSoft
- Introducing API Manager
- Policies in MuleSoft
- Implementing API security using policy
- Security capabilities of MuleSoft
Technical requirements
The requirements in this chapter are:
- Anypoint Studio installation (see Chapter 3, Exploring Anypoint Studio, for Studio installation guidance)
- An Anypoint Platform account (see Chapter 2, Designing Your API, to create a 30-day free trial account)
The need for API security
As we’re aware, APIs are responsible for carrying data and critical information back and forth in an integrated system. Hence, it is essential for us to have control over the information being processed and transferred by the APIs.
Let’s now understand the need for API security:
- To protect our APIs, applications, API network, and end systems from malicious attacks
- Prevent unauthorized use of APIs or data that is being processed by APIs
- To standardize rules and regulations across an API network
- To follow company-wide security protocols and standards
- Comply with government-laid security protocols and standards such as FedRAMP, FIPS 140, CIS Benchmarks, and so on
- To have control over incoming and outgoing data and metadata
We now know the need for and the importance of API security. Let’s now see how we can secure API and applications that, in turn, will secure our application network.
API security with MuleSoft
In this section, let’s simplify how we can achieve API security using MuleSoft.
In Figure 10.1, we can see that the application network is formed using reusable building blocks, such as Mule applications, end systems, and non-Mule applications. Here, the outer dotted line depicts the periphery of the Mule application, and the inner dotted line shows the integration between a Mule application and an external end system/non-Mule application.

Figure 10.1 – A snapshot of Anypoint Platform depicting application networks
In order to achieve total security, you can apply security regulations on any of the following:
- On the periphery of the Mule application
- On one or more Mule applications and end systems
- On one or more non-Mule applications and end systems
- On an individual Mule/non-Mule and end system
You can implement the preceding security mechanism in any permutation and combination as per your organizational security needs. This is also called the layered security approach in MuleSoft. It helps us to achieve zero-trust security. It means trusting no one and verifying every incoming and outgoing request.
We’ve now understood how to achieve total security in MuleSoft. Let’s now learn about the prime component responsible for securing our APIs, API Manager.
Introducing API Manager
In Chapter 5, All About Anypoint Platform, we saw a glimpse of API Manager. Let’s now understand the prime capabilities of API Manager.
API Manager is mainly responsible for API governance, which includes tasks such as managing, securing, and governing the API. It’s a place to manage all kinds of APIs and, in turn, our Mule applications under one roof. It is in sync with other Anypoint Platform components such as the Design Center, Exchange, Runtime Manager, and the Anypoint Studio.
Figure 10.2 represents the default dashboard of API Manager.

Figure 10.2 – Anypoint Platform depicting the API Manager dashboard
Let’s now understand the core capabilities of API Manager.
Understanding the capabilities of API Manager
From Figure 10.2, we can see the navigation menu on the left-hand side of the dashboard. Let’s learn in brief about each component in the menu:
- API Administration: It’s mainly responsible for adding/importing a new/existing API into API Manager. It creates an API instance on which we can apply security policies. We shall learn about applying security policies in the upcoming section.
- API Groups: The main functionality is to consolidate the APIs into groups and apply security configuration to the whole group. The security configuration laid on a particular group will be applicable for all the applications in that group.
- Automated Policies: There are a few predefined policies pertaining to logging and monitoring. You can apply the same set of policies across all the APIs in the particular environment. They’re known as automated policies. It saves time and makes your security configuration consistent, as you’re applying the same set of common policies throughout the environment (a design, a sandbox, or any other).
- Client Applications: These are external services or applications that consume APIs.
- Custom Policies: You can publish your customized policy in this section. You can design your own policy in Anypoint Studio and configure it to match your organizational needs. Later, you can publish this policy and apply it over the API/APIs.
- Analytics: This provides you with information related to performance metrics. You can create your own customized dashboards, charts, and so on and analyze your application’s performance.
Now that we’ve understood the capabilities of API Manager, let’s move ahead and understand the underlying security architecture by learning about a secure API gateway.
Understanding the API gateway
An API gateway acts as a gatekeeper to keep a check on incoming and outgoing requests and responses.
Learning about the secure API gateway will give you an idea of how security mechanisms are enforced in MuleSoft.
We can see the architecture of the API gateway in Figure 10.3. Let’s look at the flow of activities involved.

Figure 10.3 – The security architecture of the API gateway
With reference to Figure 10.3, let’s understand the activities involved in implementing security with the help of the API gateway:
- Whenever a request is sent to the basic endpoint or a proxy endpoint, the request is redirected to API Manager.
- API Manager has a list of configurations enforced on a particular endpoint (security, performance, and so on).
- The API gateway checks whether the configured parameters on API Manager and Anypoint Runtime Manager meets the requirements with the help of an API Autodiscovery ID. It’s a number that helps to bind the activities of API Manager with Anypoint Runtime Manager. (We shall learn more about this in later sections.)
- If all the conditions are satisfied, only then is the request allowed to reach the backend API. If the conditions are not satisfied, the API gateway rejects the request.
- Once the request reaches the backend API, it continues the normal execution flow.
We have now learned about the API gateway and the steps involved in securing the APIs with the API gateway.
Now, let’s learn about the most fundamental and easiest approach to securing your APIs, which are policies in MuleSoft.
Policies in MuleSoft
Policies help you to impose security regulations, control traffic, transform data, and improve the usability of an API. It’s important to know about policies, as they are quite easy and efficient to apply. They are predefined and can also be tailored as per your organizational needs.
Let’s now learn about the out-of-the-box policies in MuleSoft. The following policies are sorted as per their categories – that is, Security, Compliance, Transformation, Quality of Service, and Troubleshooting. We will also study in brief custom policies in MuleSoft.
Security
In this category, the policies mainly emphasize securing the API by means of authentication and authorization. Security policies protect an API from various security threats and attacks. Let’s learn about them in brief:
- Basic Authentication – Simple: This is the simplest of all the security policies, which helps you authenticate your application using a username and password.
- Basic Authentication – LDAP: This is similar to simple authentication. Here, you can authenticate using LDAP (which stands for Lightweight Directory Access Protocol) credentials.
- IP Blocklist/Allowlist: You can allow or restrict IP addresses from accessing your APIs.
- JSON/XML Threat Protection: In the case of bulky and nested JSON or XML data, you can use this policy to limit the level of nesting. This way, you’re protecting your API from a malicious payload.
- JWT Validation: JSON Web Token (JWT): helps you authenticate and authorize with the help of a valid JWT token. The token consists of claims, signature, a JSON payload, and so on.
- OAuth 2.0 Access Token Enforcement Using Mule OAuth Provider Policy: You can implement OAuth 2.0 as your security protocol to help you authorize your application. You can only use it with Mule OAuth 2.0 Provider. There are other provisions if you wish to use a different identity provider (for example, Okta or Salesforce).
- OpenAM Access Token Enforcement: This helps you secure your application by restricting access. It uses the OpenAM Access protocol and OpenAM as the authentication server to generate the OAuth token.
- PingFederate Access Token Enforcement: This allows you to secure your application by restricting access and validating the token. It uses PingFederate as a client management tool to generate an OAuth token.
- Tokenization/Detokenization: This helps you in securely transforming/de-transforming sensitive information such as Personal Identifiable Information (PII) and bank credentials.
We have now studied several security policies that will help us to enhance API security. Let’s now learn about the different policies in the compliance category.
Compliance
In this category, we mainly focus on the API being compliant with an environment and obeying the regulations. Let’s learn about the policies in the compliance category:
- Client ID Enforcement: This secures access to a resource by validating a client ID and secret. It ensures that only a request with a valid client ID and secret gets access to the resource. On registering an application in the Anypoint Platform, a client ID and client secret are generated.
- Cross-Origin Resource Sharing (CORS): This is also known as a CORS policy. As the name suggests, it helps to access resources from web applications that are in a different domain.
We have now learned about compliance-based policies. In the next section, let’s learn about the transformation policies.
Transformation
Transformation policies help in modifying or enhancing metadata information:
- Header Injection/Removal: If you want to add/remove any data/metadata as a part of an inbound header, you can use the Header Injection/Removal policy.
We now understand the transformation policies. In the next section, let’s learn about the Quality of Service.
Quality of service
As the name suggests, Quality of Service (QoS)-based policies help you to enhance the API experience. They also help with API performance optimization. Let’s check out a few of the QoS-based policies.
- HTTP Caching: This helps you cache the API response for reusability purposes.
- Rate Limiting: This puts a limit on the number of requests that can be processed by an API during a particular duration. Once it reaches the maximum threshold value, all the other requests are rejected. This can prevent a Distributed Denial-of-Service(DDOS) attack.
- Rate Limiting SLA: This is similar to Rate Limiting, but with this policy, you limit the number of requests based on a Service Level Agreement (SLA).
- Spike Control: This puts a limit on the number of requests that can be processed by an API during a particular duration. Once it reaches the maximum threshold value, it queues the requests and attempts a retry mechanism.
- Message Logging: You can log the information from an incoming/outgoing request/response.
Apart from these out-of-the-box policies, if your organization has any other different security regulations, you can design your own custom policy.
Now, let’s learn in brief about custom policies in Mule.
Custom policies
As is quite evident from the name itself, you can customize a security policy to match your organizational security needs.
You can write your custom policy in Anypoint Studio, package it using Maven, and publish the policy on Anypoint Exchange. The following code snippet represents the structure of a custom policy:
     <?xml version="1.0" encoding="UTF-8"?>
<mule xmlns:xsi="http://www.w3.org/2001/XMLSchema-instance"
    xmlns:http-policy="http://www.mulesoft.org/schema/mule
        /http-policy">
  <http-policy:proxy name="custom-policy-template">
     <http-policy:source>
         <http-policy:execute-next/>
     </http-policy:source>
  </http-policy:proxy>
</mule>
Once published, you can apply the policy to your APIs using API Manager. Along with basic transformation logic, you can also add form elements such as a text box or radio button to get user input.
Apart from this, we can also combine our custom policy with the out-of-the-box Mule policies. Custom policies give you better control if you have any particular requirements.
We now understand the different policies that we can apply to our APIs to achieve security. Let’s learn how to implement these policies and secure our APIs.
Implementing API security using policy
We have learned about policies, types of policies, and categories of policies. Now, let’s understand how to achieve security by applying a policy.
In this walkthrough, we shall apply a simple basic authentication policy:
- Import any Mule application into Anypoint Studio or use your pre-existing Mule application.
- Log in to the Anypoint Platform. Go to API Manager | API Administration | Add new API (as shown in Figure 10.4).

Figure 10.4 – Adding a new API instance on API Manager
- In order to add a new API, we’ll first configure Runtime (see Figure 10.5). Select Mule Gateway as the runtime, as we’re connecting to a pre-existing application. You can also connect to a new Mule application as a proxy.
- Select Mule 4 as the Mule version. Click Next.

Figure 10.5 – Configuring runtime while adding the API instance
- We will now configure the API. Select API from Exchange, the one we have already published, which is musicbox-sys-api (see Figure 10.6).

Figure 10.6 – Configuring the API while adding the API instance
- Once you’ve selected the API from Exchange, details such as Asset type, API version, and Asset version will be auto-populated (see Figure 10.7). Review the information and click Next.
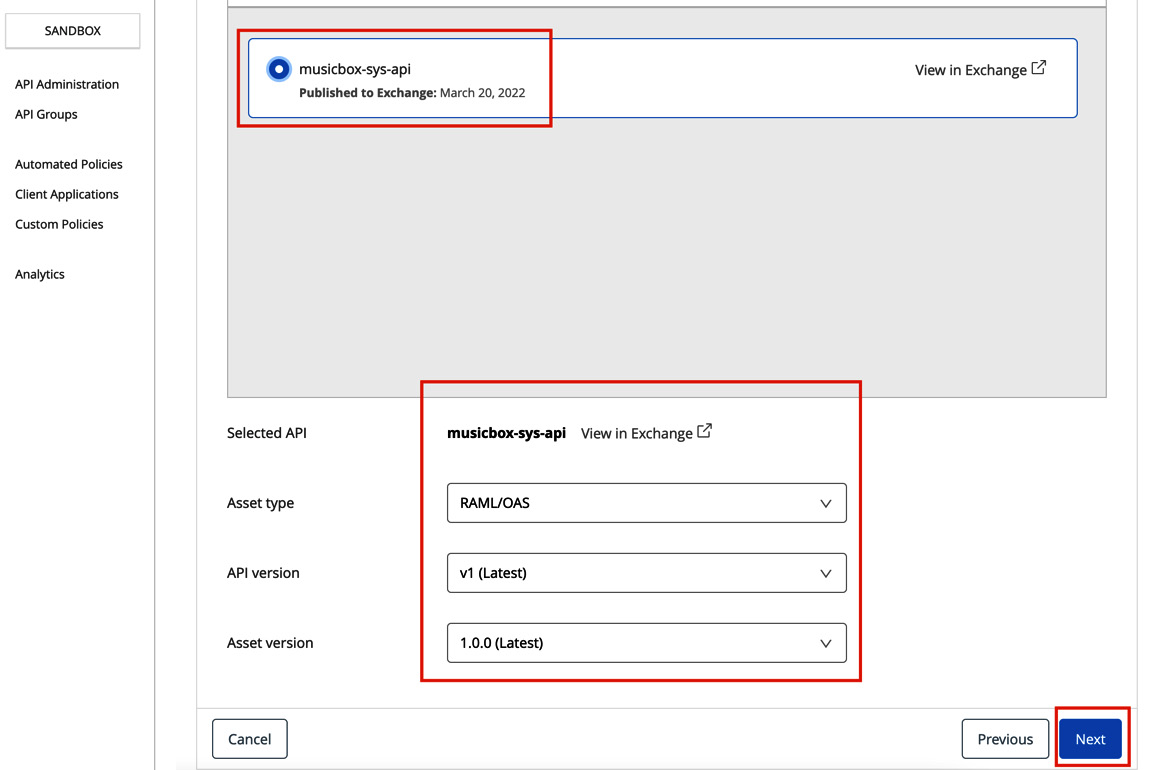
Figure 10.7 – Configuring the API from Exchange
- We will now configure the endpoint. If you wish to have a customized URL for your endpoint, you can configure it; it’s completely optional (see Figure 10.8). Click Next.
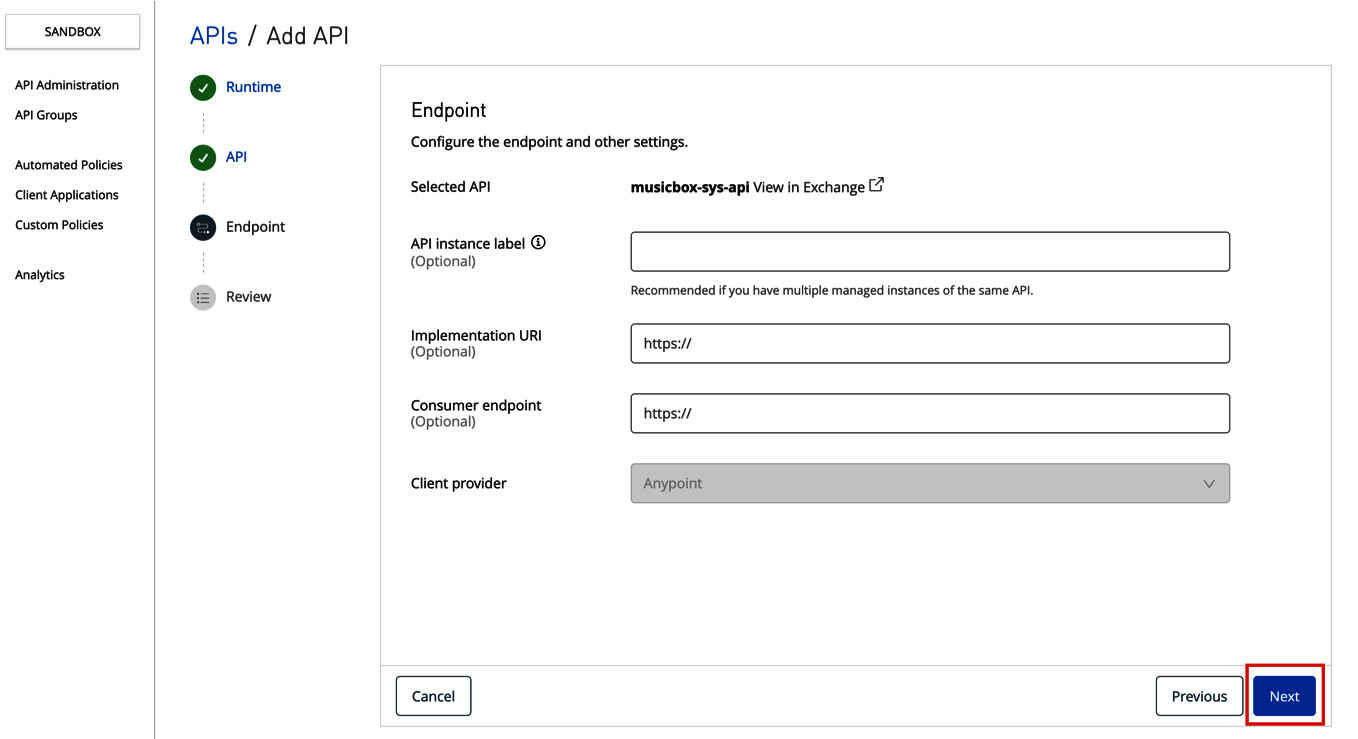
Figure 10.8 – Configuring the endpoint while creating the API instance
- In this step, we will review all the information pertaining to our API instance (see Figure 10.9). Click Save in order to finalize our API instance.

Figure 10.9 – Reviewing the API instance
You will now see a new API instance created. You can monitor and review your API performance metrics on this dashboard (see Figure 10.10).

Figure 10.10 – The API instance dashboard
We have learned about how to create an API instance in API Manager. In Figure 10.10, we can see Autodiscovery and the API ID. Let’s learn more about API Autodiscovery.
API Autodiscovery
API Autodiscovery binds the application deployed in Runtime Manager with the API instance created on API Manager.
The API Autodiscovery ID is a unique ID that helps you to connect the applications deployed on Runtime Manager to API instances on the API Manager. All the policies and other configurations that we apply on our API instance will be reflected on applications deployed in Runtime Manager.
Let’s now understand how to configure API Autodiscovery.
Configuring API Autodiscovery
To configure API Autodiscovery, follow these simple steps:
- Go to your Anypoint Studio, and open any of the previously built Mule applications or create a simple new Mule application on which you wish to configure API Autodiscovery (see Figure 10.11)
- Inside your Mule application, go to global.xml (where you manage all configurations) or any .xml file (if you don’t have global.xml), click on Global Elements | Create, search for API Autodiscovery, select API Autodiscovery, and click OK.

Figure 10.11 – Creating a new API Autodiscovery component
- Copy and paste the Autodiscovery ID from the API instance in API Manager and select your main flow, which has an APIkit router in order to apply configuration across all the flows that are being routed (see Figure 10.12).
- In this case, the API ID is 18095230 and the flow name is musicbox-sys-api-main. Once configured, click OK.

Figure 10.12 – Configuring the API Autodiscovery component
- Deploy your application to CloudHub, as shown in Figure 10.13. (Refer to Chapter 9, Deploying Your Application, to learn more about deploying the Mule application.)
- Right-click on your project, hover over Anypoint Platform and select Deploy to CloudHub.
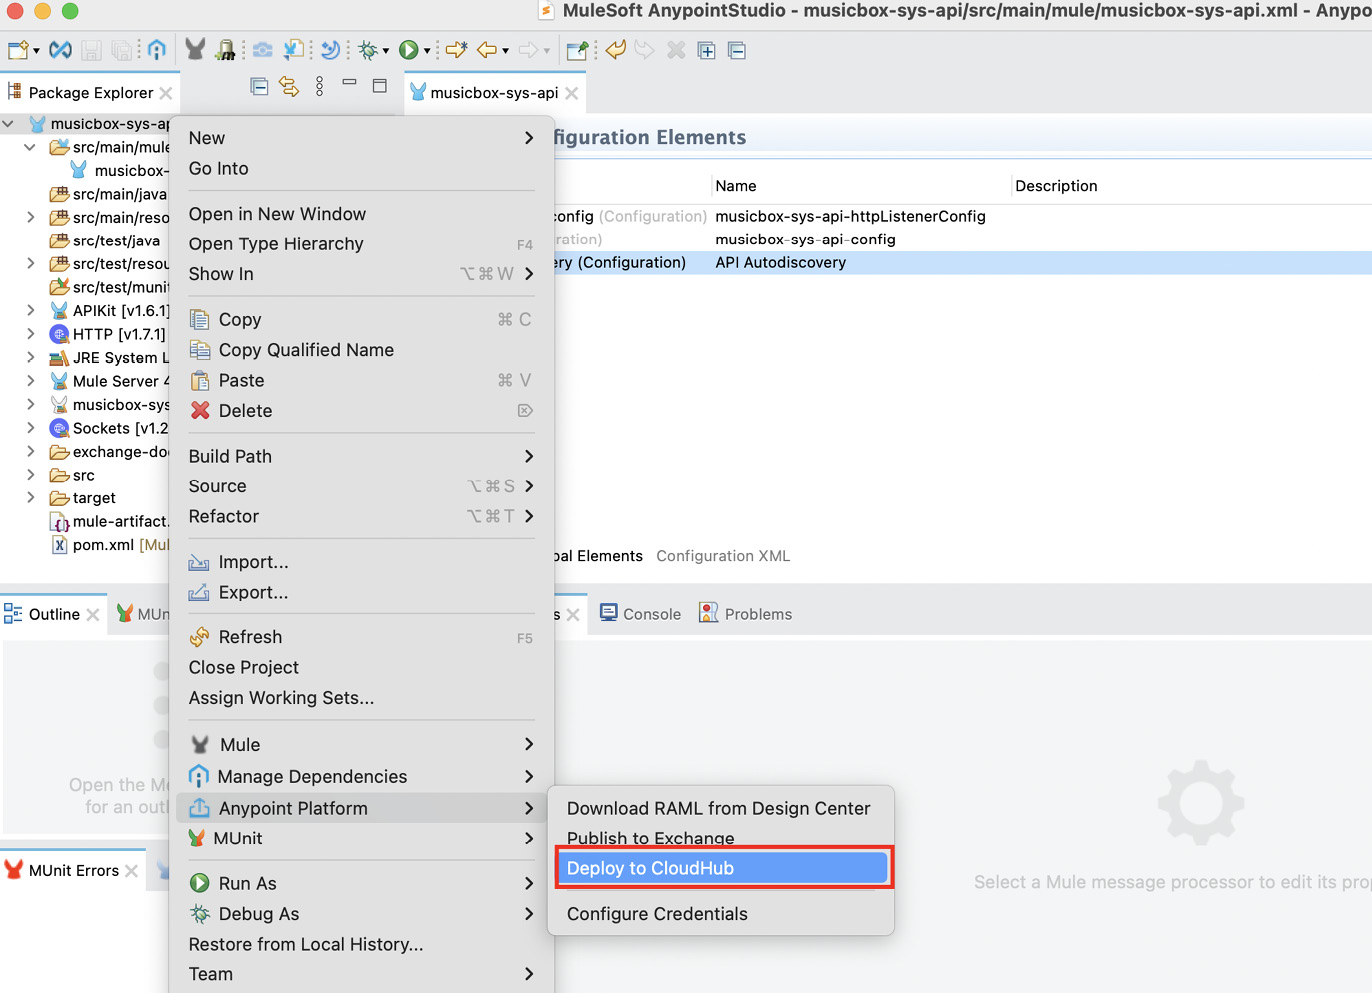
Figure 10.13 – Deploying your application to CloudHub
- Once your application is successfully deployed to CloudHub, go to Runtime Manager, select your application, and click on Logs.
You can see in Logs that your API key ID is being logged, which is the same as the Auto Discovery ID (see Figure 10.14).
Also, the status of your API instance in API Manager will be changed to Active.

Figure 10.14 – API Autodiscovery logs in Runtime Manager
In this section, we saw how to configure the API Autodiscovery ID. In the next section, let’s see how to configure a security policy.
Configuring a security policy
In the previous sections, we saw how to create an API instance and configure API Autodiscovery. Let’s now configure a security policy using API Manager with the following simple steps:
- In order to configure a policy, go to API Manager in Anypoint Platform, select the API instance, go to Policies, and click Add policy (see Figure 10.15).

Figure 10.15 – Adding a new policy
- You’ll see a list of policies. Select the Basic authentication - Simple policy, which is the simplest policy (see Figure 10.16).
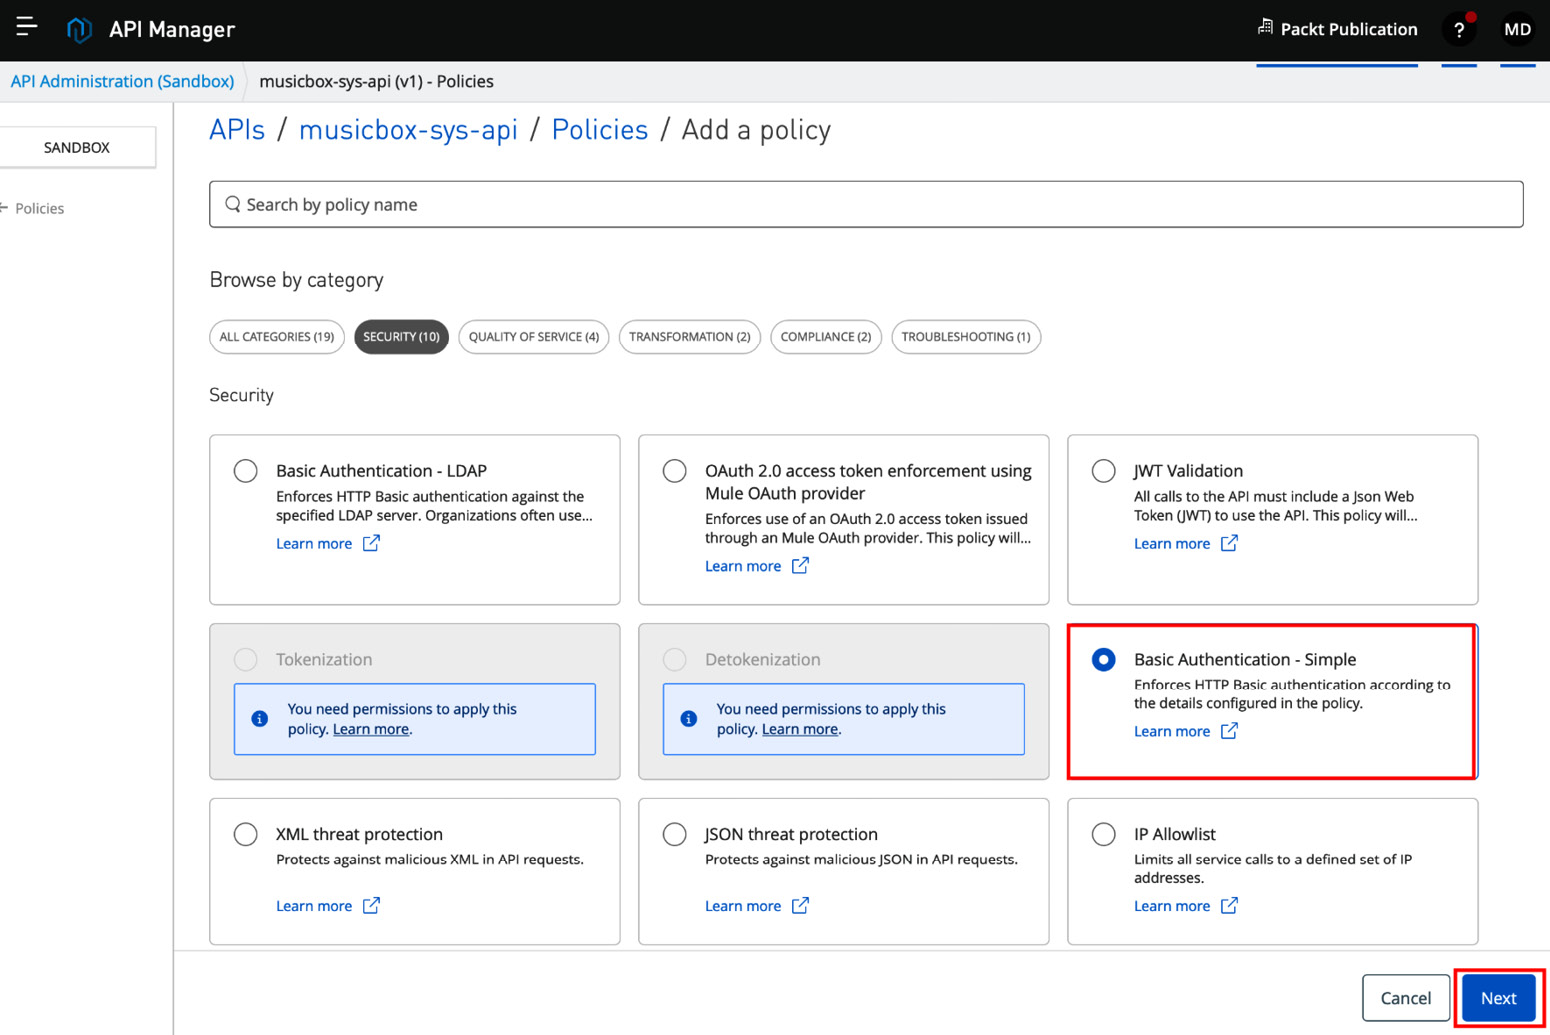
Figure 10.16 – Selecting the Basic authentication - Simple policy
- Configure User Name and User Password. Click on Advanced options to configure further (see Figure 10.17).
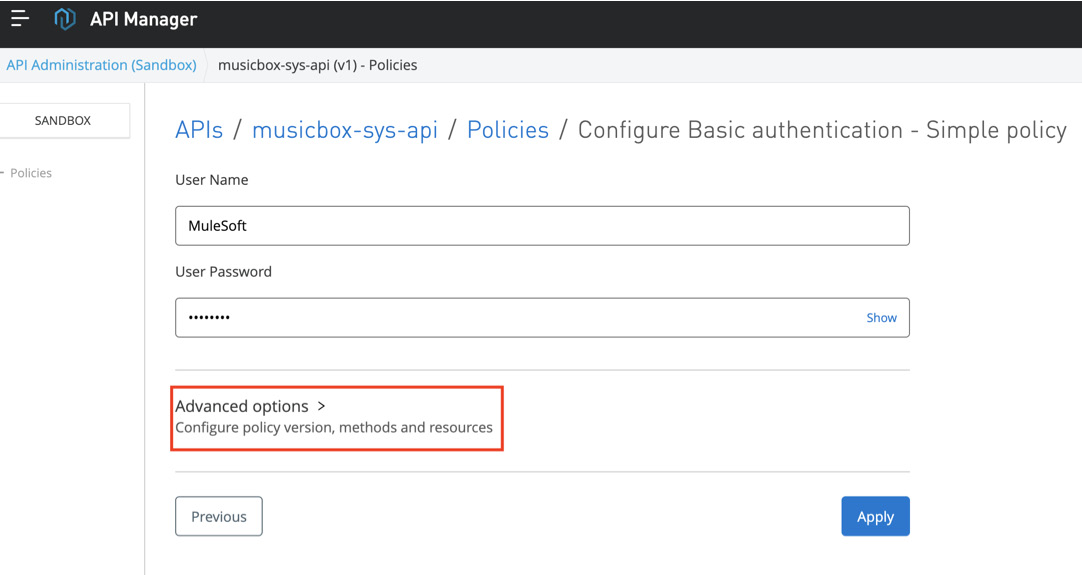
Figure 10.17 – Policy configuration
- In the Advanced options section, select the latest policy version.
You can apply the policies across all the methods and endpoints, or you can choose a particular endpoint over which you wish to apply the policy. Currently, we’re applying it across all the API methods and resources. Once done, click Apply.
Check the configuration in Figure 10.18.

Figure 10.18 – Advanced policy configuration options
You will see that your policy was successfully created (see Figure 10.19).
If you have multiple policies, you can rearrange the order of execution.

Figure 10.19 – The Policies dashboard
- You can go to the application logs in Runtime Manager to check the policy details and logs related to the policy (see Figure 10.20).

Figure 10.20 – Policy details in logs in Runtime Manager
- Go to Postman or any other similar app and try triggering the endpoint on which you’ve applied the policy. You’ll get an authorization error, as shown in Figure 10.21.

Figure 10.21 – A snapshot of Postman depicting an authentication error
- Go to the Authorization tab, select Basic Auth, and add a username and password (as defined in the policy). See Figure 10.22 for reference.
You’ll get a successful response, which means that the credentials have been validated successfully and you’re authenticated.

Figure 10.22 – A snapshot of Postman depicting a successful response
This is a simple demonstration of how we can leverage the security capabilities of MuleSoft by applying policies. We can further extend these capabilities to achieve zero-trust security.
Let’s now learn more about the security capabilities of MuleSoft.
The security capabilities of MuleSoft
MuleSoft has a wide range to offer when it comes to security. In order to leverage the security capabilities of MuleSoft, let’s learn about several security capabilities, starting with Anypoint Enterprise Security.
Anypoint Enterprise Security
In order to achieve enterprise-level security at an application level, you can install the Anypoint Enterprise Security suite. It offers you the following features to secure your Mule apps:
- Mule Secure Token Service (STS) OAuth 2.0 Provider
- Mule Credentials Vault
- Mule Message Encryption Processor
- Mule Digital Signature Processor
- Mule Filter Processor
- Mule CRC32 Processor
You can install Anypoint Enterprise Security on your Anypoint Studio to apply these capabilities.
We have learned about Anypoint Enterprise Security for Mule applications. Let’s now learn about Anypoint Security, dedicated to applications deployed over Runtime Fabric (RTF).
Anypoint Security
Anypoint Security offers a layered security approach in order to protect your APIs. It comprises the following:
- Edge policies: These are similar to the out-of-the-box MuleSoft policies
- Secrets Manager: This provides you with a secure vault to safeguard your security certificates and keystores
- Tokenization service: You can use this service to protect sensitive information like PII details, bank details, and so on
Anypoint Security helps us to secure apps deployed on RTF. Let’s now learn more about Anypoint Flex Gateway, which is a capability from MuleSoft to level up API security.
Anypoint Flex Gateway
MuleSoft offers three types of gateway – namely, a Mule gateway, Anypoint Flex Gateway, and Anypoint Service Mesh. Anypoint Flex Gateway is an ultra-fast gateway for managing the security capabilities of Mule and non-Mule applications.
You can extend the security capabilities of MuleSoft beyond Anypoint Platform with the help of Anypoint Flex Gateway.
You can configure Flex Gateway in one of two ways:
- Connected mode: Use Anypoint Platform as a visual UI to secure, manage, and monitor your APIs.
- Locally: You can configure Flex Gateway on your local machine instead of connecting it to your Anypoint Platform account using YAML configuration files. You might need third-party providers if you want to have a UI to read logs.
In order to get started, you can create a free trial account with Anypoint Platform or you need to have an Anypoint Flex Gateway subscription. You can install Flex Gateway as a Linux service, in a Docker container, or as a Kubernetes Ingress controller. There is a predefined set of instructions that you can find in Runtime Manager that makes the installation and setup of Flex Gateway easy. For more information, see this article: https://developer.mulesoft.com/tutorials-and-howtos/understanding-anypoint-flex-gateway-overview-introduction/.
We have gone through several API security techniques. You can refer to the Assignments, Questions, and Answers sections at the end of this chapter to get more hands-on with API security.
Summary
In this chapter, we’ve learned about the security capabilities of MuleSoft. We have learned about different types of policies in MuleSoft and implemented a basic authentication policy.
We have also studied the API gateway, the security architecture of the API gateway, Enterprise Security, Anypoint Security, and Anypoint Flex Gateway.
In order to make your API network reliable and secure, it’s essential to have a fair understanding of API security. It is also essential to have an understanding of various ways to achieve zero-trust security, which we have learned in this chapter.
In the next chapter, we’ll learn how to test our Mule application and what the different testing tools are. We shall also study what MuleSoft has to offer when it comes to API testing.
Assignments
Apply Header Injection and Message Logging policies on an API instance. Add header values as key = book and value = MuleSoft for Header Injection policy. Log header using Message Logging policy. Verify logs in application logs on Runtime Manager.
Questions
- What is the difference between Rate Limiting and Spike Control?
- What is the purpose of using Anypoint Autodiscovery?
- Which policy can we use to mask sensitive data?
Answers
- Whenever a maximum threshold value is reached, Rate Limiting rejects all further incoming requests, whereas Spike Control controls queues of a request.
- Anypoint Autodiscovery binds an application in Runtime Manager with an API instance in API Manager.
- Tokenization.