
3
Exploring Anypoint Studio
In the previous chapter, we looked at how we can design an API in API Designer. We’ll now look at Anypoint Studio. Anypoint Studio is an Eclipse-based integrated development environment (IDE) tool used to design and develop Mule applications. We can also use this tool to test our applications.
Anypoint Studio enables users to drag and drop connectors and modules to create a Mule application. Many versions of Anypoint Studio are available, and it is recommended to practice in the latest version.
We will see how to download and install Anypoint Studio and what the different views, perspectives, and menu options available in Anypoint Studio are. Once familiar with the tool, we will learn how to create a simple Hello World Mule application and test the application using the Postman application.
After reading this chapter, you’ll come away with an understanding of the following topics:
- What is Anypoint Studio?
- How to download and install Anypoint Studio
- Exploring the Mule Palette
- Getting familiar with various menu options and settings
- Creating and running a sample Mule application
- Exporting and importing the Mule application
- Exploring themes
- Installing software updates in Anypoint Studio
Technical requirements
You will need the following software for this chapter:
- Anypoint Studio: https://mulesoft.com/studio
- Postman application: https://www.postman.com/downloads
- We will use this tool to test the Mule application project.
- The exported JAR file of the first Mule application project, Hello World, is available in the following GitHub location
- https://github.com/PacktPublishing/MuleSoft-for-Salesforce-Developers
Let’s get started by learning how to download and install Anypoint Studio.
Downloading and installing Anypoint Studio
In this section, we will learn how to download and install Anypoint Studio. The first step begins with downloading a software file to the computer, which may take a few minutes as the file size is around 2 GB. Afterward, we will install and launch Studio. Let’s begin with downloading now.
Downloading Anypoint Studio
These steps can be followed for a simple and easy download:
- Go to https://mulesoft.com/studio. Select the operating system (OS), Windows, Linux, or macOS, as per the computer’s OS, and fill in the other required information.
- Now, click Download.
The .zip (Windows/macOS)/.tar.gz (Linux) file of the latest version of Anypoint Studio is downloaded to the computer.
The Anypoint Studio file is bundled with the following components:
- Mule runtime engine
- DataWeave
- MUnit
- MUnit Studio Plugin
- Eclipse
- Maven
- AdoptOpenJDK
Now that we’ve downloaded the file, let’s start the installation. The application can be simply installed by extracting the compressed .zip/.tar .gz file.
Installing Anypoint Studio
In this section, we will see how to install Anypoint Studio on the Windows OS. A similar procedure can be followed while installing it on other OSs, such as macOS and Linux:
- Right-click the downloaded .zip file and click Extract All.
- Provide the path where it needs to be extracted and click Extract. This extracts all the files into the mentioned folder.
Tip
For the Windows OS, do not extract the ZIP file in a large path. Try to place the file directly in C:/ or D:/. This helps avoid the path is too long error.
- Once the extraction of the file is complete, check that all the components are in the installation folder, as shown in Figure 3.1, to confirm that the installation was successful:

Figure 3.1 – Extracting Anypoint Studio for installation
We have extracted the folders to the chosen path. Next, we will see how to launch Anypoint Studio on our computer.
Launching Anypoint Studio
Follow these steps to launch Anypoint Studio:
- Right-click on AnypointStudio.exe and select Open. The Anypoint Studio launcher will pop up.
- Provide the workspace location by browsing the folder path and selecting where to store Mule projects (see Figure 3.2).
- Check the Use this as the default and do not ask again checkbox so that the launcher doesn’t ask for the workspace location the next time you open Anypoint Studio.

Figure 3.2 – Selecting a workspace location
- After launching, we can change the workspace location anytime by selecting the Switch Workspace option under the file menu.
Note
A workspace is a location on your computer where all the work you do through Anypoint Studio is stored as files. It is easier to create one workspace and save it as the default so that the Anypoint Studio remembers the workspace next time.
- Next, click Launch to open the welcome screen of Anypoint Studio.
- Skip the introduction by clicking Continue to Studio. With this, we have launched Anypoint Studio successfully, as you can see in Figure 3.3:

Figure 3.3 – Anypoint Studio: Home
Now that Anypoint Studio is all set, let us explore its various components and try building a Mule project. We will start by getting to know the Mule Palette.
Introducing the Mule Palette
The Mule Palette has modules and connectors that we can use in the flow. We can also download new modules or connectors from Anypoint Exchange, as shown in Figure 3.4. Core, HTTP, and Sockets are default modules in the Palette. Based on the project requirements, we can add modules to the Palette by using the Add Modules option. While developing a project, you can drag and drop the required components from the Mule Palette onto the canvas:

Figure 3.4 – The Mule Palette
An artist palette is a thin board that has a set of colors that enables mixing and painting on canvas. Similarly, the Mule Palette has collections of components that the developer can drag and drop onto the canvas to design or develop the Mule project.
With this, we have learned about the components available in the Mule Palette. Next, let’s move on to learn about the Mule project structure.
Exploring the Mule project structure
Before getting into creating a Mule project, it is important that we get familiar with the Mule project structure. Let us see the project structure of a Mule application in Package Explorer. These are the main folders and files that are important for every Mule project:
- src/main/mule is for Mule configuration files. It is an .xml file that contains application logic where all the flow components reside. We can store n number of Mule configuration files to have different application logic, flows, or APIs and there is no limit enforced by Mule on the number of Mule configuration files. For example, we can store our API interface, API implementation, error handling, and the global configuration in separate Mule configuration files. This folder is for storing all your Mule XML code.
- src/main/resources is for Log4j configuration, any environment-specific properties files, DataWeave scripts, and API-related documents, such as the API specification and sample payload examples.
- src/main/java is for all Java programs.
- src/test/resources is for test files such as JSON, XML, and other formats that are required for testing.
- src/test/munit is for MUnit test cases.
- mule-artifact.json contains the minMuleVersion configuration, which specifies the minimum Mule runtime version that is required to deploy the application.
- pom.xml contains dependencies, shared libraries, repositories, and other project-related information.
Figure 3.5 clearly shows the project structure of a Mule application in which helloworld.xml is the Mule configuration file:

Figure 3.5 – Project structure
Similarly, we can see the other folders, as well as the mule-artifact.json and pom.xml files in the project structure.
Now that we’ve learned how Mule project folders are structured to store different folders and files, let’s explore the different views and perspectives available in Anypoint Studio.
Introducing Mule views and perspectives
The views and perspectives of any IDE can be customized based on the user’s preference. A perspective is nothing but a collection of views. Let’s learn about different views and perspectives.
Views
Views in Anypoint Studio are the graphical representation of project metadata or properties for the active editor window. We can easily maximize, minimize, and remove views from the active window. The following are some of the views in Studio:
- Mule Palette: This manages modules and connectors.
- Mule Properties: This allows you to edit the properties of the module that is currently selected in the canvas.
- Package Explorer: This displays the Mule project folder and files.
- Console: This contains errors and other information about the embedded Mule runtime.
- Problems: This shows a list of issues that occurred in the project.
- Outline: This displays the structure of a Mule flow that is opened in the canvas.
- MUnit: This is a testing framework that helps to test the Mule application:
- MUnit Coverage: This shows how much of a Mule application has been executed
- MUnit Errors: This displays the errors that occurred during MUnit testing
- Mule Debugger: While in debug mode, this displays the Mule event structure, which consists of the payload (message), variables, and attributes.
- Mule Breakpoints: This shows a list of processors that are enabled with a breakpoint.
- Evaluate DataWeave Expression: While in debug mode, we can write any DataWeave expression to evaluate the results. We will be learning about DataWeave in detail in Chapter 6.
- API Console: This shows the generated API documentation.
These are the various views that we can see in the Anypoint Studio window. Each view gives information relevant to the particular view. On the whole, it gives a clear picture of what the user needs to see in the active window based on their preferences.
Perspectives
As mentioned earlier, a perspective is a collection of views and editors. The default perspective of Anypoint Studio is the Design perspective. We can create our own perspective and add any of the views.
The different perspectives already available in the Studio are:
- Mule Design perspective: This is the default perspective and is used while developing the Mule project
- Mule Debug perspective: This is the perspective used while testing the Mule project
- API Design perspective: This is the perspective used while writing the API specification
The user can change the perspective based on their role or activities. For example, a developer might choose the Design perspective, while a tester might choose the Debug perspective to test the application. By doing so, they can work easily with the required views. Now that we have explored the basics of Anypoint Studio, let’s try and build our own Mule application.
Building, running, and testing a Mule application
We have explored various components, views, and perspectives of Anypoint Studio. Now it is time to put all of what we have learned together with a new project. The steps involved in every Mule project are build, run, and test. Let’s elaborate on each step.
Building the Mule application
In this section, let us learn how to create a new Mule project:
- Click the Create a Mule Project option from Package Explorer (see Figure 3.6) to create a new Mule application project, or go to the File menu, click New, and select Mule Project:

Figure 3.6 – Package Explorer
- Provide the project name as HelloWorld and leave the remaining settings as they are, then click the Finish button (see Figure 3.7):

Figure 3.7 – Project Settings
- With this, we have successfully created the HelloWorld project.
- Whenever we create a new project, the HTTP, Sockets, and Core modules automatically get added to the project. We need to add the remaining required modules manually from the Mule Palette to the project. If the required module or connector is not available in the Mule Palette, we can search for it in Exchange and then add it to the project.

Figure 3.8 – Mule application – home
- In Figure 3.8, on the right, we can see the Mule Palette with the default Core, HTTP, and Sockets modules added. At present, the canvas is empty. Once we start building our Mule application, we will be adding components from the Mule Palette to the canvas.
- Next, select HTTP in the Mule Palette and then Listener.
- Drag and drop Listener onto the canvas.
- Select Listener inside the canvas. In the Listener properties, add the connection configuration by pressing the Add symbol, as shown in the following figure:

Figure 3.9 – Mule properties for HTTP Listener
- Leave the host and port (8081) values as the default values and click the OK button on the connector configuration screen (see Figure 3.10):

Figure 3.10 – HTTP connector configuration
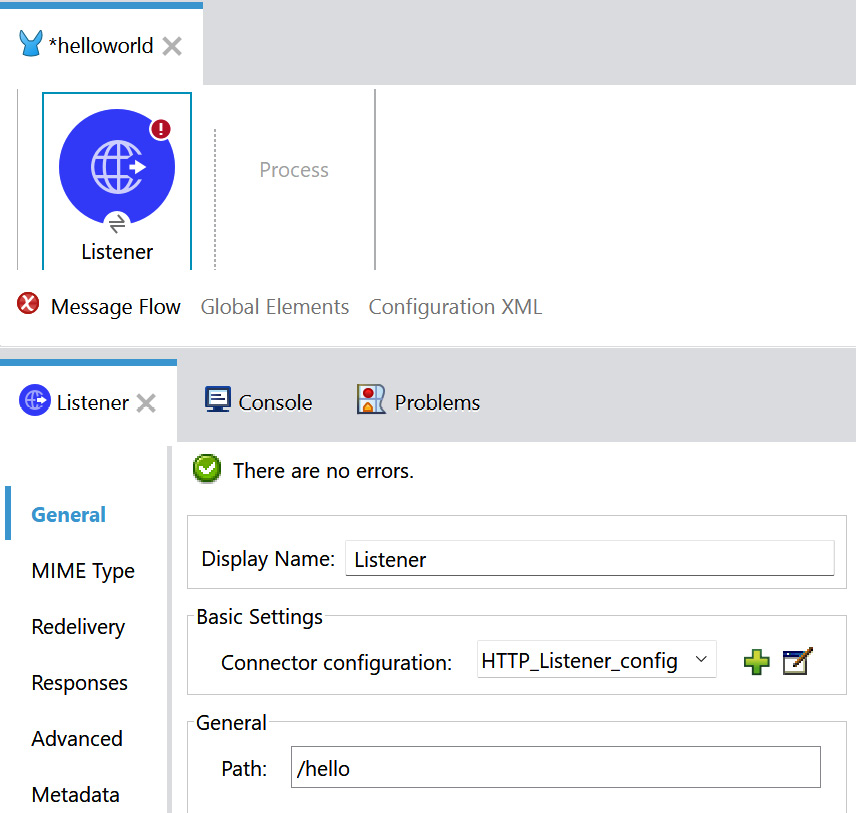
Figure 3.11 – Listener properties configuration
- Next, search for Logger in the Mule Palette (see Figure 3.12). Drag and drop Logger on to the canvas, in the Process section. Logger is a Core component that logs the messages such as error messages, status information, request, response payloads and other important information.

Figure 3.12 – Searching for Logger in the Mule Palette
- After dropping Logger onto the canvas, set the Message value to Welcome to Hello world application in the Logger properties.

Figure 3.13 – Logger properties
- Click on the Core module in the Mule Palette and select the Transform Message option.

Figure 3.14 – Mule Palette: Core module
- Drag and drop the Transform Message selection to the canvas after the Logger step.
- In the output section, change the output to application/json and also change the response as follows:
%dw 2.0
output application/json
---
{
"message" : "Hello World"
}- Transform Message converts the structure from one format to another. In this example, we are converting the output format to JSON.
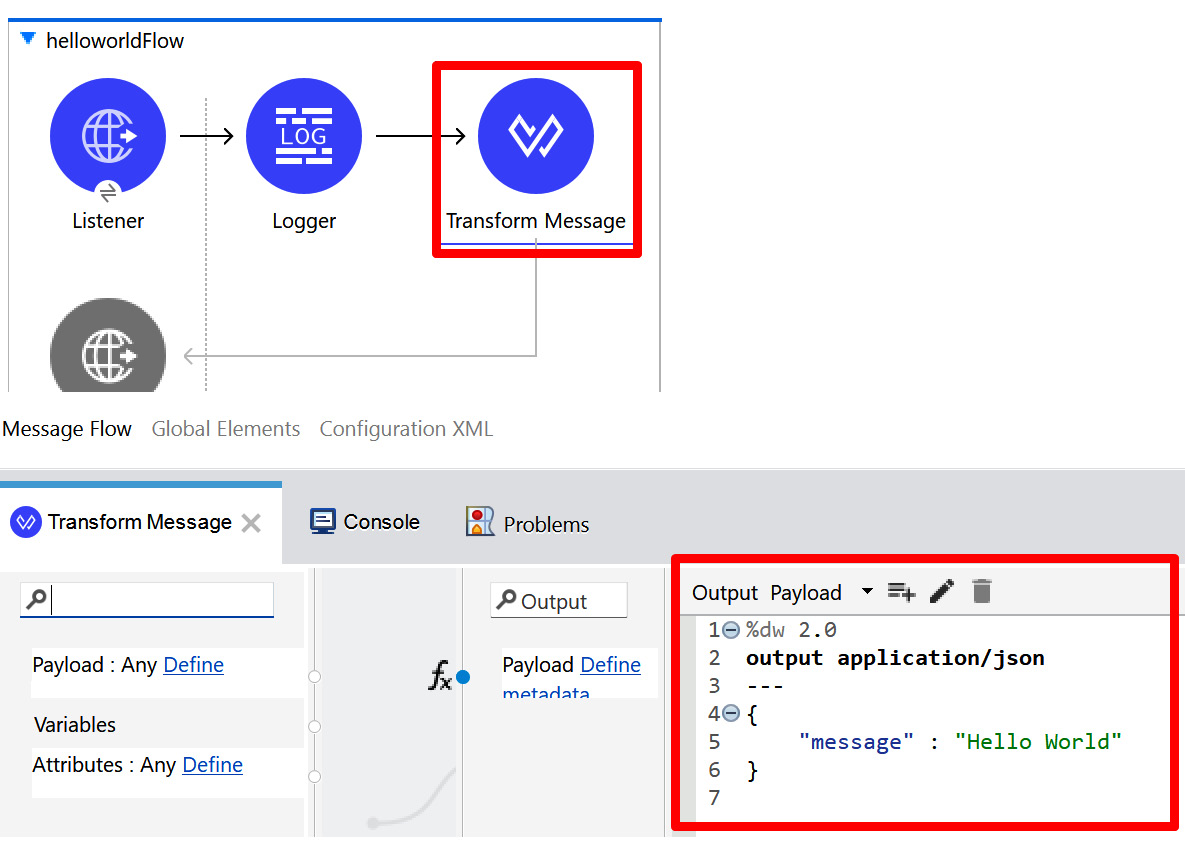
Figure 3.15 – DataWeave code in Transform Message
- Click the File menu -> Click Save button or press Ctrl + S to save the Mule application (see Figure 3.16):

Figure 3.16 – Saving the Mule application
With this, we have created the Mule application successfully. The next step is to run the application, which involves nothing more than deploying the application into Mule runtime.
Running the Mule application
In this section, we will see how to run the Mule application from Anypoint Studio:
- Go to the canvas, right-click on the empty space, and select Run project helloworld.

Figure 3.17 – Running the Mule application
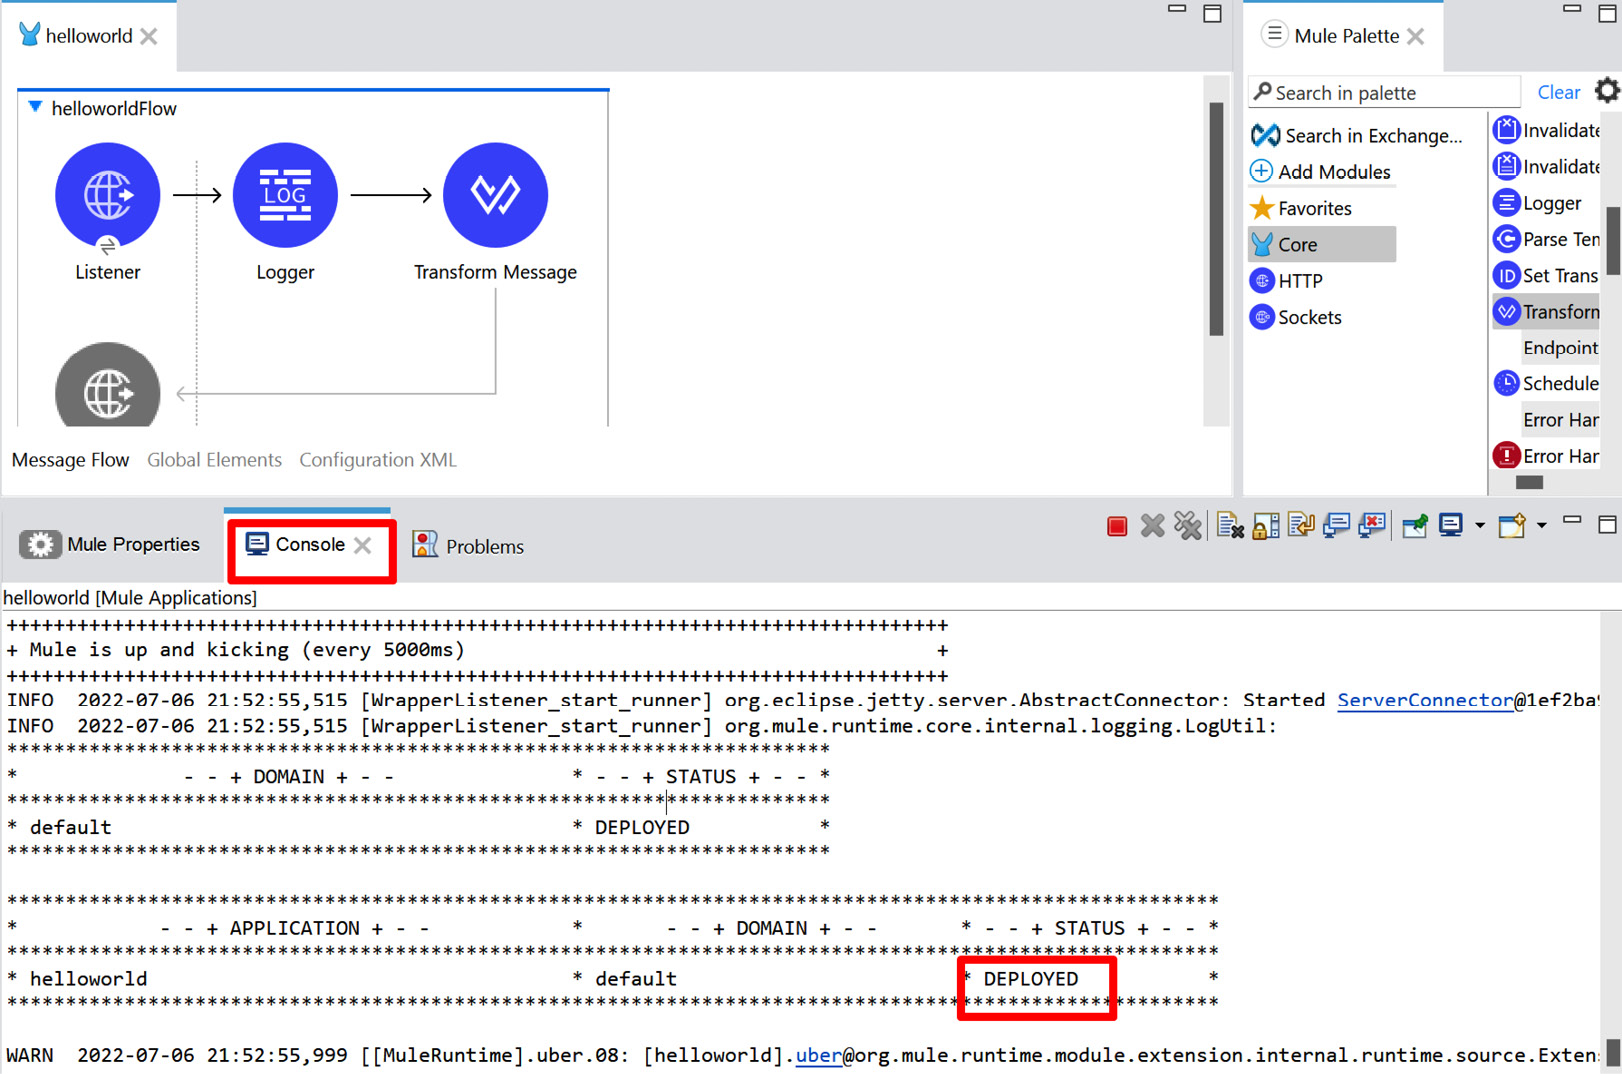
Figure 3.18 – Console view
- Once the application is deployed successfully, we will be able to see the logs showing the status as DEPLOYED in Console view (see Figure 3.18).
- To terminate the project, we can right-click on Console and select the Terminate/Disconnect All option.
- To clear the console log messages, right-click on Console and select the Clear option.
Tip
If the deployed status is FAILED due to (java.net.BindException) or Caused by: java.net.BindException: Address already in use, then try to use different ports, such as 8083, 8084, or any other port available in the system that is not used by any other applications.
Now that we have deployed the application in Anypoint Studio, the next step is to test the application.
Testing the Mule application
In this section, let us see how to test the Mule application using the API/web service testing tool (the Postman application).
Note
Postman is an application used for API/web service testing. It is an HTTP client that tests HTTP requests (GET, POST, and other methods) and receives the response. It is not related to Mule components. If you don’t have a Postman application or any other web service testing tools on your computer, then install the Postman application by referring to the link that is referenced in the Technical requirements section of this chapter.
Once the application is deployed, you can follow these steps:
- Open the Postman application.
- In the URL box, enter http://localhost:8081/hello, provide the method name as GET, and then click Send (see Figure 3.19):

Figure 3.19 – Sending a request from the Postman app
We will receive a successful response with the 200 HTTP status code and the HTTP status description as OK. Also, we will be able to see the response message in JSON format, which we set in the Transform Message step (see Figure 3.20):

Figure 3.20 – HTTP successful response

Figure 3.21 – Logger message in console
As you can see in the preceding figure, Logger has printed the required log message in the console. If the application is deployed into CloudHub, the Logger logs the message in the server log.
Good going! We are done with the very first Mule application project. In this Hello World project, the HTTP listener receives the incoming request, then, in turn, calls the logger to log the message, and finally, returns JSON output using the Transform Message step. Now, you should be confident enough to try other simple Mule projects using other components from the Mule Palette. As we move on, we will next explore how Mule files can be exported and imported.
Exporting and importing Mule files
In the previous example, we developed a new Mule project in Anypoint Studio. If we need to share the project with other developers or deploy this application into CloudHub or another deployment model, then we have to export the project.
We can export the project using the following options:
- Exporting a Mule application as a JAR file
- Exporting a Mule application as a filesystem
Let us look into each of these in detail.
Exporting a Mule application as a JAR file
Let’s try exporting the Mule application as a .jar (Java Archive) file now:
- Select the project in Package Explorer.
- Click on the File menu and then Export.
- Select Anypoint Studio Project to Mule Deployable Archive under Mule and click Next.
- Browse to the file location on your computer and click Finish (see Figure 3.22):

Figure 3.22 – Exporting settings as JAR
- It packages the Mule application as a .jar file and exports the file to a given location. A success message pops up. Click OK.
- We can see the exported .jar file in the location mentioned and the same .jar file can later be used to deploy the application directly into CloudHub.
We can share this .jar file with other developers to import into their Anypoint Studio. We can also use this .jar file to deploy the Mule application into CloudHub.
Now that we have got a clear idea of how to export a Mule application as a .jar file, let’s try exporting it as a filesystem.
Exporting a Mule application as a filesystem
Let’s try exporting a Mule application as a filesystem (as a folder and files) now:
- Select the project in Package Explorer.
- Click on the File menu and then Export.
- Select File System under General and then click Next.
- Browse to the folder location on your computer where the project needs to be exported and then click Finish (see Figure 3.23):

Figure 3.23 – Export settings: Filesystem
The Mule project is exported to the location specified as a filesystem.
By importing the filesystem into Anypoint Studio, it is easy to create a Mule application in Studio. This will be very useful when a user wants to share the Mule project with other users.
Now, let’s see how to import a Mule application from a .jar file.
Importing a Mule application from a JAR file
Let’s try importing a Mule application from a .jar file in Anypoint Studio:
- Click on the File menu and select Import.
- Under Anypoint Studio, select Packaged mule application (.jar) and click the Next button.
- Browse to the .jar file that we want to import into Anypoint Studio. Provide the project name and click Finish (see Figure 3.24):

Figure 3.24 – Importing a Mule project
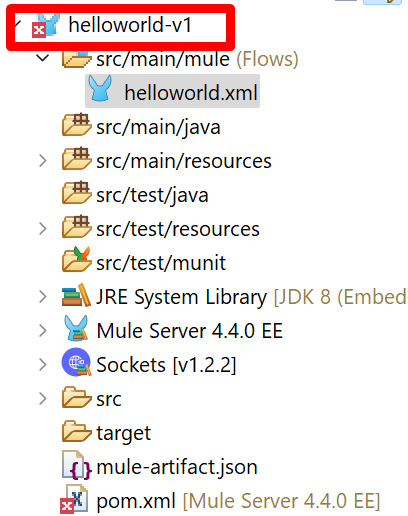
Figure 3.25 – Imported project from Package Explorer
As shown in Figure 3.25, we have imported the .jar file and created our Mule project successfully. Let’s explore another option to import the Mule project.
Importing a Mule application from the filesystem
Let’s try importing a Mule application from the filesystem (as a folder and files) now:
- Click on the File menu and select Import.
- Under Anypoint Studio, select Anypoint Studio project from File System and click Next.
- Browse to the Mule application project from the filesystem that we want to import into Anypoint Studio. Provide the project name and click Finish (see Figure 3.26):

Figure 3.26 – Importing a Mule project
Note
If you don’t uncheck the Copy project into workspace checkbox, shown in the previous screenshot, and you’re using a Git repository, your changes won’t be reflected in the original project folder. Instead, a copy of the project will be created under Anypoint Studio’s current workspace. If you want to continue using the original project folder from your Git repository, then make sure you uncheck this option.
Now, the project is imported into Anypoint Studio (see Figure 3.27):
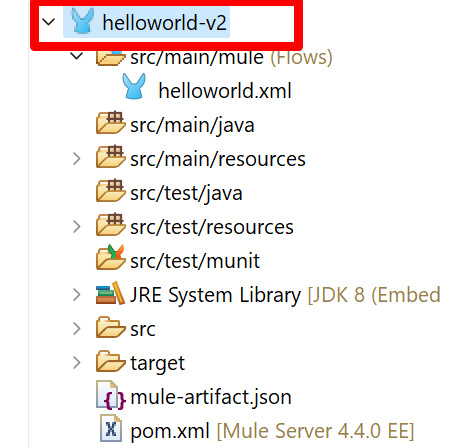
Figure 3.27 – Imported project in Package Explorer
As shown in the preceding figure, we have imported the filesystem and created our Mule project successfully.
With this, we can conclude that we have learned the concept of exporting and importing Mule applications.
We can also change or enhance the appearance of the Anypoint Studio user interface by updating the theme. Let’s move on to learn more about themes.
Updating the theme in Anypoint Studio
Each developer prefers a different user interface. Some may prefer a dark theme, while others like a light theme. The theme sets the mood for the developer to help them focus. For example, a dark theme reduces strain on the eyes and makes it easier to notice the different syntaxes as they come with different colors. The look and feel of Anypoint Studio can be updated based on user preferences. Let’s learn how to change the theme:
- Click on the Window menu and select Preferences.
- Type Theme. Select Appearance under General. In the right pane, choose the desired theme from the dropdown. In this example, let us select Studio Dark Theme. Now, select Apply and Close (see Figure 3.28):

Figure 3.28 – Studio appearance
- The dark theme is applied to Anypoint Studio. A restart is required for the theme change to take full effect.
- If we need to revert the theme to the default theme, again type Theme, then select Appearance under General, choose Studio Light Theme, and select Apply and Close.
With this, we have learned how to customize the IDE experience by changing the theme in Anypoint Studio.
Now that we’re familiar with multiple concepts and the working of Anypoint Studio, it is important to note the importance of updating the software in Anypoint Studio. Let’s see how to do this in the next section.
Installing software updates in Anypoint Studio
Software updates are mandatory for bug fixing, getting new features, and avoiding performance issues. Let’s see how to update the software in Anypoint Studio:
- Click on the Help menu and select Check for Updates.
- Check the available updates and click Next (see Figure 3.29):

Figure 3.29 – Available Updates
- Select the radio button for I accept the terms of the license agreements and click the Finish button (see Figure 3.30):

Figure 3.30 – License agreements
- We will be able to see the update progress at the bottom right of Studio.
- Click the Restart Now button to restart Studio to apply the changes.
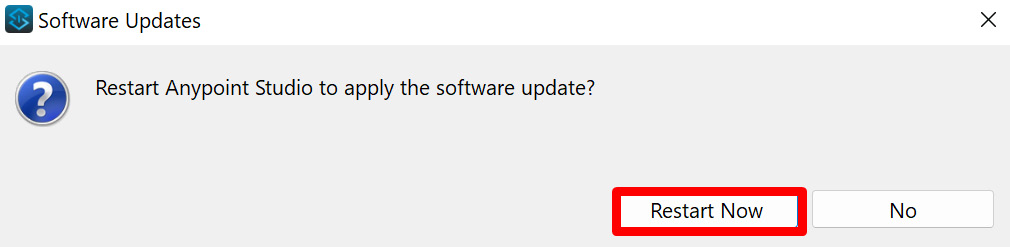
Figure 3.31 – Restart Now
It is always recommended to periodically check for any software updates.
Summary
In this chapter, we explored how to download and install Anypoint Studio. We also had a look into the various views and perspectives, as well as the Mule Palette. We created a Hello World Mule application using the HTTP connector, after which we tried to run it. Finally, we tested it using an external Postman application.
We also learned about exporting and importing a Mule application. This is important when we need to deploy these applications into different deployment models (CloudHub, on-premises, and so on) and also to share them with other developers. We next saw how to update the theme and software version of Anypoint Studio.
On completing this chapter, you have an elaborate enough knowledge of the Anypoint Studio IDE to feel confident in developing your own Mule application.
In the next chapter, we’ll explore Core module components within Anypoint Studio to understand more about flow controls, scope, endpoints, transformers, batch, and error handling.
Questions
Take a moment to answer the following questions to serve as a recap of what you just learned in this chapter:
- What’s the default port for an HTTP listener in a Mule application project?
- Can any other port be used as the HTTP listener port other than the default port?
- Which file has the dependency details of the Mule application?
- In which view can we see the Mule runtime startup logs and other logs logged by the Logger step?
- Why do we use the Postman application?
- Where can we find the modules and connectors in Anypoint Studio?
- List some of the perspectives.
Answers
- 8081.
- Yes. We can use other ports that are not used by any other application in the machine while running an application in Anypoint Studio.
- pom.xml.
- Console view.
- We can use the Postman application to test the web services.
- The Mule Palette.
- Mule Design perspective, Mule Debug perspective, and API Design perspective.