
Chapter 2: Finite State Machines
In this chapter, we'll learn how to implement a Finite State Machine (FSM) in a Unity3D game by studying the simple tank game-mechanic example that comes with this book.
In our game, the player controls a tank. The enemy tanks move around the scene, following four waypoints. Once the player's tank enters the vision range of the enemy tanks, they start chasing it; then, once they are close enough to attack, they'll start shooting at our player's tank.
To control the AI of our enemy tanks, we use an FSM. First, we'll use simple switch statements to implement our tank AI states. Then, we'll use a more complex and engineered FSM framework that will allow us greater flexibility in designing the character's FSM.
The topics we will be covering in this chapter are the following:
- Implementing the player's tank
- Implementing a bullet class
- Setting up waypoints
- Creating the abstract FSM class
- Using a simple FSM for the enemy tank AI
- Using an FSM framework
Technical requirements
For this chapter, you just need Unity3D 2022. You can find the example project described in this chapter in the Chapter 2 folder in the book repository: https://github.com/PacktPublishing/Unity-Artificial-Intelligence-Programming-Fifth-Edition/tree/main/Chapter02.
Implementing the player's tank
Before writing the script for our player's tank, let's look at how we set up the PlayerTank game object. Our Tank object is a simple mesh with the Rigidbody and Box Collider components.
The Tank object is composed of two separate meshes, the Tank and Turret, with Turret being a child of Tank. This structure allows for the independent rotation of the Turret object using the mouse movement and, at the same time, automatically following the Tank body wherever it goes. Then, we create an empty game object for our SpawnPoint transform. We use it as a reference position point when shooting a bullet. Finally, we need to assign the Player tag to our Tank object. Now, let's take a look at the controller class:

Figure 2.1 – Our tank entity
The PlayerTankController class controls the player's tank. We use the W, A, S, and D keys to move and steer the tank and the left mouse button to aim and shoot from the Turret object.
Information
In this book, we assume that you are using a QWERTY keyboard and a two-button mouse, with the left mouse button set as the primary mouse button. If you are using a different keyboard, all you have to do is pretend that you are using a QWERTY keyboard or try to modify the code to adapt it to your keyboard layout. It is pretty easy!
Initializing the Tank object
Let's start creating the PlayerTankController class by setting up the Start function and the Update function in the PlayerTankController.cs file:
using UnityEngine;
using System.Collections;
public class PlayerTankController : MonoBehaviour {
public GameObject Bullet;
public GameObject Turret;
public GameObject bulletSpawnPoint;
public float rotSpeed = 150.0f;
public float turretRotSpeed = 10.0f;
public float maxForwardSpeed = 300.0f;
public float maxBackwardSpeed = -300.0f;
public float shootRate = 0.5f;
private float curSpeed, targetSpeed;
protected float elapsedTime;
void Start() {
}
void Update() {
UpdateWeapon();
We can see in the hierarchy that the PlayerTank game object has one child called Turret, and in turn, the first child of the Turret object is called SpawnPoint. To set up the controller, we need to link (by dragging and dropping) Turret and SpawnPoint into the corresponding fields in the Inspector:

Figure 2.2 – The Player Tank Controller component in the Inspector
Later, after creating the Bullet object, we can assign it to the Bullet variable using the Inspector. Then, finally, the Update function calls the UpdateControl and UpdateWeapon functions. We will discuss the content of these functions in the following section.
Shooting the bullet
The mechanism for shooting the bullet is simple. Whenever the player clicks the left mouse button, we check whether the total elapsed time since the last fire is greater than the weapon's fire rate. If it is, then we create a new Bullet object at the bulletSpawnPoint transform's position. This check prevents the player from shooting a continuous stream of bullets.
For this, we add the following function to the PlayerTankController.cs file:
void UpdateWeapon() {
elapsedTime += Time.deltaTime;
if (Input.GetMouseButtonDown(0)) {
if (elapsedTime >= shootRate) {
//Reset the time
elapsedTime = 0.0f;
//Instantiate the bullet
Instantiate(Bullet,
bulletSpawnPoint.transform.position,
bulletSpawnPoint.transform.rotation);
}
}
}
Now, we can attach this controller script to the PlayerTank object. If we run the game, we should be able to shoot from our tanks. Now, it is time to implement the tank's movement controls.
Controlling the tank
The player can rotate the Turret object using the mouse. This part may be a little bit tricky because it involves raycasting and 3D rotations. We assume that the camera looks down upon the battlefield. Let's add the UpdateControl function to the PlayerTankController.cs file:
void UpdateControl() {
// AIMING WITH THE MOUSE
// Generate a plane that intersects the Transform's
// position with an upwards normal.
Plane playerPlane = new Plane(Vector3.up,
transform.position + new Vector3(0, 0, 0));
// Generate a ray from the cursor position
Ray RayCast =
Camera.main.ScreenPointToRay(Input.mousePosition);
// Determine the point where the cursor ray intersects
// the plane.
float HitDist = 0;
// If the ray is parallel to the plane, Raycast will
// return false.
if (playerPlane.Raycast(RayCast, out HitDist)) {
// Get the point along the ray that hits the
// calculated distance.
Vector3 RayHitPoint = RayCast.GetPoint(HitDist);
Quaternion targetRotation =
Quaternion.LookRotation(RayHitPoint –
transform.position);
Turret.transform.rotation = Quaternion.Slerp(
Turret.transform.rotation, targetRotation,
Time.deltaTime * turretRotSpeed);
}
}
We use raycasting to determine the turning direction by finding the mousePosition coordinates on the battlefield:
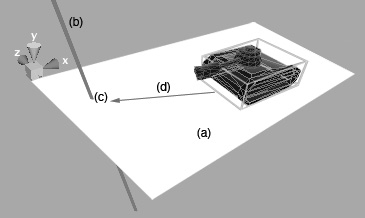
Figure 2.3 – Raycast to aim with the mouse
Information
Raycasting is a tool provided by default in the Unity physics engine. It allows us to find the intersection point between an imaginary line (the ray) and a collider in the scene. Imagine this as a laser pointer: we can fire our laser in a direction and see the point where it hits. However, this is a relatively expensive operation. While, in general, you can confidently handle 100–200 raycasts per frame, their performance is greatly affected by the length of the ray and the number and types of colliders in the scene. So, as a quick tip, try not to use a lot of raycasts with mesh colliders and use layer masks to filter out unnecessary colliders.
This is how it works:
- Set up a plane that intersects with the player tank with an upward normal.
- Shoot a ray from screen space with the mouse position (in the preceding diagram, we assume that we're looking down at the tank).
- Find the point where the ray intersects the plane.
- Finally, find the rotation from the current position to that intersection point.
Then, we check for the key-pressed input and move or rotate the tank accordingly. We add the following code at the end of the UpdateControl function:
if (Input.GetKey(KeyCode.W)) {
targetSpeed = maxForwardSpeed;
} else if (Input.GetKey(KeyCode.S)) {
targetSpeed = maxBackwardSpeed;
} else {
targetSpeed = 0;
}
if (Input.GetKey(KeyCode.A)) {
transform.Rotate(0, -rotSpeed * Time.deltaTime, 0.0f);
} else if (Input.GetKey(KeyCode.D)) {
transform.Rotate(0, rotSpeed * Time.deltaTime, 0.0f);
}
//Determine current speed
curSpeed = Mathf.Lerp(curSpeed, targetSpeed, 7.0f *
transform.Translate(Vector3.forward * Time.deltaTime *
The preceding code represents the classic WASD control scheme. The tank rotates with the A and D keys, and moves forward and backward with W and S.
Information
Depending on your level of Unity expertise, you may wonder what about the Lerp and Time.deltaTime multiplications. It may be worth a slight digression. First, Lerp stands for Linear Interpolation and is a way to transition between two values smoothly. In the preceding code, we use the Lerp function to smoothly spread the velocity changes over multiple frames so that the tank's movement doesn't look like it's accelerating and decelerating instantaneously. The 7.0f value is just a smoothing factor, and you can play with it to find your favorite value (the bigger the value, the greater the tank's acceleration).
Then, we multiply everything by Time.deltaTime. This value represents the time in seconds between now and the last frame, and we use it to make our velocity independent from the frame rate. For more info, refer to https://learn.unity.com/tutorial/delta-time.
Next, it is time to implement the projectiles fired by the player and enemy tanks.
Implementing a Bullet class
Next, we set up our Bullet prefab with two orthogonal planes and a box collider, using a laser-like material and a Particles/Additive-Layer property in the Shader field:

Figure 2.4 – Our Bullet prefab
The code in the Bullet.cs file is as follows:
using UnityEngine;
public class Bullet : MonoBehaviour {
//Explosion Effect
[SerializeField] // Used to expose in the inspector private
// fields!
private GameObject Explosion;
[SerializeField]
private float Speed = 600.0f;
[SerializeField]
private float LifeTime = 3.0f;
public int damage = 50;
void Start() {
Destroy(gameObject, LifeTime);
}
void Update() {
transform.position +=
transform.forward * Speed * Time.deltaTime;
}
void OnCollisionEnter(Collision collision) {
ContactPoint contact = collision.contacts[0];
Instantiate(Explosion, contact.point,
Quaternion.identity);
Destroy(gameObject);
}
}
The Bullet class has three properties: damage, Speed, and Lifetime – the latter so that the bullet is automatically destroyed after a certain amount of time. Note that we use [SerializeField] to show the private fields in the Inspector; by default, in fact, Unity only shows public fields. It is a good practice to set fields that we need to access from other classes as public-only.
As you can see, the Explosion property of the bullet is linked to the ParticleExplosion prefab, which we're not going to discuss in detail. This prefab is in the ParticleEffects folder, so we drop it into the Shader field. Then, when the bullet hits something, we play this particle effect, as described in the OnCollisionEnter method. The ParticleExplosion prefab uses the AutoDestruct script to automatically destroy the Explosion object after a small amount of time:
public class AutoDestruct : MonoBehaviour {
[SerializeField]
private float DestructTime = 2.0f;
void Start() {
Destroy(gameObject, DestructTime);
}
}
The AutoDestruct script is small but convenient. It just destroys the attached object after a certain number of seconds. Many Unity games use a similar script almost every time for many situations.
Now that we have a tank that can fire and move, we can set up a simple patrolling path for the enemy tanks.
Setting up waypoints
By default, the enemy tanks will patrol the game arena. To implement this behavior, we need to specify first the patrolling path. We will explore path following thoroughly in Chapter 6, Path Following and Steering Behaviors. For now, we limit ourselves to a simple waypoints path.
To implement it, we put four Cube game objects at random places. They represent waypoints inside our scene, and therefore, we name each one WanderPoint:

Figure 2.5 – WanderPoint
Here is what our WanderPoint objects look like:

Figure 2.6 – The WanderPoint properties
Note that we need to tag these points with a tag called WanderPoint. Later, we will use this tag when we try to find the waypoints from our tank AI. As you can see in its properties, a waypoint is just a Cube game object with the Mesh Renderer checkbox disabled:
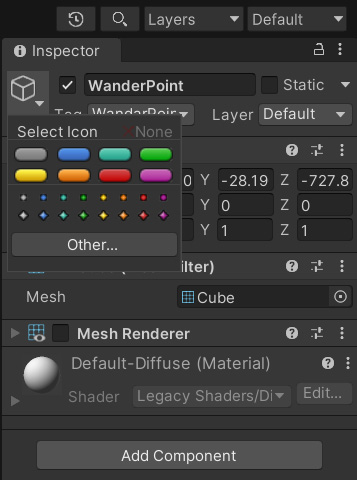
Figure 2.7 – The gizmo selection panel
To show these points in the editor (but not in the game), we use an empty object with a gizmo icon, since all we need from a waypoint is its position and the transformation data. To do that, click the small triangle near the object icon in the Inspector, as shown in Figure 2.7.
We are now ready to give life to the enemy tanks with the power of the FSM.
Creating the abstract FSM class
Next, we implement a generic abstract class to define the enemy tank AI class's methods. This abstract class will be the skeleton of our AI and represent a high-level view of what an enemy tank should do.
We can see the code of this class in the FSM.cs file:
using UnityEngine;
using System.Collections;
public class FSM : MonoBehaviour {
protected virtual void Initialize() { }
protected virtual void FSMUpdate() { }
protected virtual void FSMFixedUpdate() { }
// Use this for initialization
void Start () {
Initialize();
}
// Update is called once per frame
void Update () {
FSMUpdate();
}
void FixedUpdate() {
FSMFixedUpdate();
}
}
The enemy tanks need only to know the position of the player's tank, their next destination point, and the list of waypoints to choose from while they're patrolling. Once the player tank is in range, they rotate their turret object and start shooting from the bullet spawn point at their fire rate.
As we explained before, we will extend this class in two ways: using a simple if-then-else-based FSM (the SimpleFSM class) and a more engineered but more flexible FSM (AdvancedFSM). These two FSM implementations will inherit the FSM abstract class, and they will implement the three abstract methods: Initialize, FSMUpdate, and FSMFixedUpdate.
We will see the two different ways to implement these three methods in the next sections. For now, let's start with the basic implementation.
Using a simple FSM for the enemy tank AI
Let's look at the actual code for our AI tanks. First, let's create a new class, called SimpleFSM, which inherits from our FSM abstract class.
You can find the source code in the SimpleFSM.cs file:
using UnityEngine;
using System.Collections;
public class SimpleFSM : FSM {
public enum FSMState {
None, Patrol, Chase, Attack, Dead,
}
//Current state that the NPC is reaching
public FSMState curState = FSMState.Patrol;
//Speed of the tank
private float curSpeed = 150.0f;
//Tank Rotation Speed
private float curRotSpeed = 2.0f;
//Bullet
public GameObject Bullet;
//Whether the NPC is destroyed or not
private bool bDead = false;
private int health = 100;
// We overwrite the deprecated built-in rigidbody
// variable.
new private Rigidbody rigidbody;
//Player Transform
protected Transform playerTransform;
//Next destination position of the NPC Tank
protected Vector3 destPos;
//List of points for patrolling
protected GameObject[] pointList;
//Bullet shooting rate
protected float shootRate = 3.0f;
protected float elapsedTime = 0.0f;
public float maxFireAimError = 0.001f;
// Status Radius
public float patrollingRadius = 100.0f;
public float attackRadius = 200.0f;
public float playerNearRadius = 300.0f;
//Tank Turret
public Transform turret;
public Transform bulletSpawnPoint;
Here, we declare a few variables. Our tank AI has four different states: Patrol, Chase, Attack, and Dead. We are implementing the FSM that we described as an example in Chapter 1, Introduction to AI:

Figure 2.8 – The enemy tank AI's FSM
In our Initialize method, we set up our AI tank's properties with default values. Then, we store the positions of waypoints in our local variable. We get those waypoints from our scene using the FindGameObjectsWithTag method, trying to find those objects with the WandarPoint tag:
//Initialize the Finite state machine for the NPC tank protected override void Initialize () {
// Get the list of points
pointList =
GameObject.FindGameObjectsWithTag("WandarPoint");
// Set Random destination point first
FindNextPoint();
// Get the target enemy(Player)
GameObject objPlayer =
GameObject.FindGameObjectWithTag("Player");
// Get the rigidbody
rigidbody = GetComponent<Rigidbody>();
playerTransform = objPlayer.transform;
if (!playerTransform) {
print("Player doesn't exist. Please add one with
Tag named 'Player'");
}
}
The Update method that gets called every frame looks like the following:
protected override void FSMUpdate() {
switch (curState) {
case FSMState.Patrol:
UpdatePatrolState();
break;
case FSMState.Chase:
UpdateChaseState();
break;
case FSMState.Attack:
UpdateAttackState();
break;
case FSMState.Dead:
UpdateDeadState();
break;
}
// Update the time
elapsedTime += Time.deltaTime;
// Go to dead state is no health left
if (health <= 0) {
curState = FSMState.Dead;
}
}
We check the current state and then call the appropriate state method. Once the health object has a value of zero or less, we set the tank to the Dead state.
Debugging Private Variables
A public variable in the Inspector is not only useful because we can quickly experiment with different values but also because we can quickly look at a glance at their value when debugging. For this reason, you may even be tempted to make public (or expose to the Inspector) variables that should not be changed by the component's user. Don't worry – there is a solution: you can show the Inspector in Debug mode. In Debug mode, the Inspector also shows private fields. To enable Debug mode, click on the three dots at the top right and then click on Debug:

Figure 2.9 – Unity's Inspector in Debug mode
Now, let's see how to implement each state one by one.
The Patrol state
The Patrol state is the state in which the tank moves from waypoint to waypoint, looking for the player. The Patrol state's code is shown here:
protected void UpdatePatrolState() {
if (Vector3.Distance(transform.position, destPos) <=
patrollingRadius) {
print("Reached to the destination point
calculating the next point");
FindNextPoint();
} else if (Vector3.Distance(transform.position,
playerTransform.position) <= playerNearRadius) {
print("Switch to Chase Position");
curState = FSMState.Chase;
}
// Rotate to the target point
Quaternion targetRotation = Quaternion.LookRotation(
destPos - transform.position);
transform.rotation = Quaternion.Slerp(
transform.rotation, targetRotation,
Time.deltaTime * curRotSpeed);
// Go Forward
transform.Translate(Vector3.forward * Time.deltaTime *
curSpeed);
}
protected void FindNextPoint() {
print("Finding next point");
int rndIndex = Random.Range(0, pointList.Length);
float rndRadius = 10.0f;
Vector3 rndPosition = Vector3.zero;
destPos = pointList[rndIndex].transform.position +
rndPosition;
// Check Range to decide the random point as the same
// as before
if (IsInCurrentRange(destPos)) {
rndPosition = new Vector3(Random.Range(-rndRadius,
rndRadius), 0.0f, Random.Range(-rndRadius,
rndRadius));
destPos = pointList[rndIndex].transform.position +
rndPosition;
}
}
protected bool IsInCurrentRange(Vector3 pos) {
float xPos = Mathf.Abs(pos.x - transform.position.x);
float zPos = Mathf.Abs(pos.z - transform.position.z);
if (xPos <= 50 && zPos <= 50) return true;
return false;
}
While our tank is in the Patrol state, we check whether it has reached the destination point (that is, if the tank is100 units or less from the destination waypoint). If so, it finds the next point to reach using the FindNextPoint method. This method simply chooses a random point from among the waypoints we defined before.
On the other hand, if the tank has not reached its destination point, it checks the distance to the player's tank. If the player's tank is in range (which, in this example, we choose to be 300 units), the AI switches to the Chase state. Finally, we use the remaining code in the UpdatePatrolState function to rotate the tank and move it toward the next waypoint.
The Chase state
In the Chase state, the tank actively tries to get near the player's tank. In simple terms, the destination point becomes the player's tank itself. The Chase state implementation code is shown here:
protected void UpdateChaseState() {
// Set the target position as the player position
destPos = playerTransform.position;
// Check the distance with player tank When
// the distance is near, transition to attack state
float dist = Vector3.Distance(transform.position,
playerTransform.position);
if (dist <= attackRadius) {
curState = FSMState.Attack;
} else if (dist >= playerNearRadius {
curState = FSMState.Patrol;
}
transform.Translate(Vector3.forward * Time.deltaTime *
curSpeed);
}
In this state, we first set the destination point as the player. Then, we continue checking the player's distance from the tank. If the player is close enough, the AI switches to the Attack state. On the other hand, if the player's tank manages to escape and goes too far, the AI goes back to the Patrol state.
The Attack state
The Attack state is precisely what you expect: the enemy tank aims and shoots at the player. The following code block is the implementation code for the Attack state:
protected void UpdateAttackState() {
destPos = playerTransform.position;
Vector3 frontVector = Vector3.forward;
float dist = Vector3.Distance(transform.position,
playerTransform.position);
if (dist >= attackRadius && dist < playerNearRadius {
Quaternion targetRotation =
Quaternion. FromToRotation(destPos –
transform.position);
transform.rotation = Quaternion.Slerp(
transform.rotation, targetRotation,
Time.deltaTime * curRotSpeed);
transform.Translate(Vector3.forward *
Time.deltaTime * curSpeed);
curState = FSMState.Attack;
} else if (dist >= playerNearRadius) {
curState = FSMState.Patrol;
}
// Rotate the turret to the target point
// The rotation is only around the vertical axis of the
// tank.
Quaternion targetRotation = Quaternion.FromToRotation(
frontVector, destPos - transform.position);
turret.rotation = Quaternion.Slerp(turret.rotation,
turretRotation, Time.deltaTime * curRotSpeed);
//Shoot the bullets
if (Mathf.Abs(Quaternion.Dot(turretRotation,
turret.rotation)) > 1.0f - maxFireAimError) {
ShootBullet();
}
}
private void ShootBullet() {
if (elapsedTime >= shootRate) {
Instantiate(Bullet, bulletSpawnPoint.position,
bulletSpawnPoint.rotation);
}
}
In the first line, we still set the destination point to the player's position. After all, even when attacking, we need to keep a close distance from the player. Then, if the player tank is close enough, the AI tank rotates the turret object in the direction of the player tank and then starts shooting. Finally, if the player's tank goes out of range, the tank goes back to the Patrol state.
The Dead state
The Dead state is the final state. Once a tank is in the Dead state, it explodes and gets uninstantiated. The following is the code for the Dead state:
protected void UpdateDeadState() {
// Show the dead animation with some physics effects
if (!bDead) {
bDead = true;
Explode();
}
}
As you can see, the code is straightforward – if the tank has reached the Dead state, we make it explode:
protected void Explode() {
float rndX = Random.Range(10.0f, 30.0f);
float rndZ = Random.Range(10.0f, 30.0f);
for (int i = 0; i < 3; i++) {
rigidbody.AddExplosionForce(10000.0f,
transform.position - new Vector3(rndX,
10.0f, rndZ), 40.0f, 10.0f);
rigidbody.velocity = transform.TransformDirection(
new Vector3(rndX, 20.0f, rndZ));
Destroy(gameObject, 1.5f);
}
Here's a small function that gives a nice explosion effect. We apply a random ExplosionForce function to the tank's Rigidbody component. If everything is correct, you should see the tank flying in the air in a random direction for the player's amusement.
Taking damage
To complete the demo, we need to add another small detail: we need the tanks to take damage when they get hit by a bullet. Every time a bullet enters the collision area of the tank, the health property's value decreases, according to the Bullet object's damage value:
void OnCollisionEnter(Collision collision) {
// Reduce health
if(collision.gameObject.tag == "Bullet") {
health -=collision.gameObject.GetComponent
<Bullet>().damage;
}
}
You can open the SimpleFSM.scene file in Unity; you should see the AI tanks patrolling, chasing, and attacking the player. Our player's tank doesn't take damage from AI tanks yet, so it never gets destroyed. But the AI tanks have the health property and take damage from the player's bullets, so you'll see them explode once their health property reaches zero.
If your demo doesn't work, try playing with different values in the Inspector for the SimpleFSM components. After all, the values may change, depending on the scale of your project:

Figure 2.10 – The AI tanks in action
In this demo, we used a very simple FSM, but now it's time to step up the challenge and implement a complete FSM framework.
Using an FSM framework
The FSM framework we're going to use here is adapted from the Deterministic Finite State Machine framework, based on Chapter 3.1 of Game Programming Gems 1 by Eric Dybsend. We'll only be looking at the differences between this FSM and the one we made earlier. For this reason, it is important that you follow the example code found in the Chapter02 folder of the book repository (https://github.com/PacktPublishing/Unity-Artificial-Intelligence-Programming-Fifth-Edition). In particular, we will look at the AdvancedFSM scene.
In this section, we will study how the framework works and how we can use this to implement our tank AI. AdvancedFSM and FSMState are the two main classes of our framework. So, let's take a look at them first.
The AdvancedFSM class
The AdvancedFSM class manages all the FSMState classes we've implemented and keeps them updated with the transitions and the current state. So, the first thing to do before using our framework is to declare the transitions and states that we plan to implement for our AI tanks.
Let's start by creating AdvancedFSM.cs:
using UnityEngine;
using System.Collections;
using System.Collections.Generic;
public enum Transition {
None = 0, SawPlayer, ReachPlayer, LostPlayer, NoHealth,
}
public enum FSMStateID {
None = 0, Patrolling, Chasing, Attacking, Dead,
}
Here, we define two enumerations, one for the set of states and one for the set of transitions. Then, we add a list object to store the FSMState objects and two local variables to store the current ID of the FSMState class and the current FSMState itself.
The AddFSMState and DeleteState methods add and delete the instances of the FSMState class in our list respectively. When the PerformTransition method gets called, it updates the CurrentState variable with the new state, according to the transition:
public class AdvancedFSM : FSM {
private List<FSMState> fsmStates;
private FSMStateID currentStateID;
public FSMStateID CurrentStateID {
get {
return currentStateID;
}
}
private FSMState currentState;
public FSMState CurrentState {
get {
}
}
Now that the data part of the class is ready, we can proceed with the internal logic of the FSM framework.
The FSMState class
FSMState manages the transitions to other states. It has a dictionary object called map in which we store the key-value pairs of transitions and states. So, for example, the SawPlayer transition maps to the Chasing state, LostPlayer maps to the Patrolling state, and so on.
Let's create an FSMState.cs file:
using UnityEngine;
using System.Collections;
using System.Collections.Generic;
public abstract class FSMState {
protected Dictionary<Transition, FSMStateID> map =
new Dictionary<Transition, FSMStateID>();
// Continue...
The AddTransition and DeleteTransition methods add and delete transitions from their state-transition dictionary map object. The GetOutputState method looks up from the map object and returns the state based on the input transition.
The FSMState class also declares two abstract methods that its child classes need to implement. They are as follows:
...
public abstract void CheckTransitionRules(Transform
player, Transform npc);
public abstract void RunState(Transform player,
Transform npc);
...
The CheckTransitionRules method has to check whether the state should carry out the transition to another state. Instead, the RunState method does the actual execution of the tasks for the currentState variable, such as moving toward a destination point and chasing or attacking the player. Both methods require transformed data from the player and the Non Playable Character (NPC) entity obtained using this class.
The state classes
Unlike the previous SimpleFSM example, we write the states for our tank AI in separate classes that inherit from the FSMState class, such as AttackState, ChaseState, DeadState, and PatrolState. All of them implement the CheckTransitionRules and RunState methods. Let's take a look at the PatrolState class as an example.
The PatrolState class
This class has three methods: a constructor, CheckTransitionRules, and RunState. Let's create the PatrolState class in the PatrolState.cs file:
using UnityEngine;
using System.Collections;
public class PatrolState : FSMState {
private Vector3 destPos;
private Transform[] waypoints;
private float curRotSpeed = 1.0f;
private float curSpeed = 100.0f;
private float playerNearRadius;
private float patrollRadius;
public PatrolState(Transform[] wp, float
playerNearRadius, float patrollRadius) {
waypoints = wp;
stateID = FSMStateID.Patrolling;
this.playerNearRadius = playerNearRadius;
this.patrollRadius = patrollRadius;
}
public override void CheckTransitionRules(
Transform player, Transform npc) {
// Check the distance with player tank
// When the distance is near, transition to chase
// state
if (Vector3.Distance(npc.position, player.position)
<= playerNearRadius) {
Debug.Log("Switch to Chase State");
NPCTankController npcTankController =
npc.GetComponent<NPCTankController>();
if (npcTankController != null) {
npcTankController.SetTransition(
Transition.SawPlayer);
} else {
Debug.LogError("NPCTankController not found
in NPC");
}
}
}
public override void RunState(Transform player,
Transform npc) {
// Find another random patrol point if the current
// point is reached
if (Vector3.Distance(npc.position, destPos) <=
patrollRadius) {
Debug.Log("Reached to the destination point
calculating the next point");
FindNextPoint();
}
// Rotate to the target point
Quaternion targetRotation =
Quaternion.FromToRotation(Vector3.forward,
destPos - npc.position);
npc.rotation = Quaternion.Slerp(npc.rotation,
targetRotation, Time.deltaTime * curRotSpeed);
// Go Forward
npc.Translate(Vector3.forward * Time.deltaTime *
curSpeed);
}
}
The constructor method takes the waypoints array, stores them in a local array, and then initializes properties such as movement and rotation speed. The Reason method checks the distance between itself (the AI tank) and the player tank. If the player tank is in range, it sets the transition ID to the SawPlayer transition using the SetTransition method of the NPCTankController class, which looks as follows:
public void SetTransition(Transition t) {
PerformTransition(t);
}
The preceding function is just a wrapper method that calls the PerformTransition method of the AdvanceFSM class. In turn, that method updates the CurrentState variable with the one responsible for this transition, using the Transition object and the state-transition dictionary map object from the FSMState class. The Act method updates the AI tank's destination point, rotates the tank in that direction, and moves it forward.
Other state classes also follow this template with different reasoning and acting procedures. We've already seen them in our previous simple FSM examples, and therefore, we won't describe them again here. See whether you can figure out how to set up these classes on your own. If you get stuck, the assets that come with this book contain the code for you to look at.
The NPCTankController class
For the tank AI, we set up the states for our NPC by using the NPCTankController class. This class inherits from AdvanceFSM:
private void ConstructFSM() {
PatrolState patrol = new PatrolState(waypoints,
playerNearRadius, patrollingRadius);
patrol.AddTransition(Transition.SawPlayer,
FSMStateID.Chasing);
patrol.AddTransition(Transition.NoHealth,
FSMStateID.Dead);
ChaseState chase = new ChaseState(waypoints);
chase.AddTransition(Transition.LostPlayer,
FSMStateID.Patrolling);
chase.AddTransition(Transition.ReachPlayer,
FSMStateID.Attacking);
chase.AddTransition(Transition.NoHealth,
FSMStateID.Dead);
AttackState attack = new AttackState(waypoints);
attack.AddTransition(Transition.LostPlayer,
FSMStateID.Patrolling);
attack.AddTransition(Transition.SawPlayer,
FSMStateID.Chasing);
attack.AddTransition(Transition.NoHealth,
FSMStateID.Dead);
DeadState dead = new DeadState();
dead.AddTransition(Transition.NoHealth,
FSMStateID.Dead);
AddFSMState(patrol);
AddFSMState(chase);
AddFSMState(attack);
AddFSMState(dead);
}
Here's the beauty of using our FSM framework: since the states are self-managed within their respective classes, our NPCTankController class only needs to call the Reason and Act methods of the currently active state.
This fact eliminates the need to write a long list of the if/else and switch statements. Instead, our states are now nicely packaged in classes of their own, which makes the code more manageable, as the number of states and transitions between them grows more and more in larger projects:
protected override void FSMFixedUpdate() {
CurrentState.Reason(playerTransform, transform);
CurrentState.Act(playerTransform, transform);
}
The main steps to use this framework can be summarized as follows:
- Declare the transitions and states in the AdvanceFSM class.
- Write the state classes inherited from the FSMState class, and then implement the Reason and Act methods.
- Write the custom NPC AI class inherited from AdvanceFSM.
- Create states from the state classes, and then add transition and state pairs using the AddTransition method of the FSMState class.
- Add those states into the state list of the AdvanceFSM class, using the AddFSMState method.
- Call the CurrentState variable's Reason and Act methods in the game update cycle.
You can play around with the AdvancedFSM scene in Unity. It'll run the same way as our previous SimpleFSM example, but the code is now more organized and manageable.
Summary
In this chapter, we learned how to implement state machines in Unity3D based on a simple tank game. We first looked at how to implement FSM by using switch statements. Then, we studied how to use a framework to make AI implementation easier to manage and extend.
In the next chapter, we will look at randomness and probability and see how we can use them to make the outcome of our games more unpredictable.