
Chapter 10: Procedural Content Generation
Game AI is not only used to tell NPCs where to go or what to do. We can also use game AI to create parts of our games, to generate assets or music, to adapt the game story to the player's actions as a movie director, and even to generate narrative arcs and character backstories entirely. In the general AI world, this is the topic of Computational Creativity, a branch of AI concerned with the design of algorithms to enhance human creativity or completely automate tasks requiring human-level creativity.
The scope of computational creativity is broad and cutting edge. It started in 1952 with Alan Turing writing the first algorithm capable of generating love letters. Today, it continues with powerful machine-learning-powered algorithms attempting to write poetry, compose symphonies, or produce astounding visual art pieces.
Luckily for us, in games, we are interested in a more limited subset of this discipline. We are not interested in producing algorithms with human-level creativity (with all the philosophical questions attached to this endeavor). Instead, we only want to write algorithms that can automatically expand the contents of our game, be it by generating thousands of random dungeons, hundreds of new weapons, models of alien flora and animals, or anything else. This is called Procedural Content Generation (PCG), and it is a prominent protagonist of videogame automation.
In this chapter, we will cover the following topics:
- Understanding the basic concept of PCG in video games
- Dipping our toes into PCG by implementing a random generator for the names of Goblin NPCs
- Implementing a simple cave/dungeon generator
Technical requirements
For this chapter, you just need Unity3D 2022. You can find the example project described in this chapter in the Chapter 10 folder in the book's repository: https://github.com/PacktPublishing/Unity-Artificial-Intelligence-Programming-Fifth-Edition/tree/main/Chapter10.
Understanding Procedural Content Generation in games
As discussed in the introduction, we are refering to all the algorithms that can generate game content at runtime with PCG algorithms. A PCG algorithm may create the level design, weapons, graphical assets, musical themes, enemies, NPCs, characters' backstories, and whatever else you set your mind on. If you think about any element in a game, there is a chance that there is at least one game that attempted to generate it procedurally. But why should you?
Nowadays, PCG has become a synonym of random for the general public. Many games advertise having procedurally generated levels as a way of saying that they offer thousands of different levels that change at every playthrough. While PCG may indicate some process of causality, it is worth noting that that's just part of the PCG landscape (even if, probably, the most marketable). More properly, PCG is the opposite of randomness: it is an algorithm that very deterministically starts from a seed and produces some content (but, of course, if we use a random seed, we obtain random outputs).
There are two principal use cases for PCG:
- The first is to use PCG to generate persistent content that is impossible to pre-generate during development. If the content is too big to be stored in a file or manual generation requires too much effort, we may have this necessity. For instance, the original space simulation game Elite (1985) used PCG to store 8 galaxies with a 256-star system each (in addition to the game code) in just 32 KB. With the increase in available disk space, this use case is no longer the biggest. However, it is still possible to find uses. The new version of Elite, called Elite: Dangerous, released in 2014, used the same approach to represent a real-scale copy of the Milky Way with the astounding number of 400 billion fully explorable star systems. Note that there is no randomness involved: the galaxy is persistent, and all the players share it in the game. It would be simply impossible to store the individual data for each star system on disk.
More Info
You can find an inspiring and exciting analysis of the generative algorithm of the original Elite game at this URL: https://www.gamedeveloper.com/design/algorithms-for-an-infinite-universe.
- The second is the most common use case: add variety and replayability to a game by casually generating content at every playthrough. Rogue-like games popularized this PCG use, but the most successful videogame using PCG to forge a different random world at every new run is, without doubt, Minecraft. With PCG, you do not need to craft every level manually or to design hundreds of different levels: you just need to specify the rules and let the software automatically generate a wide variety of levels or weapons.
Now that we understand why, let's explore some different types of PCG algorithms.
Kinds of Procedural Content Generation
During the long history of game development, PCG has been used for a wide variety of tasks. As a result, we can identify six applications of PCG:
- Runtime Content Generation: This is the type of PCG we instinctively think about when we hear PCG. It includes the generation at runtime of the game contents. The creation of random worlds in Minecraft or random maps and weapons in Diablo are typical examples of this category.
- Offline Content Generation: This is the type of PCG we use during development. Even if we do not plan to give the players the ability to explore a randomly generated world, PCG is still useful for designers and developers. For instance, if we create a forest, we can use PCG to create 3D models of trees with different shapes (SpeedTree is a standard tool used for this purpose). We can also use PCG to kickstart the manual design of levels. Suppose we want to design an island. We may start by generating a simple random PCG island, then choose the one that most inspires us, and finally apply manual editing and modeling to it to create the final island we will ship in the final game. There are many other applications of PCG for design tools, but they go way out of the scope of this chapter.
- Player-Mediated Content Generation: These types of PCG algorithms use the players' input as a source of randomness.
- Dynamic Systems: This kind of PCG generates NPCs' behavior and a narrative background by simulating dynamic systems. A notable example is the A-Life system of the game called S.T.A.L.K.E.R.. In the game, the A-Life system simulates the life cycle of thousands of inhabitants of the game world. Consequently, the system provides infinite non-scripted characters to interact with and unlimited side-quests.
But that is enough theory for now. Let's start coding.
Implementing a simple goblin name generator
In the previous section, we explained that the primary purpose of PCG is to provide variety while removing from the developer the burden of scripting such variety by hand. So, imagine that we are developing an old-school RPG, and we want the players to be able to interact with the NPC characters of a goblin encampment.
In the encampment, there are hundreds of goblins, and we really want to avoid coming up with the name and the occupation of every one of them. Not only because it's boring and time-consuming, but if we're going to have random encounters with goblins in the game world, we need to have the ability to create new goblins on the fly.
Fortunately, we have a more fun (for us) solution: to write an algorithm generating a huge number of random goblin characters.
Generating goblin names
In order to generate something, we need to find some kind of generative rule. To find such a rule, the best thing is to look at different examples of what we want to generate and try to figure out if some pattern connects them. For example, for goblin names, we can look for insight in a bunch of goblin names from World of Warcraft.
Let's look at some of them: Grizzle Gearslip, Hobart Grapplehammer, and Helix Blackfuse. Continuing with this list, we may identify a common pattern:
- The names are composed of two or three syllables.
- The syllables have similar sounds, such as Bax, Griz, Hel, Hob, and so on.
- The surname is always composed of the name of an object or an adjective (gear, grapple, black, bolt) followed by a verb.
- The theme of the surnames is usually related to mechanical engineering.
That's enough to get started. We create a new scene, and we create a new script called GoblinNameGenerator, and we paste inside the following code:
class GoblinNameGenerator {
static string[] NameDatabase1 = { "Ba", "Bax", "Dan",
"Fi", "Fix", "Fiz", }; //... and more
static string[] NameDatabase2 = { "b", "ba", "be",
"bi", "d", "da", "de","di", }; // ... and more
static string[] NameDatabase3 = { "ald", "ard", "art",
"az", "azy", "bit","bles", "eek", "eka", "et",
"ex", "ez", "gaz", "geez", "get", "giez",
static string[] SurnameDatabase1 = { "Bolt", "Boom",
"Bot", "Cog", "Copper","Damp", "Dead", "Far", "Fast",
"Fiz", "Fizz", "Fizzle", "Fuse", "Gear",
"Giga", "Gold", "Grapple" }; // ... and more
static string[] SurnameDatabase2 = { "basher", "blade",
"blast", "blaster","bolt", "bomb", "boot", "bottom",
"bub", "button", "buttons", "cash",
"clamp", }; // ... and more
private static string RandomInArray(string[] array) {
return array[Random.Range(0, array.Length)];
}
public static string RandomGoblinName() {
return RandomInArray(NameDatabase1) +
RandomInArray(NameDatabase2) +
RandomInArray(NameDatabase3) + " " +
RandomInArray(SurnameDatabase1) +
RandomInArray(SurnameDatabase2);
}
}
This code straightforwardly converts the rules of goblin names into a procedural algorithm. The NameDatabase1, NameDatabase2, and NameDatabase3 arrays contain the first, middle, and last syllables of the first name. Similarly, SurnameDatabase1 and SurnameDatabase2 have the two parts of a goblin's surname. To generate the name, we chose a random piece from each list, and we put everything together.
Completing the goblin description
Now that we have a name, we need only other small details. So, let's create an empty object and attach to it a new MonoBehavior instance named GoblinWriter.
This new script contains the following code:
using System.Collections;
using System.Collections.Generic;
using UnityEngine;
public class GoblinWriter : MonoBehaviour {
public TMPro.TextMeshProUGUI textMesh;
public List<string> goblinJobs;
public int goblinMaxAge = 200;
void Start() {
UpdateString();
}
void Update() {
if (Input.GetKeyDown(KeyCode.Space)) {
UpdateString();
}
}
void UpdateString() {
string goblinName =
GoblinNameGenerator.RandomGoblinName();
string goblinAge = Random.Range(20,
goblinMaxAge).ToString();
string goblinJob = goblinJobs[Random.Range(0,
goblinJobs.Count)];
textMesh.text = $"{goblinName} is a {goblinAge}
years old goblin {goblinJob}.";
}
}
The script has three exposed properties. The first, textMesh, is a reference to the TextMesh element that will show the text on screen (you can create one by going to GameObject | UI | Text – TextMeshPro). The second, goblinJobs, stores a list of jobs we want to give to the goblins. As you can see in Figure 10.1, I added four jobs: warrior, archer, blacksmith, and shaman. The third, goblinMaxAge, represents the maximum age for my goblins.

Figure 10.1 – The Goblin Writer script in the Inspector
Whenever we call UpdateString (that is, at the start of the game and every time we press Spacebar), we simply extract a value from the set of possible values for the age, the job, and the name, and construct a string. Once we have everything set up, we can run the demo, and we should see a new goblin description every time we press Spacebar (Figure 10.2).
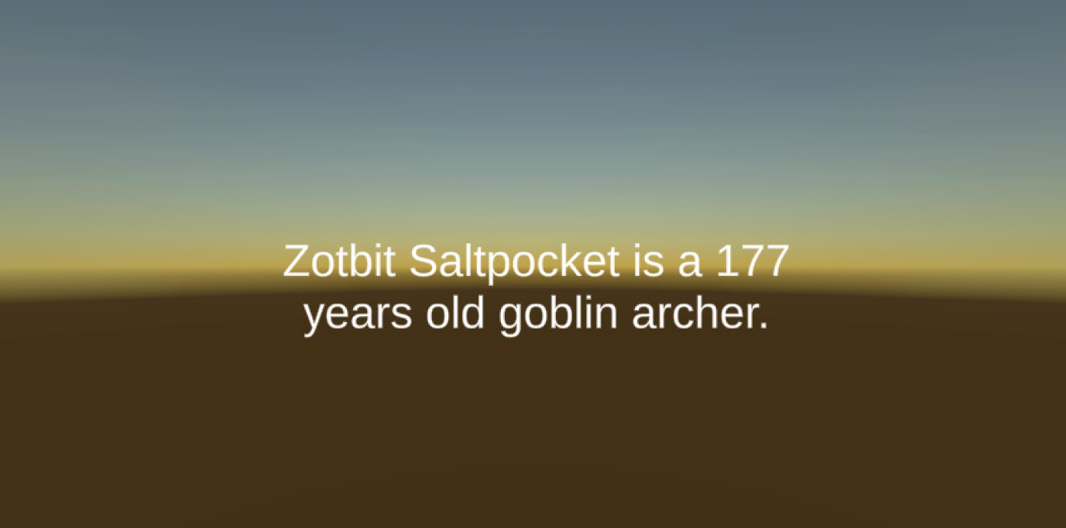
Figure 10.2 – One of the many random goblins we can generate
The example is simple, but it is an effective way to add variety to any game.
Info
The Dungeon Master manual of the fifth edition of Dungeon & Dragons contains several examples of this kind of composition and randomness-driven procedural generation. Inside it, you can find a lot of tables to generate treasures, weapons, side-quests, characters, and so on. Sure, it is designed to be used with pen and dice, but nothing stops you from translating paper algorithms into computer algorithms!
Now that we have a taste for procedural generation, let's step up the game. Let's introduce another handy tool for the PCG developer: Perlin noise.
Learning how to use Perlin noise
Perlin noise is an algorithm to define digital noise developed by Ken Perlin in 1983. It quickly became the de facto algorithm to generate natural-looking patterns in a considerable number of procedural content generation algorithms. For example, Perlin noise is used to create 3D landscapes, 2D textures, procedural animations, and much more.
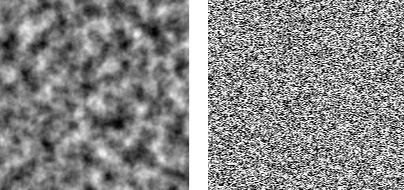
Figure 10.3 – The difference between Perlin noise (left) and white noise (right)
But what makes Perlin noise different from other noises? The short answer is that it looks more natural. This answer, however, just changes the question into what does it mean to be more natural? Let's imagine standard non-Perlin noise, for instance, a sequence of random numbers between 0 and 1. The sequence may be something like 0, 0.9, 0.2, 0.3, 0.95, and so on.
As you can see, the numbers can jump up and down without any criteria. If these numbers represent the position of a character in the game, the character will appear to teleport itself left and right frantically. That is not how things move in real life.
Perlin noise is different because, in the sequence of numbers, two consecutive numbers will always be close together. For example, after 0.9 we may have 0.91, 0.92, or 0.88 but never 0.1. The effect is like a buoy floating on the sea: it can move unpredictably left and right, up and down, but with a certain smoothness – a certain naturalness.
This looks perfect. However, how can we use Perlin noise in Unity? Luckily, Unity offers the Perlin noise algorithm as a built-in tool.
Built-in Unity Perlin noise
Unity offers a simple function to access Perlin noise:
Mathf.PerlinNoise(xCoord, yCoord);
Unity implements Perlin noise as an infinite 2D plane that you can randomly sample in code using the Mathf.PerlinNoise function. You can simply sample a random coordinate to get a random value on the Perlin noise plane.
Info
Note that Unity only offers you 2D Perlin noise. However, Perlin noise can be easily extended to 3D (for instance, to create volumetric smoke) or even four and more dimensions. If you need 3D Perlin noise, you need to develop the algorithm yourself or look for the many open source implementations you can find online (for instance, https://gist.github.com/tntmeijs/6a3b4587ff7d38a6fa63e13f9d0ac46d).
Imagine you want to create a random 2D texture using Unity's built-in Perlin noise. You can do that by starting at an arbitrary point (xStart and yStart) and then copying every surrounding point's value into the texture as you can see in the following example (the full PerlinTexture.cs file is included in the GitHub repository):
void CalculateNoise() {
for (float y = 0.0f; y < noiseTex.height; y++) {
for (float x = 0.0f; x < noiseTex.width; x++) {
float xCoord =
xOrg + x / noiseTex.width * scale;
float yCoord =
yOrg + y / noiseTex.height * scale;
float value =
Mathf.PerlinNoise(xCoord, yCoord);
pix[(int)y * noiseTex.width + (int)x] =
new Color(value, value, value);
}
}
// Copy the pixel data to the texture and load it
// into the GPU.
noiseTex.SetPixels(pix);
noiseTex.Apply();
}
However, we can also use 2D Perlin noise to generate 1D Perlin noise. In that case, we fix one coordinate (x or y) and we move the other in a straight line.
Suppose we want to animate a bobbing sphere, floating gently up and down like a balloon. We can do that by setting its y coordinate (canonically representing the up and down direction) to the value of the Perlin noise:
using UnityEngine;
public class Bobbling : MonoBehaviour {
// Range over which height varies.
public float heightScale = 1.0f;
// Distance covered per second along X axis of Perlin
// plane.
public float xScale = 1.0f;
void Update() {
float height = heightScale *
Mathf.PerlinNoise(Time.time * xScale, 0.0f);
Vector3 pos = transform.position;
pos.y = height;
transform.position = pos;
}
}
If you attach this small script to any object, you will see the object randomly moving up and down.
That's just the tip of the iceberg of Perlin noise application, but I hope that it will get you started. However, it is time for us to continue our journey into PCG. In the next section, we will generate a random cave using a new technique called Cellular Automata.
Generating random maps and caves
Another widespread application of PCG is the generation of maps and dungeons. For example, in the roguelike genre (a type of game that takes its name from the 1980s game Rogue), players face a randomly generated dungeon every time they start a game. Likewise, in Minecraft, players begin the game by generating a random world to explore and in which they need to survive. The examples are numerous – too many to be listed here.
There are significant numbers of algorithms to create game worlds. Some use fractal noise to generate random heightmaps. Some others create dungeon-like structures by creating random rooms and connecting them with corridors. Others build maps by randomly arranging manually premade rooms into a myriad of different combinations like in a puzzle (if you have ever played the tabletop game Carcassonne, you know what I am talking about).
This demo will explore a simple technique well suited for the generation of caves or natural-looking scenes, called Cellular Automata.
Cellular automata
Cellular Automata (CA) is not only a PCG algorithm. CA have been studied since 1950 as an abstract computational model. However, their popularity exploded only after the release of Conway's Game of Life in the 70s.
The basic idea of CA is to simulate the behavior of cells in a 2D grid. Each cell in the grid has two states: dead or alive. Each cell will die or live depending on rules that depend only on their neighbors.
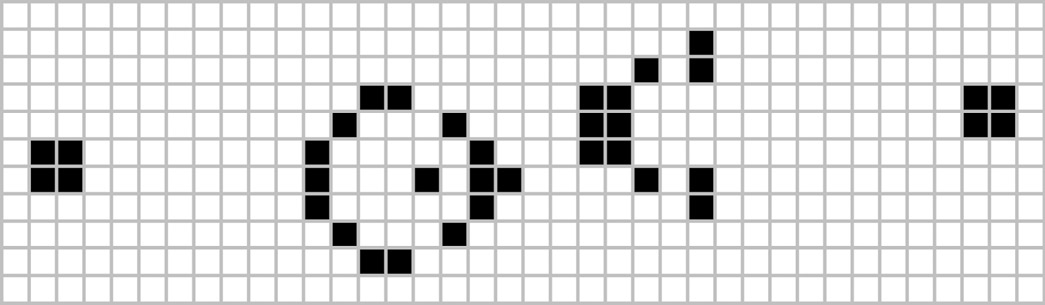
Figure 10.4 – A configuration of cells in the Game of Life
The behavior of a CA algorithm depends only on these evolution rules. So, we start from an initial configuration of alive and dead cells and then let the system evolve independently. In Game of Life, for example, we have four simple rules:
- Live cells with fewer than two live neighbors are underpopulated, and therefore they die.
- Live cells with two or three live neighbors keep living in the next generation.
- Live cells with more than three live neighbors are overpopulated, and therefore they die.
- Dead cells with exactly three live neighbors become alive again due to reproduction.
It turns out that these four simple rules are powerful enough to make the algorithm itself Turing complete. This means that it is possible to write a configuration of live and dead cells that, after applying the above four rules, is able to do any computation like a normal computer, for instance, multiplying numbers or playing chess. If you are interested in this, Paul Rendell has a detailed description of the pattern on his web page (http://rendell-attic.org/gol/tm.htm).
But let's come back to our goal. Luckily for us, we need to do something much more simple than implementing a CPU with our CA. In PCG, CA are an excellent choice because they are easy to implement and generate maps that look like natural environments such as deserts, caves, island archipelagos, and so on.
Implementing a cave generator
To implement our cave generator, we need two components:
- A component that generates and stores the map abstractly (for example, as an array of integers)
- A component that will render the abstract map in a visible 3D object in the game
So, let's start by implementing the first component. We'll call it CaveGenerator:
using UnityEngine;
using System;
public class CaveGenerator : MonoBehaviour {
[SerializeField]
private int width;
[SerializeField]
private int height;
[SerializeField]
private int seed;
private bool useRandomSeed;
private int[,] map;
void Start() {
DrawCaveMesh();
}
void Update() {
if (Input.GetKeyDown(KeyCode.G)) {
CellularAutomata(false);
DrawCaveMesh();
} else if (Input.GetKeyDown(KeyCode.Space)) {
CellularAutomata(true);
DrawCaveMesh();
} else if (Input.GetKeyDown(KeyCode.N)) {
InitializeRandomGrid();
DrawCaveMesh();
}
}
The component exposes four attributes to the Inspector. The first two are simply the weight and height of the map expressed as number of cells. Then we have the seed of the random generator in case we want to create specific maps (this is especially useful for debugging purposes). In general, though, we want a random map every time we start the game; that's why we have a useRandomSeed property: if it is true, we initialize a random seed. Finally, we have a private bidimensional array to store the map representation.
After the properties specification, we need to initialize the Start and Update callbacks. These functions will simply call the other functions that we will define next. In Update, we can also see the keys we use to control the demo: every time we press Spacebar, we run another step of the CA simulation; when we press the N key, we initialize a new map.
When we press the G key, we run a different rule for the CA (more on this when we set up the CA rules).
We'll now implement the InitializeRandomGrid function. This function initializes the map with random dead and alive cells. However, there are two additional tips. First, the function creates a border of walls (alive cells) around the map. This is because maps are usually bounded, and we do not want the players to jump off the map. This border of walls will ensure that the final map will not have caves leading out of the map edges:
void InitializeRandomGrid() {
map = new int[width, height];
if (useRandomSeed) {
seed = (int)DateTime.Now.Ticks;
}
System.Random randomGen =
new System.Random(seed.GetHashCode());
int mapMiddle = (height / 2);
for (int c = 0; c < width; c++) {
for (int r = 0; r < height; r++) {
if (c == 0 || c == width - 1 || r == 0 || r
== height - 1) {
map[c, r] = 1;
if (c == mapMiddle) {
map[c, r] = 0;
} else {
map[c, r] = (randomGen.Next(0, 100)
< 50) ? 1 : 0;
}
}
}
}
}
The second trick is to keep a vertical line of empty spaces (dead cells). That's the purpose of the check on the mapMiddle variable. The motivation for this blank line is simple: it empirically gives better results by generating a main connected cave extending over the entire map. You can remove it to get multiple isolated smaller caves or find a different starting pattern that offers a better outcome according to your tastes and use cases. The InitializeRandomGrid function initializes something like the image in Figure 10.5.

Figure 10.5 – The initial state of the map
Now, we'll look at a small utility function that we use to count the walls around a specific map cell:
int GetSurroundingWallCount(int c, int r, int size) {
int wallCount = 0;
for (int iX = c - size; iX <= c + size; iX ++) {
for (int iY = r - size; iY <= r + size; iY ++)
{
if (iX != c || iY != r) {
wallCount += isWall(iX, iY) ? 1 : 0;
}
}
}
}
bool isWall(int c, int r) {
if (c < 0 || r < 0) {
return true;
}
if (c > width - 1 || r > height - 1) {
return true;
}
return map[c, r] == 1;
}
The first function is straightforward. It looks at the cells around the target coordinates and counts the number of walls. It also takes a size parameter indicating the radius around the target coordinate. If size is equal to 1, we check the eight cells around the target coordinates (imagine a 3x3 square). If size is equal to 2, we also check the neighbors' neighbors (imagine a 5x5 square).
The isWall function is used to check if a specific coordinate represents a wall. You may ask: why don't we just check the value of map at (c,r)? Because we may enter coordinates outside the array (for instance, (-1,-1)). In that case, we assume that every cell outside the map is a wall (and it will remain a wall). This simplifies the logic for GetSurroundingWallCount.
Now it is time to get to the meat – the CA rules:
void CellularAutomata(bool clean = false) {
int[,] newmap = new int[width, height];
for (int c = 0; c < width; c ++) {
for (int r = 0; r < height; r ++) {
int numWalls =
GetSurroundingWallCount(c, r, 1);
int numWalls2 =
GetSurroundingWallCount(c, r, 2);
if (isWall(c,r)) {
if (numWalls > 3) {
newmap[c, r] = 1;
} else {
newmap[c, r] = 0;
}
} else {
if (!clean) {
if (numWalls >= 5 || numWalls2 <=
2) {
newmap[c, r] = 1;
} else {
newmap[c, r] = 0;
}
} else {
if (numWalls >= 5) {
newmap[c, r] = 1;
} else {
newmap[c, r] = 0;
}
}
}
}
}
map = newmap;
}
For the cave generator, we use two sets of rules. The first set (obtained when clean is equal to true) is described as follows:
- If a cell is a wall, it remains a wall as long as it has more than three neighboring walls. Otherwise, it becomes an empty space.
- If a cell is empty, it remains empty as long as it has fewer than five neighboring walls. Otherwise, it becomes a wall.
The second set of rules is identical to the first, but it also checks the neighbors of radius 2. If too many empty spaces surround an empty cell, then it becomes a wall. This optional behavior removes large empty spaces, promoting more narrow passages. However, this can also leave isolated 1x1 walls that look like noise (which is why this set of rules is enabled with the clean parameter equal to false).
By running these rules, we get maps such as the one in Figure 10.6.

Figure 10.6 – A random cave generated by our algorithm
We now have a perfectly working algorithm but no way to show it in the game. For this, we have the DrawCaveMesh function:
void DrawCaveMesh() {
MeshGenerator meshGen =
GetComponent<MeshGenerator>();
meshGen.GenerateMesh(map, 1);
}
This function simply invokes a mesh generator. We will implement MeshGenerator in the next section.
Rendering the generated cave
Given the abstract map representation (the bidimensional array stored in map), we need something that converts it into a mesh rendered on screen. We can do this in multiple ways. To allow flexibility, we start by defining an abstract component:
using UnityEngine;
public abstract class MeshGenerator : MonoBehaviour {
abstract public void GenerateMesh(int[,] map, float
squareSize);
}
This simple abstract class tells Unity that every valid MeshGenerator should contain a GenerateMesh function. This function takes as input the array map and the size of each cell expressed in Unity units.
That's cool, but obviously not very useful right now. We still cannot render anything. Do not worry; we will now implement a simple mesh renderer.
Basic mesh renderer
The idea of this renderer is to spawn a 1x1 cube for each wall cell. We'll call this renderer WallGenerator:
public class WallGenerator : MeshGenerator {
public override void GenerateMesh(int[,] map,
float squareSize) {
foreach (Transform t in transform) {
Destroy(t.gameObject);
}
int width = map.GetLength(0);
int height = map.GetLength(1);
for (int c = 0; c < width; c++) {
for (int r = 0; r < height; r++) {
if (map[c, r] == 1) {
GameObject obj = Instantiate(wallCube,
new Vector3(c * squareSize, 0, r *
squareSize), Quaternion.identity);
obj.transform.parent = transform;
}
}
}
transform.position =
new Vector3(-width / 2.0f, 0, -height / 2.0f);
MergeCubes();
}
First of all, note that this class extends our abstract MeshGenerator class. Second, this component exposes a single parameter called wallCube. This parameter contains a reference to a wall prefab (basically a colored 3D cube).
Then, we implement the GenerateMesh function. The implementation is once again straightforward:
- We destroy all the existing walls (stored as children).
- Then, we iterate over every cell in the abstract map and spawn a wallCube object in the proper location.
- We shift the map by half the size (for visualization purposes).
There is a problem, though. Unity is not suitable for spawning thousands of GameObjects. So, if our map is 200x200, this function will potentially spawn 40,000 GameObjects just for rendering the map. The result will be a pretty slow game (and we are not even spawning characters yet).
Fortunately, there is a quick solution:
private void MergeCubes() {
transform.GetComponent<MeshFilter>().mesh =
new Mesh();
MeshFilter[] meshFilters =
GetComponentsInChildren<MeshFilter>();
CombineInstance[] combine =
new CombineInstance[meshFilters.Length];
int i = 0;
while (i < meshFilters.Length) {
combine[i].mesh = meshFilters[i].sharedMesh;
meshFilters[i].transform.localToWorldMatrix;
meshFilters[i].gameObject.SetActive(false);
i++;
}
transform.GetComponent<MeshFilter>().mesh =
new Mesh();
transform.GetComponent<MeshFilter>()
.mesh.indexFormat =
UnityEngine.Rendering.IndexFormat.UInt32;
transform.GetComponent<MeshFilter>()
.mesh.CombineMeshes(combine, true);
transform.gameObject.SetActive(true);
foreach (Transform t in ransform) {
Destroy(t.gameObject);
}
}
The MergeCubes function takes all the cubic children we just spawned and combines them in a single game object with a single mesh. We do that by leveraging the built-in CombineMeshes tool.
As you can see in the preceding code, we first get all the children (all the individual walls). Then, for each one of them, we create CombineInstance. The only tricky thing to remember is to store the coordinates of the mesh in world coordinates (Unity does that by calling .transform.localToWorldMatrix).
Once we have all the CombineInstance objects, we replace the map's mesh with the mesh obtained by combining all the walls.
Info
Depending on the size of the map, the default mesh IndexFormat may be unable to contain all the vertices of the combined mesh. We can solve this by using 32-bit indexing with transform.GetComponent<MeshFilter>().mesh.indexFormat = UnityEngine.Rendering.IndexFormat.UInt32;.
Finally, we destroy all the children.
Now we can set up the scene. The final outcome is shown in the following screenshot.
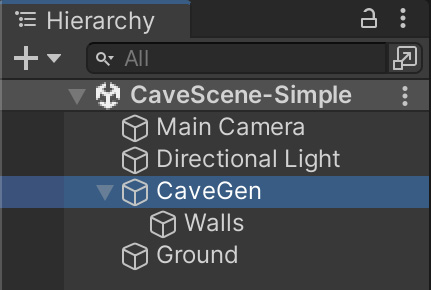
Figure 10.7 – The CaveGen Hierarchy
First, let's create a big plane to use for the ground level, and then an object called CaveGen. The CaveGen object contains a MeshRenderer and a MeshFilter component (but no mesh).
Now attach the CaveGenerator and WallRenderer components to this object and configure them as in the following screenshot.
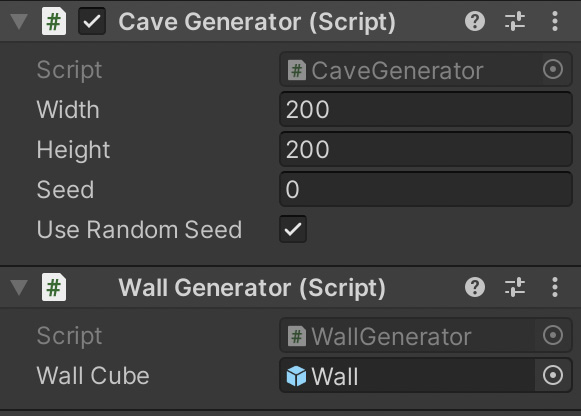
Figure 10.8 – The CaveGenerator and WallGenerator components
The final touch is adding a Wall prefab to Wall Cube. Then, finally, we can click Play, and we should see something similar to Figure 10.9.
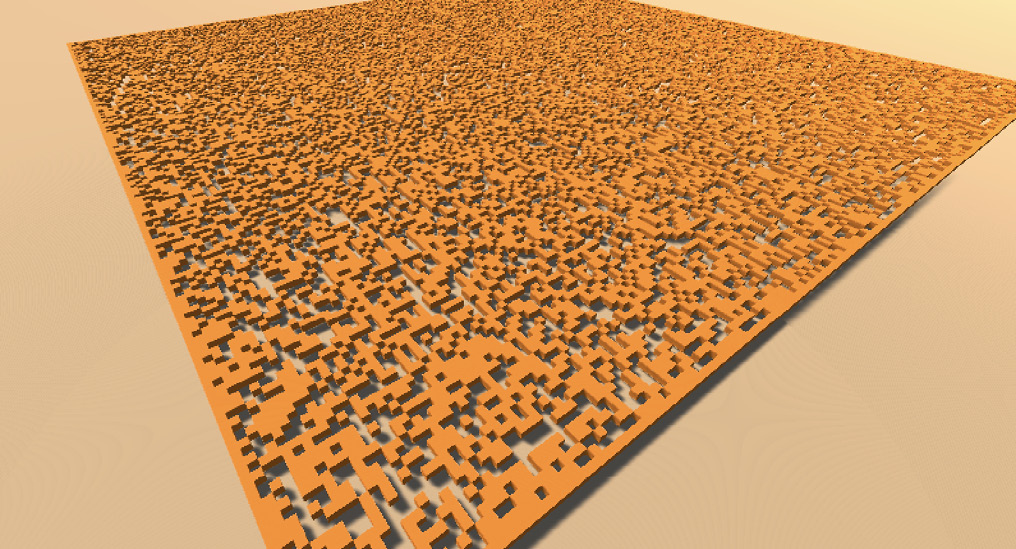
Figure 10.9 – The initial random configuration
We can now continue the map generation by pressing Spacebar (or G if we want to apply the second set of CA rules). After some time, you may note that the map stabilizes into a map like the one in Figure 10.10. At that point, your map is ready (but you can start over by pressing N).
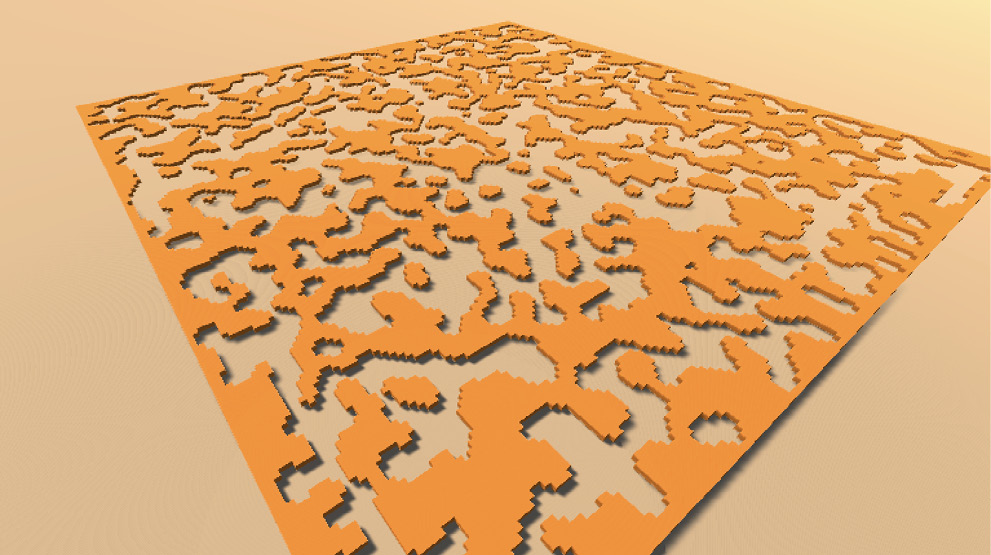
Figure 10.10 – The completely evolved map
Not bad for a PCG algorithm that we wrote in less than 130 lines of code.
Advanced mesh renderer
WallGenerator is quick and effective; however, it is not optimal. The final mesh contains a lot of redundant vertices, and we still have this pixelated look. There are many other different algorithms that we can use to generate a mesh. A standard solution is to use the Marching Squares algorithm (also called Marching Cubes if applied to 3D).
This algorithm is a bit complex, and a detailed discussion would go way beyond the scope of this book. However, in the code of this demo, I've included a MarchingCubesGenerator component for you to use and explore. The algorithm is taken from an official Unity tutorial (https://www.youtube.com/watch?v=yOgIncKp0BE) and I have adapted it for this demo.
To use it, you just need to replace the WallGenerator component with MarchingCubesGenerator. If you now run the game and run the CA for a couple of generations, you should see something like Figure 10.11.

Figure 10.11 – The map rendered using MarchingCubesGenerator
As you can see, we get smoother walls and much fewer vertices (with improved performance). If you like this cave generator and want to explore it in depth, I encourage you to go to the official tutorial by navigating to https://learn.unity.com/tutorial/generating-content.
Summary
In this chapter, we barely scratched the surface of PCG. First, we started with a simple algorithm to create randomized goblin biographies. Then, we unleashed the power of CA to develop an intricate cave system and discovered two techniques to render abstract grids in 3D maps.
However, as I said, this is just the beginning. PCG represents a massive class of algorithms blending the boundary between programming and art. PCG alone is a programming field worth exploring, and this short chapter's goal was to give you just a tiny taste of it.
Now, though, we have no more time for PCG. It is time to move on to machine learning in the next chapter.
Further reading
If you are interested in a deeper exploration of PCG in Unity, Ryan Watkins wrote an entire book on the topic titled Procedural Content Generation for Unity Game Development for Packt.