
Chapter 12: Putting It All Together
Over the previous eleven chapters, we've looked at various AI methods and built some simple demo applications using Unity3D. In this final chapter, we'll develop a more complex game example using some of the techniques we explored in previous chapters. The techniques we'll be using in this chapter include navigation meshes and finite-state machines (FSMs), but, more importantly, we will learn how to navigate and add AI to a pre-existing complex game. So, unlike the other chapters, this example is more like a real-world scenario.
In this chapter, we'll add AI to a simple tank combat game called TANKS! and contained in one of the official Unity tutorials, which, in turn, was inspired by an historic tank game called Combat for the Atari 2600. In the default version, TANKS! is a two-player game. Each player takes control of a tank, and the goal is to destroy each other. To make things more complicated, the player can decide the shot's strength (and, thus, the distance) by pressing and holding the Spacebar for a shorter or longer duration.
However, because we are AI developers, we want to build an AI for the enemy tank to play in single-player mode. So, this is what we'll do in this chapter.
In this chapter, we will cover the following topics:
- Developing the basic game structure
- Adding automated navigation
- Creating decision-making AI with FSM
Technical requirements
For this chapter, you just need Unity3D 2022. You can find the example project described in this chapter in the Chapter 12 folder in the book's GitHub repository: https://github.com/PacktPublishing/Unity-Artificial-Intelligence-Programming-Fifth-Edition/tree/main/Chapter12.
Developing the basic game structure
For this demo, we will write an AI for the free tutorial game TANKS!. You can download the base game from Unity Asset Store (https://assetstore.unity.com/packages/essentials/tutorial-projects/tanks-tutorial-46209), or follow along with the version included in the Chapter 12 folder of this book's GitHub repository. The version included with this book has the advantage of already having been tested for Unity 2022.
In either case, the game is the same. When we start the game, we see a pleasant desert scenario, with rocks, structures, palm trees, and so on. Using the keyboard, we should be able to control the blue tank (the tank moves with W, A, S, and D and shoots with the Spacebar).
The following screenshot shows the basic structure of the game:
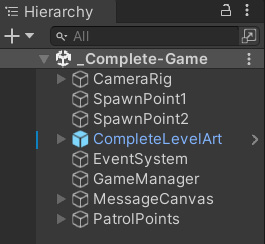
Figure 12.1 – Basic hierarchy of the game
The first time you start with an existing project, spend as much time as you can familiarizing yourself with the game structure, the basic scripts, and the components. You must know how to operate at ease in a project you don't know. To do this, run the game a couple of times, try minor modifications to the code to see the effect, and add debug messages to learn about the flow in which information moves around the game. The following image will give you an idea of how the game will look when we run it:

Figure 12.2 – The TANKS! game in action
Info
It may be helpful to follow the complete Unity tutorial, available at https://unity3d.com/learn/tutorials/s/tanks-tutorial. Even if it does not involve AI and is quite old (the tutorial has been recorded in 2015), you will still find many important teachings for game development, such as how to design a game manager, basic controls, and audio.
Adding automated navigation
The first step is to modify the level to support automated navigation. In the original game, the players control all the moving objects (the tanks), so pathfinding is unnecessary. Now that we want to add AI, we need to have a world representation through which the AI can move. Luckily, this process is straightforward, thanks to NavMeshes.
Creating the NavMesh
To do this, perform the following steps:
- Open the Navigation window (Window | AI | Navigation) and look at the NavMesh generation parameters. In this case, NavMesh generation is relatively easy: we are only interested in moving around on the ground surface plane, so there are no jumps, no links, and no slopes we need to care of.
- The only adjustment to the default NavMesh parameters we need to make is for the baking agent size (that is, the measures of the virtual agent used by Unity to verify whether a location is large enough to allow the Agent to pass).
- The tanks used in the game are about three units large, so we need to instruct the generator to remove the areas that are too small for the tank to pass through. The following screenshot shows the baking setting for the navigation mesh:

Figure 12.3 – The NavMesh baking options
Just to be on the safe side, we use an Agent Radius value of 1.8 and reduce the Max Slope value to about 20 (after all, we are not interested in slopes: the game is completely flat).
- After that, press Bake. You should get a nice NavMesh, as in the following screenshot:

Figure 12.4 – The baked NavMesh in the map
- We now want to add some patrolling points that the AI tank can follow. To do this, we create an empty GameObject; feel free to create as many other GameObject instances as you like.
- Then, we create a PatrolPoint tag, and tag all the patrol points with it.

Figure 12.5 – The patrol points labeled PPoint in the Editor view
Now that we have a world representation and a set of points that we can use to wander around, we need to create an AI-controlled agent.
Setting up the Agent
Unfortunately, the game does not support AI, so we need to add the Agent ourselves. To do this, perform the following steps:
- We have to identify the player tank. There is no tank in the scene, as you can see from the game hierarchy. As you should know from your preliminary exploration, it is the job of GameManager to spawn the tanks. The tank model we'll use is a prefab called CompleteTank.
- Let's copy the prefab and call it CompleteTankAI.
- Then we need to add the Nav Mesh Agent component to it so that we can move it around on the new NavMesh.
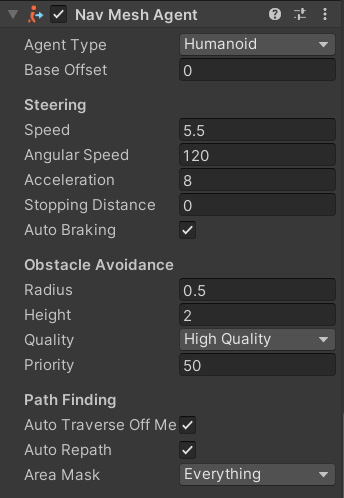
Figure 12.6 – The Inspector for the Nav Mesh Agent component
But this is not enough. First, we'll reuse the TankShooting script from the TANKS! demo, so we need to disable shooting if this script is attached to an AI (otherwise, the player could shoot for the AI agent).
- For this, we create a public Boolean variable, called m_IsAI. Note that for this demo, we are using the variable naming convention of the original tutorial. This is to not confuse people working from the Asset Store. Moreover, it is always wise to adopt the coding convention of an existing project without imposing our preferences on the entire code base. Anyway, let's add the following lines to the Update script:
private void Update () {
if (m_IsAI) {
return;
}
…
These lines just stop the Update script for the AI agent, thereby disabling player input for AI characters. It is important to enable this variable in the AI tank prefab. We also need to add another patch; in fact, if we disable the input, we will also disable the shot strength.
- So, we need to add this back into the Fire function:
// We need to make Fire public.
public void Fire (){
// Set the fired flag so only Fire is only called
// once.
m_Fired = true;
// Create an instance of the shell and store a
// reference to its rigidbody.
Rigidbody shellInstance = Instantiate (m_Shell,
m_FireTransform.position,
m_FireTransform.rotation) as Rigidbody;
// New lines: if AI, we shoot with average force.
if (m_IsAI) {
m_CurrentLaunchForce =
m_MaxLaunchForce / 2.0f;
}
// Set the shell's velocity to the launch force in
// the fire position's forward direction.
shellInstance.velocity =
m_CurrentLaunchForce * m_FireTransform.forward;
// Change the clip to the firing clip and play it.
m_ShootingAudio.clip = m_FireClip;
m_ShootingAudio.Play ();
// Reset the launch force. This is a precaution in
// case of missing button events.
m_CurrentLaunchForce = m_MinLaunchForce;
}
We are replacing the variable shooting force with a constant shooting force for simplicity.
Info
As an exercise, you could make m_CurrentLaunchForce a parameter of the Fire() functions. We also make the Fire() function public: in fact, we need to call this function from the FSM that we'll implement later.
Finally, we can remove the TankMovement component from the Tank AI prefab. Now it is time to update the GameManager script to enable player versus computer mode.
Fixing the GameManager script
As a final step, we need to instruct the GameManager script to spawn a player tank and an AI tank:
- Open the GameManager script and add a new public variable in which we'll store the new AI tank prefab:
// Reference to the prefab the players will control.
public GameObject m_TankPrefab;
// Reference to the prefab the AI will control.
public GameObject m_TankAIPrefab;
- Then, modify the SpawnAllTanks function in this way:
private void SpawnAllTanks(){
// Spaw the Player
m_Tanks[0].m_Instance = Instantiate(m_TankPrefab,
m_Tanks[0].m_SpawnPoint.position,
m_Tanks[0].m_SpawnPoint.rotation);
m_Tanks[0].m_PlayerNumber = 01;
m_Tanks[0].Setup();
// Spawn the AI Tanks
for (int i = 1; i < m_Tanks.Length; i++) {
m_Tanks[i].m_Instance =
Instantiate(m_TankAIPrefab,
m_Tanks[i].m_SpawnPoint.position,
m_Tanks[i].m_SpawnPoint.rotation);
m_Tanks[i].m_PlayerNumber = i + 1;
m_Tanks[i].Setup();
}
}
Now that this game is a single-player game, we assume that the first tank is always the player (we spawn the m_TankPrefab model), and any other tank is AI-controlled (we spawn the m_TankAIPrefab model).
- Finally, just add the prefab to the Inspector as follows. Remember to enable the m_IsAI variable in the CompleteTankAI prefab and change its layer from Player to AI.
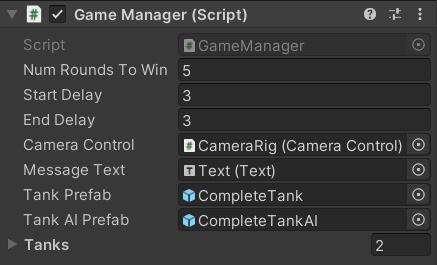
Figure 12.7 – The Game Manager script in the inspector
Now that we have set up the basics, it is finally time to write the AI of the enemy tanks.
Creating decision-making AI with FSM
In Chapter 2, Finite State Machines, we saw how to implement a simple FSM. In this section, we are using the same technique, but will apply it to the more complex scenario of this demo.
First, we need an FSM plan. We are interested only in connecting the FSM to the existing game for this demo, so we will keep it simple. The FSM for our tank is composed of just two states – patrolling and shooting.
The plan is nice and straightforward:
- The AI tank starts in the Patrol state and wanders around the previously defined patrolling points.
- Then, if the players get in range, the tank switches to the Attack state.
- In the Attack state, the tank turns toward the player and starts shooting at it.
- Finally, if we are in the Attack state and the players leave the AI's range, the tank will return to the Patrol state.

Figure 12.8 – The simple FSM for the enemy tanks
For the implementation, perform the following steps:
- Let's start with the FSM class:
using UnityEngine;
using System.Collections;
public class FSM : Complete.TankMovement {
// Next destination position of the NPC Tank
protected Vector3 destPos;
// List of points for patrolling
protected GameObject[] pointList;
protected virtual void Initialize() { }
protected virtual void FSMUpdate() { }
protected virtual void FSMFixedUpdate() { }
// Use this for initialization
void Start() {
Initialize();
}
// Update is called once per frame
void Update() {
FSMUpdate();
}
void FixedUpdate() {
FSMFixedUpdate();
}
}
As you can see, this class extends the Complete.TankMovement script. In this way, we can reuse the existing TankMovement code for things such as the engine sounds and other cosmetic aspects.
As explained in Chapter 2, Finite State Machines, the FSM class stores the data we need for the decision-making AI. Moreover, it contains the functions that the actual Tank Controller can override for the Update, FixedUpdate, and Start methods. In the FSM class, we want to store all the patrol points and the destination point (the current patrol points the tank is looking for).
- Now it is time for the complete controller. We create a new AITankController script with the following initial content:
using UnityEngine;
using System;
using UnityEngine.AI;
public class AITankController : FSM {
public Complete.TankShooting tankShooter;
public Complete.TankHealth tankHealth;
public float playerChaseRadius = 15.0f;
public float platerAttackRadius = 10.0f;
public float shootRate = 3.0f;
public float targetReachedRadius = 5.0f;
private bool isDead = false;
private float elapsedTime = 0.0f;
private GameObject player = null;
private NavMeshAgent navMeshAgent;
public enum FSMState {
None, Patrol, Attack, Dead,
}
// Current state that the NPC is reaching
public FSMState curState;
…
In the preceding code, the class starts by extending FSM and defining the states. As you can see in the FSMState enum, we have Patrol and Attack, an empty state (None), and a final state (Dead). Then we add some class attributes to store the data we need.
The first two attributes are references to the TankShooter and TankHealth scripts in the tank. We will use them to check the health and to fire bullets. Then we have an isDead Boolean to stop FSM execution. Then we have elapsedTime and shootRate for controlling how rapidly the tank will shoot, followed by two private attributes that store a reference to the player (if in range) and a reference to NavMeshAgent. Lastly, we have a variable holding the current state in the FSM.
- The Initialize function is used to initialize, of course, the FSM:
//Initialize the Finite state machine for the NPC tank
protected override void Initialize() {
navMeshAgent = GetComponent<NavMeshAgent>();
// Get the list of points
pointList = GameObject.FindGameObjectsWithTag(
"PatrolPoint");
int rndIndex = UnityEngine.Random.Range(0,
pointList.Length);
destPos =
pointList[rndIndex].transform.position;
}
In this function, we do three things:
- We get the reference to NavMeshAgent.
- We get a list of all PatrolPoint in the scene
- We randomly select one of the patrol points as the Agent's current destination.
- Then it is time for the Update function. Before this, however, we need to expose the tanks' current health. Let's add the following line to the TankHealth component:
// ...
private AudioSource m_ExplosionAudio
private ParticleSystem m_ExplosionParticles
private float m_CurrentHealth;
public float CurrentHealth { get; }
// ...
We add the CurrentHealth property so that we can get read-only public access to the private member, m_CurrentHealth.
- We are now ready to implement the FSM's FSMUpdate method:
protected override void FSMUpdate() {
switch (curState) {
case FSMState.Patrol:
UpdatePatrolState();
break;
case FSMState.Attack:
UpdateAttackState();
break;
case FSMState.Dead:
UpdateDeadState();
break;
}
elapsedTime += Time.deltaTime;
// Go to dead state is no health left
if (tankHealth.CurrentHealth <= 0) {
curState = FSMState.Dead;
}
}
As we explained previously, the main task of the Update function is to invoke the proper function depending on the current state. In addition to that, FSMUpdate also updates the elapsedTime timer and sets the Agent to the Dead state if the tank has no health.
- The Dead state is very simple: the tank does nothing, and writes on the console that it is dead:
private void UpdateDeadState() {
if (!isDead) {
Debug.Log("Dead");
}
}
- The Attack state is more interesting:
private void UpdateAttackState() {
Collider[] players = Physics.OverlapSphere(
Transform.position, playerChaseRadius,
LayerMask.GetMask("Players"));
if (players.Length == 0) {
curState = FSMState.Patrol;
player = null;
navMeshAgent.enabled = true;
return;
}
player = players[0].gameObject;
Vector3 _direction =
(player.transform.position –
transform.position).normalized;
Quaternion _lookRotation =
Quaternion.LookRotation(_direction);
transform.rotation =
Quaternion.Slerp(transform.rotation,
_lookRotation, Time.deltaTime * 3);
if (elapsedTime > shootRate) {
tankShooter.Fire();
elapsedTime = 0;
}
}
In the first part of the preceding code, we cast a sphere using Unity's physics engine to see all the players in a radius of 15 units. Then, if there is none (meaning that the player is out of range), we switch to the Patrol state, remove the player reference, enable the NavMeshAgent component, and terminate the state. Otherwise, we proceed with the attack: we get the player reference, rotate the tank in its direction, and shoot (at the correct rate).
Luckily, the original game already implemented the Fire function! That's why good class design is essential: if a class is functional, you can reutilize it very well, even for things that you didn't initially consider!
- Finally, we have the Patrol state function:
private void UpdatePatrolState() {
Collider[] players = Physics.OverlapSphere(
transform.position, playerAttackRadius,
LayerMask.GetMask("Players")"));
if (players.Length > 0) {
curState = FSMState.Attack;
player = players[0].gameObject;
navMeshAgent.enabled = false;
return;
}
if (IsInCurrentRange(destPos)) {
int rndIndex = UnityEngine.Random.Range(0,
pointList.Length);
destPos =
pointList[rndIndex].transform.position;
}
navMeshAgent.destination = destPos;
}
If no player is in range, then we proceed to wander around. First, we check whether we have reached the current destination. If so, we need to select a new destination. Then, we set up the patrol point as the destination of the navMeshAgent component (as described in Chapter 8, Navigation Mesh).
- The IsInCurrentRange function is just a simple comparison, as shown in the following code:
protected bool IsInCurrentRange(Vector3 pos) {
float xPos =
Mathf.Abs(pos.x - transform.position.x);
float zPos =
Mathf.Abs(pos.z - transform.position.z);
if (xPos <= targetReachedRadius && zPos <=
targetReachedRadius ) return true;
return false;
}
- That's it. Add the AITankController script to the CompleteAITank prefab and connect all the required elements. You can see how the AITankController component should look in the following screenshot:
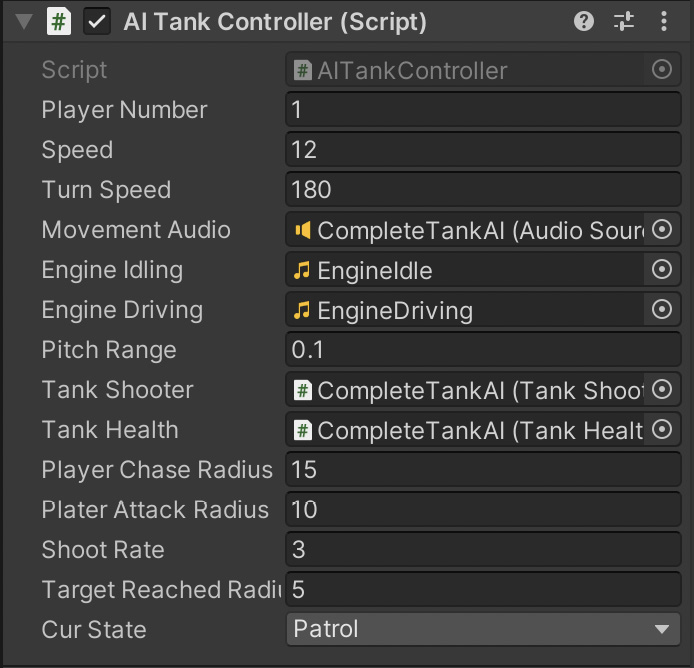
Figure 12.9 – The AI Tank Controller script in the Inspector
Remember also to set the prefab's layer to AI.

Figure 12.10 – The Layer configuration for the CompleteTankAI prefab
At this point, everything is in place. So run the game and enjoy your simple tank moving around, shooting at you.
Summary
In this chapter, we applied some of the AI techniques that we learned previously to our simple tanks combat game. Then, of course, we'd be able to use some more techniques in a larger game scope. Still, in this short chapter, we reused the simple FSM framework that we built in Chapter 2, Finite State Machines, as well as Unity's built-in navigation meshes capabilities.
This example project is a perfect starting point for exploring the AI techniques introduced in this book. You can implement many more improvements to the AI of this demo, and I encourage you to play with it a bit more. There are several pieces of low-hanging fruit, so here are my suggestions:
As a first exercise, you can increase the number of states, for instance, by adding a Chasing state in which the tank will actively look for the player. This structure is like the Attack state, but with a bigger radius. Then, as a more significant step, try to replace the FSM with a Behavior tree. The Behavior tree that we implemented in the Behavior tree demo is incredibly apt for this scenario. Finally, you need to change the script to call the correct function for the tank game, but it is an excellent exercise.
We hope that you learned something new in areas related to AI in games and Unity3D. We just scratched the surface of gameplay AI programming, but if you have reached the end of this book, you are suited for any challenge you may encounter in the future. Good luck, and have fun!