
9
Utilizing Other Advanced Features
The previous chapters have already showcased several essential core features of the FastAPI framework. However, there are features not truly inherent to the framework that can help fine-tune performance and patch missing links in our implementations. These include session handling, managing Cross-Origin Resource Sharing (CORS)-related issues, and selecting the appropriate rendition types for an application.
Aside from the built-in features, there are workaround solutions proven to work with FastAPI when applied to the application, such as its session handling mechanism, which can function well using a JWT, and SessionMiddleware. Concerning middleware, this chapter will also explore ways of customizing request and response filters other than applying the @app.middleware decorator. Other issues such as using custom APIRoute and Request will be covered in this chapter to guide us on managing incoming byte body, form, or JSON data. Moreover, this chapter will highlight how to test FastAPI components using the pytest framework and the fastapi.testclient library and how we can document the endpoint using the OpenAPI 3.x specification.
Overall, the main objective of this chapter is to provide us with other solutions that can help us complete our microservice applications. In this chapter, the following topics are included:
- Applying session management
- Managing the CORS mechanism
- Customizing APIRoute and Request
- Choosing appropriate responses
- Applying the OpenAPI 3.x specification
- Testing the API endpoints
Technical requirements
Although not data analysis-related, our application prototype for this chapter is the online restaurant review system, which will gather ordinal and nominal ratings and feedback for restaurants. The software aims to gather rates and feedback to establish the user profiles of restaurants and conduct surveys concerning their food menus, facilities, ambiance, and services. The prototype will use MongoDB as the data storage and asynchronous ODMantic as its ORM. All of the code is uploaded to https://github.com/PacktPublishing/Building-Python-Microservices-with-FastAPI under the ch09 project.
Applying session management
Session management is a feature used for managing requests and responses created by a user’s access to an application. It is also about creating and sharing data across a user session. Many frameworks usually include session handling features in their security plugins but not FastAPI. Creating user sessions and storing session data are two separate programming concerns in FastAPI. We use a JWT to establish a user session and Starlette’s SessionMiddleware to create and retrieve session data. Creating user sessions and storing session data are two entirely different programming solutions in FastAPI. We use JWT to establish a user session and Starlette’s SessionMiddleware to create and retrieve session data.
Creating user sessions
We have already proven the importance of JWT when it comes to securing FastAPI microservice applications in Chapter 7, Securing the REST APIs. However, here, the JWT is applied to create a session based on user credentials. In the api/login.py router, an authenticate() API service is implemented to create a user session for an authenticated user. It is inherent for FastAPI to generate user sessions utilizing the browser cookies. The following snippet shows the authentication process that uses the cookie values:
from util.auth_session import secret_key
from jose import jwt
@router.post("/login/authenticate")
async def authenticate(username:str, password: str,
   response: Response, engine=Depends(create_db_engine)):
    repo:LoginRepository = LoginRepository(engine)
    login = await repo.get_login_username(username,
                       password)
    if login == None:
            raise HTTPException(
                status_code=status.HTTP_403_FORBIDDEN,
                detail="Invalid authentication"
            )
    token = jwt.encode({"sub": username}, secret_key)
    response.set_cookie("session", token)
    return {"username": username}
The service will verify through LoginRepository whether the user is a valid account using its username and password credentials. If the user is a certified one, it will use a JWT to create a token derived from a certain secret_key generated using the following command:
openssl rand -hex 32
The token key will serve as the session ID of the cookie-based session. With the username credential as its payload, the JWT will be stored as a browser cookie named session.
To ensure that session has been applied, all subsequent requests must undergo authentication by the cookie-based session through the APIKeyCookie class, an API class of the fastapi.security module that implements cookie-based authentication. The APIKeyCookie class fetches the session before it is injected into a dependable function for the JWT decoding through the secret_key value used to generate the session ID. The following dependable function in util/auth_session.py will verify every access to each endpoint of the application:
from fastapi.security import APIKeyCookie
from jose import jwt
cookie_sec = APIKeyCookie(name="session")
secret_key = "pdCFmblRt4HWKNpWkl52Jnq3emH3zzg4b80f+4AFVC8="
async def get_current_user(session: str =
   Depends(cookie_sec), engine=Depends(create_db_engine)):
    try:
        payload = jwt.decode(session, secret_key)
        repo:LoginRepository = LoginRepository(engine)
        login = await repo.validate_login(
                    payload["sub"])
        if login == None:
            raise HTTPException(
                status_code=status.HTTP_403_FORBIDDEN,
                detail="Invalid authentication"
            )
        else:
            return login
    except Exception:
        raise HTTPException(
            status_code=status.HTTP_403_FORBIDDEN,
            detail="Invalid authentication"
        )
The preceding function is injected into every API endpoint to impose user session verification. When an endpoint is requested, this function will decode the token and extract the username credential for account validation. Then, it will issue Status Code 403 (Forbidden) if the user is an unauthenticated one or the session is not valid. An example of an authenticated service can be found in the following implementation:
from util.auth_session import get_current_user
@router.post("/restaurant/add")
async def add_restaurant(req:RestaurantReq,
         engine=Depends(create_db_engine),
         user: str = Depends(get_current_user)):
    restaurant_dict = req.dict(exclude_unset=True)
    restaurant_json = dumps(restaurant_dict,
              default=json_datetime_serializer)
    repo:RestaurantRepository =
             RestaurantRepository(engine)
    result = await repo.insert_restaurant(
               loads(restaurant_json))
    if result == True:
        return req
    else:
        return JSONResponse(content={"message":
         "insert login unsuccessful"}, status_code=500)
The add_restaurant() service is an endpoint that adds a restaurant Document to the MongoDB collection. But before the transaction proceeds, it checks first whether there is a cookie-based session through the injected get_current_user() dependable function.
Managing session data
Unfortunately, adding and retrieving session data is not part of APIKeyCookie-based session authentication. The JWT payload must only include the username but not all credentials and body of data. To manage session data, we need to create a separate session using Starlette’s SessionMiddleware. Although FastAPI has its fastapi.middleware module, it still supports Starlette’s built-in middleware.
We mentioned middleware in Chapter 2, Exploring the Core Features, and showed its implementation using the @app.middleware decorator. And we have proven that it acts as a filter for all incoming requests and outgoing responses to the services. This time, we will not custom implement a middleware but built-in middleware classes.
Middleware is implemented, configured, and activated in the main.py module where the instance of FastAPI is located because APIRouter cannot add middleware. We enable the middleware parameter of the FastAPI constructor and add to that List-type parameter the built-in SessionMiddleware with its secret_key and the name of the new session as constructor parameters using the injectable class, Middleware. The following code snippet of main.py shows you how to configure this:
from starlette.middleware.sessions import SessionMiddleware
app = FastAPI(middleware=[
        Middleware(SessionMiddleware,
        secret_key=
            '7UzGQS7woBazLUtVQJG39ywOP7J7lkPkB0UmDhMgBR8=',
        session_cookie="session_vars")])
Another way of adding middleware is to utilize the add_middleware() function of the FastAPI decorator. Initially, adding SessionMiddleware will create another cookie-based session that will handle session-scoped data. It is the only way since there is no direct support from FastAPI regarding session handling mechanisms where a user session is created not only for security but also for handling session objects.
To add session data to our newly created session, session_vars, we need to inject Request into each endpoint service and utilize its session dictionary to store the session-scoped objects. The following list_restaurants() service retrieves the list of restaurants from the database, extracts all the restaurant names, and shares the list of names across the session through request.session[]:
@router.get("/restaurant/list/all")
async def list_restaurants(request: Request,
       engine=Depends(create_db_engine),
       user: str = Depends(get_current_user)):
    repo:RestaurantRepository =
             RestaurantRepository(engine)
    result = await repo.get_all_restaurant()
    resto_names = [resto.name for resto in result]
    request.session['resto_names'] = resto_names
    return result
@router.get("/restaurant/list/names")
async def list_restaurant_names(request: Request,
           user: str = Depends(get_current_user)):
    resto_names = request.session['resto_names']
    return resto_names
On the other hand, the list_restaurant_names() service retrieves the resto_names session data through request.session[] and returns it as its response. By the way, it is due to SessionMiddleware that session[] exists. Otherwise, the use of this dictionary will raise an change to - exception.
Removing the sessions
It is always mandatory to log out from the application when done with the transactions to remove all the sessions created. Since the easiest and most direct way of creating sessions is through browser cookies, removing all the sessions protects the application from any compromise. The following /ch09/logout endpoint removes our sessions, session and session_vars, which technically logs out the user from the application:
@router.get("/logout")
async def logout(response: Response,
            user: str = Depends(get_current_user)):
    response.delete_cookie("session")
    response.delete_cookie("session_vars")
    return {"ok": True}
The delete_cookie() method of the Response class removes any existing browser session utilized by the application.
Customizing BaseHTTPMiddleware
The default approach in managing FastAPI sessions is through cookies, and it does not offer any other options such as database-backed, cached, and file-based sessions. The best way to implement non-cookie-based strategies for managing user sessions and session data is to customize BaseHTTPMiddleware. The following custom middleware is a prototype that creates user sessions for authenticated users:
from repository.login import LoginRepository
from repository.session import DbSessionRepository
from starlette.middleware.base import BaseHTTPMiddleware
from datetime import date, datetime
import re
from odmantic import AIOEngine
from motor.motor_asyncio import AsyncIOMotorClient
class SessionDbMiddleware(BaseHTTPMiddleware):
    def __init__(self, app, sess_key: str,
                    sess_name:str, expiry:str):
        super().__init__(app)
        self.sess_key = sess_key
        self.sess_name = sess_name
        self.expiry = expiry
        self.client_od =
         AsyncIOMotorClient(f"mongodb://localhost:27017/")
        self.engine =
         AIOEngine(motor_client=self.client_od,
            database="orrs")

    async def dispatch(self, request: Request, call_next):
        try:
            if re.search(r'authenticate',
                    request.url.path):
                credentials = request.query_params
                username = credentials['username']
                password = credentials['password']
                repo_login:LoginRepository =
                      LoginRepository(self.engine)
                repo_session:DbSessionRepository =
                      DbSessionRepository(self.engine)

                login = await repo_login.
                  get_login_credentials(username, password)

                if login == None:
                    self.client_od.close()
                    return JSONResponse(status_code=403)
                else:
                    token = jwt.encode({"sub": username},
                        self.sess_key)
                    sess_record = dict()
                    sess_record['session_key'] =
                        self.sess_key
                    sess_record['session_name'] =
                        self.sess_name
                    sess_record['token'] = token
                    sess_record['expiry_date'] =
                       datetime.strptime(self.expiry,
                            '%Y-%m-%d')
                    await repo_session.
                        insert_session(sess_record)
                    self.client_od.close()
                    response = await call_next(request)
                    return response
            else:
                response = await call_next(request)
                return response
        except Exception as e :
            return JSONResponse(status_code=403)
As discussed in Chapter 2, Exploring the Core Features, middleware is a low-level implementation of a filter for all requests and responses of the applications. So, first, SessionDbMiddleware will filter our /ch09/login/authenticate endpoint for the username and password query parameters, check whether the user is a registered one, and generate a database-backed session from the JWT. Afterward, endpoints can validate all their requests from the session stored in the database. The /ch09/logout endpoint will not include the deletion of the session from the database using its repository transactions, as shown in the following code:
@router.get("/logout")
async def logout(response: Response,
       engine=Depends(create_db_engine),
       user: str = Depends(get_current_user)):
    repo_session:DbSessionRepository =
             DbSessionRepository(engine)
    await repo_session.delete_session("session_db")
    return {"ok": True}
Note that DbSessionRepository is a custom repository implementation for our prototype, and it has a delete_session() method that will remove the session through its name from the db_session collection of our MongoDB database.
Another type of middleware that can help FastAPI applications resolve issues regarding the CORS browser mechanism is CORSMiddleware.
Managing the CORS mechanism
When integrating API endpoints with various frontend frameworks, we often encounter the "no ‘access-control-allow-origin’ header present" error from our browser. Nowadays, this setup is an HTTP-header-based mechanism of any browser, which requires the backend server to provide the browser with the "origin" details of the server-side application, which includes the server domain, scheme, and port. This mechanism is called CORS, which happens when the frontend application and its web resources belong to a different domain area than the backend app. Nowadays, browsers prohibit cross-origin requests between the server-side and frontend applications for security reasons.
To resolve this issue, we need our main.py module to place all the origins of our application and other integrated resources used by the prototype inside a List. Then, we import the built-in CORSMiddleware from the fastapi.middleware.cors module and add that to the FastAPI constructor with the list of origins, which should not be too long to avoid overhead from validating each URL. The following code snippet shows the injection of CORSMiddleware into the FastAPI constructor:
origins = [
    "https://192.168.10.2",
    "http://192.168.10.2",
    "https://localhost:8080",
    "http://localhost:8080"
]
app = FastAPI(middleware=[
           Middleware(SessionMiddleware, secret_key=
            '7UzGQS7woBazLUtVQJG39ywOP7J7lkPkB0UmDhMgBR8=',
               session_cookie="session_vars"),
           Middleware(SessionDbMiddleware, sess_key=
            '7UzGQS7woBazLUtVQJG39ywOP7J7lkPkB0UmDhMgBR8=',
              sess_name='session_db', expiry='2020-10-10')
            ])
app.add_middleware(CORSMiddleware, max_age=3600,
     allow_origins=origins, allow_credentials=True,
     allow_methods= ["POST", "GET", "DELETE",
       "PATCH", "PUT"], allow_headers=[
            "Access-Control-Allow-Origin",
            "Access-Control-Allow-Credentials",
            "Access-Control-Allow-Headers",
            "Access-Control-Max-Age"])
This time, we used FastAPI’s add_middleware() function to add CORS support to our application. Aside from allow_origins, we also need to add into CORSMiddleware the allow_credentials parameter, which adds Access-Control-Allow-Credentials: true to the response header for the browser to recognize the domain origin matches and send an Authorization cookie to allow the request. Also, we must include the allow_headers parameter, which registers a list of acceptable header keys during browser interaction. Aside from Accept, Accept-Language, Content-Language, and Content-Type, which are included by default, we need to register Access-Control-Allow-Origin, Access-Control-Allow-Credentials, Access-Control-Allow-Headers, and Access-Control-Max-Age explicitly instead of using the asterisk (*). The allow_headers parameter must also be part of the middleware to specify other HTTP methods that need to be supported by the browser. And lastly, the max_age parameter must also be in the configuration because we need to tell the browser the amount of time it will cache all the resources loaded into the browser.
If the application needs additional CORS support features, customizing the CORSMiddleware to extend some built-in utilities and features to manage CORS is a better solution.
By the way, it is not only the middleware that we can subclass and use to create custom implementations of but also the Request data and API routes.
Customizing APIRoute and Request
Middleware can process incoming Request data and outgoing Response objects of all API methods in a FastAPI application, except that it cannot manipulate the message body, attach state objects from the Request data, or modify the response object before the client consumes it. Only APIRoute and Request customization can give us a full grasp of how to control the request and response transaction. The control might include determining whether the incoming data is a byte body, form, or JSON and providing an effective logging mechanism, exception handling, content transformation, and extraction.
Managing body, form, or JSON data
Unlike in middleware, customizing APIRoute does not apply to all the API endpoints. Implementing APIRoute for some APIRouter will only impose new routing rules to those affected endpoints, while the other services can pursue the default request and response process. For instance, the following customization is responsible for data extraction that only applies to the endpoints of api.route_extract.router:
from fastapi.routing import APIRoute
from typing import Callable
from fastapi import Request, Response
class ExtractContentRoute(APIRoute):
    def get_route_handler(self) -> Callable:
        original_route_handler =
                super().get_route_handler()

        async def custom_route_handler(request: Request)
                    -> Response:
            request = ExtractionRequest(request.scope,
                        request.receive)
            response: Response = await
                    original_route_handler(request)
            return response
        return custom_route_handler
Customizing APIRoute requires the creation of a Python closure that will directly manage the Request and Response flow from APIRoute’s original_route_handler. On the other hand, our ExtractContentRoute filter uses a custom ExtractionRequest that identifies and processes each type of incoming request data separately. The following is the implementation of ExtractionRequest that will replace the default Request object:
class ExtractionRequest(Request):
    async def body(self):
        body = await super().body()
        data = ast.literal_eval(body.decode('utf-8'))
        if isinstance(data, list):
            sum = 0
            for rate in data:
                sum += rate
            average = sum / len(data)
            self.state.sum = sum
            self.state.avg = average
        return body

    async def form(self):
        body = await super().form()
        user_details = dict()
        user_details['fname'] = body['firstname']
        user_details['lname'] = body['lastname']
        user_details['age'] = body['age']
        user_details['bday'] = body['birthday']
        self.session["user_details"] = user_details
        return body

    async def json(self):
        body = await super().json()
        if isinstance(body, dict):

            sum = 0
            for rate in body.values():
                sum += rate

            average = sum / len(body.values())
            self.state.sum = sum
            self.state.avg = average
        return body
To activate this ExtractionRequest, we need to set the route_class of the APIRouter of the endpoints to ExtractContentRoute, as shown in the following snippet:
router = APIRouter()
router.route_class = ExtractContentRoute
There are three methods of choice to override when managing various request bodies:
- body(): This manages incoming request data that is in bytes
- form(): This processes incoming form data
- json(): This manages incoming parsed JSON data
- stream(): This accesses the body via a chunk of bytes using the async for construct
All of these methods return the original request body in bytes back to the service.
In ExtractionRequest, we have implemented three interface methods from the given choices to filter and process all incoming requests of the API endpoints defined in the /api/route_extract.py module.
The following create_profile() service accepts profile data from the client and implements the ExtractContentRoute filter, which will store all of this profile data in the dictionary using session handling:
@router.post("/user/profile")
async def create_profile(req: Request,
        firstname: str = Form(...),
        lastname: str = Form(...), age: int = Form(...),
        birthday: date = Form(...),
        user: str = Depends(get_current_user)):
    user_details = req.session["user_details"]
    return {'profile' : user_details}
The overridden form() method of ExtractionRequest is responsible for the user_details attribute containing all the user details.
On the other hand, the given set_ratings() method has an incoming dictionary of various ratings in which the json() override will derive some basic statistics. All the results will be returned as Request’s state objects or request attributes:
@router.post("/rating/top/three")
async def set_ratings(req: Request, data :
 Dict[str, float], user: str = Depends(get_current_user)):
    stats = dict()
    stats['sum'] = req.state.sum
    stats['average'] = req.state.avg
    return {'stats' : stats }
And lastly, the preceding compute_data() service will have an incoming list of ratings as a source of some basic statistics like in the previous service. The body() method override of ExtractionRequest will process the computation:
@router.post("/rating/data/list")
async def compute_data(req: Request, data: List[float],
  user: str = Depends(get_current_user)):
    stats = dict()
    stats['sum'] = req.state.sum
    stats['average'] = req.state.avg
    return {'stats' : stats }
Encrypting and decrypting the message body
Another scenario where we need to customize the routing of the endpoints is when we must secure the message body through encryption. The following custom request decrypts an encrypted body using Python’s cryptography module and the key of the encrypted body:
from cryptography.fernet import Fernet
class DecryptRequest(Request):
    async def body(self):
        body = await super().body()
        login_dict = ast.literal_eval(body.decode('utf-8'))
        fernet = Fernet(bytes(login_dict['key'],
             encoding='utf-8'))
        data = fernet.decrypt(
          bytes(login_dict['enc_login'], encoding='utf-8'))
        self.state.dec_data = json.loads(
             data.decode('utf-8'))
        return body
Important note
The cryptography module requires the installation of the itsdangerous extension for the encryption/decryption procedure used in this project.
DecryptRequest will decrypt the message and return the list of login records as a request state object. The following service provides the encrypted message body and key and returns the decrypted list of login records from DecryptRequest as a response:
@router.post("/login/decrypt/details")
async def send_decrypt_login(enc_data: EncLoginReq,
   req:Request, user: str = Depends(get_current_user)):
    return {"data" : req.state.dec_data}
Note that send_decrypt_login() has an EncLoginReq request model that contains the encrypted message body and the encryption key from the client.
Customizing the routes and their Request objects can help optimize and streamline microservice transactions, especially those API endpoints that require heavy loads on message body conversions, transformations, and computations.
Now, our next discussion will focus on applying different Response types for the API services.
Choosing the appropriate responses
The FastAPI framework offers other options for rendering API endpoint responses other than the most common JsonResponse option. Here is a list of some of the response types supported by FastAPI and their corresponding samples from our application:
- The API endpoints can utilize the PlainTextResponse type if their response is text-based only. The following intro_list_restaurants() service returns a text-based message to the client:
@router.get("/restaurant/index")
def intro_list_restaurants():
return PlainTextResponse(content="The Restaurants")
- Services can use RedirectResponse if they need to pursue navigation to another entirely different application or another endpoint of the same application. The following endpoint jumps to a hypertext reference about some known Michelin-starred restaurants:
@router.get("/restaurant/michelin")
def redirect_restaurants_rates():
return RedirectResponse(
url="https://guide.michelin.com/en/restaurants")
- A FileResponse type can help services render some content of a file, preferably text-based files. The following load_questions() service shows the list of questions saved in the questions.txt file placed inside the /file folder of the application:
@router.get("/question/load/questions")
async def load_questions(user: str =
Depends(get_current_user)):
file_path = os.getcwd() +
'\files\questions.txt';
return FileResponse(path=file_path,
media_type="text/plain")
- StreamingResponse is another response type that can provide us with another approach to the Server-Sent Events (SSE) implementation. Chapter 8, Creating Coroutines, Events, and Message-Driven Transactions, has provided us with an SSE that utilizes the EventSourceResponse type:
@router.get("/question/sse/list")
async def list_questions(req:Request,
engine=Depends(create_db_engine),
user: str = Depends(get_current_user)):
async def print_questions():
repo:QuestionRepository =
QuestionRepository(engine)
result = await repo.get_all_question()
for q in result:
disconnected = await req.is_disconnected()
if disconnected:
break
yield 'data: {} .format(
json.dumps(jsonable_encoder(q),
cls=MyJSONEncoder))
await asyncio.sleep(1)
return StreamingResponse(print_questions(),
media_type="text/event-stream")
- Services that render images can also use the StreamingResponse type. The following logo_upload_png() service uploads any JPEG or PNG file and renders it in the browser:
@router.post("/restaurant/upload/logo")
async def logo_upload_png(logo: UploadFile = File(...)):
original_image = Image.open(logo.file)
original_image =
original_image.filter(ImageFilter.SHARPEN)
filtered_image = BytesIO()
if logo.content_type == "image/png":
original_image.save(filtered_image, "PNG")
filtered_image.seek(0)
return StreamingResponse(filtered_image,
media_type="image/png")
elif logo.content_type == "image/jpeg":
original_image.save(filtered_image, "JPEG")
filtered_image.seek(0)
return StreamingResponse(filtered_image,
media_type="image/jpeg")
- The StreamingResponse type is also effective in rendering videos in various formats such as MP4. The following service reads a file inside the application named sample.mp4 and publishes it to the browser:
@router.get("/restaurant/upload/video")
def video_presentation():
file_path = os.getcwd() + '\files\sample.mp4'
def load_file():
with open(file_path, mode="rb") as video_file:
yield from video_file
return StreamingResponse(load_file(),
media_type="video/mp4")
- If the service wants to publish a simple HTML markup page without making references to static CSS or JavaScript files, then HTMLResponse is the right choice. The following service renders an HTML page with a Bootstrap framework provided by some CDN libraries:
@router.get("/signup")
async def signup(engine=Depends(create_db_engine),
user: str = Depends(get_current_user) ):
signup_content = """
<html lang='en'>
<head>
<meta charset="UTF-8">
<script src="https://code.jquery.com/jquery-
3.4.1.min.js"></script>
<link rel="stylesheet"
href="https://stackpath.bootstrapcdn.com/
bootstrap/4.4.1/css/bootstrap.min.css">
<script src="https://cdn.jsdelivr.net/npm/
[email protected]/dist/umd/popper.min.js">
</script>
<script
src="https://stackpath.bootstrapcdn.com/
bootstrap/4.4.1/js/bootstrap.min.js"></script>
</head>
<body>
<div class="container">
<h2>Sign Up Form</h2>
<form>
<div class="form-group">
<label for="firstname">
Firstname:</label>
<input type='text'
class="form-control"
name='firstname'
id='firstname'/><br/>
</div>
… … … … … … … …
<div class="form-group">
<label for="role">Role:</label>
<input type='text'
class="form-control"
name='role' id='role'/><br/>
</div>
<button type="submit" class="btn
btn-primary">Sign Up</button>
</form>
</div>
</body>
</html>
"""
return HTMLResponse(content=signup_content,
status_code=200)
- If the API endpoints have other rendition types needed to be published, the Response class can customize them through its media_type property. The following is a service that converts JSON data into XML content by setting the media_type property of Response to the application/xml MIME type:
@router.get("/keyword/list/all/xml")
async def
convert_to_xml(engine=Depends(create_db_engine),
user: str = Depends(get_current_user)):
repo:KeyRepository = KeyRepository(engine)
list_of_keywords = await repo.get_all_keyword()
root = minidom.Document()
xml = root.createElement('keywords')
root.appendChild(xml)
for keyword in list_of_keywords:
key = root.createElement('keyword')
word = root.createElement('word')
key_text = root.createTextNode(keyword.word)
weight= root.createElement('weight')
weight_text =
root.createTextNode(str(keyword.weight))
word.appendChild(key_text)
weight.appendChild(weight_text)
key.appendChild(word)
key.appendChild(weight)
xml.appendChild(key)
xml_str = root.toprettyxml(indent =" ")
return Response(content=xml_str,
media_type="application/xml")
Although FastAPI is not a web framework, it can support Jinja2 templating for rare cases where API services require rendering their response as an HTML page. Let us highlight how API services utilize Jinja2 templates as part of the response.
Setting up the Jinja2 template engine
First, we need to install the jinja2 module using pip:
pip install jinja2
Then, we need to create a folder that will hold all the Jinja2 templates. Jinja2 must define this folder, usually named templates, by creating the Jinja2Templates instance in FastAPI or any APIRouter. The following snippet is part of the /api/login.py router that shows the setup and configuration of the Jinja2 templating engine:
from fastapi.templating import Jinja2Templates
router = APIRouter()
templates = Jinja2Templates(directory="templates")
Setting up the static resources
After the templates folder, the Jinja2 engine requires the application to have a folder named static in the project directory to hold the CSS, JavaScript, images, and other static files for the Jinja2 templates. Then, we need to instantiate the StaticFiles instance to define the static folder and map it with a virtual name. Additionally, the StaticFiles instance must be mounted to a specific path through FastAPI’s mount() method. We also need to set the html property of the StaticFiles instance to True to set the folder in HTML mode. The following configuration shows how to set up the static resource folder in the main.py module:
from fastapi.staticfiles import StaticFiles
app.mount("/static", StaticFiles(directory="static",
          html=True), name="static")
For the FastAPI components to access these static files, the engine needs the aiofiles extension installed:
pip install aiofiles
Creating the template layout
The following template is the base or parent template for the application that can now access the Bootstrap resources from the static folder due to the template engine and aiofiles module:
<!DOCTYPE html>
<html lang="en">
    <head>
        <meta charset="UTF-8">
        <meta http-equiv="X-UA-Compatible"
              content="IE=edge">
        <meta name="viewport" content="width=device-width,
             initial-scale=1.0, shrink-to-fit=no">
        <meta name="apple-mobile-web-app-capable"
             content="yes">

        <link rel="stylesheet" type="text/css"
            href="{{url_for('static',
               path='/css/bootstrap.min.css')}}">
        <script src="{{url_for('static', path='/js/
               jquery-3.6.0.js')}}"></script>
        <script src="{{url_for('static',
              path='/js/bootstrap.min.js')}}"></script>
    </head>
    <body>
        {% block content %}
        {% endblock content %}
    </body>
</html>
Other templates can inherit the structure and design of this layout.html using the {% extends %} tags. The Jinja2 base template, like our layout.html, has these Jinja2 tags, namely the {% block content %} and {% endblock %} tags, which indicate where child templates can insert their content during the translation phase. But for all these templates to work, they must be saved in the /templates directory. The following is a sample child template named users.html that generates a table of profiles from the context data:
{% extends "layout.html" %}
{% block content %}
<div class="container">
<h2>List of users </h2>
<p>This is a Boostrap 4 table applied to JinjaTemplate.</p>
<table class="table">
    <thead>
        <tr>
          <th>Login ID</th>
          <th>Username</th>
          <th>Password</th>
          <th>Passphrase</th>
        </tr>
      </thead>
      <tbody>
    {% for login in data %}
    <tr>
        <td>{{ login.login_id}}</td>
        <td>{{ login.username}}</td>
        <td>{{ login.password}}</td>
        <td>{{ login.passphrase}}</td>
    </tr>
    {% endfor%}
</tbody>
</table>
</div>
{% endblock %}
Observe that the child Jinja2 template also has the "block" tags to mark the content to be merged into the parent template.
For the API to render the templates, the service must use the Jinja2 engine’s TemplateResponse type as the response type. TemplateResponse needs the filename of the template, the Request object, and the context data if there is any. The following is the API service that renders the previous users.html template:
@router.get("/login/html/list")
async def list_login_html(req: Request,
       engine=Depends(create_db_engine),
       user: str = Depends(get_current_user)):
    repo:LoginRepository = LoginRepository(engine)
    result = await repo.get_all_login()
    return templates.TemplateResponse("users.html",
           {"request": req, "data": result})
Using ORJSONResponse and UJSONResponse
When it comes to yielding numerous dictionaries or JSON-able-components, it is appropriate to use either ORJSONResponse or UJSONResponse. ORJSONResponse uses orjson to serialize a humongous listing of dictionary objects into a JSON string as a response. So, first, we need to install orjson using the pip command before using ORJSONResponse. ORJSONResponse serializes UUID, numpy, data classes, and datetime objects faster than the common JSONResponse.
However, UJSONResponse is relatively faster than ORJSONResponse because it uses the ujson serializer. The ujson serializer must first be installed before using UJSONResponse.
The following are the two API services that use these two fast alternatives for a JSON serializer:
@router.get("/login/list/all")
async def list_all_login(engine=Depends(create_db_engine),
         user: str = Depends(get_current_user)):
    repo:LoginRepository = LoginRepository(engine)
    result = await repo.get_all_login()
    return ORJSONResponse(content=jsonable_encoder(result),
             status_code=201)
@router.get("/login/account")
async def get_login(id:int,
       engine=Depends(create_db_engine),
       user: str = Depends(get_current_user) ):
    repo:LoginRepository = LoginRepository(engine)
    result = await repo.get_login_id(id)
    return UJSONResponse(content=jsonable_encoder(result),
             status_code=201)
We still need to apply the jsonable_encoder() component to convert BSON’s ObjectId of the result into str before the two responses pursue their serialization processes. Now, let us focus on how we provide internal API documentation using the OpenAPI 3.0 specification.
Applying the OpenAPI 3.x specification
The OpenAPI 3.0 specification is a standard API documentation and language-agnostic specification that can describe the API services without knowing its sources, reading its documentation, and understanding its business logic. Additionally, FastAPI supports OpenAPI, and it can even automatically generate the default internal documentation of the API based on OpenAPI standards.
There are three ways to document our API services using the specification:
- By extending the OpenAPI schema definition
- By using the internal code base properties
- By using the Query, Body, Form, and Path functions
Extending the OpenAPI schema definition
FastAPI has a get_openapi() method from its fastapi.openapi.utils extension that can override some schema descriptions. We can modify the info, servers, and paths details of the schema definition through the get_openapi() function. The function returns a dict of all details of the OpenAPI schema definition of the application.
The default OpenAPI schema documentation is always set up in the main.py module because it is consistently associated with the FastAPI instance. For the function to generate the dict of schema details, it must accept at least the title, version, and routes parameter values. The following custom function extracts the default OpenAPI schema for updating:
def update_api_schema():
   DOC_TITLE = "The Online Restaurant Rating System API"
   DOC_VERSION = "1.0"
   openapi_schema = get_openapi(
       title=DOC_TITLE,
       version=DOC_VERSION,
       routes=app.routes,
   )
app.openapi_schema = openapi_schema
return openapi_schema
The title parameter value is the document title, the version parameter value is the version of the API implementation, and routes contains a list of registered API services. Observe that the last line before the return statement updates FastAPI’s built-in openapi_schema defaults. Now, to update the general information details, we use the info key of the schema definition to change some values, as shown in the following sample:
openapi_schema["info"] = {
       "title": DOC_TITLE,
       "version": DOC_VERSION,
       "description": "This application is a prototype.",
       "contact": {
           "name": "Sherwin John Tragura",
           "url": "https://ph.linkedin.com/in/sjct",
           "email": "[email protected]"
       },
       "license": {
           "name": "Apache 2.0",
           "url": "https://www.apache.org/
                  licenses/LICENSE-2.0.html"
       },
   }
The preceding info schema update must also be part of the update_api_schema() function together with the update on the documentation of each registered API service. These details can includeAPI service's description and summary, the POST endpoint's description of its requestBody and GET endpoint's details about its parameters, and the API tags. Add the following paths updates:
openapi_schema["paths"]["/ch09/login/authenticate"]["post"]["description"] = "User Authentication Session"
openapi_schema["paths"]["/ch09/login/authenticate"]["post"]["summary"] = "This is an API that stores credentials in session."
openapi_schema["paths"]["/ch09/login/authenticate"]["post"]["tags"] = ["auth"]

openapi_schema["paths"]["/ch09/login/add"]["post"]
["description"] = "Adding Login User"
openapi_schema["paths"]["/ch09/login/add"]["post"]
["summary"] = "This is an API adds new user."
openapi_schema["paths"]["/ch09/login/add"]["post"]
["tags"] = ["operation"]
openapi_schema["paths"]["/ch09/login/add"]["post"]
["requestBody"]["description"]="Data for LoginReq"

openapi_schema["paths"]["/ch09/login/profile/add"]
["description"] = "Updating Login User"
openapi_schema["paths"]["/ch09/login/profile/add"]
["post"]["summary"] = "This is an API updating existing user record."
openapi_schema["paths"]["/ch09/login/profile/add"]
["post"]["tags"] = ["operation"]
openapi_schema["paths"]["/ch09/login/profile/add"]
["post"]["requestBody"]["description"]="Data for LoginReq"

openapi_schema["paths"]["/ch09/login/html/list"]["get"]["description"] = "Renders Jinja2Template with context data."
openapi_schema["paths"]["/ch09/login/html/list"]["get"]["summary"] = "Uses Jinja2 template engine for rendition."
openapi_schema["paths"]["/ch09/login/html/list"]["get"]["tags"] = ["rendition"]
openapi_schema["paths"]["/ch09/login/list/all"]["get"]["description"] = "List all the login records."
openapi_schema["paths"]["/ch09/login/list/all"]["get"]["summary"] = "Uses JsonResponse for rendition."
openapi_schema["paths"]["/ch09/login/list/all"]["get"]["tags"] = ["rendition"]
The preceding will give us a new OpenAPI document dashboard, as shown in Figure 9.1:

Figure 9.1 – A customized OpenAPI dashboard
Tags are essential variables of the OpenAPI documentation because they organize the API endpoints according to the routers, business processes, requirements, and modules. It is a best practice to use tags.
Once all the updates have been set, replace FastAPI’s openapi() function with the new update_api_schema() function.
Using the internal code base properties
FastAPI’s constructor has parameters that can replace the default info document details without using the get_openapi() function. The following snippet showcases a sample documentation update on the title, description, version, and servers details of the OpenAPI documentation:
app = FastAPI(… … … …,
            title="The Online Restaurant Rating
                       System API",
            description="This a software prototype.",
            version="1.0.0",
            servers= [
                {
                    "url": "http://localhost:8000",
                    "description": "Development Server"
                },
                {
                    "url": "https://localhost:8002",
                    "description": "Testing Server",
                }
            ])
When adding documentation to the API endpoints, the path operators of FastAPI and APIRouter also have parameters that allow changes to the default OpenAPI variables attributed to each endpoint. The following is a sample service that updates its summary, description, response_description, and other response details through the post() path operator:
@router.post("/restaurant/add",
     summary="This API adds new restaurant details.",
     description="This operation adds new record to the
          database. ",
     response_description="The message body.",
     responses={
        200: {
            "content": {
                "application/json": {
                    "example": {
                        "restaurant_id": 100,
                        "name": "La Playa",
                        "branch": "Manila",
                        "address": "Orosa St.",
                        "province": "NCR",
                        "date_signed": "2022-05-23",
                        "city": "Manila",
                        "country": "Philippines",
                        "zipcode": 1603
                    }
                }
            },
        },
        404: {
            "description": "An error was encountered during
                     saving.",
            "content": {
                "application/json": {
                    "example": {"message": "insert login
                       unsuccessful"}
                }
            },
        },
    },
    tags=["operation"])
async def add_restaurant(req:RestaurantReq,
        engine=Depends(create_db_engine),
          user: str = Depends(get_current_user)):
    restaurant_dict = req.dict(exclude_unset=True)
    restaurant_json = dumps(restaurant_dict,
           default=json_datetime_serializer)
    repo:RestaurantRepository =
            RestaurantRepository(engine)
    result = await repo.insert_restaurant(
              loads(restaurant_json))
    if result == True:
        return req
    else:
        return JSONResponse(content={"message":
           "insert login unsuccessful"}, status_code=500)
Using the Query, Form, Body, and Path functions
Aside from the declaration and additional validations, the Query, Path, Form, and Body parameter functions can also be used to add some metadata to the API endpoints. The following authenticate() endpoint has added descriptions and validations through the Query() function:
@router.post("/login/authenticate")
async def authenticate(response: Response,
    username:str = Query(...,
       description='The username of the credentials.',
       max_length=50),
    password: str = Query(...,
     description='The password of the of the credentials.',
     max_length=20),
    engine=Depends(create_db_engine)):
    repo:LoginRepository = LoginRepository(engine)
    … … … … … …
    response.set_cookie("session", token)
    return {"username": username}
The following get_login() uses the Path() directive to insert a description of the id parameter:
@router.get("/login/account/{id}")
async def get_login(id:int = Path(...,
         description="The user ID of the user."),
   engine=Depends(create_db_engine),
   user: str = Depends(get_current_user) ):
    … … … … … …
    return UJSONResponse(content=jsonable_encoder(result),
         status_code=201)
The description and max_length metadata of the Query() function will become part of the OpenAPI documentation for authenticate(), as shown in Figure 9.2:
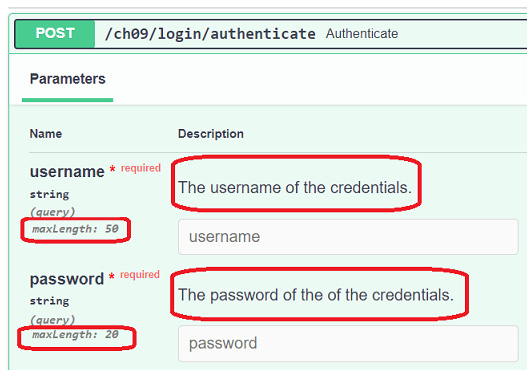
Figure 9.2 – The Query metadata
Additionally, the description metadata of the Path() directive will also appear in the get_login() documentation, as presented in Figure 9.3:
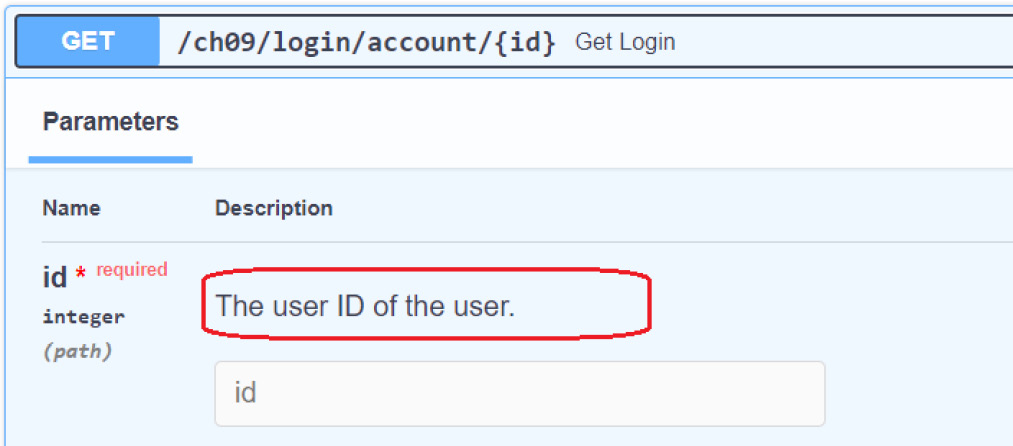
Figure 9.3 – The Path metadata
Likewise, we can add descriptions to form parameters using the Form directive. The following service shows you how to insert documentation through the Form directive:
@router.post("/user/profile")
async def create_profile(req: Request,
        firstname: str = Form(...,
          description='The first name of the user.'),
        lastname: str = Form(...,
          description='The last name of the user.'),
        age: int = Form(...,
          description='The age of the user.'),
        birthday: date = Form(...,
           description='The birthday of the user.'),
        user: str = Depends(get_current_user)):
    user_details = req.session["user_details"]
    return {'profile' : user_details}
Moreover, it is also possible to document all types of HTTP responses or status codes that the API service can throw through the path operator’s responses parameter. The following video_presentation() service provides metadata regarding the nature of its response when it encounters no errors (HTTP Status Code 200) and with runtime errors (HTTP Status Code 500):
from models.documentation.response import Error500Model
… … … … …
@router.get("/restaurant/upload/video",responses={
        200: {
            "content": {"video/mp4": {}},
            "description": "Return an MP4 encoded video.",
        },
        500:{
            "model": Error500Model,
            "description": "The item was not found"
        }
    },)
def video_presentation():
    file_path = os.getcwd() + '\files\sample.mp4'
    def load_file():
        with open(file_path, mode="rb") as video_file:
            yield from video_file
    return StreamingResponse(load_file(),
              media_type="video/mp4")
Error500Model is a BaseModel class that will give you a clear picture of the response once the application encounters an HTTP Status Code 500 error and will only be used in the OpenAPI documentation. It contains metadata such as the message that holds a hardcoded error message. Figure 9.4 shows the resulting OpenAPI documentation for video_presentation() after adding the metadata for its responses:

Figure 9.4 – The documentation for API responses
And now, for our last discussion, let us explore how we can perform unit testing in FastAPI, which could lead to a test-driven development setup.
Testing the API endpoints
FastAPI uses the pytest framework to run its test classes. So, before we create our test classes, first, we need to install the pytest framework using the pip command:
pip install pytest
FastAPI has a module called fastapi.testclient where all components are Request-based, including the TestClient class. To access all the API endpoints, we need the TestClient object. But first, we need to create a folder such as test, which will contain test modules where we implement our test methods. We place our test methods outside main.py or the router modules to maintain clean code and organization.
Writing the unit test cases
It is a best practice to write one test module per router component, except for cases where there is a tight connection between these routers. We place these test modules inside the test directory. To pursue the automated testing, we need to import the APIRouter instance or the FastAPI instance into the test module to set up TestClient. TestClient is almost like Python’s client module, requests, when it comes to the helper methods used to consume APIs.
The method names of the test cases must start with a test_ prefix, which is a pytest requirement. Test methods are all standard Python methods and should not be asynchronous. The following is a test method in test/test_restaurants.py that checks whether the endpoint returns the proper text-based response:
from fastapi.testclient import TestClient
from api import restaurant
client = TestClient(restaurant.router)
def test_restaurant_index():
    response = client.get("/restaurant/index")
    assert response.status_code == 200
    assert response.text == "The Restaurants"
TestClient supports assert statements that check the response of its helper methods, like get(), post(), put(), and delete() the status code and response body of the API. The test_restaurant_index(), for instance, uses the get() method of the TestClient API to run /restaurant/index GET service and extract its response. The assert statements are used if the statuc_code and response.text are correct. The endpoint has no imposed dependencies, so the test module is router-based.
Mocking the dependencies
Testing API endpoints with dependencies is not as straightforward as the previous example. Our endpoints have session-based security through the JWT and the APIKeyCookie class, so we cannot just run pytest to test them. First, we need to apply mocking to these dependencies by adding them to the dependency_overrides of the FastAPI instance. Since APIRouter cannot mock dependencies, we need to use the FastAPI instance to set up TestClient. All endpoints can be unit tested if the routers are part of the FastAPI configuration through include_router():
from fastapi.testclient import TestClient
from models.data.orrs import Login
from main import app
from util.auth_session import get_current_user
client = TestClient(app)
async def get_user():
    return Login(**{"username": "sjctrags",
      "login_id": 101,
      "password":"sjctrags", "passphrase": None,
      "profile": None})
app.dependency_overrides[get_current_user] =  get_user
def test_rating_top_three():
    response = client.post("/ch09/rating/top/three",
     json={
          "rate1": 10.0,
          "rate2": 20.0 ,
          "rate3": 30.0

    })
    assert response.status_code == 200
    assert response.json() == { "stats": {
          "sum": 60.0,
          "average": 20.0
      }
}
The /rating/top/three API from the /api/route_extract.py router requires a dict of ratings to derive a JSON result containing average and sum. TestClient’s path operators have JSON and data parameters, where we can pass test data to the API. Likewise, TestClient’s response has methods that can derive the expected response body, such as, in this example, the json() function.
Running the test method will result in some APIKeyCookie exceptions due to the dependency on session-based security. To bypass this issue, we need to create a fake get_current_user() dependable function to proceed with the testing. We add the get_current_user() dependable function into the roster of overrides and map it with the fake ones, such as our get_user() function, to replace its execution. This process is what we call mocking in the FastAPI context.
Aside from security, we can also mock the database connection by creating a mock database object or database engine, depending on whether it is a relational database or a NoSQL database. In the following test case, we are performing a unit test in /ch09/login/list/all, which needs MongoDB connectivity to access the list of login profiles. For the test to work, we need to create a mock AsyncIOMotorClient object with a dummy test database called orrs_test. Here is the test_list_login() test, which implements this database mocking:
def db_connect():
    client_od =
         AsyncIOMotorClient(f"mongodb://localhost:27017/")
    engine = AIOEngine(motor_client=client_od,
            database="orrs_test")
    return engine
async def get_user():
    return Login(**{"username": "sjctrags", "login_id": 101,
           "password":"sjctrags", "passphrase": None,
           "profile": None})
app.dependency_overrides[get_current_user] =  get_user
app.dependency_overrides[create_db_engine] = db_connect
def test_list_login():
    response = client.get("/ch09/login/list/all")
    assert response.status_code == 201
Running test methods
Run the pytest command on the command line to execute all unit tests. The pytest engine will compile and run all TestClient apps in the test folder, thus running all the test methods. Figure 9.5 shows a snapshot of the test result:
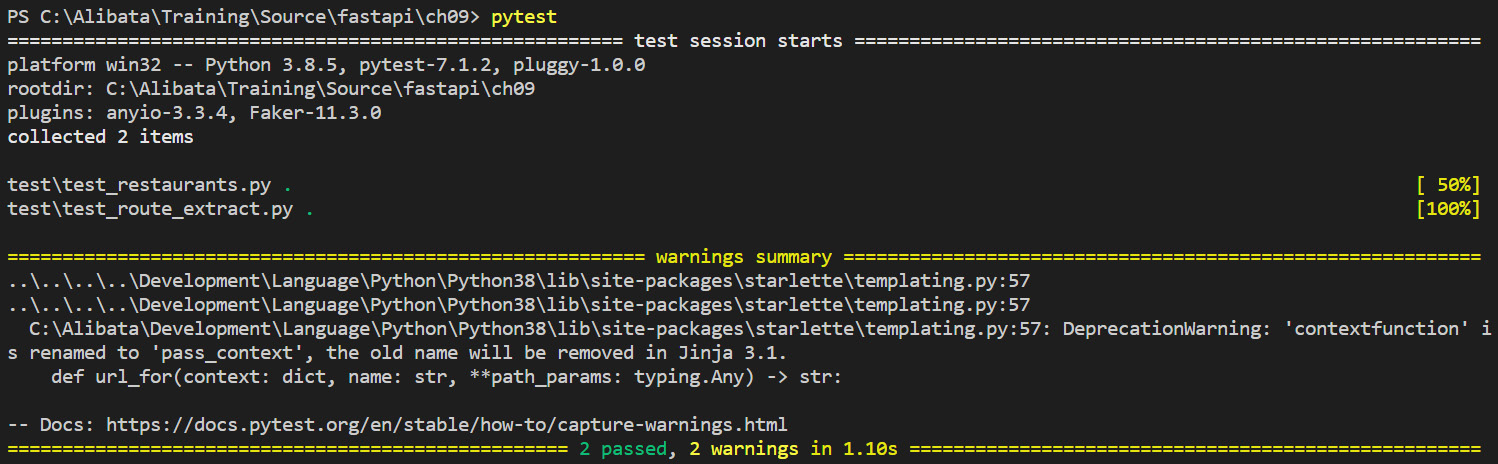
Figure 9.5 – The test result
Learning more about the pytest framework offers a heads-up in understanding the automation of test cases in FastAPI. Organizing all test methods through modules is essential in the testing phase of the application since we run all of them in bulk.
Summary
This chapter showcased some essential features that were not part of the previous chapters but can help fill some gaps during microservice development. One involves choosing better and more appropriate JSON serializers and de-serializers when converting a huge amount of data into JSON. Also, the advanced customizations, session handling, message body encryption and decryption, and testing API endpoints gave us a clear understanding of the potential of FastAPI to create cutting-edge and progressive microservice solutions. Also, this chapter introduced different API responses supported by FastAPI, including Jinja2’s TemplateResponse.
The next chapter will show us the strength of FastAPI in cracking numerical and symbolic computations.