
7
Test Automation for APIs
An application programming interface (API) helps two systems interact with each other over the internet by implementing a set of definitions and protocols. APIs help tremendously to simplify the design of software systems and assist in opening up access to the system while maintaining control and security over calls being made. APIs primarily act as intermediaries between various parts of the application as well as with external integrations.
There are three main kinds of API architectures—namely, REST, RPC, and SOAP. Each one of them has its pros and cons. Diving deep into the types of APIs and their architectures is out of the scope of this book. Instead, we will be learning about testing Representational State Transfer (REST), which has been the most popular architecture for constructing APIs.
It is crucial to maintain the quality standards of APIs as they are often the point of entry for various external application calls. Therefore, API testing becomes a fundamental part of the software development life cycle. There are various testing tools available in the market for testing APIs, some of the notable ones being Postman, SoapUI, Apigee, Assertible, and so on. Each of these tools comes with various capabilities, and it is vital to choose the right tool that suits the needs of your organization. In this chapter, we will be looking at API testing with Postman. Postman comes with plenty of built-in tools, and most of them are available for free. These are the topics that we will be covering in this chapter:
- Getting started with Postman
- Sending GET and POST requests
- Writing automated API tests
- Key considerations for API automation
Technical requirements
We will continue using Node.js along with JavaScript in this chapter. We will also download the Postman application (version 9.3.15) and the Newman command-line tool. We will need Docker installed locally to run our Postman collections on a Docker container. Docker installation instructions can be found at https://www.docker.com/.
Getting started with Postman
Before we dive into the Postman tool, it is worthwhile to understand the basics of REST APIs and what goes into testing them.
Basics of REST API testing
A REST API is stateless in nature and is built on client-server architecture. The client must provide all the data such as headers, authorization, and so on for every request since the server cannot store any information due to the stateless nature of these APIs. The communication usually happens over HTTP using JSON with support for Create, Read, Update, Delete (CRUD) methods. Some of the most commonly used REST API methods are the following:
- GET: Retrieve information about a REST API resource
- POST: Create a REST API resource
- PUT: Update a REST API resource
- DELETE: Delete a REST resource or a related component
- OPTIONS: List the supported operations in a web service
- HEAD: Returns only HTTP header and no body
Syntax to call a RESTful API goes like this: http://{host}:{port}/{initialPath}.
Here, the following applies:
- The {host} placeholder indicates the host or domain name
- The {port} placeholder indicates the TCP port number
- The {initialPath} placeholder indicates any initial path that is part of the URI for a given deployment
The primary focus of API testing is to validate the business logic of APIs, while other types of testing include performance and security. It involves the collection of test data to be sent in as JSON requests to the API and validating the response for accuracy. Some of the items to look for in the response are status, syntax, schema conformance, and functional correctness. API testing is much quicker and provides the benefit of testing very early in the development life cycle. Let us now get started with downloading and setting up Postman.
Downloading the Postman application
Postman is a popular and rapidly evolving tool that helps create, test, and document APIs. It is mainly an open source tool but has certain advanced features bundled under a Pro version. It supports Java, JavaScript, and Groovy programming languages and is quite easy to learn. It is primarily used for performing exploratory and automated API tests. Let us now download the Postman application.
To get started with the download, click on the button corresponding to your machine configuration on Postman’s downloads page (https://www.postman.com/downloads/). Open the downloaded ZIP file, and you should have the Postman app. Clicking on the icon opens the application where the user is provided with an option to sign in or create a new account. It is strongly recommended to have an account to be able to store your requests and configurations for future use. Users should see a window like the one shown in Figure 7.1 upon signing in to the account:
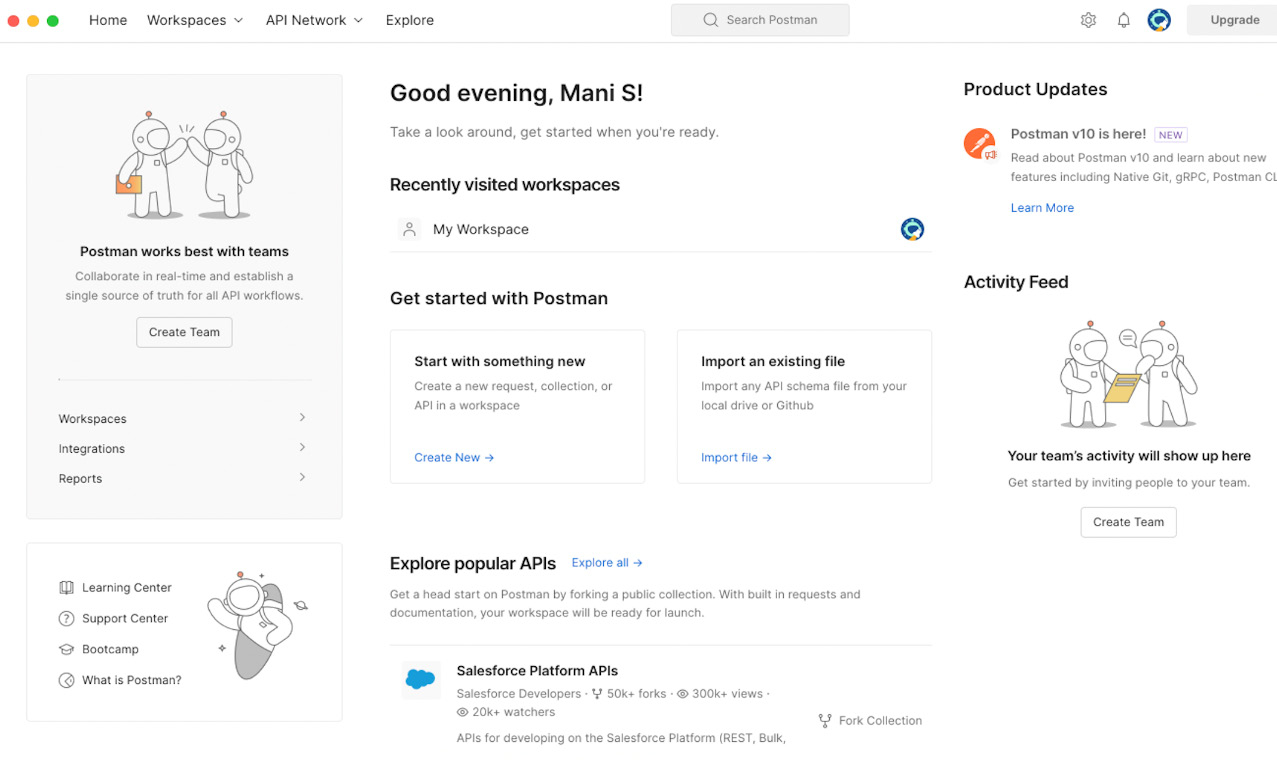
Figure 7.1 – Postman application
In the next section, let us look at how to work with workspaces in Postman.
Creating and managing workspaces
Workspaces are at the center of all the action that happens in Postman. It is one of the most important features that allows collaboration with your team and helps assemble your API collections. A workspace primarily aids in organizing the project according to the individual’s needs. Workspaces can be shared with your team members or worked on personally as well. Let us now look at how to create a new workspace in Postman. From the home page of the application shown in Figure 7.1, click on the Create New link to open a modal showing all the available options. Select the workspace option and provide a name and a brief summary for this workspace, as shown in Figure 7.2. Users have the option to select the type of access for this workspace:
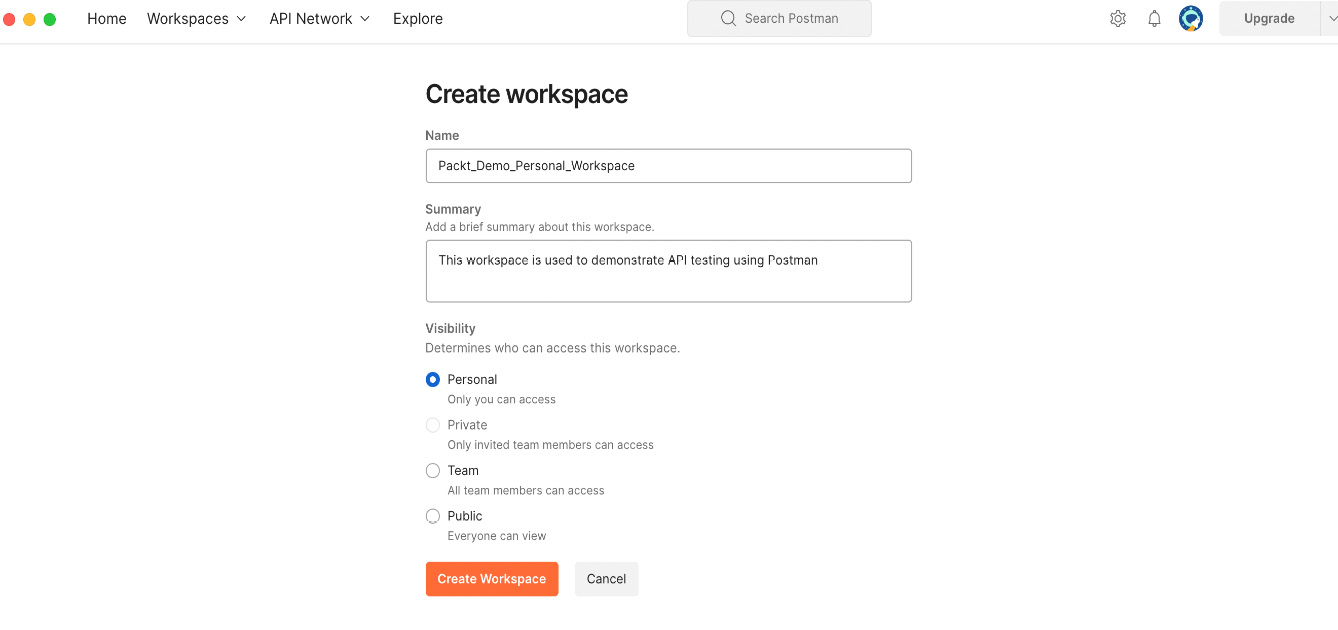
Figure 7.2 – Creating a workspace
We are creating a Personal workspace for this example. Private and Team workspaces allow adding team members to the workspace by inviting them via email or by sharing the workspace link, whereas a Public workspace can be accessed by anyone working with the Postman tool. The changes done by the team members are synchronized in real time across the user accounts accessing the workspace. Figure 7.3 shows the home page with multiple workspaces. Users can access the contents of these workspaces on any device they log in to with their account credentials. Thus, workspaces promote effective collaboration across the team:
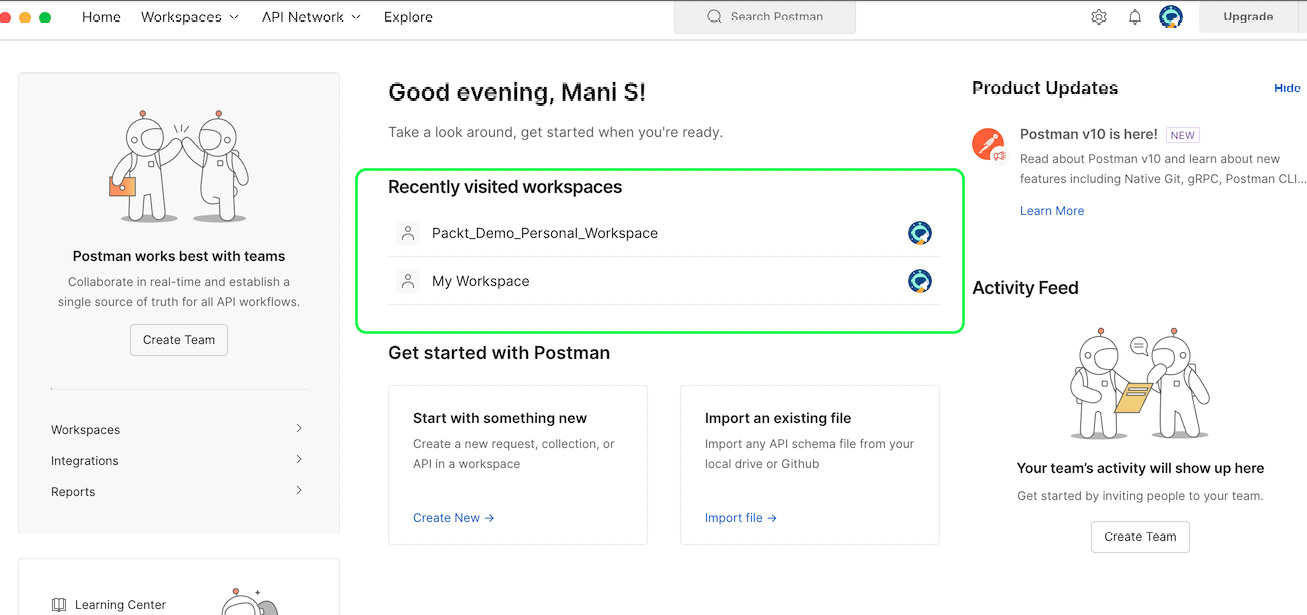
Figure 7.3 – Home page with multiple workspaces
Let us now send our first GET and POST requests using Postman.
Sending GET and POST requests
For creating requests, the user must be within a workspace and click on the + button next to the Overview tab. This is the simplest way to create a new API request. A new tab with various request details opens, as shown in Figure 7.4. This is commonly referred to as a request dashboard in Postman:
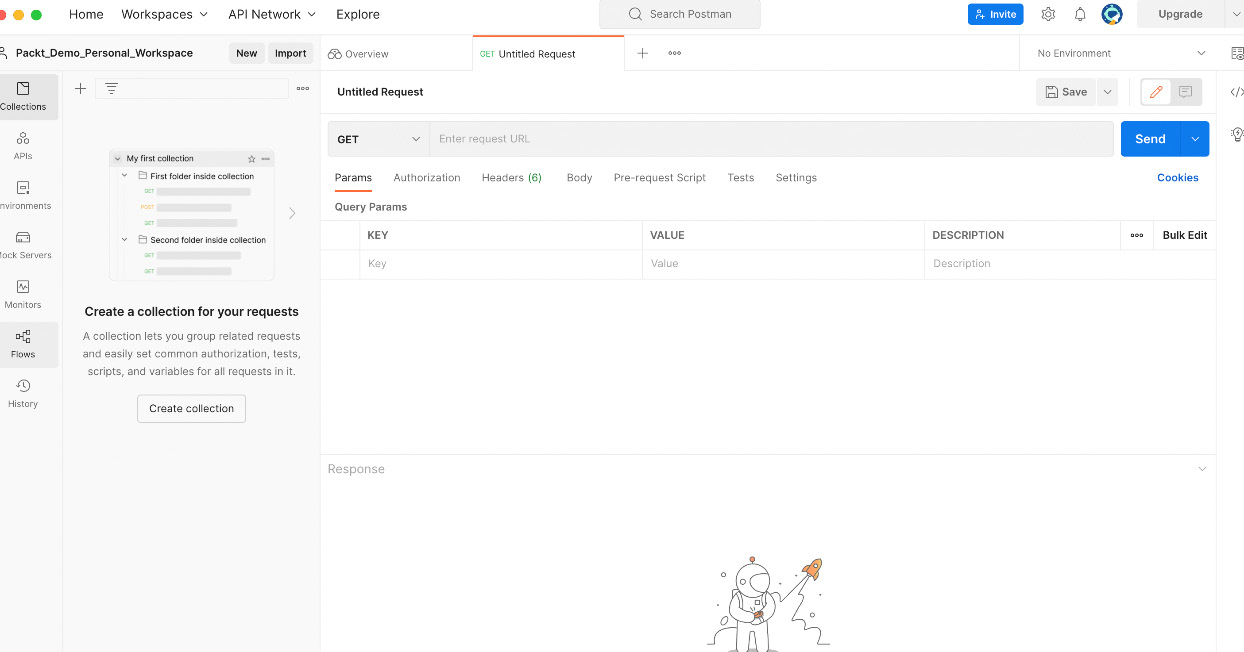
Figure 7.4 – New API request
Now, let us see how to make a GET API request.
Making a GET API request
We will be using the https://www.boredapi.com/api/activity API to get an understanding of GET requests. Bored is a free API that returns some random activities to do when bored. Postman makes it easy to get a simple GET API request without any authorization working. Just paste the API URL in the URL section of the request window and hit the Send button next to it. Every request to the server must be made with a URL to fetch the required response. Figure 7.5 shows the GET request with the response. Here, the Status section of the response says 200 OK, which means that the server responded to the request without any errors. The server returns the response in a JSON format, which can be validated for accuracy based on the business logic. In our case, we see an activity being returned with a bunch of other information:
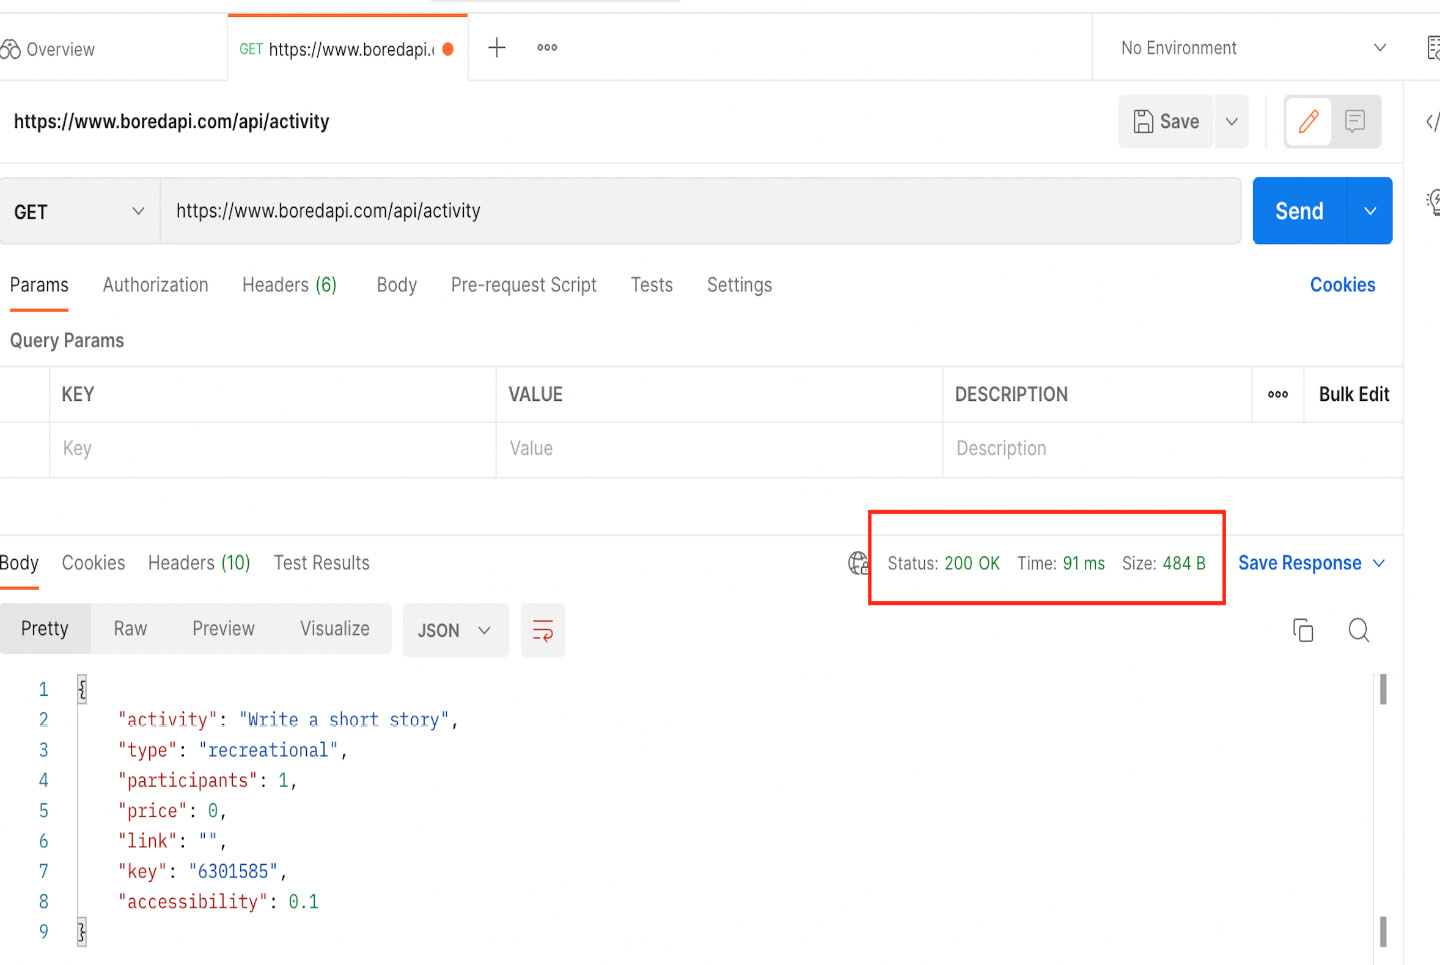
Figure 7.5 – GET API request
In most cases, the API will have certain authorization to be added for the request to work. Postman supports a wide variety of authorization mechanisms that can be accessed via the Authorization tab, as shown in Figure 7.6:
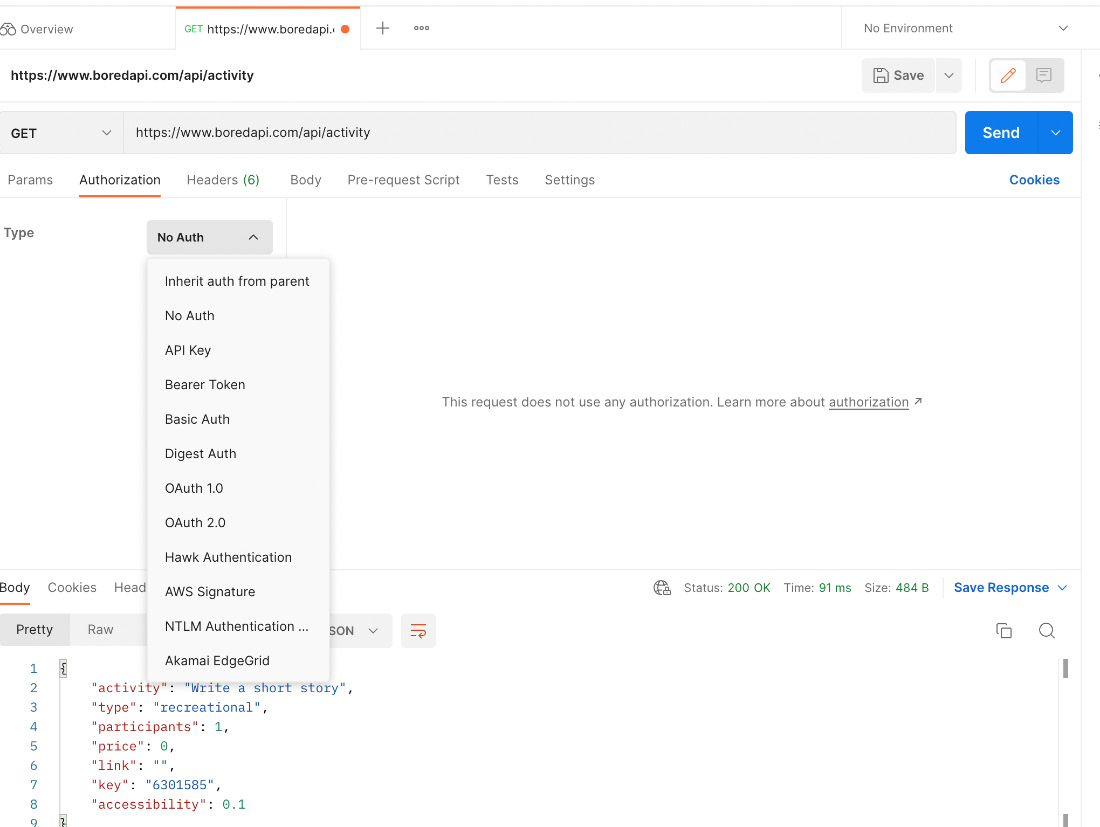
Figure 7.6 – Request authorization support in Postman
Postman identifies the applicable headers for a given API call, but in cases where there is specific metadata that must be sent as part of the header, this can be done using the Headers tab. Postman automatically identifies any query parameters that are added as part of the URL. For the case in Figure 7.7, https://api.agify.io?name=packt, a name is sent as a query parameter as part of the URL. Postman creates a parameter in the Params tab, and this can be modified to feed the request with different test data. New parameters can be manually added here as well:
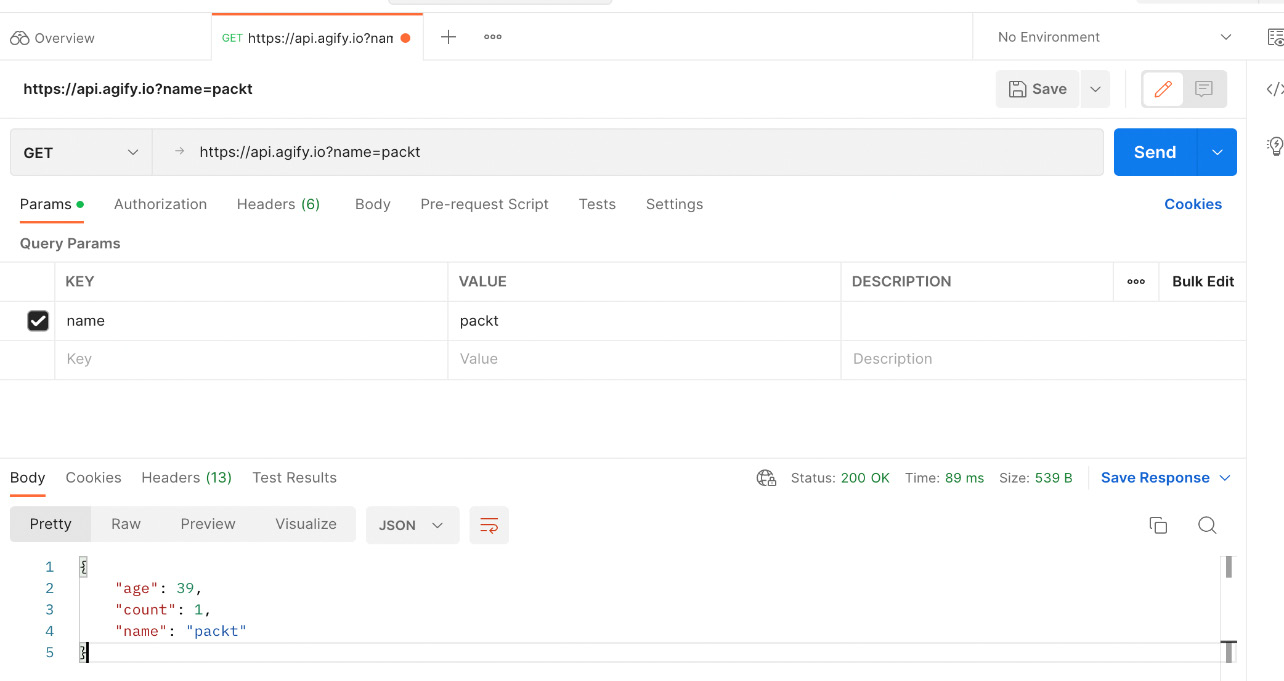
Figure 7.7 – API request with a query parameter
Users are encouraged to check out the various other features available within the request and response windows. Let us now learn to make a POST API request.
Making a POST API request
A POST request creates a new resource on the server and requires content to be sent in the body of the request. Postman supports different body types for a POST call, and in this section, we will review how to make a POST call. Create a new API request and click on the dropdown to the left of the URL section to select a POST request type. We will be using GitHub’s create a new repository API call (https://api.github.com/user/repos) for our example here. GitHub provides a lot of public APIs, but it requires the generation of an access token. This token can be generated in the personal access tokens section of your GitHub profile. Please remember to copy and save this secure token for future use in Postman. As shown in Figure 7.8, use this as a bearer token in the Authorization tab of the new POST request:
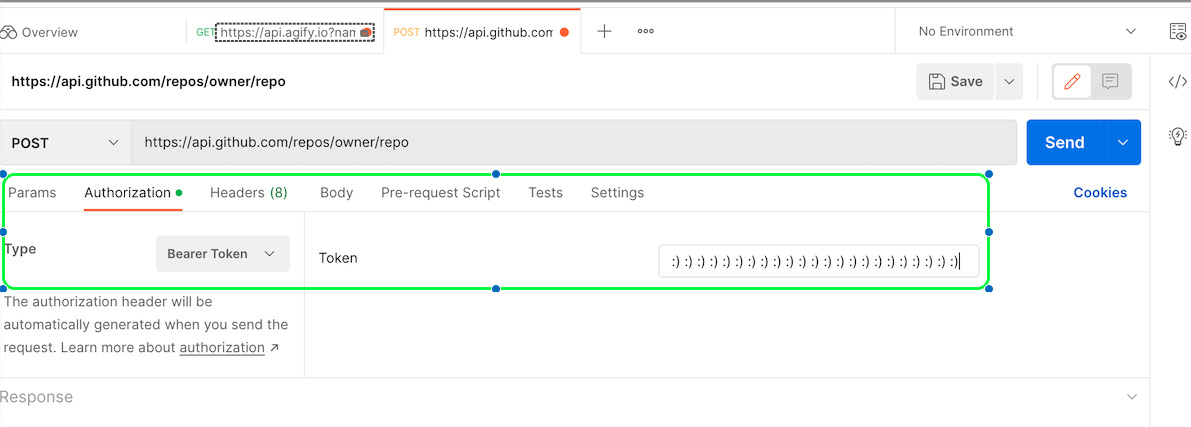
Figure 7.8 – POST API request authorization
Now, moving on to the Body section of the request, this API requires a name as a mandatory key for the new repository being created. An example of this request can be found at this link: https://docs.github.com/en/rest/repos/repos#create-a-repository-for-the-authenticated-user. We will be using the raw body type with JSON from the dropdown, as shown in Figure 7.9. Postman supports a wide variety of request body formats, and the one supported by the API being tested should be used. On hitting the Send button, we complete the POST call to the GitHub server to create a new repository with the name Packt-test-api-repo. Figure 7.9 shows the response status of 201 Created with all the metadata in the response body section. Users may notice that the status code is different from the GET call as 201 indicates that in addition to the call being successful, a new resource was created by the server:
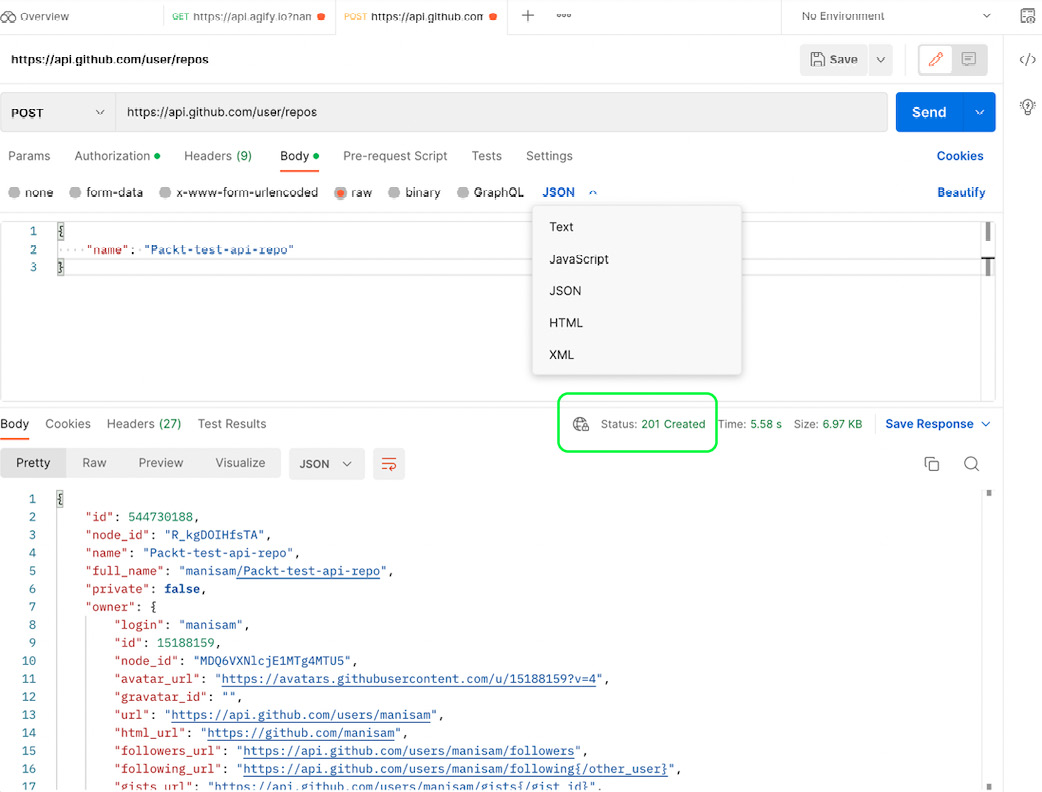
Figure 7.9 – POST API request body type
This completes our section on creating a new resource using a POST call. In the next section, let’s learn about collections and how they help structure API requests in Postman.
Organizing API requests using collections
Postman provides a way to group the API requests using collections. It helps organize a workspace by breaking it down, and a workspace can also be sorted into multiple collections. Apart from this, collections can also be published as documentation as well as run together in an automated fashion. In this section, let us review how to create a collection and add requests to it. Collections can be created in multiple ways within a workspace, and a simple way is to use the + button next to the Collections icon in the left pane of the Workspaces window. A name must be provided for the collection, and both existing and new requests can be saved to this collection. Figure 7.10 shows a new collection holding the two API requests we have created so far in the previous sections:

Figure 7.10 – Collections
Collections can thus help organize API requests in a meaningful way under a given workspace. This helps immensely when there are a high number of requests, which is usually the case when testing enterprise applications. Various other actions can be performed on collections, such as Export, Monitor, Mock, and so on. Let us now look at one more feature of a collection that promotes collaboration within the team.
Postman allows users to create a fork of a collection and merge it after making some modifications to the forked collection. These changes can be shared with other members, just like how Git pull requests work. This can be done via the Collections drop-down menu, as shown in Figure 7.11:
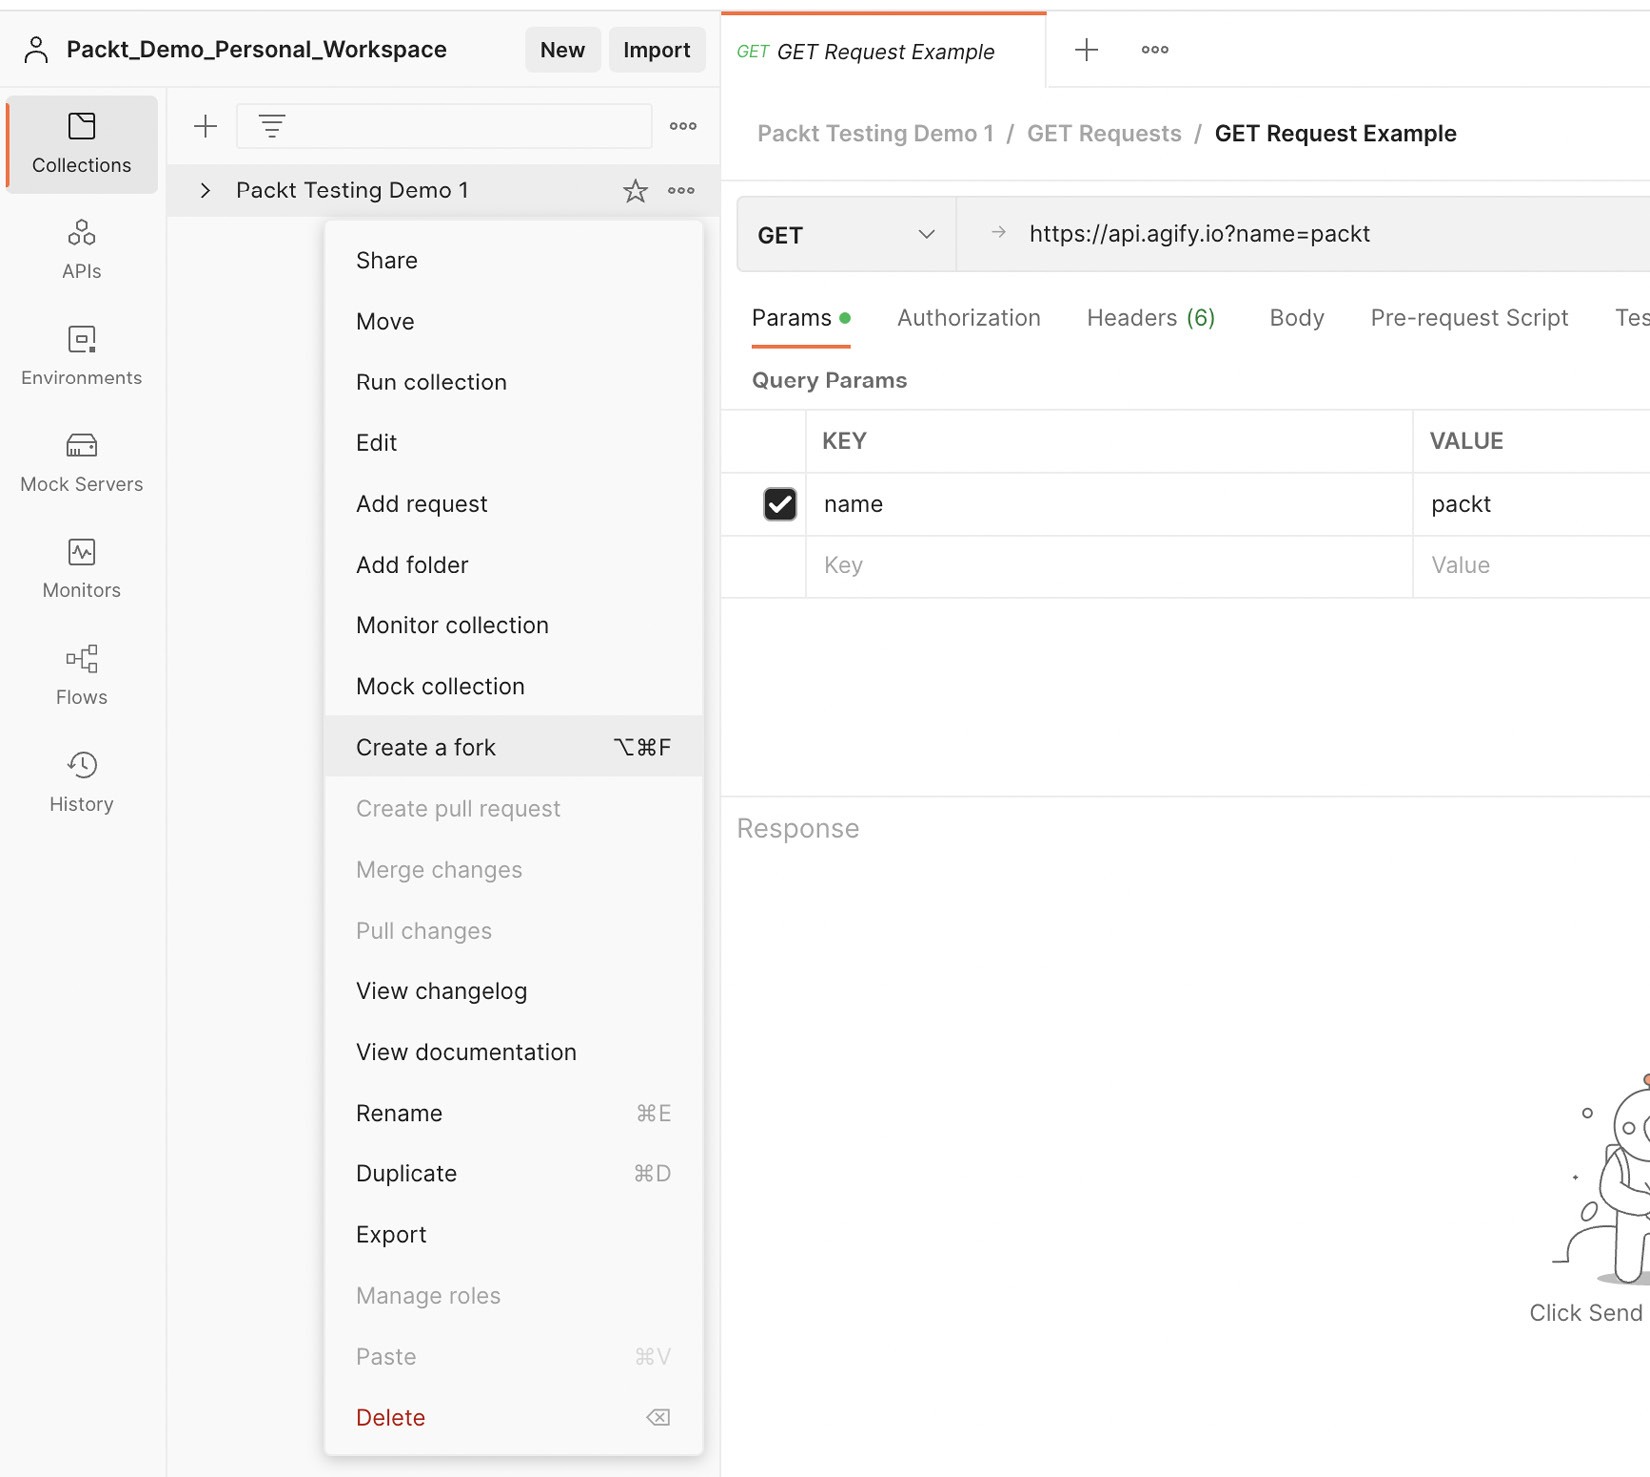
Figure 7.11 – Collections drop-down menu
On clicking the Create a fork option, the user will be required to enter a label for the fork and to which workspace this collection is to be forked, as shown in Figure 7.12:
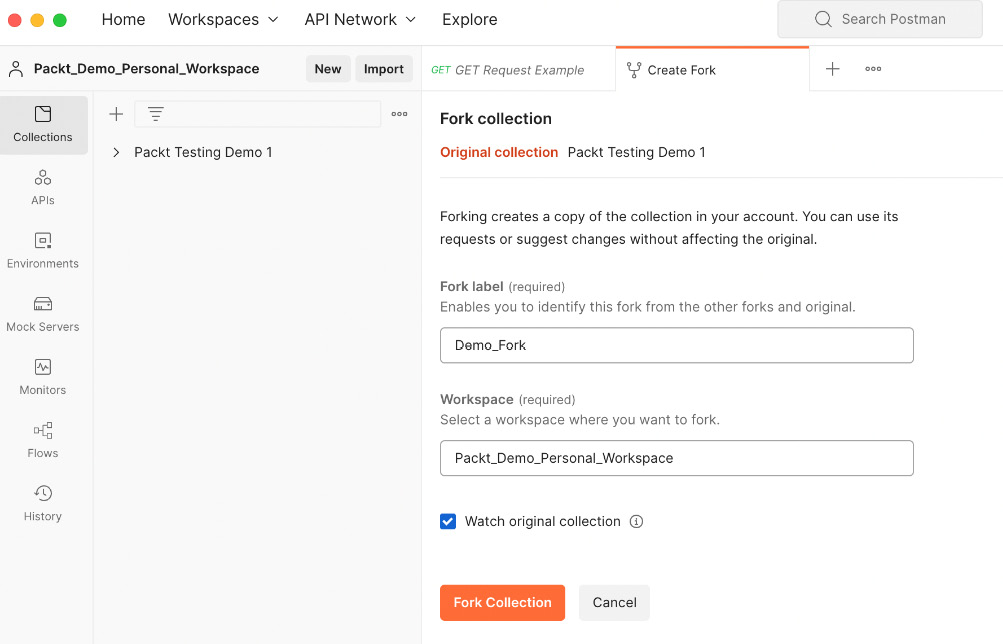
Figure 7.12 – Forking a collection
Once the required changes have been made to the forked collection, a pull request can be created using the Collections drop-down menu. Figure 7.13 shows a snippet of a pull request where the user can provide a title, description, and select reviewers:
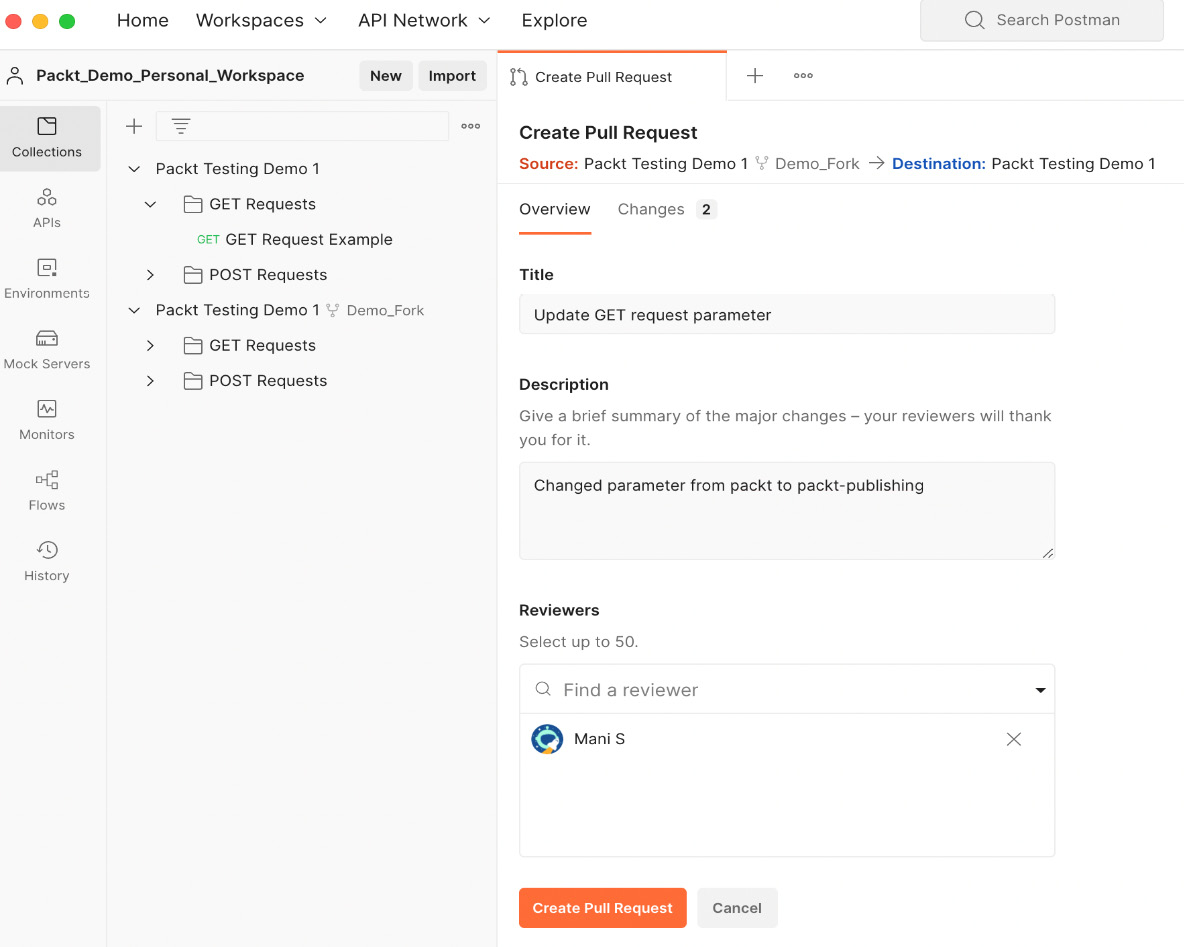
Figure 7.13 – Creating a pull request
The changes can be reviewed and merged using the merge option within the pull request or through the Collections drop-down menu. This is a neat way to keep track of changes to your API requests and nurture collaboration within the team while making these changes.
So far, we have looked at the basics of the Postman tool and how to make requests manually. This works well for testing new API features but falls short when it comes to regression testing. In the next section, let’s learn to write automated tests to validate API responses.
Writing automated API tests
Postman allows us to add tests that run automatically after an API response is returned from the server. This can be done through the Tests tab in the Postman request dashboard. We will be using the following three GitHub API requests in this section to help us set up and understand automated API response validation:
- Create a new repository
- Get a repository by name
- Delete a repository by name
In the next section, let us review how to use snippets to speed up our test automation process.
Using snippets for asserting an API response
Postman comes with pre-defined JavaScript test scripts in the form of code snippets that can directly be used in our tests. Let us start by adding snippets for some of the basic checks performed on an API response. Snippets are shown on the right pane next to the various tabs on the request dashboard.
Every API test requires the validation of the status of an API response, and Postman provides a readymade code snippet for this. On selecting the Status code: Code is 200 snippet, the following code is populated onto the Tests tab, as shown in Figure 7.14:
pm.test("Status code is 200", function () {pm.response.to.have.status(200);
});
pm represents a Postman object, and it contains all information pertaining to the request and response body. The pm object comes with a lot of properties and methods built in. Here, we use the test method, which accepts a description and a function within which an assertion can be defined. These assertions are defined using the chai library, and readers can refer to their documentation at https://www.chaijs.com/api/bdd/ to get familiarized with more assertions.
Let us now add the Status code: Code name has string snippet, which adds the following code snippet. In the case of a GET request, this string is OK, and for the POST request, it is Created, as we have seen before:
pm.test("Status code name has string", function () {pm.response.to.have.status("Created");});
Postman provides a snippet to validate the response time of the API. On adding the Response time is less than 200ms snippet, we see the following code added. Note that we use the expect assertion here, which operates on the responseTime property and checks its value range:
pm.test("Response time is less than 200ms", function () {pm.expect(pm.response.responseTime).to.be.below(200);
});
Let us now add an assertion on the response header using the Response headers: Content-Type header check snippet. This can be further modified to check the presence of any header in the response, as shown in the following code snippet:
pm.test("Last-Modified is present", function () {pm.response.to.have.header("Last-Modified");});
Figure 7.14 shows a summary of the test results for the GET repository API call with a test status for each of the snippets we have added:
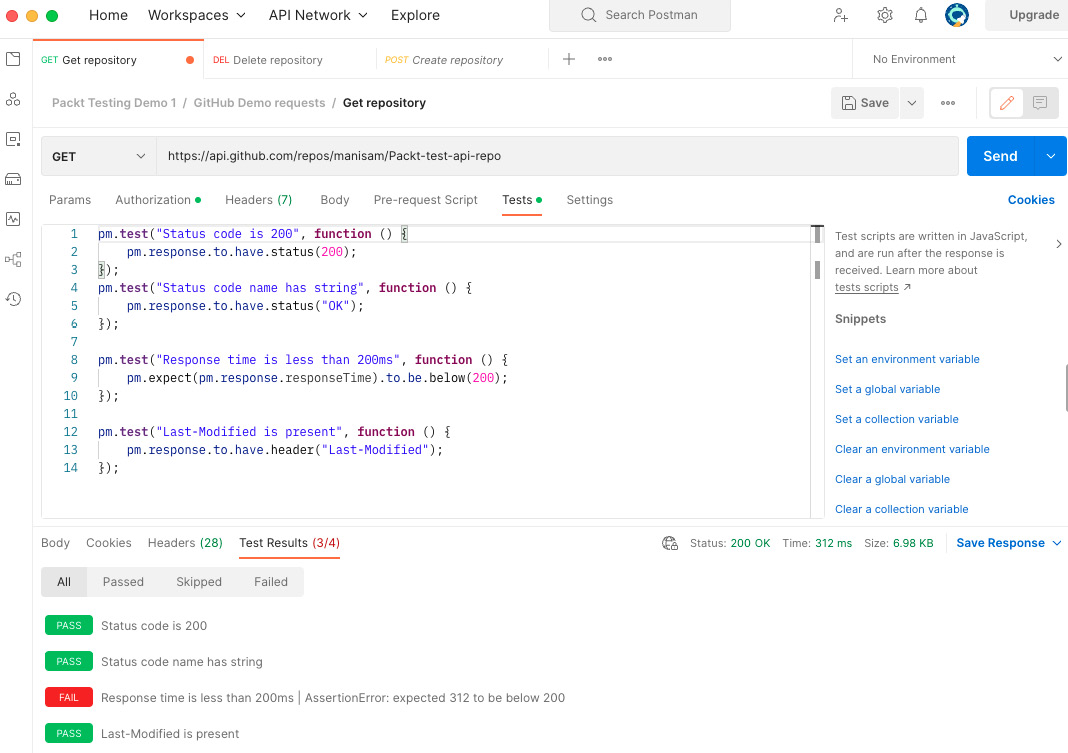
Figure 7.14 – Automated API response validation
These are some of the generic tests we can add for API responses. In the next section, let us learn how to add assertions on specific values such as the repository name on the response.
Understanding Postman variables
Let us understand what an environment means in Postman before jumping into looking at variables. An environment is an assembly of variables that can be used in API requests. For example, multiple environments can be added in Postman, each with its own collection of variables. A new environment can be created and added using the Environments drop-down menu and the icon from the top-right section of the workspace window, as shown in Figure 7.15. Here, we have created a new Packt testing environment:
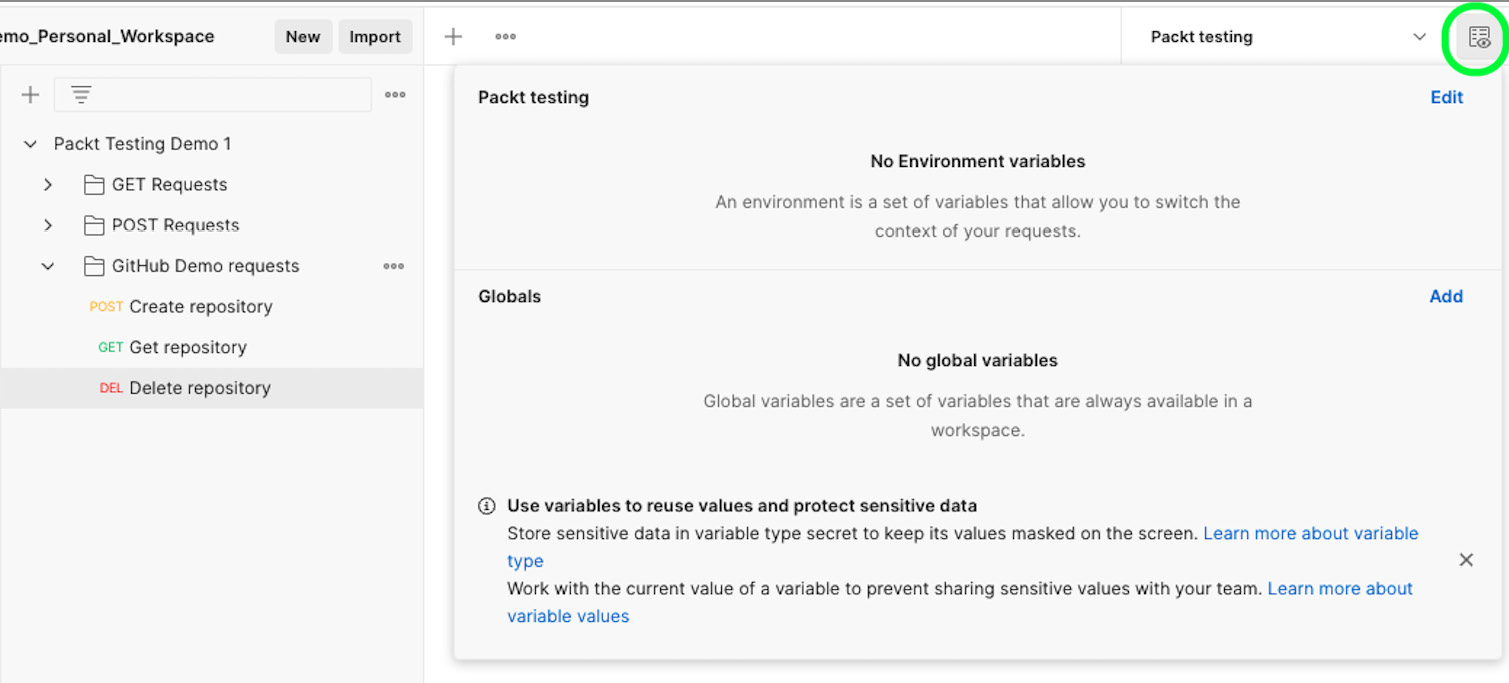
Figure 7.15 – Environments drop-down menu and icon
Postman has five types of built-in variables, which are the following:
- Global variables: Variables with the broadest scope and can be accessed anywhere in a workspace
- Collection variables: Variables scoped to be available for all the requests within a collection
- Environment variables: These variables are accessible only within an environment and primarily used to manipulate access—for example, in staging versus production
- Data variables: These are variables created when importing external data and are scoped for a single execution
- Local variables: Used on tests in a single request and lose scope as soon as the execution ends
Let us consider the API for creating a new GitHub repository to understand how variables can be used in Postman to remove static context from API requests. For example, we must validate that the repository name matches between request and response. It is also important to remember that GitHub repositories cannot have duplicate names. So, in order for this to work, we should provide a randomly generated name in our POST request body and validate the presence of this name in the corresponding response body. Dynamic variables come in handy to achieve this in Postman. Variables are defined using double curly braces: {{<variable name>}}. The request body for the create repository POST call will look like this:
{"name": "{{repository_name}}","private": false
}
Now, we need this value to be new for every POST request we send, and the best place to do this is in the Pre-request Script tab of the request dashboard. This represents a pre-condition to the test case, and it is run before the request is sent to the server. We accomplish random value generation by defining a variable with static and dynamic parts. Here, we use the variables property of the pm object. Then, we set this as an environment variable. Figure 7.16 shows a new repository_name environment variable created in the current environment, Packt testing:
let repository_name = "test_packt_api_" + pm.variables.replaceIn('{{$randomInt}}');pm.environment.set("repository_name", repository_name);The following figure shows the repository_name environment variable:
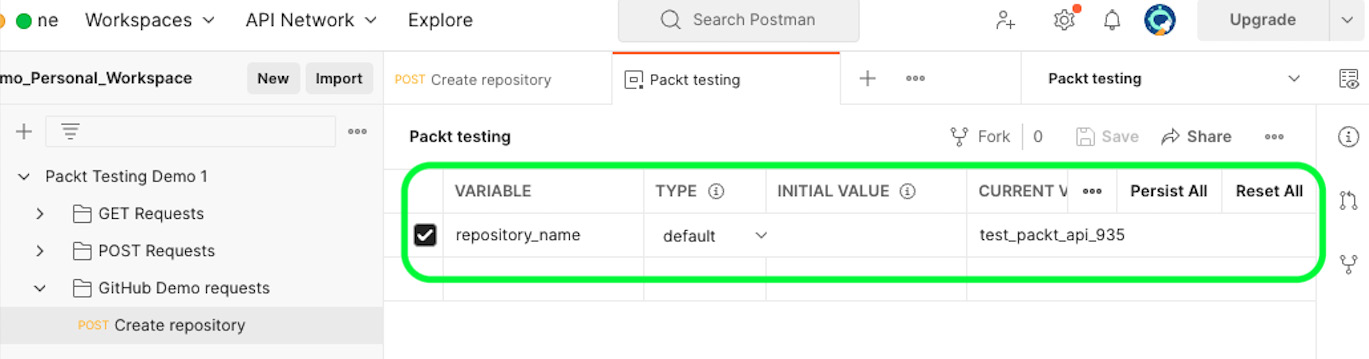
Figure 7.16 – A new environment variable created
Note
Pre-requisite scripts are run before the API request is executed, while the test scripts are run after the server returns a response.
So far, we have created an environment variable in the Pre-request Script tab and updated the request body to use that variable. Let us next add an assertion on this variable in the response body. This can be done in the Tests tab via the Response body: JSON value check snippet. This snippet helps check a specific value in the API response. Note that the value of an environment variable can be fetched using pm.environment.get("repository_name"):
pm.test("Check repository name", function () {var jsonData = pm.response.json();
pm.expect(jsonData.name).to.eql(pm.environment.get("repository_name"));});
In the next section, let us learn to chain a series of API requests by passing data from one API to the next.
Chaining API requests
Postman allows us to use variables to enable the chaining of a series of API requests. A variable created from the response of an API can be used in the subsequent request. Let us take the example of the create repository call where a new repository is created for every request. The name of this repository can be captured and used in a subsequent GET call.
For our understanding here, let us chain the create repository call with GET and DELETE calls. These calls require the name of the repository and owner. In the create repository call from the previous section, we have the repository_name variable. Let us now capture the owner variable from the response body using the following code:
let json = JSON.parse(responseBody);
pm.environment.set("owner", json.owner.login);We use the JSON.parse() method to convert responseBody into a JSON object and then create an environment variable using the login key from the response. GET and DELETE calls both use the https://api.github.com/repos/:owner/:repo route. We create requests for each of these API requests with this route, and on saving, Postman automatically creates a new Path variables section in the Params tab of the request dashboard. We can now substitute the captured environment variables as values, as shown in Figure 7.17. In this way, we are chaining the response of the create repository call to the GET and DELETE calls:
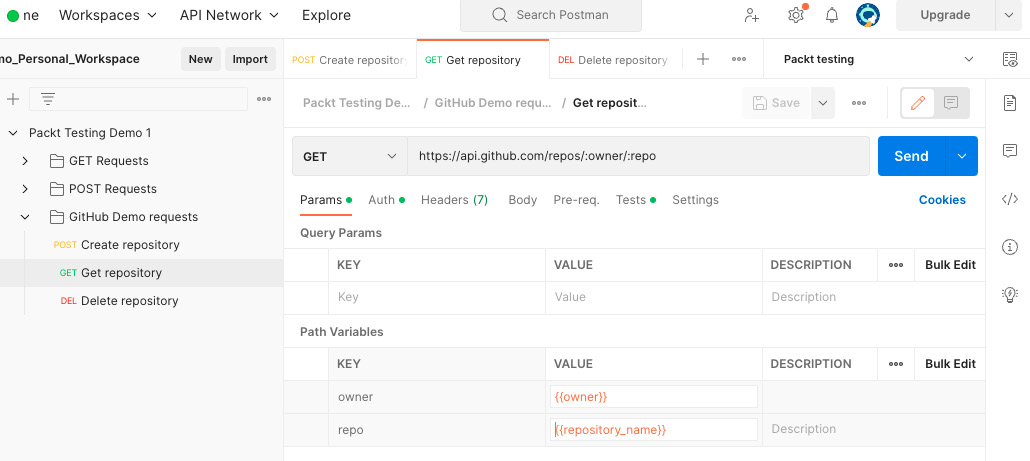
Figure 7.17 – Chaining API requests
On executing these requests one after another, we notice that the values from the request are being passed on to the next one, seamlessly eliminating static data transfer. This behavior makes Postman an effective tool for testing complex API workflows.
We now have a simple collection with multiple API requests, and it is not feasible to run each of them manually for every test cycle. In the next section, let us survey a few ways of executing tests in Postman.
Various ways to execute tests
Let us first look at how to run our tests using the Collection runner. This is helpful when all tests in a collection must be run sequentially in an automated fashion. The Collection runner window can be launched by using the Run button from the Overview tab on clicking the collection name. This opens a new tab that displays all the requests in the collection and some additional run parameters. Figure 7.18 shows this window and the associated options:
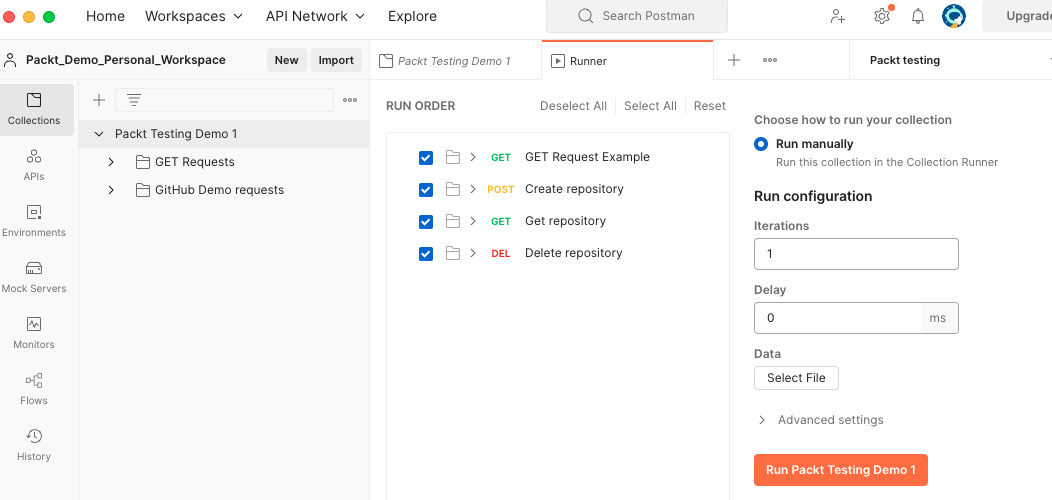
Figure 7.18 – Collection runner window
Using the Iterations option, users can specify the number of times the requests would be run. The Delay option helps to add a specified wait between subsequent requests. This is very useful in case of long-running requests. There is also an option to upload an external data file and use that data in the form of variables within the request. On clicking the Run button, all requests in the collection are run, and results with a clear breakdown are populated in the same window, as shown in Figure 7.19:
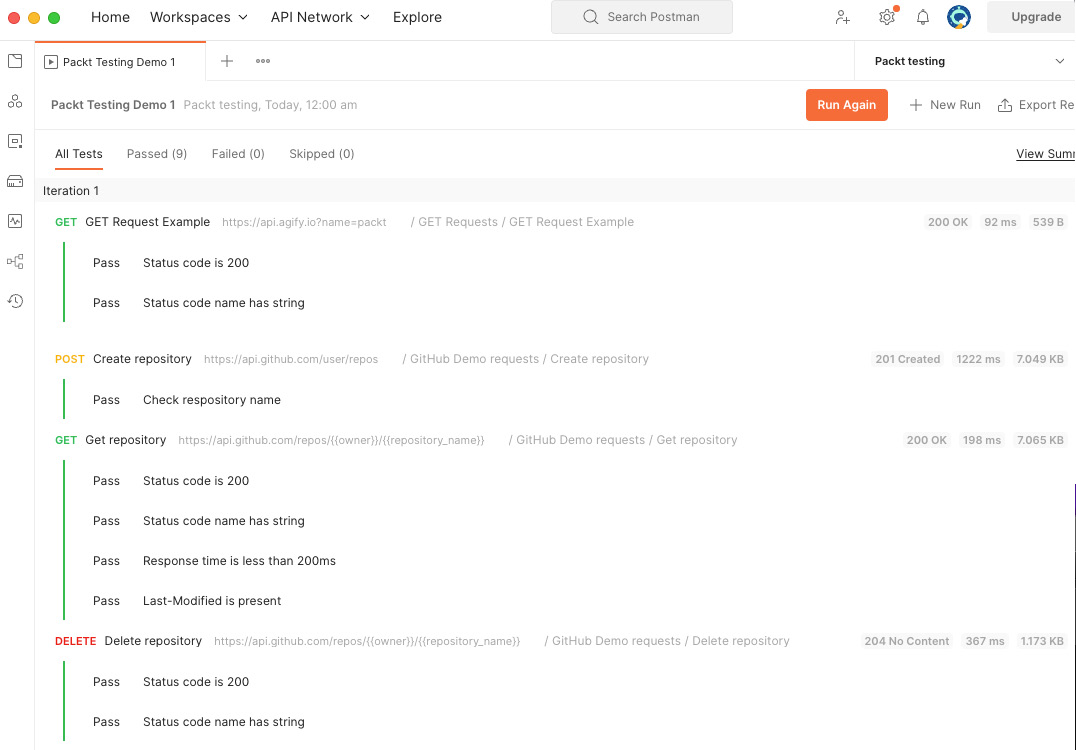
Figure 7.19 – Test results summary
Postman also supports running a collection from the command line through a tool called Newman. Newman can be installed using the npm command: npm install –g newman. The installation can be verified using the newman –v command. To run the collection, we will first export the collections and the associated environment variables. A collection can be exported and saved to the local filesystem using the Export option from the Collections drop-down menu. Similarly, environment variables can be downloaded by using the Export option within Environments on the left navigation bar. Note that these files are downloaded in a JSON format. Now that we have the collection and its necessary variables, we can run it using Newman:
newman run packt_testing_collection.json -e packt_testing_environment.json
The output from the run command line is demonstrated in Figure 7.20:
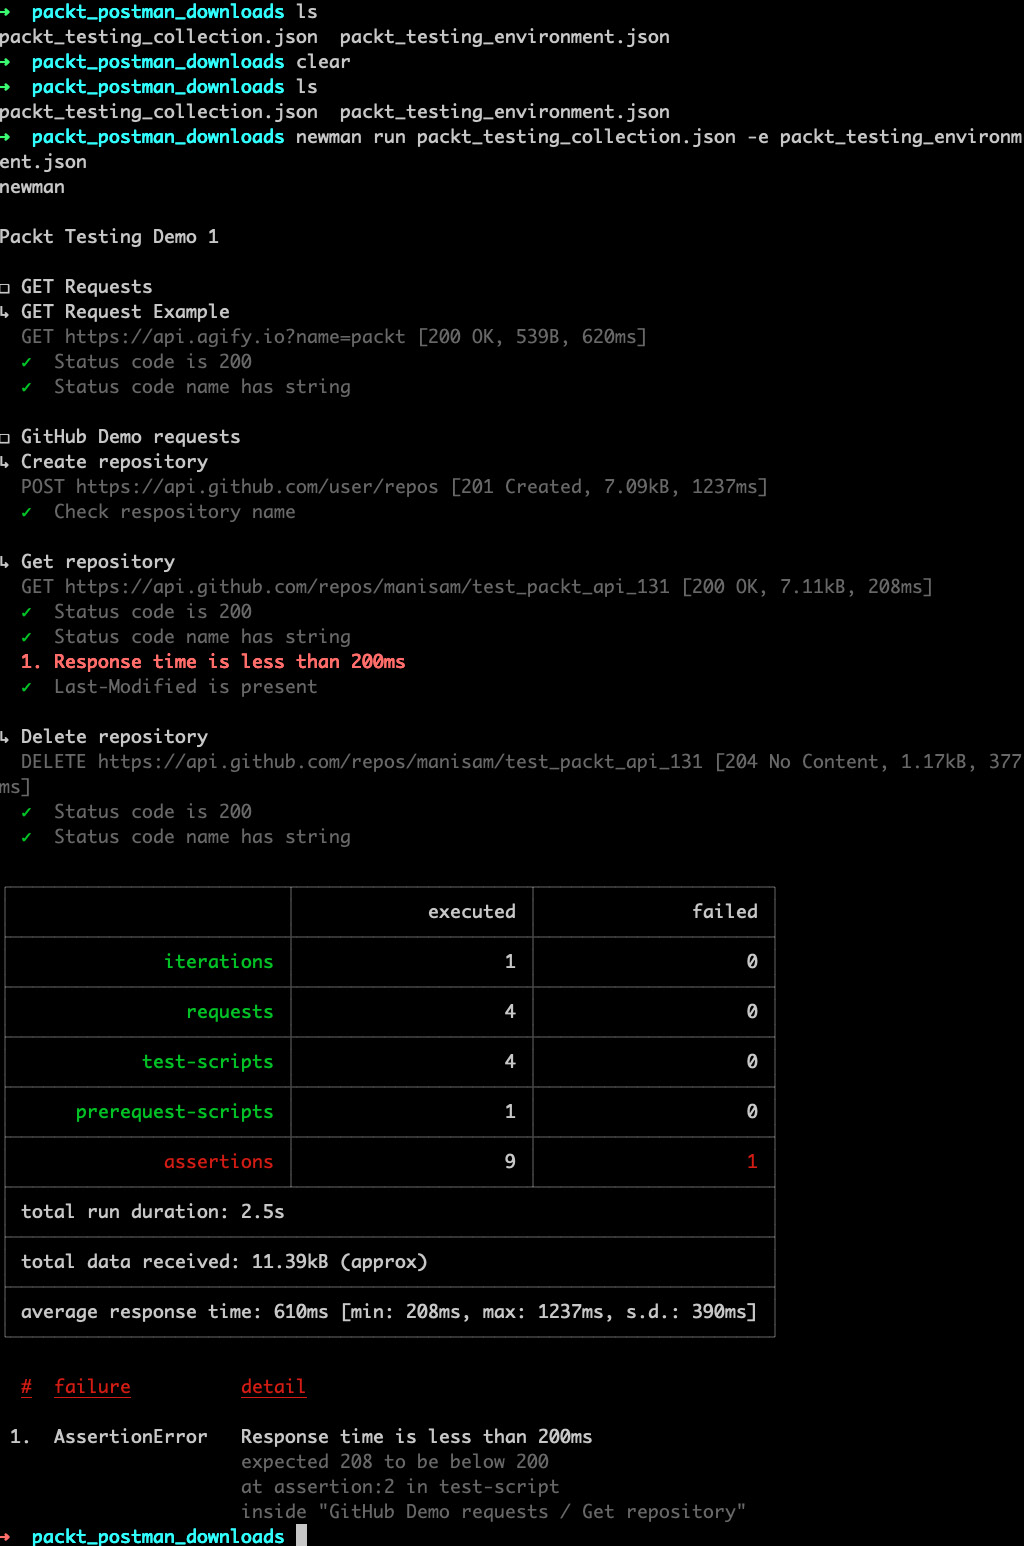
Figure 7.20 – Collection CLI run
Postman provides integration with Docker for executing tests within a Docker container. Docker is a platform that assists in building, deploying, and testing your application code on units called containers, irrespective of the underlying operating system. It provides great portability for developing and testing applications. Running a collection on Postman’s Docker container involves just a couple of commands. Once you have Docker installed on your machine, run the docker pull postman/newman command. This command pulls the latest image of the Postman docker/newman runner from Docker Hub and sets up the container. Next, we need the URL of the collection to be able to run it externally. This can be obtained using the Share option from the Collections drop-down menu. Now, run the following Docker command:
run –t postman/newman run "<<Collection URL>>"
This brings us to the end of a basic exploration of API testing with Postman. The Postman tool has so much more to offer, and its capabilities can be referenced at https://learning.postman.com/docs.
In the next section, let us review the considerations that go into API automation testing.
Key considerations for API automation
Automating API tests involves a thorough understanding of the underlying business logic as well as the architectural nuances. Data and performance aspects of the API always pose a tough challenge when trying to run multiple iterations of API tests.
Effective API test automation
Let us now look at some chief considerations when automating API tests:
- Static data references must be eliminated wherever possible. These render the tests inextensible and isolated.
- Do more than happy path testing since API tests are quick to run and can provide feedback early in the product life cycle. Applicable product use cases should be tested to a greater extent via APIs. Consider mocking and stubbing to fill in gaps to complete the application flow.
- Since there is no frontend to check the test results, it is imperative to keep API tests clear with sufficient documentation. This helps especially in debugging when there are new failures in the system.
- Manage the data needed for a test by employing setup and teardown tests wherever possible. This helps clean up the environment before and after the execution.
- Pay special attention to authentication mechanisms and try to implement these the same way a real user would access the API.
- Add extra checks for data consistency when chaining responses of multiple services. Passing the same data in different ways may not look bad at the API level but might end up breaking the UI layer of the application.
Throughout this chapter, we examined the requests and responses of REST APIs. As we saw earlier, REST is an architectural framework for creating and accessing APIs. In the next section, let us review and compare the testing aspects of GraphQL with REST.
Testing GraphQL versus REST APIs
GraphQL is a query language specification while REST is an architectural framework. Even though one is not considered a replacement for the other, the areas of focus shift when it comes to testing them. Let us now examine them one by one:
- Tests on GraphQL should include schema validation while REST demands endpoint validation.
- After the initial learning curve, changes can be done faster in GraphQL APIs due to its client-driven architecture. Test automation cycles must be designed to keep up with these rapid changes.
- Validations on API output should be customized to the specific GraphQL query being tested. This is different in the case of REST with its fixed response on endpoints.
- GraphQL was designed to ease API integration bottlenecks, while REST provides a solid foundation for individual API designs. A higher effort may be involved in testing individual GraphQL APIs while REST simplifies isolated API testing.
GraphQL is a very detailed specification on its own, and readers are encouraged to go through the documentation for further exploration.
This brings us to the end of this chapter. Let us now quickly summarize what we learned in this chapter.
Summary
We acquired a basic understanding of REST APIs and went through a basic setup of Postman with workspaces. We looked in detail at sending GET/POST requests and how to validate their responses. We then learned what collections are and how they help organize API requests within our workspace for conciseness and collaboration. In the next section, we learned how to validate responses in an automated fashion using snippets. We gained an understanding of how variables are used in Postman to chain API requests. Subsequently, we surveyed various ways to execute collections. Finally, we took up some key considerations that go into automating API tests and familiarized ourselves with how GraphQL APIS are different from their REST counterparts.
In the next chapter, we dive deep into performance testing with the JMeter tool.
Questions
- What are common areas to focus on in API testing?
- What are collections in Postman?
- What are snippets and how do they help?
- How can complex workflows be tested in Postman?
- What is Newman used for?
- What is Docker and how does it help?
- What is GraphQL and how is it used?