
Chapter 7: Creating Analytic Rules
Now that you have connected your data to Azure Sentinel and know how to write your own KQL queries, you need to know how to use those queries to detect suspicious events. This is where Azure Sentinel Analytics comes into play.
Analytics is the heart of Azure Sentinel. This is where you will set up analytic rules and queries that can run automatically to detect issues that you may have. These rules can run queries, which you build on your own or they can come from the ever-growing list of templates that Microsoft provides. This is exactly what we will learn to do in this chapter.
This chapter will take you through the following topics:
- An introduction to analytic rules
- The various types of analytic rules
- Creating rules from templates
- Creating new rules and queries using the wizard
- Managing rules including editing and deleting
An introduction to Azure Sentinel Analytics
Azure Sentinel Analytics is where you set up rules to find issues with your environment. You can create various types of rules, each with its own configuration steps and niche for the types of abnormalities you are trying to detect.
Types of analytic rules
There are currently four types of rules: scheduled, Microsoft Security, machine learning, and fusion. Each type of rule fills a specific niche. Let's explore each of these in turn.
Scheduled
As the name suggests, these rules run on a set schedule to detect suspicious events. For instance, you can have a rule run every few minutes, every hour, every day, or at other time period. The queries for these rules will use KQL to define what they are trying to find. These rules will make up a large pro portion of your analytic rules and, if you have used other SIEM systems, are probably the ones you are most familiar with.
Microsoft Security
Microsoft Security rules are used to create Azure Sentinel incidents from alerts generated from other Microsoft Security solutions. At the time of writing, the following security solutions can have their alerts passed through:
- Microsoft Cloud App Security
- Azure Security Center
- Azure Advanced Threat Protection
- Azure Active Directory Identity Protection
- Microsoft Defender Advanced Threat Protection
These rules are very useful to set up to provide a single location to go to to see all of the alerts from Azure Security applications.
Machine learning behavioral analytics
Currently, these rules can only be created from templates that Microsoft provides. They use proprietary Microsoft machine learning algorithms to help to determine suspicious events. By harnessing the power of artificial intelligence and machine learning, these queries can help to detect abnormalities in how your users behave. For example, if a user normally only logs in to a server Monday – Friday and then starts logging in on the weekend, it could be an action worth investigating.
Fusion
Fusion is another Microsoft machine learning technology that will combine information from various alerts to generate alerts about things that may otherwise be very difficult to detect. This can be very powerful as some lower-severity alerts may not mean much looking at each one separately, but when combined they can indicate a much larger issue.
Note
For more information on the Fusion technology in Azure Sentinel, look at this page: https://docs.microsoft.com/en-us/azure/sentinel/fusion.
Those are the various types of analytic rules available. As you can see, they cover a wide variety of use cases from fully automated machine learning to scheduled rules that you create yourself. In the next section, we will look at the Analytics home page.
Navigating through the Analytics home page
The Analytics home page is where you can view, create, and manage various alerts. Let's navigate through this page.
To access the Analytics home page, select Analytics from the left-hand navigation bar. The following screen will open:
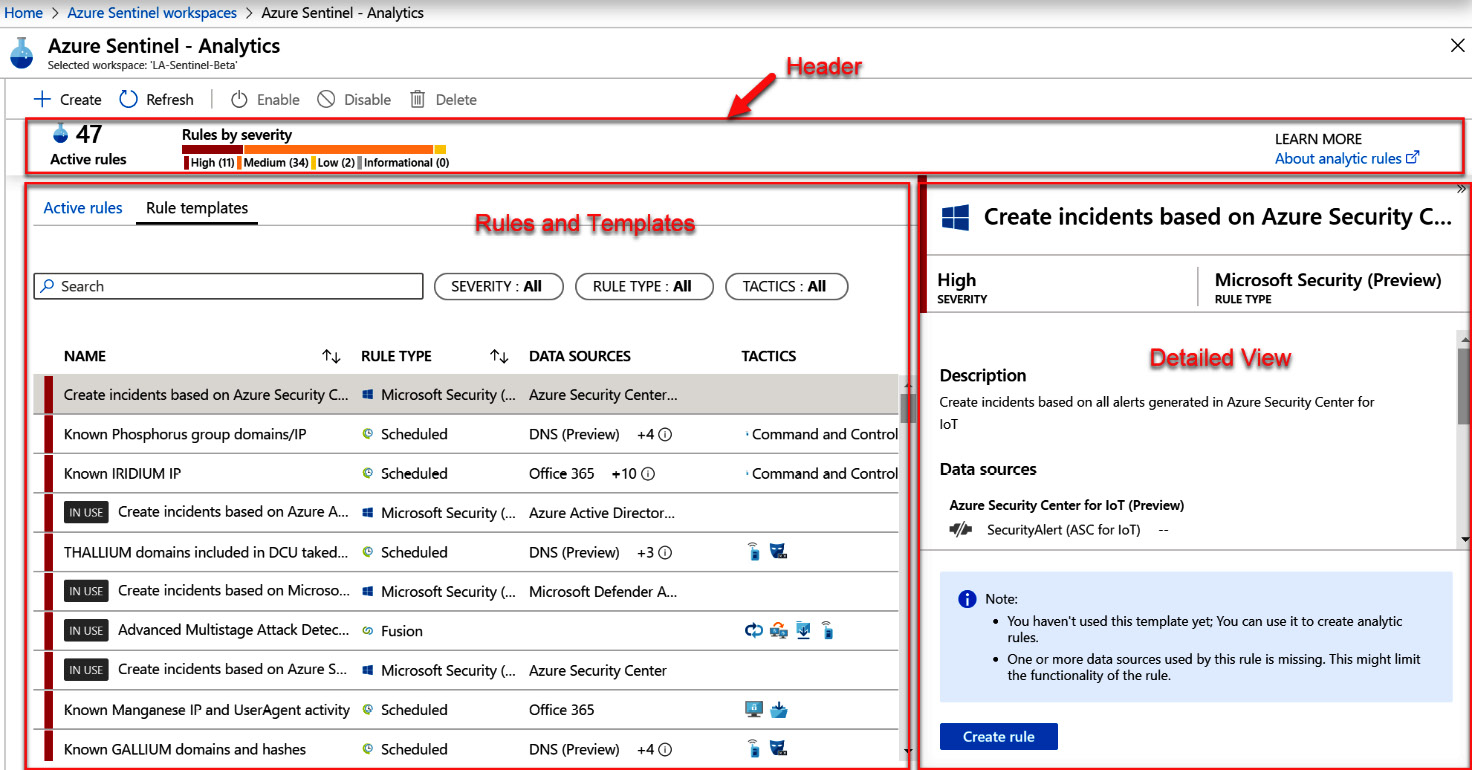
Figure 7.1 – Analytics home page
You will notice that the home page is broken into three main parts:
- The header bar
- The listing of rules and templates
- The detailed information section
Each of these parts will be described in further detail in the following sections.
The header bar
The following screenshot shows the header bar. Take a closer look at it. On the left is the number of Active rules; this is the number of rules that are currently in use. To the right of that is a listing of those rules broken down by the severity of the alert they will create. On the far right is a link that will open a new tab where you can learn more about analytic rules:

Figure 7.2 – Analytics header bar
Under the heading bar is a selector to select either Active rules or Rule Templates. Each of these tabs has different information. Let's take a look at them now.
Rule and template listings
Click on Rule Templates. It will show all of the rule templates that Microsoft has pre-loaded from Azure Sentinel's GitHub repository for you to use. Note that these are templates only; you must create a rule from them to use them, and there will be more on this later:
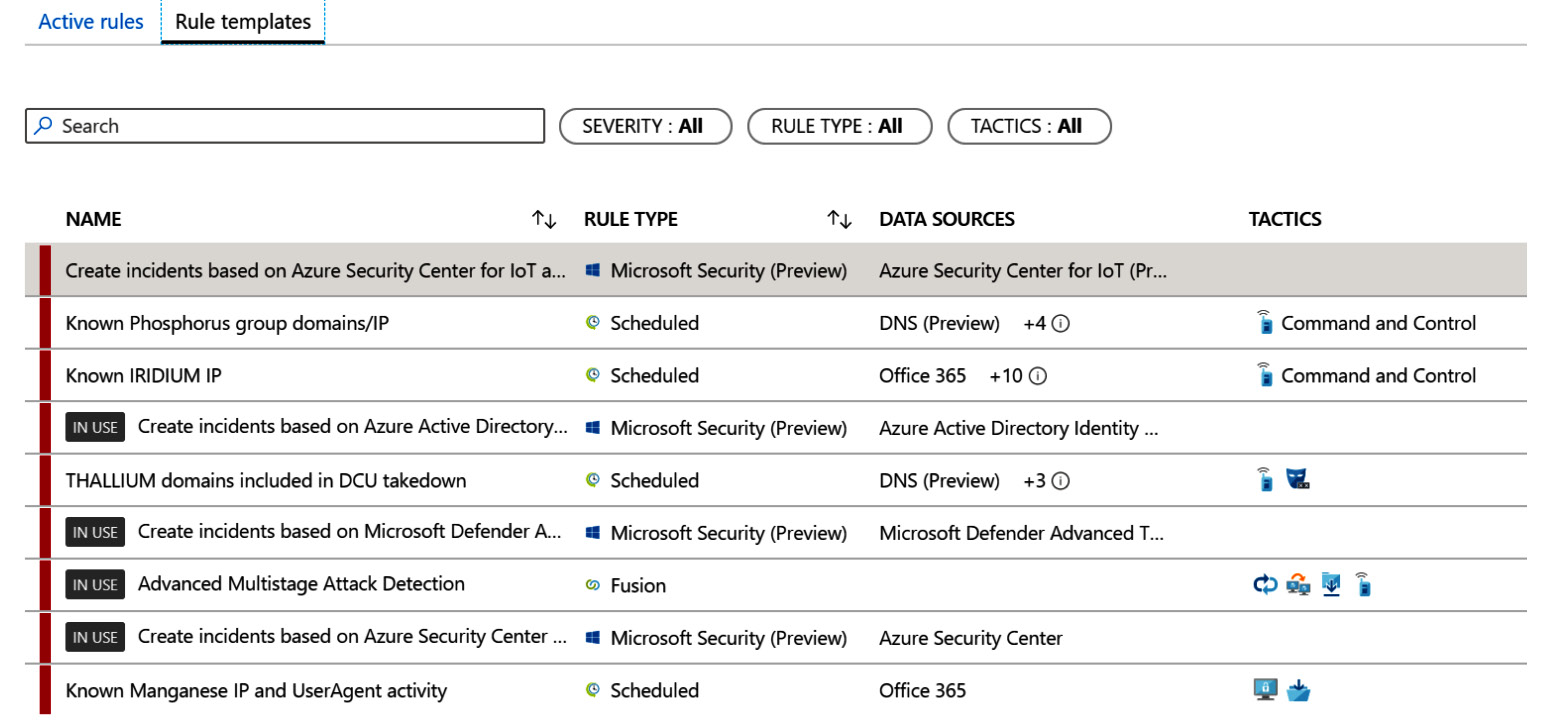
Figure 7.3 – Active rules/rule templates
If you notice in the preceding screenshot, the fourth rule template in the list states it is IN USE. This means that a rule has been created from this template already. Some of the rule templates, mainly any machine learning behavioral analytics or Fusion rules, will only allow you to create a single rule from the template, so if you see this message on those rules types, you know you cannot create another rule from the template. The other rule types have no such restrictions, so the message is more of a notification that there is at least one rule created from that template. See the Creating a rule from a rule template section for more information.
For each rule, the name, the rule type, the required data sources, and tactics (see the MITRE ATT&CK callout later) will be displayed. You can sort the name and rule type fields but not the required data sources or tactics fields since they can have multiple values. Now, click on Active rules and you will see those rules that you have either created yourself or have used a rule template to create. The following screenshot shows an example of what this looks like. We will go into more detail about this view later in this chapter:
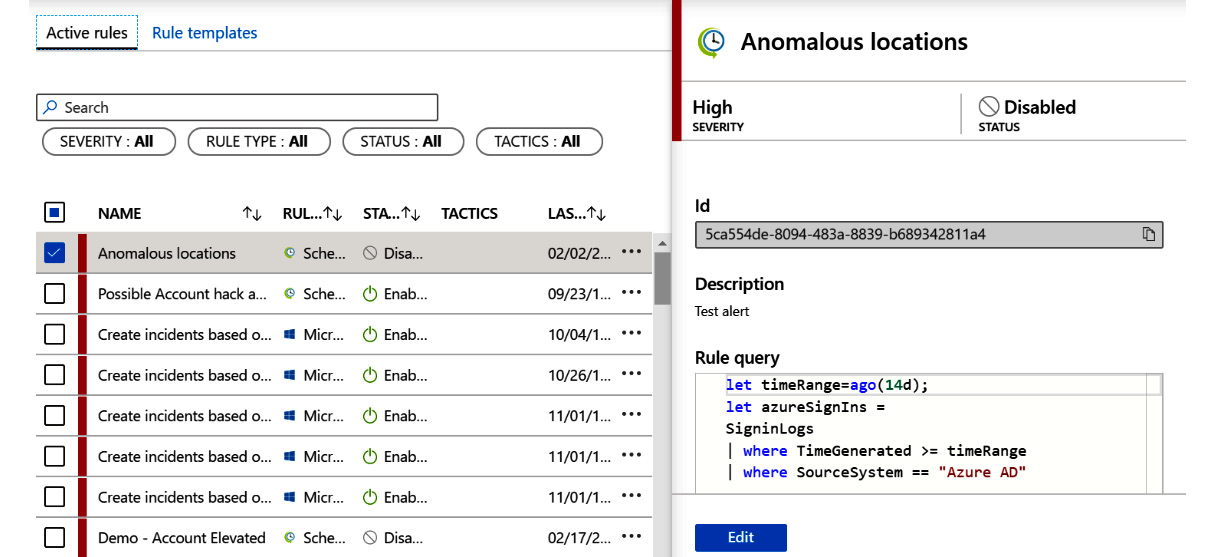
Figure 7.4 – Active rules
Immediately under those tabs is a search box and filters as shown in the following screenshot. The tab you are viewing will determine where the search and filters will look. If you are viewing the Rule templates tab, then the filter and search will only look for rule templates that match. Likewise, if you are viewing the Active rules tab, the search and filter will only look for active rules that match.
Use the search box to search for the Rule templates or Active rules for which you know at least part of the title. Filters allow you to filter your view based on SEVERITY, RULE TYPE, or TACTICS. If you are looking at the Active rules tab, you can also filter on STATUS. Click on the filter to see a drop-down list of all of the available options:

Figure 7.5 – Search box and filters
Under the filters is a listing of either the Rule templates or the Active rules, depending on which tab you are in. Let's explore these next.
Now draw your focus to the left of the NAME field in both the tabs (Active rules and Rule templates). There is a colored column. This matches the severity of the alert that will be created. Red is for high, orange for medium, yellow for low, and gray for informational. This field is used as the default for sorting the rows.
Details pane
Click on any row (in the following screenshot, we clicked on the Known Phosphorus group domains/IP template from the rule templates). This will show the details pane to the right of the listing as shown in the following screenshot. In that pane, you can see as much of the full name that fits, preceded by an icon to match the rule type. Under the name are the severity and the textual rule type:
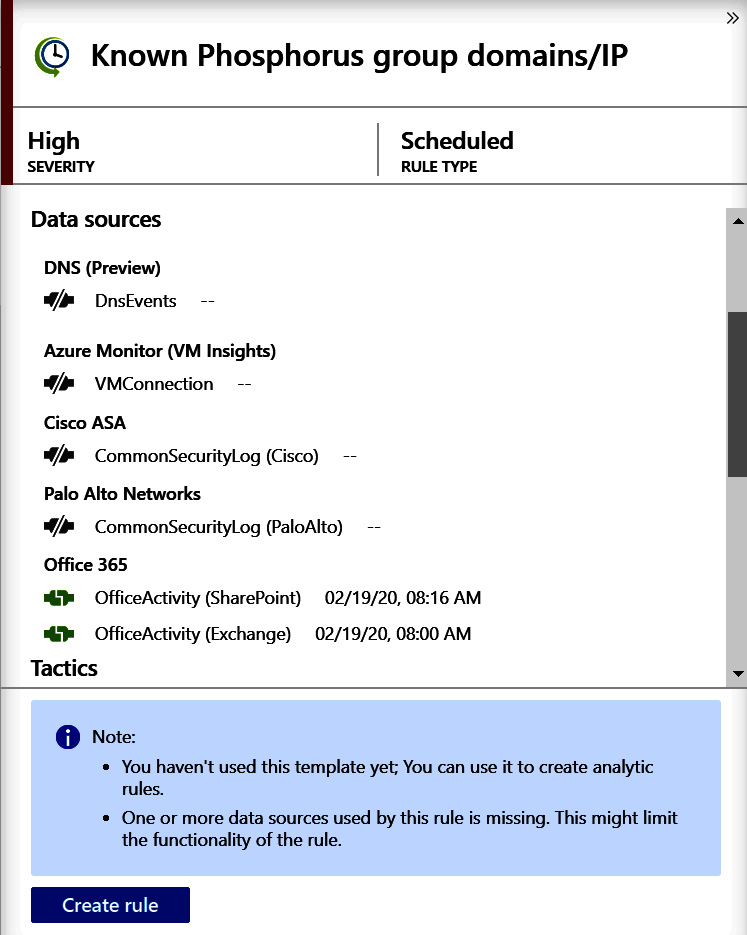
Figure 7.6 – Rule detail pane
There are currently four icons and they represent the rule types discussed in the Types of Analytics rules section from earlier. The icons are as follows:
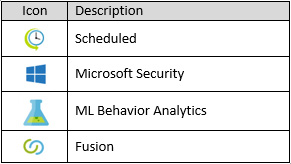
Figure 7.7 – Icons for each rule type
The description is below that line and gives you more information regarding what the rule will be doing and any other useful information.
Below that is a listing of any required data sources. If the icon to the left of the data source name is gray, that indicates that the data source is not available, and you will be unable to use this rule. If the icon is green, then the data source is present. All of the data sources must be green to use this rule template. This information will not be shown when looking at Active rules.
Now scroll the page down. You will see that under the required data sources is a listing of tactics that this rule uses, as shown in the following screenshot. This will show what types of tactics this rule is looking for:
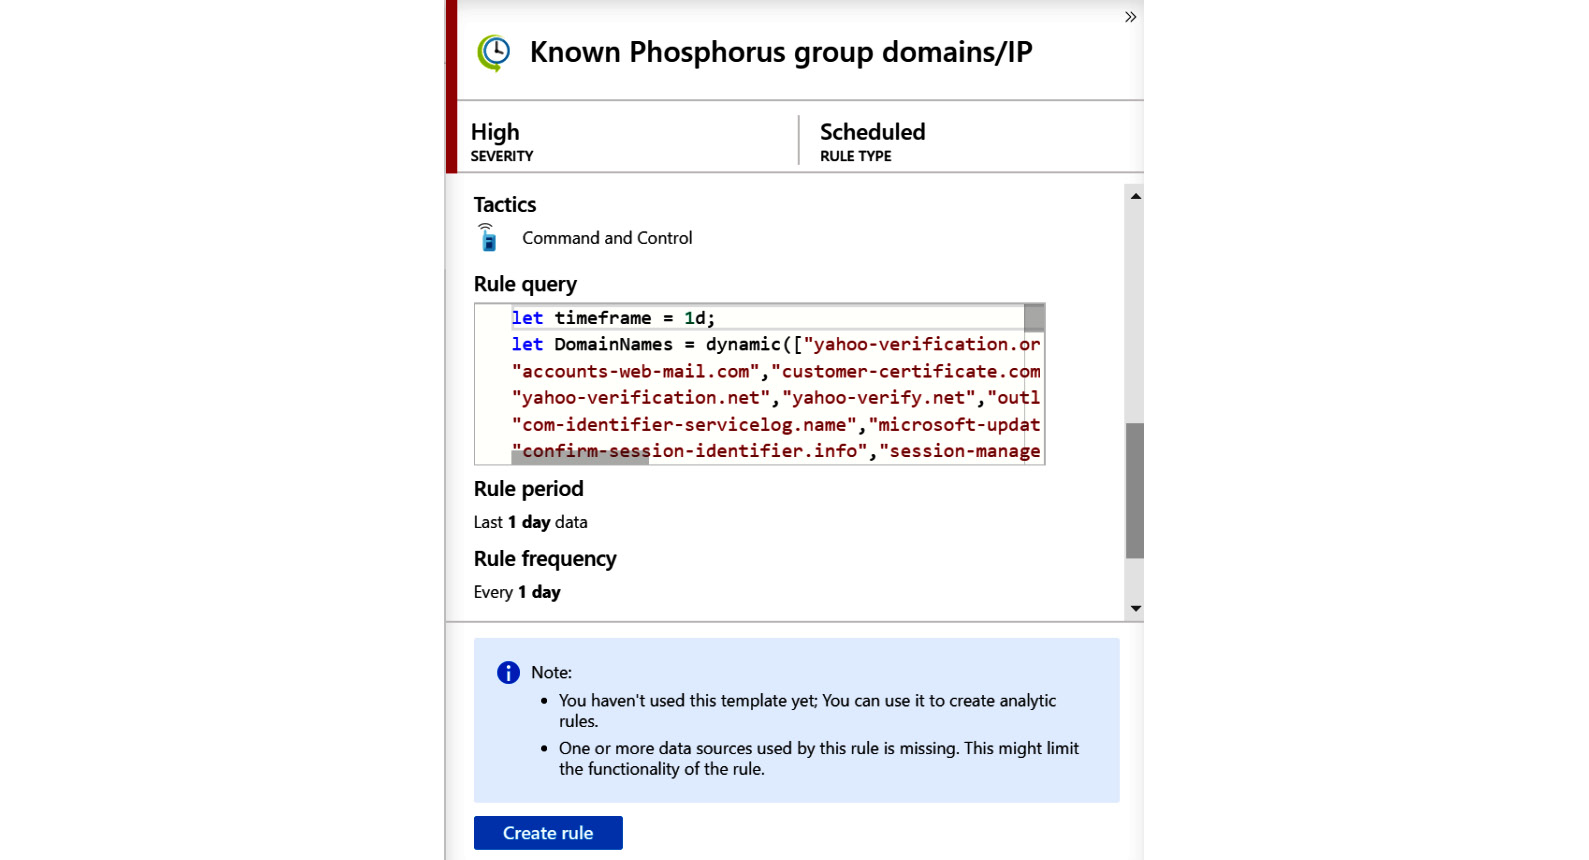
Figure 7.8 – Rule detail pane continued
MITRE ATT&CK® Tactics
The MITRE organization describes the ATT&CK® tactics as follows:“MITRE ATT&CK® is a globally-accessible knowledge base of adversary tactics and techniques based on real-world observations. The ATT&CK knowledge base is used as a foundation for the development of specific threat models and methodologies in the private sector, in government, and in the cybersecurity product and service community.” While the full discussion of tactics is beyond this book, understand that these are standard ways of designating how adversaries are trying to access your system and can be used to denote what your rules are attempting to detect. For more information, visit https://attack.mitre.org/.
The rest of the fields depend on the type of rule being looked at. Fusion and the ML behavior analytics rules will not have any further information.
If the rule is a scheduled rule, then the rule query will be shown under the tactics listing as shown in the following screenshot. This is the KQL query that will be run to determine whether an alert needs to be generated. Only scheduled rules will have this field as other rule types hide their queries:
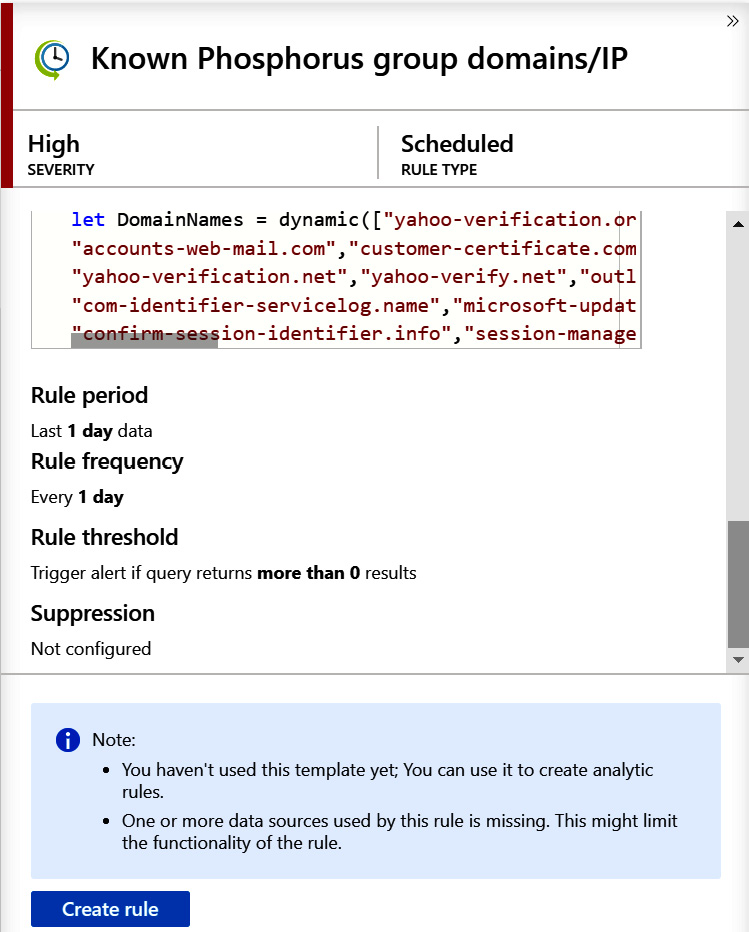
Figure 7.9 – Rule detail pane continued
Below the rule query are a few additional details:
- Rule period: This is how far in the past the query will look for its data. In this case, it will look through the data that was ingested in the last day.
- Rule frequency: This determines how often the query will be run.
- Rule threshold: This determines how many occurrences of the query finding a result there needs to be before an alert is generated.
- Suppression field (not shown): This will state whether the query has been suppressed and if so, for how long.
If the rule is a Microsoft Security rule, then instead of those fields discussed earlier, the Filter by Microsoft security service field will state which other Microsoft service is being used to generate the alerts, as shown in the following screenshot:
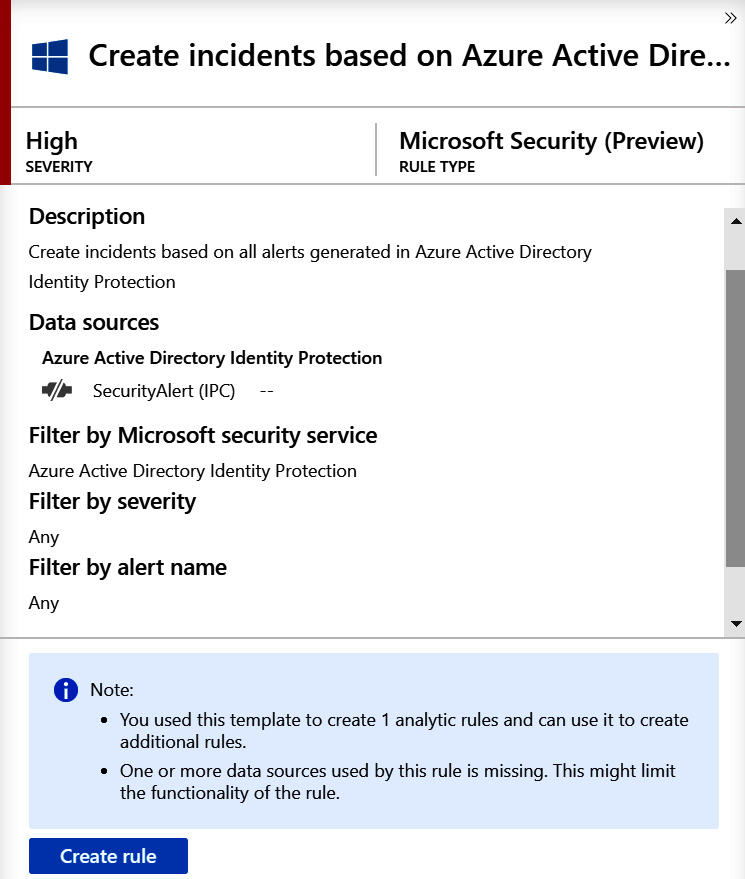
Figure 7.10 – Microsoft Security detail pane
The Filter by severity field will show which levels of severity are being used to filter the incoming alerts and Filter by alert name will do the same for the names of the alerts. These fields will be discussed in the Microsoft incident creation rule section later.
You have now learned about the Azure Sentinel Analytics home page including how to view the various rules that have been created, both in the summary and detail views. You have an understanding of what a rule template is and now it is time to learn how to use those rule templates to create a new rule and how to create a new rule from scratch using the built-in wizards.
Creating an analytic rule
As mentioned before, there are two ways to create rules. You can either use a rule template to create a rule or you can create a new one from scratch using the built-in wizards. Let's first try and do this using a rule template.
Creating a rule from a rule template
To use a rule template to create a rule, all you need to do is to select the rule in the list of rule templates. If you are able to create the rule, which can mean that you have all of the needed data sources and, in some cases, you have not already used this rule template to create a rule, then at the bottom of the rule details pane on the right side of the screen will be a Create rule button. Click it to create the rule.
Note
As stated previously, if this button is grayed out, then there will be some highlighted text above it explaining why. Referring back to figure 7.8 you will notice that we are unable to create a rule from the selected template due to missing data sources.
When you click on Create rule, you will be taken to the Rule creation wizard pages. Depending on the type of rule you are creating, there will be different questions on the pages that need to be answered and these pages will be discussed in the next section. Note that the name and description will be automatically filled in and cannot be changed.
For instance, the rule templates based on the Fusion and machine learning rule types only allow you to select whether or not the rule is enabled when creating a rule from the template. Both the schedule and Microsoft Security rule types allow you to modify all of the fields although a lot of default values have already been filled in for you. The following section covers what the fields are and how to fill them in.
Creating a new rule using the wizard
Azure Sentinel provides a wizard to help you to create new analytic rules. This wizard is comprised of either two or four pages depending on the type of rule being created. As shown in the following figure, there are two different types of rules that can be created using the wizard: Scheduled query and Microsoft incident creation. The creation of each is presented here:
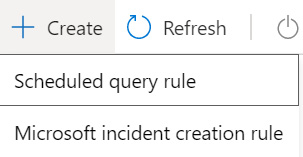
Figure 7.11 – Create a new analytics rule
We will create a new rule using the Scheduled query rule link first.
Creating a scheduled query rule
Remember, a scheduled rule is one that will run on a set schedule and uses KQL code to perform the query. It also has the added benefit of being able to associate an Azure Sentinel Playbook to perform actions when this rule generates an alert.
This allows you to create a rule where you enter your own KQL query. Let's see how to do it:
- Click on the + Create link at the top of the page. This will present you with a drop-down list where you can select Scheduled query rule.
- Once you select the option from the drop-down list, you will be presented with the General screen, as follows:
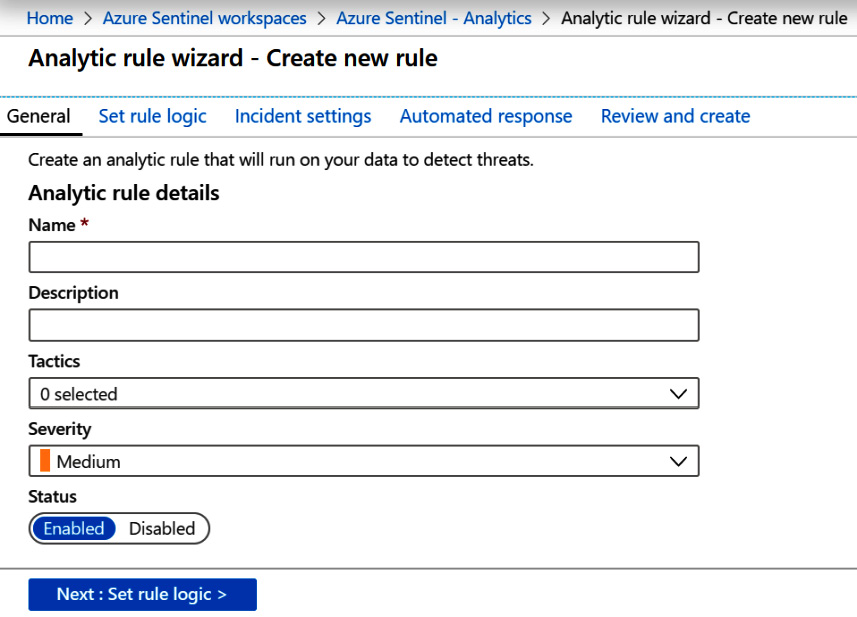
Figure 7.12 – Create new rule – General page
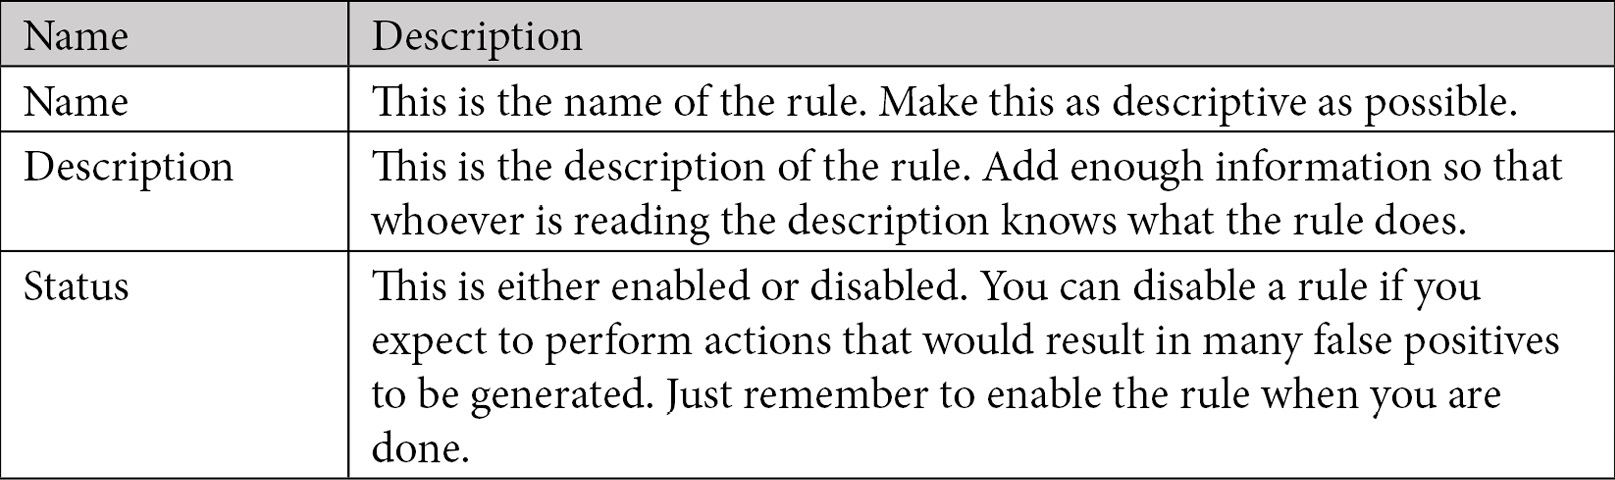
Fill in the details for each field. The following table provides further details to help you out:
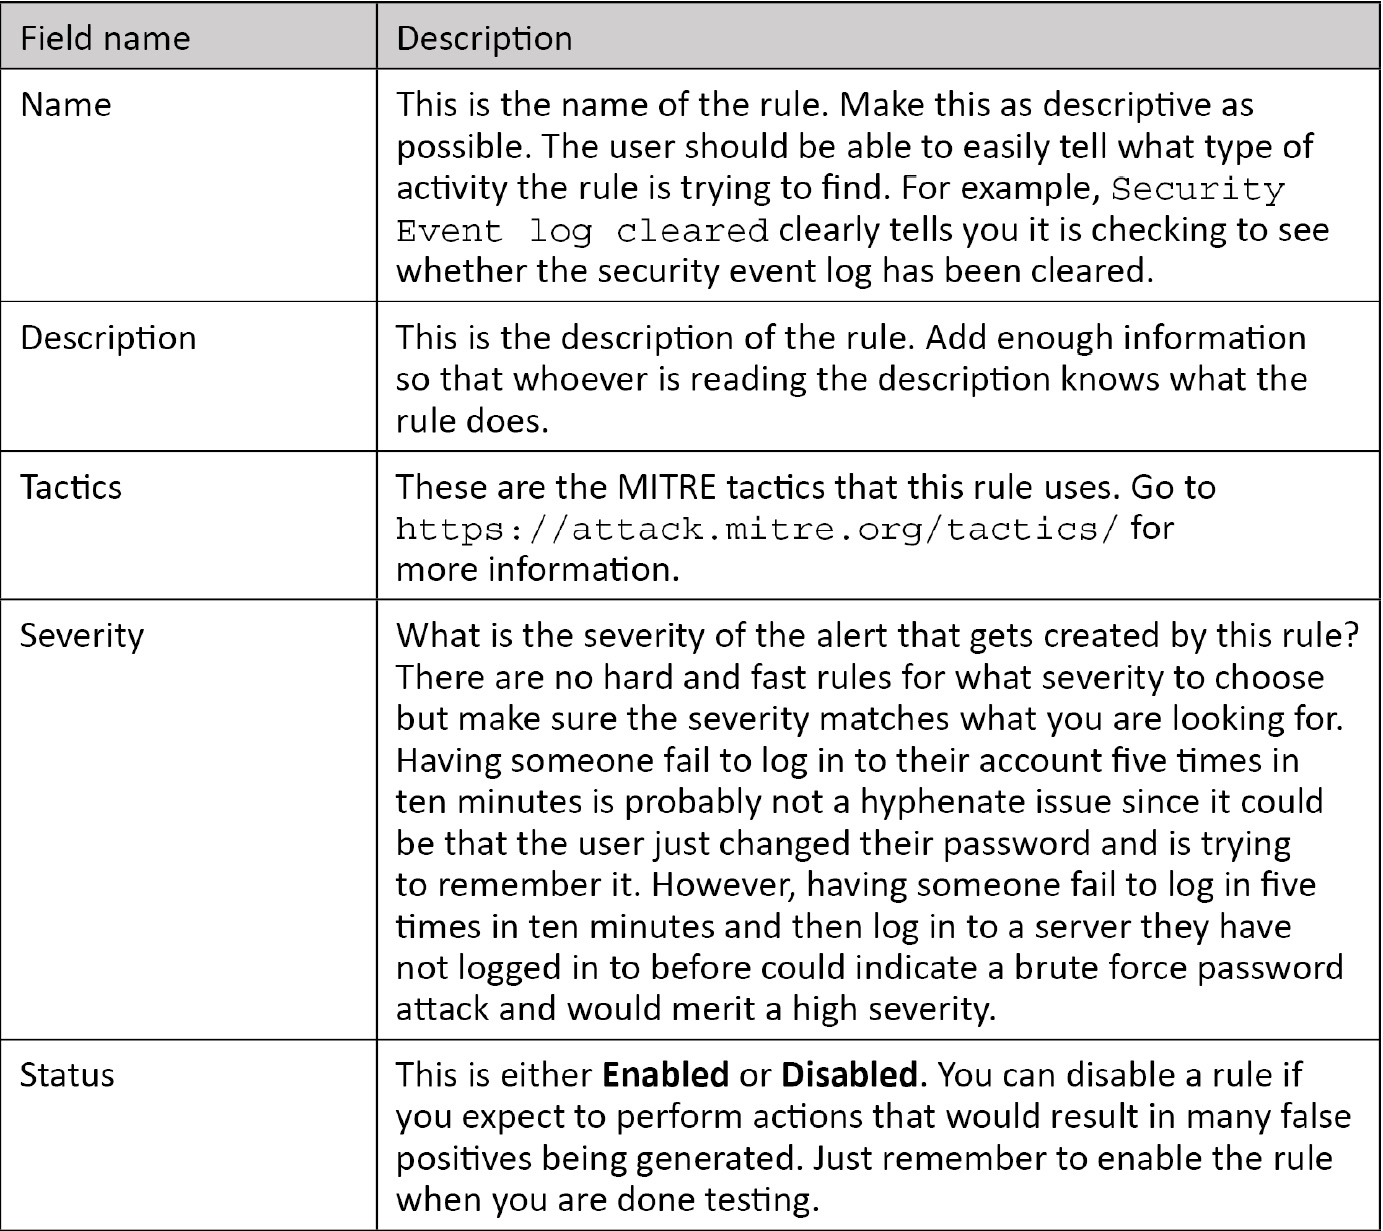
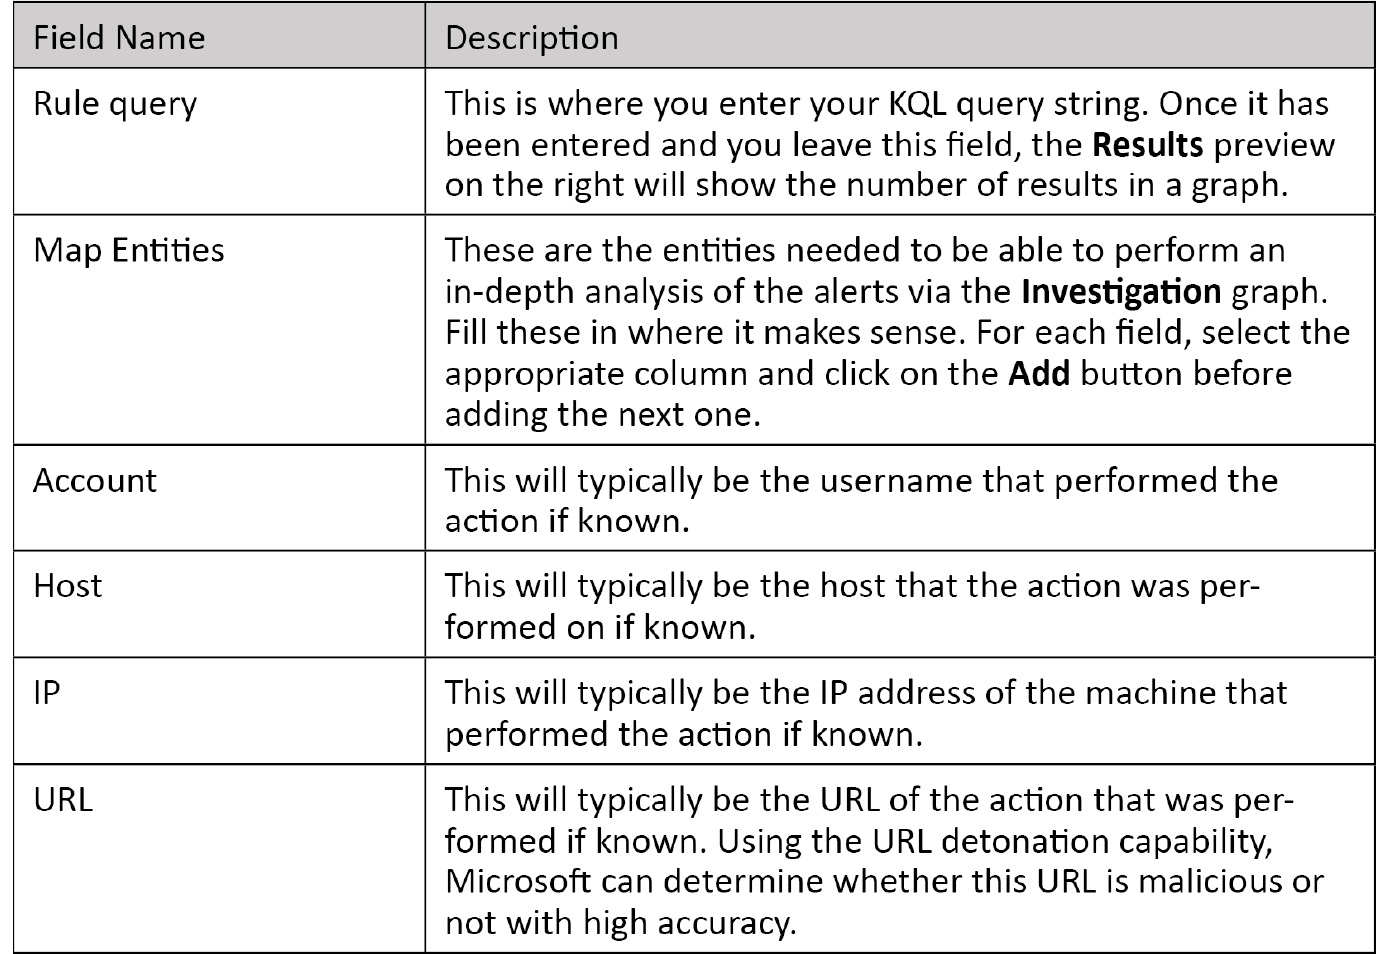
- When you have all of the fields filled in, click on Next: Set rule logic > to continue. The Set rule logic page is where you add your KQL code and entities and set the schedule and alert threshold. The screen is shown here, followed by a description of the fields:
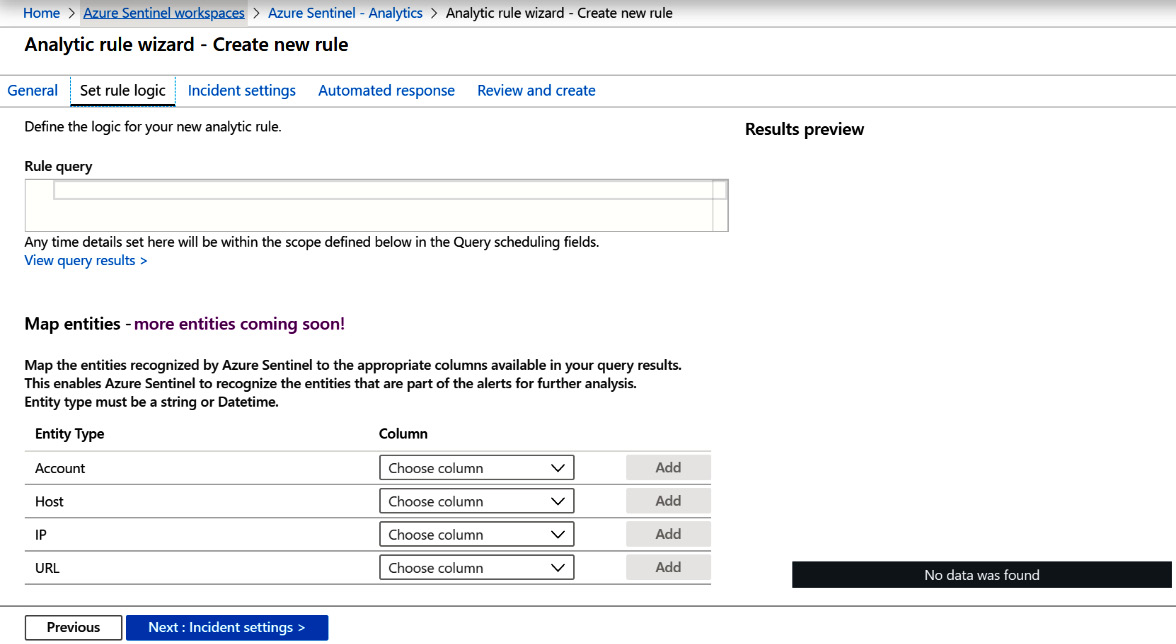
Figure 7.13 – Create rule – Set rule logic
Once again, fill in the details for each field. The following table provides further details to help you out:
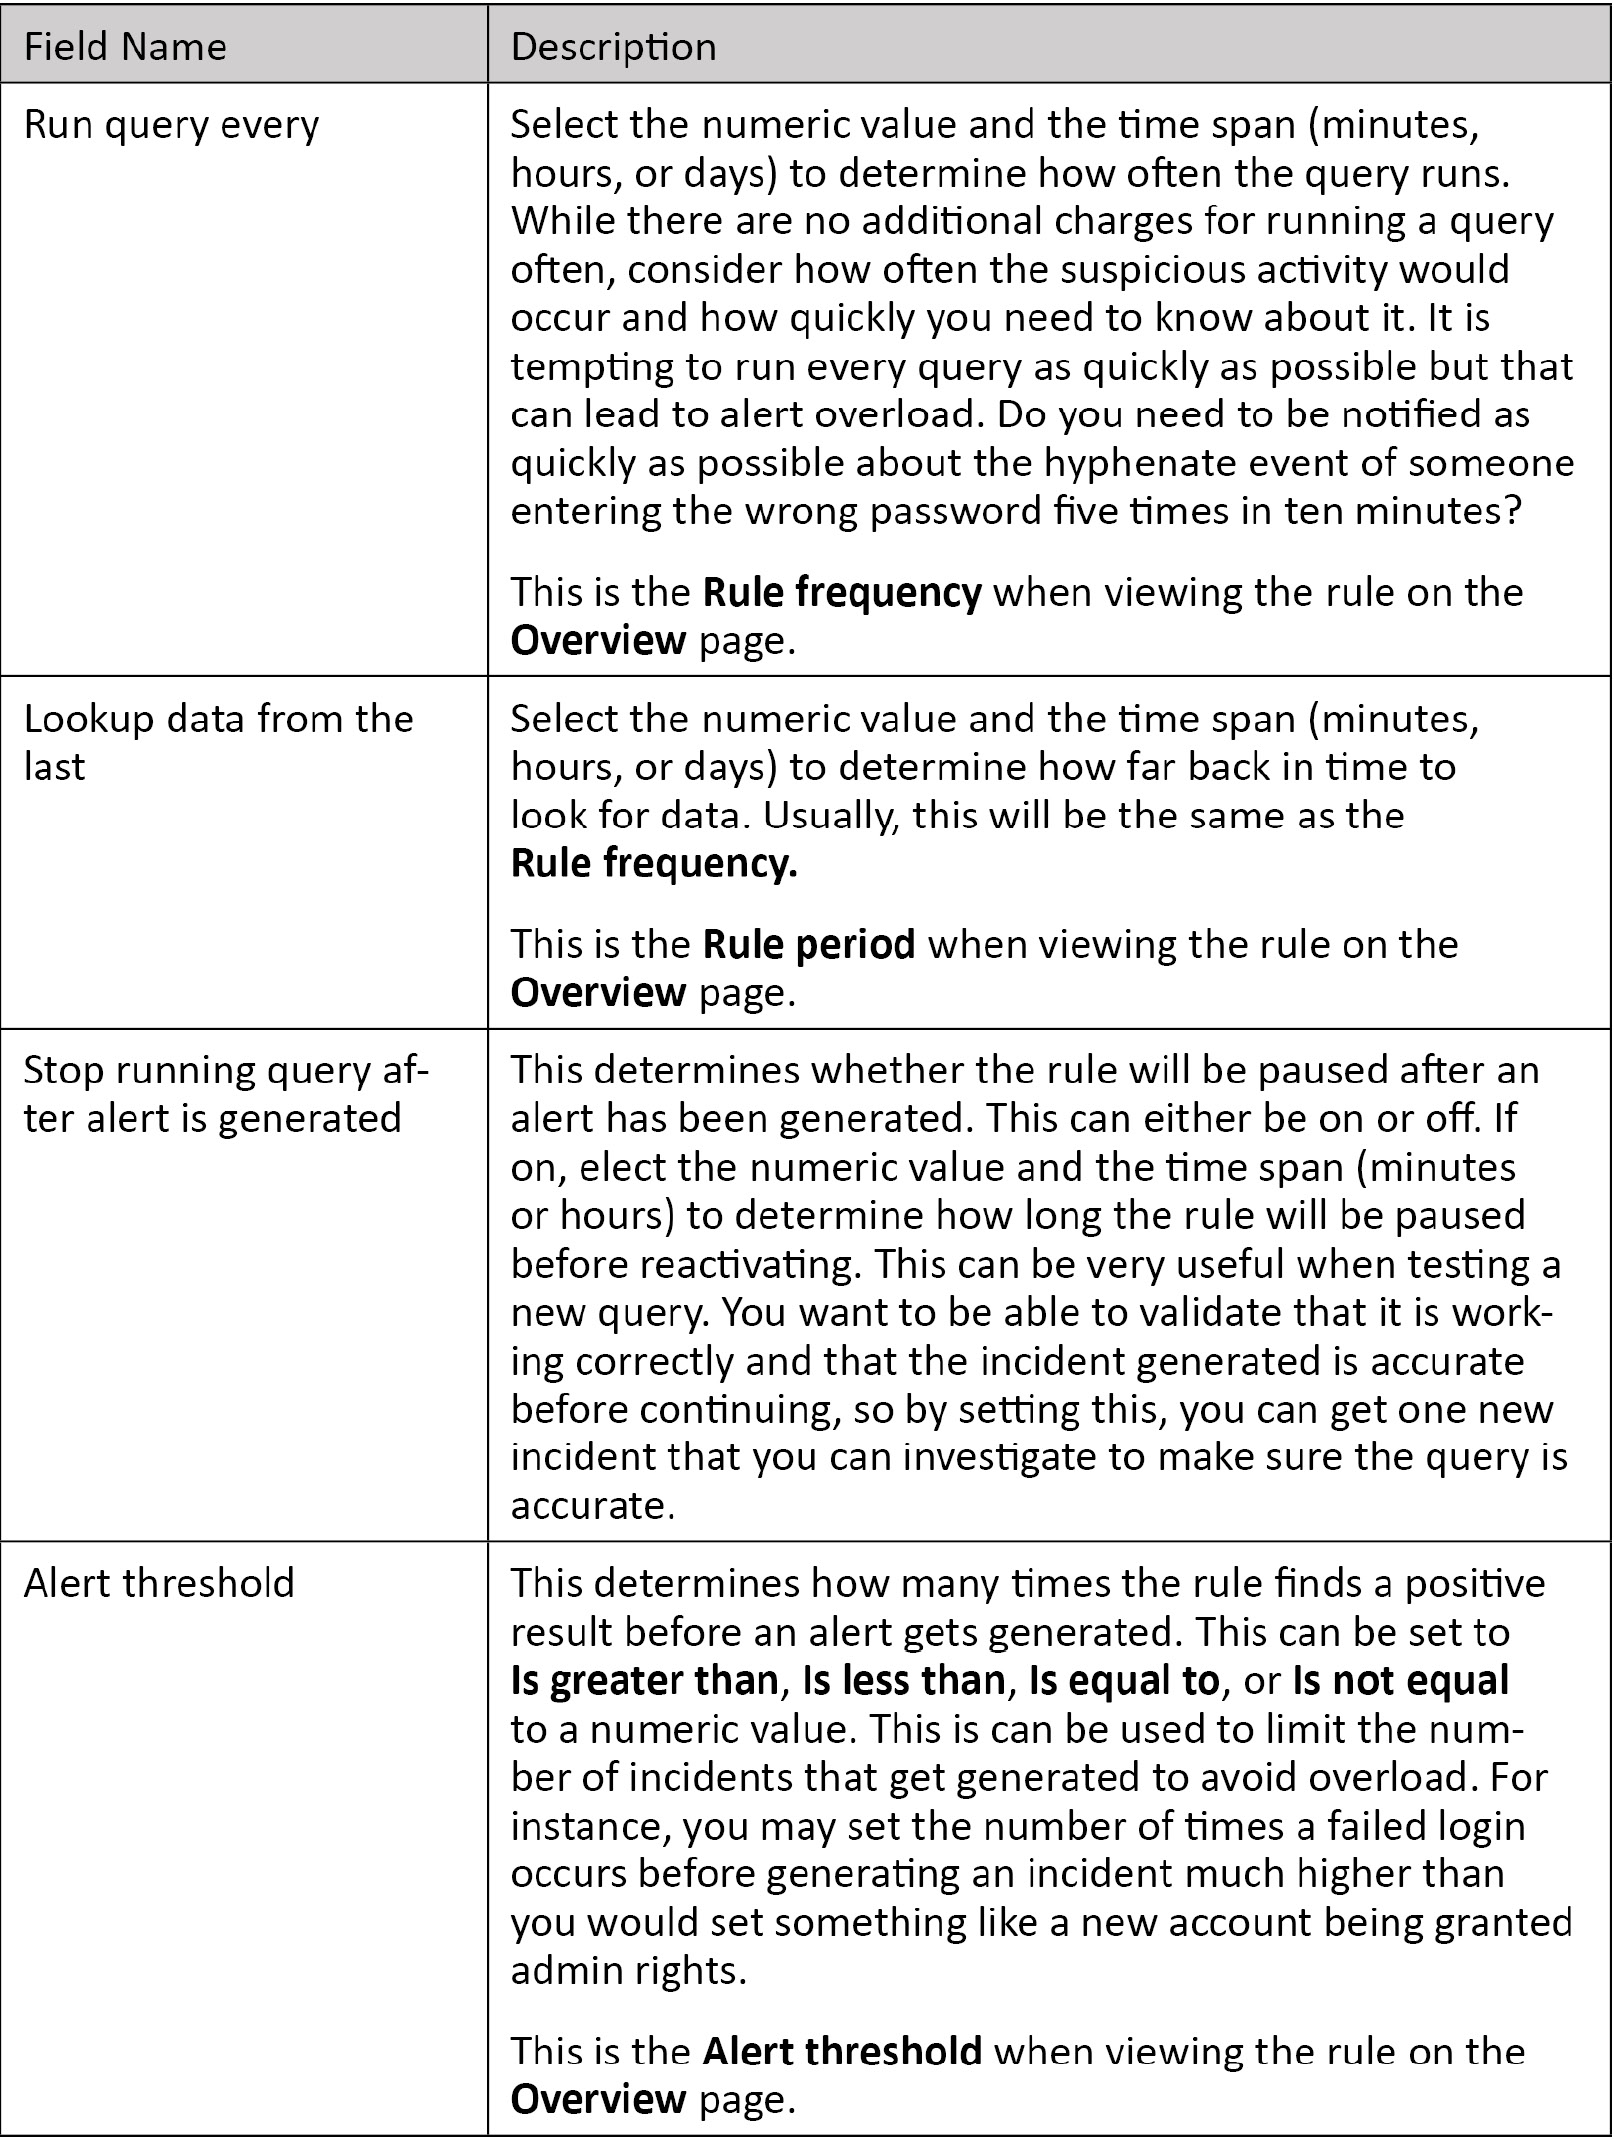
- Now, scroll down the page and you will find some more fields related to the Query scheduling and Alert threshold, as shown here:
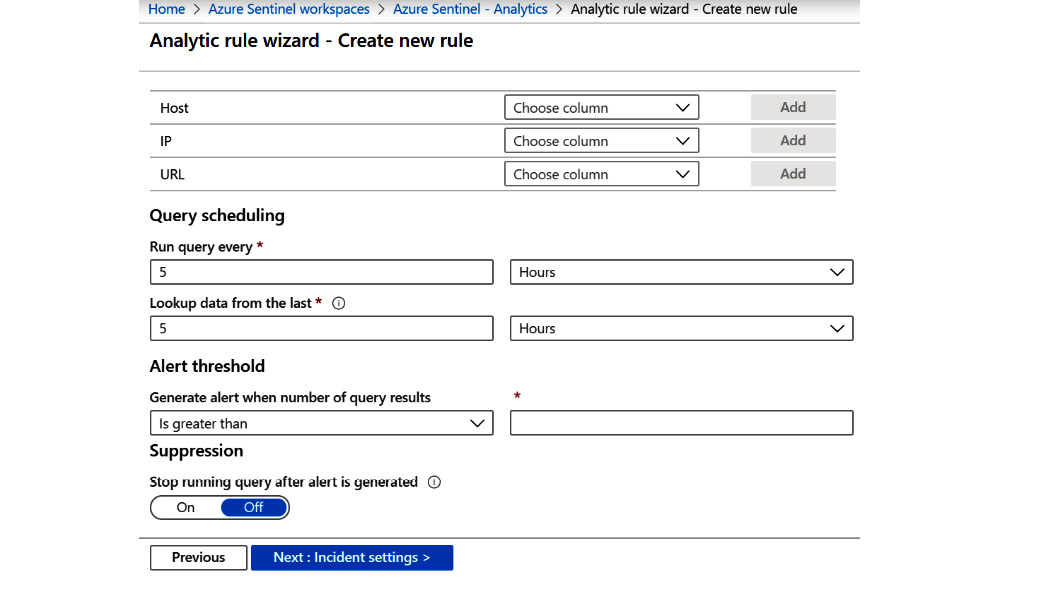
Figure 7.14 – Create rule – Set rule logic continued
The following table provides further details for each entry:
- When you have all of the fields filled in, click on Next: Incident Settings > to continue. If you need to change some values on the previous screen at any moment, click on the Previous button.
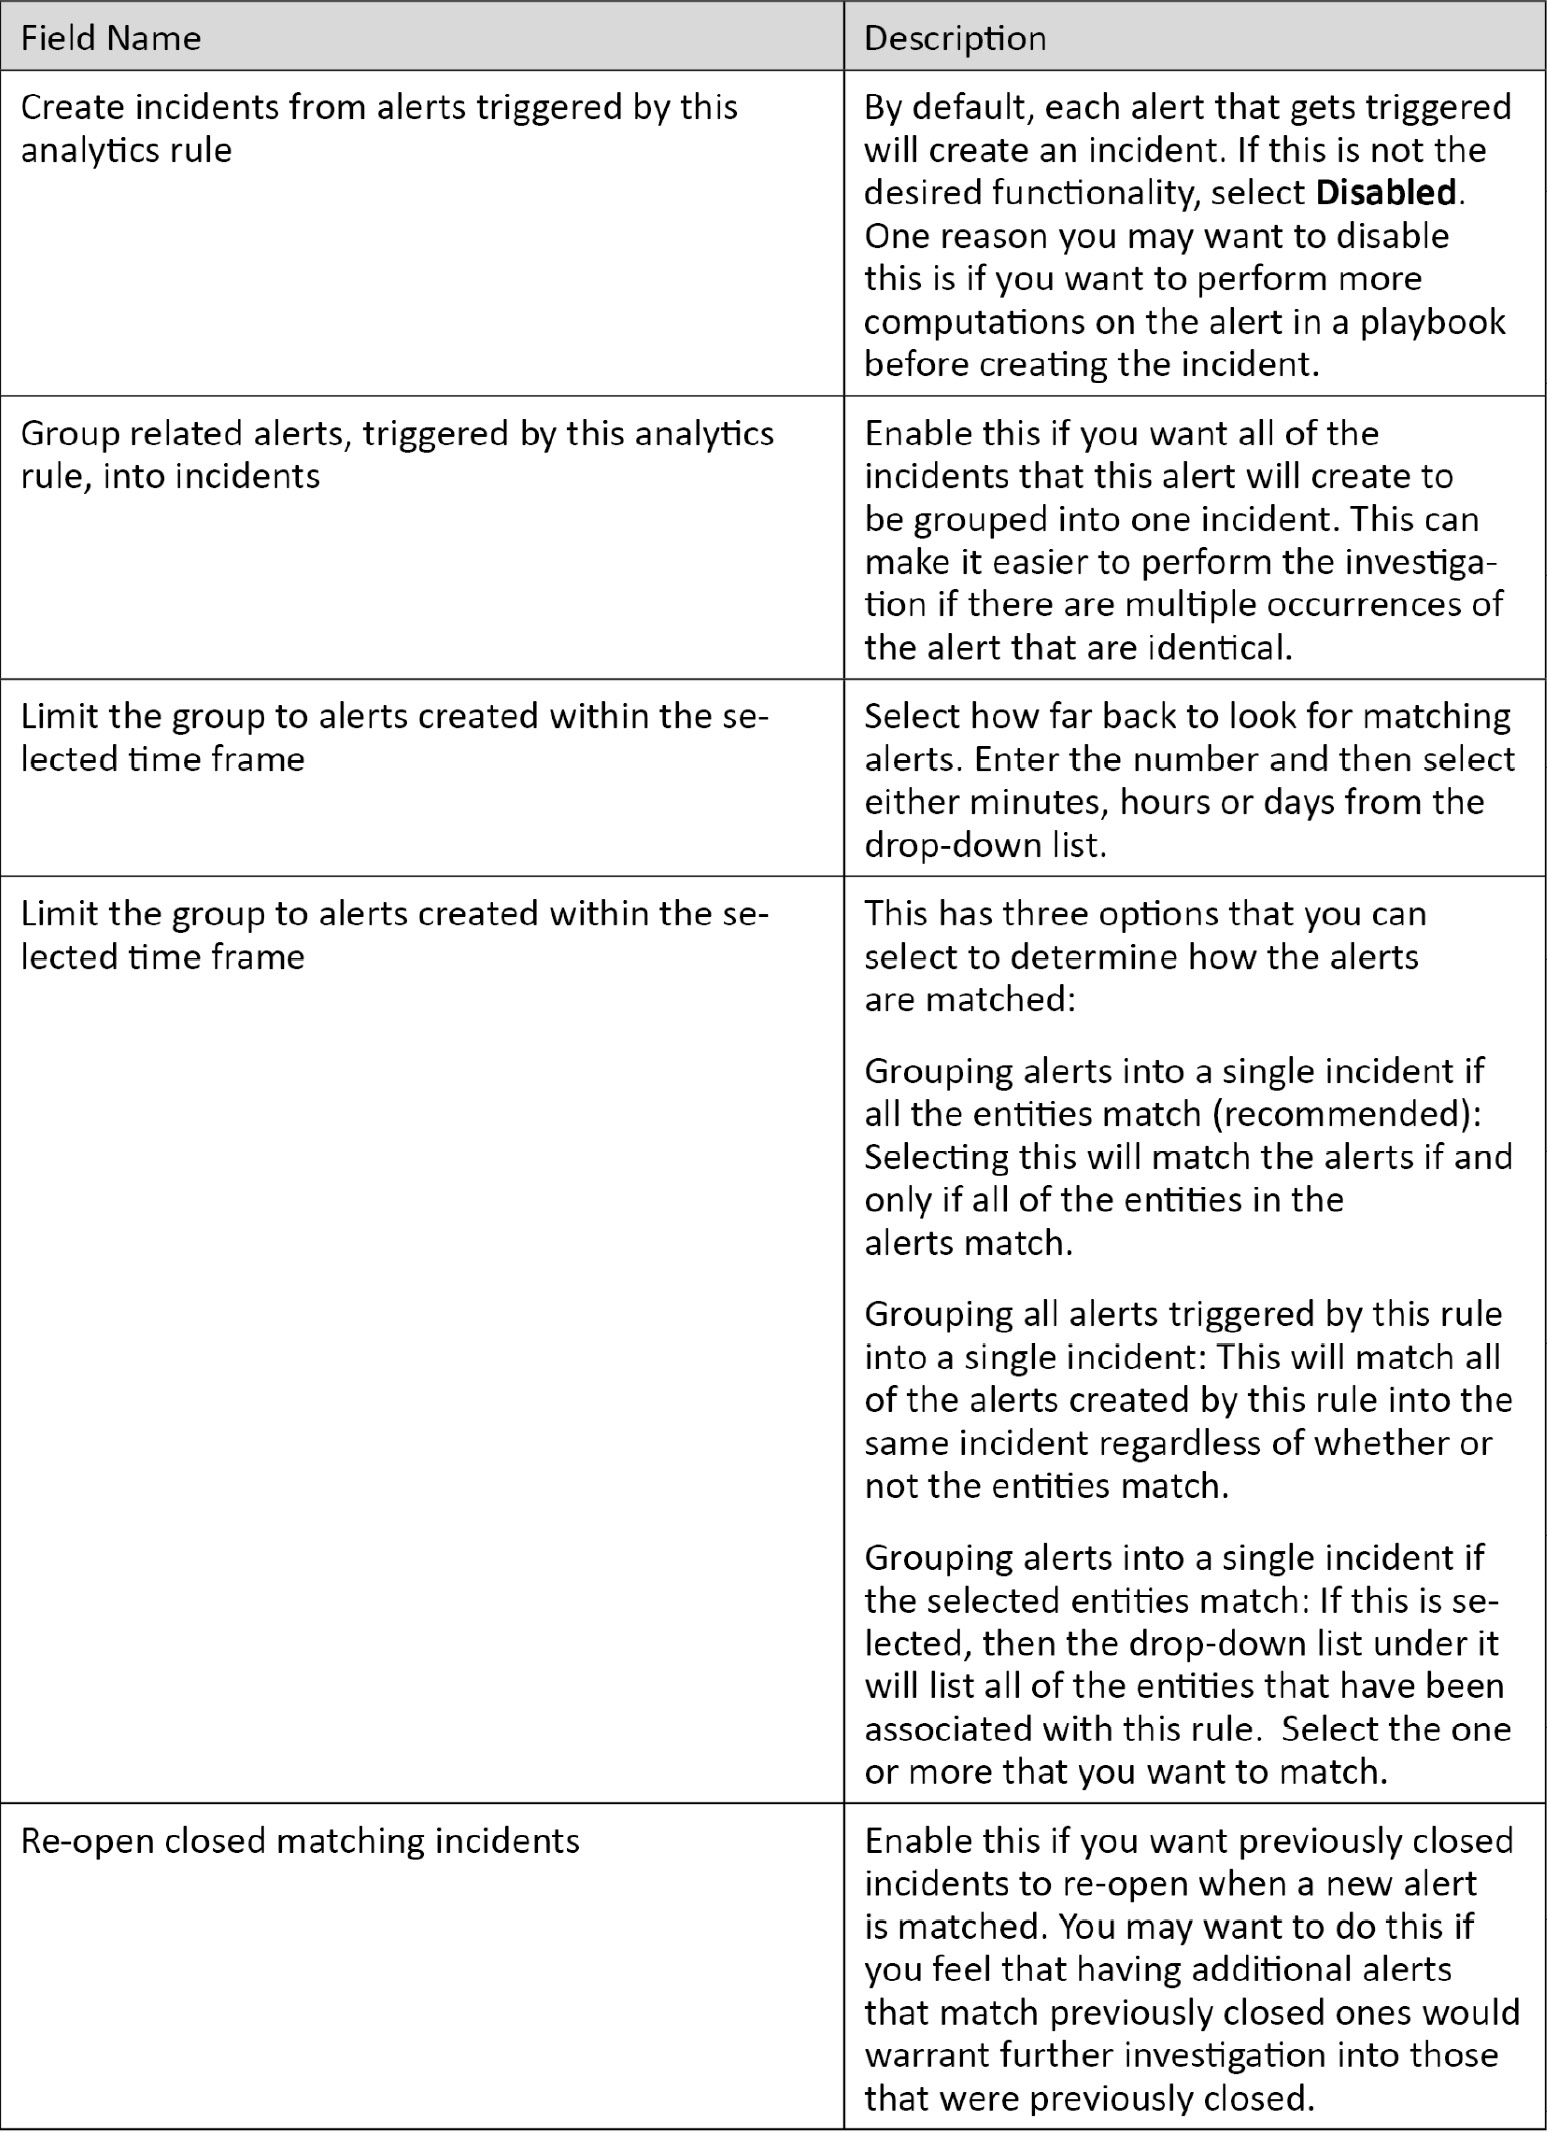
- The Incident settings page allows you to determine whether you want this alert to create an incident and whether you want this alert to group incidents together, and it is shown here:
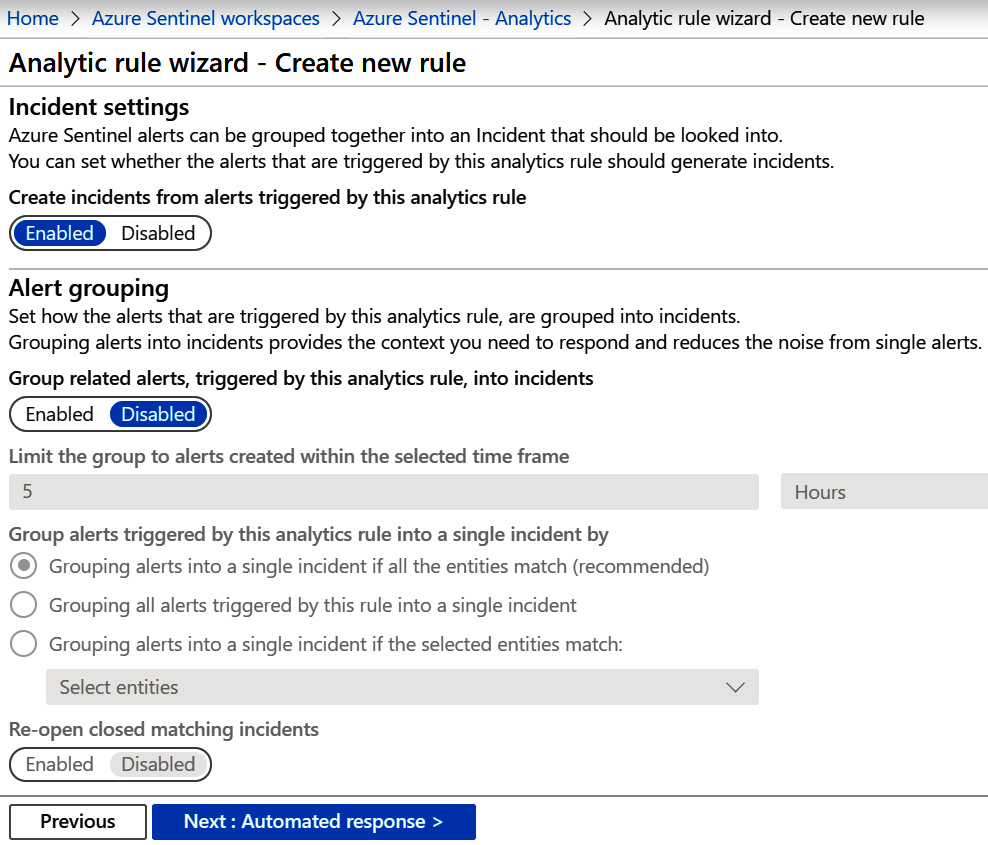
Figure 7.15 – Create rule – Incident settings page
The following table provides further details for each entry:
- When you have all of the fields filled in, click on Next: Automated response > to continue. If you need to change some values on the previous screen at any moment, click on the Previous button.
The Automated response page allows you to select a playbook that gets run automatically when an alert is generated, as shown here:
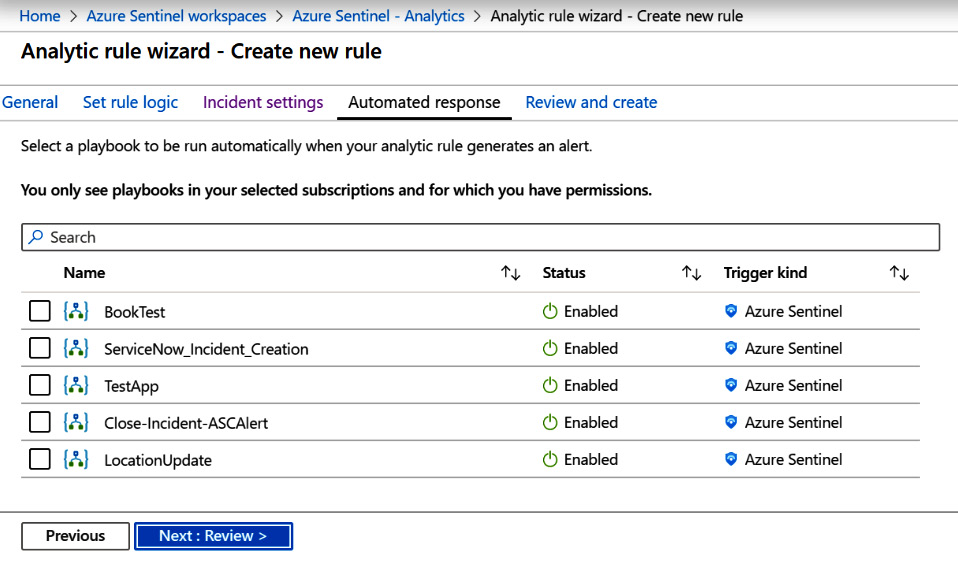
Figure 7.16 – Create rule – Automated response
In the preceding screenshot, there are multiple playbooks available to be selected. If there are no playbooks listed, then you have not created any that have Azure Sentinel set as the Trigger kind. See Chapter 11, Creating Playbooks and Logic Apps, for more information on creating Azure Sentinel playbooks.
- To choose the playbook that you want to run when this analytic rule generates an alert, click on the name of the playbook. The screen will then change to show the selected playbook, as shown here:
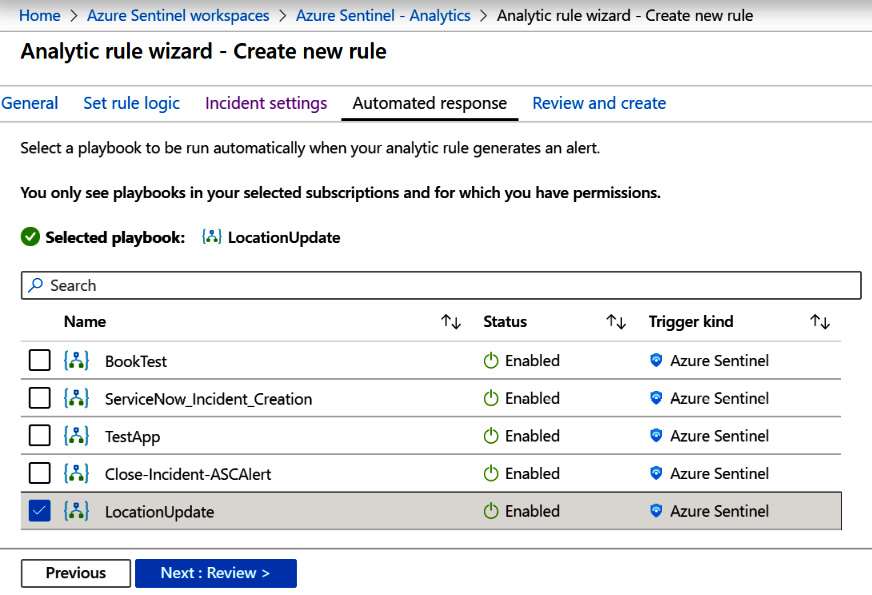
Figure 7.17 – Create rule – Automated response with the selected playbook
- When you have all of the fields filled in click, on Next: Review > to continue. If you need to change some values on the previous screen, click on the Previous button.
The Review and Create screen will show you a review of all of your choices and validate your entries to make sure they are valid. If there are issues, you will see a screen like the one shown here:
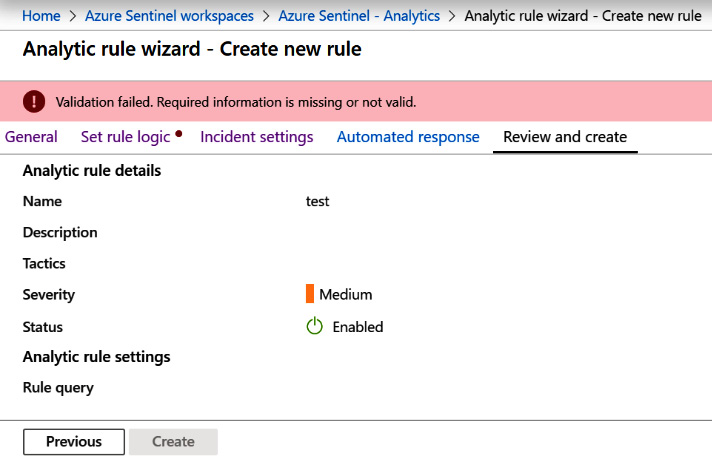
Figure 7.18 – Create rule – Review and create with an error
You can see there is an error message telling you there is a validation failure and a red dot next to the page name that has an error. In this case, it is the Set rule logic page, as indicated by the red dot to the right of the tab's name.
If there are no errors, you will see a page like the one shown here:
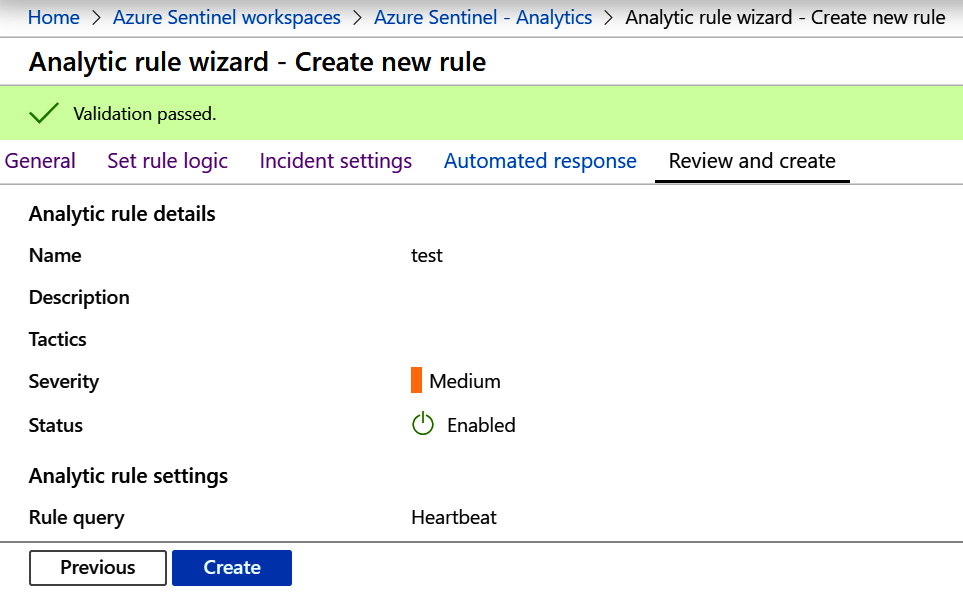
Figure 7.19 – Create rule – Review and create with no errors
- Finally, after filling in and verifying all of the details, you can then click on the Create button to create your rule.
Now you know how to create a scheduled rule. These are going to be the vast majority of the rules that you create and use. As you can see, they are quite flexible, not only in terms of the KQL query that gets run, but in terms of when it runs, whether it creates a new incident or adds new information to an existing one, and what happens automatically when this rule generates an alert. Next, we will look at creating a Microsoft incident rule.
Creating a Microsoft incident rule
When creating one of these rules, you are telling Azure Sentinel to take the alerts passed in by another Azure security system such as Microsoft Cloud App Security, apply any filters, and create the alert in Azure Sentinel. To create this type of rule, follow along with these steps:
- Click on the + Create link at the top of the page. This will present you with a drop-down list where you can select Microsoft incident creation rule.
- Once you select the option from the drop-down list, you will be presented with the General screen, as follows:
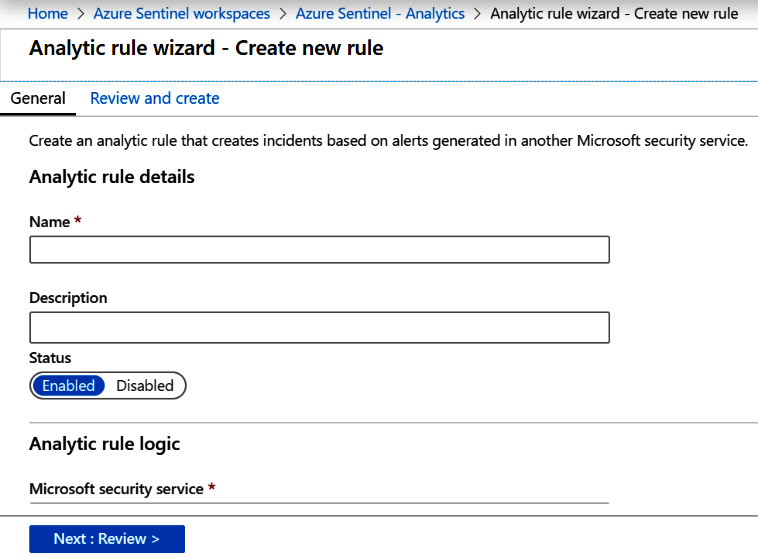
Figure 7.20 – Create Microsoft incident rule
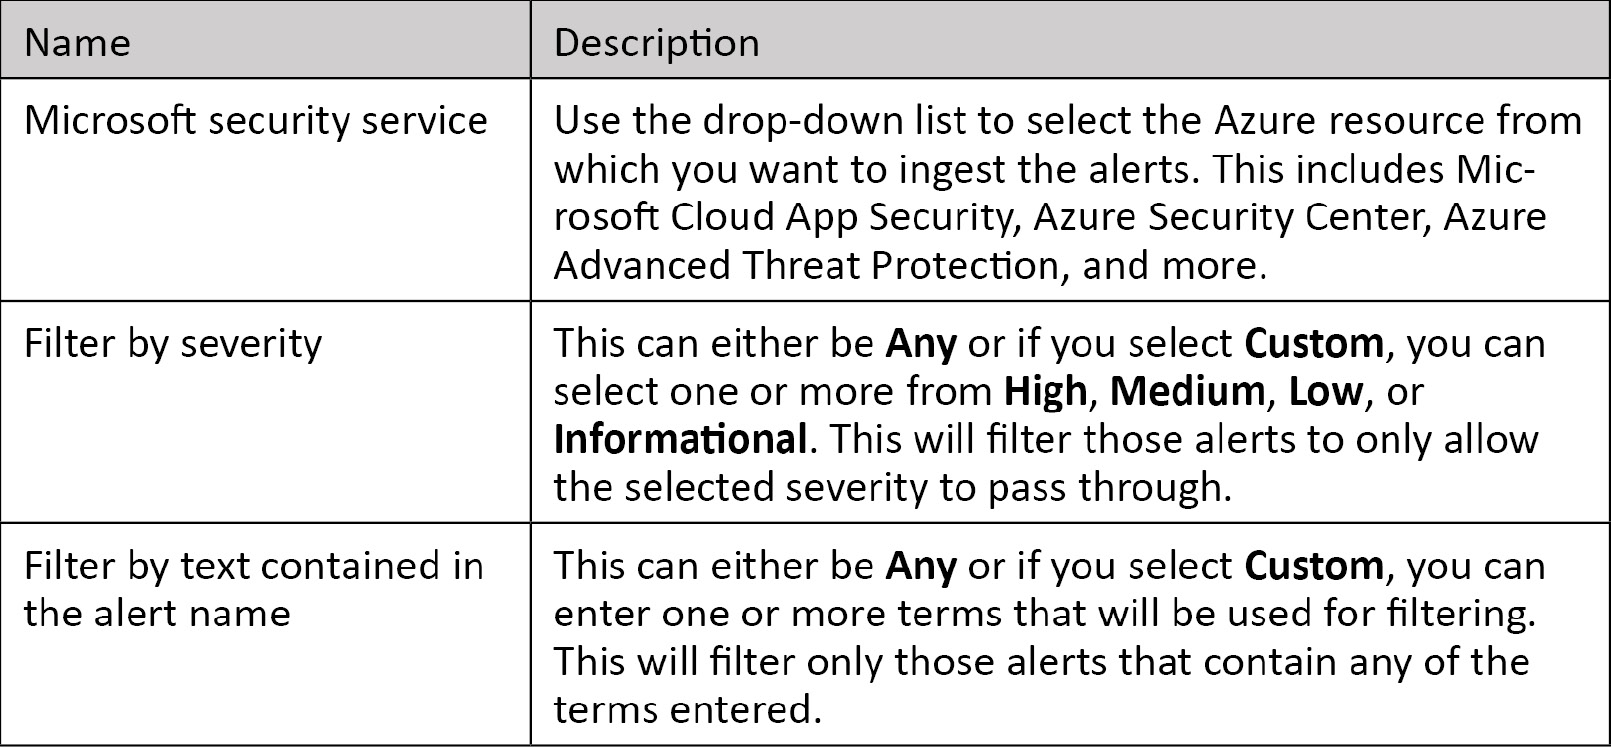
The following table provides further details for each entry:
- Scroll down and you will see more fields to fill in, as shown here:
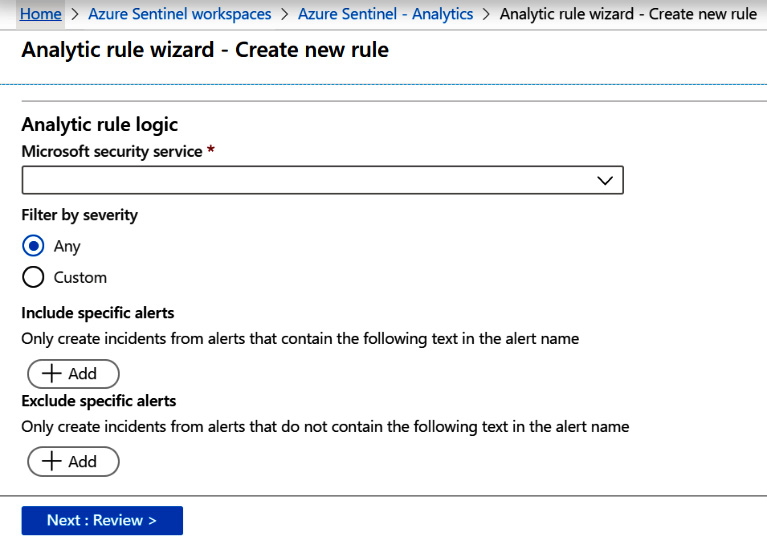
Figure 7.21 – Create Microsoft incident rule continued
The following table provides further details for each entry:
- When you have all of the fields filled in, click on Next: Review > to continue. The Review and Create screen will open, which shows you a review of all of your choices and allows you to check your entries to make sure they are valid. If there are issues, you will see a screen like the one shown here:
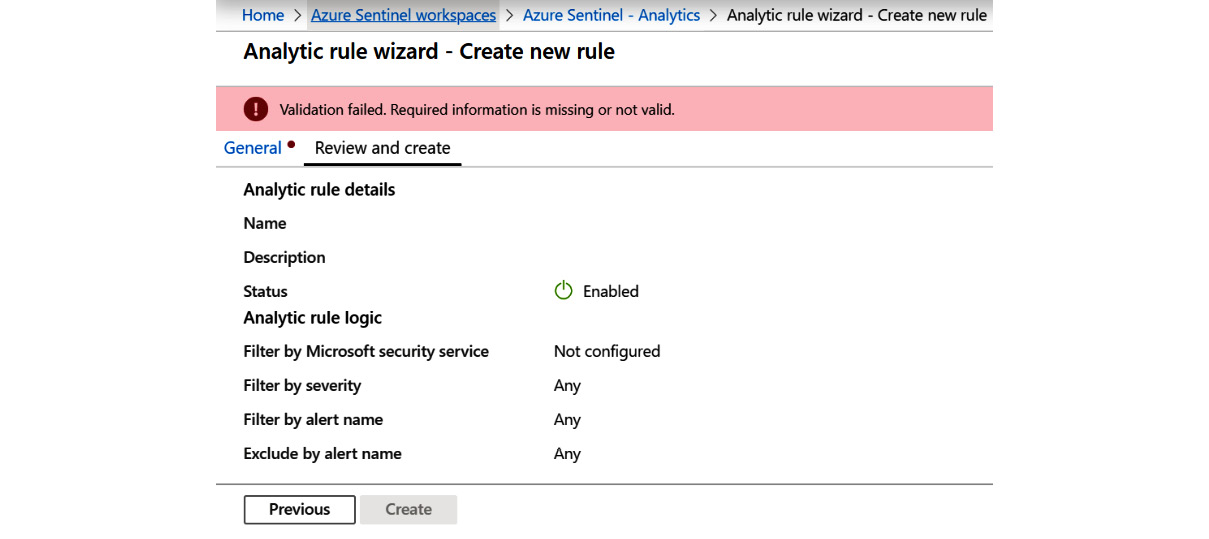
Figure 7.22 – Create Microsoft incident rule – Review and create with an error
You can see there is an error message telling you there is a validation failure and a red dot next to the page name that has an error. In this case, it is the General page, as indicated by the red dot next to the tab's name.
If there are no errors, you will see a page similar to the one shown here:
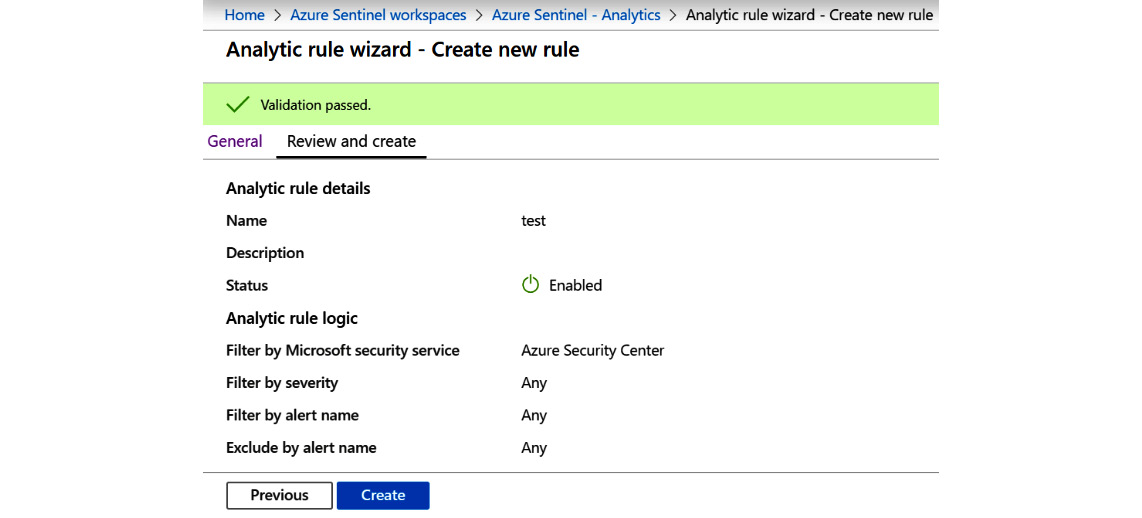
Figure 7.23 – Create Microsoft incident rule – Review and create with no errors
- Finally, click on the Create button to create your rule.
We have looked at the three different ways to create a new analytic rule; using a template, creating a new scheduled rule from scratch, and creating a new Microsoft incident rule from scratch. All three ways have their uses and you will most likely use all three while setting up Azure in your environment. Next, we will look at how to manage existing analytic rules.
Managing analytic rules
Once your rules are created, you will need to manage them on an ongoing basis to ensure they remain useful. You may need to tweak a rule to give better results, change the playbooks assigned to a scheduled rule, disable a rule, or even delete ones that are no longer needed.
You can only manage those rules listed in the Active rules tab. So, follow along to complete these two simple steps:
- Click on the Active rules link first.
- In the listing of rules, to the right of the Last Modified column is the context menu, the three periods in a row, for each rule. Click on it and you will see a drop-down list, as shown in the following screenshot:
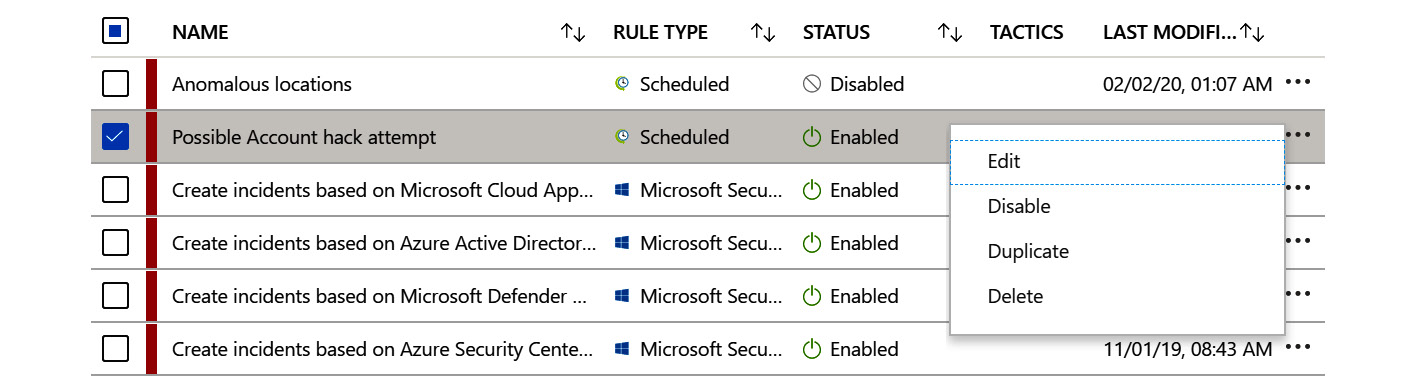
Figure 7.24 – Analytic rule context-sensitive menu
Let's see how to use these options:
- Edit: This entry will allow you to edit the rule so that you can modify any of the fields as needed. You can also edit the rule by clicking on the Edit button on the details blade. Editing a rule will take you through the same pages as creating the rule with all of the saved parameters filled in. Make the necessary changes and save them.
- Disable: This entry will allow you to disable the rule. If the rule is disabled, then this entry will be labeled Enable and it will allow you to enable the rule. You can disable a rule if you think it is no longer needed before deleting it or if you are going to perform operations that you know will trigger the rule unnecessarily. Just remember to re-enable it when you are done!
- Duplicate: This button will create an exact copy of the selected rule that you can then edit. The name will be that of the existing rule appended with – Copy X where X is the next number in the series starting with 1. So, if there is a rule called Test Rule and the Duplicate entry is selected, the new rule will be named Test Rule – Copy 1 and if Duplicate is selected again, the new rule will be called Test Rule – Copy 2, and so on.
- Delete: This entry will allow you to delete the rule. A pop-up box will ask for confirmation before the rule is deleted. For example, if you have a rule set up to check for abnormalities in equipment that is no longer running, you can delete the rule as it is no longer needed. A best practice is to disable the rule for a time period to make sure that the rule isn't needed anymore before deleting.
By effectively managing your rules, you are able to make sure your rules stay valid. You can modify the queries as needed and update any actions that get taken when a new alert is created from a scheduled rule. You can help to avoid alert overload by reclassifying an alert's severity if it is deemed to be too high (or too low). You can also delete any rules that are no longer needed.
Summary
This chapter introduced you to Azure Sentinel Analytics queries and the Analytics page. You not only learned about the different rule types but also how to create your own rules using the analytic rules templates that Microsoft has provided to make it easier. In addition, you learned how to create both a scheduled and a Microsoft incident creation rule. Finally, you learned how to manage your existing analytic rules.
You are now ready to start creating the rules needed to monitor your environment. Take a look at the extensive list of rule templates that Microsoft provides and see which of those will be useful. Then, create your own rules to fill in the blanks.
The next chapter will introduce Azure workbooks, which allow you to create very useful tables, charts, and graphs to get a better understanding of your data.
Questions
- What are the four different rule types?
- If I want a rule to run on a set interval, which rule type should I use?
- Can you have alerts from other Azure security systems create incidents in Azure Sentinel?
- What would you need to do to have a playbook automatically run when a scheduled alert fires?
- What two ways can I use to delete a rule I no longer need?
Further reading
You can refer to the following link for more details:
- Create custom analytic rules to detect suspicious threats: https://docs.microsoft.com/en-us/azure/sentinel/tutorial-detect-threats-custom
- Azure Sentinel correlation rules: Active List out; make_list() in, the AAD/AWS correlation example: https://techcommunity.microsoft.com/t5/azure-sentinel/azure-sentinel-correlation-rules-active-lists-out-make-list-in/ba-p/1029225