
Chapter 9: Selfies: Making Funny Faces
In this chapter, you will learn how to use Unity AR Foundation for face tracking in order to make fun and entertaining face filters. I apologize in advance for showing my handsome face throughout this chapter – it's a necessary evil when working with selfies!
We'll start with a brief explanation of how face tracking works, and then we will create a new AR scene with face tracking enabled. We will use a couple of 3D head models that track your head pose and to which you can add extra accessories, such as a hat and sunglasses. We are going to build a main menu so that the user can select and change models at runtime. We'll then work with dynamic face meshes and create several materials to easily switch between them. In the last part, we'll look at more advanced features such as eye tracking, face regions (ARCore), and blend shapes (ARKit).
We will cover the following topics:
- Understanding face tracking
- Configuring a new AR scene for face tracking
- Tracking the face pose with 3D models and accessories
- Controlling the app's main mode and building a main menu
- Making dynamic face meshes with a variety of materials
- Using eye-tracking (ARKit)
- Attaching stickers to face regions (ARCore)
- Tracking expressive face blend shapes (ARKit)
By the end of this chapter, you'll be familiar with many of the face tracking features in AR Foundation, ARCore, and ARKit. You will also have a working Face Maker project you can show off to your friends!
Technical requirements
To implement the project in this chapter, you need Unity installed on your development computer and connected with a mobile device that supports augmented reality applications (see Chapter 1, Setting Up for AR Development, for instructions). We also assume that you have the ARFramework template and its prerequisites installed (see Chapter 5, Using the AR User Framework). The completed project can be found in this book's GitHub repository, available at the following URL: https://github.com/PacktPublishing/Augmented-Reality-with-Unity-AR-Foundation.
Understanding face tracking
Let's start with some background on face tracking and the technology that makes it work. Face tracking is a kind of Augmented Reality that (usually) uses the front-facing camera on your mobile device. Apps such as Snapchat, Instagram, and Animoji have popularized face filter technology, and it has now become mainstream on mobile devices. It makes for highly entertaining and creative experiences. The technology detects facial features and expressions, and Unity AR Foundation enables you to write applications for attaching 3D objects to specific facial features that are tracked.
Face tracking begins with a frame of the video from your device's camera. It analyzes the pixels, looking for patterns that represent a face – for example, the bridge of the nose is lighter than the pixels surrounding it, and the eyes are darker than the forehead. Key points and regions are recognized and used to construct a 3D mesh, like a mask, representing the face. Nodes of the mesh are "locked onto" key points in the image, allowing the mesh to follow not just the pose of the face, but detailed changes that correspond to human facial expressions, like a smile or a wink of the eye.
To learn more about how face tracking works, I encourage you to watch the seminal Vox video (over 3 million views) How Snapchat's filters work, available at the following URL: https://www.youtube.com/watch?v=Pc2aJxnmzh0.
It's helpful to understand the distinction between face tracking and face identification, and how to track a face with AR Foundation.
Face tracking versus face identification
A distinction should be made between face tracking and face identification. Face tracking, in general, is limited to detecting a human face and tracking its pose (position and rotation), facial features such as the forehead and nose, and changes representing expressions, such as opening your mouth or blinking your eyes. Face identification, on the other hand, adds recognition of the features that make your face unique and different from other faces. Face recognition is used as a fingerprint. One example of face recognition technology is for unlocking devices. More advanced (and creepy) face identification is increasingly being used by authoritarian governments and law enforcement to identify strangers in a crowd, using a large database of faces.
Using Unity AR Foundation, you can access the AR face-tracking capabilities of your device. We are going to examine this next.
Tracking a face with AR Foundation
As you now know, a Unity project using AR Foundation and XR Plugins will have a scene that includes an ARSession and an ARSessionOrigin object. The AR Face Manager component is added to the AR Session Origin to enable face tracking. Like most AR Foundation features, this component wraps the Unity AR subsystems, namely the XR face subsystem (see https://docs.unity3d.com/Packages/[email protected]/api/UnityEngine.XR.ARSubsystems.XRFaceSubsystem.html). This in turn interfaces with the underlying XR plugin, such as ARCore or ARKit.
The AR Face Manager component references a face prefab provided by you. This prefab will be instantiated and tracked with the detected face. The component also provides a Maximum Face Count parameter, should you want the app to support multiple people in the same camera view (depending on the capabilities of the underlying device). The component is shown in the following screenshot:
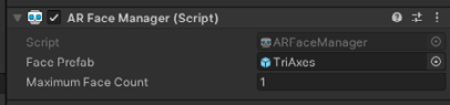
Figure 9.1 – The AR Face Manager component on an AR Session Origin object
The face prefab should have an AR Face component on it that represents a face detected by an AR device. It has properties including the face mesh vertices, facet normals, and transforms for the left and right eyes. Like other AR trackables, your scripts can subscribe to changes to know when faces have been added, updated, and removed. The specific properties available will depend on the capabilities of the underlying device. See the documentation available at the following URL: https://docs.unity3d.com/Packages/[email protected]/api/UnityEngine.XR.ARFoundation.ARFace.html. Also, see the following URL: https://docs.unity3d.com/Packages/[email protected]/api/UnityEngine.XR.ARSubsystems.XRFace.html.
AR Foundation provides an interface for AR face tracking (not identification), using the AR Face Manager component added to your AR Session Origin object. We can now get started building a selfie face filter project.
Getting started
To begin, we'll create a new scene named FaceMaker using the ARFramework scene template. If you're targeting iOS ARKit, there may be additional setup required, including installing the separate ARKit Face Tracking package. Then we'll add a project title to the UI before moving on to adding face tracking to the scene.
Creating a new scene using the ARFramework template
Create a new scene in your Unity AR-ready project using the following steps:
- Select File | New Scene.
- In the New Scene dialog box, select the ARFramework template.
- Click Create.
- Select File | Save As. Navigate to the Scenes/ folder in your project Assets folder, give it the name FaceMaker, and click Save.
The new AR scene already has the following setup from the template:
- AR Session game object with an AR Session component.
- An AR Session Origin rig with an AR Session Origin component, among others, and a child main camera. We will replace its AR Plane Manager component with an AR Face Manager one.
- UI Canvas is a screen space canvas with the child panels Startup UI, Scan UI, Main UI, and NonAR UI that we built for the ARFramework. It has the UI Controller component script that we wrote. We'll update this with the project-specific UI.
- Interaction Controller is a game object we built for the ARFramework, with an interaction controller component script we wrote that helps the app switch between interaction modes, including Startup, Scan, Main, and NonAR modes. It also has a Player Input component configured with the AR Input Actions asset we previously created. We are going to customize the main mode for our face tracking app.
- OnboardingUX is a prefab from the AR Foundation Demos project that provides AR session status messages and animated onboarding graphics prompts.
Let's start by setting the app title now as follows:
- In the Hierarchy, unfold the UI Canvas object, and unfold its child App Title Panel.
- Select the Title Text object.
- In its Inspector, change its text content to Face Maker.
If you are targeting ARKit on iOS, there may be additional project setup required.
Setting up iOS ARKit for face tracking
To develop and build a project using face tracking with ARKit for an iOS device, you also need to install the ARKit Face Tracking package via the package manager. Perform the following steps:
- Open the package manager using Window | Package Manager.
- In the Packages filter selection at the top left, choose Unity Registry.
- Use the search field at the top right to search for ar, and select the ARKit Face Tracking package from the packages list.
- Click Install at the bottom right of the window.
Then, configure ARKit XR Plugin for face tracking, as follows:
- Open the Project Settings window, using Edit | Project Settings.
- On the left-side tabs menu, select XR Plug-in Management | ARKit.
- Check the Face Tracking checkbox.
Next, we will gather some assets that we'll be using in this chapter. Some of these are also provided in this book's GitHub repository. Others are third-party assets that you must download and import separately.
Importing assets used in this project
First, you should already have the AR Foundation Samples assets in your project (the ones that we imported back in Chapter 1, Setting Up for AR Development). If you followed along, these are in the Assets/ARF-samples/ folder. It contains some useful example assets that we'll use and reference in this chapter that can give you additional insight into the capabilities of AR Foundation face tracking, as well as how to use those capabilities.
We are also going to use the assets from the AR Face Assets package from Unity (available in the Asset Store). These assets are also used in the Unity Learn tutorial, AR Face Tracking with AR Foundation (https://learn.unity.com/project/ar-face-tracking-with-ar-foundations). To import the package, follow these steps:
- Using your internet browser, go to the following URL: https://assetstore.unity.com/packages/essentials/asset-packs/ar-face-assets-184187.
- Click Add to My Assets (if necessary), then click Open In Unity.
- In Unity, this should open the Package Manager window (or select Window | Package Manager).
- Select My Assets from the Packages filter at the top left.
- Find the AR Face Assets package and click Download and/or Import (bottom right). In the Import Unity Package window, click the Import button.
- Convert the imported materials to the Universal Render Pipeline by selecting Edit | Render Pipeline | Universal Render Pipeline | Upgrade Project Materials to URP Materials.
Face accessories 3D models: I have found some free 3D models to use in this project. You can also use them or substitute your own. If you wish to use them, they are included in the following GitHub repositories:
- Sunglasses: https://free3d.com/3d-model/sunglasses-v1--803862.html. OBJ format (submitted by printable_models, https://free3d.com/user/printable_models)
- Top hat: https://free3d.com/3d-model/cartola-278168.html. FBX format (submitted by zotgames, https://free3d.com/user/zotgames)
If you're downloading these yourself, unzip and drag the files into your project's Assets/ folder. We'll address the import settings and steps later in the chapter.
Face stickers 2D sprite images: For the ARCore-based face region stickers, I found some free clipart at Creative Commons. You can use them or substitute your own. If you wish to use them, they are included in the following GitHub repositories:
- Eyebrows: https://clipground.com/images/angry-eyebrows-clipart-11.png
- Mustache: https://clipground.com/images/monocle-clipart-12.jpg
- Licking lips: https://clipground.com/images/licking-lips-clipart-12.jpg
I used Photoshop to adapt each of these images with a transparent background, square-shaped canvas, and scaled to 512x512 pixels. These are imported as Texture Type: Sprite (2D and UI).
For all the aforementioned assets, I also created button icons that we'll use in the UI. These are also available on the GitHub repository in the icons/ folder and are imported as Texture Type: Sprite (2D and UI).
We now have our basic scene created, as well as prerequisite assets imported into the project. We used the ARFramework scene template created for this book when creating the new scene, and updated the UI title text for this project. If you're working on iOS, we also installed extra required packages into the project. Then, we imported other graphic assets we're going to use, including the demo AR Face Assets pack provided by Unity. Let's now configure the scene for face tracking.
Configuring a new AR scene for face tracking
There are a few simple steps required to configure an AR Foundation-based scene for face tracking. Since we're going to do selfies, we'll set up the AR camera to use input from the front-facing camera. Then we'll add an AR Face Manager component to the AR Session Origin. If you want to use the Unity Onboarding UX animated graphic to prompt the user, you can adapt the ScanMode script for that.
Let's get started!
Setting the AR camera for selfies
Use the following steps to set up the AR camera for selfies:
- In the Hierarchy, unfold the AR Session Origin game object and select its child Main Camera.
- In the Inspector, set AR Camera Manager | Facing Direction to User.
- We also need to set the AR Session tracking mode for rotation only. Select the AR Session game object in the Hierarchy.
- In the Inspector, set the AR Session | Tracking Mode to Rotation Only.
Next, we'll add the AR Face Manager component to the AR Session Origin.
Adding an AR Face Manager component
Using the scene provided by the ARFramework template, we will replace the given AR trackable components with an AR Face Manager one. For the Face Prefab, we'll start with the TriAxes prefab from the AR Samples project. If you examine this prefab, you'll discover it has an AR Face component, so it can be used as a trackable.
To configure the AR Session to track faces, follow these steps:
- In the Hierarchy window, select the AR Session Origin game object.
- In the Inspector window, use the three-dot context menu (or right-click) on the AR Plane Manager component, and select Remove Component.
- Use the Add Component button, search for AR, and add an AR Face Manager component.
- In your Project window, locate the TriAxes prefab file (likely in the Assets/ARF-samples/Prefabs/ folder), and drag it into the Inspector, dropping it onto the AR Face Manager | Face Prefab slot.
- Save the scene using File | Save.
The scene is now basically set up for face tracking. ARFamework includes a scan mode that prompts the user to find a trackable object with their camera. We can now configure that for face tracking.
Prompting the user to find a face, or not
Optionally, you can have your app prompt the user to scan for their face. This is less necessary when using the selfie camera (with Facing Direction set to User) because when you're holding your phone and looking at the screen, the camera is looking right back at you! But if your app were using the world-facing camera instead, it might be necessary to use an instructional prompt to tell the user to find a face.
To skip the scan mode and its instructional prompt, tell the startup mode to proceed directly to the main mode, using the following steps:
- In the Hierarchy, under the Interaction Controller game object, select the Startup Mode object.
- In the Inspector, enter the text Main into the Next Mode property.
Otherwise, if you want to use scan mode, you'll need to write a FaceScanMode script as follows:
- In your Project window's Scripts/ folder, right-click and select Create | C# Script. Name it FaceScanMode.
- Open the script for editing and replace its contents as follows:
using UnityEngine;
using UnityEngine.XR.ARFoundation;
public class FaceScanMode : MonoBehaviour
{
[SerializeField] ARFaceManager faceManager;
private void OnEnable()
{
UIController.ShowUI("Scan");
}
void Update()
{
if (faceManager.trackables.count > 0)
{
InteractionController.EnableMode("Main");
}
}
}
The script shows the Scan UI panel and then, in Update, waits until a face is being tracked before transitioning the app to the main mode.
- In Unity, in the Hierarchy window, select the Scan Mode object (under Interaction Controller).
- Remove the old Scan Mode component using the three-dot context menu and then choose Remove Component.
- Drag the new FaceScanMode script onto the Scan Mode game object, adding it as a component.
- Drag the AR Session Origin game object from the Hierarchy onto the Face Scan Mode | Face Manager slot.
- In the Hierarchy, navigate and select UI Canvas | Scan UI | Animated Prompt.
- In the Inspector, set the Instruction property to Find A Face.
With this latter setup, the app starts in startup mode. After the AR Session is running, it goes to scan mode, prompting the user to find a face. Once a face is detected, the app proceeds to main mode (as yet, this does nothing). You also have the option to skip the scan mode prompt altogether by telling the startup mode to go straight to the main mode.
Let's make sure everything works so far. You're now ready to try to run the scene.
Build and run
Let's do a Build And Run on your device to ensure the project is set up correctly. Use the following steps:
- Save your work using File | Save.
- Select File | Build Settings to open the Build Settings window.
- Click Add Open Scenes to add the FaceMaker scene to Scenes In Build, and ensure it is the only scene in the list with a checkmark.
- Ensure your target device is plugged into a USB port and is ready.
- Click Build And Run to build the project.
In the following screen capture, you can see the face pose is visualized using the TriAxes prefab. I have tilted my head to the side and back a little to make the three axes more evident.

Figure 9.2 – Tracking the face pose, visualized with the TriAxes prefab
Note the direction of each of the axes. The axes are colored red, green, and blue, corresponding to X, Y, and Z respectively. The positive Z direction is in the direction that the device camera is facing, and thus, pointing towards my back.
Now that we have face tracking running, let's substitute this TriAxes prefab with something more interesting – a whole 3D head model.
Tracking the face pose with 3D heads
The AR Face Assets package from Unity that we imported at the top of this chapter contains a couple of 3D head models we can use in our project. We'll create prefabs of each model and try them separately in the AR Face Manager Face Prefab property. In the next section, we'll create a menu so that the user can pick which head to view at runtime.
Making a Mr. Plastic Head prefab
The first head prefab will use the Plasticscene Head assets given in the Unity AR Face Assets package, and found in the Assets/AR face Assets/3D Head/Plasticene Head/ folder. This folder contains an FBX model named Plasto_Head and a material named PlasiceneHead (the typo is theirs). The model will require some transform adjustments before it can be used as a face prefab. To create a prefab for this model, use the following steps:
- In the Project window, right-click in your Prefabs/ folder (create one first if necessary) and choose Create | Prefab. Rename it MrPlasticHead.
- Click Open Prefab to begin editing.
- With the root object selected, in the Inspector, click Add Component. Then, search and choose AR Face to add an AR Face component.
- From the Project window, drag the Plastic_Head model to the Hierarchy and drop it as a child of MrPlasticHead.
- Select the Plasto_Head object in the Hierarchy. In the Inspector, set Rotation | Y to 180, so it's facing the camera.
- Set Scale to (0.6, 0.6, 0.6). Then set Position | Y to -0.2. I selected these transform settings by trial and error and using a measuring cube (see the inset Tip).
- If the default material (converted to URP) appears too dark, select the child Plaso_Head/Plasto_Head object, and in the Inspector, under the Plasicene Head material, set the Base Map color to white (from middle gray).
- Save the prefab and exit back to the scene Hierarchy window using the < button in the top left of the window.
Tip: Measuring faces using a cube object
A human head is approximately 0.125 meters (5 inches) wide. You can use this fact for scaling 3D models used in your face prefabs. To help judge this, while editing a face prefab, try adding a 3D cube object, set Position to (0, 0, 0), Rotation to (0, 0, 0), and Scale to (0.125, 0.125, 0.125). This can help you decide the transform parameters of other imported models you are using.
Let's see how this looks. Add the prefab to the AR Face Manager and build the project as follows:
- In the Hierarchy window, select the AR Session Origin game object.
- From the Project window, drag the MrPlasticHead prefab into the Inspector, dropping it onto AR Face Manager | the Face Prefab slot.
- Save the scene using File | Save.
- Build the project using File | Build And Run.
Info: Material texture maps
You may note that the PlasticeneHead material uses three textures for the Base (albedo), Normal, and Occlusion maps. The Base texture provides the albedo coloring as if the surface of the mesh were painted with these pixels. The Normal map (also known as the Bump map or Height map) lets the shader alter the mathematical surface normal vector in more detail than given by the mesh geometry itself, simulating surface textures that are especially noticeable with lighting. Finally, the Occlusion map provides additional realism by darkening deeper crevasses in the surface texture, creating higher contrast as occurs in real-life materials. For a more detailed explanation, starting with Normal maps, see the following URL: https://docs.unity3d.com/Manual/StandardShaderMaterialParameterNormalMap.html.
A screen capture of me with a Mr. Plastic Head head is shown below, together with the Mr. Facet Head model that we'll use next:
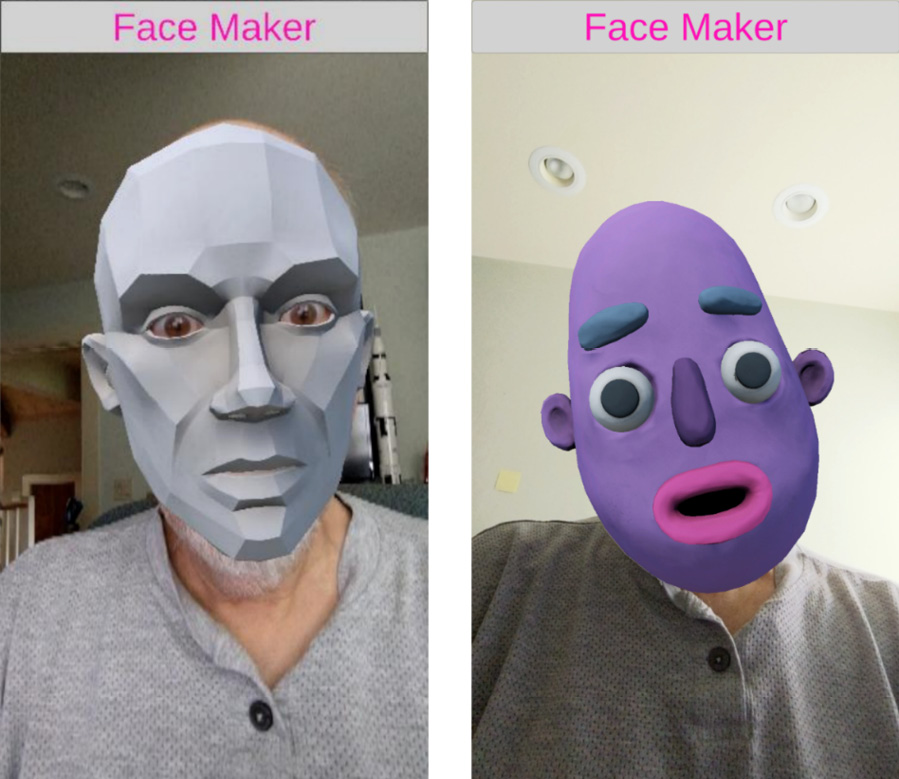
Figure 9.3 – Screen capture of myself with MrPlasticHead (right) and MrFacetHead (left)
Let's make the MrFacetHead prefab next.
Making a Mr. Facet Head prefab
There is a second model provided in the AR Face Assets package, Faceted Head, found in the Assets/AR face Assets/3D Head/Faceted Head/ folder. This folder contains an FBX model named FacetedHead, and a material also named FacetedHead. As before, the model will require some transform adjustments to be used as a face prefab. To create a prefab for this model, use the following steps:
- In the Project window, right-click in your Prefabs/ folder and choose Create | Prefab. Rename it MrFacetHead.
- Click Open Prefab to begin editing.
- With the root object selected, in the Inspector, click Add Component. Then, search and choose AR Face to add an AR Face component.
- From the Project window, drag the FacetedHead model to the Hierarchy and drop it as a child of MrFacetHead.
- With the FacetedHead object selected in the Hierarchy, in the Inspector, set Rotation | X to -90 so that it's facing the camera. Set Scale to (1.1, 1.1, 1.1).
- If the default material (converted to URP) appears too dark, select the FacetedHead object, and in its Inspector under the FacetedHead material, set the Base Map color to white.
- Save the prefab, and exit back to the scene Hierarchy window, using the < button at the top left of the window.
- In the Hierarchy window, select the AR Session Origin game object.
- From the Project window, drag the MrFacetHead prefab into the Inspector, dropping it onto the AR Face Manager | Face Prefab slot.
- Save the scene using File | Save.
- Build the project using File | Build And Run.
When it runs, you now have a Mr. Faceted Head head, as shown in the preceding figure (yes, those are my real eyes peering through the mask).
In this section, we created two prefabs, MrPlasticHead and MrFacetHead, using assets from the Unity AR Face Assets package that we imported earlier. Each of these has an AR Foundation AR Face component on its root GameObject and different imported models for the two heads. We tried using one of these in our app by adding it to the AR Face Manager component and running the scene.
Wouldn't it be nice to let the user choose a head at runtime, rather than manually setting the AR Face Manager and rebuilding the project? Next, let's create a main menu, and a changeable face prefab we can control from the menu buttons.
Building the Main mode and menu
In this section, we will set up the main mode app to handle user interactions, including face filter selections from a main menu. To do this, we first need to create a changeable face prefab that can be told which facial features to display. We'll write a FaceMainMode script that displays the main UI panel and passes change requests from the user to the face object. Then, we'll make a main menu with a set of horizontally scrolling buttons that the user can tap to change face filters.
Creating a changeable face prefab
To create a face prefab that we can use for dynamically changing filters during runtime, we'll start with an empty game object with an AR Face component, and add a script for setting the contained prefab object. Use the following steps:
- In the Project window, right-click in your Prefabs/ folder and choose Create | Prefab. Rename it Changeable Face Prefab.
- Click Open Prefab to begin editing.
- With the root object selected, in the Inspector, click Add Component. Search for and choose AR Face to add an AR Face component.
- In your Project window's Scripts/ folder, right-click and select Create | C# Script, then name it ChangeableFace.
- Open the script for editing and replace its contents as follows:
using System.Collections.Generic;
using UnityEngine;
using UnityEngine.XR.ARFoundation;
public class ChangeableFace : MonoBehaviour
{
GameObject currentPosePrefab;
GameObject poseObj;
public void SetPosePrefab(GameObject prefab)
{
if (prefab == currentPosePrefab)
return;
if (poseObj != null)
Destroy(poseObj);
currentPosePrefab = prefab;
if (prefab != null)
poseObj = Instantiate(prefab, transform, false);
}
}
The script exposes a public SetPosePrefab function that instantiates the prefab argument as a child of the current object. If the requested prefab is already instantiated, the request is ignored. If there was a previously instantiated object, it is first destroyed. The function can be called with a null value for the prefab argument that will only clear the existing instantiated object.
- Save the script and, back in Unity, drag the ChangeableFace script onto the Changeable Face Prefab root object.
- Save the prefab and exit back to the scene hierarchy using the < button at the top left of the window.
- In the Hierarchy, select the AR Session Origin object. From the Project window, drag the Changeable Face Prefab into the Inspector, dropping it onto the AR Face Manager | Face Prefab slot.
We now have a Changeable Face Prefab asset with a ChangeableFace script. We are planning to call its SetPosePrefab function from the main mode in response to a user button click. We should set up the main mode now.
Writing a main mode controller script
In our ARFramework template, interaction modes are represented with game objects under the interaction controller and are activated when a specific mode is enabled. The default MainMode script from the template is simply a placeholder. We should replace it now with a custom script for this project. To do so, follow these steps:
- In the Project window, right-click and select Create | C# script, naming it FaceMainMode.
- In the Hierarchy, select the Main Mode game object (under Interaction Controller).
- In the Inspector, remove the default Main Mode component using the three-dot menu, then click Remove Component.
- Drag the new FaceMainMode script onto the Main Mode object, adding it as a component.
- Open the FaceMainMode script for editing, and start it as follows:
using UnityEngine;
using UnityEngine.XR.ARFoundation;
public class FaceMainMode : MonoBehaviour
{
[SerializeField] ARFaceManager faceManager;
void OnEnable()
{
UIController.ShowUI("Main");
}
public void ChangePosePrefab(GameObject prefab)
{
foreach (ARFace face in faceManager.trackables)
{
ChangeableFace changeable = face.GetComponent<ChangeableFace>();
if (changeable != null)
{
changeable.SetPosePrefab(prefab);
}
}
}
}
When the main mode is enabled, it shows the main UI panel. This will contain the main menu buttons. When a menu button is clicked and it calls ChangePosePrefab, that in turn will call SetPosePrefab for any trackable faces in the scene.
Let's create the menu UI next.
Creating scrollable main menu buttons
In our user framework, a mode's UI panel will be enabled by the corresponding interaction mode. We'll now add a horizontally-scrolling main menu to the main UI panel with buttons that can change the tracked face. Use the following steps:
- In the Hierarchy, select the Main UI game object (under UI Canvas), then right-click and select UI | Panel. Rename the new panel to MainMenu Panel.
- In the Inspector, use the Anchor Presets option (at the upper left of Rect Transform) to set Bottom-Stretch, then use Shift + Alt + left-click Bottom-Stretch.
- Set Rect Transform | Height to 150.
- Remove its Image component with the three-dot menu, then Remove Component (we won't have a background on this menu).
- In the Hierarchy, right-click the MainMenu Panel, and select UI | Scroll View.
- Use Anchor Presets to click the Stretch-Stretch option, and then use Shift + Alt + left-click Stretch-Stretch.
- Remove the Image component.
- In the Scroll Rect component, uncheck Vertical.
- Delete the content of the Horizontal Scrollbar and Vertical Scrollbar fields, and disable (or delete) the Scrollbar Horizontal and Scrollbar Vertical game objects in the hierarchy.
- In the Hierarchy, unfold the child Viewport game object, and select the child Content game object.
- Click Add Component, then search for and select Horizontal Layout Group.
- Uncheck all of its checkboxes, including Child Force Expand | Width and Height.
- Set Spacing to 5.
- Click Add Component, then search for and select Content Size Fitter.
- Set Horizontal Fit to Preferred Size.
We now have a MainMenu Panel under Main UI. It contains a horizontally-scrolling content area, as shown in the following screenshot of the UI hierarchy with the Content object selected:
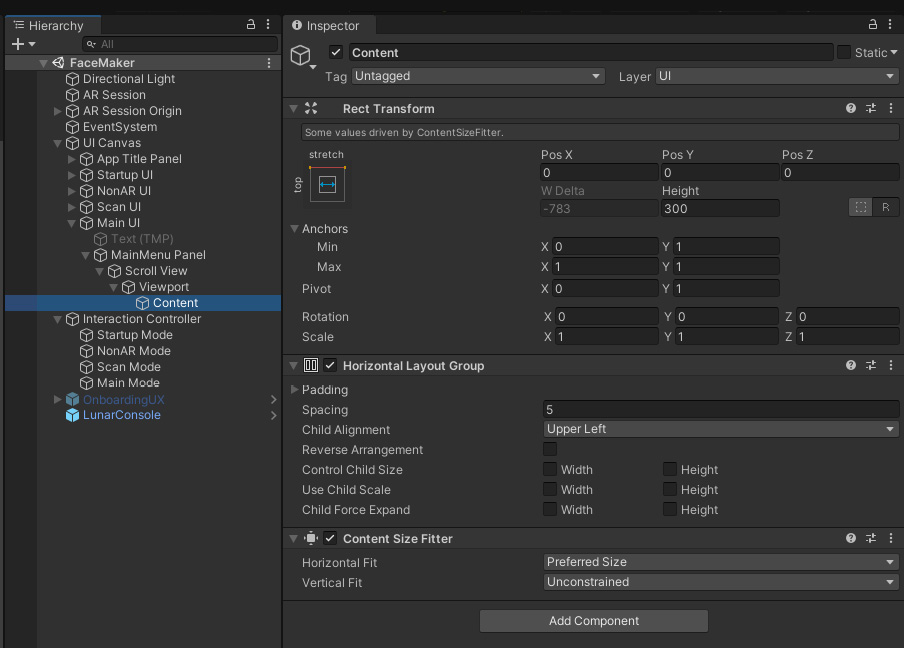
Figure 9.4 – Main UI hierarchy with content inspector shown
We can now add buttons to the Content container. For now, we'll create just two buttons, for the two heads. Later, we'll expand it with more options. Each button will display an image icon (if you don't have an icon for your own content, you can use text labels):
- In the Hierarchy, right-click the Content game object and select UI | Button. Rename it PlasticHead Button.
- Set its Width, Height to (150, 150).
- Remove its child Text object (unless you don't have an icon image for this button).
- From the Project window, drag the plastichead icon image asset (perhaps found in your /icons folder) onto the Image | Source Image slot.
- In the Inspector, click the + button at the bottom right of the On Click area of the Button component.
- From the Hierarchy, drag the Main Mode object (under Interaction Controller), into the Inspector, and drop it onto the On Click Object slot.
- In the Function selection list, choose FaceMainMode | ChangePosePrefab.
- From the Project window, drag the MrPlasticHead prefab (in your Prefabs/ folder) onto the empty parameter slot, as shown in the following screenshot:
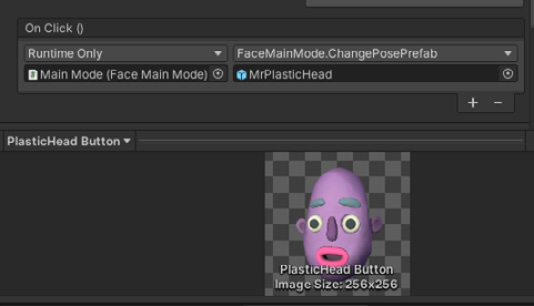
Figure 9.5 – The PlasticHead button's On Click action will pass the MrPlasticHead prefab to the FaceMainMode.ChangePosePrefab function
Tip: Creating button icons
To create many of the button icons used in this chapter, I sometimes start by making a screen capture of the actual game object. Then, in Photoshop, I isolate the shape by selecting its edges (using the Magic Wand tool) and make a cutout with a transparent background. I then crop the image on a square-shaped canvas and resize it to 256x256, before exporting it as a PNG file. Then, in Unity, I import the image and, in Import Settings, set Texture Type to Sprite (2D or UI), and click Apply. The asset can now be used as a UI sprite in an image component like those on button objects.
We now have one button in the Main Menu. This is for selecting the MrPlasticHead model. Let's make a second button, for the MrFacetHead prefab. To do that, we can duplicate and modify the first button, as follows:
- In the Hierarchy, select the PlasticHead Button game object.
- From the main menu, select Edit | Duplicate (or press Ctrl + D). Rename the copy to FacetHead Button.
- From the Project window, drag the facethead icon asset onto the Image | Source Image slot.
- From the Project window, drag the MrFacetHead prefab (in your Prefabs/ folder) onto the parameter slot (replacing the MrPlasticHead prefab already there).
The Main Menu now has two buttons. When the app runs, clicking one will show MrPlasticHead on my face. Clicking the other will show MrFacetHead. It would also be nice to offer a reset button that clears all the face filters.
Adding a reset face button
We can also add a reset button that sets the current pose object to null. Let's do this as a separate function in the FaceMainMode script. Use the following steps:
- Open the FaceMainMode script for editing, and add a ResetFace function:
public void ResetFace()
{
foreach (ARFace face in faceManager.trackables)
{
ChangeableFace changeable = face.GetComponent<ChangeableFace>();
if (changeable != null)
{
changeable.SetPosePrefab(null);
}
}
}
- In Unity, under Content in the main menu, right-click and select UI | Button - TextMeshPro. Rename it as Reset Button.
- Set its Width, Height to (150, 150). Remove its Image component.
- On its child Text (TMP) object, change the text to say Reset, check the Auto Size checkbox, and change the text Vertex Color, if you want.
- Click the + button on the On Click list, drag the Main Mode object onto the Object slot, and select FaceMainMode | ResetFace from the Function list.
My main menu, at the bottom of the screen, now looks like this with its three buttons:

Figure 9.6 – The Main Menu with three buttons
You're now ready to build and run the project. Save your work (File | Save) and build it (File | Build and Run). You now have a little Face Maker app that lets you choose between 3D heads or resetting the scene!
In this section, we created a Changeable Face Prefab that you can set the child prefab of at runtime so the user can select different head models for their selfie. We then created a Main Menu panel with horizontally scrollable buttons, and added buttons that allow the user to choose MrPlasticHead, MrFacetHead, or to reset the current model.
Next, let's add some 3D accessories to your face – sunglasses and a hat.
Attaching 3D Accessories
Suppose you now want to accessorize your face and head. The setup is very similar to the pose prefabs we just used. For this, we will introduce a couple of third-party models downloaded from the web (and imported into your project at the top of this chapter). We'll also add an AddAccessory function to the Changeable Face Prefab that allows the user to view more than one accessory at a time.
Wearing a hat
I found a 3D hat on the internet (https://free3d.com/3d-model/cartola-278168.html), and we downloaded and installed it earlier in this chapter. Feel free to use this model and/or find your own model to add to the project. I installed it in my Assets/Models/TopHat/ folder. The model is an FBX file named CapCartola. We'll also need to configure its materials.
If you select the CapCartola model in the Project window and unfold it, you'll notice it has child Camera and Light objects. This is not unusual for models exported from some 3D modeling programs such as Blender, for example. We obviously do not need these in our scene, so we'll also remove them from the imported model. Then we'll extract and set up the materials, and then put them together as a prefab. Follow these steps:
- In the Project window, select the CapCartola model (in the Assets/Models/TopHat/ folder).
- In the Inspector, you'll see Import Settings. Make sure the Model tab is selected at the top of the window.
- Uncheck the Import Cameras and Import Lights checkboxes. Then click Apply.
- Select the Materials tab at the top of the Inspector window.
- Click the Extract Materials button. This creates two new files, Material.001 (for the hat itself) and Material.002 (for its ribbon band). These are already associated with the model.
- In the Project window, right-click your Prefabs/ folder and select Create | Prefab. Rename it TopHat. Then open the prefab for editing.
- From the Project window, drag the CapCartola model into the Hierarchy, creating a child instance under the root TopHat object.
- With CapCartola selected in the Hierarchy, I found these Transform settings work for me: Position: (0, 0.18, -0.02), Rotation: (-20, 0, 0), and Scale: (0.077, 0.077, 0.077).
- Unfold CapCartola in the Hierarchy and select its child Cylinder object.
- In the Inspector, under Material.001 (for the hat itself), set the Base Map color to a blackish color (I used #331D1D).
- Likewise, under Material.002 (for the ribbon band), set the Base Map color to a nice red (I used #FF1919).
- If you add an AR Face component to the root object, you can test it out right away by using it as the AR Face Manager | Face Prefab.
- Save the prefab and exit back to the scene hierarchy.
You now have a TopHat prefab that you can use to accessorize your face. Let's also add sunglasses.
Sporting cool sunglasses
I found a 3D sunglasses model on the internet (https://free3d.com/3d-model/sunglasses-v1--803862.html), which we downloaded and installed earlier in this chapter. I installed it in my Assets/Models/Sunglasses/ folder. The original model is an OBJ file named 12983_Sunglasses_v2_l3. We'll also need to configure its materials.
Extract and set up the materials, and then put the model together as a prefab using the following steps:
- In the Project window, navigate to the folder containing the 12983_Sunglasses_v2_l3 model and select it.
- In the Inspector, you'll see Import Settings. Select the Materials tab at the top of the Inspector window and click the Extract Materials button. This creates two new files, sunglasses_body and sunglasses_lens.
- Select the sunglasses_body material and adjust it as you desire. I made mine black. The lens material may be fine as is (dark with transparency).
- In the Project window, right-click your Prefabs/ folder and select Create | Prefab. Rename it Sunglasses.
- Open the Sunglasses prefab for editing.
- From the Project window, drag the 12983_Sunglasses_v2_l3 model into the Hierarchy, creating a child instance under the root Sunglasses.
- With 12983_Sunglasses_v2_l3 selected in the Hierarchy, I found these Transform settings work for me: Position: (-0.08, -0.025, -0.058), Rotation: (-90, 90, 09), and Scale: (0.0235, 0.0235, 0.0235).
- If you also add an AR Face component to the root object, you can test it out right away by using it as the AR Face Manager | Face Prefab.
- Save the prefab and exit back to the scene hierarchy.
We now have two models we can use as face accessories. You can test them out by manually adding one to the AR Session Origin | AR Face Manager | Face Prefab slot and building and running the project. When you're done, don't forget to put the Changeable Face Prefab back into the slot.
Next, we'll add support for these accessories in the scripts.
Updating the scripts for accessories
We need to update the ChangeableFace script to manage the accessory objects. It will maintain a list of the current accessory objects, ensuring we create only one instance of any prefab.
Instead of destroying an accessory object when it's removed from the scene, we'll disable it, and then re-enable it if the user adds the same object again.
We also need to update the FaceMainMode script with a function that the menu buttons can call. This in turn passes the requested prefab to ChangeableFace.
Use the following steps to update your scripts:
- Begin by opening the ChangeableFace script for editing and add the following declaration at the top of the class:
Dictionary<GameObject, GameObject> accessories = new Dictionary<GameObject, GameObject>();
We're using a dictionary to maintain the list of instantiated accessory objects, keyed by the prefab.
- Then, add an AddAccessory function as follows:
public void AddAccessory(GameObject prefab)
{
GameObject obj;
if (accessories.TryGetValue(prefab, out obj) && obj.activeInHierarchy)
{
obj.SetActive(false);
return;
}
else if (obj != null)
{
obj.SetActive(true);
}
else
{
obj = Instantiate(prefab, transform, false);
accessories.Add(prefab, obj);
}
}
AddAccessory instantiates the prefab as a child of the face and adds it to the accessories list. However, if the prefab has already been instantiated, we remove it from the scene by setting it as inactive. Likewise, if you try to add it again, it is reactivated.
- Next, we'll add a ResetAccessories function that removes all accessories, as follows:
public void ResetAccessories()
{
foreach (GameObject prefab in accessories.Keys)
{
accessories[prefab].SetActive(false);
}
}
Tip: Avoid garbage collection by using object caching
In this AddAccessory function, I could have called Destroy to remove an existing instance, and then called Instantiate again if and when the object was added a second time. Instead, I'm managing memory by simply disabling existing objects when not wanted and reusing the same instances when requested. Repeatedly instantiating and destroying objects at runtime can cause memory fragmentation and require Unity to perform memory garbage collection (GC). GC can be computationally expensive and cause glitches in your frame rate updates (see https://docs.unity3d.com/Manual/UnderstandingAutomaticMemoryManagement.html). Likewise, you may want to refactor the other scripts in this chapter to not use Destroy.
- Next, we can open the FaceMainMenu script for editing, and add an AddAccessory function that will be called by the menu buttons, as follows:
public void AddAccessory(GameObject prefab)
{
foreach (ARFace face in faceManager.trackables)
{
ChangeableFace changeable = face.GetComponent<ChangeableFace>();
if (changeable != null)
{
changeable.AddAccessory(prefab);
}
}
}
- Next, add the following highlighted code to ResetFace:
public void ResetFace()
{
foreach (ARFace face in faceManager.trackables)
{
ChangeableFace changeable = face.GetComponent<ChangeableFace>();
if (changeable != null)
{
changeable.SetPosePrefab(null);
changeable.ResetAccessories();
}
}
}
We're now ready to add menu buttons for the TopHat and Sunglasses accessories.
Adding accessories to the main menu
To add new buttons to the main menu, we can duplicate an existing button and modify it by following these steps:
- In the Hierarchy, duplicate one of the menu buttons (found under Main UI | MainMenu Panel | Scroll View | Viewport | Content), such as the FacetHead Button game object. On the main menu, click Edit | Duplicate (or press Ctrl + D). Rename the copy to HatAccessory Button.
- From the Project window, drag the tophat icon asset onto the Image | Source Image slot.
- On the Button On Click action, change Function to FaceMainMode.AddAccessory.
- From the Project window, drag the TopHat prefab (in your Prefabs/ folder) onto the parameter slot.
- Likewise, repeat steps 1-4 for a SunglassesAcessory Button, using the sunglasses icon image and the Sunglasses prefab asset.
Save the scene and build the project. When you tap the hat button, you're wearing a top hat. Tap it again to remove it. In the following screen capture, I'm wearing the facet face, top hat, and sunglasses. I've never looked so cool!
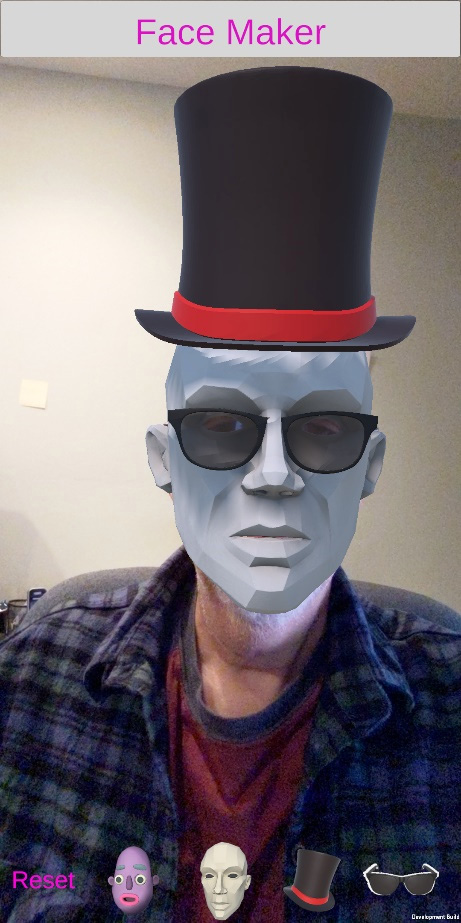
Figure 9.7 – Selfie with me wearing a top hat, sunglasses, and faceted face at the same time
In this section, we built upon the basic face pose tracking features by adding other models to be tracked at the same time. We created prefabs for the TopHat and Sunglasses using models download from the web. Then, we updated the ChangeableFace script to handle multiple accessory objects. This implements good memory management practices by avoiding duplicate instances of the same prefab and caching the spawned instances in a dictionary list. After updating the FaceMainMode script with a public AddAccessory function, we added new buttons to the main menu so that the user can accessorize their head with a hat and/or sunglasses.
So far, all our faces are fixed-expression static models. AR Foundation also supports the dynamic visualization of faces. Let's try that next.
Making dynamic face meshes with a variety of materials
To show an augmented face that matches your real-life expressions, Unity AR Foundation lets you generate a face mesh dynamically at runtime. On this mesh, you can apply different materials, giving the effect of you wearing arbitrary face masks. To add this to our project, we'll first look at the default face game object given by AR Foundation. Then we'll create several different materials to use. To integrate this feature into our project, we'll extend the ChangeableFace script to switch materials, add a similar function to the FaceMainMode script to update the face trackables, and then add menu buttons to switch materials.
Exploring AR Default Face
You can create a dynamic face game object for AR Foundation from the Unity menu at GameObject | XR | AR Default Face. The object includes an AR Face Mesh Visualizer component that generates a face mesh at runtime that matches your facial expressions, including moving your mouth and raising your eyebrows. Let's quickly try it out before we add this feature to our Changeable Face Prefab. Use the following steps:
- From the Editor menu bar, select GameObject | XR | AR Default Face. This creates an object named AR Default Face in the scene hierarchy.
Note that you won't see this object in your Scene window because the mesh is dynamically generated at runtime, so there's nothing to render yet.
- Replace the default material (the one included is not for URP): In the Project window, right-click your Materials/ folder (create one first if necessary), and name it DefaultFace Material. Set the Base Map color to your favorite color. Drag the material onto the AR Default Face object.
- Make it a prefab. Drag the AR Default Face object into the Project window's Prefabs/ folder.
- Then delete it from the Hierarchy.
- Now, drag the prefab onto your AR Session Origin | AR Face Manager | Face Prefab slot.
Here's a screen capture of me wearing the default mask, and smiling brightly, on the left. On the right is a scene view of my face mesh generated at runtime:

Figure 9.8 – Me wearing an AR default mask (left) and a wireframe of my face mesh (right)
It's easy to replace this default material with other materials to make your own masks.
Creating face materials
For fun (and for the purposes of instruction), let's try using an arbitrary photo as a face texture. I'll use a picture named WinterBarn.jpg (this was also used in Chapter 6, Gallery: Building an AR App). Create a new material using the photo, with the following steps:
- Right-click in your Project window Materials/ folder and select Create | Material, naming it PhotoFace Material.
- Drag a photo from the Project window (for example, WinterBar.jpg) onto the Base Map texture chip. Ensure the Base Map color is white.
- Duplicate the AR Default Face prefab by selecting it in the Project window and choosing Edit | Duplicate (or pressing Ctrl + D). Then rename it PhotoFace Prefab.
- Open the new prefab for editing and drag the PhotoFace Material onto it. Save the prefab and return to the scene hierarchy.
- To try it out, drag the PhotoFace Prefab onto AR Face Manager | Face Prefab and run the scene.
This ought to give you a feeling of how a 2D texture image is mapped onto the face mesh. This is called UV mapping. In the following figure, I'm wearing a mask with this ordinary photo as a texture map. On the right is an actual UV texture map (PopFace_Albedo) for the face mesh:

Figure 9.9 – Ordinary 2D image as face texture (left), and a UV mapped face texture (right)
In this way, you can use any 2D photograph or image that you want. Try others for yourself, such as your national flag, the logo of your favorite sports team, and so on.
The PopFace_Albedo texture shown in the preceding figure is included in the AR Face Assets package from Unity that we imported into our project at the beginning of this chapter. Make a material for that now by repeating steps 1-5, naming the material PopFace Material, and using PopFace_Albedo for the Base Map texture.
Likewise, the AR Face Assets package includes textures for a robot face. Again, repeat steps 1-5 for a new RobotFace Material, using Robot_Albedo for the Base Map texture. In this case, there are additional texture maps you should also add to the material – Robot_Normal and Robot_Occlusion for Normal Map and Occlusion Map, respectively.
When adding the Normal Map texture, you may be prompted with This texture is not marked as a normal map. Click the Fix Now button to apply the required Import Settings.
The following figure shows me wearing the RobotFace and PopFace masks. Not obvious in these screen captures is the fact that the face mesh follows my facial expressions in real time:
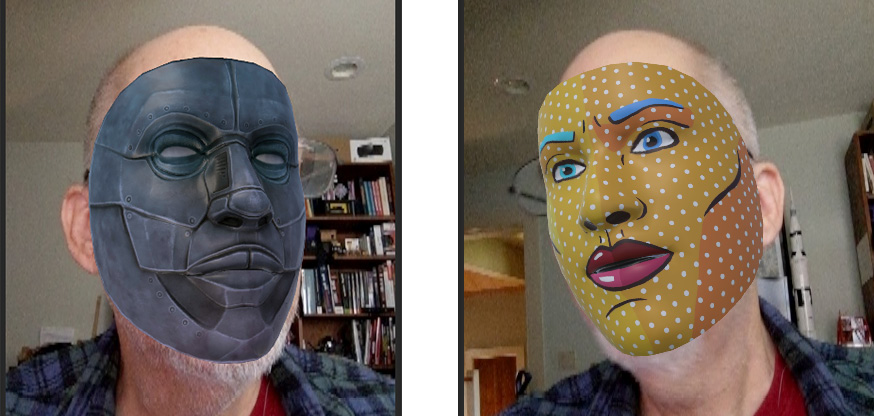
Figure 9.10 – Selfies using the Robot PBR material (left), and the Pop albedo texture (right)
Info: Using Procreate to paint your own textures
If you're interested in painting your own UV mapped face textures (and have an iPad), the Procreate app (https://procreate.art/) has a feature for doing this (check out Dilmer Valecillos's video on this at https://youtu.be/FOxhcRzDLx8).
With the materials made, we can add the face mesh visualizer to the changeable face prefab, so it will generate the face mesh at runtime.
Adding a face mesh visualizer to the changeable face prefab
To integrate a dynamic face mesh into our app, we should add it to our versatile Changeable Face Prefab. We will need the same components as the AR Default Face game object we generated earlier, and they need to be on the prefab's root object. Use the following steps to add them manually:
- Open Changeable Face Prefab for editing.
- With the prefab root object selected, click Add Component in the Inspector.
- Search for and select the AR Face Mesh Visualizer component.
- Search for and select a Mesh Filter component.
- Search for and select a Mesh Renderer component.
- Drag the DefaultFace Material from the Project window onto the Changeable Face Prefab root object.
- Save the prefab.
- Back in the scene hierarchy, drag the Changeable Face Prefab asset onto the AR Session Origin | AR Face Manager | Face Prefab slot.
If you build and run now, you'll see the default face mesh. All the menu buttons still work, letting you add 3D head models and accessories.
We want to have buttons that let the user choose between face materials. For that, we need to update our scripts.
Controlling the face material
We can hide or show the face mesh by toggling the AR Face Mesh Visualizer and Mesh Render components. Use the following steps:
- Open the ChangeableFace script for editing and add the following at the top of the script:
using UnityEngine.XR.ARFoundation;
- Add the following code to declare and initialize references to the ARFaceMeshVisualizer and MeshRenderer components:
ARFaceMeshVisualizer meshVisualizer;
MeshRenderer renderer;
private void Start()
{
meshVisualizer = GetComponent<ARFaceMeshVisualizer>();
meshVisualizer.enabled = false;
renderer = GetComponent<MeshRenderer>();
renderer.enabled = false;
}
We'll start the app with the face mesh not visible, so both components are disabled.
- Then, add a SetMeshMaterial function as follows:
public void SetMeshMaterial(Material mat)
{
if (mat == null)
{
meshVisualizer.enabled = false;
renderer.enabled = false;
return;
}
renderer.material = mat;
meshVisualizer.enabled = true;
renderer.enabled = true;
}
When given a material, mat, the function sets it in the renderer and makes sure the visualizer and renderer components are enabled. If you pass a null value for the mat, then the components will be disabled.
- Next, open the FaceMainMode script and add a ChangeMaterial function, as follows:
public void ChangeMaterial(Material mat)
{
foreach (ARFace face in faceManager.trackables)
{
ChangeableFace changeable = face.GetComponent<ChangeableFace>();
if (changeable != null)
{
changeable.SetMeshMaterial(mat);
}
}
}
Like the other functions in the script, it loops through any trackables and calls into the changeable component.
- Next, update the ResetFace function with the following highlighted line:
changeable.SetPosePrefab(null);
changeable.ResetAccessories();
changeable.SetMeshMaterial(null);
The code is now written. We added a SetMaterial function to the ChangeableFace script that enables the mesh visualizer and sets the material to render. To the FaceMainMode script, we added a ChangeMaterial function that calls SetMaterial on each trackable AR face.
We're now ready to add menu buttons for the various mesh materials.
Adding face materials to the main menu
To add new buttons to the main menu, we can duplicate an existing button and modify it, as we did earlier. Use the following steps:
- In the Hierarchy, duplicate one of the menu buttons (found under Main UI | MainMenu Panel | Scroll View | Viewport | Content), such as the FacetHead Button game object, using the main menu Edit | Duplicate options (or press Ctrl + D). Rename the copy to DefaultFace Button.
- From the Project window, drag the default face icon asset onto the Image | Source Image slot.
- On the button On Click action, change Function to FaceMainMode.ChangeMaterial.
- From the Project window, drag the DefaultFace Material (in your Materials/ folder) onto the parameter slot.
- Likewise, repeat steps 1-4 three times, for PhotoFace Button (using the photo face icon image, and the PhotoFace Material asset), for PopFace Button, and for RobotFace Button.
Save the scene and build the project. When you tap one of the face material buttons, it renders the face mesh. The following cropped screen capture shows the horizontally-scrolled menu with the new buttons:
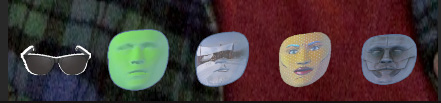
Figure 9.11 – Face mesh texture buttons on the main menu
In this section, we added an AR Face Mesh Visualizer component to our Changeable Face Prefab so that face meshes will be generated at runtime. We created several materials to apply when rendering the mesh, and then added buttons to the main menu that let the user choose between materials. When a button is clicked, it sends the material asset to the FaceMainMode. This then forwards it to the trackable face(s).
While the face visualizer can follow some of your expressions, including raised eyebrows and opening your mouth, it does nothing for your eyes. Let's consider eye tracking next.
Using eye tracking (ARKit)
For eye tracking, as you might expect, you are given the pose transforms for each eye, which you can use to update your own "eyeball" game objects. For this feature, I'll show you how to do it, but leave the details of integrating it into the project up to you. Presently, this feature requires an iOS device with a TrueDepth camera.
To learn more about eye tracking with AR Foundation, take a look at the EyeLasers scene given in the AR Foundation sample assets (we installed these in the Assets/ARF-samples/ folder).
The Face Prefab in the scene's AR Face Manager is the AR Eye Laser Visualizer prefab. This has an AR Face component (as you would expect), plus an Eye Pose Visualizer. This visualizer script, in turn, is given an eyeball prefab. In this specific scene, it is given the Eye Laser Prefab. This simply contains a long thin cylinder that'll be rendered to look like a laser beam. In summary, these dependencies could be depicted as the following:
The EyePoseVisualizer script is an example script (not part of the AR Foundation package itself). Briefly, you give it an eyeball prefab, which is instantiated twice and parented by the ARFace, leftEye, and rightEye pose transforms. For example, you'll find this line of code in the script's CreateEyeGameObjectsIfNecessary function (line 45):
m_LeftEyeGameObject = Instantiate(m_EyePrefab, m_Face.leftEye);
As a child of the tracked eye transforms, the spawned objects appear to automatically track with your detected eye movements.
The script also subscribes to the ARFace and update events, where it toggles the eyes' visibility based on the trackable's tracking state, as shown in the following code:
void OnUpdated(ARFaceUpdatedEventArgs eventArgs)
{
CreateEyeGameObjectsIfNecessary();
SetVisible((m_Face.trackingState == TrackingState.Tracking) && (ARSession.state > ARSessionState.Ready));
}
Tip: Using updated events with face tracking
This script illustrates another best practice for face tracking with AR Foundation. By subscribing to the trackables' updated events, it toggles the visibility of instantiated prefabs based on the trackable's trackingState, as well as the overall ARSession.state. You might consider refactoring the functions in our FaceMainMode class to handle updated events in this way too.
Eye tracking is not available on all platforms. When the script is enabled, it first checks the Unity eye tracking subsystem. If the feature is not supported, the component disables itself, as highlighted in the following OnEnable function (lines 65-78):
void OnEnable()
{
var faceManager = FindObjectOfType<ARFaceManager>();
if (faceManager != null && faceManager.subsystem != null && faceManager.descriptor.supportsEyeTracking)
{
m_FaceSubsystem = (XRFaceSubsystem)faceManager.subsystem;
SetVisible((m_Face.trackingState == TrackingState.Tracking) && (ARSession.state > ARSessionState.Ready));
m_Face.updated += OnUpdated;
}
else
{
enabled = false;
}
}
If you want to try this yourself with an eyeball instead of a laser beam, the following URL contains a free eyeball 3D model you could use: https://free3d.com/3d-model/eyeball--33237.html. Make it into a prefab and substitute it for the eye laser prefab on the AR eye laser visualizer prefab's Eye Pose Visualizer | Eye Prefab slot.
This is fantastic! However, you can do so much more. For example, with ARCore, you can attach graphics to specific regions of the face. Let's look into that now.
Attaching stickers to face regions (ARCore)
If your project is using ARCore XR Plugin and Android, you have access to ARCore-specific features, including transforms for three important face regions: the nose tip, left forehead, and right forehead. If you raise your left eyebrow, for example, that transform will move independently of the rest of the face, providing some more detail to the facial expressions in your app.
In addition to what we do here, you may also want to look at the ARCoreFaceRegions scene in the AR Foundation Samples project (see the ARF-samples/ folder in your project), and the ARCoreFaceRegionManager script it uses. The code we develop in this section is considerably simpler and easier to follow.
To demonstrate ARCore face regions, we'll implement several 2D stickers and attach them to the 3D face regions. We'll let you add eyebrows, a mustache, and licking lips using clipart that we identified at the top of this chapter (and I edited in Photoshop). They've been imported as Sprite (2D and UI). These are available in this book's GitHub repository.
We can start by creating the sticker prefabs.
Creating the sticker prefabs
To make prefabs of these clipart images, use the following steps:
- Right-click in the Project window and select Create | Prefab. Rename it Mustache Prefab. Then open it for editing.
- From the Project window, drag the mustache image onto the root Mustache Prefab. This creates a child object named mustache with a Sprite Renderer component.
- Set the mustache object's Transform. The following values worked for me: Position: (0, -0.02, 0) and Scale: (0,019, 0,019, 0,019).
- Save the prefab.
- Repeat steps 1-4, making Lips Prefab using the licking-lips sprite image. Use Position: (0, -0.05, 0) and Scale: (0,019, 0,019, 0,019).
- Again, repeat steps 1-4, making Eyebrow Left Prefab using the eyebrow-left sprite image. Use Position: (0, -0.01, 0) and Scale: (0,019, 0,019, 0,019).
- And likewise, one more time, make Eyebrow Right Prefab using the eyebrow-right sprite image. Use Position: (0, -0.01, 0) and Scale: (0,019, 0,019, 0,019).
We now have prefabs for a mustache, lips, and eyebrows. Let's write the scripts to attach them using the ARCore face regions support.
Managing attachments' positions
We'll create a separate script, FaceRegionAttachments on Changeable Face Prefab. It makes sense to keep it separate from the ChangeableFace script because the code is ARCore-specific and is relatively long.
The lines of code that depend on ARCore are enclosed in #if UNITY_ANDROID &&!UNITY_EDITOR compiler symbols, so they will not run in a non-Android environment (including the desktop play mode). Use the following steps:
- Create a new C# script named FaceRegionAttachments and open it for editing.
- Start writing the script by replacing the content with the following code:
using System.Collections.Generic;
using UnityEngine;
using Unity.Collections;
using UnityEngine.XR.ARFoundation;
#if UNITY_ANDROID
using UnityEngine.XR.ARCore;
#endif
public class FaceRegionAttachments : MonoBehaviour
{
ARFaceManager faceManager;
ARFace face;
Dictionary<ARCoreFaceRegion, GameObject> prefabs = new Dictionary<ARCoreFaceRegion, GameObject>();
Dictionary<ARCoreFaceRegion, GameObject> objs = new Dictionary<ARCoreFaceRegion, GameObject>();
#if UNITY_ANDROID && !UNITY_EDITOR
NativeArray<ARCoreFaceRegionData> faceRegions;
#endif
private void Start()
{
faceManager = FindObjectOfType<ARFaceManager>();
face = GetComponent<ARFace>();
}
The script first declares that we're using the ARFoundation API as well as ARCore. Then, at the top of the class, we declare variables for ARFaceManager and the object's ARFace, and initialize these in Start. We also declare two dictionaries, prefabs and objs, that will be indexed by the ARCore region identifier (enum). We then declare a NativeArray of ARCoreFaceRegionData named faceRegions that we'll be using in Update.
- Add a SetRegionAttachment function (that will be called from FaceMainMode) as follows:
public void SetRegionAttachment(ARCoreFaceRegion region, GameObject prefab)
{
GameObject obj;
if (objs.TryGetValue(region, out obj))
{
GameObject currentPrefab = prefabs[region];
Destroy(obj);
prefabs.Remove(region);
objs.Remove(region);
if (prefab == currentPrefab)
return;
}
obj = Instantiate(prefab);
prefabs.Add(region, prefab);
objs.Add(region, obj);
}
The function gets a region ID and a prefab, instantiates the prefab, and records both the prefab and spawned object in the dictionaries. If there is already a spawned object, it is first destroyed and removed from the lists. We check if the new prefab was the same as the current one, so it won't be respawned again, effectively allowing the menu button to toggle on and off as an attachment by clicking twice.
- On each Update, we need to ask ARCore for the current list of face regions, and update the spawned object transforms accordingly, as follows:
private void Update()
{
#if UNITY_ANDROID && !UNITY_EDITOR
var subsystem = (ARCoreFaceSubsystem)faceManager.subsystem;
if (subsystem == null)
return;
subsystem.GetRegionPoses(face.trackableId, Allocator.Persistent, ref faceRegions);
for (int i = 0; i < faceRegions.Length; ++i)
{
GameObject obj;
if (objs.TryGetValue(faceRegions[i].region, out obj))
{
obj.transform.localPosition = faceRegions[i].pose.position;
}
}
#endif
}
- We can also provide a public Reset function that destroys all the instantiated objects and clears the dictionaries:
public void Reset()
{
foreach (ARCoreFaceRegion region in objs.Keys)
{
Destroy(objs[region]);
}
objs.Clear();
prefabs.Clear();
}
- Finally, it's good practice to dispose of the faceRegions native array when this game object is destroyed, as follows:
void OnDestroy()
{
#if UNITY_ANDROID && !UNITY_EDITOR
if (faceRegions.IsCreated)
faceRegions.Dispose();
#endif
}
}
- Save the script, then, back in Unity, open the Changeable Face Prefab asset for editing.
- Drag the FaceRegionAttachments script onto the root Changeable Face Prefab game object, then save the prefab.
Tip: Refactor to avoid garbage collection
As we did earlier, in the Attaching 3D Accessories section, you may want to refactor this code to avoid garbage collection by reusing objects rather than repeatedly calling Destroy and Instantiate for the same prefabs.
Now we'll update the FaceMainMode script to use it and provide public functions that the menu buttons can call, as follows:
- Open the FaceMainMode script for editing, and start by adding the following lines at the top of the file (needed for the enum ARCoreFaceRegion definition):
#if UNITY_ANDROID
using UnityEngine.XR.ARCore;
#endif
- Add a private SetRegionAttachment function that loops through the trackables and calls SetRegionAttachment on them:
private void SetRegionAttachment(ARCoreFaceRegion region, GameObject prefab)
{
foreach (ARFace face in faceManager.trackables)
{
FaceRegionAttachments regionAttachments = face.GetComponent<FaceRegionAttachments>();
if (regionAttachments != null)
{
regionAttachments. SetRegionAttachment(region, prefab);
}
}
}
- Next, expose this capability via separate public functions we can call from the menu button Unity actions, as follows:
public void SetNoseAttachment(GameObject prefab)
{
SetRegionAttachment(ARCoreFaceRegion.NoseTip, prefab);
}
public void SetForeheadLeftAttachment(GameObject prefab)
{
SetRegionAttachment( ARCoreFaceRegion.ForeheadLeft, prefab);
}
public void SetForeheadRightAttachment(GameObject prefab)
{
SetRegionAttachment( ARCoreFaceRegion.ForeheadRight, prefab);
}
- Save the script.
Here, we created a new FaceRegionAttachments script that maintains dictionary lists of prefabs and spawned objs for game objects attached to specific face regions. On each frame Update, the objs transforms are updated based on the face region's pose transform, so it tracks with its region. This implementation allows multiple attachments on a face, but only one per region. Then, we updated the FaceMainMode script with public functions that can be called by menu buttons to add attachments.
We can now make the menu buttons.
Adding region attachments to the main menu
As we did earlier, to add new buttons to the main menu, we can duplicate an existing button and modify it. Use the following steps:
- In the Hierarchy, duplicate one of the menu buttons (found under Main UI | MainMenu Panel | Scroll View | Viewport | Content), such as the FacetHead Button game object. Using the main menu, navigate to Edit | Duplicate (or press Ctrl + D). Rename the copy to Mustache Button.
- From the Project window, drag the mustache icon asset onto the Image | Source Image slot.
- On the button On Click action, change Function to FaceMainMode.SetNoseAttachment.
- From the Project window, drag the Mustache Prefab asset onto the parameter slot.
- Repeat steps 1-4 for Lips Button, using the licking-lips icon image, and the Lips Prefab asset. Use the same function as the mustache, FaceMainMode.SetNoseAttachment.
- Repeat steps 1-4 again for Eyebrows Button, using the eyebrows icon image. This time, we'll have two On Click actions, one for each eye. The first calls FaceMainMode.SetForeheadLeftAttachment with the EyebrowLeft Prefab. The second calls FaceMainMode.SetForeheadRightAttachment with the EyebrowRight Prefab, as shown in the following:
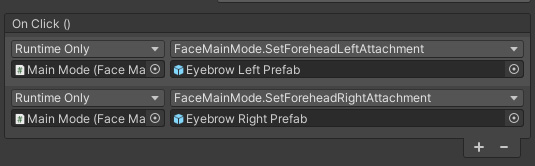
Figure 9.12 – The eyebrows button has two On Click actions, for both the left and right regions and prefabs
Save the scene and build the project. When you tap one of the region attachment buttons, it adds its sticker prefabs to the scene. The mustache and lips both set the nose attachment so you can only view one at a time. The following screen captures show me all decked out, including combining it with other face augmentations we created earlier (right):

Figure 9.13 – Selfie screenshots with multiple stickers, and (on the right) combined with other augmentations
Because this feature is specific to ARCore, you will probably want to hide the sticker buttons if you try building the project for iOS. We can add those next.
ARCore-only UI buttons
This face region stickers feature only runs on ARCore and Android. If you plan to build the same project on iOS (as well as Android), we already account for code compilation issues using conditional compile symbols. However, the menu buttons will still be visible. You could disable them by hand in the editor before doing a build, or you could let a script handle it.
Use the following ARCoreOnly script to hide buttons from the UI (unless you're targeting Android). If you're targeting Android but using play mode in the editor (using the AR Foundation remote tool), this script will disable the button so that it is visible but not interactable:
using UnityEngine;
using UnityEngine.UI;
public class ARCoreOnly : MonoBehaviour
{
private void Awake()
{
#if !UNITY_ANDROID
gameObject.SetActive(false);
#endif
#if UNITY_EDITOR
Button button = GetComponent<Button>();
button.interactable = false;
#endif
}
}
Drag a copy of this script onto the mustache button, lips button, and eyebrows button game objects so that they can only be used with ARCore.
To summarize, in this section, we created several sticker prefabs containing Sprite Renderers. We wrote an ARCore-specific script, FaceRegionAttachments, that uses the native ARCoreFaceRegionData (via ARCoreFaceSubsystem) to find the pose transform of each face region (nose tip, left forehead, and right forehead), and track each spawned game object with the given face region. We added menu buttons for each of the stickers that call public functions in FaceMainMenu by passing the sticker prefab to add. This in turn forwards the prefab to the trackable faces. Feel free to add more sticker prefabs and buttons, using similar steps to the ones found in this section.
This is cool, but having just three face regions is kind of limited. Using ARKit, you have access to much more refined detail about face geometry. This is achieved with the use of blend shapes.
Tracking expressive face blend shapes (ARKit)
ARKit introduces additional advanced face tracking features available only on iOS devices, including blend shapes. Blend shapes refer to morphing mesh geometries that are commonly used for animating the faces of NPCs (non-player characters) in video games and VR applications. Presently, they are an ARKit-specific feature. ARKit blend shapes provide intricate details of facial expressions as separate features, such as a left or right eye blink, looking down, eyes wide open, cheek puff, cheek squint, jaw left, mouth dimple, and many more. Each feature is given a coefficient on a scale of 0.0 to 1.0. This shape data can be forwarded to the Unity Skinned Mesh Renderer (https://docs.unity3d.com/Manual/class-SkinnedMeshRenderer.html) that is used in character animation. A good explanation and conversation can be found at the following URL: https://www.quora.com/What-is-blendshape-exactly.
Building an animated rig (with bones and a skinned mesh) is beyond the scope of this book. Instead, by way of explanation, I'll walk through the example assets given in the AR Foundation samples project's ARKitFaceBlendShapes scene, found in the Assets/ARF-samples/scenes/FaceTracking/ folder. To begin, you can try it yourself (if you're set up for iOS development) by building the ARKitFaceBlendShapes scene. Now, let's take a closer look.
Opening the scene in the Unity Editor, you will find AR Session Origin has an AR Face Manager component, as you'd expect. This references the SlothHead prefab for the Face Prefab.
Opening the SlothHead prefab, you will see that its root game object has an AR Face component. It also has an ARKitBlenShapeVisualizer. This is an example script provided with AR Foundation samples (it is not part of the AR Foundation package itself). This component has a parameter for Skinned Mesh Renderer. This is on the Sloth_Head2 child object, as shown in the following screenshot:
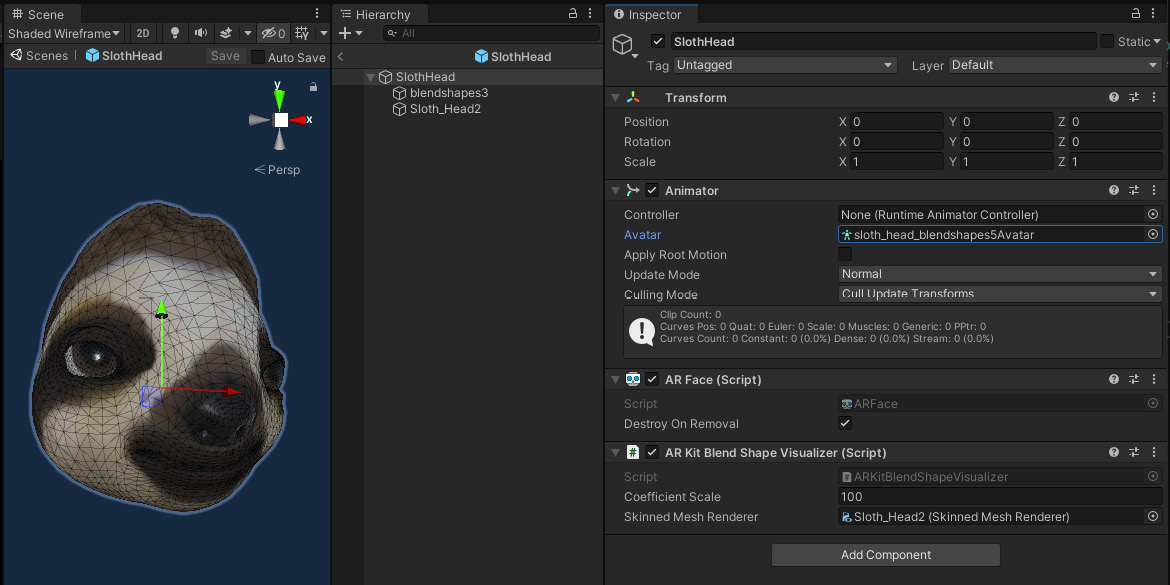
Figure 9.14 – The SlothHead prefab has the sample ARKitBlendShapeVisualizer script that references the skinned mesh render on the child Sloth_Head2
Open the ARKitBlendShapeVisualizer script in your code editor. You'll find a function, CreateFeatureBlendMapping, that is called Awake. This maps ARKit blend shape names (type ARKitBlendShapeLocation) with corresponding indexes on the skinnedMeshRenderer. For the list of locations and descriptions, see the following URL: https://docs.unity3d.com/Packages/[email protected]/api/UnityEngine.XR.ARKit.ARKitBlendShapeLocation.html.
The following screenshot shows the Sloth_Head2 object's Skinned Mesh Renderer, with some of its BlendShapes visible in the Unity Inspector:
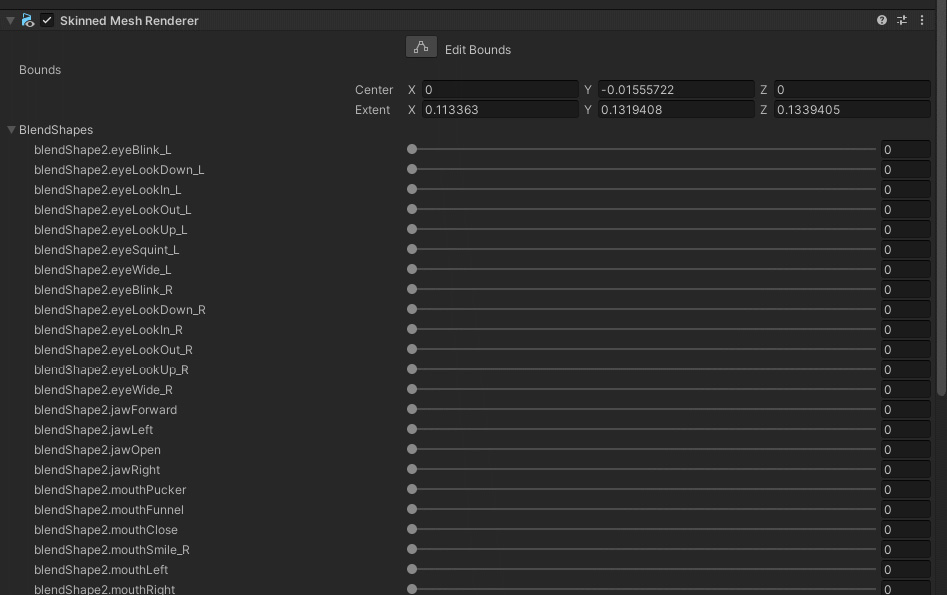
Figure 9.15 – Skinned Mesh renderer component with some of the blend shapes listed
The ARKit blend shape locations are mapped to the Skinned Mesh Renderer ones.
Then the ARKitBlendShapeVisualizer script, which subscribes to the ARFace updated events with the OnUpdated function, in turn, calls its UpdateFaceFeatures function. UpdateFaceFeatures gets the current blend shape coefficients from ARKit (m_ARKitFaceSubsystem.GetBlendShapeCoefficients), and for each coefficient, sets that coefficient value (scaled by a global scalar) to the skinnedMeshRender. From there, Unity does its magic, deforming and animating the mesh geometry to be rendered on the screen. This is not simple but does make sense if you can follow it correctly.
That's basically how blend shapes work. Developing your own models and code may require a good familiarity with the parts of Unity in question, but all the information you need is accessible. You will be successful if you know how to use it.
Summary
In this chapter, you built a face maker app that handles face tracking with the forward-facing (user-facing) camera on a mobile device. You learned that the AR Face Manager component takes a Face Prefab to instantiate when a face is tracked. You first used that to visualize specific AR Face prefabs but then created a generic Changeable Face Prefab with a ChangeableFace script that we could update from the FaceMainMode script.
You used this architecture to explore several ways of rendering tracked faces. First, you used the face pose to render an instantiated 3D head model (MrPlasticHead and MrFacetHead). Next, you used this technique to add accessories to the face, including a TopHat and Sunglasses. Then, you added an AR Face Mesh Visualizer to generate a face mesh dynamically at runtime, and then made several materials that can be applied to the mesh to make a wide variety of face masks. If you're on ARCore, you also implemented face region stickers using sprite images attached to ARCore face regions. Finally, you learned about ARKit-specific face tracking features, including eye tracking and blend shapes. In the process, you implemented a horizontally-scrolling main menu button that lets users choose various combinations of face filters. All this was great fun!
You now have a working knowledge of how to build AR applications in Unity using AR Foundation. If you followed along with each of the chapters of this book, you will have learned how to set up your system for AR development with Unity configured to build on your target platform and mobile device. You created a simple AR scene, learning the main game objects required for AR, including the AR Session and AR Session Origin. You also explored the sample AR projects provided by Unity. Next, you learned about improving the developer workflow and troubleshooting your apps, considering situations unique to AR development.
You created a user framework for developing an AR application that included onboarding graphics, interaction modes, and UI panels. This was saved as a scene template for reuse. You learned how to use the framework, first building a simple place-object scene with a simple main menu.
In the third part of the book, you built several AR applications, including a picture gallery that lets you place framed photos on your walls, with menus and user interactivity. You improved the app, adding editing tools to move, resize, delete, and change the images displayed in virtual pictures in the scene. In the next project, you used image tracking to present 3D graphics and information about the planets using real-life printed flashcards. Finally, in this chapter, you built a face tracking app with a scrolling menu containing a variety of face heads, masks, and attachable accessories to make fun selfies.
This is just the start. AR Foundation and Unity provide even more support for augmented reality applications, including object tracking and geotagging with GPS, as well as the full richness of the Unity platform for the development of interactive 3D games and applications. Go out and augment the world!