
The NHibernate Burrows framework works especially well for ASP.NET Web Forms applications. In this recipe, I'll show you how we can use Burrows to build an ASP.NET Web Forms application quickly.
- Download the latest NHibernate Burrows binaries from SourceForge at http://sourceforge.net/projects/nhcontrib/files/.
- Extract
NHibernate.Burrow.dll,NHibernate.Burrow.AppBlock.dll, andNHibernate.Burrow.WebUtil.dllto your solution'sLibfolder. - Complete the
Eg.Coremodel and mappings from Chapter 1. - In the
NHCookbookdatabase, create at least 12Productrows either by hand or by running the following SQL script at least 12 times:DECLARE @Count int; SELECT @Count = COUNT(*)+1 FROM Product INSERT INTO Product VALUES ( NEWID(), 'Eg.Core.Product', 'Product #' + CAST(@Count as VarChar(255)), 'Description of Product #' + CAST(@Count as VarChar(255)), CAST(@Count AS Decimal) * 0.99, null, null, null);
- Create a new ASP.NET Web Forms project named
Eg.Burrows. - Add a reference to the
Eg.Coremodel,log4net.dll,NHibernate.dll,NHibernate.ByteCode.Castle.dll,NHibernate.Burrows.dll,NHIbernate.Burrows.AppBlock.dll, andNHibernate.Burrows.WebKit.dll. - In the
Web.Config, add the standardlog4netandhibernate-configurationsections as done in Chapter 2. - In the
<configSections>element, add the following section declaration:<section name="NHibernate.Burrow" type= "NHibernate.Burrow.Configuration.NHibernateBurrowCfgSection, NHibernate.Burrow"/>
- Add the
NHibernate.Burrowsection toWeb.Config:<NHibernate.Burrow customConfigurator= "Eg.Burrows.BurrowsConfigurator, Eg.Burrows" />
- Inside
<system.web>, find the<httpModules>element and add the following Burrows http module:<add name= "NHibernate.Burrow.WebUtil.HttpModule" type= "NHibernate.Burrow.WebUtil.WebUtilHTTPModule, NHibernate.Burrow.WebUtil"/>
- Create a new class named
BurrowsConfiguratorusing the following code:public class BurrowsConfigurator : IConfigurator { public void Config(IPersistenceUnitCfg puCfg, Configuration nhCfg) { nhCfg.Configure(); } public void Config(IBurrowConfig val) { var unit = new PersistenceUnitElement { Name = "persistenceUnit1", NHConfigFile = null }; val.PersistenceUnitCfgs.Add(unit); } } - Create a new class named
ProductDAOwith the following code:public class ProductDAO : GenericDAO<Product> { } - Open the design view of
Default.aspx, and drag in aGridViewcontrol. - In the
Propertiespane, change the ID toProductGridView. - Drag an
ObjectDataSourcecontrol onto the page. - Name it
ProductDataSource. - From ObjectDataSource Tasks, choose Configure Data Sourc as shown in the next screenshot:
- Choose Eg.Burrows.ProductDAO from the drop-down, and click on Next.
- On the SELECT tab, choose FindAll(Int32 startRow,
Int32 pageSize,String sortExpression),returns IList<Product>, and click on Finish. - On the Properties pane, set MaximumRowsParameterName to pageSize.
- Set SelectCountMethod to CountAll.
- Set StartRowIndexParameterName to startRow.
- Set SortParameterName to sortExpression.
- From GridView Tasks for ProductGridView shown in the next screenshot, Choose ProductDataSource and check Enable Paging and Enable Selection.

- Click on Edit Columns to bring up the Fields window as shown in the next screenshot:
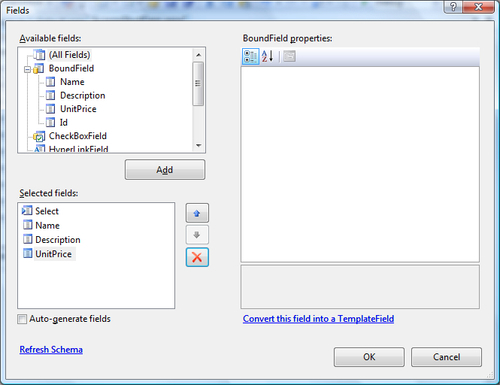
- Delete the Id field.
- On the UnitPrice field, set the DataFormatString to {0:c} and click on OK.
- From DataGrid task, click on Auto-Format and choose the Colorful scheme. The result should look like the next screenshot:

- On the Properties tab, set AllowSorting to true.
- Double-click on ProductGridView, and add this code to the
SelectIndexChangedevent:var productId = (Guid) ProductGridView .SelectedDataKey.Value; var url = string.Format( "~/ViewProduct.aspx?ProductId={0}", productId.ToString()); Response.Redirect(url); - Add a new ASP.NET Web Forms page named
ViewProduct.aspx. - Add an ASP.NET UserControl named
EditProduct.aspx. - Add the following markup to the control:
<fieldset> <legend>Edit Product</legend> <table border="0"> <tr> <td> <asp:Label ID="lblProductName" runat="server" Text="Name:" AssociatedControlID="txtProductName"> </asp:Label> </td> </tr> <tr> <td> <asp:TextBox ID="txtProductName" runat="server"></asp:TextBox> </td> </tr> <tr> <td> <asp:Label ID="lblDescription" runat="server" Text="Description:" AssociatedControlID="txtDescription"> </asp:Label> </td> </tr> <tr> <td> <asp:TextBox ID="txtDescription" runat="server" TextMode="MultiLine"> </asp:TextBox> </td> </tr> <tr> <td> <asp:Label ID="Label1" runat="server" Text="Unit Price:" AssociatedControlID="txtUnitPrice"> </asp:Label> </td> </tr> <tr> <td> <asp:TextBox ID="txtUnitPrice" runat="server"></asp:TextBox> </td> </tr> </table> <asp:Button ID="btnSave" runat="server" Text="Save" onclick="btnSave_Click" /> <asp:Button ID="btnCancel" runat="server" Text="Cancel" onclick="btnCancel_Click" /> </fieldset> - The design view should look like the following screenshot:

- In the code-behind for
EditProduct, add the following code:public partial class EditProduct : UserControl { [EntityField] protected Product product; public event EventHandler Updated; public event EventHandler Cancelled; public void Bind(Product product) { this.product = product; if (product == null) return; txtProductName.Text = product.Name; txtDescription.Text = product.Description; txtUnitPrice.Text = product.UnitPrice.ToString(); } protected void btnSave_Click(object sender, EventArgs e) { product.Name = txtProductName.Text; product.Description = txtDescription.Text; product.UnitPrice = decimal.Parse(txtUnitPrice.Text); if (Updated != null) Updated(this, new EventArgs()); } protected void btnCancel_Click(object sender, EventArgs e) { product = null; if (Cancelled != null) Cancelled(this, new EventArgs()); } } - On the second line of
ViewProduct.aspx, register theEditProductcontrol with the following markup:<%@ Register Src="EditProduct.ascx" TagName="EditProduct" TagPrefix="uc1" %>
- In the
<form>tag, add theEditProductcontrol with the following markup:<uc1:EditProduct ID="editProduct" runat="server" OnUpdated="editProduct_Updated" OnCancelled="editProduct_Cancelled"> </uc1:EditProduct>
- In the code-behind for
ViewProduct, use the following code:public partial class ViewProduct : System.Web.UI.Page { protected void Page_Load(object sender, EventArgs e) { if (!IsPostBack) { Guid Id = new Guid(Request .QueryString["ProductId"]); editProduct.Bind(new ProductDAO().Get(Id)); } } protected void editProduct_Updated( object sender, EventArgs e) { Response.Redirect("~/"); } protected void editProduct_Cancelled( object sender, EventArgs e) { Response.Redirect("~/"); } } - Build and run your web application.
In this recipe, we've built a small web application to display and edit Product data. Thanks to the Burrows
http module, Burrows will automatically handle session-per-request and transaction management.
In our web.config, we told the Burrows framework that the BurrowsConfigurator class would supply the Burrows configuration. Burrows supports multiple NHibernate configurations in the same application. Each of these is named a persistence unit. In this recipe, we only need one database. We load the Web.Config NHibernate configuration into our one and only persistence unit.
Burrows also provides a base class for data access objects that follow the common patterns of ASP.NET Web Forms data access controls. Our ProductDAO class uses this GenericDAO class.
The Default.aspx page wires an instance of ProductDAO to an ObjectDataSource, which is used to data-bind the GridView. When a user clicks on a column header, the data source calls ProductDAO.FindAll with sortExpression set to the field name. Burrows adds this as sort to the query. Similarly, paging through the GridView sets the startRow to the page number times the page size, minus one.
When a user clicks on the Select link, the SelectedIndexChanged event fires and redirects the user to ViewProduct.aspx, passing the Product Id on the query string of the URL.
The first time we load the ViewProduct page, we get the Product Id from the query string, get the Product instance from the database, and bind it to our EditProduct control.
In EditProduct, our Product field is decorated with the Burrows EntityFieldAttribute. This attribute tells Burrows that this field contains an entity and the ID of that entity should be remembered from one postback to the next. Burrows automatically loads the Product instance from the database and sets this field with each postback request. Any changes to the entity are automatically persisted at the end of each request. We can code our user control almost as if the entity was held in memory from one request to the next.
When a user clicks on the Save button, we copy the field data back to the entity instance and redirect to the Default.aspx page. When a user clicks on the Cancel button, we simply redirect without writing any data.
Burrows also provides a method for providing long-running conversations, essentially stateful business transactions using NHibernate sessions that can span several web requests. For more information on this feature, check out the conversation explained in the article at http://nhforge.org/wikis/burrow/conversation-explained.aspx.