
Some of us just want to do it the difficult way, which is not so difficult actually, but involves certain steps that have to be remembered and understood. What if there was no TinderBox? No problem!
Here we will split up in two groups again—this time depending on the version of Xcode we are using. There is the old way (Xcode 3) and the new way (Xcode 4+). You can check the version by opening the Xcode and selecting AboutXcode from the Xcode menu.
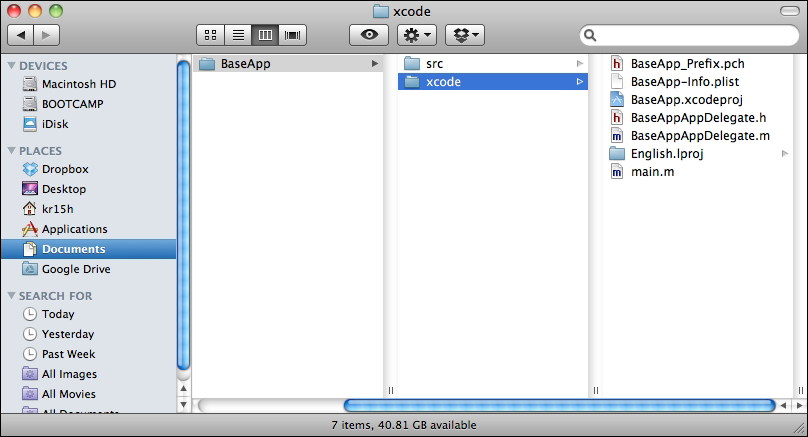
Go to your Cinder project's directory, which in my case is /Users/kr15h/Documents/CinderProjects/. Create an empty directory for our new project and name it BaseApp. Create another directory inside it and call it src. It should look like the one shown in the following screenshot:

Open up the Xcode and select New Project from the File menu. Select the Mac OS X Application category and choose Cocoa Application. Click on Choose, browse to the directory we created earlier (CinderProjects/BaseApp), and then click on Save.
Now it is recommended to close the Xcode, browse to your newly created project directory, and rename the Xcode project folder (BaseApp inside BaseApp—the one that is parent to the .xcodeproj file) to xcode.
Now open up the BaseApp.xcodeproj file. We have to remove some files that we won't need. These files include main.m, InfoPlist.strings, MainMenu.xib as well as BaseAppAppDelegate.m and BaseAppAppDelegate.h. Click on Also Move to Trash when prompted.
Let's create our first source file. Right-click on the Classes folder in the Xcode Project Navigator pane and select Add | New File. Choose C++ File from the C and C++ category. Name it BaseApp and uncheck the Also create "BaseApp.h" option. For the location, choose the BaseApp/src folder that we created earlier and click on Finish.
Open up Xcode and select New | New Project from the File menu. Select the Application item under the Mac OS X category and choose Cocoa Application. Click on Next. Enter BaseApp as Product Name and something, for example, com.mycompany as Company Identifier. Click on Next again and you will be prompted to choose the location for your project. Browse to the directory we created earlier (CinderProjects/BaseApp) and click on Create.
Close the Xcode (completely by pressing Cmd + Q) and navigate yourself to the BaseApp project directory. You can see two folders there, BaseApp and src. Rename BaseApp to xcode—all the Xcode-relevant stuff will be stored there and all the code that will be stored in the src directory is meant to be used in every other IDE. This is not a law, it is just how Cinder sample projects are being organized and that's a good way of keeping a cross-platform code project well organized. This is done to avoid the need to create a separate version of the source files for each platform and IDE.
Open the BaseApp.xcodeproj Xcode project file. We are going to remove some files that we won't need. In the Project Navigator, under the BaseApp folder, select and delete AppDelegate.h, AppDelegate.m, and MainMenu.xib. Click on Delete when prompted to remove the actual files, not just the references. Under the Supporting files folder, select and remove main.m and BaseApp-Prefix.pch. Click on Delete again when prompted.
Let's create our first C++ source file. Right-click on the BaseApp folder in the Project Navigator and choose the New File option. Select C++ File under the Mac OS X and C and C++ categories. A Save As dialog will appear. Navigate to the src directory of our BaseApp project (BaseApp/src). Name the file as BaseApp and click on Create.
Open the file we just created (BaseApp.cpp) in the editor and enter the following piece of code:
#include "cinder/app/AppBasic.h"
#include "cinder/gl/gl.h"

using namespace ci;
using namespace ci::app;
using namespace std;

class BaseApp : public AppBasic {
public:
  void setup();
  void update();
  void draw();
};

void BaseApp::setup(){}
void BaseApp::update(){}

void BaseApp::draw()
{
  // clear out the window with black
  gl::clear( Color( 0, 0, 0 ) );
}

CINDER_APP_BASIC( BaseApp, RendererGl )
If you try to compile and run the application, you will see that it is not possible. Some things are still missing and those are the connections with Cinder libraries and headers.
Under the Project menu, select Edit Project Settings. Go to the Build tab and in the Configuration select field, choose All Configurations. Let's add a user-defined build setting that will prove itself useful in a moment. This user-defined setting will store the location of the Cinder directory relative to our project. Click on the little gear button at the bottom-left corner of the Project Settings window and choose Add User-Defined Setting.
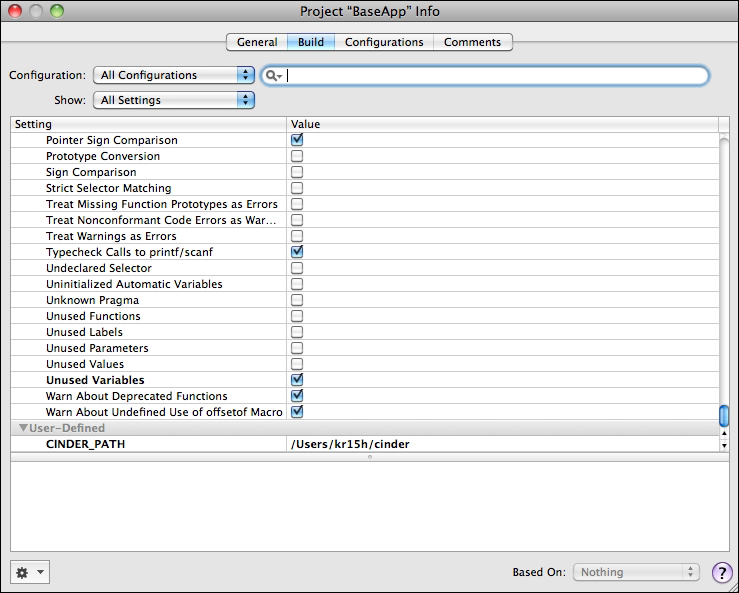
Name it as CINDER_PATH and set the value to the location of Cinder directory /Users/You/cinder (replace You with your username).
Now we have to make use of this newly created variable. Scroll to the Search Paths section and modify the User Header Search Paths setting. Set the value to $(CINDER_PATH)/include. With that done, go to Header Search Paths (notice that there is no user in front of it) and set it to $(CINDER_PATH)/boost.
Then go to the Architectures section and set the Architectures variable to i386.
Next, we have to tell Xcode where to find Cinder libraries for linking. Find the Linking section and change the Debug field under Other Linker Flags to $(CINDER_PATH)/lib/libcinder_d.a and the Release field to $(CINDER_PATH)/lib/libcinder.a.
Now for the final thing. We need to add Mac OS X frameworks that are needed for our Cinder applications. Close the Project Settings panel and right-click on the Frameworks folder in the Xcode Project Navigator and go to Add | Existing Frameworks. Then, select the following:
Accelerate.frameworkAudioToolbox.frameworkAudioUnit.frameworkCoreAudio.frameworkCoreVideo.frameworkOpenGL.frameworkQTKit.frameworkQuickTime.framework
Compile and run the project. Success! Now, you are ready to go to the Final Adjustments section of this chapter.
Follow these steps to create a user-defined variable with the path to our main Cinder location:
- Select the BaseApp project icon in the Xcode Project Navigator pane.
- Choose the BaseApp target under the Targets category.
- Make sure that we are making changes to all configurations (select All and Combined).
- Click on the Add Build Setting button and select Add User-Defined Setting from the menu.
- Call it
CINDER_PATHand enter the path to the place you copied your Cinder files.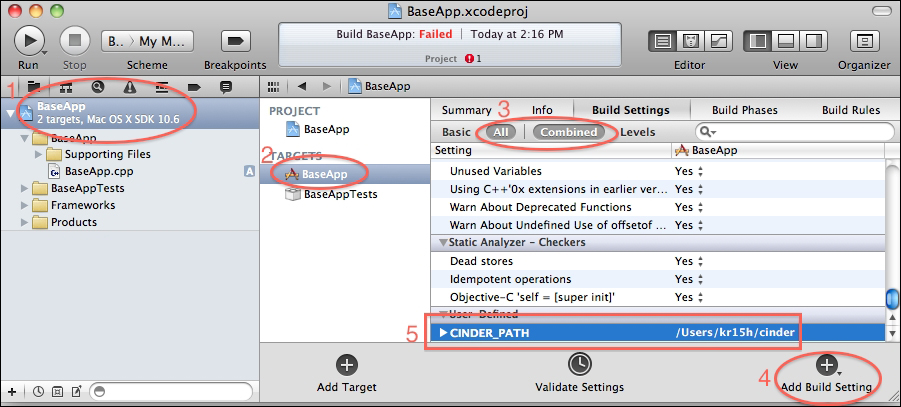
Now we have to make use of this newly created variable. Scroll to the Search Paths section and modify the User Header Search Paths setting. Set the value to $(CINDER_PATH)/include. With that done, go to Header Search Paths (notice that there is no user in front of it) and set it to $(CINDER_PATH)/boost.
Then go to the Architectures section and set the Architectures variable to i386.
Next, we have to tell Xcode where to find Cinder libraries for linking. Find the Linking section, and change the Debug field under Other Linker Flags to $(CINDER_PATH)/lib/libcinder_d.a and the Release field to $(CINDER_PATH)/lib/libcinder.a.
There is another thing that Xcode added automatically for us, a link to the prefix header file that we deleted earlier. This will throw an error while compiling because the compiler won't be able to find the prefix header file. Go to the Apple LLVM compiler 3.0 – Language tab and clear out the Prefix Header field for both Debug and Release.
Finally, we have to link our application to the Mac OS X framework libraries. To do that, follow these steps:
- Go to the Build Phases tab.
- Expand the Link Binary With Libraries section.
- Click on the Add Items button to choose frameworks.
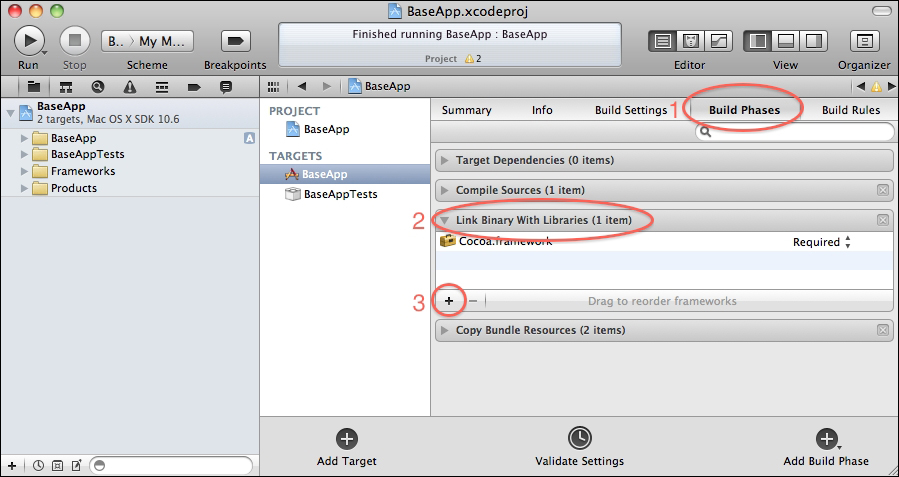
Select the following frameworks and click on Add:
Accelerate.frameworkAudioToolbox.frameworkAudioUnit.frameworkCoreAudio.frameworkCoreVideo.frameworkOpenGL.frameworkQTKit.frameworkQuickTime.framework
That's it! Compile and run the project. Success! Now, you are ready to go to the Final Adjustments section of this chapter.