In this chapter we will learn the following topics:
- Detecting a key press on the keyboard
- Detecting mouse movement and clicks
- Creating an application that will use basic input for real-time control
We have used some of these functionality in the previous chapters, but here we will try to gain a more systematic overview of what kind of basic interactivity is possible with Cinder.
Throughout this book we are writing a code that basically extends the functionality of the cinder::app::AppBasic class and base class App that it inherits. The methods that we are declaring and implementing are basically overrides of virtual functions that are built in the AppBasic and App classes and are called upon in certain events. Some of them can be called event handlers, and what they basically do is they respond to certain events that are happening during the application flow.
There are three basic methods that form the core of a Cinder application:
These methods handle the events that are happening inside the application core and a user can't control whether these functions are called or not (it is possible to stop the execution of the method by using return or similar means at the beginning of the function implementation).
Then there are methods that can be used to execute code on certain events for example moving your mouse, pressing a key on the keyboard, scrolling the mouse wheel, and so on. These are the ones we will focus on during this chapter. So here is a list of methods (or event handlers) that we will override:
Let's create a simple drawing application that will use all of these events. To do so, we will need to create a new project. Open TinderBox and create a new project with the name BasicEvents. Open the project file (xcode/BasicEvents.xcodeproj on Mac OS X or vc10BasicEvents.sln on Windows). Open the BasicEventsApp.cpp in the editor and let's start to add some code there.
First we will add a custom mouse cursor that will fall down slowly while we don't move the mouse, and returns to the current mouse position when we move it. To do so we have to declare objects that will hold the x and y position of the cursor. Add the following line of code to the class declaration part of the file:
Vec2i cursorPos;
This variable will hold the x and y positions of our cursor as int values. The i part of the Vec2i tells us that it is a two-dimensional vector that consists of integer values.
Next we need to initialize the value by setting it to the current mouse position at the application launch. Add the following line of code to the setup() method implementation:
cursorPos = getMousePos();
This will get the current mouse position and assign it to our cursor position value.
Next, we want to draw a circle at the cursorPos coordinates. Let's navigate to the draw() method implementation of our application and add the following line just after the gl::clear() function call:
gl::drawSolidCircle( cursorPos, 10 );
We've used this function before. This will draw a circle with the radius of 10 pixels at the position defined by the cursorPos variable. Compile and run the project to see for yourself!
Next we want to add the falling motion to the circle. To do so, we will need to update the circle's y position by each frame. In other words, we are going to increase the y coordinate of the circle by one frame each. Let's navigate to the update() method implementation and add a simple line of code as follows:
cursorPos.y++;
This will let our cursor fall down. Finally we need to make it stick to the mouse on the mouseMove event. We will need to declare the mouseMove() method override in the class declaration of our application. Add the following line at the end of the class declaration:
void mouseMove(MouseEvent event);
And the method implementation to the class implementation as follows:
void BasicEventsApp::mouseMove(MouseEvent event) {
    cursorPos = event.getPos();
}
There is more than one way of getting the current mouse position and instead of event.getPos(). We could use getMousePos() and it would do the same thing that is assigned to the mouse position to the cursorPos variable.
Compile and run our application to see the result as shown in the following screenshot:
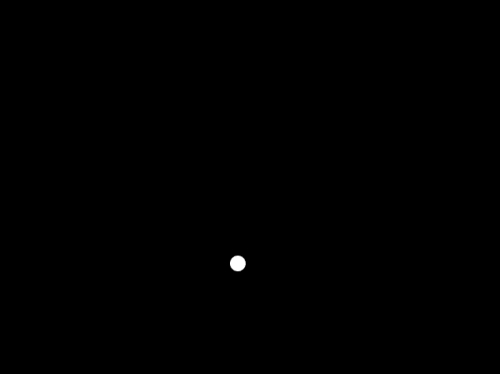
You should see a falling circle that sticks to the mouse as you move it.
The next event handler that we are going to implement is the mouseDown() handler. It will execute code every time we click on any of the mouse buttons. We will write code that will add a static circle on the screen every time we click the left mouse button. It will remove the first circle when we click the right mouse button.
To begin with, we will need to declare a new variable that will be able to store more than one pair of coordinates for our generated circles. We could use an array of Vec2i objects but as we don't know the exact count of the circles we are going to create, we will use a C++ vector.
A vector
is a dynamic array that is able to store std::vector::max_size amount of objects of a certain type. A vector array changes it's size (or length) dynamically on element add (or push) and remove (or pop).
Add the following lines of code at the end of our class declaration:
vector<Vec2i> circlePositions;
void mouseDown(MouseEvent event);
It is possible that the mouseDown() method is declared for us already. If so, don't mention the second line of the code. If mouseDown() was not declared before, go ahead and add the event handler method to the class implementation:
void BasicEventsApp::mouseDown(MouseEvent event)
{
    // check if the left mouse button was pressed
    if ( event.isLeft() ) {
        // it was
        Vec2i cp = event.getPos(); // save current mouse position
        circlePositions.push_back(cp); // and add it to the vector
    }

    // check if the right mouse button was pressed
    if ( event.isRight() ) {
        // it was
        // check if the vector has at least one element
        if ( !circlePositions.empty() ) {
            // it has, erase the first element
            circlePositions.erase(circlePositions.begin());
        }
    }
}
As you can tell from the comments in the preceding code, it checks which mouse button has been pressed and then decides what to do next. As we stated before, a circle has to be created when you click the left-mouse button and a circle has to be removed when you click on the right-mouse button. Actually we do not create circles here, we just save their positions. In the draw() method we will be able to chose whether we want to draw circles or something else entirely.
So let's navigate to the draw() method implementation and add the following code snippet:
// declare an iterator for this specific kind of vector
vector<Vec2i>::iterator i;

// loop through circle positions
for ( i=circlePositions.begin(); i!=circlePositions.end(); ++i ) {
    // and draw circles at these positions one by one
    gl::drawSolidCircle( *i, 20 );
}
To loop through a vector we have to use an iterator in this case. Vector iterators are objects that are designed to traverse the vector. In this case the iterator object is like a pointer and a vector<Vec2i> type iterator will point to a Vec2i object inside of it. By increasing and decreasing the iterator position we gain access to the next or previous item in the vector. It is possible to get the begin() and end() iterators from a vector and they point to the first and the past-the-end element of a vector respectively.
To access an element through the iterator (that is similar to a pointer), we have to make use of the concept of dereferencing
. To dereference a pointer we have to use an asterisk (*) before the pointer variable. If i is a pointer to the actual position of a circle, to access the actual Vec2i object that stores the coordinates, we have to use *i. To access properties of the object, we write (*i).x or i->x.
Compile and run the project. You should be able to add and remove circles by clicking on the right and left buttons of your mouse.

You can do the same by using the mouseUp() event handler instead of mouseDown(). The only difference is that the code will be executed when you release the mouse button.
Next we are going to make use of the mouseDrag() event handler to draw a polyline on the screen. We will need another vector for storing the coordinates of the points that will actually form the polyline. Let's declare the vector and mouseDrag() event handlers in the class declaration. Add the following line of code at the end of it:
PolyLine<Vec2f> line;
void mouseDrag(MouseEvent event);
We use PolyLine<Vec2f> here because PolyLine is a Cinder class that is used to store control point values of a line. We use Vec2f instead of int, because there is no draw function in Cinder that would accept a PolyLine class that consists of int values.
Let's move to the next step and add the implementation of the mouseDrag() method to the class implementation:
void BasicEventsApp::mouseDrag(MouseEvent event) {
    // create new position from current mouse position
    Vec2f cp = event.getPos();

    // copy it to the PolyLine
    line.push_back(cp);
}
This will add a new position with the current mouse coordinates to the PolyLine each time a change in mouse position is detected.
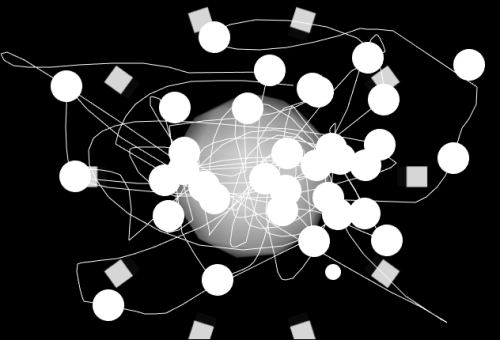
Lastly, we have to draw the PolyLine. So let's navigate to the draw() method implementation and add the following line of code there:
if ( line.size() ) {
  gl::drawSolid(line);
}
The gl::drawSolid function will basically draw a filled polygon. The PolyLine itself defines the outline of the polygon. Compile and run the project to see what I mean to say. You should end up with an image similar to the one shown in the following screenshot:

If you want to draw a line, use gl::draw(line) instead.
It would be nice if we had the ability to clear the screen while the application is running instead of closing and reopening it to start again. Let's make use of the keyDown() event handler to detect a key press. What we want to do is to erase all circles and the line when the C key is pressed. To do that, we need to declare the keyDown() method in the class declaration:
void keyDown(KeyEvent event);
Next we have to implement this, so add the following code snippet at the end of the file:
void BasicEventsApp::keyDown(KeyEvent event) {
    if ( event.getCode() == KeyEvent::KEY_c ) {
        circlePositions.clear();
        line.getPoints().clear();
    }
}
The keyDown() method takes a KeyEvent parameter that contains the code of the key that is being pressed. Here we check if the key code represents the letter C on the keyboard and if that is true, we clear the circlePositions vector and vector values in the PolyLine object that actually stores the control points in the same manner as the vector circlePositions does.
You can do the same thing with the keyUp() event handler. We won't make a separate example of it now as it works exactly the same way when a key is released.
What we will do though is we will make use of the fileDrop() event handler to place a picture in the background. It takes FileDropEvent object as a parameter. It contains the path to the file that is being dropped on to the application window. To make use of that path, we need to add these lines at the top of the class file:
#include "cinder/gl/Texture.h"
#include "cinder/ImageIo.h"
The first include is needed because it contains the gl::Texture class that we will need in order to store the background image and to draw it by using the gl::draw() function. The ImageIo.h file is here because of the image loading functions that we will need to load an actual image into the Texture instance.
Next, we need to declare a variable that will store the background image and the fileDrop() event method itself. Add the following lines of code at the end of the class declaration:
gl::Texture background;
void fileDrop(FileDropEvent);
Now we need to implement the fileDrop() method. Add the following lines of code in the class implementation:
void BasicEventsApp::fileDrop(FileDropEvent event) {
    try {
         background = gl::Texture( loadImage( event.getFile(0) ) );
   } catch( ... ) {
         console() << "unable to load file" << endl;
   };
}
Here we are making use of the try and catch statement. By doing this we just make sure that our application does not crash if the wrong kind of file is being dropped. We load an image into the background variable if we are lucky or print an error message to the console if not.
Take a closer look on the console() function call. The console() function refers to the standard output or console. This is one of the best debugging tools in the world and you should consider using it if you are not using it already.
There is one last thing missing, we have to draw the background. Go to the draw() method implementation and add the following code snippet right after the gl::clear() function call and before all the code we added to this method during this chapter. We do so because the background is the first thing that we need to draw in each frame:
if ( background ) {
    gl::draw( background, getWindowBounds() );
}
Before we draw a texture, we have to make sure that it actually exists. That's why we are using an extra if statement. Only then 'can' we draw the background texture within the bounds of our application window that is returned by the getWindowBounds() method call.
Compile and run our application. Drop an image file on to the window of our application and see what happens. You should see an image similar to the following screenshot: