
2.1. Starting a Hibernate project
In some projects, the development of an application is driven by developers analyzing the business domain in object-oriented terms. In others, it's heavily influenced by an existing relational data model: either a legacy database or a brand-new schema designed by a professional data modeler. There are many choices to be made, and the following questions need to be answered before you can start:
Can you start from scratch with a clean design of a new business requirement, or is legacy data and/or legacy application code present?
Can some of the necessary pieces be automatically generated from an existing artifact (for example, Java source from an existing database schema)? Can the database schema be generated from Java code and Hibernate mapping metadata?
What kind of tool is available to support this work? What about other tools to support the full development cycle?
We'll discuss these questions in the following sections as we set up a basic Hibernate project. This is your road map:
Select a development process
Set up the project infrastructure
Write application code and mappings
Configure and start Hibernate
Run the application.
After reading the next sections, you'll be prepared for the correct approach in your own project, and you'll also have the background information for more complex scenarios we'll touch on later in this chapter.
2.1.1. Selecting a development process
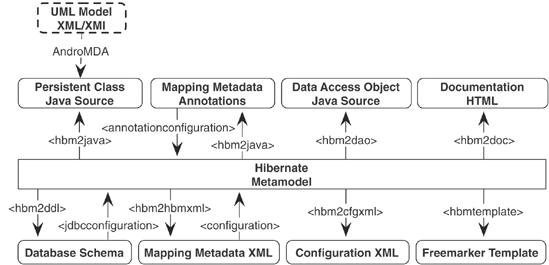
Let's first get an overview of the available tools, the artifacts they use as source input, and the output that is produced. Figure 2.1 shows various import and export tasks for Ant; all the functionality is also available with the Hibernate Tools plug-ins for Eclipse. Refer to this diagram while reading this chapter.[]
[] 1 Note that AndroMDA, a tool that generates POJO source code from UML diagram files, isn't strictly considered part of the common Hibernate toolset, so it isn't discussed in this chapter. See the community area on the Hibernate website for more information about the Hibernate module for AndroMDA.
Figure 2-1. Input and output of the tools used for Hibernate development
Note:
Hibernate Tools for Eclipse IDE—The Hibernate Tools are plug-ins for the Eclipse IDE (part of the JBoss IDE for Eclipse—a set of wizards, editors, and extra views in Eclipse that help you develop EJB3, Hibernate, JBoss Seam, and other Java applications based on JBoss middleware). The features for forward and reverse engineering are equivalent to the Ant-based tools. The additional Hibernate Console view allows you to execute ad hoc Hibernate queries (HQL and Criteria) against your database and to browse the result graphically. The Hibernate Tools XML editor supports automatic completion of mapping files, including class, property, and even table and column names. The graphical tools were still in development and available as a beta release during the writing of this book, however, so any screenshots would be obsolete with future releases of the software. The documentation of the Hibernate Tools contains many screenshots and detailed project setup instructions that you can easily adapt to create your first "Hello World" program with the Eclipse IDE.
The following development scenarios are common:
Top down—In top-down development, you start with an existing domain model, its implementation in Java, and (ideally) complete freedom with respect to the database schema. You must create mapping metadata—either with XML files or by annotating the Java source—and then optionally let Hibernate's hbm2ddl tool generate the database schema. In the absence of an existing database schema, this is the most comfortable development style for most Java developers. You may even use the Hibernate Tools to automatically refresh the database schema on every application restart in development.
Bottom up—Conversely, bottom-up development begins with an existing database schema and data model. In this case, the easiest way to proceed is to use the reverse-engineering tools to extract metadata from the database. This metadata can be used to generate XML mapping files, with hbm2hbmxml for example. With hbm2java, the Hibernate mapping metadata is used to generate Java persistent classes, and even data access objects—in other words, a skeleton for a Java persistence layer. Or, instead of writing to XML mapping files, annotated Java source code (EJB 3.0 entity classes) can be produced directly by the tools. However, not all class association details and Java-specific metainformation can be automatically generated from an SQL database schema with this strategy, so expect some manual work.
Middle out—The Hibernate XML mapping metadata provides sufficient information to completely deduce the database schema and to generate the Java source code for the persistence layer of the application. Furthermore, the XML mapping document isn't too verbose. Hence, some architects and developers prefer middle-out development, where they begin with handwritten Hibernate XML mapping files, and then generate the database schema using hbm2ddl and Java classes using hbm2java. The Hibernate XML mapping files are constantly updated during development, and other artifacts are generated from this master definition. Additional business logic or database objects are added through subclassing and auxiliary DDL. This development style can be recommended only for the seasoned Hibernate expert.
Meet in the middle—The most difficult scenario is combining existing Java classes and an existing database schema. In this case, there is little that the Hibernate toolset can do to help. It is, of course, not possible to map arbitrary Java domain models to a given schema, so this scenario usually requires at least some refactoring of the Java classes, database schema, or both. The mapping metadata will almost certainly need to be written by hand and in XML files (though it might be possible to use annotations if there is a close match). This can be an incredibly painful scenario, and it is, fortunately, exceedingly rare.
We now explore the tools and their configuration options in more detail and set up a work environment for typical Hibernate application development. You can follow our instructions step by step and create the same environment, or you can take only the bits and pieces you need, such as the Ant build scripts.
The development process we assume first is top down, and we'll walk through a Hibernate project that doesn't involve any legacy data schemas or Java code. After that, you'll migrate the code to JPA and EJB 3.0, and then you'll start a project bottom up by reverse-engineering from an existing database schema.
2.1.2. Setting up the project
We assume that you've downloaded the latest production release of Hibernate from the Hibernate website at http://www.hibernate.org/ and that you unpacked the archive. You also need Apache Ant installed on your development machine. You should also download a current version of HSQLDB from http://hsqldb.org/ and extract the package; you'll use this database management system for your tests. If you have another database management system already installed, you only need to obtain a JDBC driver for it.
Instead of the sophisticated application you'll develop later in the book, you'll get started with a "Hello World" example. That way, you can focus on the development process without getting distracted by Hibernate details. Let's set up the project directory first.
Creating the work directory
Create a new directory on your system, in any location you like; C:helloworld is a good choice if you work on Microsoft Windows. We'll refer to this directory as WORKDIR in future examples. Create lib and src subdirectories, and copy all required libraries:
WORKDIR
    +lib
      antlr.jar
      asm.jar
      asm-attrs.jars
      c3p0.jar
      cglib.jar
      commons-collections.jar
      commons-logging.jar
      dom4j.jar
      hibernate3.jar
      hsqldb.jar
      jta.jar
    +src
The libraries you see in the library directory are from the Hibernate distribution, most of them required for a typical Hibernate project. The hsqldb.jar file is from the HSQLDB distribution; replace it with a different driver JAR if you want to use a different database management system. Keep in mind that some of the libraries you're seeing here may not be required for the particular version of Hibernate you're working with, which is likely a newer release than we used when writing this book. To make sure you have the right set of libraries, always check the lib/README.txt file in the Hibernate distribution package. This file contains an up-to-date list of all required and optional third-party libraries for Hibernate—you only need the libraries listed as required for runtime.
In the "Hello World" application, you want to store messages in the database and load them from the database. You need to create the domain model for this business case.
Creating the domain model
Hibernate applications define persistent classes that are mapped to database tables. You define these classes based on your analysis of the business domain; hence, they're a model of the domain. The "Hello World" example consists of one class and its mapping. Let's see what a simple persistent class looks like, how the mapping is created, and some of the things you can do with instances of the persistent class in Hibernate.
The objective of this example is to store messages in a database and retrieve them for display. Your application has a simple persistent class, Message, which represents these printable messages. The Message class is shown in listing 2.1.
Listing 2-1. Message.java: a simple persistent class
package hello;
public class Message {
private Long id; |
The Message class has three attributes: the identifier attribute, the text of the message, and a reference to another Message object. The identifier attribute allows the application to access the database identity—the primary key value—of a persistent object. If two instances of Message have the same identifier value, they represent the same row in the database.
This example uses Long for the type of the identifier attribute, but this isn't a requirement. Hibernate allows virtually anything for the identifier type, as you'll see later.
You may have noticed that all attributes of the Message class have JavaBeans-style property accessor methods. The class also has a constructor with no parameters. The persistent classes we show in the examples will almost always look something like this. The no-argument constructor is a requirement (tools like Hibernate use reflection on this constructor to instantiate objects).
Instances of the Message class can be managed (made persistent) by Hibernate, but they don't have to be. Because the Message object doesn't implement any Hibernate-specific classes or interfaces, you can use it just like any other Java class:
Message message = new Message("Hello World");
    System.out.println( message.getText() );
This code fragment does exactly what you've come to expect from "Hello World" applications: It prints Hello World to the console. It may look like we're trying to be cute here; in fact, we're demonstrating an important feature that distinguishes Hibernate from some other persistence solutions. The persistent class can be used in any execution context at all—no special container is needed. Note that this is also one of the benefits of the new JPA entities, which are also plain Java objects.
Save the code for the Message class into your source folder, in a directory and package named hello.
Mapping the class to a database schema
To allow the object/relational mapping magic to occur, Hibernate needs some more information about exactly how the Message class should be made persistent. In other words, Hibernate needs to know how instances of that class are supposed to be stored and loaded. This metadata can be written into an XML mapping document, which defines, among other things, how properties of the Message class map to columns of a MESSAGES table. Let's look at the mapping document in listing 2.2.
Listing 2-2. A simple Hibernate XML mapping
<?xml version="1.0"?>
<!DOCTYPE hibernate-mapping PUBLIC
    "-//Hibernate/Hibernate Mapping DTD//EN"
    "http://hibernate.sourceforge.net/hibernate-mapping-3.0.dtd">

<hibernate-mapping>
    <class
        name="hello.Message"
        table="MESSAGES">

        <id
            name="id"
            column="MESSAGE_ID">
            <generator class="increment"/>
        </id>

        <property
            name="text"
            column="MESSAGE_TEXT"/>

        <many-to-one
            name="nextMessage"
            cascade="all"
            column="NEXT_MESSAGE_ID"
            foreign-key="FK_NEXT_MESSAGE"/>

    </class>

</hibernate-mapping>
|
The mapping document tells Hibernate that the Message class is to be persisted to the MESSAGES table, that the identifier property maps to a column named MESSAGE_ID, that the text property maps to a column named MESSAGE_TEXT, and that the property named nextMessage is an association with many-to-one multiplicity that maps to a foreign key column named NEXT_MESSAGE_ID. Hibernate also generates the database schema for you and adds a foreign key constraint with the name FK_NEXT_MESSAGE to the database catalog. (Don't worry about the other details for now.)
The XML document isn't difficult to understand. You can easily write and maintain it by hand. Later, we discuss a way of using annotations directly in the source code to define mapping information; but whichever method you choose, Hibernate has enough information to generate all the SQL statements needed to insert, update, delete, and retrieve instances of the Message class. You no longer need to write these SQL statements by hand.
Create a file named Message.hbm.xml with the content shown in listing 2.2, and place it next to your Message.java file in the source package hello. The hbm suffix is a naming convention accepted by the Hibernate community, and most developers prefer to place mapping files next to the source code of their domain classes.
Let's load and store some objects in the main code of the "Hello World" application.
Storing and loading objects
What you really came here to see is Hibernate, so let's save a new Message to the database (see listing 2.3).
Listing 2-3. The "Hello World" main application code
package hello;
import java.util.*;
import org.hibernate.*;
import persistence.*;
public class HelloWorld {
public static void main(String[] args) {
// First unit of work
Session session =
HibernateUtil.getSessionFactory().openSession();
Transaction tx = session.beginTransaction();
Message message = new Message("Hello World");
Long msgId = (Long) session.save(message);
tx.commit();
session.close();
// Second unit of work
Session newSession =
HibernateUtil.getSessionFactory().openSession();
Transaction newTransaction = newSession.beginTransaction();
List messages =
newSession.createQuery("from Message m order by
|
Place this code in the file HelloWorld.java in the source folder of your project, in the hello package. Let's walk through the code.
The class has a standard Java main() method, and you can call it from the command line directly. Inside the main application code, you execute two separate units of work with Hibernate. The first unit stores a new Message object, and the second unit loads all objects and prints their text to the console.
You call the Hibernate Session, Transaction, and Query interfaces to access the database:
Session—A Hibernate Session is many things in one. It's a single-threaded nonshared object that represents a particular unit of work with the database. It has the persistence manager API you call to load and store objects. (The Session internals consist of a queue of SQL statements that need to be synchronized with the database at some point and a map of managed persistence instances that are monitored by the Session.)
Transaction—This Hibernate API can be used to set transaction boundaries programmatically, but it's optional (transaction boundaries aren't). Other choices are JDBC transaction demarcation, the JTA interface, or container-managed transactions with EJBs.
Query—A database query can be written in Hibernate's own object-oriented query language (HQL) or plain SQL. This interface allows you to create queries, bind arguments to placeholders in the query, and execute the query in various ways.
Ignore the line of code that calls HibernateUtil.getSessionFactory()—we'll get to it soon.
The first unit of work, if run, results in the execution of something similar to the following SQL:
insert into MESSAGES (MESSAGE_ID, MESSAGE_TEXT, NEXT_MESSAGE_ID)
    values (1, 'Hello World', null)
Hold on—the MESSAGE_ID column is being initialized to a strange value. You didn't set the id property of message anywhere, so you expect it to be NULL, right? Actually, the id property is special. It's an identifier property: It holds a generated unique value. The value is assigned to the Message instance by Hibernate when save() is called. (We'll discuss how the value is generated later.)
Look at the second unit of work. The literal string "from Message m order by m.text asc" is a Hibernate query, expressed in HQL. This query is internally translated into the following SQL when list() is called:
select m.MESSAGE_ID, m.MESSAGE_TEXT, m.NEXT_MESSAGE_ID
    from MESSAGES m
    order by m.MESSAGE_TEXT asc
If you run this main() method (don't try this now—you still need to configure Hibernate), the output on your console is as follows:
1 message(s) found:
    Hello World
If you've never used an ORM tool like Hibernate before, you probably expected to see the SQL statements somewhere in the code or mapping metadata, but they aren't there. All SQL is generated at runtime (actually, at startup for all reusable SQL statements).
Your next step would normally be configuring Hibernate. However, if you feel confident, you can add two other Hibernate features—automatic dirty checking and cascading—in a third unit of work by adding the following code to your main application:
// Third unit of work
Session thirdSession =
    HibernateUtil.getSessionFactory().openSession();
Transaction thirdTransaction = thirdSession.beginTransaction();

// msgId holds the identifier value of the first message
message = (Message) thirdSession.get( Message.class, msgId );

message.setText( "Greetings Earthling" );
message.setNextMessage(
    new Message( "Take me to your leader (please)" )
);

thirdTransaction.commit();
thirdSession.close();
This code calls three SQL statements inside the same database transaction:
select m.MESSAGE_ID, m.MESSAGE_TEXT, m.NEXT_MESSAGE_ID
from MESSAGES m
where m.MESSAGE_ID = 1

insert into MESSAGES (MESSAGE_ID, MESSAGE_TEXT, NEXT_MESSAGE_ID)
values (2, 'Take me to your leader (please)', null)

update MESSAGES
set MESSAGE_TEXT = 'Greetings Earthling', NEXT_MESSAGE_ID = 2
where MESSAGE_ID = 1
Notice how Hibernate detected the modification to the text and nextMessage properties of the first message and automatically updated the database—Hibernate did automatic dirty checking. This feature saves you the effort of explicitly asking Hibernate to update the database when you modify the state of an object inside a unit of work. Similarly, the new message was made persistent when a reference was created from the first message. This feature is called cascading save. It saves you the effort of explicitly making the new object persistent by calling save(), as long as it's reachable by an already persistent instance.
Also notice that the ordering of the SQL statements isn't the same as the order in which you set property values. Hibernate uses a sophisticated algorithm to determine an efficient ordering that avoids database foreign key constraint violations but is still sufficiently predictable to the user. This feature is called transactional write-behind.
If you ran the application now, you'd get the following output (you'd have to copy the second unit of work after the third to execute the query-display step again):
2 message(s) found:
Greetings Earthling
Take me to your leader (please)
You now have domain classes, an XML mapping file, and the "Hello World" application code that loads and stores objects. Before you can compile and run this code, you need to create Hibernate's configuration (and resolve the mystery of the HibernateUtil class).
2.1.3. Hibernate configuration and startup
The regular way of initializing Hibernate is to build a SessionFactory object from a Configuration object. If you like, you can think of the Configuration as an object representation of a configuration file (or a properties file) for Hibernate.
Let's look at some variations before we wrap it up in the HibernateUtil class.
Building a SessionFactory
This is an example of a typical Hibernate startup procedure, in one line of code, using automatic configuration file detection:
SessionFactory sessionFactory =
    new Configuration().configure().buildSessionFactory();
Wait—how did Hibernate know where the configuration file was located and which one to load?
When new Configuration() is called, Hibernate searches for a file named hibernate.properties in the root of the classpath. If it's found, all hibernate.* properties are loaded and added to the Configuration object.
When configure() is called, Hibernate searches for a file named hibernate.cfg.xml in the root of the classpath, and an exception is thrown if it can't be found. You don't have to call this method if you don't have this configuration file, of course. If settings in the XML configuration file are duplicates of properties set earlier, the XML settings override the previous ones.
The location of the hibernate.properties configuration file is always the root of the classpath, outside of any package. If you wish to use a different file or to have Hibernate look in a subdirectory of your classpath for the XML configuration file, you must pass a path as an argument of the configure() method:
SessionFactory sessionFactory = new Configuration()
            .configure("/persistence/auction.cfg.xml")
            .buildSessionFactory();
Finally, you can always set additional configuration options or mapping file locations on the Configuration object programmatically, before building the SessionFactory:
SessionFactory sessionFactory = new Configuration()
          .configure("/persistence/auction.cfg.xml")
          .setProperty(Environment.DEFAULT_SCHEMA, "CAVEATEMPTOR")
          .addResource("auction/CreditCard.hbm.xml")
          .buildSessionFactory();
Many sources for the configuration are applied here: First the hibernate.properties file in your classpath is read (if present). Next, all settings from /persistence/auction.cfg.xml are added and override any previously applied settings. Finally, an additional configuration property (a default database schema name) is set programmatically, and an additional Hibernate XML mapping metadata file is added to the configuration.
You can, of course, set all options programmatically, or switch between different XML configuration files for different deployment databases. There is effectively no limitation on how you can configure and deploy Hibernate; in the end, you only need to build a SessionFactory from a prepared configuration.
Note:
Method chaining—Method chaining is a programming style supported by many Hibernate interfaces. This style is more popular in Smalltalk than in Java and is considered by some people to be less readable and more difficult to debug than the more accepted Java style. However, it's convenient in many cases, such as for the configuration snippets you've seen in this section. Here is how it works: Most Java developers declare setter or adder methods to be of type void, meaning they return no value; but in Smalltalk, which has no void type, setter or adder methods usually return the receiving object. We use this Smalltalk style in some code examples, but if you don't like it, you don't need to use it. If you do use this coding style, it's better to write each method invocation on a different line. Otherwise, it may be difficult to step through the code in your debugger.
Now that you know how Hibernate is started and how to build a SessionFactory, what to do next? You have to create a configuration file for Hibernate.
Creating an XML configuration file
Let's assume you want to keep things simple, and, like most users, you decide to use a single XML configuration file for Hibernate that contains all the configuration details.
We recommend that you give your new configuration file the default name hibernate.cfg.xml and place it directly in the source directory of your project, outside of any package. That way, it will end up in the root of your classpath after compilation, and Hibernate will find it automatically. Look at the file in listing 2.4.
Listing 2-4. A simple Hibernate XML configuration file
<!DOCTYPE hibernate-configuration SYSTEM
"http://hibernate.sourceforge.net/hibernate-configuration-3.0.dtd">

<hibernate-configuration>
  <session-factory>
    <property name="hibernate.connection.driver_class">
        org.hsqldb.jdbcDriver
    </property>
    <property name="hibernate.connection.url">
        jdbc:hsqldb:hsql://localhost
    </property>
    <property name="hibernate.connection.username">
        sa
    </property>

    <property name="hibernate.dialect">
        org.hibernate.dialect.HSQLDialect
    </property>

    <!-- Use the C3P0 connection pool provider -->
    <property name="hibernate.c3p0.min_size">5</property>
    <property name="hibernate.c3p0.max_size">20</property>
    <property name="hibernate.c3p0.timeout">300</property>
    <property name="hibernate.c3p0.max_statements">50</property>
    <property name="hibernate.c3p0.idle_test_period">3000</property>

    <!-- Show and print nice SQL on stdout -->
    <property name="show_sql">true</property>
    <property name="format_sql">true</property>

    <!-- List of XML mapping files -->
    <mapping resource="hello/Message.hbm.xml"/>

  </session-factory>
</hibernate-configuration>
|
The document type declaration is used by the XML parser to validate this document against the Hibernate configuration DTD. Note that this isn't the same DTD as the one for Hibernate XML mapping files. Also note that we added some line breaks in the property values to make this more readable—you shouldn't do this in your real configuration file (unless your database username contains a line break).
First in the configuration file are the database connection settings. You need to tell Hibernate which database JDBC driver you're using and how to connect to the database with a URL, a username, and a password (the password here is omitted, because HSQLDB by default doesn't require one). You set a Dialect, so that Hibernate knows which SQL variation it has to generate to talk to your database; dozens of dialects are packaged with Hibernate—look at the Hibernate API documentation to get a list.
In the XML configuration file, Hibernate properties may be specified without the hibernate prefix, so you can write either hibernate.show_sql or just show_sql. Property names and values are otherwise identical to programmatic configuration properties—that is, to the constants as defined in org.hibernate.cfg.Environment. The hibernate.connection.driver_class property, for example, has the constant Environment.DRIVER.
Before we look at some important configuration options, consider the last line in the configuration that names a Hibernate XML mapping file. The Configuration object needs to know about all your XML mapping files before you build the SessionFactory. A SessionFactory is an object that represents a particular Hibernate configuration for a particular set of mapping metadata. You can either list all your XML mapping files in the Hibernate XML configuration file, or you can set their names and paths programmatically on the Configuration object. In any case, if you list them as a resource, the path to the mapping files is the relative location on the classpath, with, in this example, hello being a package in the root of the classpath.
You also enabled printing of all SQL executed by Hibernate to the console, and you told Hibernate to format it nicely so that you can check what is going on behind the scenes. We'll come back to logging later in this chapter.
Another, sometimes useful, trick is to make configuration options more dynamic with system properties:
...
<property name="show_sql">${displaysql}</property>
...
You can now specify a system property, such as with java -displaysql=true, on the command line when you start your application, and this will automatically be applied to the Hibernate configuration property.
The database connection pool settings deserve extra attention.
The database connection pool
Generally, it isn't advisable to create a connection each time you want to interact with the database. Instead, Java applications should use a pool of connections. Each application thread that needs to do work on the database requests a connection from the pool and then returns it to the pool when all SQL operations have been executed. The pool maintains the connections and minimizes the cost of opening and closing connections.
There are three reasons for using a pool:
Acquiring a new connection is expensive. Some database management systems even start a completely new server process for each connection.
Maintaining many idle connections is expensive for a database management system, and the pool can optimize the usage of idle connections (or disconnect if there are no requests).
Creating prepared statements is also expensive for some drivers, and the connection pool can cache statements for a connection across requests.
Figure 2.2 shows the role of a connection pool in an unmanaged application runtime environment (that is, one without any application server).
Figure 2-2. JDBC connection pooling in a nonmanaged environment
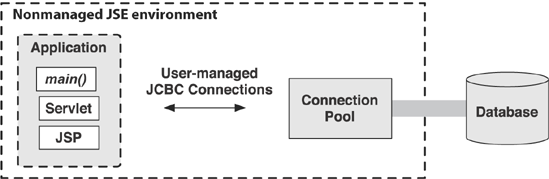
With no application server to provide a connection pool, an application either implements its own pooling algorithm or relies on a third-party library such as the open source C3P0 connection pooling software. Without Hibernate, the application code calls the connection pool to obtain a JDBC connection and then executes SQL statements with the JDBC programming interface. When the application closes the SQL statements and finally closes the connection, the prepared statements and connection aren't destroyed, but are returned to the pool.
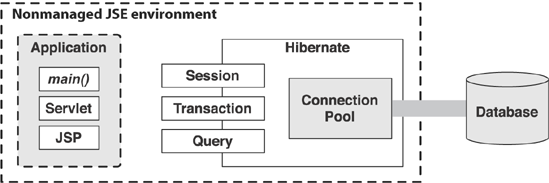
With Hibernate, the picture changes: It acts as a client of the JDBC connection pool, as shown in figure 2.3. The application code uses the Hibernate Session and Query API for persistence operations, and it manages database transactions (probably) with the Hibernate Transaction API.
Hibernate defines a plug-in architecture that allows integration with any connection-pooling software. However, support for C3P0 is built in, and the software comes bundled with Hibernate, so you'll use that (you already copied the c3p0.jar file into your library directory, right?). Hibernate maintains the pool for you, and configuration properties are passed through. How do you configure C3P0 through Hibernate?
Figure 2-3. Hibernate with a connection pool in a nonmanaged environment
One way to configure the connection pool is to put the settings into your hibernate.cfg.xml configuration file, like you did in the previous section.
Alternatively, you can create a hibernate.properties file in the classpath root of the application. An example of a hibernate.properties file for C3P0 is shown in listing 2.5. Note that this file, with the exception of a list of mapping resources, is equivalent to the configuration shown in listing 2.4.
Listing 2-5. Using hibernate.properties for C3P0 connection pool settings
hibernate.connection.driver_class = org.hsqldb.jdbcDriver hibernate.connection.url = jdbc:hsqldb:hsql://localhost hibernate.connection.username = sa hibernate.dialect = org.hibernate.dialect.HSQLDialect hibernate.c3p0.min_size = 5 |
❶ This is the minimum number of JDBC connections that C3P0 keeps ready at all times.
❷ This is the maximum number of connections in the pool. An exception is thrown at runtime if this number is exhausted.
❸ You specify the timeout period (in this case, 300 seconds) after which an idle connection is removed from the pool.
❹ A maximum of 50 prepared statements will be cached. Caching of prepared statements is essential for best performance with Hibernate.
❺ This is the idle time in seconds before a connection is automatically validated.
Specifying properties of the form hibernate.c3p0.* selects C3P0 as the connection pool (the c3p0.max_size option is needed—you don't need any other switch to enable C3P0 support). C3P0 has more features than shown in the previous example; refer to the properties file in the etc/ subdirectory of the Hibernate distribution to get a comprehensive example you can copy from.
The Javadoc for the class org.hibernate.cfg.Environment also documents every Hibernate configuration property. Furthermore, you can find an up-to-date table with all Hibernate configuration options in the Hibernate reference documentation. We'll explain the most important settings throughout the book, however. You already know all you need to get started.
FAQ
Can I supply my own connections? Implement the org.hibernate.connection.ConnectionProvider interface, and name your implementation with the hibernate.connection.provider_class configuration option. Hibernate will now rely on your custom provider if it needs a database connection.
Now that you've completed the Hibernate configuration file, you can move on and create the SessionFactory in your application.
Handling the SessionFactory
In most Hibernate applications, the SessionFactory should be instantiated once during application initialization. The single instance should then be used by all code in a particular process, and any Session should be created using this single SessionFactory. The SessionFactory is thread-safe and can be shared; a Session is a single-threaded object.
A frequently asked question is where the factory should be stored after creation and how it can be accessed without much hassle. There are more advanced but comfortable options such as JNDI and JMX, but they're usually available only in full Java EE application servers. Instead, we'll introduce a pragmatic and quick solution that solves both the problem of Hibernate startup (the one line of code) and the storing and accessing of the SessionFactory: you'll use a static global variable and static initialization.
Both the variable and initialization can be implemented in a single class, which you'll call HibernateUtil. This helper class is well known in the Hibernate community—it's a common pattern for Hibernate startup in plain Java applications without Java EE services. A basic implementation is shown in listing 2.6.
Listing 2-6. The HibernateUtil class for startup and SessionFactory handling
package persistence;

import org.hibernate.*;
import org.hibernate.cfg.*;

public class HibernateUtil {

  private static SessionFactory sessionFactory;

  static {
    try {
       sessionFactory=new Configuration()
                           .configure()

                           .buildSessionFactory();
    } catch (Throwable ex) {
       throw new ExceptionInInitializerError(ex);
    }
  }

  public static SessionFactory getSessionFactory() {
      // Alternatively, you could look up in JNDI here
      return sessionFactory;
  }

  public static void shutdown() {
      // Close caches and connection pools
      getSessionFactory().close();
  }

}
|
You create a static initializer block to start up Hibernate; this block is executed by the loader of this class exactly once, on initialization when the class is loaded. The first call of HibernateUtil in the application loads the class, builds the SessionFactory, and sets the static variable at the same time. If a problem occurs, any Exception or Error is wrapped and thrown out of the static block (that's why you catch Throwable). The wrapping in ExceptionInInitializerError is mandatory for static initializers.
You've created this new class in a new package called persistence. In a fully featured Hibernate application, you often need such a package—for example, to wrap up your custom persistence layer interceptors and data type converters as part of your infrastructure.
Now, whenever you need access to a Hibernate Session in your application, you can get it easily with HibernateUtil.getSessionFactory().openSession(), just as you did earlier in the HelloWorld main application code.
You're almost ready to run and test the application. But because you certainly want to know what is going on behind the scenes, you'll first enable logging.
Enabling logging and statistics
You've already seen the hibernate.show_sql configuration property. You'll need it continually when you develop software with Hibernate; it enables logging of all generated SQL to the console. You'll use it for troubleshooting, for performance tuning, and to see what's going on. If you also enable hibernate.format_sql, the output is more readable but takes up more screen space. A third option you haven't set so far is hibernate.use_sql_comments—it causes Hibernate to put comments inside all generated SQL statements to hint at their origin. For example, you can then easily see if a particular SQL statement was generated from an explicit query or an on-demand collection initialization.
Enabling the SQL output to stdout is only your first logging option. Hibernate (and many other ORM implementations) execute SQL statements asynchronously. An INSERT statement isn't usually executed when the application calls session.save(), nor is an UPDATE immediately issued when the application calls item.setPrice(). Instead, the SQL statements are usually issued at the end of a transaction.
This means that tracing and debugging ORM code is sometimes nontrivial. In theory, it's possible for the application to treat Hibernate as a black box and ignore this behavior. However, when you're troubleshooting a difficult problem, you need to be able to see exactly what is going on inside Hibernate. Because Hibernate is open source, you can easily step into the Hibernate code, and occasionally this helps a great deal! Seasoned Hibernate experts debug problems by looking at the Hibernate log and the mapping files only; we encourage you to spend some time with the log output generated by Hibernate and familiarize yourself with the internals.
Hibernate logs all interesting events through Apache commons-logging, a thin abstraction layer that directs output to either Apache Log4j (if you put log4j.jar in your classpath) or JDK 1.4 logging (if you're running under JDK 1.4 or above and Log4j isn't present). We recommend Log4j because it's more mature, more popular, and under more active development.
To see output from Log4j, you need a file named log4j.properties in your classpath (right next to hibernate.properties or hibernate.cfg.xml). Also, don't forget to copy the log4j.jar library to your lib directory. The Log4j configuration example in listing 2.7 directs all log messages to the console.
Listing 2-7. An example log4j.properties configuration file
# Direct log messages to stdout
log4j.appender.stdout=org.apache.log4j.ConsoleAppender
log4j.appender.stdout.Target=System.out
log4j.appender.stdout.layout=org.apache.log4j.PatternLayout
log4j.appender.stdout.layout.ConversionPattern=%d{ABSOLUTE}
|
The last category in this configuration file is especially interesting: It enables the logging of JDBC bind parameters if you set it to DEBUG level, providing information you usually don't see in the ad hoc SQL console log. For a more comprehensive example, check the log4j.properties file bundled in the etc/ directory of the Hibernate distribution, and also look at the Log4j documentation for more information. Note that you should never log anything at DEBUG level in production, because doing so can seriously impact the performance of your application.
You can also monitor Hibernate by enabling live statistics. Without an application server (that is, if you don't have a JMX deployment environment), the easiest way to get statistics out of the Hibernate engine at runtime is the SessionFactory:
Statistics stats =
    HibernateUtil.getSessionFactory().getStatistics();

stats.setStatisticsEnabled(true);
...

stats.getSessionOpenCount();
stats.logSummary();

EntityStatistics itemStats =
    stats.getEntityStatistics("auction.model.Item");
itemStats.getFetchCount();
The statistics interfaces are Statistics for global information, EntityStatistics for information about a particular entity, CollectionStatistics for a particular collection role, QueryStatistics for SQL and HQL queries, and SecondLevelCacheStatistics for detailed runtime information about a particular region in the optional second-level data cache. A convenient method is logSummary(), which prints out a complete summary to the console with a single call. If you want to enable the collection of statistics through the configuration, and not programmatically, set the hibernate.generate_statistics configuration property to true. See the API documentation for more information about the various statistics retrieval methods.
Before you run the "Hello World" application, check that your work directory has all the necessary files:
WORKDIR
build.xml
+lib

  <all required libraries>
+src
  +hello
    HelloWorld.java
    Message.java
    Message.hbm.xml
  +persistence
    HibernateUtil.java
  hibernate.cfg.xml (or hibernate.properties)
  log4j.properties
The first file, build.xml, is the Ant build definition. It contains the Ant targets for building and running the application, which we'll discuss next. You'll also add a target that can generate the database schema automatically.
2.1.4. Running and testing the application
To run the application, you need to compile it first and start the database management system with the right database schema.
Ant is a powerful build system for Java. Typically, you'd write a build.xml file for your project and call the build targets you defined in this file with the Ant command-line tool. You can also call Ant targets from your Java IDE, if that is supported.
Compiling the project with Ant
You'll now add a build.xml file and some targets to the "Hello World" project. The initial content for the build file is shown in listing 2.8—you create this file directly in your WORKDIR.
Listing 2-8. A basic Ant build file for "Hello World"
<project name="HelloWorld" default="compile" basedir=".">

    <!-- Name of project and version -->
    <property name="proj.name"      value="HelloWorld"/>
    <property name="proj.version"   value="1.0"/>

    <!-- Global properties for this build -->
    <property name="src.java.dir"   value="src"/>
    <property name="lib.dir"        value="lib"/>
    <property name="build.dir"      value="bin"/>

    <!-- Classpath declaration -->
    <path id="project.classpath">
        <fileset dir="${lib.dir}">
            <include name="**/*.jar"/>
            <include name="**/*.zip"/>
        </fileset>

    </path>

    <!-- Useful shortcuts -->
    <patternset id="meta.files">
        <include name="**/*.xml"/>
        <include name="**/*.properties"/>
    </patternset>

    <!-- Clean up -->
    <target name="clean">
        <delete dir="${build.dir}"/>
        <mkdir dir="${build.dir}"/>
    </target>

    <!-- Compile Java source -->
    <target name="compile" depends="clean">
        <mkdir dir="${build.dir}"/>
        <javac
            srcdir="${src.java.dir}"
            destdir="${build.dir}"
            nowarn="on">
            <classpath refid="project.classpath"/>
        </javac>
    </target>

    <!-- Copy metadata to build classpath -->
    <target name="copymetafiles">
        <copy todir="${build.dir}">
            <fileset dir="${src.java.dir}">
                <patternset refid="meta.files"/>
            </fileset>
        </copy>
    </target>

    <!-- Run HelloWorld -->
    <target name="run" depends="compile, copymetafiles"
        description="Build and run HelloWorld">
        <java fork="true"
              classname="hello.HelloWorld"
              classpathref="project.classpath">
              <classpath path="${build.dir}"/>
        </java>
    </target>

</project>
|
The first half of this Ant build file contains property settings, such as the project name and global locations of files and directories. You can already see that this build is based on the existing directory layout, your WORKDIR (for Ant, this is the same directory as the basedir). The default target, when this build file is called with no named target, is compile.
Next, a name that can be easily referenced later, project.classpath, is defined as a shortcut to all libraries in the library directory of the project. Another shortcut for a pattern that will come in handy is defined as meta.files. You need to handle configuration and metadata files separately in the processing of the build, using this filter.
The clean target removes all created and compiled files, and cleans the project. The last three targets, compile, copymetafiles, and run, should be self-explanatory. Running the application depends on the compilation of all Java source files, and the copying of all mapping and property configuration files to the build directory.
Now, execute ant compile in your WORKDIR to compile the "Hello World" application. You should see no errors (nor any warnings) during compilation and find your compiled class files in the bin directory. Also call ant copymetafiles once, and check whether all configuration and mapping files are copied correctly into the bin directory.
Before you run the application, start the database management system and export a fresh database schema.
Starting the HSQL database system
Hibernate supports more than 25 SQL database management systems out of the box, and support for any unknown dialect can be added easily. If you have an existing database, or if you know basic database administration, you can also replace the configuration options (mostly connection and dialect settings) you created earlier with settings for your own preferred system.
To say hello to the world, you need a lightweight, no-frills database system that is easy to install and configure. A good choice is HSQLDB, an open source SQL database management system written in Java. It can run in-process with the main application, but in our experience, running it stand-alone with a TCP port listening for connections is usually more convenient. You've already copied the hsqldb.jar file into the library directory of your WORKDIR—this library includes both the database engine and the JDBC driver required to connect to a running instance.
To start the HSQLDB server, open up a command line, change into your WORKDIR, and run the command shown in figure 2.4. You should see startup messages and finally a help message that tells you how to shut down the database system (it's OK to use Ctrl+C). You'll also find some new files in your WORKDIR, starting with test—these are the files used by HSQLDB to store your data. If you want to start with a fresh database, delete the files between restarts of the server.
Figure 2-4. Starting the HSQLDB server from the command line

You now have an empty database that has no content, not even a schema. Let's create the schema next.
Exporting the database schema
You can create the database schema by hand by writing SQL DDL with CREATE statements and executing this DDL on your database. Or (and this is much more convenient) you can let Hibernate take care of this and create a default schema for your application. The prerequisite in Hibernate for automatic generation of SQL DDL is always a Hibernate mapping metadata definition, either in XML mapping files or in Java source-code annotations. We assume that you've designed and implemented your domain model classes and written mapping metadata in XML as you followed the previous sections.
The tool used for schema generation is hbm2ddl; its class is org.hibernate. tool.hbm2ddl.SchemaExport, so it's also sometimes called SchemaExport.
There are many ways to run this tool and create a schema:
You can run <hbm2ddl> in an Ant target in your regular build procedure.
You can run SchemaExport programmatically in application code, maybe in your HibernateUtil startup class. This isn't common, however, because you rarely need programmatic control over schema generation.
You can enable automatic export of a schema when your SessionFactory is built by setting the hibernate.hbm2ddl.auto configuration property to create or create-drop. The first setting results in DROP statements followed by CREATE statements when the SessionFactory is built. The second setting adds additional DROP statements when the application is shut down and the SessionFactory is closed—effectively leaving a clean database after every run.
Programmatic schema generation is straightforward:
Configuration cfg = new Configuration().configure();
SchemaExport schemaExport = new SchemaExport(cfg);
schemaExport.create(false, true);
A new SchemaExport object is created from a Configuration; all settings (such as the database driver, connection URL, and so on) are passed to the SchemaExport constructor. The create(false, true) call triggers the DDL generation process, without any SQL printed to stdout (because of the false setting), but with DDL immediately executed in the database (true). See the SchemaExport API for more information and additional settings.
Your development process determines whether you should enable automatic schema export with the hibernate.hbm2ddl.auto configuration setting. Many new Hibernate users find the automatic dropping and re-creation on SessionFactory build a little confusing. Once you're more familiar with Hibernate, we encourage you to explore this option for fast turnaround times in integration testing.
An additional option for this configuration property, update, can be useful during development: it enables the built-in SchemaUpdate tool, which can make schema evolution easier. If enabled, Hibernate reads the JDBC database metadata on startup and creates new tables and constraints by comparing the old schema with the current mapping metadata. Note that this functionality depends on the quality of the metadata provided by the JDBC driver, an area in which many drivers are lacking. In practice, this feature is therefore less exciting and useful than it sounds.
Warning:
We've seen Hibernate users trying to use SchemaUpdate to update the schema of a production database automatically. This can quickly end in disaster and won't be allowed by your DBA.
You can also run SchemaUpdate programmatically:
Configuration cfg = new Configuration().configure();
SchemaUpdate schemaUpdate = new SchemaUpdate(cfg);
schemaUpdate.execute(false);
The false setting at the end again disables printing of the SQL DDL to the console and only executes the statements directly on the database. If you export the DDL to the console or a text file, your DBA may be able to use it as a starting point to produce a quality schema-evolution script.
Another hbm2ddl.auto setting useful in development is validate. It enables SchemaValidator to run at startup. This tool can compare your mapping against the JDBC metadata and tell you if the schema and mappings match. You can also run SchemaValidator programmatically:
Configuration cfg = new Configuration().configure();
new SchemaValidator(cfg).validate();
An exception is thrown if a mismatch between the mappings and the database schema is detected.
Because you're basing your build system on Ant, you'll ideally add a schemaexport target to your Ant build that generates and exports a fresh schema for your database whenever you need one (see listing 2.9).
Listing 2-9. Ant target for schema export
<taskdef name="hibernatetool"
         classname="org.hibernate.tool.ant.HibernateToolTask"
         classpathref="project.classpath"/>

<target name="schemaexport" depends="compile, copymetafiles"
    description="Exports a generated schema to DB and file">

    <hibernatetool destdir="${basedir}">
        <classpath path="${build.dir}"/>

        <configuration
            configurationfile="${build.dir}/hibernate.cfg.xml"/>

        <hbm2ddl
            drop="true"
            create="true"
            export="true"
            outputfilename="helloworld-ddl.sql"
            delimiter=";"
            format="true"/>

    </hibernatetool>

</target>
|
In this target, you first define a new Ant task that you'd like to use, HibernateToolTask. This is a generic task that can do many things—exporting an SQL DDL schema from Hibernate mapping metadata is only one of them. You'll use it throughout this chapter in all Ant builds. Make sure you include all Hibernate libraries, required third-party libraries, and your JDBC driver in the classpath of the task definition. You also need to add the hibernate-tools.jar file, which can be found in the Hibernate Tools download package.
The schemaexport Ant target uses this task, and it also depends on the compiled classes and copied configuration files in the build directory. The basic use of the <hibernatetool> task is always the same: A configuration is the starting point for all code artifact generation. The variation shown here, <configuration>, understands Hibernate XML configuration files and reads all Hibernate XML mapping metadata files listed in the given configuration. From that information, an internal Hibernate metadata model (which is what hbm stands for everywhere) is produced, and this model data is then processed subsequently by exporters. We discuss tool configurations that can read annotations or a database for reverse engineering later in this chapter.
The other element in the target is a so-called exporter. The tool configuration feeds its metadata information to the exporter you selected; in the preceding example, it's the <hbm2ddl> exporter. As you may have guessed, this exporter understands the Hibernate metadata model and produces SQL DDL. You can control the DDL generation with several options:
The exporter generates SQL, so it's mandatory that you set an SQL dialect in your Hibernate configuration file.
If drop is set to true, SQL DROP statements will be generated first, and all tables and constraints are removed if they exist. If create is set to true, SQL CREATE statements are generated next, to create all tables and constraints. If you enable both options, you effectively drop and re-create the database schema on every run of the Ant target.
If export is set to true, all DDL statements are directly executed in the database. The exporter opens a connection to the database using the connection settings found in your configuration file.
If an outputfilename is present, all DDL statements are written to this file, and the file is saved in the destdir you configured. The delimiter character is appended to all SQL statements written to the file, and if format is enabled, all SQL statements are nicely indented.
You can now generate, print, and directly export the schema to a text file and the database by running ant schemaxport in your WORKDIR. All tables and constraints are dropped and then created again, and you have a fresh database ready. (Ignore any error message that says that a table couldn't be dropped because it didn't exist.)
Check that your database is running and that it has the correct database schema. A useful tool included with HSQLDB is a simple database browser. You can call it with the following Ant target:
<target name="dbmanager" description="Start HSQLDB manager">
    <java
        classname="org.hsqldb.util.DatabaseManagerSwing"
        fork="yes"
        classpathref="project.classpath"
        failonerror="true">
        <arg value="-url"/>
        <arg value="jdbc:hsqldb:hsql://localhost/"/>
        <arg value="-driver"/>
        <arg value="org.hsqldb.jdbcDriver"/>
    </java>
</target>
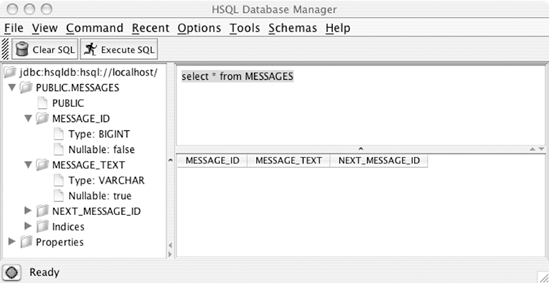
You should see the schema shown in figure 2.5 after logging in.
Run your application with ant run, and watch the console for Hibernate log output. You should see your messages being stored, loaded, and printed. Fire an SQL query in the HSQLDB browser to check the content of your database directly.
You now have a working Hibernate infrastructure and Ant project build. You could skip to the next chapter and continue writing and mapping more complex business classes. However, we recommend that you spend some time with the "Hello World" application and extend it with more functionality. You can, for example, try different HQL queries or logging options. Don't forget that your database system is still running in the background, and that you have to either export a fresh schema or stop it and delete the database files to get a clean and empty database again.
Figure 2-5. The HSQLDB browser and SQL console
In the next section, we walk through the "Hello World" example again, with Java Persistence interfaces and EJB 3.0.