Chapter 7. Under the hood of the UpdatePanel
In this chapter:
- Using the PageRequestManager
- Anatomy of an asychronous postback
- Error handling
- An UpdatePanel cookbook
- UpdatePanel caveats and limitations
Using the UpdatePanel control can be a bit like using a Swiss Army knife. Most of the time, the primary utilities, such as the knife and scissors, are used to resolve issues. Other times, using additional functions and features of the tool make more sense when you’re attempting to solve complex problems. For example, it’s more feasible to use a screwdriver as opposed to the knife for a task such as tightening a screw. Knowing that these functions exist—and, just as important, how and when to use them—will make your use of the tool effective. The same notion is applied to the UpdatePanel: Understanding how to use its principal functions is only half the battle. Gaining a deeper knowledge of its capabilities and how it works will empower you to fully exploit its potential and take more control of your applications.
In previous chapters (specifically, chapters 4 and 6), you learned how to use the UpdatePanel control to effectively apply a partial-page rendering pattern to ASP.NET pages, thus greatly improving the user experience. If you’ve skipped to this chapter and haven’t had any exposure to the UpdatePanel control, we encourage you to first read the earlier sections as prerequisites to the upcoming content. A basic familiarity with the UpdatePanel control will increase your aptitude and chances of successfully understanding the topics we’re about to discuss.
This chapter will take you on a deep dive into the UpdatePanel and the partial-page rendering mechanism. It will reveal how partial-page updates work behind the scenes. In addition, it will demonstrate through a series of examples how to leverage this new-found knowledge to address a variety of scenarios, such as control development, performance enhancements, and client-side scripting support.
In the spirit of the Swiss Army knife, we’ll begin our exploration by looking at a rarely mentioned but highly effective tool in the partial-page rendering mechanism: the PageRequestManager.
7.1. The PageRequestManager: the unsung hero
So far, the UpdatePanel has received much of the credit for partial-page rendering. With little effort, ASP.NET developers can leverage the control to declare regions of a page for partial updates. As a result, a normal postback is replaced with an asynchronous one that can update fragments of a page without causing the browser to refresh. You know that some of this behavior can’t be done with a few server controls; essential to the solution is client-side scripting to at least update the UI. It should come as no surprise that the UpdatePanel server control looks to another resource on the client side to manage the updates and requests to the server.
The PageRequestManager is the client-side counterpart to the UpdatePanel control. When partial rendering is enabled, this JavaScript object manages the asynchronous postbacks and updates that take place in the browser. To help you comprehend how the UpdatePanel works, we’ll shed light on where it all begins: with the PageRequestManager and its client-side event model.
7.1.1. The client-side event model
The PageRequestManager is a JavaScript object that becomes available when partial rendering is enabled on a page. Its primary responsibilities include managing the UpdatePanel controls on the page, performing asynchronous postbacks to the server, and processing the results to dynamically update the contents of the page. During this process, the PageRequestManager goes through a series of events, much like the ASP.NET page lifecycle, that presents an opportunity for you to take more control of what happens during an asynchronous postback.
Figure 7.1 illustrates the events that occur when an asynchronous postback is triggered from within an UpdatePanel.
Figure 7.1. The PageRequestManager fires off a series of events before, during, and after an asynchronous postback. This allows the page and control developer to have more influence over how content is rendered during a postback.
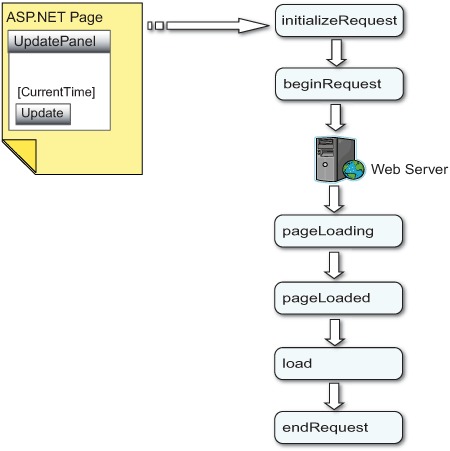
Perhaps the best way to ease into explaining how you can use these events is to first outline the order in which they occur. A high-level understanding of the intentions of each event will give you more insight into the client-side event model. Once we’ve established this foundation, we can then take a more intrusive look into how the events work and how to leverage them. What follows is a brief explanation of each event in the model.
The initializeRequest event
When a trigger such as a button click or column sort on a GridView occurs, the asynchronous postback process is initiated. In response to this action, the PageRequestManager fires a client-side event called initializeRequest. As its name suggests, the early stages of a request to the server begin to take shape here. Along with information about which DOM element caused this to occur, the event establishes an opportunity for you to cancel or give precedence to a particular asynchronous postback.
The beginRequest event
If the asynchronous postback hasn’t been canceled or aborted in the previous event, the next step in the timeline is the beginRequest event. Raised just before the asynchronous postback is sent to the server, this occasion is typically used to relay to the user a visual cue that an asynchronous process is about to begin. When a process can end up being lengthy, it’s important to keep the user in tune with the application by providing instant feedback.
Tip
The UpdateProgress control (discussed in chapters 1 and 4) leverages the beginRequest event to display its contents as a visual cue to the user during an asynchronous postback. It then uses the endRequest event to hide the visual cue—signifying an end to the request.
In addition, you can invoke custom scripts in response to the event. After this occurs, the asynchronous postback is sent to the server.
The pageLoading event
After the postback is processed on the server, its response is sent back down to the client, and the pageLoading event is raised. During this event, the updated HTML for declared regions of the page is sent down to the client. Additional scripts are also delivered to assist in managing the state of the UpdatePanel controls and subsequent postbacks. Because this event occurs before any updates are made, it presents you with an opportunity to inspect the data from the server and apply customizations, cleanup, or additional handling.
The pageLoaded event
The pageLoaded event signifies the completion of the partial updates to the page. During an asynchronous postback, this event is fired immediately after the pageLoading event. However, this event is also fired by the PageRequestManager when it’s initially loaded on a page. What is important to remember right now is that the pageLoaded event (as its name states) is fired each time a page is loaded, regardless of what caused the page to load (or reload). Later, we’ll demonstrate how to distinguish between normal and asynchronous requests during this event.
The load event
The next event fired is not a PageRequestManager event, but rather one that belongs to the Application object (introduced in chapter 2). To recap, the load event signifies that all scripts have been loaded and that all client-side objects in the application have been created and initialized. Because this event is significant to the event lifecycle that exists on the client, the PageRequestManager raises it during asynchronous postbacks, on behalf of the Application object.
Note
The PageRequestManager has a function called pageLoaded. When it’s called, it’s passed in a parameter that indicates whether this is the initial load for the page. If this is the initial load, the Application object naturally raises the load event during the client-side page lifecycle. If this isn’t the initial load, a call is made to the raiseLoad function in the Application object, which, as its name suggests, raises the load event.
The endRequest event
Finally, if everything goes smoothly, the endRequest event is raised by the PageRequestManager after the load event. This event indicates that the processing for the request has completed. We chose our words carefully when we said “if everything goes smoothly”; this event is also raised when an error is thrown during the postback processing. If an error occurs, details about the error are passed along with the event arguments, allowing you to handle the error yourself or let it be dealt with elsewhere in the page. We’ll spend more time on error handling later in the chapter. You can rely on the fact that the endRequest event will always be raised at the end of a partial postback.
You should now have a high-level understanding of the client-side event model offered by the PageRequestManager. If the previous overview wasn’t thorough enough, have no fear—we’ve only just begun to explore how the model behaves. Soon, we’ll provide more insight into what is happening behind the scenes and how to program against it effectively.
The next step is to understand how an asynchronous postback works. We’ll walk through the process of how it originates from the client, how it’s processed, and how it’s sent back to the browser for partial updates to the UI.
7.1.2. The anatomy of an asynchronous postback
In this section, we’ll walk through an asynchronous postback and uncover how it works behind the scenes. We’ll examine how the pieces are initially put into place and how a request is formulated, sent to the server, and eventually parsed and updated in the UI. In the end, you’ll have a deep appreciation of the partial-page rendering behavior that the ASP.NET AJAX framework provides.
Laying the foundation
While a page is loaded, a number of things are put into place that lay the groundwork for partial postbacks. The first significant event that occurs is the OnInit event for the ScriptManager. The ScriptManager calls the PageRequestManager server object to determine whether the page is in the process of handling an asynchronous postback. It then exposes this value through the read-only property IsInAsyncPostBack.
System.Web.Extensions.dll includes an internal sealed class called PageRequestManager. Guess which class the ScriptManager relies on to do most of its work? The internal modifier signifies that the class is made visible only in the current package: to other classes in the library, but not to you. A sealed class can’t be inherited. This pattern is often applied to classes in a library that are meant to remain hidden or non-extendable. By doing this, the ASP.NET AJAX library can place the main engine of the partial-page rending mechanism in a single class and provide other extendible classes (ScriptManager, UpdatePanel) that are built on top of the core functionality.
At times, accessing this property can be helpful during the ASP.NET page lifecycle. For instance, you may wish to apply different or additional logic that depends on the type of postback. Listing 7.1 shows a simple example of how to access this useful information.
Listing 7.1. Using the IsInAsyncPostBack property to identify asynchronous postbacks
protected void Page_Load(object sender, EventArgs e)
{
  if (Page.IsPostBack)
  {
     if (ScriptManager1.IsInAsyncPostBack)
     {
        // Perform some extra logic here....
     }
  }
}
After querying the asynchronous postback state, the OnInit event handler for the PageRequestManager is called. Here, the browser’s capabilities are checked to determine whether partial rendering is even possible. Following a similar pattern, the ScriptManager exposes this value through the SupportsPartialRendering property. If this check passes and the ScriptManager has the EnablePartialRendering property set to true (its default value), then the prerequisites for partial rendering have been met and the PageRequestManager JavaScript object is made available in the browser.
Next up is the Render event of the ScriptManager control. As expected, it calls the Render method of the PageRequestManager (does this guy have to do everything?). Subsequently, it injects some JavaScript into the page that calls two internal methods, _initialize and _updateControls, for the JavaScript object. An example of how this is rendered by the browser appears in listing 7.2. Note that results vary based on what controls you declare on the page.
Listing 7.2. Configuring the page for partial updates with _initialize and _updateControls
Sys.WebForms.PageRequestManager._initialize('ScriptManager1',
                    document.getElementById('form1'));

Sys.WebForms.PageRequestManager.getInstance(). _updateControls(['tUpdatePanel1'
                                 ,'tUpdatePanel2']
                                 , ['Update1']
                                 , []
                                 , 90);
Tip
We’re almost there! If you’ve read this far into the asynchronous postback process, you’ll be relieved to know that you’re close to establishing the foundation that will enable partial postbacks to occur. To complete your understanding of this first milestone, you need to traverse a few more steps: specifically, the recent calls to the PageRequestManager in the browser.
The first method, _initialize, calls another internal method, _initialize-Internal, which adds handlers for the following browser events: submit, load, unload, and click (handlers for these events are responsibly released during the unload event). It also creates a delegate for the window __doPostback function, so that normal postbacks raised by server controls and other elements can be intercepted. Registering for these events puts the PageRequestManager into a position where it can capture normal postbacks and replace them with asynchronous ones when applicable.
Last is the call to the PageRequestManager’s internal _updateControls function. Passed into it is an array of UpdatePanel IDs on the page as well as the IDs of any controls that have been registered as asynchronous postback controls and normal postback controls (see chapter 6). The timeout value, in seconds, is the last parameter passed into the call.
Internally, this method builds and maintains a number of private arrays for the UpdatePanel IDs and relevant controls on the page. These arrays are used later during asynchronous postbacks to determine which element invoked the postback as well as how to determine which action to take (a normal postback versus asynchronous postback).
Note
The first parameter in the call takes an array of UpdatePanel IDs. Notice that they’re prefixed with the character t. This relays to the PageRequestManager whether the panel has the ChildrenAsTriggers property (see chapter 6) enabled. If the property were set to false, the UpdatePanel ID would be prefixed with f instead.
With the foundation in place, the partial-rendering mechanism is ready to be invoked. Let’s take the next step by examining what happens when a request is about to be made to the server.
Before the asynchronous postback
In ASP.NET, when a postback is about to happen, the first thing that is usually determined is which control invoked the process. Conveniently, the name of the control that invoked the postback is placed on the page in a hidden field called __EVENTTARGET. From managed code, one of the many ways you can examine its value is through the Params collection of the Request object:
string controlName = this.Request.Params.Get("__EVENTTARGET");
This works for most controls, but it isn’t supported for two common controls in the ASP.NET toolbox: Button and ImageButton. Instead of calling the __doPostBack JavaScript function that all other controls use, these button controls are rendered by the browser with simple input type='submit' tags. All these buttons do is cause the form to submit it to itself. When one of these buttons is clicked, you determine the control that invoked the postback by walking through the controls collection on the page and looking for the first and only button control. What about the other controls? Fortunately, this is the only input-type control added to the collection, so all you have to do is find the first (and only) button control in the collection.
Fortunately for you, the ID of the control that invoked the property is also exposed by the ScriptManager with the AsyncPostBackSourceElementID property. In addition, it’s captured by the PageRequestManager in the browser (more on this soon).
What remains, is formatting the request to the server and sending it across the wire asynchronously. When one of the button controls is clicked, this process begins with an internal handler called _onFormElementClick. The _onFormElementClick handler is also the only way to track whether a submit button has been clicked, because the other controls invoke the __doPostBack function.
Here, it’s determined whether the request should be sent asynchronously or as a normal postback. Alternatively, if the request originated from another control, other than the Button or ImageButton control, then the JavaScript __doPostBack function is called and intercepted by the PageRequestManager. Both approaches lead you to the _onFormSubmit function, where the following tasks are performed:
- A sanity check is made to confirm that the submit event happened in an UpdatePanel or a registered asynchronous postback control.
- The form body is formatted for the request to the server by iterating through the elements on the page.
- A new Sys.Net.WebRequest object (introduced in chapter 5) is instantiated for the asynchronous request.
- The initializeRequest event is raised, and its arguments are checked to catch any actions from the client to cancel the request.
- Any previous postbacks are aborted—only one can happen at a time.
- The beginRequest event is raised.
- The Sys.Net.WebRequest object is populated with additional headers to indicate an asynchronous request.
- The request is sent to the server with the _onFormSubmitCompleted function registered as the callback method to invoke when complete.
When the request is being formatted on the client, it adds a new X-MicrosoftAjax header and sets its value to Delta=true to relay to the server that you don’t want a typical response, but a delta response instead. You want to be returned only changes relevant to the regions you specified with the UpdatePanels, instead of changes for the whole page.
Another header called Cache-Control is initialized to no-cache to prevent caches from interfering with the request as well as preventing server-side page output cache. For more about the Cache-Control field, refer to the HTTP protocol at http://www.w3.org/Protocols/rfc2616/rfc2616-sec14.html.
As you continue to put together blocks of knowledge about how asynchronous postbacks work, you’ll eventually have all the pieces to complete your understanding of a partial postback. You’re more than halfway: All that remains is learning how the postback is processed and how the updates are applied.
During the asynchronous postback
When the request reaches the server, a new Page instance is created, and all the stages of the page lifecycle take place. These include events raised for other web controls on the page and routine events that occur during a typical postback. The server determines that the request is asynchronous by examining the headers in the request and finding the X-MicrosoftAjax field we mentioned earlier. Using a tool called Web Developer Helper, an IE browser plug-in developed by a member of the ASP.NET team, you can easily view the fields in the request made to the server. Figure 7.2 shows a screen shot of a captured request. This tool and others are discussed in appendix B.
Figure 7.2. A capture of an asynchronous HTTP request confirms that the X-MicrosoftAjax fields is being added to the request.

As you can see by examining the Request Headers tab in the dialog, the X-MicrosoftAjax field is passed into the request along with the Cache-Control field we mentioned earlier.
Figure 7.2 also gives you insight into the response coming from the server. Typically, a response from the server during a normal postback includes the HTML for the entire page to render in the browser. Also, the Content-Type is set to text/html. For partial postbacks, this type is set to text/plain; and instead of the entire HTML being sent from the browser, the payload instead includes the following:
- Only the HTML rendered for regions of the UpdatePanel controls on the page
- The updated ViewState for the page
- A set of script blocks, hidden fields, and data items for managing and applying updates to the page
Figure 7.3 gives you a glimpse into the payload sent from the server in response to an asynchronous request.
Figure 7.3. The response from the server during an asynchronous postback includes uniquely formatted text that is parsed by the PageRequestManager in the browser to apply the partial-page updates.
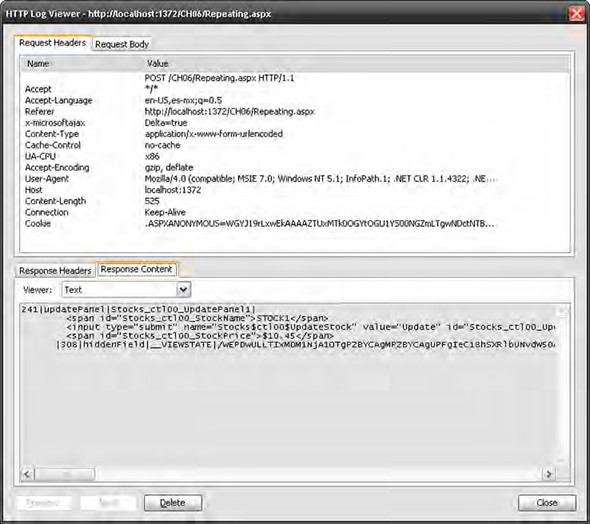
If you take a close look at the Response Content tab displayed in the bottom panel of figure 7.3, you’ll see some strangely formatted content that is part HTML and part plain text. Prefixed with an integer that signifies the size of the payload, the character | is used as a delimiter for certain keys in the text (a format only a mother could love). It’s important to note that this text shouldn’t be tampered with and is parsed by the PageRequestManager to apply the updates to the page. Considering the warning, it doesn’t mean you can’t evaluate the content and add additional logic to your script based on the data. This brings you to the last and final step of the process: evaluating the data from the server and updating the interface.
After the asynchronous postback
Going back to when the request was made, you included a callback function called _onFormSubmitCompleted. This method is now invoked in the browser to signify that the server has completed its portion of the processing. If any errors occurred, they’re also caught here in the browser and the endRequest event is raised prematurely in the client-side event model. Included in the endRequest event arguments is information about the error. If there are no errors, the pageLoading event is raised, and the PageRequestManager begins to parse the data from the response and apply the updates to the DOM. Additional scripts are also loaded at this time, and the scroll position, which was recorded before the request was sent, is restored at the end. Once complete, the pageLoaded, load, and endRequest events are raised in their respective order. At last, the partial-page rendering pattern comes to an end.
It’s time to put this valuable knowledge to work and get back to coding. The best way to come full circle with all the information we’ve introduced is to apply it.
7.2. A client-side event viewer
Often, when .NET developers are learning about the page lifecycle, they throw together an application that displays the raised events on a page. This widespread technique helps them understand the order in which the events occur, the arguments that are passed along, and ultimately what can and can’t be accomplished during each event. To reinforce your understanding of the client-side event model, you’ll build a similar application that will let you observe what happens during partial-page updates. Figure 7.4 shows the application you’ll build in this section: a client-side event viewer that hooks into the events of the PageRequestManager and Application objects.
Figure 7.4. A client-side event viewer application will let you observe how the PageRequestManager and partial-page rendering mechanism works.
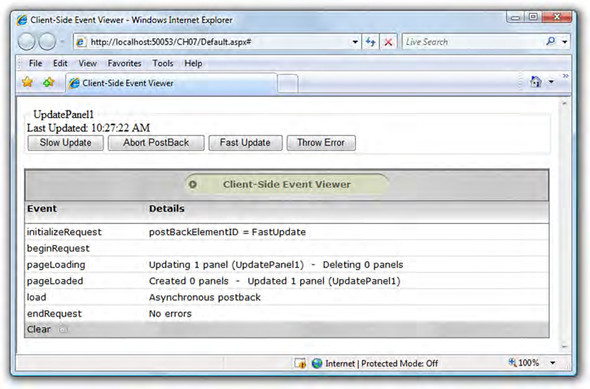
Serving as a platform for comprehending the client-side events, this learning tool also lets you experiment with different scenarios that often occur during development. The application has a little style applied to it as well (this is all about the user experience, isn’t it?). Rather than take up space displaying the stylesheet, we’ll leave that up to you to download from the book’s website if you want to produce the same look.
7.2.1. Getting started
The first step is to create a new Ajax-enabled site. Using the Visual Studio template provided by the installation package (see chapter 1 for more details), create the site and add the markup shown in listing 7.3.
Listing 7.3. The general layout for the client-side event viewer
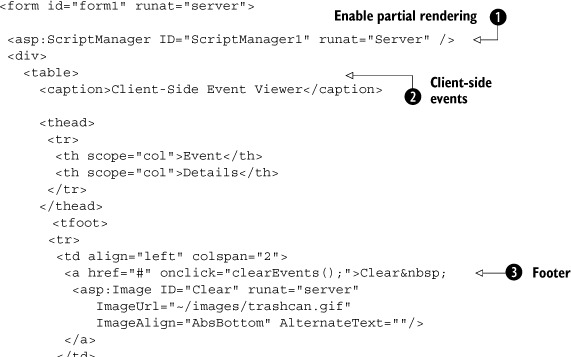
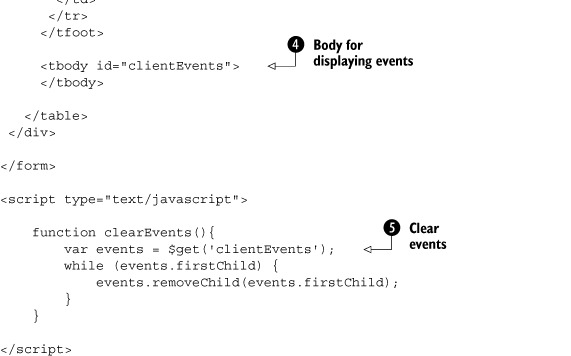
Examining the code, the first thing to notice is the required ![]() ScriptManager control at the top. With its presence and the EnablePartialRendering property set to true (the default value), the page becomes Ajax-enabled and the PageRequestManager object is available. Next is the basic
ScriptManager control at the top. With its presence and the EnablePartialRendering property set to true (the default value), the page becomes Ajax-enabled and the PageRequestManager object is available. Next is the basic ![]() table structure you use to display the client-side events. Information about each event is populated in the
table structure you use to display the client-side events. Information about each event is populated in the ![]() body of the table and can be cleared from the
body of the table and can be cleared from the ![]() footer by clicking the hyperlink that calls the
footer by clicking the hyperlink that calls the ![]() clearEvents function. Pretty straightforward so far—you’ve put together the overall UI layout and can now start working with the events.
clearEvents function. Pretty straightforward so far—you’ve put together the overall UI layout and can now start working with the events.
7.2.2. Handling client-side events
With the basic structure in place, you can begin by adding the first handlers for a few of the events raised by the Application object. Listing 7.4 demonstrates how to add the handlers and the way information about each of them is captured and displayed on the page.
Listing 7.4. Raising the init and load events with the Application object

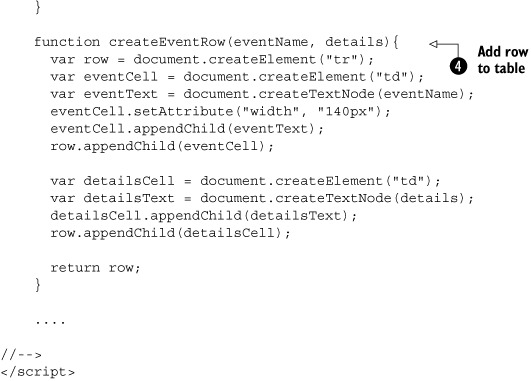
The events that you’re interested in from the Application object are ![]() init and load. The handler for the init event named
init and load. The handler for the init event named ![]() onInit updates the event viewer by adding a row to the table body. This is done by calling the local function
onInit updates the event viewer by adding a row to the table body. This is done by calling the local function ![]() createEventRow. This generic routine adds another row to the body of the table to display information about an event. You’ll use this function
throughout the section to add information about each event. For the init event, you pass in the name of the event and leave the second parameter, used to display additional details, as an empty
string.
createEventRow. This generic routine adds another row to the body of the table to display information about an event. You’ll use this function
throughout the section to add information about each event. For the init event, you pass in the name of the event and leave the second parameter, used to display additional details, as an empty
string.
Next is the load event raised by the Application object and its corresponding ![]() onLoad handler. Here, you check to see if you’re currently processing a normal postback or an asynchronous one by examining one
of the properties passed in to the event arguments: isPartialLoad. Listing 7.5 reiterates how this is done to format more information about the event.
onLoad handler. Here, you check to see if you’re currently processing a normal postback or an asynchronous one by examining one
of the properties passed in to the event arguments: isPartialLoad. Listing 7.5 reiterates how this is done to format more information about the event.
Listing 7.5. Querying the event arguments to determine whether the postback is asynchronous

The additional information is passed in to the second parameter of the createEventRow function. If you run the application now, you’ll see that both events are populated in the event viewer, which shows that you’re off to a good start and ready to handle more events.
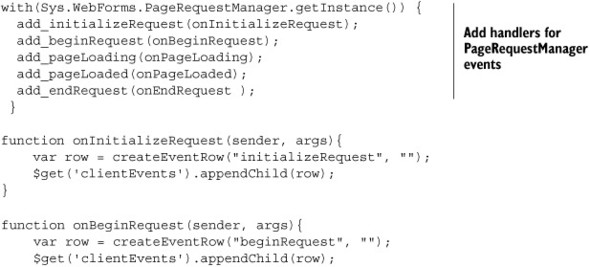
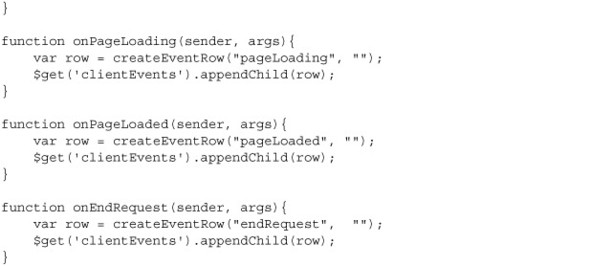
Let’s continue by addressing the events raised by the PageRequestManager. Listing 7.6 shows how to add handlers for each of those events as well as some simple code to update the event viewer.
Listing 7.6. Adding event handlers for events raised by the PageRequestManager
Note
There can be only one PageRequestManager on a page. In order to work with the object, you must retrieve an instance of it. You do so by calling the object’s static getInstance method. To cut back on some typing, we used the JavaScript with statement to leverage the same instance for all the commands that add the handlers.
The handlers are in place; now you need events to initiate a partial-page update. To keep things simple, add an UpdatePanel to the page and assign it some child controls that invoke a postback when you interact with them (see listing 7.7).
Listing 7.7. Adding an UpdatePanel control and child controls to invoke asynchronous postbacks
<asp:Panel ID="Panel1" runat="server" GroupingText="UpdatePanel1">
 <asp:UpdatePanel ID="UpdatePanel1" runat="server"
           UpdateMode="Conditional">
   <ContentTemplate>
     Last Updated: <asp:Label ID="LastUpdated1" runat="server" />
     <div>
      <asp:Button ID="Update1" runat="server" Text="Update"
         OnClick="Update_Click" />
     </div>
   </ContentTemplate>
 </asp:UpdatePanel>
</asp:Panel>
You add a Label control and a Button control as the child controls for the UpdatePanel. When the button is clicked, the text in the label is updated with the current time (a pattern used throughout the book). When the time changes, this serves as the indication that a partial update has been applied:
protected void Update_Click(object sender, EventArgs e)
{
    LastUpdated1.Text = DateTime.Now.ToLongTimeString();
}
Because the button is declaratively placed in the ContentTemplate tag of the UpdatePanel, it performs a partial postback when you interact with it. This time, when you run the application and click the Update button, the events raised by the PageRequestManager and Application object are displayed in the event viewer application. Figure 7.5 proudly displays your progress. Notice how the distinction between the types of postbacks is made during the load event.
Figure 7.5. Your progress thus far: capturing each event raised during an asynchronous postback

Let’s evaluate where you are right now before going any further. You have an application that registers a handler for each of the events raised during a partial postback. We’ve started exploring some of the arguments passed in by initially adding more logic in the load event handler.
It makes sense to continue our investigation with the first event raised by the PageRequestManager: the initializeRequest event. This important occasion is when you can abort a request or determine which request has precedence over another. Let’s continue to build out the application, resuming with how to abort a request.
7.2.3. Aborting a postback
The initializeRequest event is raised to signify the early stages of an asynchronous request. The arguments passed along with the event are of the type InitializeRequestEventArgs. Here, you can retrieve the ID of the element that invoked the request by examining its postBackElement member. In addition, based on the ID, you may decide to abort a request by calling the PageRequestManager’s abortPostBack method.
To see this in action, let’s add another button to the UpdatePanel that will give you the opportunity to abort a request. In addition, you’ll delay the logic on the server to increase the window of opportunity for aborting when the Update button is clicked. Both changes to the declarative markup and the code-behind are shown in listing 7.8.
Listing 7.8. Clicking the Abort button aborts the postback.
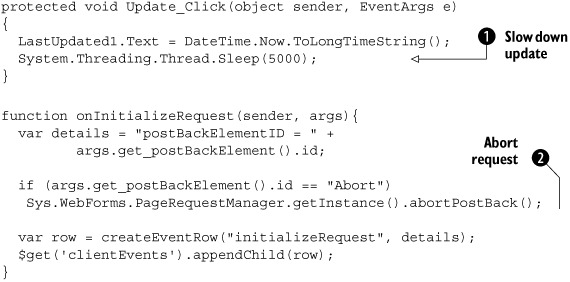
First, you put a ![]() Sleep call into the code-behind to slow down the update, essentially giving you a 5-second window (5,000 milliseconds) of opportunity
to test the abort logic. Remember, calling Sleep is only for demonstration purposes and should never be implemented in production code. Next, you compare the ID of the element
that initiated the postback with that of the Abort button on the page; if they match, you call the
Sleep call into the code-behind to slow down the update, essentially giving you a 5-second window (5,000 milliseconds) of opportunity
to test the abort logic. Remember, calling Sleep is only for demonstration purposes and should never be implemented in production code. Next, you compare the ID of the element
that initiated the postback with that of the Abort button on the page; if they match, you call the ![]() abortPostBack function in the PageRequestManager. The result is a premature end to the request.
abortPostBack function in the PageRequestManager. The result is a premature end to the request.
Note
Because the abortPostBack function is like a static method of the PageRequestManager, you can also call it outside the initializeRequest handler. In some cases, you may wish to have a simple element on the form that can abort a request at any time.
The next time you run the application and click the Abort button during the asynchronous postback, you’ll see that the request is aborted and the endRequest event is fired immediately. We encourage you to walk through this example to reinforce your understanding of how this works.
7.2.4. Managing postback priority
As we mentioned earlier, in addition to aborting a request, the initializeRequest event is also an opportunity for you to prioritize asynchronous postbacks. Because the framework handles only one request at a time, the latest one always gets sent—essentially canceling any previous request by default. At times, you may wish to take more control of this scenario by examining which element invoked the request and deciding whether it should take precedence over the current request. Or, you may wish to cancel all incoming requests until the current postback has been completed.
When the PageRequestManager’s abortPostBack function is called, all asynchronous requests are stopped and the partial-page postback is terminated. This is different than setting the cancel property in the InitializeRequestEventArgs class. Because the framework handles only one asynchronous request at a time, it naturally gives precedence to the latest request. If one request is currently being processed, but another occurs in that time, the initial request is canceled and priority is given to the latest request. You can control this behavior by examining which element invoked the request and updating the cancel property accordingly.
The InitializeRequestEventArgs class has a property called cancel. Setting the cancel property to true cancels the latest request from being sent to the server. If an asynchronous request is currently being processed, then it proceeds without any interruptions. To demonstrate, let’s add to the form another button called FastUpdate that does the same thing as the Update button, minus the Sleep call. This button demonstrates how you can assign priority to a specific request. Listing 7.9 shows the new button added to the page.
Listing 7.9. Adding a new button to assign precedence to a postback
<asp:Button ID="Update1" runat="server" Text="Update"
   OnClick="Update_Click" />
<asp:Button ID="Abort" runat="server" Text="Abort" />
<asp:Button ID="FastUpdate" runat="server" Text="Fast Update"
   OnClick="FastUpdate_Click" />
Now, when a request is made, you check to see if you’re in the middle of an asynchronous postback. If so, then you cancel the latest request to give precedence (priority) to the previous postback. To accomplish this, make the updates to the onInitializeRequest handler shown in listing 7.10.
Listing 7.10. Aborting and canceling requests during partial updates

We may be lazy, but we pride ourselves on being proactively lazy. This example makes a copy of an instance of the ![]() PageRequestManager so you can use it later in the function without all the extra typing. Next, you check to see if you’re
currently in an asynchronous postback by getting the
PageRequestManager so you can use it later in the function without all the extra typing. Next, you check to see if you’re
currently in an asynchronous postback by getting the ![]() isInAsyncPostBack property from the PageRequestManager. This makes sense because you want to abort and cancel a request only if you’re currently
in the middle of one. Finally, if the Abort button wasn’t the element that invoked the request, you set the
isInAsyncPostBack property from the PageRequestManager. This makes sense because you want to abort and cancel a request only if you’re currently
in the middle of one. Finally, if the Abort button wasn’t the element that invoked the request, you set the ![]() cancel property to true to give priority to the previous request.
cancel property to true to give priority to the previous request.
7.2.5. Notifying the user
Just before an asynchronous request is sent to the server, the PageRequestManager raises the beginRequest event. Similar to the previous example, the BeginRequestEventArgs passed into this handler includes the postBackElement property. When raised, this occurrence gives you the opportunity to notify the user about the upcoming postback before it begins. For lengthy operations, what typically happens (and is recommended) is that the user is given a visual prompt signifying that work is in progress. The prompt is removed when the process is completed. Listing 7.11 demonstrates how you add this behavior to the existing application.
Listing 7.11. Show and hide a visual prompt to the user during asychronous operations.

During the postback, the visual prompt you’d like to display to the user is declared in a div element called ![]() loadingPanel. When the onBeginRequest function is invoked, the element is displayed by
loadingPanel. When the onBeginRequest function is invoked, the element is displayed by ![]() changing its style. To complete the process, when the onEndRequest function is called, you hide the element by setting the
changing its style. To complete the process, when the onEndRequest function is called, you hide the element by setting the ![]() style back to its original state. The next step is the server-side processing of the request.
style back to its original state. The next step is the server-side processing of the request.
7.2.6. Locked and loaded
Where are you in the process? Let’s quickly recap. You’ve invoked the request and passed the stage where it could have been aborted or canceled gracefully. In addition, you’re displaying to the user an indication that an update or request is being processed—there is no turning back now!
In between the beginRequest and endRequest events raised by the PageRequestManager are two additional events that notify you about the progress of the postback on the server. The first event, pageLoading, occurs when the most recent postback has been received but before any updates to the interface are applied. Passed in to the arguments is information about which UpdatePanel controls will be updated and deleted.
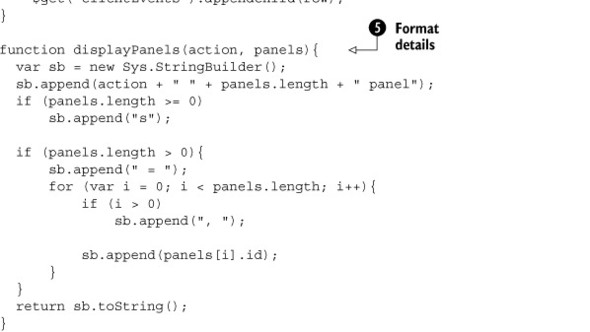
The second event, pageLoaded, is raised after the contents on the page have been rendered. This event also tells you which panels were created and updated. Listing 7.12 shows how you add this information to the event viewer application.
Listing 7.12. Determine which panels are being rendered as a result of a partial postback.
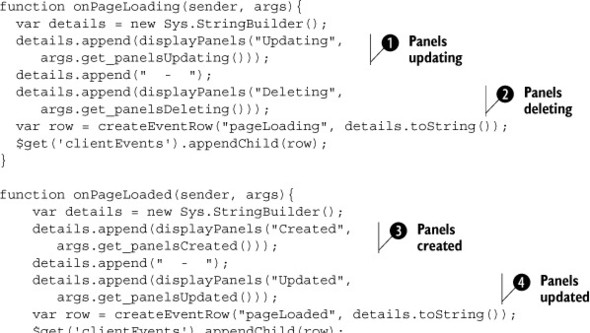
In the onPageLoading function, you retrieve the panels that are ![]() updating and
updating and ![]() deleting from the PageLoadingEventArgs object. To display information about each of them, you call a local utility function called
deleting from the PageLoadingEventArgs object. To display information about each of them, you call a local utility function called ![]() displayPanels, which formats the details for the event viewer.
displayPanels, which formats the details for the event viewer.
You follow a similar pattern in the onPageLoaded function by accessing the panels that are ![]() created and
created and ![]() updated from the PageLoadedEventArgs object. The displayPanels function is leveraged again to update the viewer. After these occurrences, the endRequest event is raised by the PageRequestManager, thus completing a successful partial-page update.
updated from the PageLoadedEventArgs object. The displayPanels function is leveraged again to update the viewer. After these occurrences, the endRequest event is raised by the PageRequestManager, thus completing a successful partial-page update.
But what if something doesn’t go smoothly? What happens when an error occurs on the server during the postback processing? This question leads us to the last feature in the event viewer project: error handling.
7.2.7. Client-side error handling
Regardless of whether an error occurs during an asynchronous postback, the PageRequestManager always raises the endRequest event. Passed into the handler for this occasion is an instance of the EndRequestEventArgs object. If an error occurs, it can be retrieved with the error property. If you decide to handle the error, you can update the errorHandled member to prevent it from being thrown on the page, resulting in an unfriendly dialog box. To validate these statements, let’s add a button to the page that throws an error when it’s clicked; see listing 7.13.
Listing 7.13. Throw an unfortunate, but polite, error.
<asp:Button ID="ThrowError" runat="server" Text="Throw Error"
  OnClick="ThrowError_Click" />
...
protected void ThrowError_Click(object sender, EventArgs e)
{
    throw new InvalidOperationException("Nice throw!");
}
Now, let’s capture the error and handle it in the event handler so it doesn’t display that unfriendly dialog box we mentioned earlier. Listing 7.14 illustrates the updated handler for the endRequest event.
Listing 7.14. Handling an error from the client
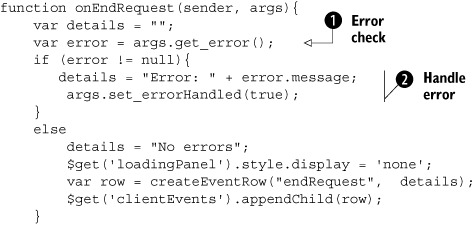
The ![]() error property is retrieved from the arguments in the handler. If an error occurs, you update the client-side event details accordingly
and set the
error property is retrieved from the arguments in the handler. If an error occurs, you update the client-side event details accordingly
and set the ![]() errorHandled property to true.
errorHandled property to true.
This completes the event viewer application! You implemented a simple (but sharp looking) application that displays the client-side events that occur during a partial-page update. In the process, you picked up valuable knowledge about each of the events and how to exert more control over the application. Let’s take this powerful knowledge a step further and begin to investigate more complex scenarios.
7.3. UpdatePanel cookbook
The beginning of this section marks an important milestone in the chapter. At this point, you should have a firm grasp of how the partial-page rendering mechanism works. You should have also picked up the tools necessary to take more control of the application during asynchronous postbacks. With this knowledge at your disposal, we can now tackle more intricate and challenging problems.
When we put together the content for this portion of the chapter, we decided to do something a bit different. First, we monitored the ASP.NET forums (see http://forums.asp.net/default.aspx?GroupID=34) for difficult problems developers were running into. We then put together a set of solutions to those problems that we could present here, after a strong foundation was established, to demonstrate both limitations and creative techniques. Sometimes, when technical books present this type of format, they call it a cookbook—hence the title for the section. What follows are the recipes for success.
7.3.1. Why is the UpdatePanel slow?
Sometimes, when the UpdatePanel contains many controls, a significant drop in performance occurs. As partial postbacks are invoked, the controls in the UpdatePanel begin to take a long time to render. This is most commonly observed when a GridView is used, particularly when many rows are displayed on the control.
Figure 7.6 shows the steps that occur after the server-processing portion of an asynchronous postback is complete.
Figure 7.6. After returning from an asynchronous postback, all the components associated with elements in the UpdatePanel are disposed.

Just before the old markup is replaced with the updated HTML, all the DOM elements in the panel are examined for Microsoft Ajax behaviors or controls attached to them. To avoid memory leaks, the components associated with DOM elements are disposed, and then destroyed when the HTML is replaced. As the number of elements in the page region increases, this phase of the partial-page update can take a while.
Solution
The following solution works only if the elements in the UpdatePanel aren’t associated with any Microsoft Ajax components or behaviors, including extenders. By disassociating the GridView from its parent node, the PageRequestManager bypasses the time-consuming step of checking for any leaks in the elements. Listing 7.15 demonstrates how this can be accomplished with a GridView control.
Listing 7.15. Removing the parent node to speed up the rending process
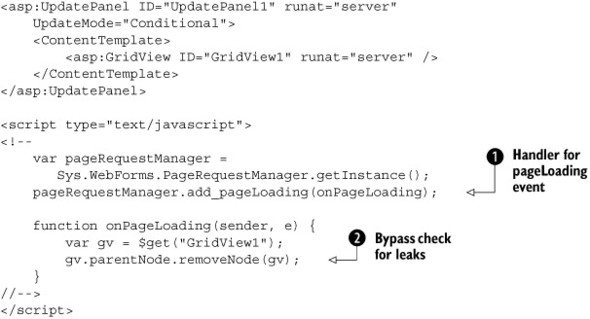
If you subscribe to the ![]() pageLoading event raised by the PageRequestManager, then you can get a reference to the GridView’s container element and
pageLoading event raised by the PageRequestManager, then you can get a reference to the GridView’s container element and ![]() remove it. As a result, the PageRequestManager won’t iterate through the elements in the GridView, and the new HTML will
replace the old.
remove it. As a result, the PageRequestManager won’t iterate through the elements in the GridView, and the new HTML will
replace the old.
Tip
If you have multiple controls in an UpdatePanel that are also not associated with any behaviors or components, try placing them in a common container element, such as a div. Then, you can remove the parent node of the common container element instead of removing the container for each of the controls.
We hope that enhancement will come in handy one day. Next, let’s talk about how to handle dynamic scripts.
7.3.2. Inject JavaScript during a partial postback
If you’ve ever inserted dynamic JavaScript into a page, then you’re most likely familiar with the ClientScriptManager class. Accessible through the Client-Script property of the Page instance, this class exposes a number of useful methods. Among these methods are techniques for inserting JavaScript code and code blocks into a page:
- RegisterClientScriptBlock— Injects JavaScript code anywhere on the page, depending on when the method is called
- RegisterStartupScript— Injects JavaScript at the end of the page, ensuring that the script is parsed and loaded after the page has been rendered by the browser
- RegisterClientScriptInclude— Injects a script tag with an src attribute that specifies the location of a JavaScript file to load
- RegisterClientScriptResource— Similar to the previous call, except the src attribute specifies the location of a JavaScript file embedded in an assembly as a web resource
If you’ve called any of these methods during an asynchronous postback, you may have noticed that they no longer work reliably, and in most cases don’t work at all. When an asynchronous postback occurs, the PageRequestManager anticipates that the data coming from the server is formatted in a special way. Earlier, in section 7.1.2, we mentioned this awkward format by examining what gets returned from the server as a response to an asynchronous request. Along with the new HTML for the page, the incoming payload includes the updated ViewState of the page and other helpful information. Because these methods were around long before ASP.NET AJAX came into the picture, it makes sense that they no longer work in this context—they don’t comply with the new format. What is the solution?
When you’re working with UpdatePanel controls and partial postbacks, you must use a set of APIs provided by the ScriptManager that supplements the previously mentioned methods. Luckily, the methods are basically the same to the caller—taking in an additional parameter that defines what invoked the script (the Page or a Control). These methods are aware of the format the PageRequestManager expects and configure the injected script accordingly so the incoming data from the server can be interpreted in the browser.
If you’ve wrapped a web control in an UpdatePanel and would like to inject script into the page, you must use the methods provided by the ScriptManager to make it compatible. In addition, if you’re using third-party controls that no longer work in an UpdatePanel, the reason is most likely that they call the traditional methods for injecting script into the page. For a resolution, download and install the latest patches or updates from the vendor to add support for ASP.NET AJAX.
Listing 7.16 demonstrates how to use one of the new APIs provided by the ScriptManager to inject JavaScript at the end of the page.
Listing 7.16. Registering script with the ScriptManager ensures that it’s UpdatePanel-compatible.
string msg = string.Format("alert("{0}");",
                          "You've done this before, haven't you?");

ScriptManager.RegisterStartupScript(TestButton, typeof(Button),
                                   "clickTest",
                                    msg, true);
In this example, you format the message—a simple alert call—and then call the ScriptManager’s static RegisterStartupScript method to dynamically place script at the end of the page. The only difference in the method call is the first parameter, which you use to pass in the instance of the Button control that invoked the insert.
Because we’re on the topic of things that you must change in existing and previous code, let’s look at those useful validator controls we’ve been so faithful to over the years.
7.3.3. Getting the validators to work
Just like the registered scripts in the previous section, you may also have noticed during your ASP.NET AJAX development that the ASP.NET 2.0 validator controls aren’t compatible with the UpdatePanel. As a temporary fix, the ASP.NET team has released the source code for a set of compatible validator controls.
Note
At the time of this writing, the controls are available as a download that you must apply. Future plans are to deploy the new validator controls through the Windows Update mechanism. If you’ve already installed this update, you can skip this section.
To replace the old controls with the new and improved ones, you must compile the source code and then reference the assemblies for your website (we also provide the assemblies in the source code for this chapter, on the book’s website). You can do this by using the Add Reference dialog in Visual Studio. When you’re developing a website (in contrast to a web application project) you can also copy the binaries into the bin folder and then refresh the folder.
After you add the references to the new controls, you have to make a few modifications to the site’s web.config file to complete the transition. What’s left is to use a technique called tag mapping to re-map the old controls to the new ones in an elegant fashion. This method allows you to preserve all the declarative code you’ve implemented with the existing validator controls. The other advantage of this approach is that when the new validator controls are eventually deployed from Windows Update, the only changes you’ll have to make are removing the compiled binaries (DLL files) from the bin folder and the tag-mapping setting in web.config.
Listing 7.17 shows how to apply the tag mapping to the web.config file.
Listing 7.17. Exchange existing validators with the new set while preserving the tag.
<tagMapping>
    <add tagType="System.Web.UI.WebControls.CompareValidator"
      mappedTagType="Sample.Web.UI.Compatibility.CompareValidator,
           Validators,
      Version=1.0.0.0"/>
    <add tagType="System.Web.UI.WebControls.CustomValidator"
      mappedTagType="Sample.Web.UI.Compatibility.CustomValidator,
        Validators,
        Version=1.0.0.0"/>
    <add tagType="System.Web.UI.WebControls.RangeValidator"
      mappedTagType="Sample.Web.UI.Compatibility.RangeValidator,
        Validators,
        Version=1.0.0.0"/>
    <add tagType="System.Web.UI.WebControls.RegularExpressionValidator" mappedTagType="Sample.Web.UI.Compatibility. RegularExpressionValidator,
      Validators, Version=1.0.0.0"/>
    <add tagType="System.Web.UI.WebControls.RequiredFieldValidator" mappedTagType="Sample.Web.UI.Compatibility. RequiredFieldValidator,
      Validators, Version=1.0.0.0"/>
    <add tagType="System.Web.UI.WebControls.ValidationSummary"
      mappedTagType="Sample.Web.UI.Compatibility.ValidationSummary,
      Validators, Version=1.0.0.0"/>
</tagMapping>
Keeping up the pace of resolving complex issues, the next challenge is one you may have come across recently in your ASP.NET AJAX development. If not, you’ll most likely be faced with it someday soon.
7.3.4. Sys.WebForms.PageRequestManagerParseErrorException
While working with the UpdatePanel control, you’ll probably run into this long but descriptive exception. Although this message may sound more like a medical procedure than something you’d expect from the PageRequestManager, its expressive name is informative.
In earlier sections, we touched on the special format the PageRequestManager expects from a server response. A previous example showed you how to replace some of the register script calls from the ClientScriptManager class with the new and improved methods offered by the ScriptManager. This solution eliminated a lot of the headaches for working with dynamic scripts on the page. However, there are a few more cases where parsing errors are still prevalent. What follows is a list of the most common causes that throw this exception, as well as their respective solutions. Each of these scenarios involves the UpdatePanel control:
- Calling Response.Write—Normally, you use this as a debugging tool. If you’re working locally, you may want to consider using the Sys.Debug class in the Microsoft Ajax Library or writing to a Label control on the form. Because Response.Write doesn’t comply with the format that the PageRequestManager expects, PageRequestManager fails to parse it.
- Using Server.Transfer—Because the client expects only fragments of the page in return, not a new page, it becomes confused and can’t update the interface when it’s presented with a new set of elements in the DOM. If you must call Server.Transfer from an UpdatePanel, register the control (either declaratively or programmatically) that invokes the call as a PostBackTrigger (see chapter 6 for more details about triggers) or place it outside the UpdatePanel if possible.
- Server trace is enabled— Tracing uses Response.Write, which brings us back to the first noted issue. Searching for alternatives to tracing and debugging is your best approach.
To round off your understanding of the UpdatePanel and partial-page updates, let’s look at some of the current limitations.
7.4. Caveats and limitations
As much as we love the partial-page rendering mechanism, it has its limitations. In this section, we’ll point out some of the gotchas that you may come across during development. Although some limitations have possible workarounds, a client-centric approach (see chapter 1 for development scenarios) can sometimes alleviate a few of these restraints. Often, it’s best to leverage both models (client- and server-centric development) to get the best out of each of them and at the same time let them complement each other.
7.4.1. Asynchronous requests are sequential
Normal postbacks occur sequentially because each postback, in effect, returns a new page. This model is applied to asynchronous postbacks as well, primarily because of the complexity involved in maintaining the page state during a postback. ViewState, for example, is commonly used to persist the state of items on a page. Now, imagine that several calls were handled asynchronously—it would become extremely challenging, and close to impossible, to merge the changes made to the page between requests. For stability, asynchronous requests from the browser are handled one at a time.
7.4.2. Unsupported ASP.NET 2.0 controls
In ASP.NET 2.0, a few server controls currently don’t work with the UpdatePanel. The TreeView, Menu, and FileUpload server controls deliver unexpected results when they’re registered as triggers for partial-page updates. In the next version of the .NET framework and Visual Studio (codename Orcas), most issues related to these controls will be resolved. For now, alternatives are to leverage third-party vendor controls or to not place them in the UpdatePanel.
7.5. Summary
You learned in this chapter that the partial-page rendering mechanism is more than a set of special server controls. We exposed a client-side counterpart to the server controls called the PageRequestManager, which does most of the work to make all this happen. Most importantly, you gained insight into how the UpdatePanel works under the hood. With this knowledge, you can now take more control of your applications and solve complex situations that you couldn’t before. In addition, we explored limitations and issues of the ASP.NET AJAX framework, to keep you on your toes.
The next chapter takes you on a journey into how client-side components are authored with the Microsoft Ajax Library.
