
Chapter 2. A first unit test
- Exploring unit-testing frameworks in .NET
- Writing our first test with NUnit
- Working with the NUnit attributes
- Understanding indirect state testing
When I first started writing unit tests with a real unit-testing framework, there was little documentation, and the frameworks I worked with did not have proper examples. (I was mostly coding in VB 5 and 6 at the time.) It was a challenge learning to work with them, and I started out writing rather poor tests. Fortunately, times have changed.
This chapter will get you started writing tests even if you have no idea where to start. It will get you well on your way to writing real-world unit tests with a framework called NUnit—a .NET unit-testing framework. It’s my favorite framework in .NET for unit testing because it’s easy to use, easy to remember, and has lots of great features.
There are other frameworks in .NET, including some with more features, but NUnit is where I always start. I sometimes then expand to a different framework if the need arises. We’ll look at how NUnit works, its syntax, and how to run it and get feedback when the test fails or passes. To accomplish this, I’ll introduce a small software project that we’ll use throughout the book to explore the testing techniques and best practices.
First, we need to look at what a unit-testing framework is, and at what it enables us to do that we couldn’t and wouldn’t have done without it.
2.1. Frameworks for unit testing
Consider the advantages an integrated development environment (IDE) gives you as a developer. Unit-testing frameworks offer similar advantages for testing.
To this day, in many IDEs for other environments (such as Unix), the steps involved in getting a final binary output from your code aren’t as simple, and may require manually calling other external tools to do parts of this big task. When using a modern IDE like Visual Studio .NET or Eclipse for Java, you do all your coding tasks within that environment, in a structured manner. You write the code, you compile it, you build any resources (like graphics and text) into it, and you create the final binary—all that building and compiling with no more than a couple of keystrokes.
Doing things completely manually would be error-prone and time-consuming, and people would defer doing that as much as possible. These problems are alleviated by tooling. In the same way, unit-testing frameworks help developers write tests more quickly with a set of known APIs, execute those tests automatically, and review the results of those tests easily.
2.1.1. What unit-testing frameworks offer
Up to now, the tests you’ve done were limited:
- They were not structured. You had to reinvent the wheel every time you wanted to test a feature. One test might look like a console application, another uses a UI form, and another uses a web form. You don’t have that time to spend on testing, and the tests fail the “easy to implement” requirement.
- They were not repeatable. Neither you nor your team members could run the tests you’d written in the past. That breaks the “repeatedly” requirement and prevents you from finding regression bugs. With a framework, you can more easily and automatically write tests that are repeatable.
- They were not on all your code. The tests didn’t test all the code that matters. That means all the code with logic in it, because each and every one of those could contain a potential bug. (Property getters and setters don’t count as logic, unless you have some sort of logic inside them.) If it were easier to write the tests, you’d be more inclined to write more of them, and get better coverage.
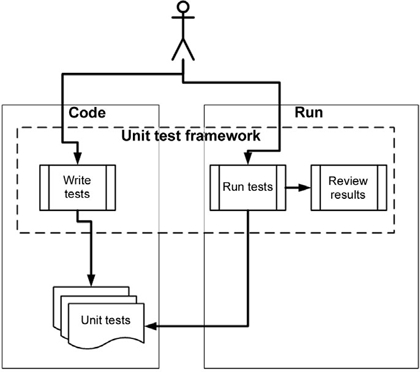
In short, what you’ve been missing is a framework for writing, running, and reviewing unit tests and their results. Figure 2.1 shows the areas in software development where a unit-testing framework has influence.
Figure 2.1. Unit tests are written as code, using libraries from the unit-testing framework. Then the tests are run from a separate unit-testing tool, and the results are reviewed (either in the UI or as text) by the developer or an automated build process.
Unit-testing frameworks are code libraries and modules that help developers unit-test their code, as outlined in table 2.1. They also have another side—running the tests as part of an automated build, which I cover in later chapters.
Table 2.1. How unit-testing frameworks help developers write and execute tests, and review results
|
Unit-testing practice |
How the framework helps |
|---|---|
|
Write tests easily and in a structured manner. |
Framework supplies the developer with a class library that holds
|
|
Execute one or all of the unit tests. |
Framework provides a test runner (a console or GUI tool) that
|
|
Review the results of the test runs. |
The test-runners will usually provide information such as
|
At the time of this writing, there are more than 150 unit-testing frameworks out there—practically one for every programming language in public use. A good list can be found at http://www.xprogramming.com.Consider that .NET, alone, has at least 9 different unit-testing frameworks; among these, NUnit is the de facto standard.
Note
Using a unit-testing framework doesn’t ensure that the tests we write are readable, maintainable, or trustworthy, or that they cover all the logic we’d like to test. We’ll look at how to ensure that our unit tests have these properties in chapter 7 and in various other places throughout this book.
2.1.2. The xUnit frameworks
Collectively, these unit-testing frameworks are called the xUnit frameworks, because their names usually start with the first letters of the language for which they were built. You might have CppUnit for C++, JUnit for Java, NUnit for .NET, and HUnit for the Haskell programming language. Not all of them follow these naming guidelines, but most of them do.
In this book, we’ll be using NUnit, a .NET unit-testing framework that makes it easy to write tests, run them, and get the results. NUnit started out as a direct port of the ubiquitous JUnit for Java, and has since made tremendous strides in its design and usability, setting it apart from its parent and breathing new life into an ecosystem of test frameworks that’s changing more and more. The concepts we’ll be looking at will be understandable to Java and C++ developers alike.
2.2. Introducing the LogAn project
The project that we’ll use for testing in this book will be simple at first, and will only contain one class. As the book moves along, we’ll extend that project with new classes and features. We’ll call it the LogAn project (short for “log and notification”).
Here’s the scenario. Your company has many internal products it uses to monitor its applications at customer sites. All these products write log files and place them in a special directory. The log files are written in a proprietary format that your company has come up with that can’t be parsed by any existing third-party tools. You’re tasked with building a product, LogAn, that can analyze these log files and find various special cases and events in them. When it finds these cases and events, it should alert the appropriate parties.
In this book, we’ll write tests that verify LogAn’s parsing, event-recognition, and notification abilities. Before we get started testing our project, though, we’ll look at how to write a unit test with NUnit. The first step is installing it.
2.3. First steps with NUnit
As with any new tool, you’ll need to install it first. Because NUnit is open source and freely downloadable, this task should be rather simple. Then we’ll see how to start writing a test with NUnit, use the various built-in attributes that NUnit ships with, and run our test and get some real results.
2.3.1. Installing NUnit
You can download NUnit from www.NUnit.org or www.NUnit.com.NUnit is free to use and is an open source product, so you can get the source code for NUnit, compile it yourself, and use the source freely within the limits of the open source license. (See the license.txt file in the program directory for license details.)
Note
At the time of writing, the latest version of NUnit is 2.2.8. The examples in this book should be compatible with most future versions of the framework.
To install NUnit, run the setup program you downloaded. The installer will place a shortcut to the GUI part of the NUnit runner on your desktop, but the main program files should reside in a directory named something like c:Program FilesNUnit-Net-2.0 2.2.8. If you double-click the NUnit desktop icon, you’ll see the unit test runner shown in figure 2.2.
Figure 2.2. The NUnit GUI is divided into three main parts: the tree listing the tests on the left, messages and errors at the top right, and stack trace information at the bottom right.

We’ll be using this GUI to run our tests shortly.
2.3.2. Loading up the solution
If you have the book’s code on your machine, load up the ArtOfUnitTesting.sln solution from the Code folder inside Visual Studio 2008.
Note
The C# Express Edition of Visual Studio 2008 (or above) is fine for use with this book.
We’ll begin by testing the following simple class with one method (the unit we’re testing) inside it:
|
public class LogAnalyzer |
This method may not seem complicated, but we’ll test it to make sure it works. In the real world, you’ll want to test any method that contains logic, even if it seems to be simple. Logic can fail, and we want to know when it does. In the following chapters, we’ll test more complicated scenarios and logic.
The method looks at the file extension to determine whether a file is a valid log file or not. Our first test will be to send in a valid filename, and make sure the method returns true.
Here are the first steps for writing an automated test for the IsValidLogFileName method:
1.
Add a new class library project to the solution, which will contain your test classes.
2.
To that library, add a new class that will hold your test methods.
3.
Add a new method to the preceding test case named IsValidLogFileName.
We’ll touch more on test-naming and arrangement standards later in the book, but the basic rules are listed in table 2.2.
Table 2.2. Basic rules for placing and naming tests
|
Object to be tested |
Object to create on the testing side |
|---|---|
|
Project |
Create a test project named [ProjectUnderTest].Tests. |
|
Class |
For each class, create at least one class with the name [ClassName]Tests. |
|
Method |
For each method, create at least one test method with the following name: [MethodName]_[StateUnderTest]_[ExpectedBehavior]. |
For example, the name for our LogAn test project would be AOUT.Logan.Tests (with AOUT standing for Art of Unit Testing). The name for the LogAnalyzer test class would be LogAnalyzerTests.
Here are the three parts of the test method name:
- MethodName— The name of the method you’re testing
- StateUnderTest— The conditions used to produce the expected behavior
- ExpectedBehavior— What you expect the tested method to do under the specified conditions
In our test of the IsValidLogFileName method, the state or condition is that we’re sending the method a valid filename, and the expected behavior is that the method will return a true value. Our test method name might be IsValidFileName_validFile_ReturnsTrue().
We haven’t used the NUnit test framework yet, but we’re close. We still need to add a reference to the project under test for the new testing project. Do this by right-clicking on the test project and selecting Add Reference. Then select the Projects tab and select the LogAn project.
The next thing to learn is how to mark the test method to be loaded and run by NUnit automatically.
2.3.3. Using the NUnit attributes in your code
NUnit uses an attribute scheme to recognize and load tests. Just like bookmarks in a book, these attributes help the framework identify the important parts in the assembly that it loads, and which parts are tests that need to be invoked.
NUnit provides an assembly that contains these special attributes. You just need to add a reference in your test project (not in your production code!) to the NUnit.Framework assembly. You can find it under the .NET tab in the Add Reference dialog box. Type Nunit and you’ll see several assemblies starting with that name; add nunit.framework.
NUnit needs at least two attributes to know what to run:
- [TestFixture] —The [TestFixture] attribute denotes a class that holds automated NUnit tests. (If you replace the word “Fixture” with “Class”, it makes much more sense.) Put this attribute on your new LogAnalyzerTests class.
- [Test] —The [Test] attribute can be put on a method to denote it as an automated test to be invoked. Put this attribute on your new test method.
When you’re done, your test code should look like this:
|
[TestFixture] |
Tip
NUnit requires test methods to be void and accept no parameters.
At this point, you’ve marked your class and a method to be run. Now, whatever code you put inside your test method will be invoked by NUnit whenever you want.
2.4. Writing our first test
How do we test our code? A unit test usually comprises three main actions:
- Arrange objects, creating and setting them up as necessary.
- Act on an object.
- Assert that something is as expected.
Here’s a simple piece of code that does all three, with the assert part performed by the NUnit framework’s Assert class:
|
[Test] |
Before we go on, you’ll need to know a little more about the Assert class, because it’s an important part of writing unit tests.
2.4.1. The Assert class
The Assert class has static methods and is located in the NUnit.Framework namespace. It’s the bridge between your code and the NUnit framework, and its purpose is to declare that a specific assumption is supposed to exist. If the arguments that are passed into the Assert class turn out to be different than what we’re asserting, NUnit will realize the test has failed and will alert us. We can optionally tell the Assert class what message to alert us with if the assertion fails.
The Assert class has many methods, with the main one being Assert.IsTrue (some Boolean expression), which verifies a Boolean condition. But there are many other methods.
This one verifies that an expected object or value is the same as the actual one:
Assert.AreEqual(expectedObject, actualObject, message);
Here’s an example:
Assert.AreEqual(2, 1+1, "Math is broken");
This one verifies that the two arguments reference the same object:
Assert.AreSame(expectedObject, actualObject, message);
Assert.AreSame(int.Parse("1"),int.Parse("1"),
  "this test should fail").
Assert is simple to learn, use, and remember.
Now that we’ve covered the basics of the API, let’s run a test
2.4.2. Running our first test with NUnit
It’s time to run our first test and see if it passes or not. To do that, we need to have a build assembly (a .dll file in this case) that we can give to NUnit to inspect. After you build the project, locate the path to the assembly file that was built.
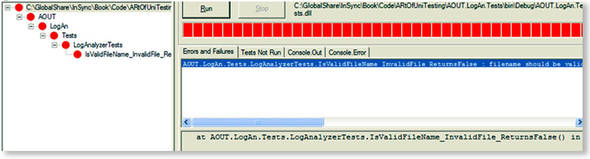
Then, load up the NUnit GUI and select File > Open. Enter the name of your test’s assembly. You’ll see your single test and the class and namespace hierarchy of your project on the left, as shown in figure 2.3. Click the Run button to run your tests. The tests are automatically grouped by namespace (assembly, typename) so you can pick and choose to run only by specific types or namespaces. (You’ll usually want to run all of the tests to get better feedback on failures.)
Figure 2.3. NUnit test failures are shown in three places: the test hierarchy on the left becomes red, the progress bar at the top becomes red, and any errors are shown on the right.
As you can see, we have a failing test, which might suggest that there’s a bug in the code. It’s time to fix the code and see the test pass.
2.4.3. Fixing our code and passing the test
A quick look through the code reveals that we’re testing for an uppercase filename extension, and our test is sending in a lowercase filename extension, which makes our code return false instead of true. Our test could also have failed if our code threw an exception of any kind. An unhandled exception in your code is considered a failure, unless your code is supposed to throw an exception under specific circumstances. (We’ll see how to test for deliberate exceptions in section 2.5.2.)
If we fix the if statement in the production code to look like this, we can make the test pass:
if(!fileName.ToLower().EndsWith(".slf"))
But this is a sign that the name of our test may need changing, and that we need another test to make sure that sending in an uppercase extension works. (We know that it works now, but who’s to say that some programmer working on this feature won’t break it in the future?) A better name for our current test might be IsValidFileName_validFileLowerCased_ReturnsTrue().
If you rebuild the solution now, you’ll find that NUnit’s GUI can detect that the assembly has changed, and it will automatically reload the assembly in the GUI. If you rerun the tests, you’ll see that the test passes with flying (green) colors.
2.4.4. From red to green
NUnit’s GUI is built with a simple idea in mind: all the tests should pass in order to get the “green” light to go ahead. If even one of the tests fails, you’ll see a red light on the top progress bar to let you know that something isn’t right with the system (or your tests).
The red-green concept is prevalent throughout the unit-testing world, and especially in test-driven development (TDD). Its mantra is “Red-Green-Refactor,” meaning that you start with a failing test, then pass it, and then make your code readable and more maintainable.
2.5. More NUnit attributes
Now that you’ve seen how easy it is to create unit tests that run automatically, we’ll look at how to set up the initial state for each test, and how to remove any garbage that’s left by your test.
A unit test has specific points in its lifecycle that you’ll want to have control over. Running the test is only one of them, and there are special setup methods that run before each test run, as we’ll see in the next section.
2.5.1. Setup and teardown
For unit tests, it’s important that any leftover data or instances from previous tests are destroyed and that the state for the new test is recreated as if no tests have been run before. If you have leftover state from a previous test, you might find that your test fails, but only if it’s run after a different test, and it passes other times. Locating that kind of dependency bug between tests is difficult and time-consuming, and I don’t recommend it to anyone. Having tests that are totally independent of each other is one of the best practices I will be covering in part 2 of this book.
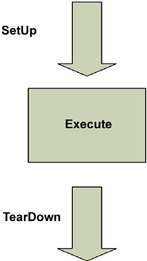
In NUnit, there are special attributes that allow easier control of setting up and clearing out state before and after tests. These are the [SetUp] and [TearDown] action attributes. Figure 2.4 shows the process of running a test with setup and teardown actions.
Figure 2.4. NUnit performs setup and teardown actions before each and every test method.
For now, make sure that each test you write uses a new instance of the class under test, so that no leftover state will mess up your tests.
We can take control of what happens in the setup and teardown steps by using two NUnit attributes:
- [SetUp]— This attribute can be put on a method, just like a [Test] attribute, and it causes NUnit to run that setup method each time it runs any of the tests in your class.
- [TearDown]— This attribute denotes a method to be executed once after each test in your class has executed.
Listing 2.1 shows how we can use the [SetUp] and [TearDown] attributes to make sure that each test receives a new instance of LogAnalyzer, while also saving some repetitive typing.
Listing 2.1. Using [SetUp] and [TearDown] attributes
using NUnit.Framework;

namespace AOUT.LogAn.Tests
{
   [TestFixture]
    public class LogAnalyzerTests
    {
        private LogAnalyzer m_analyzer=null;

        [SetUp]
        public void Setup()
        {
            m_analyzer = new LogAnalyzer();
        }

        [Test]
         public void IsValidFileName_validFileLowerCased_ReturnsTrue()
         {
             bool result =
  m_analyzer.IsValidLogFileName("whatever.slf");

            Assert.IsTrue(result, "filename should be valid!");
         }

  [Test]
   public void IsValidFileName_validFileUpperCased_ReturnsTrue()
   {
            bool result =
  m_analyzer.IsValidLogFileName("whatever.SLF");

            Assert.IsTrue(result, "filename should be valid!");
        }

        [TearDown]
         public void TearDown()
         {
            m_analyzer = null;
         }
     }
}
You can think of the setup and teardown methods as constructors and destructors for the tests in your class. You can only have one of each in any test class, and each one will be performed once for each test in your class. In listing 2.1 we have two unit tests, so the execution path for NUnit will be something like that shown in figure 2.5.
Figure 2.5. How NUnit calls SetUp and TearDown with multiple unit tests in the same class: each test is preceded by running SetUp and followed by a TearDown method run.

NUnit contains several other attributes to help with setup and cleanup of state. For example, [TestFixtureSetUp] and [TestFixtureTearDown] allow setting up state once before all the tests in a specific class run, and once after all the tests have been run (once per test fixture). This is useful when setting up or cleaning up takes a long time, and you want to only do it once per fixture. You’ll need to be cautious about using these attributes. You may find that you’re sharing state between tests if you’re not careful.
Next, we’ll look at how we can test that an exception is thrown by our code when it should be.
2.5.2. Checking for expected exceptions
One common testing scenario is making sure that the correct exception is thrown from the tested method when it should be.
Let’s assume that our method should throw an ArgumentException when we send in an empty filename. If our code doesn’t throw an exception, it means our test should fail. We’re going to test the method logic in listing 2.2.
Listing 2.2. The LogAnalyzer filename-validation logic we’d like to test
public class LogAnalyzer
    {
        public bool IsValidLogFileName(string fileName)
        {
            if(String.IsNullOrEmpty(fileName))
            {
                throw new ArgumentException("No filename provided!");
            }
            if(!fileName.EndsWith(".SLF"))
            {
                return false;
            }
            return true;
        }
    }
There’s a special attribute in NUnit that helps us test exceptions: the [ExpectedException] attribute. Here’s what a test that checks for the appearance of an exception might look like:
|
[Test] |
There are several important things to note here:
- The expected exception message is provided as a parameter to the [ExpectedException] attribute.
- There’s no Assert call in the test itself. The [ExpectedException] attribute contains the assert within it.
- There’s no point getting the value of the Boolean result from the method because the method call is supposed to trigger an exception.
Given the method in listing 2.2 and the test for it, this test should pass. Had our method not thrown an ArgumentException, or had the exception’s message been different than the one expected, our test would have failed—saying either that an exception was not thrown or that the message was different than expected.
2.5.3. Ignoring tests
Sometimes you’ll have tests that are broken and you still need to check in your code to the main source tree. In those rare cases (and they should be rare!), you can put an [Ignore] attribute on tests that are broken because of a problem in the test, not in the code.
|
[Test] |
Running this test in the NUnit GUI will produce a result like that shown in figure 2.6.
Figure 2.6. In NUnit, an ignored test is marked in yellow (the middle test), and the reason for not running the test is listed under the Tests Not Run tab on the right.

What happens when you want to have tests running not by a namespace but by some other type of grouping? That’s where test categories come in.
2.5.4. Setting test categories
You can set up your tests to run under specific test categories, such as slow tests and fast tests. You do this by using NUnit’s [Category] attribute:
|
[Test] |
When you load your test assembly again in NUnit, you can see them organized by categories instead of namespaces. Switch to the Categories tab in NUnit, and double-click the category you’d like to run so that it moves into the lower Selected Categories pane. Then click the Run button. Figure 2.7 shows what the screen might look like after you select the Categories tab.
Figure 2.7. You can set up categories of tests in the code base and then choose a particular category to be run from the NUnit GUI.

So far, we’ve run simple tests against methods that return some value as a result. What if our method doesn’t return a value, but changes some state in the object?
2.6. Indirect testing of state
Throughout this chapter and the next, we’ll be using state-based testing methods in our unit tests.
Definition
State-based testing (also called state verification) determines whether the exercised method worked correctly by examining the state of the system under test and its collaborators (dependencies) after the method is exercised.
Let’s consider a simple state-based testing example using the LogAnalyzer class, which we can’t test simply by calling one method in our test. Listing 2.3 shows the code for this class.
Listing 2.3. Testing the property value by calling IsValidLogFileName
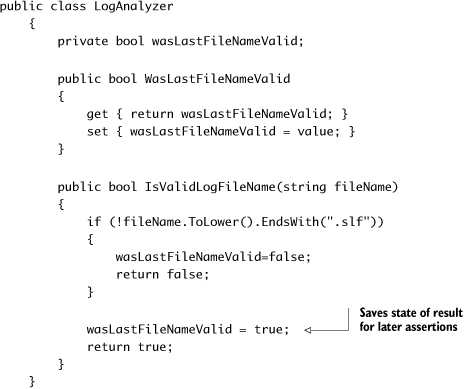
As you can see in this code, LogAnalyzer remembers what the last outcome of a validation check was. Because the logic depends on having another method invoked first, we can’t simply test this functionality by writing a test that gets a return value from a method; we have to use alternative means to see if the logic works.
First, we have to identify where the logic we’re testing is located. Is it in the new property called wasLastFileNameValid? Not really; it’s in the IsValidLogFileName method, so our test should start with the name of that method. Listing 2.4 shows a simple test to see if the outcome is remembered.
Listing 2.4. Testing a class by calling a method and checking the value of a property
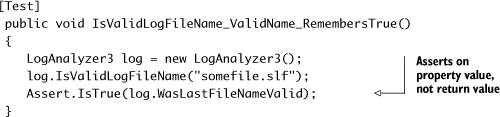
Notice that we’re testing the functionality of the IsValidLogFileName method by asserting against code in a different location than the piece of code under test.
Listing 2.5 shows another example (that will be used again in chapter 3). This one looks into the functionality of a built-in memory calculator. (Take a look at Calculator.cs under CH3 and CalculatorTests.cs in the book’s sample code.)
Listing 2.5. The Add() and Sum() methods
public class Calculator
    {
        private int sum=0;

        public void Add(int number)
        {
         sum+=number;
        }

        public int Sum()
        {
            int temp = sum;
            sum = 0;
            return temp;
        }
    }
The Calculator class works a lot like the pocket calculator you know and love. You can click a number, then click Add, then click another number, then click Add again, and so on. When you’re done, you can click Equals and you’ll get the total so far.
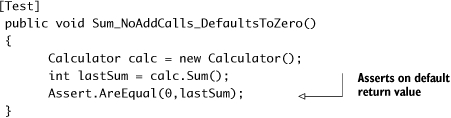
Where do you start testing the Sum() function? You should always consider the simplest test to begin with, such as testing that Sum() returns 0 by default. This is shown in listing 2.6.
Listing 2.6. The simplest test for Calculator’s Sum()
We can’t write any other test without first invoking the Add() method, so our next test will have to call Add() and assert against the number returned from Sum(). Listing 2.7 shows our test class with this new test.
Listing 2.7. The two tests, with the second one calling the Add() method

Notice that this time the tests initialize the Calculator object in a [SetUp]-related method. This is a good idea, because it saves time writing the tests, makes the code smaller, and makes sure Calculator is always initialized the same way. It’s also better for test maintainability, because if the constructor for Calculator changes, you only need to change the initialization in one place instead of going through each test and changing the new call.
So far, so good. But what happens when the method we’re testing depends on an external resource, such as the filesystem, a database, a web service, or anything else that’s hard for us to control? That’s when we start creating test stubs, fake objects, and mock objects, which are discussed in the next few chapters.
2.7. Summary
In this chapter, we looked at using NUnit to write simple tests against simple code. We used the [SetUp] and [TearDown] attributes to make sure our tests always use new and untouched state. We used [Ignore] to skip tests that need to be fixed. Test categories can help us group tests in a logical way rather than by class and namespace, and [ExpectedException] helps us make sure our code throws exceptions when it should. Finally, we looked at what happens when we aren’t facing a simple method with a return value, and we need to test the end state of an object. This attribute is handy, and you’ll use it in many of your future tests.
This isn’t enough though. Most test code has to deal with far more difficult coding issues. The next couple of chapters will give you some more basic tools for writing unit tests. You’ll need to pick and choose from these tools when you write tests for various difficult scenarios you’ll come across.
Finally, keep the following points in mind:
- It’s common practice to have one test class per tested class, one test project per tested project, and at least one test method per tested method.
- Name your tests clearly using the following model: [MethodUnderTest]_[Scenario]_[ExpectedBehavior].
- Use the [SetUp] and [TearDown] attributes to reuse code in your tests, such as code for creating and initializing objects all your tests use.
- Don’t use [SetUp] and [TearDown] to initialize or destroy objects that aren’t shared throughout the test class in all the tests, because it makes the tests less understandable. Someone reading your code won’t know which tests use the logic inside the setup method and which don’t.
In the next chapter, we’ll look at more real-world scenarios, where the code to be tested is a little more realistic than what you’ve seen so far. It has dependencies and testability problems, and we’ll start discussing the notion of integration tests versus unit tests, and what that means to us as developers who write tests and want to ensure our code’s quality.