
Chapter 3. Using stubs to break dependencies
- Defining stubs
- Refactoring code to use stubs
- Overcoming encapsulation problems in code
- Exploring best practices when using stubs
In the previous chapter, we wrote our first unit test using NUnit and explored the different testing attributes that are available, such as [ExpectedException], [SetUp], and [TearDown]. We also built tests for simple use cases, where all we had to check on were simple return values from simple objects.
In this chapter, we’ll take a look at more realistic examples where the object under test relies on another object over which we have no control (or which doesn’t work yet). That object could be a web service, the time of day, threading, or many other things. The important point is that our test can’t control what that dependency returns to our code under test or how it behaves (if we wanted to simulate an exception, for example). That’s when we use stubs.
3.1. Introducing stubs
Flying people into space presents interesting challenges to engineers and astronauts, one of the more difficult being how to make sure the astronaut is ready to go into space and operate all the machinery. A full integration test for a space shuttle would require being in space, and that’s obviously not a safe way to test astronauts. That’s why NASA has full simulators that mimic the surroundings of a space shuttle’s control deck, which removes the external dependency of having to be in outer space.
Definition
An external dependency is an object in your system that your code under test interacts with, and over which you have no control. (Common examples are filesystems, threads, memory, time, and so on.)
Controlling external dependencies in your code is the topic that this chapter, and most of this book, will be dealing with. In programming, we use stubs to get around the problem of external dependencies.
Definition
A stub is a controllable replacement for an existing dependency (or collaborator) in the system. By using a stub, you can test your code without dealing with the dependency directly.
Let’s look at a real example and make things a bit more complicated for our LogAnalyzer class, introduced in the previous chapters. We’ll try to untangle a dependency against the filesystem.
Test pattern names
xUnit Test Patterns by Gerard Meszaros is a classic pattern reference book for unit testing. It defines patterns for things we fake in our tests in at least five ways, which I feel confuses people (although it’s detailed). In this book, I chose to use only three definitions for fake things in tests: fakes, stubs, and mocks. I feel that this simplification of terms makes it easy for readers to digest the patterns, and that there’s no need to know more than those three to get started and write great tests. In various places in the book, though, I will refer to the pattern names used in xUnit Test Patterns so that you can easily refer to that definition if you’d like.
3.2. Identifying a filesystem dependency in LogAn
Our LogAnalyzer class application can be configured to handle multiple log filename extensions using a special adapter for each file. For the sake of simplicity, let’s assume that the allowed filenames are stored somewhere on disk as a configuration setting for the application, and that the IsValidLogFileName method looks like this:
|
public bool IsValidLogFileName(string fileName) |
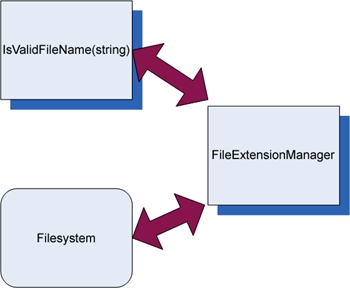
The problem that arises, as depicted in figure 3.1, is that, once this test depends on the filesystem, we’re performing an integration test, and we have all the associated problems: integration tests are slower to run, they need configuration, they test multiple things, and so on.
Figure 3.1. Our method has a direct dependency on the filesystem. Our design of the object model under test inhibits us from testing it as a unit test; it promotes integration testing.

This is the essence of test-inhibiting design: the code has some dependency on an external resource, which might break the test even though the code’s logic is perfectly valid. In legacy systems, a single class or method might have many dependencies on external resources over which your test code has little, if any, control. Chapter 9 touches more on this subject.
3.3. Determining how to easily test LogAnalyzer
“There is no object-oriented problem that cannot be solved by adding a layer of indirection, except, of course, too many layers of indirection.” I like this quote (from a friend of mine) because a lot of the “art” in the art of unit testing is about finding the right place to add or use a layer of indirection to test the code base.
You can’t test something? Add a layer that wraps up the calls to that something, and then mimic that layer in your tests. Or make that something replaceable (so that it is itself a layer of indirection). The art also involves figuring out when a layer of indirection already exists instead of having to invent it, or knowing when not to use it because it complicates things too much. But let’s take it one step at a time.
The only way we can write a test for this code, as it is, is to have a configuration file in the filesystem. Because we’re trying to avoid these kinds of dependencies, we want our code to be easily testable without resorting to integration testing.
If we look at the astronaut analogy we started out with, we can see that there’s a definite pattern for breaking the dependency:
1.
Find the interface or API that the object under test works against. In the astronaut example, this was the joysticks and monitors of the space shuttle, as depicted in figure 3.2.
Figure 3.2. A space shuttle simulator has realistic joysticks and screens to simulate the outside world.
(Photo courtesy of NASA)

2.
Replace the underlying implementation of that interface with something that you have control over. This involved hooking up the various shuttle monitors, joysticks, and buttons to a control room where test engineers were able to control what the space shuttle interface was showing to the astronauts under test.
Transferring this pattern to our code requires more steps:
1.
Find the interface that the method under test works against. (In this case, “interface” isn’t used in the pure object-oriented sense; it refers to the defined method or class being collaborated with.) In our LogAn project, this is the filesystem configuration file.
2.
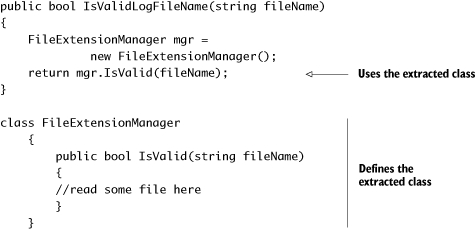
If the interface is directly connected to our method under test (as in this case—we’re calling directly into the filesystem), make the code testable by adding a level of indirection to the interface. In our example, moving the direct call to the filesystem to a separate class (such as FileExtensionManager) would be one way to add a level of indirection. We’ll also look at others. (Figure 3.3 shows how the design might look after this step.)
Figure 3.3. Introducing a layer of indirection to avoid a direct dependency on the filesystem. The code that calls the filesystem is separated into a FileExtensionManager class, which will later be replaced with a stub in our test.
3.
Replace the underlying implementation of that interactive interface with something that you have control over. In our case, we’ll replace the instance of the class that our method calls (FileExtensionManager) with a stub class that we can control (StubExtensionManager), giving our test code control over external dependencies.
Our replacement instance will not talk to the filesystem at all, which breaks the dependency on the filesystem. Because we aren’t testing the class that talks to the filesystem, but the code that calls this class, it’s OK if that stub class doesn’t do anything but make happy noises when running inside the test. Figure 3.4 shows the design after this alteration.
Figure 3.4. Introducing a stub to break the dependency

In figure 3.4, I’ve added a new interface into the mix. This new interface will allow the object model to abstract away the operations of what a FileExtensionManager class does, and will allow the test to create a stub that looks like a FileExtensionManager. You’ll see more on this method in the next section.
We’ve looked at one way of introducing testability into our code base—by creating a new interface. Now let’s look at the idea of code refactoring and introducing seams into our code.
3.4. Refactoring our design to be more testable
I’m going to introduce two new terms that will be used throughout the book: refactoring and seams.
Definition
Refactoring is the act of changing the code’s design without breaking existing functionality.
Definition
Seams are places in your code where you can plug in different functionality, such as stub classes. (See Michael Feathers’ book, Working Effectively with Legacy Code, for more about seams.)
If we want to break the dependency between our code under test and the filesystem, we can use common design patterns, refactorings, and techniques, and introduce one or more seams into the code. We just need to make sure that the resulting code does exactly the same thing. Here are some techniques for breaking dependencies:
- Extract an interface to allow replacing underlying implementation.
- Inject stub implementation into a class under test.
- Receive an interface at the constructor level.
- Receive an interface as a property get or set.
- Get a stub just before a method call.
We’ll look at each of these.
3.4.1. Extract an interface to allow replacing underlying implementation
In this technique, we need to break out the code that touches the filesystem into a separate class. That way we can easily distinguish it and later replace the call to that class from our tested function (as was shown in figure 3.3). Listing 3.1 shows the places where we need to change the code.
Listing 3.1. Extracting a class that touches the filesystem, and calling it
Next, we can tell our class under test that, instead of using the concrete FileExtensionManager class, it will deal with some form of ExtensionManager, without knowing its concrete implementation. In .NET, this could be accomplished by either using a base class or an interface that FileExtensionManager would extend.
Listing 3.2 shows the use of a new interface in our design to make it more testable. Figure 3.4 showed a diagram of this implementation.
Listing 3.2. Extracting an interface from a known class

We’ve simply created an interface with one IsValid (string) method, and made FileExtensionManager implement that interface. It still works exactly the same way, only now we can replace the “real” manager with our own “stub” manager to support our test.
We still haven’t created the stub extension manager, so let’s create that right now. It’s shown in listing 3.3.
Listing 3.3. Simple stub code that always returns true
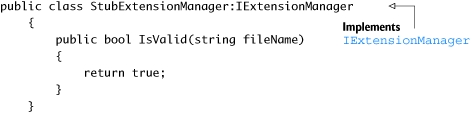
This stub extension manager will always return true, no matter what the file extension is. We can use it in our tests to make sure that no test will ever have a dependency on the filesystem, but also so we can create new and bizarre scenarios where we can simulate serious system errors like making the stub manager throw an OutOfMemoryException and seeing how the system deals with it. Later in this chapter, we’ll add configurability to the stub class so it can emulate many things and be used by multiple tests.
Now we have an interface and two classes implementing it, but our method under test still calls the real implementation directly:
|
public bool IsValidLogFileName(string fileName) |
We somehow have to tell our method to talk to our implementation rather than the original implementation of IExtensionManager. We need to introduce a seam into the code, where we can plug in our stub.
3.4.2. Inject stub implementation into a class under test
There are several proven ways to create interface-based seams in our code—places where we can inject an implementation of an interface into a class to be used in its methods. Here are some of the most notable ways:
- Receive an interface at the constructor level and save it in a field for later use.
- Receive an interface as a property get or set and save it in a field for later use.
- Receive an interface just before the call in the method under test using
- a parameter to the method (parameter injection).
- a factory class.
- a local factory method.
- variations on the preceding techniques.
The parameter injection method is trivial: you send in an instance of a (fake) dependency to the method in question by adding a parameter to the method signature.
Let’s go through the rest of the possible solutions one by one and see why you’d want to use each.
3.4.3. Receive an interface at the constructor level (constructor injection)
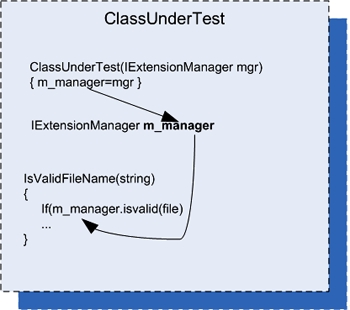
In this scenario, we add a new constructor (or a new parameter to an existing constructor) that will accept an object of the interface type we extracted earlier (IExtensionManager). The constructor then sets a local field of the interface type in the class for later use by our method or any other. Figure 3.5 shows the flow of the stub injection.
Figure 3.5. Flow of injection via a constructor
Listing 3.4 shows how we could write a test for our LogAnalyzer class using a constructor injection technique.
Listing 3.4. Injecting our stub using constructor injection
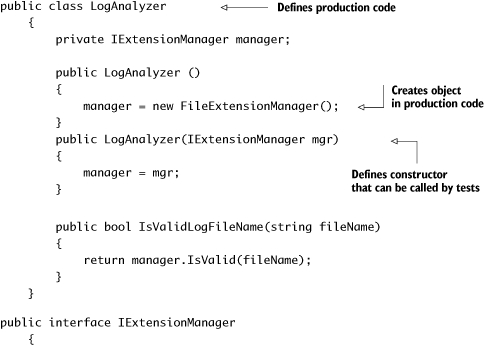

Note
The stub analyzer is located in the same file as the test code because currently the stub is used only from within this test class. It’s far easier to locate, read, and maintain a stub in the same file than in a different one. If, later on, I have an additional class that needs to use this stub, I can move it to another file easily.
Notice that the test in listing 3.4 tests some domain logic that’s built on top of the call to the FileExtensionManager. The domain logic in IsValidLogFileName should make sure that the extension is supported, and that the filename is long enough to be considered.
You’ll also notice that the stub object in listing 3.4 can be configured by the test code as to what Boolean value to return when its method is called. Configuring the stub from the test means the stub class’s source code can be reused in more than one test case, with the test setting the values for the stub before using it on the object under test. This also helps the readability of the test code, because the reader of the code can read the test and find everything she needs to know in one place. Readability is an important aspect of writing unit tests, and we’ll cover it in detail later in the book, particularly in chapter 7.
Another thing to note is that, by using parameters in the constructor, we’re in effect making the parameters non-optional dependencies (assuming this is the only constructor), which is a design choice. The user of the type will have to send in arguments for any specific dependencies that are needed.
Problems with constructor injection
Problems can arise from using constructors to inject implementations. If your code under test requires more than one stub to work correctly without dependencies, adding more and more constructors (or more and more constructor parameters) becomes a hassle, and it can even make the code less readable and less maintainable.
For example, suppose LogAnalyzer also had a dependency on a web service and a logging service in addition to the file extension manager. The constructor might look like this:
|
public LogAnalyzer(IExtensionManager mgr, ILog logger, IWebService |
One solution to these problems is to create a special class that contains all the values needed to initialize a class, and to have only one parameter to the method: that class type. That way, you only pass around one object with all the relevant dependencies. (This is also known as a parameter object refactoring.) This can get out of hand pretty quickly, with dozens of properties on an object; but it’s possible.
Another possible solution to these problems is using inversion of control (IoC) containers. You can think of IoC containers as “smart factories” for your objects (although they are much more than that). A couple of well-known containers of this type are Spring.NET and Castle Windsor. Both provide special factory methods that take in the type of object you’d like to create and any dependencies that it needs, and then initialize the object using special configurable rules such as what constructor to call, what properties to set in what order, and so on. They’re powerful when put to use on a complicated composite object hierarchy where creating an object requires creating and initializing objects several levels down the line. If your class needs an ILogger interface at its constructor, for example, you can configure such a container object to always return the same ILogger object that you give it, when resolving this interface requirement. The end result of using containers is usually simpler handling and retrieving of objects, and less worry about the dependencies or maintaining the constructors.
Tip
Some of the more popular containers in the .NET world are Castle Windsor, Microsoft Unity, and Spring.NET. There are also many up-and-coming container implementations, such as Autofac, Ninject, and StructureMap, which use a more fluent interface API, so look at them when you read more about this topic. Dealing with containers is beyond the scope of this book, but you can start reading about them with Scott Hanselman’s list: http://www.hanselman.com/blog/ListOfNETDependencyInjectionContainersIOC.aspx.
Now, imagine that you have 50 tests against your constructor, and you find another dependency you had not considered, such as a factory service for creating special objects that works against a database. You’d have to create an interface for that dependency and add it as a parameter to the current constructor, and you’d also have to change the call in 50 other tests that initialize the code. At this point, your constructor could use a facelift. Whatever logic it does have is beginning to be hidden by the many parameters. Fortunately, using property getters and setters can solve this problem easily, as we’ll see in section 3.4.4.
When you should use constructor injection
My experience is that using constructor arguments to initialize objects can make your testing code more cumbersome unless you’re using helper frameworks such as IoC containers for object creation. Every time you add another dependency to the class under test, you have to create a new constructor that takes all the other arguments plus a new one, make sure it calls the other constructors correctly, and make sure other users of this class initialize it with the new constructor.
On the other hand, using parameters in constructors is a great way to signify to the user of your API that these parameters are non-optional. They have to be sent in when creating the object.
If you want these dependencies to be optional, refer to the next section. It discusses using property getters and setters, which is a much more relaxed way to define optional dependencies than, say, adding different constructors to the class for each dependency.
There are people who disagree with my approach and define constructor arguments as non-optional arguments, using properties strictly for optional ones. That way, the semantics of the class also imply the proper usage of that class. I agree somewhat with this approach; my problem is with its maintainability.
Tip
You’ll find that dilemmas about what method to use in which situation are common in the world of unit testing. This is a wonderful thing. Always question your assumptions; you might learn something new.
If you choose to use constructor injection, you’ll probably also want to use IoC containers. This would be a great solution if all code in the world were using IoC containers, but most people don’t know what the Inversion of Control principle is, let alone what tools you can use to make it a reality. The future of unit testing will likely see more and more use of these frameworks. As that happens, we’ll see clearer and clearer guidelines on how to design classes that have dependencies, or we’ll see tools that solve the dependency injection problem without needing to use constructors at all.
In any case, constructor parameters are just one way to go. Properties are often used as well.
3.4.4. Receive an interface as a property get or set
In this scenario, we add a property get and set for each dependency we’d like to inject. We then use this dependency when we need it in our code under test. Figure 3.6 shows the flow of injection with properties.
Figure 3.6. Using properties to inject dependencies. This is much simpler than using a constructor because each test can set only the properties that it needs to get the test underway.

Using this technique (also called dependency injection, a term that can also be used to describe the other techniques in this chapter), our test code would look quite similar to that in section 3.4.3, which used constructor injection. But this code, shown in listing 3.5, is more readable and simpler to achieve.
Listing 3.5. Injecting a stub by adding property setters to the class under test

Like constructor injection, property injection has an effect on the API design in terms of defining which dependencies are required and which aren’t. By using properties, you’re effectively saying, “This dependency isn’t required to operate this type.”
When you should use property injection
Use this technique when you want to signify that a dependency of the class under test is optional, or if the dependency has a default instance created that doesn’t create any problems during the test.
3.4.5. Getting a stub just before a method call
This section deals with a scenario where you get an instance of an object just before you do any operations with it, instead of getting it via a constructor or a property. The difference is that the object initiating the stub request in this situation is the code under test; in previous sections, the stub instance was set by code external to the code under test before the test started.
Use a factory class
In this scenario, we go back to the basics, where a class initializes the manager in its constructor, but it gets the instance from a factory class. The Factory pattern is a design that allows another class to be responsible for creating objects.
Our tests will configure the factory class (which, in this case, uses a static method to return an instance of an object that implements IExtensionManager) to return a stub instead of the real implementation. Figure 3.7 shows this.
Figure 3.7. A test configures the factory class to return a stub object. The class under test uses the factory class to get that instance, which in production code would return an object that isn’t a stub.
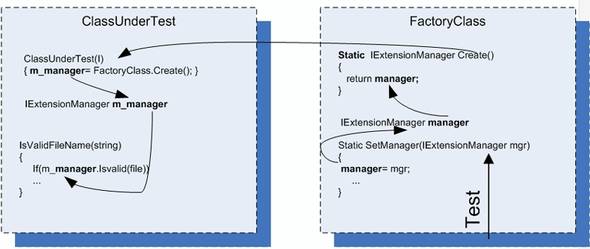
This is a clean design, and many object-oriented systems use factory classes to return instances of objects. But most systems don’t allow anyone outside the factory class to change the instance being returned, in order to protect the encapsulated design of this class.
In this case, I’ve added a new setter method (our new seam) to the factory class so that our tests will have more control over what instance gets returned. Once you introduce statics into test code, you might also need to reset the factory state before or after each test run, so that other tests won’t be affected by the configuration.
This technique produces test code that’s easy to read, and there’s a clear separation of concerns between the classes. Each one is responsible for a different action.
Listing 3.6 shows code that uses the factory class in LogAnalyzer (and also includes the tests).
Listing 3.6. Setting a factory class to return a stub when the test is running


The implementation of the factory class can vary greatly, and the examples shown here represent only the simplest illustration. For more examples of factories, read about the factory method and the Abstract Factory Design patterns in the classic book Design Patterns, by the Gang of Four (Erich Gamma, Richard Helm, Ralph Johnson, and John M. Vlissides).
The only thing you need to make sure of is that, once you use these patterns, you add a seam to the factories you make so that they can return your stubs instead of the default implementations. Many systems have a global #debug switch that, when turned on, causes seams to automatically send in fake or testable objects instead of default implementations. Setting this up can be hard work, but it’s worth it when it’s time to test the system.
Hiding seams in release mode
What if you don’t want the seams to be visible in release mode? There are several ways to achieve that. In .NET, for example, you can put the seam statements (the added constructor, setter, or factory setter) under a conditional compilation argument, like this:
|
#if DEBUG |
There’s also a special attribute in .NET that can be used for these purposes:
|
[Conditional("DEBUG")]
|
When you should use conditional compilation
First, you need to realize that we’re dealing with a different layer depth here than the previous sections. At each different depth, we’re faking (or stubbing) a different object. Table 3.1 shows three layer depths that are used inside the code to return stubs.
Table 3.1. Layers of code that can be faked
|
Code under test |
Possible action |
|---|---|
|
Layer depth 1: the FileExtensionManager variable inside the class |
Add a constructor argument that will be used as the dependency. A member in the class under test is now fake; all other code remains unchanged. |
|
Layer depth 2: the dependency returned from the factory class into the class under test |
Tell the factory class to return your fake dependency by setting a property. The member inside the factory class is fake; the class under test isn’t changed at all. |
|
Layer depth 3: the factory class that returns the dependency |
Replace the instance of the factory class with a fake factory that returns your fake dependency. The factory is a fake, which also returns a fake; the class under test isn’t changed. |
The thing to understand about layers of indirection is that the deeper you go down the rabbit hole (down the code-base execution call stack) the better manipulation power you have over the code under test, because you create stubs that are in charge of more things down the line. But there’s also a bad side to this: the further you go down the layers, the harder the test will be to understand, and the harder it will be to find the right place to put your seam. The trick is to find the right balance between complexity and manipulation power so that your tests remain readable but you get full control of the situation under test.
For the scenario in listing 3.6 (using a factory), adding a constructor-level argument would complicate things when we already have a good possible target layer for our seam—the factory at depth 2. Layer 2 is the simplest to use here because the changes it requires in the code are minimal:
- Layer 1 (faking a member in the class under test) You would need to add a constructor, set the class in the constructor, set its parameters from the test, and worry about future uses of that API in the production code. This method would change the semantics of using the class under test, which is best avoided unless you have a good reason.
- Layer 2 (faking a member in a factory class) This method is easy. Add a setter to the factory and set it to a fake dependency of your choice. There’s no changing of the semantics of the code base, everything stays the same, and the code is dead simple. The only con is that this method requires that you understand who calls the factory and when, which means you need to do some research before you can implement this easily. Understanding a code base you’ve never seen is a daunting task, but it still seems more reasonable than the other options.
- Layer 3 (faking the factory class) You would need to create your own version of a factory class, which may or may not have an interface. This means also creating an interface for it. Then you would need to create your fake factory instance, tell it to return your fake dependency class (a fake returning a fake—take note!), and then set the fake factory class on the class under test. A fake returning a fake is always a bit of a mind-boggling scenario, which is best avoided because it makes the test less understandable.
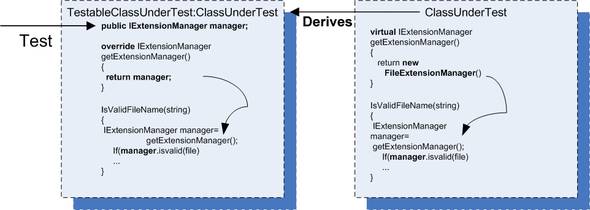
Use a local factory method (Extract and Override)
This method doesn’t reside in any of the layers listed in table 3.1; it creates a whole new layer of indirection close to the surface of the code under test. The closer we get to the surface of the code, the less we need to muck around with changing dependencies. In this case, the class under test is also a dependency of sorts that we need to manipulate.
In this scenario, we use a local virtual method in the class under test as a factory to get the instance of the extension manager. Because the method is marked as virtual, it can be overridden in a derived class, which creates our seam. We inject a stub into the class by inheriting a new class from the class under test, overriding the virtual factory method, and finally returning whatever instance the new class is configured to return in the overriding method. The tests are then performed on the new derived class. The factory method could also be called a stub method that returns a stub object. Figure 3.8 shows the flow of object instances.
Figure 3.8. We inherit from the class under test so we can override its virtual factory method and return whatever object instance we want, as long as it implements IExtensionManager. Then we perform our tests against the newly derived class.
Here are the steps for using a factory method in your tests.
.
In the class under test,
.
add a virtual factory method that returns the real instance.
.
use the factory method in your code, as usual.
.
In your test project, create a new class:
.
Set the new class to inherit from the class under test.
.
Create a public field (no need for property get or set) of the interface type you want to replace (IExtensionManager).
.
Override the virtual factory method.
.
Return the public field.
.
In your test code,
.
create an instance of a stub class that implements the required interface (IExtensionManager).
.
create an instance of the newly derived class, not of the class under test.
.
configure the new instance’s public field (which you created earlier) and set it to the stub you’ve instantiated in your test.
When you test your class now, your production code will be using your stub through the overridden factory method.
Listing 3.7 shows what the code might look like when using this method.
Listing 3.7. Faking a factory method

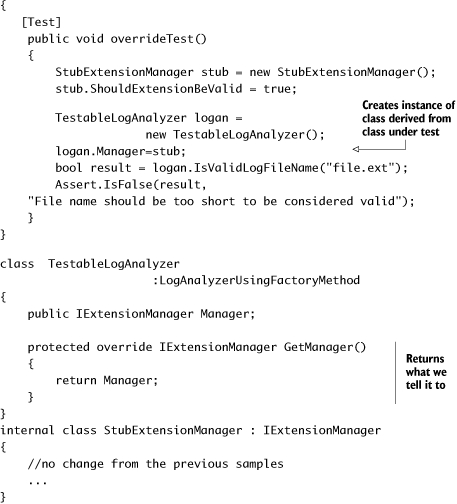
The technique we’re using here is called Extract and Override, and you’ll find it extremely easy to use once you’ve done it a couple of times. It’s a powerful technique, and one I will put to other uses throughout this book.
Tip
You can learn more about this dependency-breaking technique and others in a book I have found to be worth its weight in gold: Working Effectively with Legacy Code by Michael Feathers.
Extract and Override is a powerful technique because it lets you directly replace the dependency without going down the rabbit hole (changing dependencies deep inside the call stack). That makes it quick and clean to perform, and it almost corrupts your good sense of object-oriented aesthetics, leading you to code that might have fewer interfaces but more virtual methods. I like to call this method “ex-crack and override” because it’s such a hard habit to let go of once you know it.
When you should use this method
Extract and Override is great for simulating inputs into your code under test, but it’s cumbersome when you want to verify interactions that are coming out of the code under test into your dependency.
For example, it’s great if your test code calls a web service and gets a return value, and you’d like to simulate your own return value. But it gets bad quickly if you want to test that your code calls out to the web service correctly. That requires lots of manual coding, and mock frameworks are better suited for such tasks (as you’ll see in the next chapter). Extract and Override is good if you’d like to simulate return values or simulate whole interfaces as return values, but not for checking interactions between objects.
I use this technique a lot when I need to simulate inputs into my code under test, because it helps keep the changes to the semantics of the code base (new interfaces, constructors, and so on) a little more manageable. You need to make fewer of them to get the code into a testable state. The only times I don’t use this technique is when the code base clearly shows that there’s a path already laid out for me: there’s already an interface ready to be faked or there’s already a place where a seam can be injected. When these things don’t exist, and the class itself isn’t sealed (or can be made nonsealed without too much resentment from your peers), I check out this technique first, and only after that move on to more complicated options.
3.5. Variations on refactoring techniques
There are many variations on the preceding simple techniques to introduce seams into source code. For example, instead of adding a parameter to a constructor, you can add it directly to the method under test. Instead of sending in an interface, you could send a base class, and so on. Each variation has its own strengths and weaknesses.
One of the reasons you may want to avoid using a base class instead of an interface is that a base class from the production code may already have (and probably has) built-in production dependencies that you’ll have to know about and override. This makes implementing derived classes for testing harder than implementing an interface, which lets you know exactly what the underlying implementation is and gives you full control over it.
In chapter 4, we’ll look at techniques that can help you avoid writing manual stub classes that implement interfaces, and instead use frameworks that can help do this at runtime.
But for now, let’s look at another way to gain control over the code under test without using interfaces. You’ve already seen one way of doing this in the previous pages, but this method is so effective it deserves a discussion of its own.
3.5.1. Using Extract and Override to create stub results
You’ve already seen an example of Extract and Override in section 3.4.5. We derive from the class under test so that we can override a virtual method and force it to return our stub.
But why stop there? What if you’re unable or unwilling to add a new interface every time you need control over some behavior in your code under test? In those cases, Extract and Override can help simplify things, because it doesn’t require writing and introducing new interfaces—just deriving from the class under test and overriding some behavior in the class.
Figure 3.9 shows another way we could have forced the code under test to always return true about the validity of the file extension.
Figure 3.9. Using Extract and Override to return a logical result instead of calling an actual dependency. This uses a simple fake result instead of a stub.

In the class under test, instead of virtualizing a factory method, we virtualize the calculation result. This means that, in our derived class, we override the method and return whatever value we want, without needing to create an interface or a new stub. We simply inherit and override the method to return the desired result.
Listing 3.8 shows how our code might look using this technique.
Listing 3.8. Returning a result rather than a stub object from an extracted method
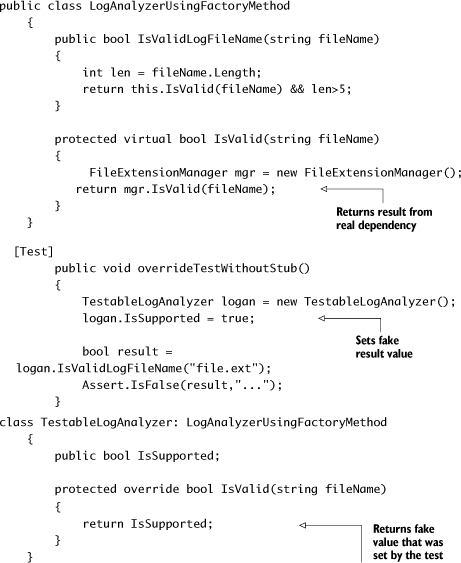
When you should use Extract and Override
The basic motivation for using this technique is the same as for the method discussed in section 3.4.5. This technique is even simpler than the previous one. If I can, I use this technique over the previous one.
By now, you may be thinking to yourself that adding all these constructors, setters, and factories for the sake of testing is problematic. It breaks some serious object-oriented principles, especially the idea of encapsulation, which says, “Hide everything that the user of your class doesn’t need to see.” That’s our next topic. (Appendix A also deals with testability and design issues.)
3.6. Overcoming the encapsulation problem
Some people feel that opening up the design to make it more testable is a bad thing because it hurts the object-oriented principles the design is based on. I can wholeheartedly say to those people, “Don’t be silly.” Object-oriented techniques are there to enforce some constraints on the end user of the API (the end user being the programmer who will use your object model) so that the object model is used properly and is protected from unforeseen ways of usage. Object orientation also has a lot to do with reuse of code and the single-responsibility principle (which requires that each class has only a single responsibility).
When we write unit tests for our code, we are adding another end user (the test) to the object model. That end user is just as important as the original one, but it has different goals when using the model. The test has specific requirements from the object model that seem to defy the basic logic behind a couple of object-oriented principles, mainly encapsulation. Encapsulating those external dependencies somewhere without allowing anyone to change them, having private constructors or sealed classes, having nonvirtual methods that can’t be overridden: all these are classic signs of overprotective design. (Security-related designs are a special case that I forgive.) The problem is that the second end user of the API, the test, needs them as a feature in the code. I call the design that emerges from designing with testability in mind testable object-oriented design (TOOD), and you’ll hear more about TOOD in Appendix A.
The concept of testable designs conflicts in places with the concept of object-oriented design. If you really need to consolidate these two worlds (to have your cake and eat it too), here are a few tips and tricks you can use to make sure that the extra constructors and setters don’t show up in release mode or at least don’t play a part in release mode.
Tip
A good place to look at design objectives that adhere more to the idea of testable design is Bob Martin’s timeless SOLID design series of articles. SOLID stands for Single Responsibility Principle, Open Closed Principle, Liskov Substitution Principle, Interface Segregation Principle, and Dependency Inversion Principles. These principles can be found at http://butunclebob.com/ArticleS.UncleBob.PrinciplesOfOod.
3.6.1. Using internal and [InternalsVisibleTo]
If you dislike adding a public constructor to your class that everyone can see, you can make it internal instead of public. You can then expose all internal related members and methods to your test assembly by using the [InternalsVisibleTo] assembly-level attribute.
Listing 3.9 shows this more clearly.
Listing 3.9. Exposing internals to the tests assembly
public class LogAnalyzer
    {
      ...
      internal LogAnalyzer (IExtensionManager extentionMgr)
        {
            manager = extentionMgr;
        }
    ...
}

using System.Runtime.CompilerServices;
[assembly:
       InternalsVisibleTo("AOUT.CH3.Logan.Tests")]
Such code can usually be found in AssemblyInfo.cs files. Using internal is a good solution if you have no other way of making things public to the test code.
3.6.2. Using the [Conditional] attribute
The System.Diagnostics.ConditionalAttribute attribute is notable in its non-intuitive action. When you put this attribute on a method, you initialize the attribute with the string signifying a conditional build parameter that’s passed in as part of the build. (DEBUG and RELEASE are the two most common ones, and Visual Studio uses them by default according to your build type.)
If the build flag is not present during the build, the callers to the annotated method won’t be included in the build. For example, this method will have all the callers to it removed during a release build, but the method itself will stay on:
|
[Conditional ("DEBUG")]
|
You can use this attribute on methods (but not on constructors) that you only want called in certain debug modes.
Note
These annotated methods won’t be hidden from the production code, which is different from how the next technique we’ll discuss behaves.
It’s important to note that using conditional compilation constructs in your production code can reduce its readability and increase its “spaghetti-ness.” Beware!
3.6.3. Using #if and #endif with conditional compilation
Putting your methods or special test-only constructors between #if and #endif constructs will make sure they only compile when that build flag is set, as shown in listing 3.10.
Listing 3.10. Using special build flags
#if DEBUG
        public LogAnalyzer (IExtensionManager extensionMgr)
        {
            manager = extensionMgr;
        }
#endif
...
#if DEBUG
       [Test]
        public void
IsValidFileName_NameLessThan6SupportedExtension_False()
        {
...
            //create analyzer and inject stub
            LogAnalyzer log =
                new LogAnalyzer (myFakeManager);
            ...
        }
#endif
This method is commonly used, but it can lead to code that looks messy. Consider using the [InternalsVisibleTo] attribute where you can, for clarity.
3.7. Summary
We started writing simple tests in the first couple of chapters, but we have dependencies in our tests that we need to find a way to override. We learned how to stub out those dependencies in this chapter, using interfaces and inheritance.
A stub can be injected into your code in many different ways. The real trick is to locate the right layer of indirection, or to create one, and then use it as a seam from which you can inject your stub into running code.
The deeper you go down the layers of interactions, the harder it will be to understand the test, and to understand the code under test and its deep interactions with other objects. The closer you are to the surface of the object under test, the easier your test will be to understand and manage, but you may also be giving up some of your power to manipulate the environment of the object under test.
Learn the different ways of injecting a stub into your code. When you master them, you’ll be in a much better position to pick and choose which method you want to use when.
The Extract and Override method is great for simulating inputs into the code under test, but if you’re also testing interactions between objects (the topic of the next chapter), be sure to have it return an interface rather than an arbitrary return value. It will make your testing life easier.
Testable object-oriented design (TOOD) can present some interesting advantages over classic object-oriented design, such as allowing maintainability while still permitting tests to be written against the code base. If you really need them, there are several ways of hiding your testable design in release mode, such as the [InternalsVisibleTo] and the [Conditional] attributes.
In chapter 4, we’ll take a look at some other issues relating to dependencies, and find ways to resolve them: how to avoid writing manual stubs for interfaces, and how to test the interaction between objects as part of your unit tests.