
Chapter 4. Interaction testing using mock objects
- Defining interaction testing
- Understanding mock objects
- Differentiating mocks and stubs
- Exploring mock object best practices
In the previous chapter, we solved the problem of testing code that depends on other objects to run correctly. We used stubs to make sure that the code under test received all the inputs it needed so that we could test its logic independently.
In this chapter, we’ll look at how you test whether an object calls other objects correctly. The object being called may not return any result or save any state, but it has complex logic that needs to result in correct calls to other objects. Using the approach we’ve employed so far won’t do here, because there’s no externalized API that we can use to check if something has changed in the object under test. How do you test that your object interacts with other objects correctly? We’ll use mock objects.
The first thing we need to do is define what interaction testing is, and how it’s different from the testing we’ve done so far—state-based testing.
4.1. State-based versus interaction testing
We defined state-based testing in section 2.6 of chapter 2. Let’s define interaction testing, and then look at how we use it in our unit tests.
Definition
Interaction testing is testing how an object sends input to or receives input from other objects—how that object interacts with other objects.
You can also think of interaction testing as being “action-driven testing,” and state-based testing as being “result-driven testing.” Actiondriven means that you test a particular action an object takes (such as sending a message to another object). Result-driven means you test that some end result is now true (that a property value has changed, for example). It’s usually preferable to check the end results of objects, not their particular actions. But sometimes interactions between objects are the end result. That’s when we need to test the interaction itself (where the end result of calling a method on the object under test is that the object then calls another object, such as a web service).
Interaction testing, in one form or another, has existed since the first days of unit testing. Back then, there weren’t any names or patterns for it, but people still needed to know if one object called another object correctly.
Let’s look at an example of the two types of testing. Say you have a watering system, and you have given your system specific instructions on when to water the tree in your yard: how many times a day and what quantity of water each time. Here’s how you’d test that it’s working correctly:
- State-based testing— Run the system for a specific amount of time (say 12 hours), and at the end of that time, check the state of the tree being irrigated. Is the land moist enough, is the tree doing well, are its leaves green, and so on. It may be quite a difficult test to perform, but assuming you can do it, you can find out if your watering system works.
- Interaction testing— At the end of the irrigation hose, set up a device that records when irrigation starts and stops, and how much water flows through the device. At the end of the day, check that the device has been called the right number of times, with the correct quantity of water each time, and don’t worry about checking the tree. In fact, you don’t even need a tree to check that the system works. You can go further and modify the system clock on the irrigation unit, so that it thinks that the time to irrigate has arrived, and it will irrigate whenever you choose. That way, you don’t have to wait (for 12 hours in this example) to find out whether it works.
Sometimes state-based testing is the best way to go because interaction testing is too difficult to pull off. That’s the case with crash test dummies: a car is crashed into a standing target at a specific speed, and after the crash, both car and dummies’ states are checked to determine the outcomes. Running this sort of test as an interaction test in a lab can be too complicated, and a real-world state-based test is called for. (People are working on simulating crashes with computers, but it’s still not close to testing the real thing.)
Now, back to the irrigation system. What is that device that records the irrigation information? It’s a fake water hose, or a stub, you could say. But it’s a smarter breed of stub—a stub that records the calls made to it. That’s partly what a mock object is.
Definition
A mock object is a fake object in the system that decides whether the unit test has passed or failed. It does so by verifying whether the object under test interacted as expected with the fake object. There’s usually no more than one mock per test.
A mock object may not sound much different from a stub, but the differences are large enough to warrant discussion and special syntax in various frameworks, as you’ll see in chapter 5. Let’s look at exactly what the difference is.
4.2. The difference between mocks and stubs
The distinction between mocks and stubs is important because a lot of today’s tools and frameworks (as well as articles) use these terms to describe different things. There’s a lot of confusion about what each term means, and many people seem to use them interchangeably. Once you understand the differences, you can evaluate the world of tools, frameworks, and APIs more carefully and understand more clearly what each does.
At first glance, the difference between mocks and stubs may seem small or nonexistent. The distinction is subtle, but important, because many of the mock object frameworks that we’ll deal with in the next chapters use these terms to describe different behaviors in the framework. The basic difference is that stubs can’t fail tests, and mocks can.
Stubs replace an object so that we can test another object without problems. Figure 4.1 shows the interaction between the stub and the class under test.
Figure 4.1. When using a stub, the assert is performed on the class under test. The stub aids in making sure the test runs smoothly.

The easiest way to tell we’re dealing with a stub is to notice that the stub can never fail the test. The asserts the test uses are always against the class under test.
On the other hand, the test will use a mock object to verify whether the test failed or not. Figure 4.2 shows the interaction between a test and a mock object. Notice that the assert is performed on the mock.
Figure 4.2. The class under test communicates with the mock object, and all communication is recorded in the mock. The test uses the mock object to verify that the test passes.

Again, the mock object is the object we use to see if the test failed or not.
Let’s look at these ideas in action by building our own mock object.
4.3. A simple manual mock example
Creating and using a mock object is much like using a stub, except that a mock will do a little more than a stub: it will save the history of communication, which will later be verified.
Let’s add a new requirement to our LogAnalyzer class. This time, it will have to interact with an external web service that will receive an error message whenever the LogAnalyzer encounters a filename whose length is too short.
Unfortunately, the web service we’d like to test against is still not fully functional, and even if it were, it would take too long to use it as part of our tests. Because of that, we’ll refactor our design and create a new interface for which we can later create a mock object. The interface will have the methods we’ll need to call on our web service, and nothing else.
Figure 4.3 shows how our MockWebService will fit into the test.
Figure 4.3. Our test will create a MockWebService to record messages that LogAnalyzer will send. It will then assert against the MockWebService.

First off, let’s extract a simple interface that we can use in our code under test, instead of talking directly to the web service:
|
public interface IWebService |
This interface will serve us when we want to create stubs as well as mocks. It will let us avoid an external dependency we have no control over.
Next, we’ll create the mock object itself. It may look like a stub, but it contains one extra bit of code that makes it a mock object.
|
public class MockService:IWebService |
Our mock implements an interface, as a stub does, but it saves some state for later, so that our test can then assert and verify that our mock was called correctly.
Note
According to xUnit Test Patterns by Gerard Meszaros, this would be called a Test Spy.
Listing 4.1 shows what the test might look like.
Listing 4.1. Testing the LogAnalyzer with a mock object

Notice how the assert is performed against the mock object, and not against the LogAnalyzer class. That’s because we’re testing the interaction between LogAnalyzer and the web service. We still use the same dependency injection techniques from chapter 3, but this time the mock object (used instead of a stub) also makes or breaks the test.
Also notice that we aren’t writing the tests directly inside the mock object code. There are a couple of reasons for this:
- We’d like to be able to reuse the mock object in other test cases, with other asserts on the message.
- If the assert were put inside the mock object, whoever reads the test would have no idea what we’re asserting. We’d be hiding essential information from the test code, which hinders the readability and maintainability of the test.
In your tests, you might find that you need to replace more than one object. We’ll look at combining mocks and stubs next.
4.4. Using a mock and a stub together
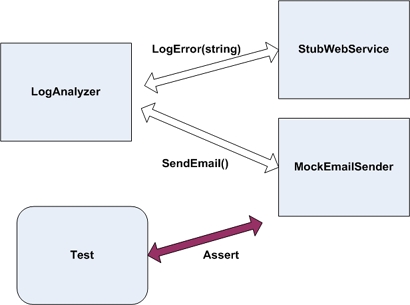
Let’s consider a more elaborate problem. This time our LogAnalyzer not only needs to talk to a web service, but if the web service throws an error, LogAnalyzer has to log the error to a different external dependency, sending it by email to the web service administrator, as shown in figure 4.4.
Here’s the logic we’d like to test inside LogAnalyzer:
|
if(fileName.Length<8) |
Figure 4.4. LogAnalyzer has two external dependencies: web service and email service. We need to test LogAnalyzer’s logic when calling them.

Notice that there’s logic here that only applies to interacting with external objects; there’s no end result returned to the caller. How do you test that LogAnalyzer calls the email service correctly when the web service throws an exception?
Here are the questions we’re faced with:
- How can we replace the web service?
- How can we simulate an exception from the web service so that we can test the call to the email service?
- How will we know that the email service was called correctly or at all?
We can deal with the first two questions by using a stub for the web service. To solve the third problem, we can use a mock object for the email service.
Definition
A fake is a generic term that can be used to describe either a stub or a mock object (handwritten or otherwise), because they both look like the real object. Whether a fake is a stub or a mock depends on how it’s used in the current test. If it’s used to check an interaction (asserted against), it’s a mock object. Otherwise, it’s a stub.
In our test, we’ll have two fakes. One will be the email service mock, which we’ll use to verify that the correct parameters were sent to the email service. The other will be a stub that we’ll use to simulate an exception thrown from the web service. It’s a stub because we won’t be using the web service fake to verify the test result, only to make sure the test runs correctly. The email service is a mock because we’ll assert against it that it was called correctly. Figure 4.5 shows this visually.
Here’s the interface for the email service, followed by the mock email service:
|
public interface IEmailService |
Listing 4.2 shows the code that implements figure 4.5.
Figure 4.5. The web service will be stubbed out to simulate an exception; then the email sender will be mocked to see if it was called correctly. The whole test will be about how LogAnalyzer interacts with other objects.
Listing 4.2. Testing the LogAnalyzer with a mock and a stub


Note that the public properties
![]() we’ve added will be used instead of a constructor. We’ll use these setters to set the stub and mock, which will make the code
easier to read and maintain.
we’ve added will be used instead of a constructor. We’ll use these setters to set the stub and mock, which will make the code
easier to read and maintain.
This code raises some interesting questions:
- Why are we doing several asserts in a single test? How easy would it be to separate this test into three different tests with one assert each? Could the three asserts be combined into a single logical test?
- It can be quite tedious to create manual mocks and stubs for each test or test class. How can we overcome that?
- Couldn’t we have used the MockService from listing 4.1 as a stub?
We’ll explore answers to these questions in the rest of this and the next chapter.
One important thing to consider is how many mocks and stubs you can use in a test.
4.5. One mock per test
In a test where you test only one thing (which is how I recommend you write tests), there should be no more than one mock object. All other fake objects will act as stubs. Having more than one mock per test usually means you’re testing more than one thing, and this can lead to complicated or brittle tests. (Look for more on this in chapter 7.)
If you follow this guideline, when you get to more complicated tests, you can always ask yourself, “Which one is my mock object?” Once you’ve identified it, you can leave the others as stubs and not worry about assertions against them.
Next, we’ll deal with a more complex scenario: using a stub to return a stub or a mock that will be used by the application.
4.6. Stub chains: stubs that produce mocks or other stubs
One of the most common scamming techniques online these days follows a simple path. A fake email is sent to a massive number of recipients. The fake email is from a fake bank or online service claiming that the potential customer needs to have a balance checked or to change some account details on the online site.
All the links in the email point to a fake site. It looks exactly like the real thing, but its only purpose is to collect data from innocent customers of that business. This simple “chain of lies” is known as a “phishing” attack, and is more lucrative that you’d imagine. Most people respond instinctively to these emails and do what’s asked. Consequently, it’s one of the biggest threats to identity theft in the world.
How does this “chain of lies” matter to us? Sometimes we want to have a fake component return another fake component, producing our own little chain of stubs in our tests, so that we can end up collecting some data during our test. A stub leads to a mock object that records data.
The design of many systems under test allows for complex object chains to be created. It’s not uncommon to find code like this:
|
IServiceFactory factory = GetServiceFactory(); |
Or like this:
|
String connstring = |
Suppose you wanted to replace the connection string with one of your own during a test. You could set up the Configuration property of the GlobalUtil object to be a stub object. Then, you could set the DBConfiguration property on that object to be another stub object, and so on.
It’s a powerful technique, but you need to ask yourself whether it might not be better to refactor your code to do something like this:
|
String connstring =GetConnectionString(); |
You could then override the virtual method as described in section 3.4.5 in chapter 3. This can make the code easier to read and maintain, and it doesn’t require adding new interfaces to insert two more stubs into the system.
Tip
Another good way to avoid call chains is to create special wrapper classes around the API that simplify using and testing it. For more about this method, see Michael Feathers’ book, Working Effectively with Legacy Code. The pattern is called “Adapt Parameter” in that book.
Handwritten mocks and stubs have benefits, but they also have their share of problems. Let’s take a look at them.
4.7. The problems with handwritten mocks and stubs
There are several issues that crop up when using manual mocks and stubs:
- It takes time to write the mocks and stubs.
- It’s difficult to write stubs and mocks for classes and interfaces that have many methods, properties, and events.
- To save state for multiple calls of a mock method, you need to write a lot of boilerplate code to save the data.
- If you want to verify all parameters on a method call, you need to write multiple asserts. If the first assert fails, the others will never run, because a failed assert throws an exception.
- It’s hard to reuse mock and stub code for other tests.
These problems are inherent in manually written mocks and stubs. Fortunately, there are other ways to create mocks and stubs, as you’ll see in the next chapter.
4.8. Summary
This chapter covered the distinction between stub and mock objects. A mock object is like a stub, but it also helps you to assert something in your test. A stub, on the other hand, can never fail your test and is strictly there to simulate various situations. This distinction is important because many of the mock object frameworks you’ll see in the next chapter have these definitions engrained in them, and you’ll need to know when to use which.
Combining stubs and mocks in the same test is a powerful technique, but you must take care to have no more than one mock in each test. The rest of the fake objects should be stubs that can’t break your test. Following this practice can lead to more maintainable tests that break less often when internal code changes.
Stubs that produce other stubs or mocks can be a powerful way to inject fake dependencies into code that uses other objects to get its data. It’s a great technique to use with factory classes and methods. You can even have stubs that return other stubs that return other stubs and so on, but at some point you’ll wonder if it’s all worth it. In that case, take a look at the techniques described in chapter 3 for injecting stubs into your design. (Only one mock framework currently allows stubbing a full call chain in one line of code—creating stubs that return stubs—and that’s Typemock Isolator.)
One of the most common problems encountered by people who write tests is using mocks too much in their tests. You should rarely verify calls to fake objects that are used both as mocks and as stubs in the same test. (This is quite a narrow corner case. You verify a function was called. Because it’s still a function, it must return some value, and because you’re faking that method, you’ll need to tell the test what that value will be. This value is the part in the test that’s a stub, because it has nothing to do with asserting whether the test passes or fails.) If you see “verify” and “stub” on the same variable in the same test, you most likely are overspecifying your test, which will make it more brittle.
You can have multiple stubs in a test, because a class may have multiple dependencies. Just make sure your test remains readable. Structure your code nicely so the reader of the test understands what’s going on.
You may find that writing manual mocks and stubs is inconvenient for large interfaces or for complicated interaction-testing scenarios. It is, and there are better ways to do this, as we’ll see in the next chapter. But often you’ll find that handwritten mocks and stubs still beat frameworks for simplicity and readability. The art lies in when you use which.
Our next chapter deals with mock object frameworks, which allow you to automatically create, at runtime, stub or mock objects and use them with at least the same power as manual mocks and stubs, if not more.