
Chapter 2. Testing Ruby
- Testing principles
- Test-driven development
- Behavior-driven development
- Using stubs and mocks
- Testing your tests
How do you currently test your code? From what people tell us, it seems the most popular testing methodology is “works now, works later”: they test their software by playing around with it, and if it works now, they assume it always will. If this is your approach, you’ve surely encountered many of the problems we did when we used that method: changes to one part of the system breaking another, unexpected edge cases (or non-edge cases!) causing the software to behave unexpectedly, and so on. Then comes the inevitable debugging. The whole business is a huge time and effort sink.
You can avoid this entire situation and gain more assurances along the way by using automated testing. Ruby makes it easy by including a unit-testing library with its standard distribution (and more tools are available via third-party libraries). But before we use that library, let’s take a look at the basics of software testing.
2.1. Testing principles
Automated testing is a process in which code is written to test the behavior of other code. For example, if you wrote a shopping cart web application, you would write code that would call the various pieces of the application and verify its results (to ensure the calculate_total method gave you a correct total), test all the “moving parts” of your application (by calling a piece of code that uses the database to ensure your database code is behaving properly), and so on. These sorts of tests are called automated because, well, they are. You write the test code, you run it (typically inside a container specifically meant for testing), and it tests the code it’s written to test. This means no more clicking around on your application for 10 minutes to ensure that one feature is functioning properly; no more writing that fake input file and hoping it treats other input files the same way; and no more wasting hours of time trying to nail down what part of your big system is causing that little error to pop up. (OK, so maybe not “no more,” but at least a lot less!)
So what exactly do we mean by a test? A test at its core is a piece of code that ensures that another piece of code does what it’s supposed to. In testing, you’re seeking to set up a test state in your application and check for (the right) changes to that state after the tests run. You write tests that will verify the results of a method or other value-bearing code to ensure that, in most cases, the input is handled properly.
If you wanted to write tests for your method get_results_as_string, you would write a test to ensure it returned a string. You would also write a test that made sure it raised exceptions with the wrong input as a safeguard: you want it to complain when it’s improperly used (you want to test what works, and what doesn’t). You are testing the behavior of your code in an isolated environment to ensure it behaves as it should. This may sound abstract now, but we’ll take a look at what these tests look like in Ruby later in this chapter.
2.1.1. Why bother with testing?
Many developers avoid testing because of all that extra code, and we’ll certainly give it to you honestly: testing creates more code. But don’t let that scare you. Although testing may cost you some keystrokes, you’ll appreciate it later when it saves brain power and time. Testing keeps your other code in line; it lets you know if your code is still behaving the same way, rather than your having to think hard about whether or not it is, or, even worse, finding out it’s not when you’ve deployed it and it crashes hard.
So, the first benefit of testing is obvious: you know that the code works. You could just run the code and see for yourself—there’s no need to write automated test cases. But consider the huge time sink that would become: spending hours a day poking at your application, making sure each piece is working properly. Using automated tests gives you peace of mind and a productivity boost because if the tests pass (and if they’re well-written tests) you can be assured your code is behaving properly.
As we all know, code has a sensitive personality: you fix things in one place, and it may get upset and break in another place. Testing helps you maintain the behavior of your application; if you add code or refactor it, how can you be sure that your application will behave the same way unless you test it? And what better way to test it than with consistent, automated tests? Let’s say you refactor a class’s methods and cut them down from 13 to 6. Can you be sure that the methods that are exposed to the rest of the application still behave the same? If you’ve written a solid test suite, it should be easy. Just run the tests, and if they all pass, it should presumably work in the same fashion as it did before.
Another benefit of automated tests is that they help with debugging. Some bugs are notoriously hard to find when you have to repeatedly run the code, each time going through manual steps like creating and deleting data to make the bug surface, fixing and testing it again to see if you got to the root of the problem. Test cases are more granular, and they tell you exactly what they’re doing, so by running the test cases you can find bugs and fix them easily.
Testing and dynamic languages
Many critics of dynamic typing say that debugging dynamic languages is harder because the compiler doesn’t help you with debugging through type checking, but testing can help you get over a dependence on this static compiler behavior. Because Ruby objects are defined by behavior rather than a static definition, you can use tests to verify their behavior more effectively than by relying on the compiler. Compilers don’t test for nulls, string values, integers out of range, or partially constructed objects, and they are easily fooled by type casting. Testing gives you the same level of granularity with a much wider test spectrum, and as such, more information when trying to debug.
Now that we’ve covered the basic principles of testing, let’s look at testing in Ruby. The “burden” of testing is much lighter in Ruby, thanks to its built-in testing libraries and third-party tools. In this section, we’ll take a look at these tools and how they can help you effectively write tests and code faster and easier.
2.1.2. Types of testing
When people refer to testing, they are usually talking about unit tests. Unit tests test your code in small, discrete units: methods or classes or whatever small units of code you care to test. These tests are the core of all testing, because they test your code at its lowest level and verify its basic behaviors. Unit tests are the bread and butter of testing; typically these will be the first tests you write and will act as the foundation that other test types are built from. You wouldn’t want to write tests for a database application and all of its queries without first writing a test to ensure it can connect and make a query, right?
Unit tests should be concentrated. They should test the smallest unit possible: a single method at a time, a single call signature at a time, a single class at a time, a single module at a time, and so on. In doing this, you create a set of tests that depends only on what’s being tested, making their results more accurate. This way the foo method can’t make the test for bar fail.
Note
Most developers initially have difficulty gaining this separation of concerns. Don’t worry! There are plenty of techniques and libraries to help you out. Further on in this chapter, we discuss some of these strategies.
Higher up in the architecture we find integration tests. These tests involve larger pieces of code, and you can think of them as being something like compound unit tests. As the name suggests, they test the integration of your application’s pieces. For example, Rails’s integration tests allow you to test an entire application flow, from logging in, through filling a form, to getting a page with search results. Other integration tests could test a full application operation, like an e-commerce transaction or a sequence of actions like downloading, extracting, and using data. Their purpose is to make sure that all of the moving parts of your application, like your code, the database, any third-party code, and so on, are all moving in the right direction.
There are many other types of testing (functional tests, acceptance testing, regression testing, and so on), but these are beyond the scope of this book (and you may never need to write any of these sorts of tests if you have a testing/QA team). The remainder of this chapter will show you how to unit test your code using Ruby and its libraries, and we’ll start by walking through a basic testing workflow.
2.1.3. Testing workflow
Developers typically don’t test as much as they should. The excuses usually range from “It’s too much code!” to “We don’t have time for tests!” This temptation to skip testing is especially prevalent when tests are an afterthought to development. This tendency to ignore testing (along with a few more reasons we’ll discuss a little later) is why we advocate a test-first approach to development. In a test-first approach, you write your tests before you write your code, using your tests as a way to describe the behavior of the code you will write. For example, if you were writing an application to process XML files, you would want to write tests that describe how the application would behave when fed a valid XML file, when fed an invalid XML file, when the process is complete, and so on, and then you would go back and write the code to make those tests valid.
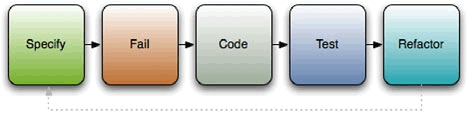
The test-first methodology can follow one of two paths: test-first development or test-driven development. We’ve described test-first development above: write your tests, and then write your code to make the tests pass. Test-driven development (TDD) is the same idea, except that it adds an element of code refactoring to the mix. The basic process can be broken into five steps: add, fail, code, test, refactor (as shown in figure 2.1).
Figure 2.1. Test-driven development is a five-step process: add, fail, code, test, refactor.
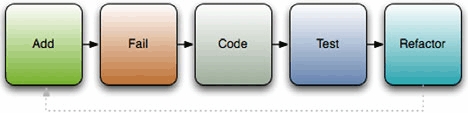
In the first step, you add tests for any new code you want to write before you write the code. You write a test that tests for the right behavior of the method; if the method takes a string and returns its length, write a test that calls the method with "hello" and test for a return value of 5; if it should raise an exception when you pass it a nil, test for that. As tests are added, you create a specification of the behavior that your code should conform to.
Once the specification is laid out, you move on to the fail step. In this step you run the tests and ensure they fail. And for a reason. We use tests to deal with errors we make in the code, but we can make errors while writing test cases. We can set up an object with all the right values, but forget to call the method we’re supposed to test, or call a method but forget to check its result, and such a test will always pass. Until you can make the test fail at least once, you have no certainty it’s actually testing your code.
Next, you write code to make the tests pass: you implement the specification you’ve created with the tests. Write the method, module, or class, and if the tests pass, great! If the tests fail, go back and debug your code to make them pass. When they all pass, go back and refactor your tests and code so they’re more effective (shorter but accomplish just as much or more).
But why bother with all this business?
2.2. Test-driven development with Ruby
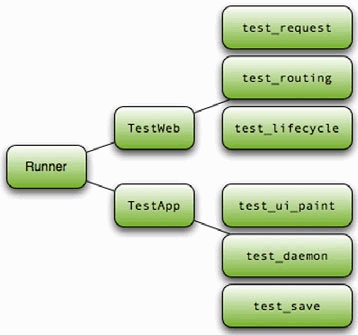
The built-in Ruby testing library is similar to the libraries of other languages, such as Java and Python. The general architecture consists of test suites, built from methods, which make assertions about your code. These test suites are run by test runners, which invoke the tests and report the results. As shown in figure 2.2, a single runner may invoke a number of suites, which may hold a whole lot of tests (the ActiveRecord tests for mySQL have 1,035 tests with 3,940 assertions!).
Figure 2.2. Test suites are composed of a collection of unit tests that are run one by one by a test runner.
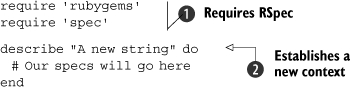
So, let’s get going on writing some tests. We’ll start with a basic test: testing the length of a string. First, we’ll need to create a test harness, which in Ruby is a class that inherits from Test::Unit::TestCase. Listing 2.1 shows our test case.
Listing 2.1. A simple test using Test::Unit
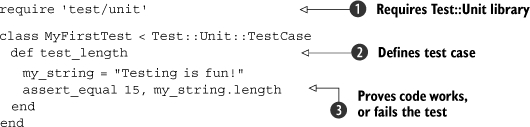
First, we need to require the Test::Unit library ![]() and create a class that inherits from Test::Unit::TestCase. We can then create methods that test the code
and create a class that inherits from Test::Unit::TestCase. We can then create methods that test the code ![]() . Within these methods, we will make assertions
. Within these methods, we will make assertions ![]() about the code. Save this code to a file (for example, my_first_test.rb) and run it. You should see output that looks something like this:
about the code. Save this code to a file (for example, my_first_test.rb) and run it. You should see output that looks something like this:
Loaded suite my_first_test Started . Finished in 0.00058 seconds. 1 tests, 1 assertions, 0 failures, 0 errors |
You can see that we had one test (one method that contained tests), one assertion, and no failures. We had one assert_equal statement that evaluated to true, so we had no failures. The assert_equal method isn’t the only assertion available; there are a number of assert methods, which are listed in table 2.1.
Table 2.1. Ruby’s built-in testing library offers a large number of assertions baked right in.
Assertion | Description |
|---|---|
assert(boolean) | Passes if boolean (that is, a boolean expression) is true. |
assert_equal(expected, actual) | Passes if expected == actual or expected != actual. |
assert_nil(object) | Passes if object == nil or object != nil. |
assert_match(pattern, string) | Passes if string matches or doesn’t match pattern (such as a regular expression). |
assert_raise(exception...) {block} | Passes if the block raises or doesn’t raise the provided Exception(s) |
assert_same(expected, actual) | Passes if actual.equal?(expected) or if !actual.equal?(expected). |
assert_respond_to(object, method) | Passes if object can respond to the given method. |
assert_throws(expected_sym) {block} | Passes if the block throws the provided symbol; assert_nothing_thrown passes if the provided block doesn’t throw any symbols. |
assert_instance_of(class, object) | Passes if object.class == class. |
assert_operator(first, operator, second) | Passes if the first object compared to the second object is true when using the provided operator. |
assert_kind_of(class, object) | Passes if object.kind_of?(class). |
assert_in_delta(expected, actual, delta) | Passes if actual - expected <= delta. |
assert_send(send_array) | Passes if method sent to object returns true. |
Using these assertions, you can build sets of tests that check your code effectively, but, like your code, tests don’t run in a vacuum. Often you need a little bit of setup before execution, or some teardown afterwards, such as reading in files or creating objects. Test::Unit provides a way to do that using the xUnit architecture. For example, if we wanted to test our string for length, emptiness, and hash value, it wouldn’t make sense to instantiate the string in each method; instead we would use the setup method. Take a look at listing 2.2 to see what we mean.
Listing 2.2. Using setup and teardown to prepare tests
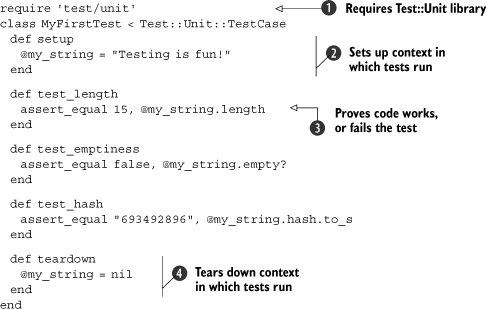
We start out the same way as last time: require the library and create a class that inherits from TestCase ![]() . But this time, we do something a little different. We create a setup method that creates an instance variable to hold our string
. But this time, we do something a little different. We create a setup method that creates an instance variable to hold our string ![]() . Now we refer to my_string as an instance variable throughout our tests (
. Now we refer to my_string as an instance variable throughout our tests (![]() and other places). Finally, we (superfluously) set my_string to nil in teardown
and other places). Finally, we (superfluously) set my_string to nil in teardown ![]() . The teardown method is special, like setup, and it’s run after tests. Yes, this example is a little contrived (especially because we didn’t do the whole testing cycle), but it’s important to understand the concept before we take it into practice. Now that you have the concept, let’s move on to an example that’s a little more real world.
. The teardown method is special, like setup, and it’s run after tests. Yes, this example is a little contrived (especially because we didn’t do the whole testing cycle), but it’s important to understand the concept before we take it into practice. Now that you have the concept, let’s move on to an example that’s a little more real world.
Let’s say you’re building an application to grab some XML reports from a remote server, pull some data out, then process the data you pull out. The reports, which are output from your payroll server, are catalogs of employees and hours worked; they are used by the application you’re building to generate departmental expense reports. One of these reports might look something like this:
<payroll-report> <department name="Graphics"> <employee name="Janice Partridge"> <week id="1">40</week> <week id="2">38</week> <week id="3">30</week> <week id="4">40</week> </employee> <employee name="James Jones"> <week id="1">33</week> <week id="2">23</week> <week id="3">30</week> <week id="4">25</week> </employee> </department> <department name="IT"> <employee name="Andrea Lantz"> <week id="1">40</week> <week id="2">41</week> <week id="3">45</week> <week id="4">39</week> </employee> </department> </payroll-report> |
Fairly simple, right? Departments have employees, which have weeks and hours. That’s simple enough to implement, and we’ll get to it soon, but first let’s write the test cases. Take a look at listing 2.3.
Listing 2.3. Tests for our to-be-implemented XML reporter

First, we create an instance of the PayrollReporter class ![]() in the setup method. The constructor takes a path to an XML file (we’ll feed it a test file here). Next, we create a test for a method named department, which will retrieve the details (employees, for example) of a department
in the setup method. The constructor takes a path to an XML file (we’ll feed it a test file here). Next, we create a test for a method named department, which will retrieve the details (employees, for example) of a department ![]() . We follow this with a test for a method named employee, which will do the same thing but for employees (it will retrieve a hash of their work hours)
. We follow this with a test for a method named employee, which will do the same thing but for employees (it will retrieve a hash of their work hours) ![]() . The last test we create is for a method named get_hours_for, which retrieves the total hours worked by an employee
. The last test we create is for a method named get_hours_for, which retrieves the total hours worked by an employee ![]() . Then we run the tests and get a load of errors. If we create a stub file (a file that has all classes and methods defined but with no method bodies), we should see failures rather than errors.
. Then we run the tests and get a load of errors. If we create a stub file (a file that has all classes and methods defined but with no method bodies), we should see failures rather than errors.
We’ve added some tests and they are properly failing, so let’s implement the code (which you can see in listing 2.4).
Listing 2.4. Our PayrollReporter implemented
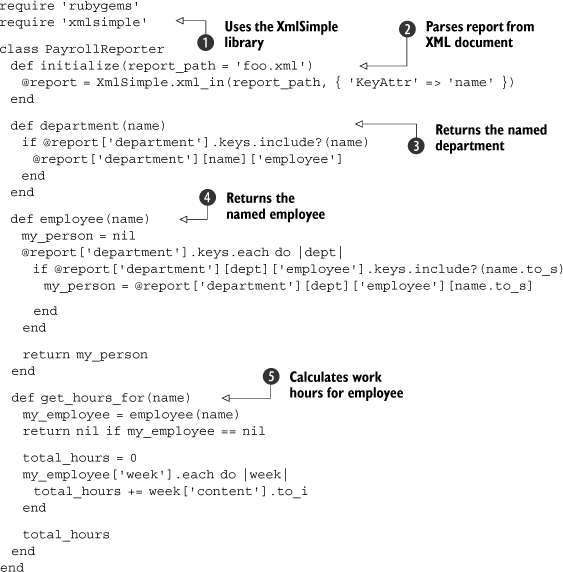
We’ll talk more about using and manipulating XML data later in this book, but for now we’ll use a library named XmlSimple to do basic data extraction ![]() . We implement each piece of the code individually. First the constructor, which takes a file path and opens it for parsing
. We implement each piece of the code individually. First the constructor, which takes a file path and opens it for parsing ![]() . Then a department method to get the employees in a department
. Then a department method to get the employees in a department ![]() , and an employee method to get the work hours of an employee
, and an employee method to get the work hours of an employee ![]() . Last, a get_hours_for method to get the total work hours of an employee
. Last, a get_hours_for method to get the total work hours of an employee ![]() . Now we need to run the tests to ensure they pass.
. Now we need to run the tests to ensure they pass.
Loaded suite payroll_reporter_test Started ... Finished in 0.028279 seconds. 3 tests, 8 assertions, 0 failures, 0 errors |
Excellent! Now that all of our tests pass, we can move on and refactor the current code and add new code (maybe a method to get an employee’s work hours for a certain week or a whole department’s work hours). As we add this code, we’ll use the tests to ensure that the application’s behavior is consistent. If the language of assertions and tests doesn’t appeal to you, there is an alternative testing method.
2.3. Behavior-driven development with RSpec
Test cases help you ensure the code behaves as it should, but how do you know what it should behave like? We like to base our development on a written specification, which tells us what the code should do. The tests measure whether the code behaves according to the specification, and the code itself implements the expected behavior. A written specification makes it easier to work as a team, to work against in-development libraries and services, to communicate to stakeholders what the software does, and to track progress as the features are implemented.
In this section we’ll talk about behavior-driven development, an approach that focuses on specifying, testing and implementing behavior (in that order), and we’ll show you how to do that using RSpec.
2.3.1. What is behavior-driven development?
Specifications take many forms, from high-level architecture diagrams through storyboards and screen mocks, all the way down to capturing the behavior of each functional unit. The high-level specification is most likely to remain accurate because it doesn’t capture a lot of details, and wholesale changes to the architecture and major components don’t happen frequently. It’s much harder to keep a functional specification synchronized with the code. If you have ever developed against a specification written as a Word document, you’ll know what we’re talking about. The specification starts out as the best ideas about the software to be written, and it’s only during development that you find it contains wrong assumptions, which must be fixed in code. In a matter of days, the code starts to diverge from the document, and the document turns into a work of fiction.
Behavior-driven development (BDD) was conceived by Dan North to address this issue. To do BDD right, you start by writing a specification of the code, but instead of creating a static document, you create it in the same repository that holds the source code. The specification forms a template that describes the expected behavior, which you then fill up with test cases. As you make changes, you reflect those back into the specification and tests, changing them alongside the code. The process is illustrated in figure 2.3.
Figure 2.3. The behavior-driven development process starts with specification, adds tests, and builds an implementation that matches the specification and passes the tests.
If this sounds a bit conceptual, don’t worry. In practice, it’s easy to do. A specification document may initially look something like this:
describe "A new string" do it "should have a length of zero." it "should be empty." end |
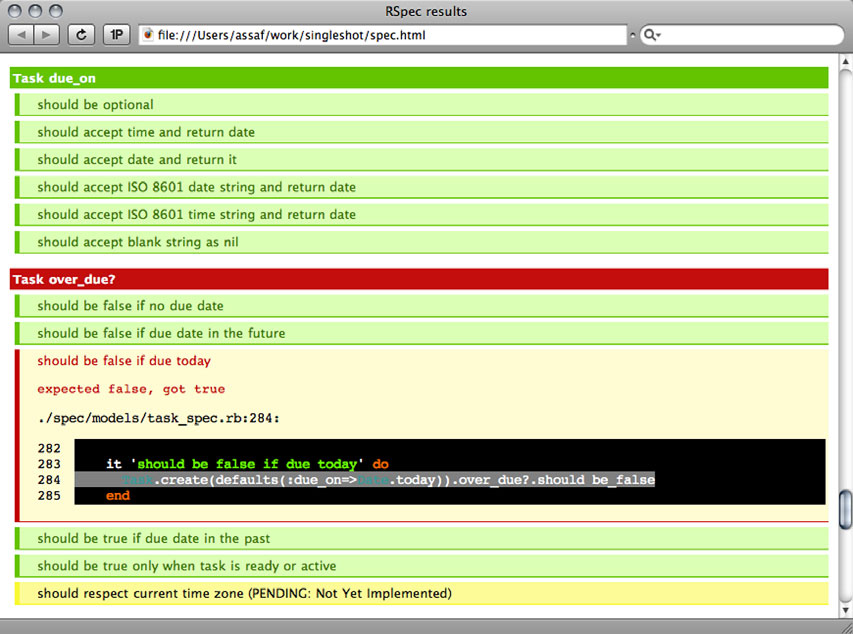
This is Ruby code, and we’ll explain what it does in just a moment. It’s also a specification that’s easy to read and understand. The behavior stands out, so we don’t have to guess it from the code. When we run it through a tool, we get a report that looks the one shown in Figure 2.4. The report we generate has three colors: green for test cases that pass, identifying behaviors we implemented correctly; red for failing tests; and yellow for anything we specified but haven’t implemented yet. It tells us where we stand so we can track progress on our project.
Figure 2.4. An HTML report showing successful, failing, and pending specifications
To go from the specification to working code, we’ll start by adding test cases (see listing 2.6). From here on, we’re following TDD practices: write a test that fails, then write the implementation to make the test pass.
We’ll encounter the difference between BDD and TDD again when we decide to make a change to our specification. Perhaps we will realize we need to use a different message format, present a task to the end user in a different way, or simplify a set of methods that are part of the public API. Whatever the reason, we’re going to return to this file, change the specification to describe the new behavior, fill it up with a test case to check the new behavior, and work out the implementation to conform to both. BDD gives us a way to manage change, keeping the code and specification synchronized.
Now that we have covered the basics of BDD, let’s look at a particular framework—one that’s used extensively in the Ruby world and that also influenced BDD frameworks for languages as diverse as Java and FORTRAN. We’re talking about RSpec.
2.3.2. Testing with RSpec
Let’s build a suite of BDD tests using RSpec as we look at a simple spec for a class we’ll create. We’ll start by installing RSpec (gem install rspec), which provides us with the spec library we need to require in our code and the spec command-line tool we’ll use to run these specification files. You can also use the command-line tool to generate reports like the one in figure 2.4 and to repeatedly run only failing tests. In chapter 3 we’ll talk about Rake, and we’ll show you how to set up your environment to automate these tasks.
Let’s return to our previous string-testing example to get a grasp on BDD; listing 2.5 shows a basic spec for a new string object.
The role of specification in agile development
Agile development practices put emphasis on progress through small, incremental iterations, with a close feedback loop between developer and end users. Agile development is the antithesis of BDUF (Big Design Up Front) and the waterfall model. What agile practitioners discovered is that having one stage to cement the specification, followed by a marathon to implement it, led to disaster. No matter how good your intentions, it’s impossible to predict everything up front. Business needs may change as you’re building the software, technical difficulties require adjustments, and your customer may realize he needs something different when he sees the working code. To create software successfully, you need the ability to evolve its design as you’re building it, working closely with end users to make sure it meets their expectations.
To make agile practices work, you still need a specification. What you don’t need is a specification that’s cast in stone before the first day of development. It has to be a living, changing document that can adapt to evolving requirements. It’s even better when it documents not what the software should have looked like, but what the delivered software actually does, and when it can be used to track progress. That makes BDD an important tool for agile development.
Listing 2.5. A context for an empty queue string
First, we require the needed libraries ![]() , which make available the methods that we must have. Then we create a context
, which make available the methods that we must have. Then we create a context ![]() for our string object: “A new string.” This context will describe the expected behavior of a new string. We can list those behaviors without writing any code to test them yet, or we can go straight ahead and start adding code that will test these behaviors. Because this is a trivial example, we’ll go ahead and add some real test cases, which you can see in listing 2.6.
for our string object: “A new string.” This context will describe the expected behavior of a new string. We can list those behaviors without writing any code to test them yet, or we can go straight ahead and start adding code that will test these behaviors. Because this is a trivial example, we’ll go ahead and add some real test cases, which you can see in listing 2.6.
Listing 2.6. A few specs for a string object
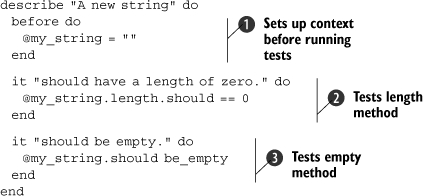
The general setup of the contexts and specifications may look familiar to you, because they are somewhat similar to those in the TDD library. First, we specify a before block ![]() , which will create an instance variable for us to use in our specifications (cleaning up after a test is done using an after block). Next, we create a specification that a new string should have a length of 0
, which will create an instance variable for us to use in our specifications (cleaning up after a test is done using an after block). Next, we create a specification that a new string should have a length of 0 ![]() .
.
Note the use of the method should; the should and should_not methods are the primary verbs used in RSpec. These methods, combined with predicates (like empty ![]() ), allow you to specify various conditions. You use these predicates to describe how the object being tested should behave (should throw_symbol), exist (should be_instance_of), respond (should respond_to), and so on. Check out table 2.2 to see a list of the specification predicates that are available. You can find more details on the RSpec website (rspec.info).
), allow you to specify various conditions. You use these predicates to describe how the object being tested should behave (should throw_symbol), exist (should be_instance_of), respond (should respond_to), and so on. Check out table 2.2 to see a list of the specification predicates that are available. You can find more details on the RSpec website (rspec.info).
Table 2.2. RSpec has numerous specifications you can use to verify the behavior of your application.
Specification | Description |
|---|---|
should be_predicate [args] | Uses the question mark form of the method provided as the predicate (e.g., simple_object.should be_empty calls empty? on the simple_object). |
should be_close(val, tolerance) | Allows a value tolerance for floating-point specifications. |
should have_something [args] | Calls has_something? on the receiver (e.g., should_have_key calls has_key?). |
should <operator> value | Uses Ruby’s operators to test (e.g., should_be < 3 or should_be =~ /hi/). |
should include(item) | Specifies that a collection should or should not include item. |
should match(regex) | Specifies that the receiver should or should not match the provided regular expression. |
should be_an_instance_of(class) | Uses instance_of? to test the receiver’s class. |
should be_a_kind_of(class) | Uses kind_of? to test the receiver’s class ancestry. |
should respond_to(symbol) | Tests whether the receiver responds to the given symbol using respond_to?. |
should raise_error([ex], [mesg]) | When called on a Proc, specifies that a given exception should or should not be raised; if no exception is given, checks for any exception thrown. The parameter for mesg is a string or regular expression that is matched against the exception’s message. |
should throw_symbol [:symbol] | When called on a Proc, tests whether a given symbol was thrown; if no symbol is given, tests for any symbol. |
should change(receiver, :method) | When called on a Proc, tests whether the value of receiver.method has changed after the Proc has executed; this method has a number of forms (check the latest documentation to see them all). |
should have(number).things | Tests the receiver’s count (should_have), lower limit (should_have_at_least), and upper limit (should_have_at_most) of the collection named for things (e.g., my_array.should have(3).items). |
should eql(arg) | Specifies that the receiver should or should not be equal to arg in object identity (eql) or merely value (equal). |
should satisfy {|arg| block } | Tests whether the block evaluates to true when the receiver is passed as the only argument. |
Getting back to our example, you can run the specs and make sure they pass (which they should!).
Now let’s look at BDD with something a little more realistic. Let’s say you want to test an IntranetReader object, which is a wrapper for your intranet’s RSS feed. We’ll create a spec for all the behaviors of the library. Remember, because we’re using behavior-driven development, we want to start with a spec, and we need to specify behavior for whether or not the object has stories in it, whether it properly connected, whether the RSS is parsed correctly, and so on, rather than asserting values and conditions. Let’s start with the most basic spec, which you can see in listing 2.7.
Listing 2.7. A basic spec for our IntranetReader class
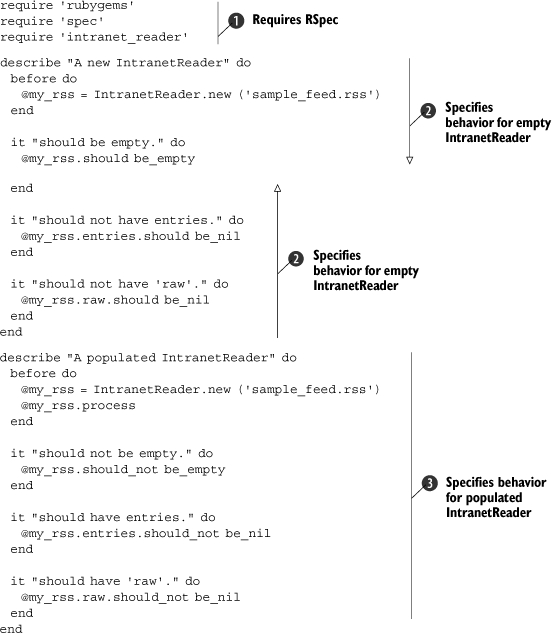
This is similar to our specification in listing 2.6, except this time we’ve specified two contexts. First, we require our essential libraries ![]() , and then we proceed to create a context for an empty IntranetReader
, and then we proceed to create a context for an empty IntranetReader ![]() . Inside the context, we have specifications to check for the emptiness of the new object we’ve created. A second context holds specifications for a populated IntranetReader
. Inside the context, we have specifications to check for the emptiness of the new object we’ve created. A second context holds specifications for a populated IntranetReader ![]() . These specifications ensure that the object was populated properly.
. These specifications ensure that the object was populated properly.
If you run these specifications now (using the spec command like this: spec intranet_reader_spec.rb), you will get some errors (especially if you don’t create an intranet_reader.rb file to require). It should look something like the following when they’re failing “correctly.” (The actual output includes stack traces of all failing tests, which we haven’t included here.)
FFFFFF ... Finished in 0.002936 seconds 4 specifications, 4 failures |
Once you’ve reached this point, all you have to do is go back and implement code to make the tests pass, just like in test-driven development. Listing 2.8 shows our implementation using the SimpleRSS gem, but yours may look somewhat different.
Listing 2.8. Our implementation of IntranetReader
require 'rubygems' require 'simple-rss' require 'open-uri' class IntranetReader def initialize(url) @feed_url = url end def process @raw = open(@feed_url).read @rss = SimpleRSS.parse @raw end def entries @rss.items if @rss end def empty? @rss.nil? ? true : @rss.items.empty? end def raw @raw end end |
If you run the specifications and there are no failures, it’s time to add and refactor tests, code, or both. Perhaps you’d like to implement a method to validate the RSS input before it’s processed, or maybe you’d like to allow the user to search the RSS feed. Whatever you add, just remember: specify, code, test, refactor.
But what if your testing environment doesn’t have access to the RSS feed? How do you mimic your production environment for testing? The next section will discuss a few strategies for dealing with this problem and a few techniques for setting up an environment for your tests.
2.4. A testing environment
As you read this chapter and start playing with tests, you may be wondering, “What if my test environment doesn’t have access to certain parts of my application, like networked components or third-party services?” Fortunately for us, the pioneers of software testing devised a number of techniques to handle this sort of thing. In this section, we’ll take a look at three of these techniques: fixtures, stubs, and mocks.
2.4.1. Setting up a baseline with fixture data
One of the earliest difficulties you’ll encounter with testing is replicating the environment in which your code will run. Often the problem is not so much replicating the relationship among your code, but the external environment from the OS or network. Many developers use fixtures as a first crutch to get this sort of environment up and going. Fixture data (or fixtures) create a fixed, baseline environment for your tests to run in. For example, as with Ruby on Rails, you might use a YAML file to set up the database with an initial set of products so you can test your inventory management code against known data. Or, you might create a few data files that are prepopulated with data that would normally be generated by another application so you can test how your code reacts to existing data.
Note
In the Ruby development realm, you will probably most often hear the term “fixture” applied to Rails and its testing fixtures for databases. Don’t be confused: the concept of a fixture existed before Rails was around and is useful outside of Rails.
There is no special technique necessary to use fixtures because you are simply constructing a baseline environment for testing. For example, let’s say you were testing a component of your application that received the output from ps to check for the existence of a process. Listing 2.9 shows the original class and test.
Listing 2.9. A process checker class and test
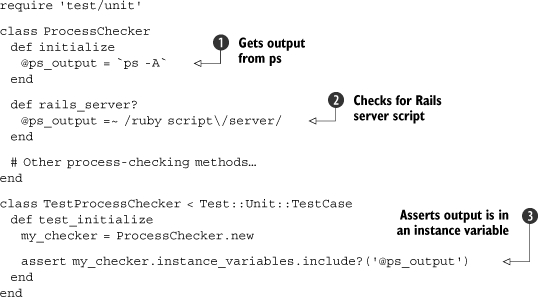
As you can see, we have a ProcessChecker class that grabs the output from ps, stores it in an instance variable ![]() , and checks that variable for various processes (in this case, we just check that the Rails server script is running)
, and checks that variable for various processes (in this case, we just check that the Rails server script is running) ![]() . We then create a test that ensures that variable is actually set when the object is instantiated
. We then create a test that ensures that variable is actually set when the object is instantiated ![]() . But now we’re at a testing impasse. How do you test the results of the ps call? Will you have to start the Rails server script every time this test is run? What if the deployment environment doesn’t even have Rails installed?
. But now we’re at a testing impasse. How do you test the results of the ps call? Will you have to start the Rails server script every time this test is run? What if the deployment environment doesn’t even have Rails installed?
This is one situation where implementing a fixture makes sense. If you create standard data for the object to use instead of making a call to ps every time, you can ensure your tests will run the same everywhere (even on Windows!). Take a look at the revised version of the test in listing 2.10.
Listing 2.10. A revised test with fixture data
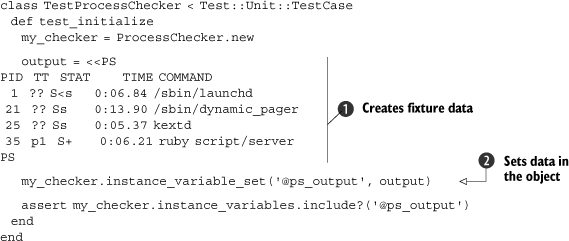
In this instance, we fill in some fixture data, which has static output from a run of the ps command ![]() . This data is then fed into the object via instance_variable_set
. This data is then fed into the object via instance_variable_set ![]() . Now we can run this test on any platform (even though Windows will complain that it can’t find ps) and it should behave the same way, because we now have a set of fixture data to work from.
. Now we can run this test on any platform (even though Windows will complain that it can’t find ps) and it should behave the same way, because we now have a set of fixture data to work from.
Note
We are injecting the data in a way that makes our test case fragile ![]() . We recommend adding methods to your classes and modules that will assist in testing. We wanted to show what’s possible when you don’t have full control of the objects you’re testing.
. We recommend adding methods to your classes and modules that will assist in testing. We wanted to show what’s possible when you don’t have full control of the objects you’re testing.
You could then go back to your tests to refactor or add to them, as in listing 2.11.
Listing 2.11. Our refactored and expanded tests

Now that we’ve refactored to use the setup method ![]() , it’s trivial to add tests for the methods on the class
, it’s trivial to add tests for the methods on the class ![]() .
.
Fixtures make it easy to set a baseline environment for your tests, but they can’t cover everything. For example, if you’re using a database, fixtures often don’t scale easily and become a hassle to maintain (you can find plenty of blog posts about the subject on Google). If you plan on running your software on multiple platforms, you may have to maintain a fixture for each platform in cases like the preceding example. There are alternative methods to get around these problems, and with a little work and abstraction we can take advantage of them. We can use fixtures to rake data, as discussed earlier, and we can use stubs and mocks to fake methods and components. Let’s start with stubs.
2.4.2. Faking components with stubs
Stubs are “fake” objects or methods that mimic the behavior of “real” objects. A stubbed object creates a facade of a real object, seemingly behaving like the real object, but in actuality faking the real object’s logic. This technique is useful for mimicking parts of your application that may not be available or that are performance intensive.
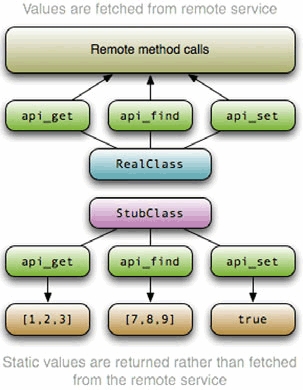
For example, let’s say you have an application that orders products from one of your suppliers, but you don’t want to order a room full of products while running your tests. In that case, you would create stubbed objects to fake the supplier service so your tests can still be run without buying anything. These objects would act like, expose the same API as, and return the same values as the real objects that interact with the remote service, except they wouldn’t be interacting with the remote service. For a visual of the concept, see figure 2.5.
Figure 2.5. A stubbed class will seem to act like the real object but won’t actually behave like it. In this case, the stub doesn’t grab data from a remote service, but to the code consuming the API, it appears to.
Let’s look at this example in code. Let’s say the supplier exposes a web service API to you and has included a natural Ruby wrapper for this service. The API exposes a search method for finding products, an add_to_cart method for adding products to your cart, and a purchase method for finishing your order. Your application receives the purchasing data in XML form, which is parsed and then given to the supplier object to execute the purchase. The supplier class has an execute_purchase method, which takes an array of product names and quantities from the XML purchasing data. Our test for a simple purchase is shown in listing 2.12.
Listing 2.12. Building tests for our supplier class
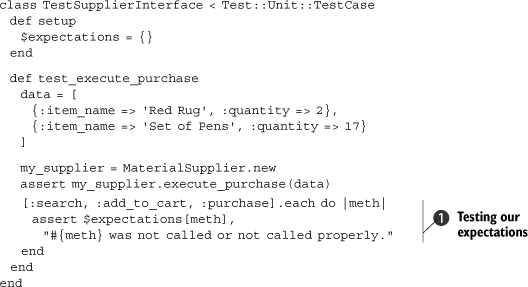
class TestSupplierInterface < Test::Unit::TestCase def test_execute_purchase data = [ {:item_name => 'Red Rug', :quantity => 2}, {:item_name => 'Set of Pens', :quantity => 17} ] my_supplier = MaterialSupplier.new assert my_supplier.execute_purchase(data) end end |
As you can see, we instantiate our class, call the execute_purchase method, and assert returns the truth value. If you run the tests, it should fail, so we’re ready to implement the class. The class implementation for this particular supplier is shown in listing 2.13.
Listing 2.13. A class for handling purchasing from a supplier
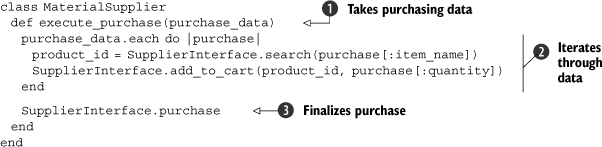
As we mentioned, the execute_purchase method takes purchasing data from another part of your application ![]() . The data is then iterated, the product name is searched for, its id is found, and it is added to the cart
. The data is then iterated, the product name is searched for, its id is found, and it is added to the cart ![]() . After the cart has been populated, we finalize the purchase
. After the cart has been populated, we finalize the purchase ![]() .
.
Now that we have a test and a class, how do we reliably test this? We can use the remote system to implement it, but we shouldn’t depend on that all the time, especially if we want our tests to be consistent and reliable in every environment. Even if it is available, you probably don’t want to (or shouldn’t) send real requests to the remote server. So, we need to stub it.
To stub the SupplierInterface class, we need to create a class of the same name with input methods that return the right results (without making any requests to the remote service). Because we only use this class for testing, we’ll include it in the same file as our test case (listing 2.12). Listing 2.14 shows the stubbed SupplierInterface.
Listing 2.14. A stubbed SupplierInterface
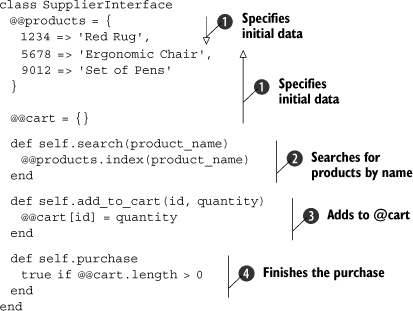
We’ve created a stubbed version of SupplierInterface that works from data that we’ve statically created ![]() . We use class-level hashes to implement searching (using the index method)
. We use class-level hashes to implement searching (using the index method) ![]() and adding to a cart
and adding to a cart ![]() . Because all we are testing at this point is whether we can add items to the cart and purchase them, we can just have the purchase method mimic the remote system and return true if the order is successful (if there are items in the cart)
. Because all we are testing at this point is whether we can add items to the cart and purchase them, we can just have the purchase method mimic the remote system and return true if the order is successful (if there are items in the cart) ![]() . Now our tests should execute in the same manner, except using our local stubbed class instead of the remote service interface.
. Now our tests should execute in the same manner, except using our local stubbed class instead of the remote service interface.
Stubbing is a useful technique for getting your tests up and running, but at the end of the day, stubs are still dumb objects. They pass back the value you ask for, but they don’t verify that the right method calls are being made to them. This deficiency can make your tests weaker than they would be if you were to test those calls to the objects you’re stubbing, because you could be missing out on a missed method call or a wrong parameter. Now let’s take a look at another technique: mocks.
2.4.3. Setting behavior expectations with mock objects
Mock objects are similar to stubs, except they set expectations about your code’s interactions with them. In our previous example, a mock object wouldn’t have just stupidly taken the input for the search or add_to_cart methods—it would have verified that it received the right parameters or that the method was called in the first place. In doing this, it not only tests your code’s actions on the returned values, it also tests your code’s interactions with these objects: parameters passed, methods called, exceptions raised, and so on.
In this section, we’ll look at a couple of ways to create mock objects. The first method we’ll discuss is creating your own mock object patterns, no library required. We’ll then take a look at using libraries such as Mocha to create mock objects.
Creating custom mocks
Before there were fancy mocking libraries, developers had to get their hands dirty and build their own mock objects. Unlike programming on punch cards, creating your own custom mock objects is still a valid practice. Sometimes there is a specific order or logic to how your application runs, and trying to shoehorn that into some mocking libraries’ interfaces can sometimes be awkward. Building your own mock objects is simply easier.
Let’s continue with our previous example. If we take our stubbed class and add expectations for each method, we can make it into a mock object. Listing 2.15 shows a revised version of the SupplierInterface stubbed class from listing 2.14.
Listing 2.15. Tests for shipping components
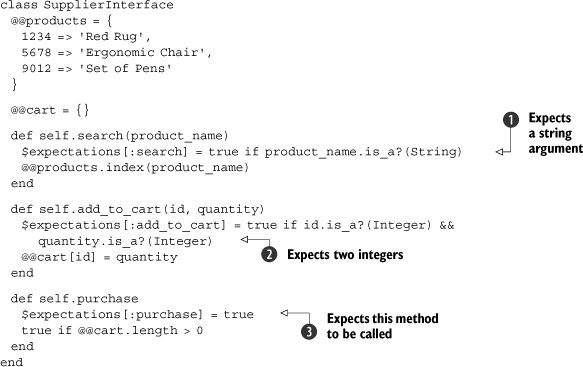
Here we have created expectations about parameters (![]() and
and ![]() ) and an expectation that the purchase method will be called
) and an expectation that the purchase method will be called ![]() , setting global variables appropriately. (This is not the best practice, but for the sake of brevity we’ll keep it simple.) These expectations can then be evaluated in an updated test, as shown in listing 2.16.
, setting global variables appropriately. (This is not the best practice, but for the sake of brevity we’ll keep it simple.) These expectations can then be evaluated in an updated test, as shown in listing 2.16.
Listing 2.16. An updated test to use our custom mock
As you can see, we have added a small piece of code ![]() to the end of the method that iterates over our known expectations (one for each method we expected to be called) to make sure they were set. If they weren’t, the test fails. This technique makes our tests more robust, and, if used consistently, can make full test coverage a lot quicker than using simple stubs or nothing at all.
to the end of the method that iterates over our known expectations (one for each method we expected to be called) to make sure they were set. If they weren’t, the test fails. This technique makes our tests more robust, and, if used consistently, can make full test coverage a lot quicker than using simple stubs or nothing at all.
The only problem with custom mocks is they aren’t formal, and, as a result, they are time-consuming to maintain. Fortunately there are a few libraries to formalize your mocks and speed up the development of your tests.
Creating mocks with Mocha
As mocking has become more popular, a number of libraries has been created that make the process much easier. In this section, we’re going to discuss Mocha, one of the newer mocking libraries. Its mocking interface is much more intuitive and powerful than those of some other mocking libraries, so it’s the one we’d recommend, were you to ask (and you are asking, because you are reading this book!).
Tip
If you find that Mocha doesn’t work with your testing practices, or that it is “too magical,” you may want to look into FlexMock, Jim Weirich’s mocking library, or RSpec’s mocking capabilities.
Mocha works via a mechanism it calls expectations (which is why we called our hash $expectations in the earlier examples). Mocha sets expectations on object behavior; so, for example, you might set an expectation that an object will have its process method called or that an object’s save method will be called and it should return true. This is just like what we did before, except that Mocha makes the process much cleaner. Mocha expectations are defined by a single method, expects, and they can be attached to any object. When an expectation is attached to an object, a stub is automatically created and an expectation is set up. Listing 2.17 shows our example (from listing 2.16) refactored to use Mocha.
Listing 2.17. The previous mocking example, rewritten using Mocha
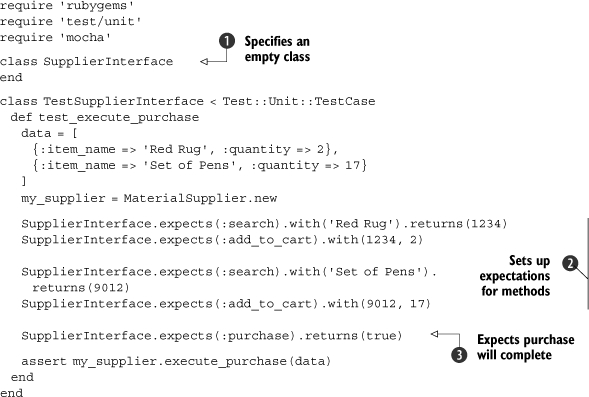
In this version of the code, we still verify behavior, but we don’t have to spend the time to implement an entire class, and we get the benefit of being able to verify specific calls to a method. We first create a blank class, because all we’re doing is attaching stubs to a dummy class ![]() ; in a real-world setting, this would be unnecessary, because there would be a real class to attach the stubs to. Next, we define expectations for each method and for calls to that method
; in a real-world setting, this would be unnecessary, because there would be a real class to attach the stubs to. Next, we define expectations for each method and for calls to that method ![]() . The final expectation is then set and the method tested
. The final expectation is then set and the method tested ![]() . When this test suite is executed, you should see something like the following:
. When this test suite is executed, you should see something like the following:
Loaded suite purchasing Started . Finished in 0.001637 seconds. 1 tests, 6 assertions, 0 failures, 0 errors |
As you can see, assertions are created for each expectation that we set. These assertions verify the behavior of your code when calling the stubbed methods.
Ruby offers a number of utilities to take all sorts of measurements of your testing code. Now that we’ve taken a look at testing, specifying, stubbing, and mocking, we need to look at a few techniques that test your tests.
2.5. Testing your tests
No one is perfect. If testing helps to smoke out your imperfections, who’s to say you won’t create some in the process of writing test code? In other words, “Who’s testing the testers?” In this section, we’ll look two metrics for evaluating your testing code’s coverage and quality.
2.5.1. Testing code coverage
As your applications grow in size, so will your test suites, and as your test suites grow in size, so will the chances that you’ll miss testing a method or class here or there.
Typically, there isn’t an issue with skipping a test here or there unless it’s an important method that you forgot to test or a class that is used quite often. But Ruby offers a couple of tools that can help you ensure your code is covered with good quality tests 100%, and we’ll look at them next.
Tip
The ZenTest tool from Ryan Davis is another way to avoid skipping tests. If you run it over your code, it will generate stubs for code that you’ve written tests for or generate tests for code that doesn’t have any. It’s excellent if you’re writing tests for the existing code or if you’re doing TDD and want to exert less effort.
Testing coverage with rcov
The rcov utility from Mauricio Fernandez allows you to test the C0 coverage of your code (coverage of method and statements, but statements with conditions will not test fully). It can be installed using RubyGems (for example: gem install rcov) and executed using the rcov command. When executed with a test file as a parameter, it will crawl through the code and look at the test coverage for each class. Rcov collects this data and produces HTML/XHTML (or, optionally, text).
Tip
Rcov can show your results in a simple text format if you feed it the -T option on the command line.
Rcov works by running over test suites and checking the line coverage of the code. You run it by invoking the rcov command followed by the list of files to test. As an example, we’ll run rcov on a portion of Rails using the command rcov test/*.rb -o coverage/ (the -o option allows you to specify an output directory). Figure 2.6 shows the generated HTML page.
Figure 2.6. The rcov tool presents its results as HTML or text; the HTML view has nice graphs that illustrate code coverage and individual pages for each file tested.
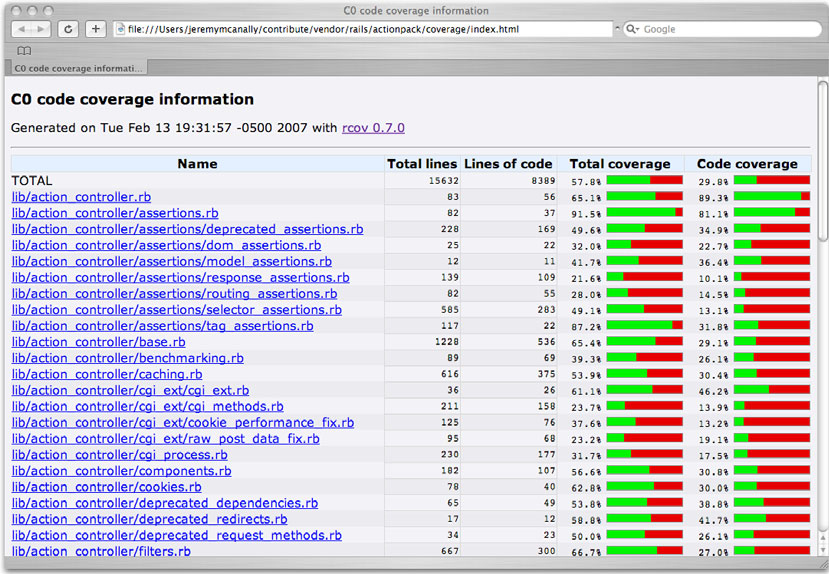
As you can see, a percentage is given for each code file, along with a small bar graph. Running this on a smaller codebase will yield less spectacular results, but it’s still a useful tool for making sure your code is completely covered.
Once you’ve mastered code coverage, it may beneficial to ensure your tests are of good quality and coverage; Heckle is a tool for testing just that.
2.5.2. Testing quality with Heckle
Heckle, from Ryan Davis, is a different kind of tool. Think of Heckle as your tests’ worst nightmare. It tests the quality of your tests using a technique called fuzz testing. The problem with test cases is that merely passing doesn’t guarantee you’re putting the code to the test. Perhaps you’re calling one method, but not testing for the changes it makes to the object. These kinds of errors happen on occasion, and you’ll notice them when you change the test code slightly and the test still passes. Heckle takes your tests, messes with the test code, then runs them again to ensure that they fail when they should. If your tests don’t notice crazy changes to your code, then either that code isn’t covered or it isn’t covered well.
Tip
Heckle also supports RSpec. All you have to do is invoke RSpec with the --heckle option.
Think of Heckle as a way of testing your tests—checking them for coverage and quality. Let’s say you have the class in listing 2.18.
Listing 2.18. A simple class to Heckle
class Customer def initialize(name = nil) @name = name end def tag tag = "Customer: " tag += @name.nil? ? "<unknown>" : @name tag end end |
This class will create a pretty simple object to represent customers and hold their names. Listing 2.19 shows a test for this class.
Listing 2.19. Our tests to Heckle
require 'test/unit' require 'customer' class TestCustomer < Test::Unit::TestCase def test_tag @customer = Customer.new('Mike Stevens') assert_equal 'Customer: Mike Stevens', @customer.tag end end |
For an example’s sake, we have one test that tests the value returned by the tag method. If we were to run rcov on this, it would tell you that we have 100 percent coverage, but if we run Heckle, we’ll see a different story:
Initial tests pass. Let's rumble. ********************************************************************** *** Customer#tag loaded with 3 possible mutations ********************************************************************** 3 mutations remaining... 2 mutations remaining... 1 mutations remaining... The following mutations didn't cause test failures: def tag tag = "Customer: " tag = (tag + if @name.nil? then "�37Be|H�20B�27�22W3_q�27�25Gf?bZHJ&p/P& P�16�36-#�31" else @name end) tag end |
One mutation that Heckle ran didn’t cause a test failure when it should have. Note that it changed the value that is returned from tag from <unknown> to a long string of text. Because we didn’t test for this, it didn’t fail. So now we need to go back and add or refactor tests to catch the mutation. Listing 2.20 shows how we did it.
Listing 2.20. Our updated tests that can stand up to even a strong Heckling!
class TestCustomer < Test::Unit::TestCase def test_tag @customer = Customer.new('James Litton') assert_equal 'Customer: James Litton', @customer.tag end def test_tag_empty @customer = Customer.new assert_equal 'Customer: <unknown>', @customer.tag end end |
We added a test to test for an empty name attribute, and if we run Heckle again, we should see a different result:
Initial tests pass. Let's rumble. ********************************************************************** *** Customer#tag loaded with 3 possible mutations ********************************************************************** 3 mutations remaining... 2 mutations remaining... 1 mutations remaining... No mutants survived. Cool! |
No mutants survived! Great! So we’ve fixed our tests to stand up even to fuzz testing. Now it’s time to go back and create more tests, more code, and heckle again and again. Even though Ruby makes this cycle easier, it can get annoying to make a change, run the tests, make a change, run the tests, and so on ad nauseum.
2.6. Summary
Ruby’s testing facilities almost make it too hard not to test! In this chapter, you’ve been exposed to TDD and how to do it with Ruby. You should be able to build test suites for new and old code and expand those tests over time. You were also shown how to do BDD using the RSpec library, starting with the specification and working your way through to implementation.
We also discussed how to mimic a production environment while testing, using techniques like fixtures and fake objects. You learned how to build stubs and mocks (both from scratch and using Mocha) in order to mimic code functionality. In the last stretch, we looked at a couple of secondary tools that can help you out when writing tests. The rcov tool will ensure your code is covered, and the Heckle tool will help you ensure your code is covered well.
In the next chapter, we’ll start looking at using Ruby with other technologies. The rest of this book is about practical techniques, many of them using other technologies, but before we dig into that content, we need to take a look at the basics of integration and automation with Ruby.