
Chapter 8. Deployment
This chapter covers
- Using gems to distribute libraries and applications
- Using Capistrano to deploy and manage servers
- Using Vlad to deploy and manage servers
- Monitoring servers with God.rb
Much has been written on the topic of deploying applications written in Ruby on Rails. However, not all Ruby applications are web applications, and not all web applications use Rails. This chapter will focus on the deployment concerns that arise when deciding how to create Ruby applications and how to release those applications into a live environment once done.
For veteran Rails developers, a lot of this will be familiar: we will discuss using Capistrano to deploy applications, packaging up reusable components in Ruby gems, and using God to monitor a deployed application. However, we will go beyond the common uses of these tools and explain how to customize them for a variety of server-based applications, beyond Rails.
Keep in mind that the process of deploying live applications can be complex. The topic could easily fill an entire book of this size. This chapter will focus on tools written in Ruby that can help you deploy applications and libraries. If you’re interested specifically in web applications, you can find setup and configuration instructions in appendix C.
8.1. Creating deployable packages with RubyGems
When deciding how to structure new Ruby programs, it’s worth taking some time to decide how you will deploy them. While some of the programs you create will be yours and yours alone, you may also find yourself creating code for hundreds or even thousands of developers. This may be because you are writing open source software, or because others will use your code in a large enterprise situation, or even because you are writing commercial code to be used by those who purchase it.
In this section, we will look at how to create skeletons for your code that will make it easy to release and deploy to other developers. Because Ruby’s gem system is designed to be robust and decentralized, this section will focus on building Ruby gems and creating your own secure gem repositories.
Using the latest version of RubyGems
RubyGems is an extension of Ruby and not part of the official Ruby 1.8 distribution, although some distributions do contain it. The One-Click Ruby Installer (for Windows and Mac OS X) includes RubyGems, as do Mac OS X 10.5 (Leopard) and JRuby. RubyGems will become part of Ruby 1.9 and above.
If you do not have RubyGems installed, we recommend downloading RubyGems 1.2 or later from the RubyForge website and installing it by unpacking the archive file and running the setup.rb file found there. For example:
$ wget http://rubyforge.org/frs/download.php/38646/rubygems-1.2.0.tgz
$ tar xzf rubygems-1.2.0.tgz
$ cd rubygems-1.2.0
$ sudo ruby setup.rbIf you already have RubyGems installed, we recommend upgrading to 1.2 (which may require upgrading to Ruby 1.8.6). You can check which version of RubyGems you have by running the command gem --version. To upgrade to the latest version, use this command:
$ gem update --systemYou can find more information about installing Ruby and setting up RubyGems in appendix A.
8.1.1. Using RubyGems in your organization
Suppose we run the IT department of a medium-sized programming firm. Pretty much everyone’s writing Ruby code, but project groups are having difficulties sharing code. For instance, one team spent all month writing some code to send alerts out via AIM, and another team was several days into implementing the same code before they realized it had already been done. To avoid such problems, we want to provide a centralized repository of Ruby libraries produced by different teams in our organization.
Problem
You want to use the RubyGems system to allow your teams to integrate their packages into their existing libraries of Ruby code. You want them to be able to use their existing tools and to have downloaded gems integrate seamlessly into their existing repositories. Finally, you want to be able to support dependencies and requirements, as well as provide support for automatically installing C extensions.
Solution
We can use Ruby tools to generate gem skeletons and fill in information about dependencies and C extensions. We can then host these gems on a server and give the developers a URL that they can use with the gem command-line utility to pull gems from the company repository instead of from the default RubyForge repository.
Let’s tackle these problems one at a time. First, let’s take a look at generating empty gems that you can fill with the appropriate information. We’re going to use the newgem utility to build the skeleton. It allows you to build a full skeleton, including a website to upload to RubyForge and automates other gem-related tasks. However, we’re going to use the --simple switch to tell newgem to generate only enough code to get us up and running. Here’s the command:
newgem ruby_in_practice --simple |
Inside the directory created by this command, you should see a pretty simple structure containing a series of files at the root level (LICENSE, README, Rakefile, and TODO). There’s a directory for your library (lib) and one for your tests (spec). There will also be a folder called script that includes generator scripts for Rubigen (which we will not be discussing here).
The main work we’ll be doing here is inside of the Rakefile file, which holds the configuration for the gem we’ll be building. You’ll want to replace the sample information at the top, which will automatically be used further down in the gem specification. By default, the created gem will include all of the files in your lib and spec directories; you can change that by modifying the s.files declaration to include other files (where “s” refers to the variable that holds Gem::Specification). You can add dependencies by using s.add_dependency inside the gem specification. For instance, if you wanted to require hpricot 0.5 or higher, you would add this line:
s.add_dependency "hpricot", ">= 0.5" |
You can include dependencies that are private to your organization or common gems that are on the main RubyForge server.
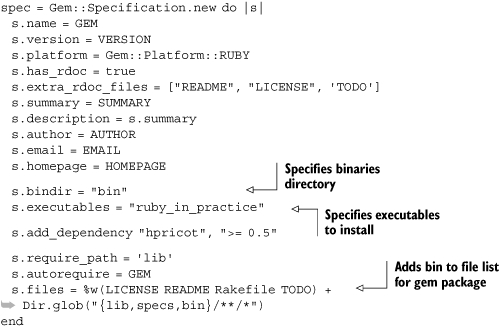
Your gem specification should look like the one in listing 8.1.
Listing 8.1. Gem specification
GEM = "ruby_in_practice" VERSION = "0.1.0" AUTHOR = "Sample McSample" EMAIL = "[email protected]" HOMEPAGE = "http://sample.example.com" SUMMARY = "A sample gem for Ruby in Practice" spec = Gem::Specification.new do |s| s.name = GEM s.version = VERSION s.platform = Gem::Platform::RUBY s.has_rdoc = true s.extra_rdoc_files = ["README", "LICENSE", 'TODO'] s.summary = SUMMARY s.description = s.summary s.author = AUTHOR s.email = EMAIL s.homepage = HOMEPAGE s.add_dependency "hpricot", ">= 0.5" s.require_path = 'lib' s.autorequire = GEM s.files = %w(LICENSE README Rakefile TODO) + Dir.glob("{lib,specs}/**/*") end |
When, later on, we install and use the gem in our application, RubyGems will add the gem’s lib directory to the LOAD_PATH, so we can easily require these files from our application. To prevent naming conflicts, by convention we use a file that has the same name as the gem. You will notice that newgem generated the file lib/ ruby_in_practice.rb. That will be the starting point for loading up the code that makes up our gem.
If your gem requires more than one file (and most do), we recommend placing additional files in a subdirectory that follows the same naming convention. In our case, that would be the lib/ruby_in_practice directory. Listing 8.2 shows an example of a lib/ ruby_in_practice.rb file that requires additional files from the gem when it loads.
Listing 8.2. Requiring Ruby files from a gem
require 'ruby_in_practice/parser' require 'ruby_in_practice/lexer' require 'ruby_in_practice/interactive' |
Requiring ruby_in_practice from an external file will automatically push the items under s.require_path (in this case lib) into the load path, so requires like those in listing 8.2 will work perfectly.
Discussion
The gem tool provides a variety of commands for installing, building, searching, serving, and performing many other gem-management tasks. You can learn more by running gem help commands.
Making a gem release is usually a more involved process. We like to run the full set of test case on our gem before packaging it for distribution. There are also other release tasks you may want to automate, like creating a changelog, tagging the release in source control, uploading the gem to a gem server, and so forth. Instead of running these tasks manually for each release (and sometimes getting them wrong), it’s easier to automate the entire process using Rake. If you look into your gem repository, you will notice that most gems are built with the help of Rake.
As you get more involved with gem development, you’ll want to explore different tools that will streamline different parts of the process. Newgem, which we just covered, takes the pain out of creating a new skeleton library and Rakefile for your gems. Another such tool is the rubyforge gem, which automates the process of making a new gem release via the RubyForge website.
Most gems consist entirely of Ruby code, but some contain portions of C code. C code is useful for talking to third-party and system APIs (e.g., a graphics or sound library), and for optimizing sections of critical code. Including C extensions is pretty simple too, assuming you have a working extconf.rb file already. Create a new directory called ext inside the gem skeleton, and place your extconf.rb file and any required C files into it. Then, add the following line to the gem specification:
s.extensions = "ext/extconf.rb" |
This tells the gem installer to run extconf.rb and then to make and make install the generated Makefile. This will produce the same effect as manually installing the extension.
Here, too, there are a variety of tools you can use. Ruby can easily call out to C code, but if you’re wrapping a library with a large C/C++ API, you’ll find it easier to use tools like SWIG (http://www.swig.org) to generate the wrapper code for you.
Now that we’ve looked at how to package a gem, let’s distribute it to other developers in the company by setting up a central gem repository.
8.1.2. Setting up a RubyGems repository
If you have an organization that needs to share Ruby code written by different departments, or if there’s another reason you’re distributing code to be used by others, you’re going to want to start by setting up your own repository.
Problem
You need to deploy various software packages to a remote server where it will run, but managing dependencies has become quite complex. Additionally, it’s difficult to manage the process of getting your files to the server and keeping track of which versions are running. Having already set up a server in the previous section, you want to incorporate your newly organized dependency system into your deployments.
Solution
To solve this problem, we’ll package up and version the code into gems, and deploy the gems onto the server that will be running the code. Using the binary features of RubyGems, we can create a binary with the package that will run the code and that we can execute and monitor on the remote server. Because we will be using gems, we’ll be able to specify both RubyForge dependencies and dependencies on our own gem repository.
We’ve already looked at the basics of packaging up code into gems. In order to use rake package and rake install to test our gem locally, we need to develop our code inside a gem structure. This means we need to make a few changes to the gem specification from listing 8.1 to add support for a binary that will run our code. We’ll add a bin directory under ruby_in_practice, and add a file called ruby_in_practice under it. The binary will typically look something like the one in listing 8.3.
Listing 8.3. Deployable binary
#!/bin/env ruby require 'ruby_in_practice' RubyInPractice.start |
This binary assumes that you have a module somewhere in your codebase called RubyInPractice with a class method called start. This is a convenient way to structure your code—it keeps your binary very simple, and it’s unlikely to need to change between versions. Keep in mind that in Ruby, Dir.pwd is the directory that the binary was run from, while File.dirname(__FILE__) is the directory that the code is in. This allows you to flexibly decide where to store support files like logs and PID files.
In order to make sure that our binary will get deployed along with our code, we’ll need to make some changes to the gem specification we put together for listing 8.1. Let’s take a look at just the gem specification part of the Rakefile in listing 8.4.
Listing 8.4. Gem specification including binary
Now, all we need to do is package up the gem, drop it on our server, and run gem install on the server. If we have a company-wide gem server, we could drop it on that server and deploy from there. We can specify dependencies and C extensions just as before, and our app will gracefully refuse to run if a dependency is not met. Say goodbye to dependency hell!
The gem server command will open up a server on port 8808, making the local repository available to users via the --source parameter to the normal gem command. Listing 8.5 shows some examples.
Listing 8.5. Using a custom repository with the gem command
gem install rails --source=http://example.com:8808 gem list --source=http://example.com:8808 gem query -nrails --source=http://example.com:8808 |
Our users will be able to install a gem ![]() , list all available gems
, list all available gems ![]() , query the gem list for those matching a particular pattern
, query the gem list for those matching a particular pattern ![]() , and use many other commands available via the gem command. In essence, our server has become an alternative to the canonical RubyGems server. For more information on the available commands, run the gem help command from your command line.
, and use many other commands available via the gem command. In essence, our server has become an alternative to the canonical RubyGems server. For more information on the available commands, run the gem help command from your command line.
Discussion
When you create your repository using gem server, you also have a number of options that will allow you to customize how you expose your repository to the world. Those options are detailed in table 8.1.
Table 8.1. The available options to the gem server command
Option | Effect |
|---|---|
--daemon | Runs the server in daemon (background) mode. |
--p[ort]=PORT | Runs the server on the designated port; if you use port 80, your users will be able to access the gem server without supplying a port to gem –source. |
--d[ir]=LOCATION | Specifies the location of the gem repository. |
As indicated in table 8.1, you can specify a location for the gem server that you expose. Say, for instance, that the server you are using for gems also has its own set of gems that you do not wish to expose (to make for more readable gem list output, for instance). You could install the gems you wish to expose in a custom location via gem install -i, and then use the location parameter to gem server to expose just those gems.
Assuming you are in the directory that will contain just the gems you want to expose, listing 8.6 shows how to do this.
Listing 8.6. Using a custom location for gem server
gem install rails -i ./gems gem server -d ./gems --daemon |
Listing 8.6 demonstrates how to install the gems into a new directory ![]() and then call gem server with the necessary settings
and then call gem server with the necessary settings ![]() . You don’t need to call the directory gems, but it’s conventional and good practice to do so.
. You don’t need to call the directory gems, but it’s conventional and good practice to do so.
Ruby gems are the standard mechanism for deploying libraries, command-line tools, plugins, and even full libraries like Rails. Deploying web applications involves a different process. Besides pushing Ruby code, you’ll want to manage the web server, update the database schema, and perform other management tasks. In the next section, we’ll talk about Capistrano and Vlad the Deployer, two tools designed specifically for deploying and managing web applications.
8.2. Deploying web applications
So now you know how to deploy libraries and simple command-line applications. Web applications tend to be more complex. Besides the application and libraries, you have to take care of the web server itself, manage the database, process log files, mount network drives, and so forth. You might be deploying to a cluster of machines and configuring and managing multiple servers. These tasks call for a different kind of deployment and management tool.
In this section, we’re going to discuss two such tools: Capistrano and Vlad the Deployer. Capistrano was developed originally for deploying Rails applications, but it can be used for many other remote deployment and management tasks. We’ll look at a couple of examples of that. Vlad provides all the same features but is based entirely on Rake.
8.2.1. Simplifying deployment with Capistrano
Suppose we maintain a daemon written in Ruby that needs to be deployed to four production servers. We also need to test it on a staging server before pushing to production. We use subversion and release the daemons to the server from trunk when the release is ready. Our daemon is started and stopped via a shell command (daemon_ctl start and daemon_ctl stop). The start and stop commands handle cleaning up any zombie PID files.
Problem
You want to make sure that all four releases of your daemon make it to production, and that if any of them fail, they silently roll back. You have a production environment with four servers, and a staging environment with a single server. Both environments have identical requirements.
Solution
For this task, we’re going to use Capistrano. Before setting this up, however, we’ll need to gather information. Capistrano requires the username for the remote servers and subversion repository, the URL for the repository, and the directory the code will be checked out to.
Once we’ve gathered all this information, we need to add a file called “Capfile” to the root of our source tree. Deployment with Capistrano uses recipes, which are similar to Rake tasks. You’ll find recipes on the web for managing Apache web servers, deploying Rails applications, using source control, starting and stopping background processes, migrating database schemas, and much more. These are placed in the Capfile and are loaded by the cap command-line tool. The Capfile we’ll need for this problem is pretty straightforward. Listing 8.7 shows a sample of what we’ll need.
Listing 8.7. Capfile for deploying a simple daemon
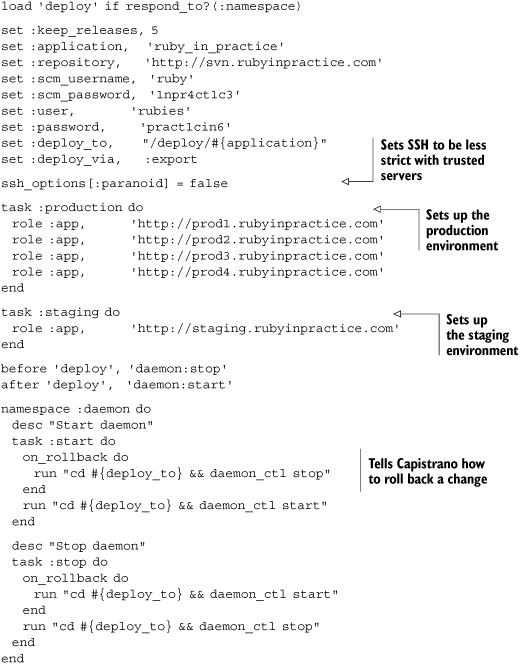
In this relatively simple Capistrano recipe, we set up our environment, set up different environments for production and staging, and create two new tasks to start and stop the daemon. In order to be sure that the daemon will be turned off while we deploy and turned back on after we deploy, we used before and after filters to trigger the daemon at the appropriate times.
The most interesting parts of the Capistrano recipe are the on_rollback callbacks. Capistrano will automatically execute the rollback functions if any of the deployments fail, allowing you to specify that if the deployments fail, your daemons will turn back on.
Reusing recipes
Don’t have time to reinvent the wheel? A quick search on Google will reveal Capistrano recipes that you can copy and paste into your Capfile and get started by building on other people’s experience.
A great source for recipes is Deprec, available from http://deprec.rubyforge.org. Deprec is a collection of canned Capistrano recipes for setting up a production Rails server from scratch. And we do mean from scratch. It will copy SSH public keys over, install the entire Ruby on Rails stack, set up a working web server (Apache or Nginx), and get you up and running with minimum fuss.
Discussion
As you can see, it’s pretty simple to use the default Capistrano deployment recipe to deploy non-Rails applications. That’s because Capistrano’s default code mainly handles checking code out of your source control system and deploying it to a remote location. You can use the run command to call out to shell commands on your remote servers, and they will be fired on all remote servers.
If necessary, you can use the sudo command to run the commands with superuser privileges. This allows you a fair bit of flexibility, effectively allowing you to do anything through Capistrano that you’d be able to do by manually logging in to your remote servers. Capistrano uses SSH to log into the remote server as the current user; if you maintain separate accounts, you can tell Capistrano to log in as a different user by passing USER=name as a command-line argument.
An important caveat of using run and sudo is that each command is run separately, and history is not preserved. That’s why we used run "cd #{deploy_to} && daemon_ctl stop" in listing 8.7 instead of two separate run calls. That is typically not a problem, but it sometimes requires the creation of fairly convoluted code. In this respect, at least, a passing knowledge of the intricacies of bash can be quite helpful.
It is quite common to use Capistrano to deploy against and manage multiple environments. Our example was based on two environments, one for staging and one for production, and we used Capistrano tasks to configure each of these environments. For example, to deploy to the staging server, you would run this command:
$ cap staging deploy |
To deploy to all the production servers, you’d run this command:
$ cap production deploy |
Remember that staging and production are ordinary tasks. You can choose whatever name suits you. Just remember to run these tasks ahead of any task that requires the configuration, by placing it first on the command line.
Next, let’s take a look at using Capistrano to intercept the incoming SSH stream in order to tail all of our remote logs at once.
8.2.2. Tailing remote logs with Capistrano
Now that we have our daemon purring away on four remote servers, we might want to look at the remote logs. Typically, you will want to see the logs from all four servers at once, with some sort of line-header indicating what server it’s from. Since Capistrano uses Net::SSH, we can intercept the incoming stream, examine it, modify it, and then output it.
Problem
You want to connect to all of your remote servers, tail the logs, and have the results outputted to your local monitor.
Solution
We’re going to use Net::SSH’s incoming stream to get what we need. Capistrano’s run and sudo commands both take an optional block with three arguments. The first argument is the channel, which is a Net::SSH::Connection::Channel object. You can get the full information about the object in the Net::SSH RDoc, but we will mainly use this object to extract information about which connection is being used. The next argument is the stream, which will be :err if the SSH connection returns an error. Finally, the last argument is the data being returned from the remote server.
This all comes together in listing 8.8, where we add support for tailing remote logs to our Capistrano recipe.
Listing 8.8. Tailing a remote log
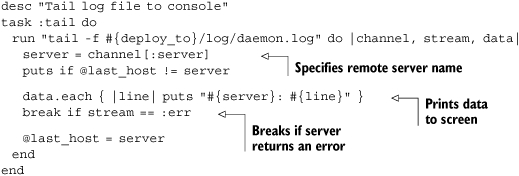
As you can see, the recipe is pretty simple: we run a command on the remote server and then process it. We use an instance variable called @last_host to track the previous returned message, so we can put a blank line between messages from different servers.
Discussion
There’s not much to say about this recipe because it’s so straightforward. You’ll probably want to take a look at the Net::SSH documentation, just to satisfy yourself about the internals (and especially if you want to go further with remote tailing), but the basics are pretty, well, basic. It’s possible to get more adventurous and make each host use a different color for output. That’s left as an exercise for the reader, but you might want to check out the ansi-colors gem, which allows you to do things like "string".red.on_white.
Interactive tasks using HighLine
When Capistrano needs to prompt you for input, it uses a terminal I/O library called HighLine. HighLine has a lot of interesting features for writing interactive tasks that require user intervention. You can use it to create colored output, to ask questions, to present a menu of choices, and to hide passwords entered on the console. You can find more about highline at http://highline.rubyforge.org.
We won’t discuss HighLine at length here, but we’ll show you a couple of examples:
task "time" do
Capistrano::CLI.ui.say("The time is <%= color(Time.now, BOLD) %>")
end
task "nuke_everything" do
if Capistrano::CLI.ui.ask("Nuke everything!?") == 'yes'
nuke!
else
puts "Better safe then sorry."
end
end
Another tool for remote deployment and management is Vlad the Deployer.
8.2.3. Deploying with Vlad the Deployer
As promised, let’s dive into using Vlad the Deployer to handle deployment tasks. Capistrano and Vlad fulfill the same role but differ in the way you define and configure tasks. Vlad is based on Rake, which we covered in chapter 3, and if you’re already using Rake extensively you may find it more familiar.
As we write this, Vlad the Deployer is still not quite up to snuff (it wouldn’t be trivial to tail logs with Vlad as we did with Capistrano, for example), but for simple deployment, it’s certainly a sight to behold.
Problem
As in section 8.2.1, you have a daemon that needs to be deployed to four servers via subversion. The deployment should roll back if any of them fail.
Solution
Vlad the Deployer is a Ruby package written by the Ruby Hit Squad. It aims to resolve several perceived core deficiencies with Capistrano. Specifically, it is dramatically smaller than Capistrano, weighing in at only 500 lines of code. It uses Rake as its core, so you can leverage your existing Rake knowledge in your deployment process. If you like using Rake for various development and management tasks, you’ll appreciate being able to intermix deployment into your existing arsenal (you could force running all tests before deploying).
The starting point for Vlad is your existing Rakefile. To make use of Vlad, you must first require and load it:
require 'vlad' Vlad.load |
The load method supports a variety of configuration options for loading different recipes. For example, listing 8.9 shows a sample Rakefile that loads Vlad along with the Subversion and Mongrel recipes (these two are provided by Vlad).
Listing 8.9. Rakefile loading Vlad with Subversion and Mongrel recipes
require 'vlad' Vlad.load :scm=>:subversion, :app=>:mongrel |
The load method also loads the config/deploy.rb file, where you collect all the deployment configurations and tasks used by Vlad. Listing 8.10 shows a config/deploy.rb file that performs the same deployment tasks we used Capistrano for earlier.
Listing 8.10. config/deploy.rb for Vlad the Deployer
set :domain, 'rubyinpratice.com' set :deploy_to, '/deploy/ruby_in_practice' set :repository, 'http://svn.rubyinpractice.com' role :app, "prod1.#{domain}" role :app, "prod2.#{domain}" role :app, "prod3.#{domain}" role :app, "prod4.#{domain}" namespace 'daemon' do desc "Start daemon" remote_task 'start' do run "cd #{deploy_to} && daemon_ctl start" end desc "Stop daemon" remote_task 'stop' do run "cd #{deploy_to} && daemon_ctl stop" end end namespace 'vlad' do task 'update' => 'daemon:stop' task 'start' do task('daemon:start').invoke end task 'deploy' => ['update', 'migrate', 'start'] end |
Discussion
Since Vlad uses Rake, you can use Rake’s prerequisites and task actions to chain together tasks and add new behaviors to existing tasks.
In listing 8.10 we defined two remote tasks, daemon:start and daemon:stop. We enhanced Vlad’s update task to run daemon:stop as a prerequisite, stopping the daemon before running the actual update. In contrast, we enhanced Vlad’s start task to include a new action that will run the daemon:start task.
To trigger a Vlad deploy, run rake vlad:update vlad:migrate vlad:start. Alternatively, you can write a simple vlad:deploy task that runs all these tasks in sequence, as we did in listing 8.10.
To deploy new code, automatically stopping and starting the daemon as necessary, run this command:
$ rake vlad:deploy |
Now that we’ve covered two ways to get your code onto the server, let’s tackle keeping your code running once it’s on the remote server. We’ll look at a little Ruby utility called God that should handle most, if not all, of your monitoring needs.
8.3. Monitoring with God.rb
Once you have your daemon running on the remote server, you’ll want to keep an eye on it. If it starts consuming too many system resources, you’ll want to restart it; if it goes down, you’ll want to be notified.
The tool we’re going to discuss in this section is called God. God’s influence is monit, a well-known Unix system-management tool. Whereas monit uses its own syntax and miniconfiguration language, God allows you to write notification rules directly in Ruby, for more flexibility and control. It also solves some of the most annoying issues that were present in monit, especially when handing daemons and PIDs. In short, God is everything that monit is as well as everything people wanted monit to be. You can find God at http://god.rubyforge.org.
8.3.1. A typical God setup
In section 8.2 we deployed a daemon process to our production servers. We’ll continue with the same scenario, and use God to monitor the daemons running on our production servers.
Problem
You want to watch your daemon and make sure it stays up. Additionally, you want a way to gracefully start and stop the daemon, and to make sure it’s not gobbling up all your system resources.
Solution
In listing 8.11, we’ll use God.rb to set up our monitoring environment, which will include monitoring, graceful startup and shutdown, and resource-usage monitoring.
Listing 8.11. Watching daemon processes with God.rb
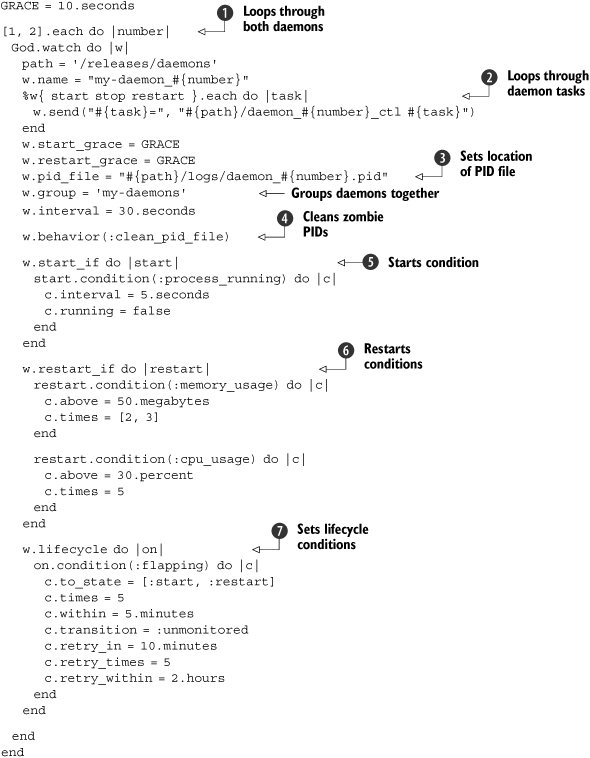
In order to avoid having to type the entire configuration file twice, we loop over the daemon numbers ![]() . If we add additional daemons, we’ll probably want to add more daemons to this list. Also note that this God configuration file is appropriate for our staging environment, where we have both daemons on the same server. We can use the exact same script on the production environments by removing the daemon numbers that will not be run on the server in question.
. If we add additional daemons, we’ll probably want to add more daemons to this list. Also note that this God configuration file is appropriate for our staging environment, where we have both daemons on the same server. We can use the exact same script on the production environments by removing the daemon numbers that will not be run on the server in question.
We also loop over the start, stop, and restart tasks, so we can easily change the command that is used to manage the daemons later ![]() without having to change it in three places. We specify the location of the PID file that will be created by the daemon
without having to change it in three places. We specify the location of the PID file that will be created by the daemon ![]() , which, in this particular case, will be inside the log directory in our release directory.
, which, in this particular case, will be inside the log directory in our release directory.
Because we rely on PID files, we must consider the possibility that our code will be killed without the opportunity for the PID to be correctly cleaned. This is called a “zombie PID,” and it can wreak havoc with our daemon start script. That’s why God provides the :clean_pid_file behavior, which will wipe out existing PIDs before it attempts to start up your code ![]() .
.
We use one rule to monitor each daemon process every 5 seconds and start it if it’s not already started or if it crashed ![]() . Two additional rules will restart the process if it runs amok, which we define as eating up 50MB of memory two out of three times, or if it uses over 30 percent of CPU five consecutive times
. Two additional rules will restart the process if it runs amok, which we define as eating up 50MB of memory two out of three times, or if it uses over 30 percent of CPU five consecutive times ![]() . These are checked at the default 30-second interval.
. These are checked at the default 30-second interval.
Finally, we can set some events to occur across state changes (called lifecycle conditions). In this case, we want to handle the situation where God keeps trying to start the process, but it keeps failing (the flapping condition) ![]() . We try more frequently early on, but then taper off as time goes on, and eventually give up. Specifically, if the daemon gets started or restarted five times in five minutes, we stop monitoring for ten minutes (in case the problem was intermittent and goes away if you leave it alone for a bit). If the flapping occurs more than five times over two hours, we give up.
. We try more frequently early on, but then taper off as time goes on, and eventually give up. Specifically, if the daemon gets started or restarted five times in five minutes, we stop monitoring for ten minutes (in case the problem was intermittent and goes away if you leave it alone for a bit). If the flapping occurs more than five times over two hours, we give up.
Discussion
The configuration file in listing 8.11, while designed to handle the special case we developed in sections 8.2.1 and 8.2.2, is still very similar to the configuration file that the creator of God.rb uses to monitor his mongrels at http://en.gravatar.com, and which he makes available on the God.rb site (http://god.rubyforge.org). Chances are your configuration file will look similar as well. After all, there’s not much difference between monitoring one server or another.
As you noticed, God’s condition syntax is pretty easy to use. For every event (start, stop, restart), you can specify conditions that should trigger the event. In our example, we chose to trigger the start event if the daemon is not running, and check its status every 5 seconds. We also protect against runaway conditions like memory leaks and infinite loops by restarting the daemon. In our example, we trigger a restart if memory usage goes beyond 50MB in two out of the last three times we checked it. We trigger a restart if CPU usage goes above 30 percent five times in a row.
Obviously these limits will be different, depending on the application you’re monitoring and the environment it’s running, as would the reaction time. When God checks the process status, memory consumption may be high because the garbage collector didn’t get the chance to claim unused memory yet. Likewise, CPU usage could reach 100 percent when running a critical section of code. By telling God to ignore these momentary spikes, we reduce the chance of false positives.
In our example, we set the start condition to check every 5 seconds, restarting a crashed daemon as soon as possible. For the restart tasks, we use a 30-second interval: if our daemon enters an infinite loop, God will notice that within the first 30 seconds, but will take an additional two minutes before making a decision and reacting. Unfortunately, picking up the right setup is a trade-off between response time and accuracy, and it’s more art than science.
Monitoring our servers for failure and overcapacity creates a self-healing environment. Sometimes, an attempt to recover from a spike in load will create even more burden on the server, leading to a domino effect of ever-increasing restarts, or flapping. For that reason, we also monitor and react to lifecycle changes; for example, backing off from restarting a process when it looks like our attempt at recovery leads to cascading failure.
Likewise, monitoring for lifecycle changes can alert system administrators to bugs in the code, areas that need optimization, or the need for a hardware upgrade. We’ll look at that next.
8.3.2. Notifications
Now that we have an infrastructure for keeping our daemons up and running, we’ll probably want to be notified if they go down. In particular, when the flapping condition gives up after two hours of failures, we probably want the entire team to be notified. On the other hand, more minor issues can be sent to the team lead only.
Problem
You want to set up God.rb to notify the entire team after a flapping failure, but only the team lead if the process is restarted due to excess CPU or RAM usage.
Solution
Listing 8.12 shows how we can set up God to send emails.
Listing 8.12. Telling God.rb how to notify our team members
God::Contacts::Email.message_settings = { :from => '[email protected]' } God::Contacts::Email.server_settings = { :address => 'daemons.example.com', :port => 25, :domain => 'example.com', :authentication => :plain, :user_name => 'daemon_master', :password => 't3hm4n' } {'lead' => '[email protected]', 'joe' => '[email protected]', 'john' => '[email protected]', 'mark' => '[email protected]' }.each do |name, email| God.contact(:email) do |c| c.name = name c.email = email c.group = 'developers' end end |
To simplify setting up large numbers of email addresses, we’ve looped through a Hash and set the emails all at once. If you have a very large number of emails to set up, you might do something similar but with an external YAML file.
Now that we have our emails and groups set up, listing 8.13 shows how we can attach our notifications to the conditions specified in listing 8.11.
Listing 8.13. Monitoring with notifications
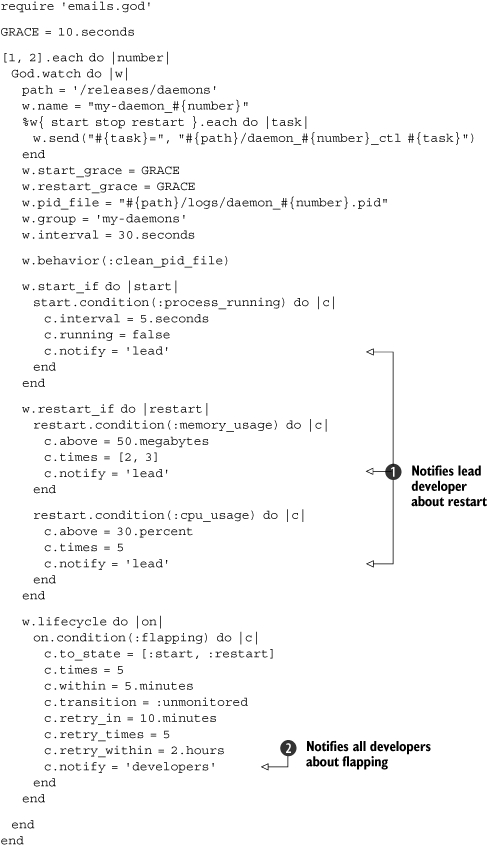
For simplicity, we broke the configuration file into two parts. The first specifies the email addresses to use (listing 8.12). The second (listing 8.13) uses the same monitoring configuration that we explored in section 8.3.1, with the addition of notifications. We added notification to the lead developer whenever the daemon is restarted after a crash or is forced to restart due to memory or CPU consumption ![]() . Flapping conditions are typically a sign our code is going out of control, so we notify the entire developers group
. Flapping conditions are typically a sign our code is going out of control, so we notify the entire developers group ![]() .
.
Discussion
Now that we have a configuration file, it’s time to use it. We’ll start by testing it out, and for that we’ll run God in the console:
$ sudo god -c config.god -D |
You’ll see messages from God as it’s loading the configuration file and monitoring the processes. That will help you troubleshoot any problems with your configuration file. To stop God, press Ctrl-C.
Once you know the configuration file works, it’s time to deploy God as a background process. You can do that using init scripts, launchd, or whatever works best in your environment. Here is an example of a cron task that runs God on every boot:
@reboot god -c /etc/god/config.god |
You can then check whether God is running:
$ sudo god status my-daemons: my-daemon_1: up my-daemon_2: up |
Other commands allow you to start and stop tasks, load new configurations, and terminate god. Run god --help for more information.
8.4. Summary
Deploying Ruby applications is a complex topic. Most people use a mix of Ruby, Unix, and hand-rolled tools in their full deployment solution. What most people don’t know, is how mature the existing Ruby tools are. In fact, because Ruby is a flexible and powerful language for running command-line scripts, you should also consider using these tools for tasks not specific to Ruby, such as deploying PHP applications or monitoring various servers and processes in your environment.
For automated deployment to a remote server, you can use either Capistrano or Vlad the Deployer to automate even fairly complex, transactional remote tasks. To share code within your organization, the RubyGems infrastructure has become extremely stable with version 1.0, allowing you to create, within your organization, a repository akin to the one people use for their day-to-day packaging systems.
For monitoring, you can say goodbye to the arcane monit tool and say hello to the pure-Ruby God.rb. God.rb even handles emailing and fairly complex monitoring rules, so you’ll never need to manually SSH into your server to find out why your app is down again.
The landscape is only getting better with time. Capistrano, Vlad, and God.rb get better with every release, and as Ruby improves, so will these tools. Compared with old-school Unix utilities that are stuck in the ’90s and require some fairly advanced system programming knowledge to hack on, the choice is clear. Ruby deployment tools have arrived.
We just covered web applications and deployment, and through some of the examples showed you how to build Ruby applications that use relational databases. In the next chapter, we’re going to delve deeper into databases and show you more options for handling data storage from Ruby applications.