
Chapter 11. Identity and authentication
- Storing passwords securely
- Authenticating users against LDAP and Active Directory
- Authenticating Rails applications using restful_authentication
- Authenticating semiprivate personal feeds
- Authenticating using HTTP Basic authentication
- Authenticating Rails applications using OpenID
Trust is the foundation of successful networked systems. If you are providing a personalized service over a network, you need to be able to trust that your users are who they say they are, and your users must trust you with their identity and their personal data. This chapter looks primarily at how you can trust your users—by implementing a robust authentication mechanism. How well you execute that authentication will influence how much trust your users will place in your application. Your approach to security has a big impact, whether you are ensuring that users’ passwords are safe, or you are offering an authentication option that involves a trusted third party.
In this chapter, we take a look at how to use Ruby and Rails to implement your own secure authentication schemes as well as integrate with established authentication mechanisms like Lightweight Directory Access Protocol (LDAP), Active Directory, and OpenID.
11.1. Securely storing a password
With few exceptions, your users’ passwords should never be persisted in a way that would allow anyone access to them. For example, if a hacker were to get hold of your site’s database, he shouldn’t find a column filled with passwords as plain text. Hopefully, this is obvious, but enough sites on the web violate this rule that it is worth making sure your applications don’t make this mistake.
Problem
You need to store a password for later authentication, and do it securely.
Solution
Securely hash the password using a salt, and store the resulting string. When it is time to authenticate a user, run the submitted password through the same one-way process and compare the result to what you stored.
Hashes with salt
A salt is the common term for a secondary input to a cryptographic function. It is typically used with a hash function, in order to make dictionary attacks on encrypted data difficult. A good summary of how this works can be found in Philippe Oechslin’s article, “Password Cracking: Rainbow Tables Explained” (http://www.isc2.org/cgi-bin/content.cgi?page=738).
Listing 11.1 shows an example of an ActiveRecord class implementing this approach.
Listing 11.1. An ActiveRecord class implementing password hashing
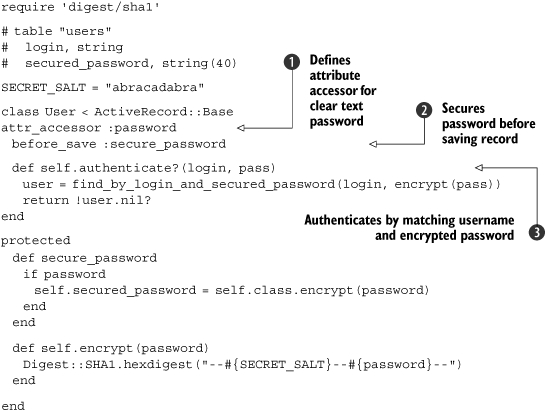
In this example, the database table has a column named secured_password. This code supports setting the user’s password, as well as authenticating a user. The password is assigned as clear text to the password attribute defined using attr_accessor ![]() . The before_save callback encrypts the value of that attribute and stores it as the secured_password
. The before_save callback encrypts the value of that attribute and stores it as the secured_password ![]() , which gets persisted to the database. When it is time to authenticate a given username and password, the authenticate method searches for a matching username and password, using the one-way encrypted password value
, which gets persisted to the database. When it is time to authenticate a given username and password, the authenticate method searches for a matching username and password, using the one-way encrypted password value ![]() .
.
Discussion
An implementation of the SHA1 algorithm is included in the Ruby standard library—it was written in C to make it perform as quickly as possible. The properties of this government-standard algorithm make it a great solution to the problem of storing passwords. Specifically, it is repeatable and nonreversible. It is important that it be repeatable so that the same password will always produce the same result, which can be compared to previous results. It is important that it be nonreversible so that if someone gains access to the encrypted string, it is computationally infeasible to discover the actual password.
The salt makes it more difficult to do a dictionary attack against your encrypted passwords—computing a list of the encrypted versions of common passwords and checking them against yours.
Although the SHA1 algorithm is in wide use, vulnerabilities have been discovered. The vulnerabilities are not believed to be serious, because to make use of them, an attacker would need much greater computational power than is typically available. Still, developers with healthy paranoia would do well to consider the more secure cousins of SHA1, known collectively as SHA2. The implementations of SHA2 that are included in Ruby’s standard library are SHA256, SHA384, and SHA512. Here is some sample usage:
require 'digest/sha1' puts Digest::SHA256.hexdigest("Please hash me.") puts Digest::SHA384.hexdigest("Please hash me.") puts Digest::SHA512.hexdigest("Please hash me.") |
There is also an alternate approach to the solution that adds complexity but offers a more secure system overall. Instead of using a single salt, we will create a salt for each user and store it as an additional field. This dramatically increases the resources necessary for a dictionary attack. It also means that if two users choose the same password, the encrypted versions will still be different. If one of them had access to the encrypted passwords, it could not discover that it was using the same password as the other user. Listing 11.2 shows an implementation of this approach.
Listing 11.2. Per-user salt for password hashing
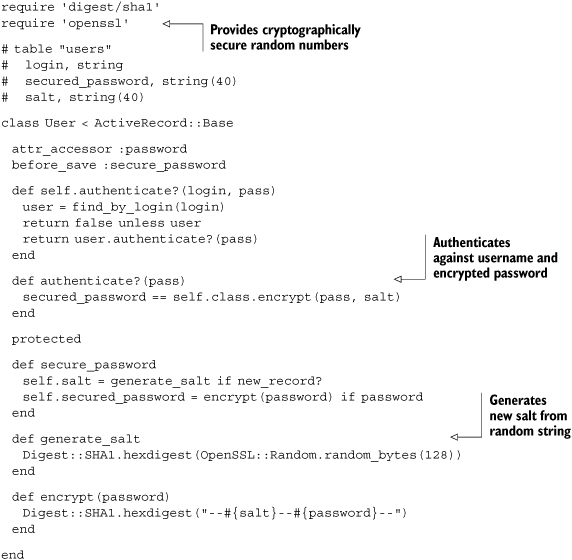
In this version, a row must be retrieved from the database in order to validate a password. This is because the salt is stored alongside the login and secured password. At first glance, this seems like it might be insecure, and indeed, the separate location of the salt and secured password is an advantage of the original implementation. However, that advantage is outweighed by how much more difficult we are making life for an attacker by having a unique salt for each user.
To generate a different salt for each user, we need to pick a random value. Don’t make the mistake of using the system time—if the attacker can guess when the account was created, it’s easy for her to generate all the possible salt values and crack the password. And quite often, we’ll store the account creation time directly in the users table. Using Ruby’s rand method doesn’t help either, because the random numbers it generates are not that random. They’re based on the system clock, and even though they look secure, they can be cracked in a few seconds with today’s hardware. Instead, we opted to use the OpenSSL library to generate a cryptographically secure random number to protect our salt from brute force attacks.
Note
This use of multiple salts is the approach used by the restful_authentication Rails plugin, discussed in section 11.3.
If we go through great efforts to avoid persisting our users’ passwords in plain text, it would be careless to write passwords to our log files. To avoid this in your Rails applications, add the following code to the controller that handles authentication, where password is the name of your password parameter:
class UsersController < ApplicationController filter_parameter_logging :password ... end |
This will replace the value of any parameter whose name contains “password” with the string [FILTERED].
Now that we’ve looked at a simple authentication scheme, let’s take a look at authentication and identity with LDAP.
11.1.1. Authenticating against LDAP
LDAP is an open standard for interacting with hierarchical sets of people, groups, or resources. Popular open source LDAP servers include OpenLDAP and Fedora Directory Server (FDS). Commercial offerings include Sun’s Java System Directory and Novell’s eDirectory.
LDAP servers are well-suited to hold information about people and their security credentials. As a result, they are commonly used for authentication purposes. Let’s take a look at how we can accomplish this with Ruby.
Problem
You need to authenticate users against an LDAP server.
Solution
We can use a Ruby LDAP library like the ruby-net-ldap gem to validate a username/password pair. Listing 11.3 shows an implementation of LDAP authentication with Ruby.
Listing 11.3. Authenticating with ruby-net-ldap
require 'net/ldap' def valid_user?(username, password) ldap = initialize_ldap(username, password) ldap.bind end def initialize_ldap(username, password) Net::LDAP.new(:base => 'dc=example,dc=com', :host => 'your-ldap-server', :auth => {:username => "uid=#{username},cn=users", :password => password, :method => :simple}) end |
The method LDAP.bind attempts to connect to the LDAP instance using the credentials we supply. It returns true if successful, and false if not.
Discussion
The primary alternative to the ruby-net-ldap gem used in listing 11.3 is ruby-ldap. While ruby-net-ldap is a pure Ruby LDAP client implementation, ruby-ldap is a wrapper around the OpenLDAP C library. As you might guess, this means that ruby-net-ldap is far more portable and easier to install, though ruby-ldap offers significantly better performance.
Ruby-ldap has an interesting library built on top of it called Ruby/ActiveLdap. ActiveLdap maps LDAP entries to objects in much the same way that ActiveRecord maps database rows to objects. Here is an example of defining a User class using ActiveLdap:
class User < ActiveLdap::Base ldap_mapping :dn_attribute => 'uid', :prefix => 'cn=users', :classes => ['top','account'] belongs_to :groups, :class => 'Group', :many => 'memberUid', :foreign_key => 'uid' end |
ActiveLdap is likely overkill if your only use for LDAP is authentication. In that case, ruby-net-ldap is probably fast enough and your best bet. On the other hand, if your application is doing a lot with LDAP entries, like queries and read-write operations, ActiveLdap is definitely worth a look.
Leveraging a central corporate LDAP directory is a great strategy for applications being deployed internally. Your users will thank you for not making them create and remember yet another password!
11.2. Authenticating against Active Directory
Active Directory from Microsoft is used by many businesses for identity management. Integrating your authentication system with Active Directory is a great way to provide a good logon experience for internal applications and help the business keep identity and password management centralized.
Problem
You need to authenticate users against an existing Active Directory installation.
Solution
Fortunately, Active Directory is compatible with the LDAP spec, so we can use a Ruby LDAP library, like the ruby-net-ldap gem, to validate a username/password pair. See listing 11.4 for an example.
Listing 11.4. Authenticating against Active Directory using ruby-net-ldap
equire 'net/ldap' def valid_user?(username, password) ldap = initialize_ldap(username, password) ldap.bind end def initialize_ldap(username, password) Net::LDAP.new(:base => 'dc=example,dc=corp', :host => 'exampledomaincontroller', :auth => {:username => "#{username}@example.corp", :password => password, :method => :simple}) end |
Ask your Active Directory administrator for the name of the domain controller—that’s the LDAP host in the case of an Active Directory installation.
This example takes advantage of a convenience offered by Active Directory: you can send user@domain as the username for the purposes of binding, and Active Directory will handle it properly. Normally, LDAP instances expect a distinguished name (DN) in this spot.
Discussion
The approach in listing 11.4 is suitable for an application that should be available to any member of the Active Directory instance, but if you need more information about a user, you can call the search method, which returns a collection of LDAP entries, in place of the bind method, which simply confirms that the provided credentials are valid. This would be useful, for example, to validate that a user is not only who she says she is (via password), but also that she is a member of a particular group. The search method uses a filter based on the sAMAccountName attribute, which is the closest thing to a simple username attribute in Active Directory’s schema.
Here’s an example:
def valid_app_user?(username, password) ldap = initialize_ldap(username, password) entries = ldap.search :filter => "sAMAccountName=#{username}" return false unless entries && !entries.empty? return member_of_ad_group?("G-MyAppUsers", entries.first) end def member_of_ad_group?(group, ldap_entry) group_names = ldap_entry[:memberof] # returns a collection of fully- # qualified Active Directory groups group_names.any?{|name| name.include? 'CN=#{group},' } end |
The array of groups returned by the :memberof attribute of an Active Directory LDAP entry contains the distinguished name of the groups. Something like this:
CN=G-MyAppUsers,OU=Groups Security,OU=Example,DC=example,DC=corp |
In the member_of_ad_group? method, we’re looking for a match in the first part, the common name (CN).
If you want a solution specific to Active Directory, ruby-activedirectory takes all the features and idiosyncrasies of Active Directory into account. It provides classes for Users, Groups, and Computers. The ActiveDirectory::User authenticate method will validate a particular user’s password. Using it is straightforward:
require 'activedirectory' def valid_user?(username, password) user = ActiveDirectory::User.find('jdoe') user.authenticate(password) end |
This library depends on ruby-ldap being installed, which can be a little tricky, as it wraps the OpenLDAP C library. If you can get over that hurdle, ruby-activedirectory is quite useful in working with an Active Directory installation.
11.3. Adding authentication to your Rails application
Most nontrivial Rails applications offer a personalized experience to each user of the site. The most common solution to personalization needs is letting users sign up for an account and authenticating them when they visit the site. While implementing a username/password authentication system eventually leads to various decisions and custom code, adding a basic implementation isn’t particularly difficult.
Problem
You need to add authentication to a Rails application...quickly!
Solution
The easiest and most well-trodden route to getting user authentication in a Rails application is by using the restful_authentication plugin to generate the necessary code. First, you’ll need to install the plugin:
script/plugin install restful_authentication |
You’ll see some text scroll by, and if it’s successful, you should see the plugin’s README and you’ll have a vendor/plugins/restful_authentication folder in your Rails application.
Tip
You may have to provide the source for the plugin (the plugin’s source repository). In this case, you’ll need to add --source=http://svn.technoweenie.net/projects/plugins/restful_authentication/ to the script/ plugin call.
The next step is generating the code. We need a User model, a UsersController, and a migration, along with tests and a couple of useful library classes. The plugin rolls all of these into one convenient generator:
script/generate authenticated User |
To get access to all of the helpers and other code, we need to mix the AuthenticatedSystem module into ApplicationController instead of UsersController, where the plugin will place it, so that it is available to all of our controllers. We need to remove the include AuthenticationSystem line from users_controller.rb:
class UsersController < ApplicationController # Be sure to include AuthenticationSystem in # Application Controller instead include AuthenticatedSystem ... end |
We also need to move the AuthenticatedSystem module to ApplicationController in application.rb:
class ApplicationController < ActionController::Base include AuthenticatedSystem ... end |
The restful_authentication plugin enforces its authentication through before_filters. To restrict a controller, we can add before_filter :login_required to its class body, like this:
class TodosController < ApplicationController before_filter :login_required ... end |
Next, we’ll need to set up the database tables for users and their sessions. This just involves running the database migration generated by the plugin.
rake db:migrate |
That’s all the setup we need. If you start your application using script/server, you can create the first account by pointing your web browser to http://0.0.0.0:3000/users/new.
Tip
Rick Olson is a member of the Ruby on Rails core team and is known online as “technoweenie.” You can find some incredibly useful plugins (including this one) and learn a lot by browsing his repository at http://github.com/technoweenie/plugins/.
Discussion
It is easy to assume that authentication on the web is simple because thousands of websites have implemented it. The truth is that the possible variations and nuances are manifold. Can any visitor sign up and create an account, or are accounts created only by users with administrative privileges? Does a user log in with her username, or does she log in with an email address? Perhaps either is possible? What sort of confirmation or activation step is necessary? The purpose of the restful_authentication plugin is not to support all these scenarios, but rather to put into place the most common mechanisms for username/password authentication and give you a solid base to build upon.
Our favorite thing about the restful_authentication plugin is the quality of the tests (or specs) it adds to a project. Both the generated model and the controller are accompanied by tests that together sport 100 percent code coverage. When you’re ready to start customizing your application’s authentication logic, start with the tests—either adding tests to drive new features, or modifying tests to drive changes to the generated code.
Tip
The generator will generate tests and test helpers for you by default, but you can tell the plugin to give you specs for RSpec instead by giving it the --rspec option or by simply adding a spec/ directory to your Rails application.
The restful_authentication plugin also provides very useful helper methods you can use in your own tests. Inside of your lib directory, you’ll notice that the generation process has added authenticated_test_helper.rb. It defines a module that is mixed into the two test classes generated (test/unit/user_test.rb and test/functional/users_controller_ test.rb in the previous example). Let’s look at how to use a few of these helper methods.
The login_as method takes a symbol (:quentin in the following example) that is used to look up a user from the YAML fixtures:
def test_index_ok_for_logged_in_user login_as :quentin get :index assert_response :ok end |
It then sets that user as the logged-in user by setting session[:user] to the ID of the specified user. This helper lets you interact with controllers in your tests as if a user were logged in to your application. You can also interact as an anonymous user; when the login_as method is passed nil, it clears any existing value of session[:user], thereby simulating an anonymous user:
def test_index_not_available_to_anonymous_user login_as nil get :index assert_response 401 end |
The power of Ruby’s block syntax is evident in the assert_difference method. In the following example, the count method of User is called twice. In between, the content of the block is executed—a POST to the create action, in this case:
def test_create_increments_user_count assert_difference 'User.count', 1 do post :create, :user => {:login => 'foo', :password => 'test'} end end |
The return values of the two calls are compared to verify that the difference is equal to the value of the second argument to assert_difference: 1 in our example.
Conversely, assert_no_difference works just like assert_difference but instead ensures that the return value of the specified method is the same before and after the block executes:
def test_create_with_invalid_login_does_not_change_user_count assert_no_difference User, :count do post :create, :user => {:login => nil, :password => 'test'} end end |
If you’re thinking, “Wow! Some of these test helpers are really handy,” you would be right. It is a good idea to mix this module into the Test::Unit::TestCase class defined in test/test_helper.rb. You can then remove it from the generated tests and use it in any of your tests for the rest of your application.
The restful_authentication plugin consists entirely of code generators, so there’s really no need to keep it installed once you’re happy with the code you’ve generated. You can either delete the directory or remove it like this:
script/plugin remove restful_authentication |
The code you generated with it will still be present and working, but you won’t be transferring an extra directory with every deployment for no reason.
Let’s take a look at putting authentication into action by creating semi-private peruser feeds.
11.4. Semi-private, personalized feeds
RSS and Atom feeds are a great way for users to keep a connection to your site. In the case of a data-driven site, the information in a feed is likely unique or at least personalized for each user. Unfortunately, many feed readers don’t support username/password authentication, or don’t do so securely.
Problem
You need to offer feeds that are personalized and semi-private but that still work with typical feed readers.
Solution
We’ll create and associate a secret token with each user that can be used to authenticate for feeds only. Listing 11.5 shows a sample ActiveRecord migration that adds a column to hold our secret token. In the subsequent listings, we’ll modify the User class to populate the token for new users, and demonstrate how to integrate it with a controller.
Listing 11.5. An ActiveRecord migration to add our token column
require 'digest/sha1' require 'openssl' class AddUserToken < ActiveRecord::Migration class User < ActiveRecord::Base end def self.up add_column :users, :token, :string, :limit => 40 User.find(:all).each do |user| user.token = Digest::SHA1.hexdigest( user.save end end def self.down remove_column :users, :token end end |
We want to work with a clean version of the User class, so that any future changes to the application code won’t risk breaking this migration ![]() . After adding the column
. After adding the column ![]() , the migration populates it with a random token
, the migration populates it with a random token ![]() . We’ll make use of that in the listings that follow.
. We’ll make use of that in the listings that follow.
Next, our User model should automatically create a token when a new user is added. As such, we’ll need to add a before_create call to generate the token before the User is created. Listing 11.6 shows our implementation.
Listing 11.6. A User model that generates tokens upon creation
require 'digest/sha1' require 'openssl' class User < ActiveRecord::Base before_create :generate_token ... def generate_token self.token = Digest::SHA1.hexdigest(OpenSSL::Random.random_bytes(128)) end end |
We are creating a random 40-character token, and using SHA1 is a convenient way to do that. We will then add these tokens to the personalized feed URLs that our application exposes, and use them to associate the incoming requests for feeds with the right user’s data. If our application’s actions require a login by default (via a filter in ApplicationController called login_required), a CommentsController that implements this concept might look like the one in listing 11.7.
Listing 11.7. A comments controller implementing our token authentication
class CommentsController < ApplicationController skip_before_filter :login_required, :only => [:index] prepend_before_filter :login_or_feed_token_required, :only => [:index] def index @comments = current_user.comments respond_to do |format| format.html format.rss { render_rss_feed_for @comments } format.atom { render_atom_feed_for @comments } end end ... end |
Here, for the index action only, the controller will bypass the default login_required filter, but add a filter that calls the login_or_feed_token_required method. This method allows the request to proceed if either the user is logged in or the request is for an RSS or Atom feed and the request params hash contains the correct secret token.
The following code should be added to our ApplicationController:
def login_or_feed_token_required if params.has_key?(:token) && return true if @user = User.find_by_token(params[:token]) end login_required end |
We attempt to authenticate using the token if appropriate, and otherwise fall back to the login_required method.
Discussion
The solution relies on providing an alternate means of authentication (a secret token) to each user. This alternate authentication provides only limited rights: read-only access to XML feeds. In the event that the secret is leaked, this approach limits exposure. Contrast that with having a user’s password compromised because your application forced him to embed it in a feed URL used from a web-based feed reader.
Since we want to support users in keeping their data secure, it is a good idea to provide a mechanism that allows users to replace their secret tokens on demand. You can provide this with a Rails controller action like this one:
class UsersController < ApplicationController ... def refresh_token @user.generate_token @user.save! end ... end |
It is important that users realize that changing their tokens will break any externally stored URLs.
You might consider using the same token, or a separate one, as an authentication mechanism for your application’s API. If your API provides both read and write operations, this would obviously increase risk. Still, your users would probably prefer embedding a randomly generated 40-character string in a script than in their passwords.
When you detect that you are handling an RSS or ATOM request, you can be fairly confident that an RSS reader or a script is the requestor. In these situations, you can more efficiently handle the request by turning off the session for that request, like this:
class CommentsController < ApplicationController ... session :off, :only => :index, :if => Proc.new { |req| is_feed_request?(req) } ... def self.is_feed_request?(request) request.format.atom? || request.format.rss? end end |
Note that is_feed_request is defined as a class method of the controller. For the method to resolve in the session :off statement, it must be a class method.
If the data in the feeds is not sensitive, keep it simple and skip authentication for feeds altogether. You could also consider making the feed content a shallow, nonsensitive indicator of the content with links back into the site, where the user would have to authenticate normally. Another approach you may want to consider is simple, time-tested HTTP Basic Authentication.
11.5. HTTP Basic Authentication
Sometimes you need some very simple authentication capabilities. HTTP Basic Authentication is a well-known standard supported by practically every web browser and web automation library. It offers a simple way to secure an API or application meant to be consumed by simple scripts.
Problem
You need to access the username and password sent via HTTP Basic Authentication in a simple Ruby CGI application.
Solution
Listing 11.8 shows how we can extend CGI to allow access to HTTP Basic data.
Listing 11.8. Authenticating with HTTP Basic using CGI
class CGI def basic_auth_data user, pass = '', '' header_keys = ['HTTP_AUTHORIZATION', 'X-HTTP_AUTHORIZATION', 'X_HTTP_AUTHORIZATION', 'REDIRECT_X_HTTP_AUTHORIZATION'] header_key = header_keys.find{ |key| env_table.has_key?(key) } authdata = env_table[header_key].to_s.split if header_key if authdata && authdata[0] == 'Basic' return Base64.decode64(authdata[1]).split(':')[0..1] end end end # Here's an example usage: cgi = CGI.new username, password = cgi.basic_auth_data |
In this example, we open up the CGI class and add CGI.basic_auth_data, a method that can extract the relevant HTTP headers according to the HTTP spec. Note how two of Ruby’s language features (open classes and multiple return values) allow us to create nicer usage syntax than we could in less flexible languages.
Discussion
As you can tell from the code in listing 11.8, the username and password is Base64-encoded. This makes the user’s credentials extremely easy for an attacker sniffing HTTP traffic to access. Ensuring that HTTP traffic occurs over HTTPS is one way to make this technique more secure.
While a programmatic web client can be written to always send authorization headers, most graphical web browsers prompt for basic authentication upon receiving a response with a 401 status code and a WWW-Authenticate header. While testing using a browser, you may not see any authorization headers until you challenge the browser, like this:
cgi.out("status" => "AUTH_REQUIRED", "WWW-Authenticate" => 'Basic realm="My Application"') { "And you are...?" } |
Since most developers use Rails for web development these days, people have ported HTTP Basic Authentication to the framework. Rails 2.0 provides this functionality in ActionController::Base, specifically the authenticate_or_request_with_http_basic method.
Note
With the release of Rails 2.3, Rails now supports digest authentication in addition to basic authentication.
11.6. Integrating OpenID into your application
OpenID is an open standard for decentralized single sign-on. It seeks to address the problem that every internet user is familiar with—too many usernames and passwords.
If a site supports OpenID, a user can simply enter her OpenID (janedoe.myopenid.net, for example) and get redirected to her OpenID provider’s website, where she agrees to allow the originating site to authenticate before being redirected back to the originating site with a token that proves the user is the owner of the ID.
Of course, this explanation is a slight simplification of the OpenID protocol. We recommend you familiarize yourself with the details of the interactions. A great resource is the documentation embedded in the ruby-openid gem source code. Check out lib/openid/consumer.rb in particular.
Problem
You need to support single sign-on via OpenID.
Solution
We’re only going to use OpenID in our application, so we can use the ruby-openid gem to abstract the details of the inter-server communication and initiate and complete the process in controller actions. Listing 11.9 shows a simple controller that handles logging in with OpenID.
Listing 11.9. A simple OpenID login controller
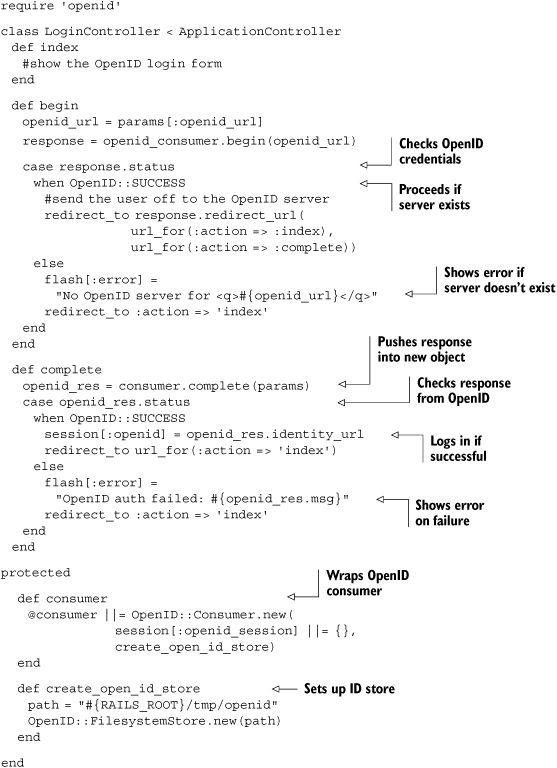
We’ll need a login form, of course, so the view for the index action of the controller would look like this:
<% form_tag url_for(:action => 'begin') do %> <%= text_field_tag 'openid_url' %> <%= submit_tag 'Login' %> <% end %> |
Submitting this form results in a request that is handled by our begin action, which starts the OpenID transaction. Taken all together, this code will allow you to check the session for an :openid key and use that to determine whether the user is authenticated.
For a simple, readable way to check whether a user has authenticated, we could define a helper method like so:
class ApplicationController < ActionController::Base ... def authenticated? session.has_key? :openid end ... end |
You could also have a User model backed by a database table if you need to store peruser preferences or attributes. You could access it based on the user’s OpenID, like this:
class ApplicationController < ActionController::Base ... def current_user User.find_by_open_id_url(session[:openid]) end ... end |
Discussion
As one would expect, there are a number of OpenID plugins, the most prominent of which is open_id_authentication from the Rails core team. There are two major differences between these plugins and the previous example code. First, the plugins attempt to encapsulate most of the logic within modules in the plugin, naturally. Second, the plugins all default to using a database store instead of a filesystem store. For an application that is load-balanced across multiple servers, the filesystem store is inadequate.
A common idiom is to allow users to choose between a username/password login scheme or OpenID. Integrating open_id_authentication with restful_authentication to achieve this effect is not very difficult. First, we’ll need to add a field to our user model and a field to the forms to edit them. Listings 11.10 and 11.11 show a migration and edited view to allow for this logic.
Listing 11.10. A database migration to create the OpenID tables
class AddOpenIdAuthenticationTables < ActiveRecord::Migration def self.up create_table :open_id_authentication_associations, :force => true do |t| t.integer :issued, :lifetime t.string :handle, :assoc_type t.binary :server_url, :secret end create_table :open_id_authentication_nonces, :force => true do |t| t.integer :timestamp, :null => false t.string :server_url, :null => true t.string :salt, :null => false end add_column :users, :identity_url, :string end def self.down drop_table :open_id_authentication_associations drop_table :open_id_authentication_nonces remove_column :users, :identity_url end end |
Listing 11.11. Edited view to support OpenID authentication
<% form_tag session_path do -%> <p><label for="email">Login</label><br/> <%= text_field_tag 'login' %></p> <p><label for="password">Password</label><br/> <%= password_field_tag %></p> <p><label for="identity_url">Identity URL:</label><br /> <%= text_field_tag :openid_url %></p> <p class="submit"><%= submit_tag 'Log in' %></p> <% end -%> |
Next, we’ll need to edit (or basically replace) our controller to allow for OpenID authentication and non-OpenID authentication. This requires us to add some conditional logic as shown in listing 11.12.
Listing 11.12. A new SessionsController that supports OpenID
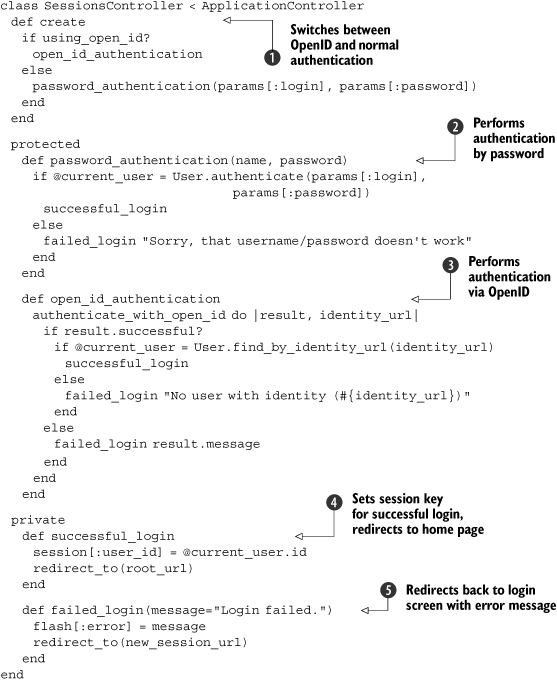
In this new controller (listing 11.12), we first need to replace our earlier create method with one that can differentiate between standard authentication and OpenID ![]() . In this implementation, we use the plugin’s convenience method using_open_id? (which, in turn, checks for the presence of a value for params[:identity_url]).
. In this implementation, we use the plugin’s convenience method using_open_id? (which, in turn, checks for the presence of a value for params[:identity_url]).
Next, we need to create two methods for handling the types of authentication: password_authentication ![]() and open_id_authentication
and open_id_authentication ![]() . The password_authentication method is basically the previous create method, except renamed and using calls to our successful_login and failed_login methods. The open_id_authentication method consists of the logic that we previously wrote in listing 11.9, except now it’s abstracted away into a plugin and condensed down to a single method.
. The password_authentication method is basically the previous create method, except renamed and using calls to our successful_login and failed_login methods. The open_id_authentication method consists of the logic that we previously wrote in listing 11.9, except now it’s abstracted away into a plugin and condensed down to a single method.
Finally, we create two methods that are called when logins succeed ![]() (or fail
(or fail ![]() ), regardless of authentication type.
), regardless of authentication type.
Now we need to add a route to config/routes.rb that the OpenID plugin can use to handle communication with the OpenID server:
map.open_id_complete 'session', :controller => 'sessions', :action => 'create', :requirements => { :method => :get } |
Now our users should be able to log in with either a username/password pair or their favorite OpenID provider.
OpenID is rapidly gaining support in the industry. Companies that provide an OpenID account to all their customers include AOL, Yahoo!, WordPress, SixApart, Orange, and France Telecom. Although it is primarily targeted for the public web, applications for the enterprise are quite interesting. A company could run a public OpenID server for just its employees, thereby vouching for the identity of anyone with an OpenID provided by the company. Also, because OpenID libraries are available for practically every web development platform, it has become an option for single-sign on in a heterogeneous environment. You might easily layer an OpenID server atop your Active Directory or proprietary authentication system. If you’re interested in this, there are several open source OpenID servers, including some written in Ruby cataloged on the OpenID website (http://wiki.openid.net/Libraries).
11.7. Summary
Teenagers today are fond of vintage T-shirts, or simply those that appear to be vintage. This style has been dubbed “authenticitude” by marketing wonks—the attitude of authenticity. For Rubyists, though, we think “authenticitude” should be the attitude of treating authentication seriously, and letting your users know that you do.
Whether your application lives in a corporate environment or on the public web, whether your users are open standards junkies, newbies, or mindless client applications, we hope this chapter has what you need to implement a great authentication system. Take it seriously. Know your users and let them know that their data and identities are safe with you.
If you want to wear a faux-vintage T-shirt while you’re coding it, that’s your business.