
Chapter 12. Searching and indexing
This chapter covers
- Searching databases
- Indexing content using Ferret and Solr
- Searching with other technologies
- The scraping technique
Throughout this book, and throughout your entire programming life, you’ve been used to dealing with data, because it forms the input and output for all computer programs. So far, we have mostly looked at transforming data from one state to another, but in this chapter we’re going to investigate Ruby’s abilities to let you search through data.
Unfortunately, as a language that has reached maturity only in the last few years, Ruby is not blessed with hundreds of search-related libraries. This is not necessarily a bad thing, as search technologies progress quickly, and most of the available Ruby search solutions are up to date and ready to use in production immediately.
In this chapter, we’ll look at Ruby-specific techniques for searching and indexing data, and we’ll examine some solutions to common search-related problems.
We’re going to look at standalone libraries and techniques available to Ruby developers, and we’ll walk through the process of indexing content using two Apache Lucene-based libraries, Ferret and Solr, as well as a performance-driven Ruby-only library called FTSearch. We’ll also look at integrating search features with other technologies, and at searching the web, searching databases, and adding indexing and search features to Ruby on Rails applications.
First, we’ll define searching and indexing, as well as other related terminology.
Note
We will only cover search libraries that are under active development and that have been updated in the last year. There are several older libraries that you may hear about, but we feel it’s important to focus on up-to-date, well-supported tools, so that the level of documentation and support you would expect is still present.
12.1. The principles of searching
Searching refers to the process of taking a collection of data, processing it so that it can be scanned quickly, then enabling a program or a user to find small elements of data within the larger set. Google provides the most ubiquitous form of search technology in our lives today. If you want to find a web page that contains a certain word, or set of words, you go to http://www.google.com, type in your query, and receive your results almost instantaneously.
The amount of data Google can search across is somewhere in the range of billions of pages, which take up thousands of gigabytes of space. Google, therefore, certainly can’t scan every page, byte by byte, looking for results to your query. It could take days (or longer!) to get your search results that way, although it would still, technically, be a “search engine.”
The process that allows Google to produce search results in under a second is indexing, and the performance benefits of indexing are so significant that every search library or tool must provide indexing services of one form or another.
Indexing technologies can be extremely advanced, but at their most basic, they work in the same way as an index in a book. For example, if you turn to the index of this book and search for a particular term, you know roughly where in the index to look, because the index is in alphabetical order. Furthermore, once you find your desired term, you’re provided with a set of page numbers to refer to. This contrasts significantly with having to read through every page of the book to find something. Computers use similar techniques. A search engine’s indexer makes a note of words and phrases on a page, and links those terms (using, for performance and efficiency, a unique numeric ID that references each distinct term) to the page it is indexing. When a search is run, the query engine can quickly look up the IDs of pages that match the terms provided by a user’s search query.
12.2. Standalone and high-performance searching
In this section, we’re going to look at generic, standalone searching and indexing scenarios with the simplest problem we can provide: indexing, and then querying, a corpus of documents. This contrasts with the latter half of this chapter, where we will look at how to use and integrate search techniques in busier situations, such as on the web or within a database-driven web application.
12.2.1. Standalone indexing and search with Ferret
Ferret is a Ruby implementation of Apache Lucene, an open source search and indexing library written in Java. Lucene is incredibly popular in the open source world, and a significant amount of software, and many libraries, use it for implementing large and small search systems. Lucene is an indexing and search library, and so does not include any features relating to obtaining or specially parsing content. These features are provided by other libraries, or by the software using Lucene. As a Ruby implementation of Lucene, Ferret shares the same characteristics.
Ferret will not crawl the web for you, download emails, or index different types of content in unique ways. Instead, you have to use Ferret from your Ruby programs in a generic way. Like Lucene, Ferret can deal with different data formats, and as long as you can extract the textual content of the data you wish to index, Ferret can handle it. Ferret works with the concepts of documents and fields, where documents represent individual groups of content to be indexed (such as a single web page, an email message, or the lyrics of a song) and fields are more detailed elements of data with documents (such as dates, author information, and other metadata).
In this section, we’re going to look at using Ferret to index and search through documents we provide.
Problem
You wish to be able to index, and then search via query, an arbitrary set of documents (that may or may not contain multiple fields of metadata, such as titles, descriptions, and author information) quickly and efficiently. You do not care if the index is usable only from Ruby.
Solution
We’ll look at three solutions to the problem. The first, in listing 12.1, implements a basic text-only indexing and searching system. The second, in listing 12.2, looks at indexing and searching through content that contains metadata and multiple fields. The third solution, in listing 12.3, looks at storing an index to disk and then loading it from another program (which allows the index to persist).
Each solution assumes that you have installed the ferret gem. This is very simple to do on a system running Ruby and RubyGems; use gem install ferret.
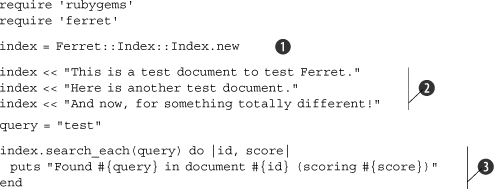
Listing 12.1. Basic document search
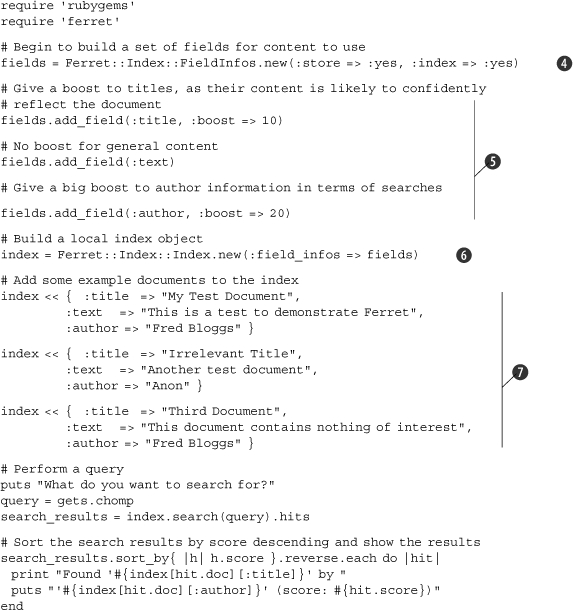
Listing 12.2. Multifield document search
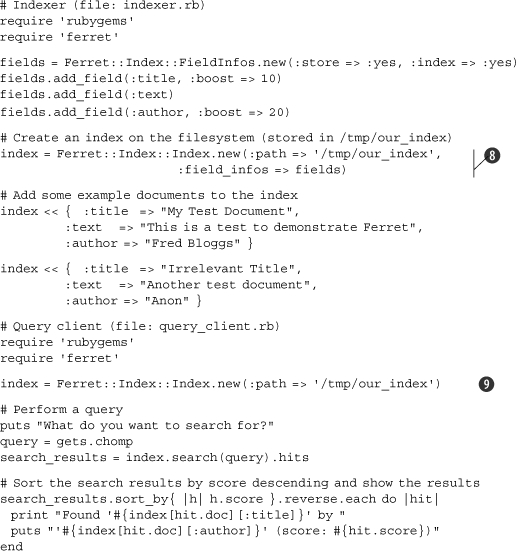
Listing 12.3. Separate indexer and query client programs
These three solutions are very similar, but they show different approaches and levels of complexity. All of them use a Ferret index, with the first two solutions storing the index in memory for immediate use only, and the final solution storing the index to and loading it from the disk.
In listing 12.1, we can see how simple it is to create an index by creating a new object from the Ferret::Index::Index class ![]() .
.
Next, we supply the index with multiple documents to be indexed ![]() . We used strings, but we could have used almost any form of data in Ruby that can translate to a string (such as an array or a hash).
. We used strings, but we could have used almost any form of data in Ruby that can translate to a string (such as an array or a hash).
Whether we use an in-memory or on-disk index, “pushing” documents to the index causes them to be indexed immediately. Finally, we query the index using the search_each method, which performs a search and iterates over each result, passing in the document ID of the matching document, along with a quality score, each time ![]() .
.
We did not give our documents ID numbers, but Ferret did this for us in the order that we supplied the documents. For example, the first solution performs a query of “test”, which nets the following results:
Found test in document 0 (scoring 0.70710676908493) Found test in document 1 (scoring 0.5) |
Because the word “test” wasn’t mentioned in the third document (the document that has an ID of 2, due to 0-indexing), it’s not returned as a result.
Listing 12.2 shows how the previous solution can be extended with an option to include information about a set of fields that exist on the supplied documents. We define these fields first into a group using class Ferret::Index::FieldInfos, then pass that composite object through to the index as an option.
Defining fields to be indexed and managed separately by Ferret is easy. First, we create the FieldInfos object that will hold all of the information ![]() .
.
This constructor takes many different options, but the important ones are :store and :index. These options act as the default choices for all the fields we define from here on out. The :store option lets us choose whether the index will store the actual content of a field (or whether the content should be compressed and/or processed and then discarded entirely) and :index specifies whether a field should be indexed at all. In our case, we want the default to be yes for both.
Next, we define three fields: a “title” field, a “text” or content field, and an author field ![]() . Adding the fields is as easy as calling add_field on the FieldInfos object. Then we specify the field name, along with any options. In this case, the default options of :store => :yes and :index => :yes are used on all of the fields, but on two of the fields we provide a “boost.”
. Adding the fields is as easy as calling add_field on the FieldInfos object. Then we specify the field name, along with any options. In this case, the default options of :store => :yes and :index => :yes are used on all of the fields, but on two of the fields we provide a “boost.”
Boosting is useful when you have columns that contain data that’s more important than data in other columns. In this case, for example, we give document titles more importance in the rankings than the main content (in the text field). We then give the author name even more importance than the title, so that if one document contains “Fred” in the title, and another was written by someone named “Fred,” the latter document would probably score more highly.
Once the fields are defined in the FieldInfo set, we define the index much like in our first example, but we also pass through the field data ![]() .
.
Then, to add documents with defined fields, we use hashes ![]() . Because the fields are delimited in these sample documents, Ferret knows how to handle them in relation to the fields defined in the index.
. Because the fields are delimited in these sample documents, Ferret knows how to handle them in relation to the fields defined in the index.
If we run this example and provide it with a test query, we can see how the boosts affect the results:
What do you want to search for? > document Found 'Third Document' by 'Fred Bloggs' (score: 1.97577941417694) Found 'My Test Document' by 'Fred Bloggs' (score: 0.922030389308929) Found 'Irrelevant Title' by 'Anon' (score: 0.065859317779541) |
Notice that even though each document contains the word “document,” the document that ranks highest is the one with the word in both the title and the content, whereas the second result lacks the word in the content, and the third document, with an extremely low score, merely contains it in the text field.
Listing 12.3 demonstrates how to store and retrieve an index from disk. Ferret makes it extremely simple; it is only necessary to specify the pathname within the construction of the index object ![]() .
.
If the directory specified using the :path parameter doesn’t exist, it’ll be created, as it is in the first example of this third solution. In the second example, the index is loaded in much a similar fashion ![]() .
.
Because the index should already exist, and the field information is predefined, we don’t need to construct and pass through the field information to Ferret, as it’s already part of the index’s structure. The rest of the third solution then uses the same querying code as used earlier.
Discussion
While the queries we performed in the solutions were simple, single-word queries, Ferret has support for complex queries, as you’d expect from a search tool. You can search for phrases, perform Boolean operations (“fred OR martha” or “foo AND bar”), and use wildcards (such as “fre*”).
You can learn more about the query syntax supported by Lucene at http://lucene.apache.org/java/docs/queryparsersyntax.html.
You can also learn more about how to use Ferret by looking at the official tutorial at http://ferret.davebalmain.com/api/files/TUTORIAL.html.
Next, we’re going to look at a true Apache Lucene instance, installed and made available remotely by another Apache product: Solr.
12.2.2. Integrating with the Solr search engine
In the previous section, we looked at using Ferret, a Ruby implementation of Apache Lucene, to index and search data. As we discovered, Ferret and Lucene are indexing and searching libraries, and the ability to parse the data to be indexed, as well as to interpret the results of searches, rests with the client application.
In this section, we’re going to look at Lucene from a different angle, using the Solr search server. Solr, another Apache project, is an open source search server that uses Lucene. Whereas Lucene is only a searching and indexing library, Solr provides higher-level features such as XML and JSON HTTP-based APIs, replication, caching, and a web-based administration interface. If Lucene is the guts of a searching and indexing system, Solr provides the friendly face necessary to use it at a higher level.
Whether you choose to use Ferret or Solr depends on your preferences and the fit between your requirements and the pros and cons of each technology. Even though both provide Lucene-based functionality, their interfaces are so radically different that careful consideration is required. Solr wins out if you need features like replication and the ability to rapidly scale or to easily access indexes over a network, or if you want to provide the same index to multiple applications, including non-Ruby applications. Ferret wins out if you want a simple, single-machine, Ruby-only solution, because it can be installed in one step using RubyGems, whereas Solr requires you to install several pieces of software just to get started.
The solution covered in this section expects that you have Apache Solr installed and running correctly. The installation of Solr is beyond the scope of this chapter, but the official home page is at http://lucene.apache.org/solr/, and information about its dependencies, such as Java 1.5 (or higher), and how to download Solr, is available in the main tutorial provided on the site.
Problem
You wish to use a Solr installation to index and query a set of documents, whether the Solr server is local or remote. This will give you the ability to perform searches over HTTP and to use Solr’s features to gain access to a more robust, scalable, cross-application search solution.
Solution
In our solution in listing 12.4, we assume Solr is installed and running, and that access to the admin interface is possible at http://localhost:8983/solr/admin/. If the server is running on a different machine or port, replace localhost references in the code with the relevant hostname, IP address, and/or port.
Listing 12.4. The MySolr class
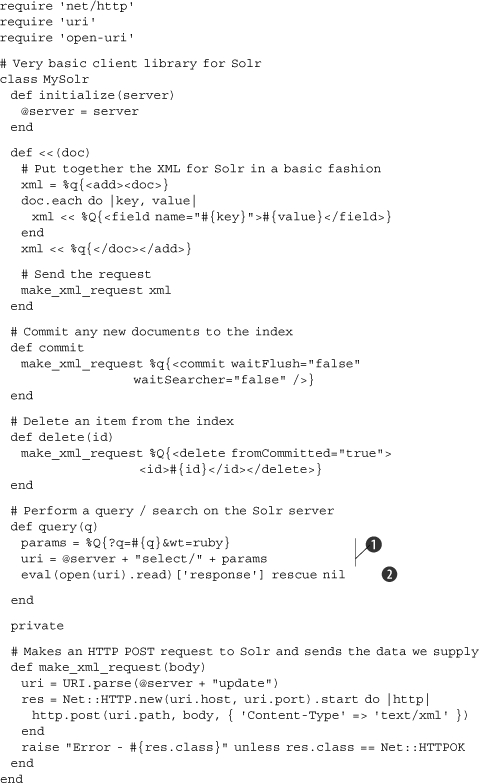
A class is specially provided here, as current libraries available are focused on integration with Ruby on Rails, rather than for use directly from Ruby. As such, this basic library demonstrates how Solr works at a deeper level by making the HTTP requests directly. Once you become familiar with Solr, you may choose to take a different approach, or to use one of the Rails/ActiveRecord-based solutions.
The MySolr class (listing 12.4) is used by the remainder of this solution, so you’ll need to include it at the top of the code in listings 12.5 through 12.7 or require it in. These three code examples give demonstrations of some of the most basic functions provided by both Solr and the MySolr interface class.
Listing 12.5. Adding and indexing documents
# Create an index object using the MySolr class index = MySolr.new("http://localhost:8983/solr/") # Add documents to the index index << { :id => 1, :name => "My Test Document", :text => "This is a test to demonstrate Solr" } index << { :id => 2, :name => "Irrelevant Title", :text => "Another test document" } # Commit the documents to the index index.commit |
Listing 12.6. Querying the index
results = index.query('title') # Print the results puts "#{results['numFound']} result(s) found!" puts results['docs'].each do |result| puts "Document ID: #{result['id']}" puts " Title: #{result['name']} " end |
Running listing 12.6 after the indexing routine in listing 12.5 should produce a result like the following:
1 result(s) found! Document ID: 2 Title: Irrelevant Title |
Listing 12.7. Deleting items from the index
index.delete(1) index.delete(2) index.commit |
As a search engine system with a network-accessible API, most of the code that makes up the MySolr library is concerned with making HTTP connections and moving XML data around. This contrasts with our earlier experiments with Ferret, which work in a very natural, Ruby-coded way. Solr, on the other hand, accepts XML instructions over HTTP, although its internal operation is somewhat similar to that of Ferret.
The MySolr class is not to be considered a particularly reliable Solr client library, although it works well for our demonstration of how to integrate with Solr at the HTTP level. One major flaw with the library is that it doesn’t construct XML documents in a reliable way. (The intricacies of building XML documents is long-winded and beyond the scope of this chapter.)
This solution depends on a Solr server being installed and running when MySolr is used. It also expects you to be using the “example” Solr server that’s built by default when you install Solr. This example server includes a schema with predefined field types that we use in the solution (namely, id, name, and text). If you wanted to build your own schema from scratch, you would need to cater for this in the documents you index from Ruby, and ensure that they only present the legitimate fields to Solr; otherwise an error will result.
From the client’s point of view, using MySolr is similar to using the Ferret library. In listing 12.5, we create an index and push documents onto it. Querying is quite different, as you can see in listing 12.6. Solr accepts queries over HTTP to a URL like so:
http://hostname:port/solr/select?q=query |
If you have Solr running, you can use such a URL and see the results come back in XML format. For our purposes, we add an extra option that makes Solr return the results in a Ruby-friendly format, by using a URL like this:
http://hostname:port/solr/select?q=query&wt=ruby |
This technique is apparent in the query method of MySolr (listing 12.4) when we put the URL together ![]() . Solr will return a string that can be evaled by Ruby:
. Solr will return a string that can be evaled by Ruby:
{'responseHeader'=>{'status'=>0,'QTime'=>0,'params'=>{'q'=>'title', |
We evaluate this and return the relevant section from the query method (![]() in listing 12.4). This eval line downloads the results (using open-uri’s convenient technique), evaluates the Ruby-friendly text response, then returns only the response section, because the responseHeader section only contains information about the request and how long it took to complete.
in listing 12.4). This eval line downloads the results (using open-uri’s convenient technique), evaluates the Ruby-friendly text response, then returns only the response section, because the responseHeader section only contains information about the request and how long it took to complete.
The information that gets returned to the main client is then a hash that looks like this:
{'numFound'=>1,'start'=>0,'docs'=>[{'name'=>'Irrelevant Title','id'=> |
With this information, it’s rudimentary to walk through the information and present the results.
Deleting items indexed by Solr is achieved, again, by a simple HTTP call. The code in listing 12.7 demonstrates how this feature of MySolr is used, and the code in the library illustrates the API call at a more direct level.
Discussion
In this section we have interfaced with Solr, a system that provides a network-accessible API using HTTP to a search indexer and query engine. Ruby is particularly well equipped to deal with engaging with remote APIs, and Solr is a great example of where using a system built upon a non-Ruby technology can still have a good fit with Ruby code.
Our solution focused primarily on the mundane indexing and querying, but behind the scenes were many API calls produced by MySolr and delivered using HTTP.
You can learn more about Solr’s HTTP API calls and how to index data and configure Solr at the Solr Wiki at http://wiki.apache.org/solr/FrontPage.
Later in this chapter, we will look briefly at how to use Solr from a Ruby on Rails application, where the acts_as_solr plugin takes care of all of the intricacies of XML and HTTP.
12.2.3. Ultrafast indexing and searching with FTSearch
The previous two sections have looked at Apache Lucene-based searching and indexing tools. In this section, we’re going to look at a more grassroots, specialized, and high-performance library called FTSearch.
FTSearch is a performance-focused search library written primarily in Ruby (with a little C, for performance) by Mauricio Fernandez. FTSearch began its life when Fernandez wanted to create a tool that could search Ruby’s documentation faster than the existing ri tool. He decided to start by writing a basic suffix-array-based full-text search engine, and his first pure Ruby implementation—achieved in merely 300 lines—was already many times faster than ri’s existing search.
With further work, and the addition of a little C code, FTSearch became so fast that Fernandez began to test FTSearch on the source code for Linux rather than on the trivial amount of Ruby documentation available. At the end of 2006, Fernandez’s benchmarks showed that FTSearch was outperforming Ferret (and therefore the Lucene approach in general) by between 3 and 30 times.
These characteristics, coupled with FTSearch’s current lack of many features Ferret and Solr provide, mean FTSearch is ideally equipped for situations where you have a massive set of text files (such as source code) and all you need to do is index and perform queries on their raw contents very rapidly.
Problem
You want to index, and then search via query, an arbitrary set of documents or files extremely quickly, without using an Apache Lucene derivative. Raw indexing and query performance are the overriding considerations, as opposed to features.
Solution
We will use an indexer (listing 12.8), which will define the fields, iterate through the files, and index them. We’ll then use a query script (listing 12.9) to query the index we created.
Listing 12.8. Using FTSearch to build an indexer
Listing 12.9. Querying the index

Before we look at how the FTSearch library is used, it’s necessary to cover its installation process. As a prerelease library, FTSearch requires a manual installation. The library, in its current state, can be installed using the Darcs package manager (darcs.net/), like so:
darcs get http://eigenclass.org/repos/ftsearch/head/ |
Or, if you don’t want to download and install Darcs, you can mirror or manually download all of the files directly from eigenclass.org/repos/ftsearch/head/.
Once you have all of the files, the README file explains how to compile the C portion of the library. On most systems, this is as easy as running this command:
cd ext/ftsearch && ruby extconf.rb && make |
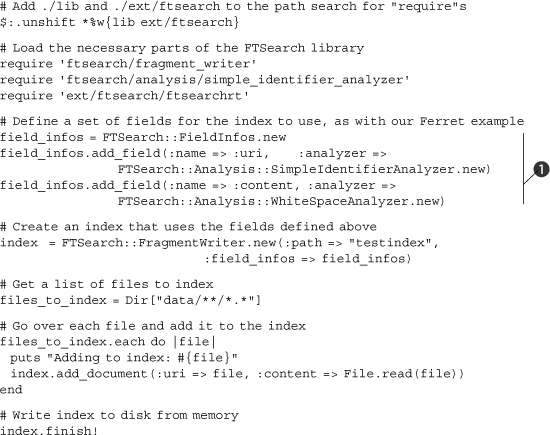
The FTSearch solution is split into an indexer and a program that performs queries upon the index. The indexer (listing 12.8) looks very similar to the Ferret indexer. Fields are defined, again using a FieldInfos class ![]() . Notice that we specify different analyzers to be used on the two fields. The content is indexed with each word being parsed once it is broken up by whitespace. But filenames are divided up by other separators, and the SimpleIdentifierAnalyzer looks for groups of alphanumeric characters, whether or not separated by whitespace. This will allow the query client to search for words within filenames.
. Notice that we specify different analyzers to be used on the two fields. The content is indexed with each word being parsed once it is broken up by whitespace. But filenames are divided up by other separators, and the SimpleIdentifierAnalyzer looks for groups of alphanumeric characters, whether or not separated by whitespace. This will allow the query client to search for words within filenames.
The rest of the indexer retrieves a list of files from the data subdirectory and provides them to the index object to be indexed. Finally, the finish! method is called on the index to write the data to disk.
The querying program (listing 12.9) looks a little more complex. Due to FTSearch’s young age, it’s necessary to do more work than you need to do with Ferret. We have to require quite a few library files (which, in future, will hopefully be replaced with a single require "ftsearch"!) and create instances of readers for the different types of files in the index. Usually these functions would be abstracted away within a library, and it’s anticipated that this will happen with FTSearch in the future.
Once the reader objects are prepared and the user has supplied a query, the first step is to get a list of all of the “raw hits” for the query ![]() . With the list of raw hits in the bag, it’s time to refer them to the documents
. With the list of raw hits in the bag, it’s time to refer them to the documents ![]() , and then sort our results by the scores with rank_offsets
, and then sort our results by the scores with rank_offsets ![]() . The second argument to rank_offsets is an array with weights for each field used in the index. Whereas with Ferret the boost values could be provided up front and stored in the index, with FTSearch it is currently necessary to provide these figures at the time of search. Therefore, we’re giving words within the filename a “boost” of 1,000,000, and words within the files themselves a boost of only 10,000.
. The second argument to rank_offsets is an array with weights for each field used in the index. Whereas with Ferret the boost values could be provided up front and stored in the index, with FTSearch it is currently necessary to provide these figures at the time of search. Therefore, we’re giving words within the filename a “boost” of 1,000,000, and words within the files themselves a boost of only 10,000.
Displaying the sorted results is easy, as rank_offsets returns an array containing document IDs and scores ![]() .
.
Discussion
If the source code to the Linux 0.01 kernel (http://www.kernel.org/pub/linux/kernel/Historic/linux-0.01.tar.gz) is extracted into the “data” directory, the code in listing 12.9 is run, and a query of “Linus” is supplied, the results should look like this:
2 found 2 documents found Results: Document ID: 68 Score: 2 Filename: data/linux/kernel/vsprintf.c Document ID: 28 Score: 1 Filename: data/linux/include/string.h |
If you want to run your own tests, make sure you provide a large corpus, such as the large collection of source code found in the Linux kernel. FTSearch’s techniques are better suited to indexing and searching large sets of data, not small sets, so it makes sense to test it out properly!
The FTSearch installation comes with a README file and several excellent examples, all of which are more in-depth than the simple solution demonstrated here. By reading through the examples, the full power of FTSearch becomes apparent. A FTSearch vs. Ferret benchmarking tool is also included, so you can see FTSearch’s significant speed advantages for yourself.
12.2.4. Indexing and searching Rails data with Ferret and Solr
When approaching search with Rails, you might be asking, “Why use Ferret or Solr or Sphinx from Rails? Can’t I search with a database and ActiveRecord?”
Rails and ActiveRecord provide an abstraction between classes, objects, and data stored in a database. Rails supports a number of different database systems, such as MySQL, PostgreSQL, Microsoft SQL Server, and Oracle. Unfortunately all of these database systems work in different ways.
Some of the database engines Rails supports include advanced full-text search features and others do not. Furthermore, different data and table types within each engine can have different search characteristics. This has meant that Rails and ActiveRecord have not been able to provide a generic, easy way to perform full-text searches on tables within Rails applications, instead leaving users to perform sloppy, non-portable SQL hacks like this (for MySQL):
results = Post.find(:all, :conditions => "title LIKE '%search phrase%'") |
The downside to the preceding code line is that it forces the database to go through every row in the posts table to find an entry with a title containing the necessary word or phrase. As we discussed in section 12.1, this is considered to be a search, but without any indexing process it’s extremely inefficient and slow, particularly on larger datasets.
To get around the performance problems, it’s possible to use the Lucene-inspired Ferret library that we looked at in section 12.2.1 to index data that’s in our database, and then query the index when we want to perform searches, rather than querying the database directly. Once Ferret returns the correct document IDs, we can use standard ActiveRecord methods to extract the data from the live database.
Problem
You want to index, then search via query, data stored in a single Rails model using a Ferret- or Solr-based index.
Solution
We are going to focus on a Ferret-based solution, and then we’ll take a quick look at how to change the solution to work using Solr. As the interfaces of the two plugins are so similar, a full, second solution for Solr is not necessary.
Note that this solution relies on having Ferret installed (as explained in section 12.2.1). You will also need the acts_as_ferret Rails plugin, which can be installed simply:
gem install acts_as_ferret |
Once acts_as_ferret is installed, add the following line to the end of your config/environment.rb file, and the remainder of the solution will work:
require 'acts_as_ferret' |
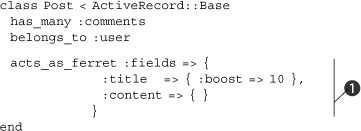
Once acts_as_ferret is installed and included in our Rails application, using Ferret’s features on our models becomes extremely trivial. To get started, open your model file (app/models/post.rb or whichever model you please), and edit it so it looks similar to listing 12.10. Note the call to acts_as_ferret; this tells the plugin that this model is searchable.
Listing 12.10. A simple search-enabled class using acts_as_ferret
Querying the index is very simple and offers helpers that will work from models, controllers, and views:
Post.find_by_contents("test").each do |post| result_title = post.title result_score = post.ferret_score end |
The acts_as_ferret line throws a whole set of gears into action that take care of indexing and tracking the title and content fields/attributes on our Post objects. But a more powerful style to follow is the style shown in listing 12.10 ![]() . This style is more complex, but it allows us to specify options for each field, much as we did in section 12.2.1. Similar to our example in listing 12.2, we apply a boost to a particular field. This means that words contained within the title of a post are considered more important than those in the content. Because titles are usually more concise and targeted than the content of blog posts, this is a good use of the boost technique.
. This style is more complex, but it allows us to specify options for each field, much as we did in section 12.2.1. Similar to our example in listing 12.2, we apply a boost to a particular field. This means that words contained within the title of a post are considered more important than those in the content. Because titles are usually more concise and targeted than the content of blog posts, this is a good use of the boost technique.
You can also specify whether or not Ferret should store the data it’s indexing by using the :store option, much as we did in listing 12.2 (by default, storing is off):
acts_as_ferret :fields => { :title => { :boost => 10, :store => :yes }, :content => { } } |
Now let’s add posts to be indexed to our database (you can do this using the script/console tool to make it easier):
Post.create(:title => "Test Post", :content => "A test document!") Post.create(:title => "Another Post", :content => "More test stuff!") Post.create(:title => "Third Post", :content => "End of testing") |
The acts_as_ferret plugin takes care of the indexing automatically, so we can immediately start making queries using the find_by_contents method that acts_as_ferret adds to models it’s supporting:
Post.find_by_contents("test").each do |post| puts "#{post.title} - #{post.ferret_score}" end |
With our example data, we get these results:
Test Post - 1.0 Another Post - 0.025548005476594 |
Naturally, more complex examples are possible, as you get the full range of Boolean, wildcard, and other searches that Ferret supports:
Post.find_by_contents("te*").each { |p| puts p.title } |
It’s also possible to query the index without returning each matching object. This could be useful if you just wanted to count the number of results, do pagination, or get access to the metadata:
Post.find_id_by_contents("test*") |
The preceding search results in an array like the following:
[3, [{:score=>1.0, :model=>"Post", :id=>"1", :data=>{}}, {:score=>0.0157371964305639, :model=>"Post", :id=>"2", :data=>{}}, {:score=>0.0157371964305639, :model=>"Post", :id=>"3", :data=>{}}]] |
The find_by_contents method also supports the :limit and :offset features that will be familiar from other finders:
Post.find_by_contents("*", :limit => 1, :offset => 1) |
This search will return not the first result, but the second result, and it can also be useful for pagination.
You can learn a lot more about how acts_as_ferret works from the official wiki at http://projects.jkraemer.net/acts_as_ferret/wiki.
Discussion
Now that we’ve covered acts_as_ferret sufficiently, let’s look at using the same code with Solr, a Lucene-based search server. The acts_as_solr plugin provides a very similar interface to acts_as_ferret, and its API documentation is available at http://api.railsfreaks.com/projects/acts_as_solr/.
The acts_as_solr plugin is installed in the same way as most Rails plugins, using the script/plugin tool (which requires Subversion to be installed):
ruby script/plugin install |
The plugin can use a remote Solr install (as we did in section 12.2.2—you should even be able to use the same example install that we used previously) but it also comes with its own version of Solr, which makes things easier. To run it, type this:
cd vendor/plugins/acts_as_solr/solr/ java -jar start.jar |
Solr will then be running permanently, and you can continue developing on another shell or terminal.
Before we change any code in the Rails application, the configuration file in db/solr.yml must be updated to use the correct address and port number for the currently running version of Solr. Update this for both production and development environments before continuing, or the acts_as_solr plugin might break in one or the other environment. The address of the Solr server will have been printed on the screen when you ran the Solr server.
Changing the Post model from that in the Ferret example to using acts_as_solr, results in the following:
class Post < ActiveRecord::Base has_many :comments belongs_to :user acts_as_solr :fields => [{:title => {:boost => 10}}, :content] end |
The syntax is a little different for specifying the boost (and any other options you might choose to use), but the technique is almost the same as for acts_as_ferret. For example, querying is very similar:
Post.find_by_solr("test") |
Or, if you’d like to get a full set of results:
Post.find_by_solr("test").records.each { |p| puts p.title } |
Both of these solutions (Ferret and Solr) are great in themselves, but they can sometimes suffer from corrupted indexes, complex deployments, or performance problems. The Sphinx full-text search engine, covered in the next section, isn’t perfect, but it does solve some of these problems and offers a compelling alternative to Lucene-based solutions.
12.2.5. Searching in Rails with Ultrasphinx
Ferret and the other search options we discuss in this chapter are tested and proven to work well in most situations, but some environments call for more-performant and better-scaling solutions. Sphinx, a search daemon written by Andrew Aksyonoff, is a high-performance full-text search engine that works with MySQL and PostgreSQL. In this section, we’ll look at using Sphinx in your Rails applications using a plugin.
Before getting started, you’ll need to install the Sphinx search engine, available from http://www.sphinxsearch.com/. Once you get it installed, we can look at how to use it with Ruby.
Problem
You need to do high-performance indexing and searching in our Rails application.
Solution
The Ultrasphinx plugin by Evan Weaver is by far the best Sphinx interface for Ruby. It supports all the basic features of Sphinx (plus a few extras like spell-checking), and wraps all this in an incredibly simple API that works with ActiveRecord.
Note
If the Ultrasphinx syntax doesn’t work for you, try Thinking Sphinx. It offers nearly the same functionality with a different syntax. You can get it at http://github.com/freelancing-god/thinking-sphinx
To get the Ultrasphinx plugin working, you’ll first need to install it. Ultrasphinx requires the Chronic gem, so you’ll have to install it too:
sudo gem install chronic script/plugin install –x |
After you get that installed, copy the default.base file from the plugin’s examples directory to your config/ultrasphinx directory. Now we can add the Ultrasphinx calls to the models we want to index. Listing 12.11 shows a basic indexed model.
Listing 12.11. A model that’s indexed with Ultrasphinx
class Article < ActiveRecord::Base is_indexed :fields => ['title', 'content', 'byline'] end |
Note that we specify the fields to index along with the call to is_indexed. Only the fields we indicate here will be indexed.
Finally, we need to let Ultrasphinx set up the Sphinx daemon and build the index. Ultrasphinx encourages you not to edit the configuration files by hand, because they include a lot of Ultrasphinx- and Rails-specific options that need to stay the way they are for the plugin to work. To get everything set up, run the following Rake tasks:
rake ultrasphinx:configure rake ultrasphinx:index rake ultrasphinx:daemon:start |
The Sphinx daemon should now be configured, the models indexed, and the daemon started.
Tip
You can also run rake ultrasphinx:bootstrap to do the same thing as the Rake commands.
Listing 12.12 shows how to execute a search.
Listing 12.12. Executing a full-text search with Ultrasphinx
@search = Ultrasphinx::Search.new(:query => 'excellent food') @search.run @results = @search.results |
After the search in listing 12.12 is run, the @results variable will have an enumerable collection of ActiveRecord objects returned for “excellent food”, and you can use them as you would anything else that includes Enumerable (e.g., #each, #[], and so on).
When it comes times to rotate your Sphinx index, you can do so by running the following Rake task:
rake ultrasphinx:index |
This will rotate the index leaving the daemon in its current state (started or stopped).
Discussion
We’ve just covered the basic case here, but there are a lot of useful options available in Ultrasphinx that go beyond a simple use case.
One great feature of the Ultrasphinx plugin is its built-in support for the de facto standard pagination plugin: will_paginate from Mislav Marohni? and P.J. Hyett. To get paginated results from your searches, you’ll first want to install will_paginate:
script/plugin install git://github.com/mislav/will_paginate.git |
Then, in your controller, feed a page parameter to the initializer for Ultrasphinx:: Search. In this case, we’ll use params[:p] as the value:
@search = Ultrasphinx::Search.new(:query => @query,:page => params[:p]) |
Then, in your views, you’ll need to use the will_paginate view helper.
<%= will_paginate(@search) %> |
You can then operate on your search results like other collections you previously paginated using will_paginate.
If you’d like to have your results highlighted to show matches in the fields, you can tell Ultrasphinx to highlight matched sections by calling excerpt instead of run:
@results = @search.excerpt |
After this, the model instances in @results will be frozen and have their contents changed to the excerpted and highlighted results.
If you’d like to weight the results of your search, you can provide a hash with the field-to-weight ratios in them. For example, if we wanted the title and byline of an article to have more weight in the results than the body, we’d do something like this:
@search = Ultrasphinx::Search.new(:query => @query, :weights => |
Now the search results will be ordered by the weight of the matches on the indexed fields.
You can also provide a number of options for indexing. If you want to cut down on indexing overhead, you can switch to delta indexing, which lets you provide a constraint on what values will be indexed. For example, if we wanted to only index records that had been changed in the last day, we could do something like the following in our .base file in config/ultrasphinx/:
delta = <%= 1.day + 30.minutes %> |
To tell Ultrasphinx that models should use the delta index, you’ll need to change the call to is_indexed slightly to add :delta => true:
is_indexed :fields => ['title', 'body'], :delta => true |
The only catch to this is that it builds a separate index. This means you’ll need to rotate it using a different Ultrasphinx Rake task (rake ultrasphinx:index:delta) and you’ll need to merge the changes into the main index inside the delta period (for example, if your delta is one day, you’ll need to do it daily). If you keep this in mind, a delta index is an excellent way to keep your indexing overhead to a minimum.
You can also assign arbitrary conditions to indexing. For example, if you only want to index videos that have not been marked as “deleted,” you could do something like the following:
class Video < ActiveRecord::Base is_indexed :fields => ['title', 'desc'], :conditions => "deleted = 0" end |
From now on, Sphinx will only index records whose deleted attribute is false (or, in SQL, 0). This is useful for situations where content may be hidden or otherwise masked from users and, as such, should not show up in searching.
Next, we’re going to change gears significantly. We’ll move away from the dry, technical world of directly interfacing with indexing and querying routines and rely on more-automated indexing solutions.
12.3. Integrating search with other technologies
So far, we’ve focused on indexing and querying various collections of local data, but now we’re going to look at how we can use and integrate searching and indexing techniques with other technologies, such as the web and database-driven applications.
12.3.1. Web search using a basic API (Yahoo!)
In the eyes of many, search means Google. We know that there’s a lot more to search than that, but it’s impossible to escape the fact that, to many people, “search” relates to the ability to search the web. This isn’t a bad assumption to make, because the web, coupled with search engines like Google and Yahoo!, provides a relatively device- and format-agnostic way to search large sets of data. In the rest of this chapter, we’re going to look at how you can perform your own web searches with Ruby on both Google and Yahoo! using two different techniques, a search API and “scraping.”
In this solution, we’ll query Yahoo! and process the results it returns in a basic XML format, although a similar approach can be used for many systems that provide basic APIs where the query can be specified on a URL and the results are returned in a structured format (such as searches made with Amazon.com’s developer APIs).
Problem
You want to perform web searches using search engines, such as Yahoo!, that return structured data.
Solution
We’ll use the Yahoo! Web Search API to search for the five top results for “ruby”; our implementation is in listing 12.13.
Listing 12.13. Searching for “ruby” using Yahoo!’s API
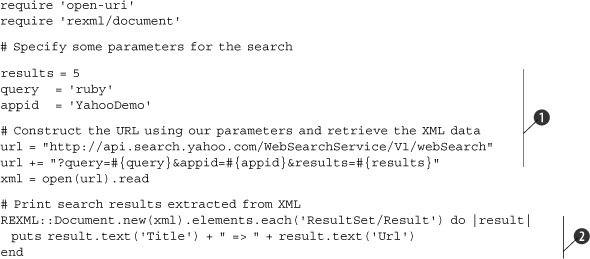
Yahoo! provides access to its Web Search API via simple URLs. The first half of our program is concerned entirely with loading up the libraries we need to use (code omitted below) and building up one of these URLs ![]() .
.
The basic parameters required by Yahoo! are the number of results to return (in this case, 5), an application ID (YahooDemo), and a query (in this case, ruby). There are about ten other parameters that access advanced features, like removing adult sites, choosing sites from certain countries, and so forth. They are covered in detail at http://developer.yahoo.com/search/web/V1/webSearch.html.
The application ID in our example is YahooDemo, which Yahoo! provides for test purposes only. It should work for a few queries, but if you want to use the Yahoo! Web Search API seriously, you’ll need to apply to Yahoo! for your own application ID and agree to their terms and conditions. You can learn more about this, and the rest of Yahoo!’s APIs at http://developer.yahoo.com/search/.
After the URL has been put together, we use open-uri’s useful open method to download the XML:
xml = open(url).read |
The resulting XML is too long and complex to print in this book, but its format becomes apparent from the code we use to parse it ![]() . This code uses Ruby’s standard XML process library, REXML, to iterate over each Result element of the XML from Yahoo!, and then to print out the contents of the inner Title and Url elements in each case:
. This code uses Ruby’s standard XML process library, REXML, to iterate over each Result element of the XML from Yahoo!, and then to print out the contents of the inner Title and Url elements in each case:
Ruby Programming Language => http://www.ruby-lang.org/en Ruby (programming language) - Wikipedia, the free encyclopedia => http://en.wikipedia.org/wiki/Ruby_programming_language Ruby Central => http://www.rubycentral.com/ Ruby Annotation => http://www.w3.org/TR/ruby/ Ruby Programming Language => http://ruby-lang.org/ |
Discussion
The Yahoo! Web Search API represents, to us as programmers, an excellent web search API because the results are returned in a programmer-friendly XML format. This format has been defined by Yahoo! and will remain consistent and documented (at Yahoo!’s developer site).
The results of running this program—a Yahoo! web search using the query “ruby”—will look something like this:
Ruby Programming Language => http://www.ruby-lang.org/en Ruby (programming language) - Wikipedia, the free encyclopedia => http://en.wikipedia.org/wiki/Ruby_programming_language Ruby Central => http://www.rubycentral.com/ Ruby Annotation => http://www.w3.org/TR/ruby/ Ruby Programming Language => http://ruby-lang.org/ |
Next, we’re going to move on to a rougher approach to searching—a Google “screen scraping” approach.
12.3.2. Web search using a scraping technique (Google)
Let’s face it, Google is the granddaddy of search, so it’s natural to want to be able to use its results in a programmatic fashion. Or how about other sites, like the Internet Movie Database (http://www.imdb.com) or a typical e-commerce site? Unfortunately, we need to resort to the dark magic of scraping.
Problem
You want to perform web searches and extract data from search engines or other websites that don’t present their results in a structured way. This forces you to use a scraping technique.
Solution
Until the end of 2006, Google provided access to a SOAP-based search API, but this has been withdrawn from use for all except existing users. As this system is now deprecated and closed to the public, we cannot go into its operation. Google replaced the SOAP-based API with an AJAX-based one to be used directly on web pages, but this API is not of significant use to us.
It should be noted that scraping search results in an automated fashion is against Google’s terms of service, although it is generally allowed for nonautomated, personal use. We expect you to use any code provided in this section in good faith and in compliance with Google’s terms of service (or those of any other site you choose to scrape).
To start, you need to install the scRUBYt! library. scRUBYt! (http://scrubyt.org/) is a Ruby library, developed by Peter Szinek, that makes it easy to automate and process data on the web. It is available as a gem and can be installed as follows:
gem install scrubyt |
On some platforms, you may also need to install an extra gem (only do this if there is an error when running this solution):
gem install ParseTreeReloaded |
Now, let’s get down to scraping. Listing 12.14 shows how to fetch a Google results page and scrape the results from it.
Listing 12.14. Scraping Google for results for “ruby”
The conciseness of the main part of our code emphasizes how easy scRUBYt! makes processing data on the web.
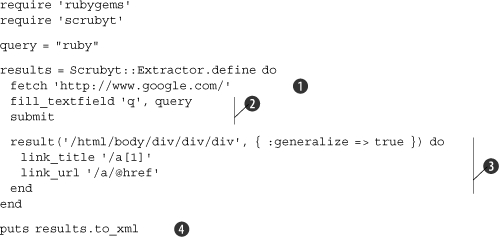
The steps involved should be clear. As scRUBYt! features its own domain-specific language (DSL), we define an extractor through the Scrubyt::Extractor class, and then the fun can begin.
The first step of the extraction process is to fetch the http://www.google.com homepage ![]() . That done, we can fill out the search form with our desired query and submit the form. In this case, it’s easy to see by looking at the source code that the Google search form uses a text field with a name of q to accept the user’s query, so we use fill_textfield to do this job for us, and submit the form
. That done, we can fill out the search form with our desired query and submit the form. In this case, it’s easy to see by looking at the source code that the Google search form uses a text field with a name of q to accept the user’s query, so we use fill_textfield to do this job for us, and submit the form ![]() .
.
Once the form is submitted, a results page will be returned, and we need to define a pattern to match against each result. scRUBYt! is powerful enough to allow us to specify example results, obtained by hand, and then work out the XPath rules to scrape that data from a page. In this case, to ensure that the example works, I have specified the XPath rules explicitly ![]() .
.
The result block gives us access to each result (found with an XPath query of /html/body/div/div/div) and allows us to define which elements of the result we want to extract. In this case, we’re extracting the title and URL of the links, although you could extract the result descriptions too, with an extra rule. These methods are simple patterns and could use any name, other than link_title and link_url. scRUBYt!’s DSL is clever enough to work out that these are the names we’re giving to the respective elements, and it will use these names in the resulting XML. For example, this code is as valid and would result in XML output using slightly different element names:
result_title '/a[1]' result_url '/a/@href' |
The resulting XML that comes from the final puts line ![]() can then be processed using any XML library, such as REXML or SimpleXML.
can then be processed using any XML library, such as REXML or SimpleXML.
The results returned by this program, after a whole collection of raw debugging information, should look something like this:
<root> <result> <link_title>Ruby Programming Language</link_title> <link_url>http://www.ruby-lang.org/</link_url> </result> <result> <link_title>Ruby Home Page - What's Ruby</link_title> <link_url>http://www.ruby-lang.org/en/20020101.html</link_url> </result> <result> <link_title> Ruby (programming language) - Wikipedia, the free encyclopedia </link_title> <link_url> http://en.wikipedia.org/wiki/Ruby_programming_language </link_url> </result> <result> <link_title>Ruby - Wikipedia, the free encyclopedia</link_title> <link_url>http://en.wikipedia.org/wiki/Ruby</link_url> </result> [.. extra results removed to preserve space ..] </root> |
Discussion
As Google doesn’t supply a programmer-friendly API, we had to resort to scraping Google’s data from the regular HTML pages. As explained earlier, automating this process on a mass scale is against Google’s terms and conditions, so tread with caution. That said, you will be able to use this same technique with other websites and search engines, and the scraping library, scRUBYt!, comes with many examples of using the library to scrape sites like IMDB, Yahoo! Finance, Amazon.com, and so on.
12.4. Summary
This chapter has covered a tight niche, in terms of Ruby. As we’ve seen, only a handful of search libraries and techniques have been developed in Ruby so far, but all of them are reasonably powerful and ready to be used in production scenarios.
We first looked at the general principles of searching and indexing, and then looked at some high-performance, standalone solutions in the guises of Ferret, a Ruby Apache Lucene port, Solr, an HTTP-based search server and interface to Lucene, and FTSearch, a high-performance suffix-array-based indexer and search library. We then discussed how to search in your Rails applications using solutions like acts_as_ferret, acts_as_solr, and Ultrasphinx—plugins that bridge the gap between Rails applications and search libraries.
Finally, this chapter has shown you how to get your bearings with the search technologies available to you in Ruby. It’s also shown you some further technologies and libraries you can explore and look out for in the future.
In the next chapter, we’re going to move on to document processing and report generation.