
Chapter 5. Securing a Restlet application
In chapter 3 you saw how to deploy a Restlet application on premises, but this application was freely accessible to any client. In the real world free accessibility is rarely desirable, and a point comes when you need to take security into account. This chapter covers how to secure a Restlet application. We address the issue of securing the communication between the client and the server by using transport level security that can ensure confidentiality and integrity of the exchange.
Then we go through three related notions: authentication, assignment of roles, and authorization. The section on authentication guides you through verifying the identity of the remote user. The section on role assignments shows how remote users may be mapped into the system’s overall identity management structures, specifically via roles in the application. The section on authorization shows how to grant or deny users permission to perform an action, depending on their authentication status and on the action they wish to perform.
Finally we show how to protect against accidental modification during the exchange of representations using the mechanisms that ensure end-to-end integrity of the data. We begin by explaining how to implement transport confidentiality and integrity with Restlet.
5.1. Ensuring transport confidentiality and integrity
The most common way of securing communication over the internet is to use the Transport Level Security (TLS) protocol, or the Secure Socket Layer (SSL) protocol from which TLS is derived. TLS can be used to ensure the confidentiality and integrity of the communication between a client and a server, making the communication immune to eavesdropping or alteration by a third party or through network failure.
This section covers TLS and SSL and describes how to configure a Restlet component to use them. First we explain how the TLS protocol works, particularly in the context of HTTP, and the purpose of certificates. Then we describe what keystores are, how to generate private and public keys, and how to handle certificates in Java. Finally we explain how Restlet is configured to use certificates and how to configure custom SSL contexts for specialized applications.
5.1.1. Understanding TLS and SSL
The purpose of TLS is to ensure the security of the communications between a client and a server. It provides applications with secure sockets, which have been designed to match normal sockets as closely as possible. Correct configuration of TLS is necessary in order to ensure the confidentiality and integrity of the communication.
TLS is the Internet Engineering Task Force’s (IETF) standard for a transport layer security protocol. TLS v1.0 is based on SSL v3. As a result TLS is still often referred to as SSL in a number of frameworks and applications. For the purpose of this book, TLS and SSL can be considered to be the same except when an explicit version is given. In Java, most of the classes related to the configuration of TLS/SSL use the SSL prefix.
TLS normally relies on Public Key Cryptography, which uses a pair of keys to encrypt and decrypt messages. The pair of keys consists of a private key, known only to the person or machine by which it was generated, and an associated public key, which may be distributed publicly. Two main operations can be performed: encryption and signing. Encryption is used to make the content of a message secret and is done using the public key; decryption can then only be performed using the corresponding private key. Signing is used to assert the authenticity of a message and involves similar operations, but is done using the private key; validating the signature is done using the corresponding public key. Here the action of signing means using a private key to encrypt the result of applying a hash function to the content of the message being sent.
A fundamental requirement to avoid man-in-the-middle attacks is to enable the client to verify the identity of the server with which it’s communicating. Without this verification, the client could be talking to an impostor relaying, eavesdropping, and possibly altering the messages exchanged with the legitimate server. The mechanism to verify the identity of a remote server relies on certificates (usually based on the X.509 standard), which bind a public key to an identity and are distributed as part of a Public Key Infrastructure (PKI). For this reason, the server must be configured to use a certificate.
A certificate is a signed statement that includes a public key and other information such as date of validity, Subject Distinguished Name (Subject DN), and the Issuer Distinguished Name (Issuer DN). The Subject is the entity to which the certificate is issued; it’s the entity that has the private key associated with the public key in the certificate. The Issuer is the entity that asserts that the information in the certificate, in particular the identity of the subject, is correct. The issuer is usually a Certification Authority (CA), which may be a commercial company or may be a local CA created within your institution or company. PKIs describe the relationships and trust models between the CAs and are associated with legal documents describing the intended use of various X.509 attributes (depending on CA policies).
The verification process in a PKI relies on the certificate consumer to be configured with a set of certificates it trusts a priori: the trusted anchors. Verifying a certificate then consists of building a chain between that certificate and one of the trusted anchors; there may be intermediate certificates in the chain.
Alternative trust models exist, such as FOAF+SSL, that may require more specialized SSL settings. Certificates can also be self-signed, in which case the trust model has to be established by some other means (for example, someone you trust gives you this certificate in person). Figure 5.1 illustrates the HTTPS connection process.
Figure 5.1. HTTPS sequence diagram with TLS/SSL

When a user agent connects to an HTTPS server, it first verifies the certificate of the server during the TLS handshake (before any HTTP data is exchanged). Web browsers are generally bundled with a number of CA certificates (the trusted anchors), often from commercial or governmental CAs. The Oracle Java SE also comes with a set of trust anchors (the default truststore in Java’s terminology), but the reference guide for the Java Secure Socket Extension (JSSE), which is the part of the Java SE responsible for handling TLS, recommends checking the content of that truststore when deploying applications.
Once the certificate has been verified against a set of trusted anchors, the client must also verify that the certificate matches the name of the host it intends to connect to. To be acceptable, the host name must be in the Subject Alternative Name DNS entry (an X.509 extension) or, if this extension is absent, in the Common Name (CN) field of the certificate’s Subject DN.
Only once these verifications have been performed may the TLS handshake proceed, including the exchange of random session keys. Upon completion of the handshake, the HTTP communication may begin on top of the TLS layer. TLS protects the HTTP communication from eavesdropping, using encryption, and from third-party alteration, because such attacks would make the communication terminate abruptly (which would cause an exception in Java).
In addition, clients may also send a certificate to the server during the TLS handshake, when the server wishes to use client-certificate authentication. The verification process on the server side is similar except that there is no requirement to check the host name.
5.1.2. Storing keys and certificates
In general, special files are used to store certificates and private keys. For TLS two kinds of files are used, keystores and truststores, which can also be used in Java code via the java.security.KeyStore class. The names may appear confusing, but both keystores and truststores are instances of KeyStore.
In this context, the keystore is the store that has the information local to the application; the keystore contains the server certificate and its private key on a server and the client certificate and its private key on a client.
In contrast, the truststore is the store used for making trust decisions regarding certificates presented by remote peers. The truststore is used by the client to verify the certificates of the servers it connects to and by the server to verify the client certificates it receives (if the server is configured to ask for client certificates).
The Oracle JRE is provided with a default truststore that contains a number of commercial CA certificates (similar to browsers). The Oracle Java SE supports a number of types of keystores. The default type is JKS, but PKCS12 (PKCS#12 format) is also supported and can be used for importing and exporting .p12 files with a number of tools such as web browsers or OpenSSL. Java provides a command-line tool to manipulate keystores called keytool. Other third-party tools exist.
The following subsections give an overview of the keytool operations used to create and manage certificates for use with Restlet.
5.1.3. Generating a self-signed certificate
This section describes how to generate a key pair using keytool, which also creates a self-signed certificate implicitly. Note that this tool has been greatly enhanced in Java 5.
The following command creates a 2048-bit RSA key pair and creates a self-signed certificate for CN=simpson.org,OU=Simpson family,O=The Simpsons,C=US where CN is the common name (fully qualified domain name or IP address), OU the organizational unit, O the organization, and C the country code, using an SHA1 signature digest. Then it stores it into the server alias of a keystore file called serverKey.jks:
keytool -keystore serverKey.jks -alias server -genkey -keyalg RSA
         -keysize 2048 -dname
        "CN=simpson.org,OU=Simpson family,O=The Simpsons,C=US"
         -sigalg "SHA1withRSA"
Note that you’ll be prompted for passwords for the keystore and the key itself. Let’s enter password as the example value. This certificate can then be exported as an independent certificate file server.crt, using this command (providing the same password):
keytool -exportcert -keystore serverKey.jks
        -alias server -file serverKey.crt
The certificate file can then be distributed and imported explicitly in browsers, whereas the private key remains in the keystore file. By design, private keys can’t be recovered from public keys or certificates, so backing up the keystore at this stage is recommended. In the following subsection you see how to have this key material certified by a certification authority (CA).
5.1.4. Generating a certificate request
This section describes how to generate a certificate signing request (CSR), which may be required by the CA that will provide your certificate. (Alternatively, some CAs have web interfaces that allow for the key material generation within the browser.)
A CSR binds a public key to a requested identity and attributes and is as such similar to a certificate. But it can’t be used as a certificate. CAs may choose to emit certificates that have different attributes or DN structures than those that were requested, depending on their policies. A CSR is signed by the private key corresponding to its public key, therefore proving that whoever generated the CSR owns this private key.
A prerequisite for the generation of a CSR is a key pair, generated as described in the previous section. Then the CSR can be created with this command:
keytool -certreq -keystore serverKey.jks
        -alias server -file serverKey.csr
Alternatively, tools such as OpenSSL can be used to generate certificates, certificate requests, and CAs. OpenSSL users may want to start with the man-page for CA.pl.
Next you must import the resulting certificate created by the CA into the keystore to be able to use it.
5.1.5. Importing a trusted certificate
After approval of the certificate request, the CA will provide a certificate file, usually in PEM or DER format. It needs to be imported back into the keystore to be used as a server certificate:
keytool -import -keystore serverKey.jks
        -alias server -file serverKey.crt
This command is also used for importing CA certificates into a special keystore that’s going to be used as a truststore—on the client side, for example. In this case the -trustcacerts options may also be required:
keytool -import -keystore clientTrust.jks -trustcacerts
        -alias server -file serverKey.crt
This trusted certificate may also be imported explicitly into your browser or used by a programmatic HTTPS client. This is useful if you’re deploying your own infrastructure, or during development phases.
5.1.6. Enabling HTTPS in Restlet
Enabling HTTPS on a Restlet server is only relevant to standalone Restlet server connectors. If your Restlet application is running within a Servlet container, the container’s connectors must be configured according to its documentation.
Configuration regarding HTTPS can be set using the parameters of the server’s context. Table 5.1 lists all useable parameters in this context.
Table 5.1. Parameters of the server context related to the use of HTTPS
|
Parameter name |
Description |
|---|---|
| keystorePath | Specifies the path for the keystore used by the server |
| keystorePassword | Specifies the password for the keystore containing several keys |
| keystoreType | Specifies the type of the keystore |
| keyPassword | Specifies the password of the specific key used |
| truststorePath | Specifies the path to the truststore |
| truststorePassword | Specifies the password of the truststore |
| truststoreType | Specifies the type of the truststore |
| sslContextFactory | Specifies a custom SslContextFactory implementation |
| needClientAuthentication | Indicates whether to require client certificate authentication |
| wantClientAuthentication | Indicates whether you want client certificate authentication |
Next we cover a basic configuration of the keystore for an HTTPS-based server. The use of the sslContextFactory parameter is described in subsection 5.1.7.
The code in the following listing illustrates how to set up an HTTPS server using a certificate stored in serverKey.jks, as described in the previous sections.
Listing 5.1. Basic configuration of the keystore on a server
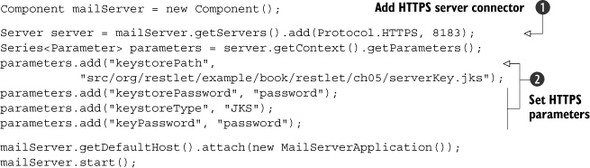
After having configured and added the HTTPS server to the component ![]() , you need to set the parameters related to HTTPS in order to configure the associated keystore
, you need to set the parameters related to HTTPS in order to configure the associated keystore ![]() . They correspond to its path, password, and type. Another password also needs to be set for the associated key.
. They correspond to its path, password, and type. Another password also needs to be set for the associated key.
Note
In order to run this example, you need to ensure that you correctly generated the SSL keystore in the previous section. If you’re using version 2.0 of the framework, you also need to add HTTPS client and server connectors to your classpath, such as org.restlet.ext.net.jar and org.restlet.ext.jetty.jar, and its dependencies.
You should then be able to start your server and point your browser to https://localhost:8183/accounts/chunkylover53/mails/123. Remember that the certificate must be trusted by the browser; otherwise you will get a warning message. Even if you are getting a warning from the browser (perhaps because you are running in a test environment where you have not configured your trusted certificates), the browser should let you see the certificate and verify that it’s the one you have indeed configured on the server, then manually accept it.
Let’s now see how to invoke this HTTPS server with Restlet on the client side. This time, because you use the server certificate to encrypt the communication, you don’t need to provide a keystore. But because you used a self-signed certificate so far, you need to explicitly say that you trust it using the previously created truststore on the client side, as detailed in the following listing.
Listing 5.2. Basic configuration of the truststore on a client
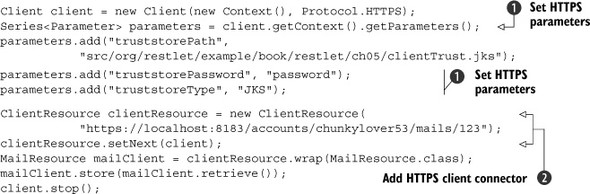
After having created and configured the HTTPS client ![]() , you need to explicitly add it to the ClientResource instance that you’ll use to communicate with your previous HTTPS server
, you need to explicitly add it to the ClientResource instance that you’ll use to communicate with your previous HTTPS server ![]() . The parameters correspond to the client-side truststore. You can now launch this HTTPS client after making sure that the
HTTPS server is still running to see that everything works as expected.
. The parameters correspond to the client-side truststore. You can now launch this HTTPS client after making sure that the
HTTPS server is still running to see that everything works as expected.
The settings presented in this section represent the traditional cases for enabling SSL on a server and a client. More advanced settings with custom management of trust or with other types of keystore configurations may also be used, as described next.
5.1.7. Providing a custom SSL context
In addition to the settings described previously, it’s possible to provide a Restlet server with customized SSL settings, using its org.restlet.ext.ssl.SslContextFactory abstract class (in Restlet Framework version 2.1). This can be configured via a parameter (using the class name) or via an attribute (using an existing instance). Table 5.2 lists all implementations of this interface provided by Restlet.
Table 5.2. Provided implementations of the SslContextFactory interface
|
Implementation |
Description |
|---|---|
| DefaultSslContextFactory | Makes it possible to configure most basic options when building an SSLContext |
| JsslutilsSslContextFactory | Corresponds to a wrapper for the SSLContextFactory of jSSLutils |
| PkixSslContextFactory | Uses PKIXSSLContextFactory from jSSLutils and can be configured via parameters |
To configure it via a parameter, pass the fully qualified class name of an implementation of SslContextFactory into the sslContextFactory parameter of the connector’s context. An instance of this class will be created and its init() method called using the connector’s parameters.
To configure it via an instance, pass the configured instance into the sslContext-Factory attribute of the connector’s context. Configuring the SslContextFactory can be used for FOAF+SSL authentication or grid proxy certificates. The Restlet SSL extension (see the org.restlet.ext.ssl package) provides a JsslutilsSslContextFactory which wraps jSSLutils’s SSLContextFactory that implements some of these cases.
jSSLutils is a small library designed to assist users who need SSL settings that are often not configurable by using the default text parameters in Java.
It provides a consistent way of setting SSL-related parameters in Restlet, Jetty, and Apache Tomcat, such as methods for configuring PKCS#11 keystores (typically based on hardware cryptographic devices) and explicit configuration of Certificate Revocation Lists (CRL), for example.
It also provides extensions to alter the trust management, for example to accept grid proxy certificates (a type of certificate used for delegation of credentials in grid computing) or FOAF+SSL certificates (used to authenticate a WebID [3] using semantic web and social networking technologies).
This project is hosted at http://code.google.com/p/jsslutils/.
The following snippet describes how to specify a custom SSL context factory at the Restlet client side:
final SSLContext customSslContext = (...)
client.getContext().getAttributes().put("sslContextFactory",
     new SslContextFactory(){
         public SSLContext createSslContext()throws Exception {
             return customSslContext;
         }
         public void init(Series<Parameter> parameters) {
             // customSSLContext ignores standard parameters.
         }
});
At this point, you know how to ensure the confidentiality and the integrity of exchanges between clients and servers using TLS, SSL, and HTTPS. The next step is to explain how servers can authenticate those clients to ensure that they are indeed who they say they are.
5.2. Authenticating users
This section describes how to authenticate users, or check the identity of a client that connects to a server. Authentication is a prerequisite for authorization, which consists of making and enforcing an authorization decision depending on authentication information.
Figure 5.2 describes elements involved when implementing authentication with Restlet from client to server sides. Note that in HTTP, authentication is most often synonymous with challenge authentication, which means that the server first specifies the type of credentials that it’s expecting from the client in order to successfully authenticate subsequent requests. Then, the client can respond by providing the proper credentials to the server.
Figure 5.2. Entities involved when using authentication with Restlet on both client and server sides

Let’s first describe how to configure authentication on the client side.
5.2.1. Providing authentication credentials on the client side
On the client side, several classes from the org.restlet.security package of the Restlet API are involved regarding authentication:
- ChallengeRequest—Corresponds to the authentication challenge sent by an origin server to a client. Upon reception of this request, the client should send a new request with the proper ChallengeResponse set. When used with HTTP connectors, this class maps to the WWW-Authenticate header. Note that multiple challenge requests can be sent to a client at the same time, in case several schemes are supported.
- ChallengeResponse—Corresponds to the authentication response sent by a client to an origin server. This is typically following a ChallengeRequest sent by the origin server to the client. Sometimes, it might be faster to preemptively issue a challenge response if the client knows for sure that the target resource will require authentication. When used with HTTP connectors, this class maps to the Authorization header.
- ChallengeScheme—Corresponds to the challenge mechanism used to authenticate remote clients, such as HTTP Basic.
Let’s now describe how to add client credentials to requests on the client side based on these classes.
Setting Authentication Credentials in a Request
Securing a request with Restlet is done using the ChallengeResponse class. After initializing the class, you can set it on the entity making the request, either the Request itself or a ClientResource instance, using the setChallengeResponse method.
The constructor of the ChallengeResponse class accepts three parameters:
- The challenge scheme—Specifies the scheme used to authenticate remote clients.
- The identifier—Corresponds to the user identifier, such as a login name or an access key.
- The secret—Corresponds to the user secret, such as a password or a secret key.
Restlet provides an important range of built-in security schemes. These are defined as constants in the ChallengeScheme class. Table 5.3 lists all these schemes available in version 2.1.
Table 5.3. Security schemes declared by the ChallengeScheme class
|
Name |
Description |
|---|---|
| CUSTOM | Custom scheme based on IP address, query parameters, and so on |
| FTP_PLAIN | Plain FTP scheme |
| HTTP_AWS_QUERY | Amazon Web Services scheme using a URI query parameter |
| HTTP_AWS_S3 | Amazon Web Services digest-like HTTP scheme for S3 |
| HTTP_AZURE_SHAREDKEY | Microsoft Azure Shared Key scheme |
| HTTP_AZURE_SHAREDKEY_LITE | Microsoft Azure Shared Key lite scheme |
| HTTP_BASIC | Standard HTTP Basic scheme |
| HTTP_COOKIE | Special scheme using HTTP cookies |
| HTTP_DIGEST | Standard HTTP Digest scheme |
| HTTP_NTLM | Microsoft NTLM HTTP scheme |
| HTTP_OAUTH | OAuth HTTP scheme |
| POP_BASIC | Basic POP scheme |
| POP_DIGEST | Digest POP scheme |
| SDC | Google Secure Data Connector scheme |
| SMTP_PLAIN | Plain SMTP scheme |
We won’t describe all of these schemes in this chapter; we focus on HTTP Basic in this section and on HTTP Digest in the next section. Some of the schemes are described in other chapters, the S3 and SDC ones in chapter 8, respectively in sections 8.7 and 8.8.3.
Two new extensions related to security were added to version 2.1 of Restlet Framework, based on a contribution from Ericsson Labs. They provide support for draft versions of OAuth 2.0 (supporting delegated authentication to web APIs) and OpenID 2.0 (interoperable authentication, client and server sides).
Let’s implement HTTP Basic authentication for a request. Imagine that your mail server is now secured and requires you to provide a username and a password, as we’ll explain in section 5.2.4, “Verifying user credentials.” The following code snippet describes how to preemptively provide those credentials:
ChallengeResponse authentication = new ChallengeResponse(
    ChallengeScheme.HTTP_BASIC, "chunkylover53", "pwd");
clientResource.setChallengeResponse(authentication);
As you can see, the ChallengeResponse class is the central class to provide those credentials in a request. Restlet internally relies on an authentication helper to convert this information into a proper HTTP header.
There are cases where authentication is a bit complex and requires some exchanges between client and server. In the next section, we’ll describe the case of the HTTP Digest authentication and how Restlet manages it.
Receiving Security Credentials in a Response
Some security schemes are more complex than others to implement on the client side because they require a preliminary exchange with the server before being able to authenticate a request. That’s the case with digest authentication.
The first step is to send the request without any authentication hints. The server will send back HTTP error 401 (Client Unauthorized), telling that you need an authentication. In this response, the HTTP WWW-Authenticate header is present and gives unique and transient information to build the authentication credentials for the next requests. Figure 5.3 gives details about interactions between client and server regarding digest authentication.
Figure 5.3. Interactions between client and server sides during HTTP Digest digest authentication

Information to build authenticated requests and send them back from the server are available with Restlet using the ChallengeRequest class. To get the corresponding instances, you need to iterate over the list returned by the getChallengeRequests() method. The one with the HTTP Digest scheme is the one you’re prepared to support in this example. This instance will be used to instantiate the ChallengeResponse for subsequent requests to secured resources in addition to username and password. Listing 5.3 describes how to implement HTTP Digest authentication based on security hints received from the server on the first unauthenticated request.
Listing 5.3. Two-step client authentication with HTTP Digest
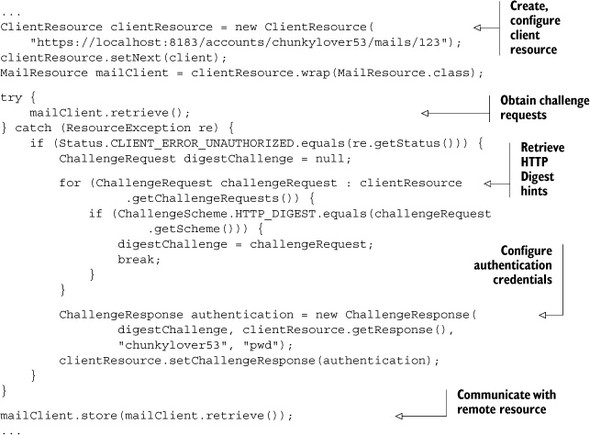
The first step is to extract security hints sent back by the server after the first unauthenticated request. Based on them, you create a new ChallengeResponse instance, adding the username and password. Once set on the ClientResource instance, the request can be sent again. This time around it will be successfully authenticated.
Before dealing with the server-side security support in Restlet and testing the previous client-side code, let’s look at how the framework allows proxy authentication.
Support for Proxy Authentication
Restlet also supports proxy authentication that is sometimes required in large organization in order to leave the intranet and access the web at large. This support is based on the proxyChallengeResponse property of Request. This property holds credentials that contain the authentication information of the user agent for the proxy. These credentials are sent to the server using the Proxy-Authorization HTTP header.
This feature is also used by the SDC support within Restlet in order to provide credentials necessary to authenticate with the secured channel. For more details, refer to chapter 8, section 8.9, “Accessing intranet resources with Restlet’s SDC extension.”
Let’s dive now into the server side of Restlet authentication support.
5.2.2. The org.restlet.security.Authenticator class
The Authenticator class is a Filter subclass that implements the mechanisms for authenticating remote users. Its function is to associate a user identity with a request using a Verifier. In addition, it may use the optional Enroler, if present, to associate the user with roles. Figure 5.4 illustrates the main Authenticator subclasses as well as the Restlet classes and interfaces involved in the authentication process that we’ll describe in this subsection.
Figure 5.4. Hierarchy of authenticator classes
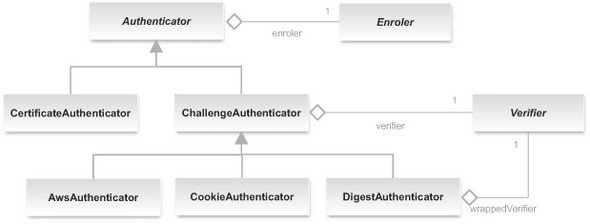
The Authenticator is an abstract class that requires the definition of the authenticate(Request, Response) method in its concrete subclasses. All the preceding details about challenge requests and responses are useful when implementing this method. Typically, authentication is performed by presenting the client with a challenge, via an HTTP header mechanism.
The ChallengeAuthenticator, described in the next subsection, is a concrete Authenticator that implements the challenge mechanism and uses a Verifier, described in section 5.2.4, to verify the response to such challenges.
Some authenticators only rely on existing information associated with the request, without requiring an additional challenge. This is the case with the Certificate-Authenticator, described in section 5.2.5, which supports the authentication via trusted TLS client certificates.
By default, authenticators don’t forward the request to the next Restlet in the routing chain if the request isn’t authenticated successfully. But they may be configured for optional authentication using the optional Boolean property, in which case the request will go through even if no authentication information was obtained.
Authenticators aren’t to be confused with authorizers, covered in section 5.4, which make authorization decisions about whether the request will be able to proceed, with or without user authentication. Typically, an Authenticator is immediately chained to an Authorizer, which is then chained to the protected Restlet.
Let’s now describe the authenticator that uses the challenge mechanism described previously to authenticate requests.
5.2.3. Challenge-based authentication
The ChallengeAuthenticator class provides mechanisms to authenticate client requests via a challenge. The verification of the credentials provided by the client in response to this challenge is delegated to its Verifier, as described in the next subsection. The ChallengeAuthenticator expects to be initialized with a Challenge-Scheme, a realm name (used by a number of challenge schemes), and a Verifier.
The purpose of the Verifier is to ascertain that the user’s response to the challenge is the one that was expected (ensuring that users are who they say they are). Because authenticators are filters, they use the Restlet routing system described in section 2.4.
The simplest ChallengeAuthenticator is one that uses HTTP Basic authentication, where the user identifier and password are almost sent as clear text via standard HTTP headers. This mode triggers a popup dialog in web browsers. Once the identifier and passwords reach the ChallengeAuthenticator, it can use a Verifier to check whether they match what is expected, as described in the next section. Note that as the password is sent in the clear, this scheme is only acceptable when used over HTTPS. The following listing shows how to protect your example mail server application with the HTTP Basic scheme.
Listing 5.4. Protecting resources with HTTP Basic
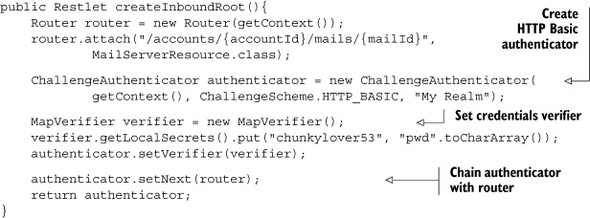
Even though in this example you used the MapVerifier class to store the authentication secrets in an easy way, keep in mind that this verifier isn’t secure by itself because all passwords are available in clear from the JVM memory.
Another common authentication mechanism is HTTP Digest, also using standard HTTP headers. It’s stronger than Basic, using a hash signature computed from the password as a shared key. It can be used over regular HTTP but has documented weaknesses in brute force attacks. Because the mechanism required for HTTP Digest authentication is more complex and requires cryptographic functions, this is implemented in the DigestAuthenticator, a subclass of ChallengeAuthenticator present in the org.restlet.ext.crypto extension. The next listing adapts the example to use HTTP Digest authentication.
Listing 5.5. Protecting resources with HTTP Digest

You might have noticed that the previous snippet called the setWrappedVerifier() method instead of the setVerifier() one used in the HTTP Basic case because DigestAuthenticator needs to wrap your regular verifier into a DigestVerifier one to do all the HTTP Digest computation, as illustrated in figure 5.4.
In the next section, we explain what a verifier is and how to verify the credentials in a ChallengeResponse obtained by the ChallengeAuthenticator object.
5.2.4. Verifying user credentials
Although the ChallengeAuthenticator is the Restlet filter presenting the challenge and receiving its response, the verification of the response provided by the user is delegated to the Verifier interface, described in the figure 5.5.
Figure 5.5. Hierarchy of credentials verifiers

The verify method is responsible for checking if the user can be authenticated using credentials present in the request. This method returns an integer describing the corresponding result. Some constants are present in the interface to describe all possible results.
Three implementations of the Verifier interface are described in this section: the SecretVerifier (the simplest form), the DigestVerifier (used for HTTP Digest authentication), and the JaasVerifier (that relies on the standard Java Authentication and Authorization Service).
Let’s look at those three types of verifiers in more detail.
Secret Verifier
The SecretVerifier is an abstract Verifier implementation that can check the identifier and secret (typically a password) provided by the user. Upon success, it associates the Request with a new User built from the identifier value. The SecretVerifier doesn’t require shared knowledge of the secret, but at least needs a way to verify that secret, for example via a one-way digest of the password. It can be implemented as a map of identifiers and passwords (see the MapVerifier class) or check the secret against other mechanisms, such as Apache Httpd’s htaccess files or an LDAP store.
The following snippet describes a simple implementation of the SecretVerifier class that checks a hard-coded username and password. The verification process could also be done using a database or a directory:
public class SimpleSecretVerifier extends SecretVerifier {
    @Override
    public int verify(String identifier, char[] secret) {
        return (("chunkylover53".equals(identifier)) && compare(
                "pwd".toCharArray(), secret)) ?
                RESULT_VALID : RESULT_INVALID;
    }
}
Let’s deal with another kind of verifier, the one dedicated to secret digest-based authentication.
Secret Digest Verifier
Due to the nature of HTTP Digest authentication, the DigestAuthenticator requires the Verifier to know the secret to verify. This is an extra constraint compared with the SecretVerifier. The LocalVerifier is a subclass of SecretVerifier that not only verifies that a secret is valid, but can also get this shared secret in clear text in order to compute a digest from it that can be compared with the digest provided by the user, following the standard HTTP Digest mechanism.
As you saw in listing 5.5, such a SecretVerifier is then wrapped in the Digest-Verifier associated with the DigestAuthenticator. Let’s deal with the Restlet security support based on the JAAS technology.
JAAS Verifier
In circumstances where your Restlet application is deployed as part of a more complex system, it may be useful to rely on the Java Authentication and Authorization Service (JAAS) to verify the user’s credentials with JAAS login modules. If you aren’t familiar with JAAS, you might want to read more about this standard Java API first, or skip this subsection as it’s a pretty advanced topic.
The LoginModule interface is an abstraction for a pluggable authentication mechanism in the JAAS architecture. It’s responsible for verifying the user credentials and populating the JAAS Subject passed to it with various Principals when authentication is successful. A principal is a general way of modeling an authenticated entity, such as an individual or a role, as described in section 5.3.1. Then, a LoginModule can communicate with the application requesting authentication via Callbacks and the application’s CallbackHandler.
The JaasVerifier, part of the org.restlet.ext.jaas extension, provides a Call-backHandler that supports the NameCallback and the PasswordCallback, obtained from the ChallengeResponse’s identifier and secret, respectively. Therefore, the Jaas-Verifier can be configured to use any LoginModule that requires either or both of these Callbacks, which are common. There are a number of LoginModules provided as part of various libraries or containers. Some, like the LdapLoginModule, are provided with Java SE. Although documenting JAAS and LoginModules in detail is outside the scope of this book, here is an example showing how to use the LdapLoginModule with Restlet. The JaasVerifier can be plugged into any ChallengeAuthenticator from which it can extract a secret; for example one with HTTP Basic authentication, as illustrated here:
JaasVerifier verifier = new JaasVerifier("MailServerApplication");
verifier.setUserPrincipalClassName("com.sun.security.auth.UserPrincipal");
authenticator.setVerifier(verifier);
In addition, JAAS must be configured, either programmatically or via a policy file passed via the java.security.auth.login.config system property. In this case, the policy file could be along these lines (you are invited to look up the Java API documentation of LdapLoginModule for further details):
MailServerApplication {
    com.sun.security.auth.module.LdapLoginModule REQUIRED

        userProvider="ldap://ldap.example.net/"
        authIdentity="uid={USERNAME},ou=people,dc=example,dc=net"
        useSSL="false"
        debug="true"
 };
Here, MailServerApplication is the JAAS application name, which must match the name given when constructing the JaasVerifier. This login module will provide new principals when the authentication is successful. In particular, this module adds an instance of com.sun.security.auth.UserPrincipal containing the username and an LdapPrincipal. Each LoginModule can add any number of principals to the Subject. Each of these instances may be from different concrete implementations of Principal. They may represent the users or various attributes such as roles. To distinguish what these instances represent, the JaasVerifier can be configured with a class name to indicate from which instance to extract the Restlet User name. In the previous example, using setUserPrincipalClassName(), the request’s User is set to the name of the first principal returned of class com.sun.security.auth.UserPrincipal.
Although the JaasVerifier doesn’t do any mapping of potential role principals obtained via a LoginModule to Restlet roles, these principals are retained with the ClientInfo list of principals and may be used by an Enroler.
Even though this is the most common authentication mechanism in HTTP, challenge authentication isn’t the only one available. Another popular one is based on SSL certificates and is presented next.
5.2.5. Certificate-based authentication
Certificate-based authentication is a mechanism that doesn’t rely on a challenge at the HTTP or application layer, because this is done via the TLS handshake underneath.
Client certificate authentication is done via the configuration, on the server side, of the TLS stack to request a certificate from the client. The server must be configured with a trust store that contains the trust anchors used to verify a client certificate and additionally configured to want (or need) a client certificate when the client connects. If the wantClientAuthentication parameter is set to true, the connection will be established even if the client doesn’t present a certificate. In contrast, if the needClientAuthentication parameter is set to true, the TLS handshake will fail if no certificate is presented, without moving the connection to the HTTP layer. Presenting a certificate that isn’t trusted will make the connection abort in either mechanism. Note that if both parameters are set to true, it’s equivalent to requiring a client certificate:
parameters.add("wantClientAuthentication", "true");
In both cases the server asks for a client certificate. The wantClientAuthentication parameter indicates that it’s an optional request, but needClientAuthentication will abort the SSL handshake if no client certificate is presented, without any HTTP exchange allowed, and therefore without the possibility of an error page being presented.
Client certificate authentication will often require you to configure a trust store to indicate which CA certificates you trust to have issued client certificates for your system. This can be done by setting the following additional properties on the context:
parameters.add("truststorePath",
    "src/org/restlet/example/book/restlet/ch05/serverTrust.jks");
parameters.add("truststorePassword", "password");
parameters.add("truststoreType", "JKS");
Configuring a client certificate allows complete trusted communication. From the client to the server, requests are encrypted using the server certificate. This is already the case without a client certificate. What is different now is that the response is encrypted using the client certificate so only this client can decrypt the corresponding content.
Such configuration can also be defined within Web navigators. Firefox contains its own certificate store that can be managed through the Preferences – Advanced – Manage certificates section. Internet Explorer directly relies on the Windows certificate store.
In addition, the javax.net.ssl.SSLContext may be configured via customized instances of org.restlet.engine.security.SslContextFactory to change the trust settings. The Java SE default settings use the PKIX algorithm, whereby certificates are verified against CA certificates in the trust store; this is also the traditional model used by browsers. In this model, a hierarchical chain is built between the certificates to verify a certificate in the trust store. A certificate is verified if it has been emitted using a certificate in the trust store or via an intermediary that has; there may be a number of intermediate certificates in the chain (see section 5.1.1 for details).
Other TrustManagers may be configured if you need alternative trust models that aren’t handled by default in Java, for example to accept grid proxy certificates (RFC 3280) or FOAF+SSL certificates, using a custom SslContextFactory, as described in section 5.1.6.
Once the authentication has been successful at the TLS layer, it needs to be handled at the HTTP layer in Restlet. This may be done by extending the Authenticator class to take the certificate chain presented in the request’s clientInfo.certificates property and mapping it to a user Principal.
You can now adapt the mail example application to this authentication scheme. First, you have to create a key store for the client side using this command line:
keytool -keystore clientKey.jks -alias client -genkey -keyalg RSA
         -keysize 2048 -dname
         "CN=friends.simpson.org,OU=Simpson friends,O=The Simpsons,C=US"
         -sigalg "SHA1withRSA"
Now, you can export the new certificate and import it into a new serverTrust.jks truststore as explained in sections 5.1.3 and 5.1.5. Then, you need to configure the MailClient HTTPS connector with both a keystore (clientKey.jks) and a truststore (client-Trust.jks). On the server side, you only need to replace, in the MailApplication, the challenge-based authenticator with the CertificateAuthenticator (added to the SSL extension in version 2.1) as illustrated in the next listing.
Listing 5.6. Protecting resources with trusted TLS client certificates

Once the authentication of the user has been completed, whether via a client certificate or via an HTTP challenge, as described in this section, it’s generally useful to obtain additional information regarding the user, so as to be able to make an authorization decision. Typically, this additional information consists of roles that the user may have in the organization or the system, as described next.
5.3. Assigning roles to authenticated users
Many systems rely on Role-Based Access Control (RBAC), in which individuals are assigned roles in the system, which are then used to make the authorization decision. This allows for the decoupling of the individuals from the authorization they’re granted.
For example, instead of authorizing Homer to read a particular document because this document is part of the payroll application and Homer also is the head of the Simpson’s family finances, the CFO role could be defined and granted to Homer so that if it’s no longer him, then the next user in that role will still have access to this document.
This section presents the org.restlet.security.Enroler interface and its associated classes aimed to associate roles with user requests. It also presents the structures available to model organizations, groups of users, and roles.
5.3.1. Request principals
The Java security framework relies on the java.security.Principal interface for granting permissions. The Principal interface has only one method, getName(), and represents an authenticated entity, in the broad sense of the term: this can be an individual, a service, a role, and so forth.
On the Restlet API side, the request’s clientInfo property can contain three kinds of principals: one user, a list of roles, and a list of additional principals. User and Role classes in the org.restlet.security package are two predefined principals in the Restlet API. All principals can be accessed and modified via their accessors on an instance of ClientInfo (see the getUser(), getRoles(), and getPrincipals() methods). The association of roles based on a user is done via the Enroler interface, described in the next subsection.
5.3.2. The org.restlet.security.Enroler interface
The Authenticator class typically invokes the Enroler specified via the enroler property after a successful authentication in order to associate roles with the request’s clientInfo property. Its single method, enrole(ClientInfo), is expected to add roles to the ClientInfo instance based on the authenticated user and principals it already refers to. It may also be used to add other principals if necessary.
Such information may be obtained independently of the act of verifying the remote user’s identity, although it should only be associated with an authenticated entity. This provides some flexibility regarding modeling of roles and other userrelated data. The Restlet API provides a level of abstraction to model these roles and a default Enroler, described in the next subsection.
Alternatively, more customized retrieval of role data can be achieved, for example, by querying an LDAP directory based on the Distinguished Name authenticated via a TLS client certificate.
5.3.3. Organizations, users, and groups
The structure of an organization, in particular users, groups, and roles, may be modeled via the org.restlet.security.Realm class, more specifically, the MemoryRealm.
In this model, a number of users may be grouped into an org.restlet.security.Group instance, and groups can also be nested. Both users and groups may be associated with roles. The groups are useful for allocating roles to a set of users, as the role in the system may depend on whether users belong to a particular group. Users and groups tend to represent entities within the scope of an organization, whereas roles are mapped from users and groups within the context of a particular application. One benefit of this separation is the increased portability of the application between heterogeneous deployment environments.
Let’s put this feature in practice in the next listing, defining the Simpsons family as an organization composed of users within the MailServerComponent introduced in section 3.3.1. At the same time, you complete the example in order to fully use annotated interfaces covered in section 4.5.4. You can see the result in the source code provided along this book.
Listing 5.7. Defining a memory realm with users and mapping to roles
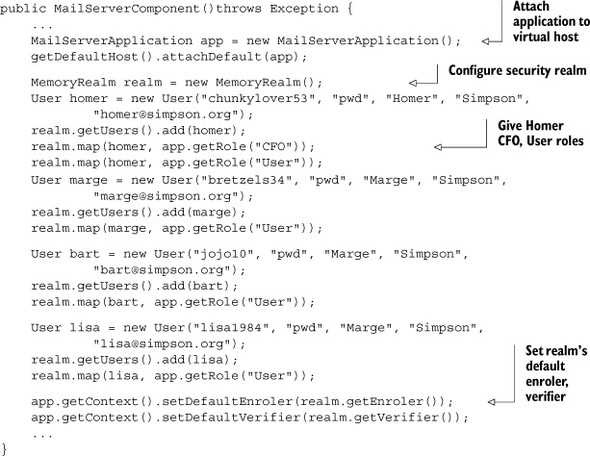
On the client side, you don’t need to change anything to your MailClient provided in listing 3.2 besides adding the challenge authentication (switching back to HTTP Basic) exactly like in section 5.2.1. You can launch the test client to confirm that the example still works, but note that although the authenticated Homer is given the CFO role, it isn’t taken into account when processing. In section 5.4, we’ll cover how to enforce authorization policies, but for now let’s explain how the realm’s enroler and verifier can be used within the application.
5.3.4. The default enroler and verifier
The default enroler of the application’s context is the enroler used by the authenticators within that application (unless specified otherwise). It’s called after each successful authentication to allocate roles to the request, whether or not it’s configured with your main realm’s enroler (as shown previously).
It’s convenient to set such an enroler for your application, so as to avoid having to repeat this code explicitly for each authenticator it may contain. In the same spirit, there is a default verifier that can be set on the Context class that is used by default in ChallengeAuthenticator instances when no custom verifier is provided.
5.4. Authorizing user actions
This section describes how to authorize access, following the authentication of the user. This is where the decision of granting or denying access is made and enforced.
5.4.1. The org.restlet.security.Authorizer class
The Authorizer is a Filter subclass that provides the mechanism to authorize requests. Its function is to grant or deny the request access to the next Restlet it protects, depending on the authentication information passed to it.
In particular, the authentication information may include a user name, roles, and various principals, as described in section 5.3, which may be used, for example, by the RoleAuthorizer (see section 5.4.2). In addition, the authorization can also depend on the request itself; for example, the MethodAuthorizer (see section 5.4.3) makes its authorization decisions depending on the HTTP method.
In figure 5.6 hereafter, you can see the Authorizer subclasses provided by the Restlet Framework, including ConfidentialAuthorizer to only authorize secure requests, such as those coming through an HTTPS connector.
Figure 5.6. Hierarchy of authorizers

In next subsection, we’ll look more closely at the role authorizer.
5.4.2. The role authorizer
As described in section 5.3, permissions are often granted to roles rather than a specific user, allowing for more flexibility in the management of the permissions within an organization. Permissions tend to be granted to people depending on their role with respect to the application, which in turn may depend on the position within the organization, rather than being tied to a particular individual. The mapping of roles to users is done using the Enroler, described in section 5.3, before the request is passed on to the authorizer.
The RoleAuthorizer is an authorizer that makes its decision depending on whether the client has been allocated certain roles. This authorizer is configured with a set of authorized and forbidden roles. A client will be allowed through only if it has at least one of the authorized roles and none of the forbidden roles.
A RoleAuthorizer that would only authorize users that have the CFO role would be configured as follows:
RoleAuthorizer authorizer = new RoleAuthorizer();
authorizer.getAuthorizedRoles().add(getRole("CFO"));
authorizer.setNext(router);
This uses the getRole(String) method of Application to get the registered instance of Role from its name. Note that you also need to declare the supported roles in the MailServerApplication’s constructor like this:
getRoles().add(new Role("CFO"));
getRoles().add(new Role("User"));
Alternatively, some authorizers may depend on the method used, but not necessarily on the identity or roles of the user. The next subsection presents the method authorizer.
5.4.3. The method authorizer
The MethodAuthorizer is an authorizer that makes its decision depending on the request method and on whether the client is anonymous or authenticated. This authorizer is configured with a set of methods allowed for anonymous users and a set of methods allowed for authenticated users. A MethodAuthorizer that would let any GET user do a request but allow POST only for authenticated users would be configured as illustrated here:
MethodAuthorizer authorizer = new MethodAuthorizer();
authorizer.getAnonymousMethods().add(Method.GET);
authorizer.getAuthenticatedMethods().add(Method.GET);
authorizer.getAuthenticatedMethods().add(Method.POST);
authorizer.setNext(router);
In some cases, knowing only the method used in the request to perform the action is too coarse to be able to make an authorization decision. The next subsection explains how to implement fine-grained authorization, where the decision may also depend on the state of the resource.
5.4.4. Fine-grained authorization
Finer-grained authorization may be performed within a given resource; for example, if authorization also depends on the content of this resource. This is often done in a bespoke manner, although the authorizers described previously may be used independently of being filters (using their authorize method).
In an email application, each account has a different owner. Only Homer ought to be able to read his emails. When the client sends a request to read emails from a given account, it’s only once the data about this particular account has been retrieved by the ServerResource that an authorization decision can be made.
In addition, authorization regarding a particular resource may depend on the state of that resource at a given moment in time. In these cases, finer-grained authorization that depends on the state of the resource itself is required. This could not be achieved by a filter that would not have prior knowledge of the resource data.
Although this may require some customized implementation depending on the data this kind of resource models, utility methods such as ServerResource.isInRole (String roleName) can assist when performing fine-grained authorization within the resource as illustrated here:
    public String represent(){
        String result = AccountsServerResource.getAccounts()
                .get(this.accountId);

        if (isInRole("CFO")) {
            return result + " (CFO access)";
        } else {


            return result;
        }
    }
We’ll now complete our overview of authorization support in Restlet by covering how to use the JVM security manager, combined with JAAS.
5.4.5. Using Java security manager
It can be desirable to benefit from the Java security manager’s ability to sandbox a Restlet Application within its host virtual machine. Although the Restlet Framework doesn’t provide an explicit security manager configuration, this section provides pointers and examples regarding how this can be done.
If you intend to use the security manager, it’s recommended that you read its official Java documentation, in particular the section on the syntax of policy files. Activating the default security manager can be done using this system property flag (no value is required):
-Djava.security.manager
The policy file may be configured using this flag:
-Djava.security.policy="src/org/restlet/example/book/restlet/ch05/sec4/
     server/jaas.policy"
This section is based on a short example, whereby a server resource is allowed to read the server’s home directory only if the user connecting to it has the CFO role. An example policy file is shown in listing 5.8. The first grant block grants permissions with the basics for the Restlet server to run. The second block grants the permission to read the server’s home directory to subjects with the CFO role. (This is only an example, which is probably too permissive for serious applications.)
Listing 5.8. Example policy file
grant {
   permission java.lang.RuntimePermission "*";
   permission java.net.NetPermission "*";
   permission java.util.logging.LoggingPermission "control";
   permission java.util.PropertyPermission "*", "read";
   permission java.net.SocketPermission "*", "listen,accept,resolve";
   permission javax.security.auth.AuthPermission "modifyPrincipals";
   permission javax.security.auth.AuthPermission "doAsPrivileged";
};

grant principal org.restlet.security.Role "CFO" {
   permission java.io.FilePermission "${user.home}", "read";
};
In order to associate the user’s principals to the request, the static JaasUtils.doAsPrivileged() method may be used within a ServerResource, as illustrated next.
Listing 5.9. Running sensitive code as a privileged user

If you attach this FilesServerResource to the router of your MailServerApplication using the /accounts/{accountId}/files URI template, you can issue GET calls and compare the result with and without proper authentication of the chunkylover53 user, which grants to the authenticated user a principal of class org.restlet.security.Role, with the name CFO. Then, the action of reading the home directory is allowed, as instructed in the second grant block in the example policy file.
In the next section, we move away from the topic of authentication and authorization, to focus on ensuring the integrity of the data transfers.
5.5. Ensuring end-to-end integrity of data
In some cases, one of the risks that may be associated with an application is due to the potential failures that would cause the data to be altered before, during, or after the communication. This section presents how to ensure end-to-end integrity of data, by using digests of the representations. These digests aren’t cryptographically signed, therefore they protect only against accidental modifications of the representations, not against man-in-the-middle attacks, which could potentially replace the digest too.
This section briefly introduces the concepts related to digests in general and within the context of HTTP (more specifically the Content-MD5 header). Then, we show how to use them with the Restlet Framework.
5.5.1. Ensuring representation integrity
HTTP provides a way to ensure the integrity of a representation by using a header that contains the digest of the representation. The digest is the result of a one-way function that would change almost completely given a minor alteration of the representation. Commonly used digest algorithms include MD5 and SHA-1, although both are now considered to have weaknesses. Users willing to ensure additional security against active attackers will need to check the robustness of the digest algorithm they use when they implement their systems.
The Content-MD5 header, defined in the HTTP specification, is optional and may be present in responses and requests that have an entity. This header must contain the MD5 digest of the representation in the associated entity. It may be verified by any parties in the exchange, but must not be modified by intermediates, in particular by proxy servers. The next listing shows an example HTTP response that includes a Content- MD5 header.
Listing 5.10. Example HTTP response with Content-MD5 header
HTTP/1.1 200 The request has succeeded
Date: Thu, 27 May 2010 20:31:39 GMT
Server: Restlet-Framework
Content-Length: 12
Content-MD5: 7Qdih1MuhjZehB6Sv8UNjA==
Content-Type: text/plain; charset=UTF-8

Hello World!
The recipient of this representation may verify the integrity of the representation by computing its digest and comparing it with the reference digest in the Content-MD5 header. Computing the digest and attaching it to the representation can be done in the Restlet Framework using the DigesterRepresentation, which wraps an existing representation and provides the utility methods for sending and verifying the digests, as described next.
5.5.2. Representation digesting
The operations used for digesting representations as a sender and as a receiver are similar. In both cases, the representation must be fully read and the digest must be computed. The main distinction between the two operations is that the receiver must compare the digest it computed from the representation it has received with the digest that was received with it. Both operations can be handled with a Digester-Representation, more specifically its computeDigest() and checkDigest() methods.
These two methods only finalize the computation; consuming the representation via the DigesterRepresentation methods is an essential part of the computation.
As a sender, setting the digest of a representation in the Content-MD5 header can be achieved by wrapping this representation in a DigesterRepresentation. This is a four-step process, as illustrated in listing 5.11:
- The initial representation must be wrapped into a DigesterRepresentation.
- Its content must be fully read, as this contributes to the computation of the digest (in this particular example, the content is read and discarded via exhaust()).
- The digest must be computed and finalized, using computeDigest().
- The digest must be set as a property of the representation.
Listing 5.11. Example setting the representation’s digest as a sender

As exhaust() consumes and discards the representation entirely, this technique can’t be used for representations for which the source may only be read once, otherwise the content would be entirely lost. The next section describes how to use the Digester-Representation without losing content.
As a receiver, verifying the digest of a representation is a three-step process. First, the received representation must be wrapped with a DigesterRepresentation. Second, its content must be read fully. Third, the digest must be computed and compared with the existing Content-MD5 header. This last step is done via the checkDigest() method:
DigesterRepresentation digesterRepresentation =
    new DigesterRepresentation (response.getEntity());
digesterRepresentation.exhaust();
boolean correctDigest = digesterRepresentation.checkDigest();
Again, this example discards the content representation received using exhaust(). The following section describes how not to lose content when digesting a representation.
5.5.3. Digesting without losing content
The computation of the digest of a representation requires processing the entire content of this representation. The DigesterRepresentation class is a wrapper that can let you use a representation and compute its digest while the content is being read. Therefore, using a DigesterRepresentation via its getStream(), getReader(), getText(), or write() methods will transparently contribute to the computation of the digest of the wrapped representation. Once the entire representation has been processed, the computeDigest() method will return the computed digest, or checkDigest() will verify the representation against the associated digest property.
This can be achieved when processing a representation that is being received, while using its content. Unfortunately, when sending the representation, this requires the representation to be read twice from its beginning, because the related HTTP header has to be sent before the content. This problem could be overcome by using trailer headers, which aren’t supported yet in Restlet Framework 2.1.
The following example writes the representation received onto System.out. Because the write() method is called on the wrapping DigesterRepresentation and not the original representation, the digest is computed while the representation is being consumed:
Representation responseEntity = response.getEntity();
DigesterRepresentation digesterRepresentation =
   new DigesterRepresentation (responseEntity);
digesterRepresentation.write(System.out);
boolean correctDigest = digesterRepresentation.checkDigest();
This lets the application use the content of the representation while computing its digest at the same time. The checkDigest() method then finalizes the digest computation and checks it against the value obtained from the Content-MD5 header. If no digest was associated with the original representation, then checkDigest() will return false.
5.6. Summary
In this chapter, you have learned how to enable a number of security features in a Restlet application. These can be categorized into three themes: protecting the communication between the client and the server; dealing with user authentication, identity management, and authorization; and protection against accidental network failures.
You saw how to enable HTTPS on a Restlet server to protect the communication between the client and the server by configuring TLS/SSL and creating certificates.
You also learned how to authenticate remote users, or verify their identity using authenticators and verifiers. The API for authentication is flexible and allows for simple use cases (for example, a list of usernames and passwords) as well as larger organizational structures (for example, authentication and identity management via a company directory).
Then, you learned how to make and enforce an authorization decision based on the information about the client, its user, and the action they’re trying to perform. Finally, you saw how to protect the representations against accidental alterations, using representation digests.
After covering security, let’s now continue our road to the deployment of a Restlet application with chapter 6 which will discuss other essential tasks which are to document the RESTful web API it exposes and to deal with the versioning needs of an application during its life cycle.