Chapter 9. Data storage with Clojure
- Using Clojure with MySQL for simple needs
- Using Clojure with HBase for big data
- Using Clojure with Redis for key-value storage
This chapter begins an exciting journey. We’re going to use all the concepts you’ve learned so far and apply them to applications that might be useful in the real world. We’ll start by discussing a simple requirement common to most nontrivial applications, that of storing data.
First, we’ll look at relational database systems because many applications need a standard relational database. MySQL fits the bill for most people, and we’ll examine an open source project that provides functionality to allow Clojure programs to talk to MySQL.
After discussing MySQL, we’ll look at communicating with HBase, which is an open source implementation of Google’s BigTable. These are column-oriented databases that can handle extremely large datasets, often measured in petabytes. The term big data has been used recently to describe such systems, and HBase is one answer to such large-scale data storage requirements.
Finally, we’ll wrap up the chapter by examining Redis, a new key-value store designed for extremely fast lookups. We’ll write code to create a convenient Clojure abstraction that makes dealing with Redis easy and transparent. It will allow you to map Clojure data structures into and out of Redis.
9.1. MySQL & clj-record
In this section, we’re going to work with a MySQL database using the clj-record library. We’ll first look at a quick example of the library in action, followed by a look under the hood at its inner workings.
9.1.1. ActiveRecord, users, and charges
Martin Fowler documented the active record design pattern in his book Patterns of Enterprise Application Architecture. In this pattern, a class or a module corresponds directly to a single database table. Methods or functions are created that allow the usual CRUD (create, read, update, and delete), along with other convenience methods to look things up using different columns of the table, and accessor methods to read column values. Although this is a simple pattern, it turns out to be applicable in a large percentage of cases; domain objects are mapped to tables in a straightforward manner. As an example, this is the pattern used in the eponymous ActiveRecord library that forms an integral part of the Ruby on Rails web application framework. Now that you understand this pattern at a high level, let’s look at an example.
Setting up the tables
Let’s imagine you’re dealing with users and charges. Let’s further imagine that you have a MySQL table called users for this purpose and that it has the structure shown in table 9.1.
Table 9.1. The structure of the users table
|
Column name |
Data type |
Description |
|---|---|---|
| id | int | The identity column for each row |
| login | varchar | The username of the user |
| first_name | varchar | The first name of the user |
| last_name | varchar | The last name of the user |
| password | varchar | The user’s password |
| email_address | varchar | The user’s email address |
This is a simple table, and our use of the active record pattern will support code to create records for new users, find records pertaining to existing users via their id or other attributes, update such records, and also delete them. As mentioned earlier, we’re going to use the open-source library clj-record in order to implement this.
Let’s also create another table for the all the charges. We’ll call it charges and give it the structure shown in table 9.2.
Table 9.2. The structure of the charges table
|
Column name |
Data type |
Description |
|---|---|---|
| id | int | The identity column for each row |
| user_id | int | The user to whom this charge belongs |
| amount_dollars | int | The dollar part of the charge amount |
| amount_cents | int | The cents part of the charge amount |
| category | varchar | The category of this charge |
| vendor_name | varchar | The vendor of this item or service |
| date | datetime | The date this charge was billed |
Having established these two tables, you can now use clj-record to access them.
Getting started with clj-record
The clj-record project was created by John Hume and is located at http://github.com/duelinmarkers/clj-record. Once you’ve downloaded it and put it on the Clojure classpath, you can use it in your programs via calls to require. You’ll now write code to implement your user and charge entities.
9.1.2. The user model
The clj-record library is based on Clojure namespaces. In order to define a model class (such as user, in this case), you define a namespace that ends with that name. Further, by including the clj-record.boot namespace, you pull in all the required code to use the library. Consider the following example:
(ns org.rathore.amit.damages.model.user
  (:require clj-record.boot))
Requiring clj-record.boot pulls in several different namespaces, including core, associations, and validation. In order to get things going, you only need to call the init-model function from the clj-record.core namespace. But it depends on the existence of a var named db, which must contain the database configuration information. Here’s an example of what such a configuration might look like:
(def db
  {:classname "com.mysql.jdbc.Driver"
   :subprotocol "mysql"
   :user "root"
   :password "password"
   :subname "//localhost/damages_dev"})
clj-record supports a few databases: Apache Derby, MySQL, and PostgreSQL among them. In this example, we’ve specified MySQL. In typical applications, the configuration information might be specified in a dedicated configuration file, and a function would read it from there.
Now that you have your database configuration ready, you can call init-model. This can be simple as the following:
(clj-record.core/init-model)
Note that, by default, the clj-record library makes an assumption about the table that the model is going to use. In this case, because the model name is user, the table will be assumed to be users. You can override this using the :table-name option, as shown here:
(clj-record.core/init-model
 :table-name "members")
You’re now ready to start accessing the database, and it’s quite simple. In the following section, you’ll see how to create, read, update, and delete rows of the users table. After that, you’ll see how to handle associations, validations, and so on.
Creating records
Let’s import the user namespace. As you’ve seen several times over the past few chapters, this is as simple as the following:
(require '(org.rathore.amit.damages.model [user :as user]))
Remember that all the functions that were defined when you called init-model are in the user namespace. Here’s how you can create a user:
user=> (user/create {:login "rob"
                     :first_name "Robert"
                     :last_name "Berger"
                     :password "secret"
                     :email_address "[email protected]"})
{:email_address "[email protected]", :password "secret", :last_name "Berger",
     :first_name "Robert", :login "rob", :id 1}
Note that the id field gets populated automatically, and you don’t have to figure out what it should be. Let’s create another one:
user=> (user/create {:login "rob2"
                    :first_name "Robert"
                    :last_name "Stevenson"
                    :password "friday"
                    :email_address "[email protected]"})
{:email_address "[email protected]", :password "friday", :last_name
     "Stevenson", :first_name "Robert", :login "rob2", :id 2}
Now that you have a couple of records in your table, let’s look at reading them back out.
Reading records
You’ve seen how to create new users; now let’s use a few more functions provided by the clj-record library to read them out. If the id of the record you’re looking for is known, then you can use the get-record function:
user=> (user/get-record 1)
{:email_address "[email protected]", :password "secret", :last_name "Berger",
     :first_name "Robert", :login "rob", :id 1}
If you don’t know the exact row-id and would like to search for records based on some other attributes, you can do that using the find-records function:
user=> (user/find-records {:first_name "robert"})
({:email_address "[email protected]", :password "secret", :last_name "Berger",
     :first_name "Robert", :login "rob", :id 1}
 {:email_address "[email protected]", :password "friday", :last_name "Steven-
     son", :first_name "Robert", :login "rob2", :id 2})
find-records accepts a map of attributes and will find records whose columns match all those attributes specified in the map.
The clj-record library supports other finder functions such as find-record and find-by-sql. You can find more information on these on the clj-record project page.
Updating records
Updating a record is just as simple. You use the update function for this purpose, which accepts a map of attributes that need updating. The map must include the id attribute so that the correct record can be found. Here’s an example:
user=> (user/update {:login "stevenson" :id 2})
{:id 2, :login "stevenson"}
You can confirm that it worked by reading the complete record again:
user=> (user/get-record 2)
{:email_address "[email protected]", :password "friday", :last_name
     "Stevenson", :first_name "Robert", :login "stevenson", :id 2}
Finally, let’s look at deleting rows.
Deleting records
The final piece of CRUD is deletion, and you’ll now see how to delete some of the records you just created. The clj-record library provides the function destroy-record for this purpose, which accepts a map that must contain an :id key. Here’s an example:
user=> (user/destroy-record {:id 2})
(1)
You can confirm it was deleted by trying to read it back:
user=> (user/find-records {:id 2})
()
Our next stop in exploring clj-record is to explore associations. In order to do so, you’ll set up the second model in your system: charges.
9.1.3. Associations
Database systems like MySQL are relational; they support relationships between tables. In this section, you’ll examine the clj-record support for two kinds of such relationships: belongs-to and has-many.
First, let’s set up a namespace to handle the charges tables that you defined earlier. As you did for the user model, you’ll define a namespace that ends in charge:
(ns org.rathore.amit.damages.model.charge
  (:require clj-record.boot)
You’re ready to call init-model now, but you’ll use the associations support provided by clj-record in order to specify that each charge belongs to your user model.
(clj-record.core/init-model
 (:associations
  (belongs-to user)))
Testing this at the REPL will involve calling require:
(require '(org.rathore.amit.damages.model [charge :as charge]))
Let’s now create a charge for your user “rob”:
user=> (charge/create {:user_id 1, :amount_dollars 11 :amount_cents 50
     :category "books" :vendor_name "amazon" :date "2010-01-15"})
{:date #<Timestamp 2010-01-15 00:00:00.0>, :vendor_name "amazon", :category
     "books", :amount_cents 50, :amount_dollars 11, :user_id 1, :id 1}
And one more, just to be sure:
user=> (charge/create {:user_id 1, :amount_dollars 27 :amount_cents 91
     :category "meals" :vendor_name "stacks" :date "2010-01-15"})
{:date #<Timestamp 2010-01-15 00:00:00.0>, :vendor_name "stacks", :category
     "meals", :amount_cents 91, :amount_dollars 27, :user_id 1, :id 2}
Similarly, you can update the definition of your user model to say that your users have many charges:
(ns org.rathore.amit.damages.model.user
  (:require clj-record.boot))

 (clj-record.core/init-model
 (:associations
  (has-many charges)))
Let’s now see the associations in action. You’ll first use get-record to load your user object and then load the charges associated with it:
user=> (let [rob (user/get-record 1)]
        (user/find-charges rob))
({:date #<Timestamp 2010-01-15 00:00:00.0>, :vendor_name "amazon", :category
     "books", :amount_cents 50, :amount_dollars 11, :user_id 1, :id 1}
{:date #<Timestamp 2010-01-15 00:00:00.0>, :vendor_name "stacks", :category
     "meals", :amount_cents 91, :amount_dollars 27, :user_id 1, :id 2})
This makes it convenient to work with graphs of related data. clj-record also provides similar support for deleting associations. Our next stop will be a quick tour of some convenient aspects of this library.
9.1.4. Validations and callbacks
The clj-record library supports features beyond what you’ve seen so far. This section will look at a couple of features: validations and callbacks. Validations are a mechanism to ensure that the integrity of data in each record is maintained. Callbacks are a way to run arbitrary code whenever certain things happen to a record, such as saving to the database, loading from the database, and so on.
Validations
Let’s add a check to our charge model, so that you can guard against expenses with amounts less than zero. Here’s the change to the call to init-model:
(clj-record.core/init-model
 (:associations
  (belongs-to user))
 (:validation
  (:amount_dollars "Must be positive!" #(>= % 0))
  (:amount_cents "Must be positive!" #(>= % 0))))
You can now use the validate function to check if there are any errors:
user=> (let [errors (charge/validate {:amount_dollars 0
                                     :amount_cents -10
                                     :date "2010-01-10"
                                     :vendor_name "amazon"})]
        (println errors))
{:amount_cents [Must be positive!]}
This way, you can easily ensure business rules are being satisfied before persisting things into the database.
Callbacks
A callback is a function that gets called when a particular event occurs. The clj-record library supports three kinds of callbacks: before-save, before-update, and after-load. The specified function is handed the record that’s being processed and must return a possibly modified version of the record. Here’s an example of our charge model’s init-model function:
(clj-record.core/init-model
 (:callbacks
  (:before-save (fn [record]
                  (if-not (:category record)
                    (assoc record :category "uncategorized")
                    record)))))
And here it is in action:
user=> (charge/create {:amount_cents 0 :amount_dollars 10 :vendor_name
     "amazon" :date "2010-01-01"})
{:date #<Timestamp 2010-01-01 00:00:00.0>, :vendor_name "amazon", :category
     "uncategorized", :amount_cents 0, :amount_dollars 10, :user_id nil,
     :id 6}
Okay! You’ve been through a whirlwind introduction to the clj-record library, and by now, you’re able to add database persistence support to your applications. Our last stop in this part of the chapter is a peek under the covers of this nifty library, to see how it’s implemented.
9.1.5. A look under the hood
This section has two related purposes: to get a high-level understanding of how clj-record is implemented and to learn tricks you can then use in your own programs. With that, I’d like to bring your attention to a few points about the implementation.
Clj-record.boot
As you’ve seen in the past several examples, the way to get started with the clj-record library is to require the clj-record.boot namespace. Internally, the library is made up of several different namespaces that contain code related to things like associations, validations, callbacks, and serialization. Instead of having the client programmer require all these namespaces, clj-record.boot does something convenient: it requires all these other namespaces. Here’s the relevant line (minus the doc string):
(ns clj-record.boot
  (:require
    (clj-record core callbacks associations validation serialization)))
This is a convenient way to allow users of a library to quickly get started with as little clutter as possible.
Clj-record.core
The most interesting (and certainly most directly useful) thing about the core namespace is the init-model macro. As you saw in previous sections, it can accept several options, and it generates a large amount of code. It generates all the methods that you’ve seen in the previous sections: get-record, find-records, destroy-records, create, update, and so on. The following listing shows what it looks like.
Listing 9.1. The init-model macro from clj-record.core

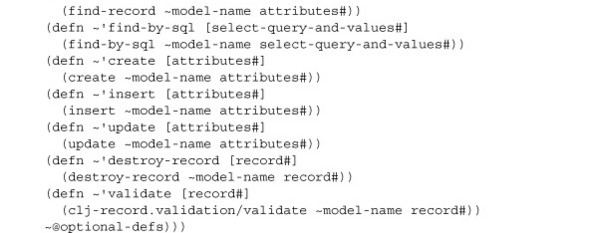
The code in listing 9.1 won’t work as is on the REPL, because it depends on a lot of other things defined in clj-record. Let’s look at a couple of points of note. The model name is parsed out from the current namespace ![]() . This is how it builds the model around the namespace in which you call init-model.
. This is how it builds the model around the namespace in which you call init-model.
The second is that the init-model macro expands to several calls to the defn macro, all wrapped inside a do ![]() block. The expansion occurs in the namespace that the model is being defined around, and that’s how all those functions are
made available. It makes it easy to put all related functions in the same namespace (such as user or charge), because database access functions are readily available.
block. The expansion occurs in the namespace that the model is being defined around, and that’s how all those functions are
made available. It makes it easy to put all related functions in the same namespace (such as user or charge), because database access functions are readily available.
Code organization
As mentioned earlier, the clj library has separate namespaces for things like associations, validations, callbacks, serialization, and so on. This organization makes the code easy to navigate, understand, and maintain.
That wraps up our tour of clj-record. It’s a straightforward library and works well enough in systems that need access to databases that aren’t looking to implement complex schemas. It also has a find-by-sql function, which allows straight SQL access to the database. For larger projects, many people are now looking beyond relational databases, and our next stop is going to be the first NoSQL data store we’re going to look at in this chapter.
9.2. HBase
HBase, which is the open source version of Google’s BigTable, is a rather interesting data-storage technology. As opposed to a traditional relational database (RDBMS), Google describes BigTable as a “sparse, distributed, persistent multi-dimensional sorted map.” Let’s further examine what that means and how it’s different from working with relational databases.
9.2.1. Meet HBase
In this section, we’ll quickly explore HBase. If you’re familiar with relational databases, you’ll notice that things in HBase are significantly different from that world. We’ll start by addressing scalability and then talk about schema design. It takes a little time to get your head wrapped around the column-oriented approach, so we’ll explore a simple example.
Scalability
Most people come to HBase for its scalability. Anyone who has had to scale, say, MySQL knows it’s a lot of work. Up to a point, adding machines to a master-slave setup can satisfy scalability requirements. For serious scaling requirements, data must be sharded across multiple servers. Sharding is a technique in which a large dataset is broken into sections, each stored on a different server. This allows the system to scale the data storage beyond what a single database server can handle comfortably. This sharding has to be done at the application level, using some strategy, and it affects code that writes to or reads from the database. Any code that relied on joins will need to be rewritten to reflect the sharding strategy. This approach to scaling adds a lot of complexity to the application. HBase makes this unnecessary.
HBase can scale to support petabytes of data, and it does so by scaling across thousands of commodity servers. With HBase, application code that accesses the data doesn’t have to change as the data store is scaled up. HBase runs on top of the Hadoop Distributed File System (HDFS), and all data gets replicated across several nodes in a transparent manner. Not only does this allow the system to grow to use thousands of nodes, but it also adds a tremendous amount of reliability in the case where nodes fail (as they will).
Column oriented
HBase differs from traditional relational databases in the way that tables are defined and also in the manner in which rows are created and used. In the normal RDBMS world, a table is defined with a fixed set of columns, and these can’t be changed in any particularly dynamic manner. Further, each row of such a table always has the same set of columns as defined in the table. One of the columns is defined to contain the primary key and is unique across all rows of the table. The primary key can be used to identify a single row.
In HBase, data is still stored in rows, and each row has a row-id. Inside each HBase table, rows can have any number of columns. This is possible because HBase is a column-oriented data store, implying that underneath it, data for each column is stored contiguously. This sparse but efficient storage allows wide variation in the columns of each row.
This makes designing schemas for column-oriented data stores different for folks coming from a traditional RDBMS background. In the next section, you’ll see an example of what this looks like. For now, it’s enough to know that each HBase column contains two parts: a statically defined (during table creation) column family name and a dynamically defined qualifier. Putting the two pieces together, a complete column name looks like the following:
<column-family>:<qualifier>
As mentioned, the column families of an HBase table are the only things that are defined at table creation time. They can also be changed (or new ones created) using administrative tools provided with HBase. This is analogous to using alter statements to modify the structure of tables in the SQL world. The qualifier portion of the column name can be created at program runtime, without having to declare it earlier. HBase supports millions of qualifiers in each column family and hundreds of column families.
There’s one more element that we need to talk about before we’re ready to look at an example—versions.
Versions
So far, you’ve seen that each HBase row has a row-id and a variable set of columns via the combination of column families and qualifiers. Another dimension is added to this by the fact that each cell of an HBase row can contain multiple versions of data. The version keys are timestamps, and a new version of data is created every time a cell is written to. The default number of versions is three, but this can be set to any number when the table is created.
To get something out of the a table, you have to follow this trail:
row-id > column-family > column-qualifier > version
This is what is meant by a multidimensional data store. Now that you understand the anatomy of an HBase table, you’re ready to look at an example.
Schema design
Designing for column-oriented data stores feels rather odd when you’re used to relational database systems. Here’s a traditional example, used both in Google’s BigTable paper and in the HBase documentation. Imagine working on an Internet search engine. This domain would require you to store web pages in a table, which might be designed as shown in table 9.3.
Table 9.3. Example of an HBase table storing web pages
|
Row key |
contents |
anchor |
mime |
|||
|---|---|---|---|---|---|---|
|
cnnsi.com |
my.look.ca |
bbc.com |
bbc.co.uk |
|||
| “com.cnn.www” | <html>... | “CNN” | “CNN.com” | “text/html” | ||
| “com.bbc.www” | <html>... | “BBC US” | “BBC UK” | “text/html” | ||
| ... and more rows ... | ||||||
Note that contents, anchor, and mime are column families. The anchor column family has been used along with several qualifiers: cnnsi.com, my.look.ca, bbc.com, and so on, and these are different for different rows. As mentioned earlier, because data is stored sparsely, these seemingly null values in each row pose no efficiency overhead.
We’re now ready to write some Clojure code to access HBase.
9.2.2. Using Clojure to access HBase
HBase is written in Java, so the Java client library that it ships with is perfect for your Clojure programs. For the remainder of this section on HBase, you’ll need to have HBase 0.20.2 installed and running on your system. You’ll also need to have the HBase JAR file on your Clojure classpath. We’ll first learn about accessing an HBase table directly, and then we’ll propose an abstraction that will make life easier for most Clojure programs.
One piece of XML-driven configuration needs to be configured before your Clojure programs can access the HBase system. A file called hbase-site.xml lives in the conf directory inside the HBase root folder. This file will need to be copied into a location on the JVM’s classpath and will need to contain some information regarding your particular installation of HBase. Listing 9.2 shows the content of the file for a standalone installation, as an example.
Listing 9.2. Contents of a sample hbase-site.xml for a standalone HBase system
<configuration>
  <property>
    <name>hbase.master</name>
    <value>localhost:60000</value>
  </property>
  <property>
    <name>hbase.rootdir</name>
    <value>hdfs://localhost:50001/hbase</value>
  </property>
  <property>
    <name>hbase.zookeeper.quorum</name>
    <value>localhost</value>
  </property>
  <property>
    <name>hbase.cluster.distributed</name>
    <value>false</value>
  </property>
</configuration>
Direct access
Imagine you had a table called clojure_test that had a column family named meta. This can be done by creating it at the HBase shell using the following command:
create "clojure_test", "meta"
In order to do any of the following, you’ll need to import the necessary libraries. The following code imports all that’s required:
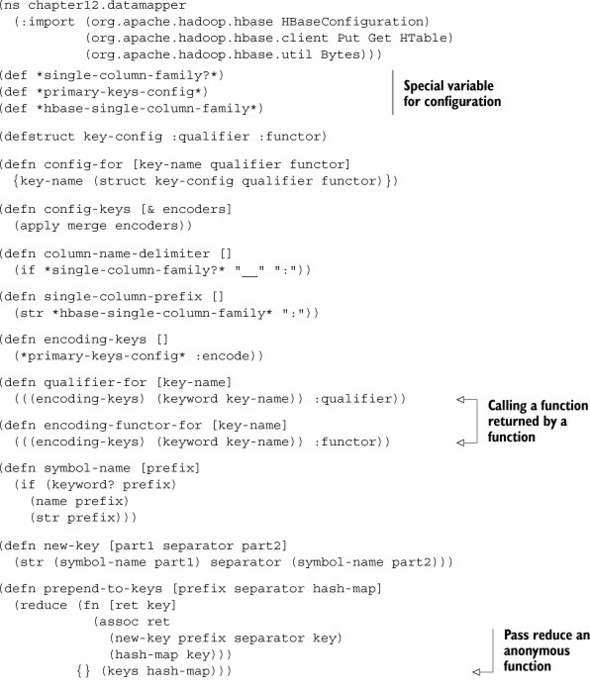
(ns chapter12
  (:import (java.util Set)
           (org.apache.hadoop.hbase HBaseConfiguration)
           (org.apache.hadoop.hbase.client Put Get HTable)
           (org.apache.hadoop.hbase.util Bytes)))
The first function is a utility function to allow you to get a handle to your HBase table:
(defn hbase-table [table-name]
  (HTable. (HBaseConfiguration.) table-name))
Let’s begin by writing something to the table and then follow it up with reading it back out. Consider the following couple of functions:
(defn add-to-put [p object column-family]
  (let [name-of (fn [x]
                  (if (keyword? x) (name x) (str x)))]
    (doseq [[k v] object]
      (.add p (Bytes/toBytes column-family)
              (Bytes/toBytes (name-of k))
              (Bytes/toBytes (str v))))))

(defn put-in-table [object table-name column-family row-id]
  (let [table (hbase-table table-name)
        p (Put. (Bytes/toBytes row-id))]
    (add-to-put p object column-family)
    (.put table p)))
You can test it at the REPL like so:
chapter12=> (put-in-table {:a "x" :b "y"}
                          "clojure_test"
                          "meta"
                          "repl")
nil
This writes a single row into the clojure_test table, which has a single column family of meta, and the values x and y are stored with column qualifiers a and b, respectively. You can verify this by running the following command at the HBase shell:
scan "clojure_test"
Issuing this command will cause HBase to print a bunch of text at the shell, as shown in figure 9.1.
Figure 9.1. Output from the scan "clojure_test" command issued at the HBase shell
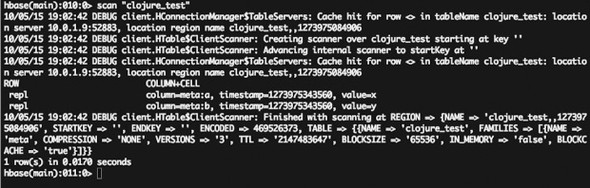
The part of the text shown in the image that you’re interested in is the following:
ROW                   COLUMN+CELL
repl                  column=meta:a, timestamp= 1273975343560, value=x
repl                  column=meta:b, timestamp= 1273975343560, value=y
This shows that a row with the row-id of repl has two columns populated: meta:a and meta:b.
Let’s now write a function to read your data back out of the table. Here’s the function that does it:
(defn print-from-table [table-name row-id column-family]
  (let [table (hbase-table table-name)
        g (Get. (Bytes/toBytes row-id))
        r (.get table g)
        nm (.getFamilyMap r (Bytes/toBytes column-family))]
    (doseq [[k v] nm]
      (println (String. k) ":" (String. v)))))
You can confirm that this works by attempting to print the row you just inserted into the table from the REPL:
chapter12=> (print-from-table "clojure_test" "repl" "meta")
a : x
b : y
nil
Similar code can be written to scan across tables, something that’s quite a common operation because HBase doesn’t support any SQL-like querying mechanism. The API to do this is built on the Scan class. Writing code to perform scans is left as an exercise to you.
Let’s now talk a little about the Get/Put classes that you used to do your reads and writes. This interface is simple (and may remind some folks of RESTful APIs from the world of web services), but it can get tedious to use if you have to drop down to using such Java classes every time you want to talk to HBase. This calls for building a higher-level abstraction that’s friendlier to Clojure. We’ll examine this in this next section.
A data mapper
A data mapper is a layer of code that moves data between objects and a data store, while keeping each independent of the other. In the case of Clojure, maps are the most commonly used form of (traditional) objects. In this section, you’ll specify what you’d like your data mapper to do and what limitations it will have.
Most Clojure programs use simple hash maps to represent things like employees, customers, and buildings, depending on the domain. Contrast this with other languages such as Java or Ruby where you might use classes and objects. The advantage of using Clojure data structures is that you gain simplicity and get to use Clojure’s entire sequence library.
Imagine that you were working on a program that dealt with paintings and that a typical description of a painting might look like this:
(def painting
     {:trees ["cedar", "maple", "oak"],

      :houses 4,
      :cars [{:make "honda", :model "fit", :license  "ah12001"},
             {:make  "toyota", :model  "yaris",
                                       :license  "xb34544"}],
      :road {:name "101N" :speed 65}})
You’d like to store these types of maps in HBase, in a table named paintings. Note that the map isn’t deep and that there are some restrictions in the data mapper you’re about to define. The values in such maps can be simple primitives like 4 or lists containing other primitives (for example, ["cedar", "maple", "oak"]). The values can also be other hash maps such as the value for :road in this example, but such maps can’t themselves be deep. Finally, the value can be a list of simple hash maps, such as the value for the :cars key.
Although this may sound arbitrarily restrictive, it turns out that many applications do fine within these constraints. Besides, you can certainly modify the mapper for more complex, nested maps.
In the previous section, you saw how simple maps can be persisted to an HBase table. Your job now is to transform this nested map into a simple one that’s easy to insert into a single HBase row. For instance, you could transform the previous map into one that looks like this:
{ "road:name"  "101N",
  "road:speed"  65,
  "houses:"  4,
  "trees:cedar"  "cedar",
  "trees:maple"  "maple",
  "trees:oak"  "oak",
  "cars_model:ah12001"  "fit",
  "cars_model:xb34544"  "yaris",
  "cars_make:ah12001"  "honda",
  "cars_make:xb34544"  "toyota"}
This flattened map is simple to store into an HBase table that has the following column families: road, houses, trees, and cars. The key to any such transformation is that it be reversible, so that when you want to read back your data from the HBase row, you can convert it back into the familiar Clojure data structure that you started out with. Let’s examine the transformed map.
The idea is simple. The keys of your transformed hash map will contain parts of your data. For instance, our original map has a key :road that has a value of {:name "101N" :speed 65}. In the transformed map, the equivalent keys are "road:name" and "road:speed", and their values are "101N" and 65, respectively. Similar transforms are made for the :houses and :trees keys.
Transforming values that are primitives, lists of primitives, or a simple map is straightforward. Handling values that are lists of maps is a little trickier. This situation is analogous to a has-many relationship: our painting has many cars in it, and each car has a few data elements. In order to flatten this structure, you need to pick a primary key inside each car. Here, we’ve picked :license for this role. The flattening then takes place in a similar fashion as before, but the value for the primary key is tacked onto all the other keys for each car. For example, consider this car:
{:make "honda"
 :model "fit"
 :license "ah12001"}
The value of the primary key is "ah12001", and this is tacked onto each key when the flattening occurs:
{"cars_make:ah12001"  "honda"
 "cars_model:ah12001"  "fit"}
The primary key and its value are implicitly represented in this map; there’s no separate need to add them on their own. When you reverse the transform, you’ll use the knowledge that the primary key was :license and add the keys back as needed. In this manner, you can flatten out a value that’s a series of maps. Our next stop will be to look at some code that will allow you to flatten maps this way, and after that we’ll talk about reading back things from HBase.
Datamapper—writing to HBase
As you saw in the previous section, you want to convert your Clojure maps (up to a certain depth, as described earlier) into flattened maps, which are easy to store in a single HBase row. There are two ways to store a flattened map in an HBase table row, and the one you choose depends on your table design.
The first method defines your HBase table using multiple column families. In our painting example from earlier, this might mean you define column families named houses, roads, cars, and trees. This might be useful in situations where you might need to read only a subset of your object (say, cars), and this can be done without reading all the columns. Remember that data under a column family is stored contiguously, so reading one is more efficient that reading multiple. This table design, means that if another attribute is added to your object, you’d have to use the HBase admin tools to alter the schema to add a new column family.
The other option is to use only one column family, named something general like meta. This will allow you to be flexible in what attributes your objects have, but it means that your flattening process will have to ensure that the transformed map has keys that can be stored within a single column family. Our data mapper will handle both these options.
Let’s first see what using the functions might look like. In order to do so, let’s recap what we said about handling map values that are themselves lists of maps (the has-many-maps analogy). We said we’d pick a primary key and use the value of the primary key to mark up the keys in the transformed map. See the earlier painting example to refresh your memory. Sometimes, there may be no clear, single primary key. In that case, you’ll pick one, write a function to return a value unique to each map, and use that to mark up the keys instead. To generalize, this transform process can be represented by a function. In the case where there’s a clear primary key, this function would return the value of that key. In our paintings example from before, this function would be the following:
(fn [painting-map]
  (:license painting-map))
This can be abbreviated to #(:license %) or even :license.
In addition to the function, the flattening process needs to know which key is the one that has multiple maps as its value and what the primary key itself is. The config-for function is used for this:
(config-for :cars :license :license)
This says that the :cars key has a value that’s a list of maps, and inside the inner maps :license is the primary key. Further, the value to be used to mark up the keys for the flattened map should be obtained by applying the function provided (which, as described earlier, in this case is the value of :license itself). Although this looks redundant in the call to config-for, in other cases the function could be arbitrarily complex.
Multiple such keys can be configured using the config-for function and then bundled together using the config-keys function. In the case of our painting example, the single :cars key can have a sequence of hash maps as its key. We refer to this process of transforming a generic map into a flattened one as encoding. The reverse process would be defined as decoding. This complementary set of information can be bundled together inside a simple map with the keys :encode and :decode. Here’s the encoding part of this configuration:
(def keys-config
  {:encode (config-keys
              (config-for :cars :license :license))})
To recap, the general form of this is
{:encode (config-keys
                   (config-for ...)
                   (config-for ...)
                 ...)
 :decode (config-keys
                   (config-for ...)
                   (config-for ...)
                 ...)
}
keys-config, as defined here, contains only the encode part, which is sufficient to go one way—in the direction of flattening. The code for all of this flattening is shown in the following listing.
Listing 9.3. Transforming Clojure maps into ones suitable for insertion into HBase rows
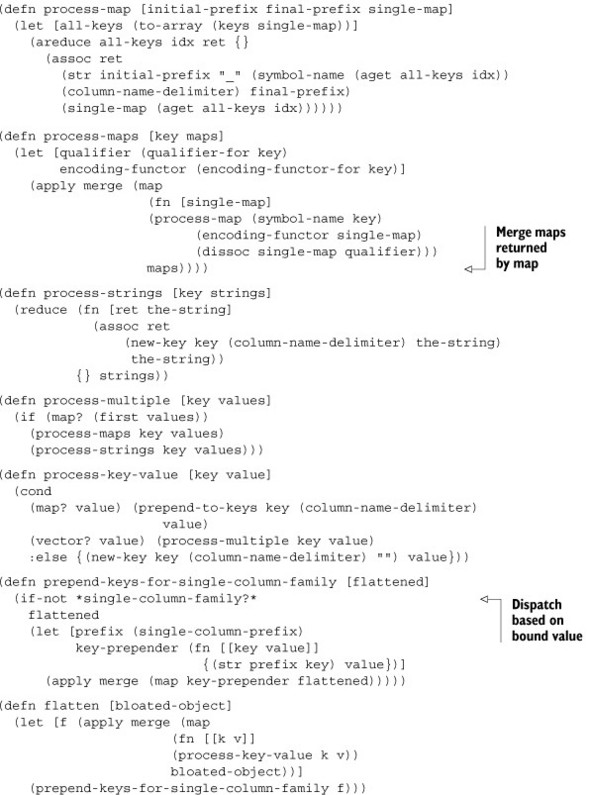
Let’s now use this configuration to flatten our previously defined painting object into a map suitable to be inserted into an HBase table with multiple column families:
chapter12.datamapper=> (binding [*single-column-family?* false
          *primary-keys-config* keys-config]
  (flatten painting))
{"road:name" "101N",
 "houses:" 4,
 "road:speed" 65,
 "trees:cedar" "cedar",
 "trees:maple" "maple",
 "trees:oak" "oak",
 "cars_model:ah12001" "fit",
 "cars_model:xb34544" "yaris",
 "cars_make:ah12001" "honda",
 "cars_make:xb34544" "toyota"}
If you wanted to flatten this into a map suitable for an HBase table with a single column family called meta, you could do that too:
chapter12.datamapper=> (binding [*single-column-family?* true
                                *hbase-single-column-family* "meta"
                                *primary-keys-config* keys-config]
                        (flatten painting))
{"meta:road__name" "101N",
"meta:houses__" 4,
"meta:cars_model__ah12001" "fit",
"meta:cars_model__xb34544" "yaris",
"meta:cars_make__ah12001" "honda",
"meta:cars_make__xb34544" "toyota",
"meta:road__speed" 65,
"meta:trees__cedar" "cedar",
"meta:trees__maple" "maple",
"meta:trees__oak" "oak"}
Both these maps can easily be persisted into HBase, using the function insert-into-hbase, as shown in the following listing.
Listing 9.4. Inserting a Clojure map into an HBase row
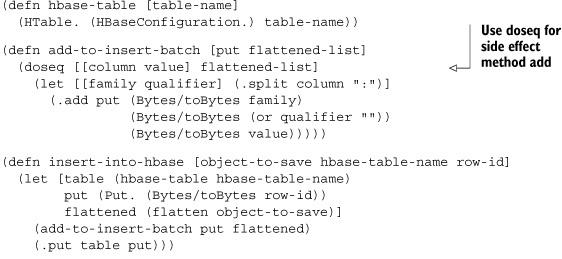
Here it is in action:
chapter12.datamapper=>
    (binding [*single-column-family?* true
              *hbase-single-column-family* "meta"
              *primary-keys-config* keys-config]
     (insert-into-hbase painting "clojure_test" "flatten-test"))
nil
Our next stop will be to explore reading this back out.
Datamapper—reading from HBase
In order to get your Clojure map back from the HBase table, you need to do two things. The first is to read from the HBase table and convert the resulting Result object into the flattened map you put into the row in the first place. Then you’d need to convert the flattened map into your original map, like the one defined earlier as painting.
The first part of the solution is in the next listing. It shows code that reads the data from the HBase row.
Listing 9.5. Reading the flattened map back out from HBase
(defn hbase-object-as-hash [hbase-result]
  (let [extractor (fn [kv]
                     {(String. (.getColumn kv))
                      (String. (.getValue kv))})
        key-values-objects (.list hbase-result)]
    (apply merge (map extractor key-values-objects))))

(defn read-row [hbase-table-name row-id]
  (let [table (hbase-table hbase-table-name)
        hbase-get-row-id (Get. (Bytes/toBytes row-id))]
    (.get table hbase-get-row-id)))

(defn get-flattened-map [hbase-table-name row-id]
  (hbase-object-as-hash (read-row hbase-table-name row-id)))
chapter12.datamapper=>
  (get-flattened-map "clojure_test" "flatten-test")
{"meta:road__name" "101N",
 "meta:houses__" "4",
 "meta:cars_model__ah12001" "fit",
 "meta:cars_model__xb34544" "yaris",
 "meta:cars_make__ah12001" "honda",
 "meta:cars_make__xb34544" "toyota",
 "meta:road__speed" "65",
 "meta:trees__cedar" "cedar",
 "meta:trees__maple" "maple",
 "meta:trees__oak" "oak"}
Note how all values come out as strings (because HBase stores everything as an uninterpreted byte array). You could write code to convert the values into other types (such as numbers).
As far as the second part of this problem goes, converting a flattened map back into the original hydrated one, we won’t solve that here. The code is available along with the rest of the code for this book from http://manning.com/ClojureinAction.
What follows, is an example of this hydration process, starting with an updated keys-config object that now includes the :decode key:
(def keys-config
  {:encode (config-keys
             (config-for :cars :license :license))
   :decode (config-keys
             (config-for :cars :license #(first (.split % "@"))))})
And now let’s see the hydration in action. Again, note that the values are still strings, and some wrapper code might convert them into more appropriate types (one approach might be to use the Clojure reader, via a call to read-string).
chapter12.datamapper=>
  (binding [*single-column-family?* true
            *hbase-single-column-family* "meta"
            *primary-keys-config* keys-config]
  (read-as-hydrated "clojure_test" "flatten-test"))
{:cars [{:make "toyota", :model "yaris", :license "xb34544"}
        {:make "honda", :model "fit", :license "ah12001"}],
:trees ["maple" "oak" "cedar"],
:road {:name "101N", :speed "65"},
:houses "4"}
This was a long section! You saw the basics of HBase table design and then used Clo-jure to do some basic read and write operations. You didn’t look in any detail at the scan operations, but you did write the beginnings of a simple data mapper that can persist (and read back) Clojure maps into HBase rows. Our final stop in this chapter is going to be Redis.
9.3. Redis
The previous section talked about HBase, a sort of heavy artillery for big data. Often, applications need some form of data storage that’s lighter in weight and extremely fast. Redis is one such choice, a sort of light saber of key-value stores. It’s described as an advanced, extremely performant key-value store, similar to memcached but persistent. Further, values can be strings, lists, sets, maps, and sorted sets. These features make it extremely suitable as a sort of “data structure server.” In fact, in this chapter, you’ll create your own abstraction on top of it, which will allow you to more easily move data into and out of Redis. To get started, you’ll download and install Redis and then using an open source Clojure library to read and write values into it.
9.3.1. Installing Redis
Redis is open source software made available under the BSD license. It’s hosted at http://redis.io. Installing it is quite easy on most UNIX/Linux or Mac OS systems. You download the compressed distribution, and unzip it into a directory of your choice. The software uses the standard compilation tool chain, and running make compiles and gets it ready for use. Following that, executing the redis-server script file starts the server. And that’s it! Once you’ve done this you’ll be ready to start writing to and reading from Redis.
9.3.2. Accessing Redis from Clojure programs
Several libraries have been written to access Redis from a variety of languages. From our point of view, there are a couple of choices: you can either use something written in Java or look for options written in Clojure. Luckily, there are two Java libraries, JDBC-redis and JRedis, and one Clojure library, redis-clojure. We’re going to use redis-clojure, which is written in idiomatic Clojure that makes it easy and fun to use.
Getting started
In chapter 4, we mentioned the redis-clojure library as an example of using multi-methods. It’s hosted at http://github.com/ragnard/redis-clojure and can be easily compiled using lein. To do so, check out the source, change to the directory, and run
lein jar
You’ll need leiningen (found at https://github.com/technomancy/leiningen) for this to work. The previous command builds the redis-clojure JAR file, which can then be put on the JVM classpath to ensure that Clojure can see it. Or you can just put the src directory of the Redis-clojure project on your classpath. To get started using it, you need to refer to the redis namespace, as follows:
(ns chapter12.redis
  (:require redis))
In order to talk to the Redis server, you need to establish a connection to it. redis-clojure provides the convenient with-server macro that does this. It accepts a map containing the Redis server configuration, followed by code, which will execute in the context of a connection to Redis. Here’s an example:
chapter12.redis=>
 (redis/with-server {:host "127.0.0.1" :port 6379 :db 0}
        (redis/ping))
"PONG"
As you might have guessed, the redis namespace has all the functions that allow communication with the Redis server, and the ping function just checks to see if the Redis server is up (which replies with the string "PONG").
Strings
As mentioned earlier, Redis supports several data types, namely strings, lists, sets, maps, and sorted sets. There are also different functions that deal with setting and getting these data types as the values for various keys. Let’s start by looking at setting and getting strings. I’ve omitted the REPL prompt for the following examples:
(redis/with-server {:host "127.0.0.1" :port 6379 :db 0}
  (redis/set "name" "deepthi"))
"OK"

(redis/with-server   {:host "127.0.0.1" :port 6379 :db 0}
  (redis/get "name" ))
"deepthi"
Lists
Here’s an example of using the list data type. Let’s start by setting a couple of values in a list:
(redis/with-server   {:host "127.0.0.1" :port 6379 :db 0}
  (redis/rpush "names" "adi"))
"OK"
 (redis/with-server   {:host "127.0.0.1" :port 6379 :db 0}
   (redis/rpush "names" "punit"))
"OK"
And now, let’s read them back:
(redis/with-server   {:host "127.0.0.1" :port 6379 :db 0}
  (redis/lindex "names" 0))
"adi"
 (redis/with-server   {:host "127.0.0.1" :port 6379 :db 0}
   (redis/lindex "names" 1))
"punit"
Sets
Let’s also look at dealing with sets, which are similar to lists but can’t have duplicates:
(redis/with-server    {:host "127.0.0.1" :port 6379 :db 0}
  (redis/sadd "names-set" "amit"))
true

(redis/with-server    {:host "127.0.0.1" :port 6379 :db 0}
  (redis/sadd "names-set" "adi"))
true

(redis/with-server    {:host "127.0.0.1" :port 6379 :db 0}
  (redis/sadd "names-set" "adi"))
false

(redis/with-server    {:host "127.0.0.1" :port 6379 :db 0}
  (redis/smembers "names-set"))
#{"adi" "amit"}
Similarly, there are functions to handle sorted sets. A full reference to all the commands it supports is here: http://redis.io/commands.
Other
Redis also supports a lot of other things, such as atomically incrementing the integer value of a key. This can be used to automatically assign IDs to Redis objects, similar to the autoincrement feature found in relational databases.
There are ways to atomically pop a value from a list-type collection, to get a random member of a set, to perform set operations (such as intersections and unions), or to sort a list or set. Again, more information is at the command reference mentioned previously.
Working with individual key values is easy but can be a little tedious in programs that make extensive use of Redis. Let’s now look at building a little abstraction on top of Redis so you can work more naturally with Clojure maps.
9.3.3. A Redis data mapper
The inspiration for this mapper comes from the fact that most ORM (object-relational mapping) libraries make life easier for the developer. They hide the details of the database and SQL from code that’s trying to get a job done and hence also make the code clearer and shorter. It also often feels more natural to work in the native data structures of the language while letting the library handle converting them to a format suitable for storage in the underlying database engine.
We’d like to do something similar when working with Redis (even though it’s already quite easy, especially with the redis-clojure library). We’d like to work with Clojure maps, for instance, and not have to worry about how to break them down into key-value pairs that can be stored in Redis. Or we’d like to read them out as key pairs and construct the original map by reversing the breakdown process. In this manner, this is analogous to the HBase data mapper you saw earlier.
For the sake of variety, we’ll take a different approach to implementing this mapper. The approach involves the use of a concept called let-over-lambda, and the reason for this name will become obvious shortly. Let’s get started.
Def-redis-type
We’d like to define a higher-level abstraction that represents something that’s “Redis aware.” The following REPL conversation shows what you’ll implement:
user> (use 'chapter12-redis-datamapper)
nil

user> (def-redis-type consumer
        (string-type :id :merchant-id :start-time :timezone)
        (list-type :cart-items)
        (primary-key :id :merchant-id))
#'user/consumer
This defines the idea of a Redis-aware consumer type. (To work with this, you’ll need to get code from listings 9.6 and 9.7.) You could then query it like so:
user> (consumer :name)
consumer

user> (consumer :format)
:clj-str
user> (consumer :key-separator)
"___"

user> (consumer :primary-key)
(:id :merchant-id)
The :format here refers to the format in which the values will be stored in Redis. We’d like to support the Clojure built-in clj-str format (which will allow you to use the Clojure reader to deserialize things) and also JSON, so that if other, non-Clojure programs want to read the values, they can do so by using a JSON parser. The format defaults to clj-str but can be overridden using the :format option. This is also true for the key separator, which will be used to construct keys that will store pieces of the Redis-aware objects. Here’s how the overriding works:
user> (def-redis-type consumer
        (string-type :id :merchant-id :start-time :timezone)
        (list-type :cart-items)
        (primary-key :id :merchant-id)
        (format :json)
        (key-separator "##"))
#'user/consumer
user> (consumer :format)
:json
user> (consumer :key-separator)
"##"
For now, we’ll support only a limited set of data types—specifically, strings and lists. Extending the types to include others will be easy, once you understand how the rest work, and we’ll leave such extensions as an exercise to you.
Instantiating and using redis objects
Now let’s see how you’d use these abstractions. First, we’ll show how to set simple string-type data:
user> (def c (consumer :new))
#'user/c

user> (c :set! :id "adi")
"adi"

user> (c :set! :merchant-id "14")
"14"

user> (c :set! :start-time (System/currentTimeMillis))
1264582286124
Here’s how to add list types:
user> (c :add! :cart-items {:sku "XYZ" :cost 10.95})
{:sku "XYZ", :cost 10.95}

user> (c :add! :cart-items {:sku "ABC" :cost 22.40})
{:sku "ABC", :cost 22.4}
Finally, here’s how to get data out of these objects:
user> (c :get :merchant-id)
"14"

user> (c :get :cart-items)
({:sku "ABC", :cost 22.4} {:sku "XYZ", :cost 10.95})
Our last stop before we dive into the implementation is to show how to save these to Redis and how to get them back out.
Persistence
Here’s how to save an object into Redis:
user> (redis/with-server   {:host "127.0.0.1" :port 6379 :db 0}
       (c :save!))
true
Let’s look at how you’d go about loading one from Redis at a later time. You’ll need the primary key(s) and use the :find command:
user> (redis/with-server {:host "127.0.0.1" :port 6379 :db 0}
           (def d (consumer :find "adi" "14")))
#'user/d
And to confirm that it indeed has the right data, do this:
user> (d :get :id)
"adi"
user> (d :get :merchant-id)
"14"
user> (d :get :cart-items)
({:cost 22.4, :sku "ABC"} {:cost 10.95, :sku "XYZ"})
So that’s the broad usage. You’re now ready to see how this is implemented.
Implementation
The code is divided into two namespaces. Listing 9.6 shows a namespace called chapter12-redis-datamapper, which contains most of the code for all the examples you’ve seen so far. Listing 9.7 contains a namespace called chapter12-redis-persistence, which contains the code that implements the persistence of Clojure maps into Redis and also deserializing it back out.
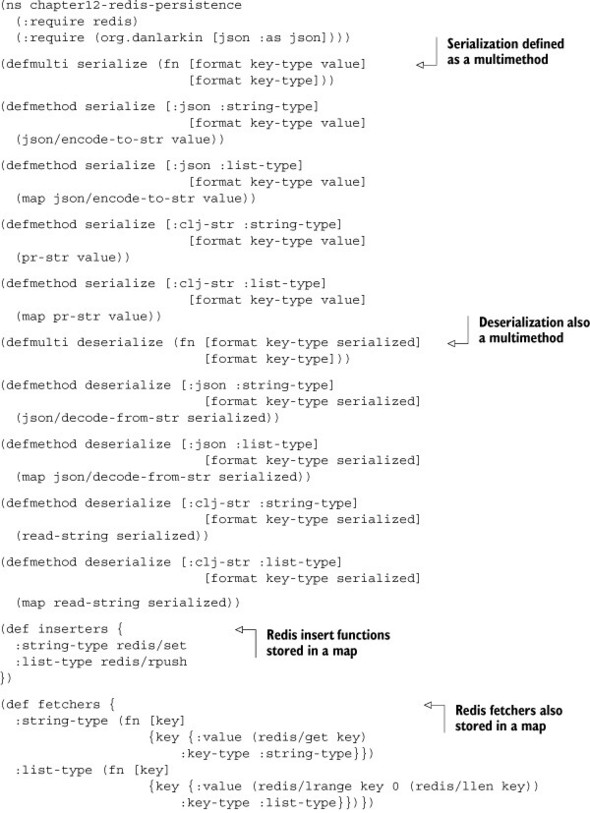
Listing 9.6. Namespace containing functions exposed to users of this library
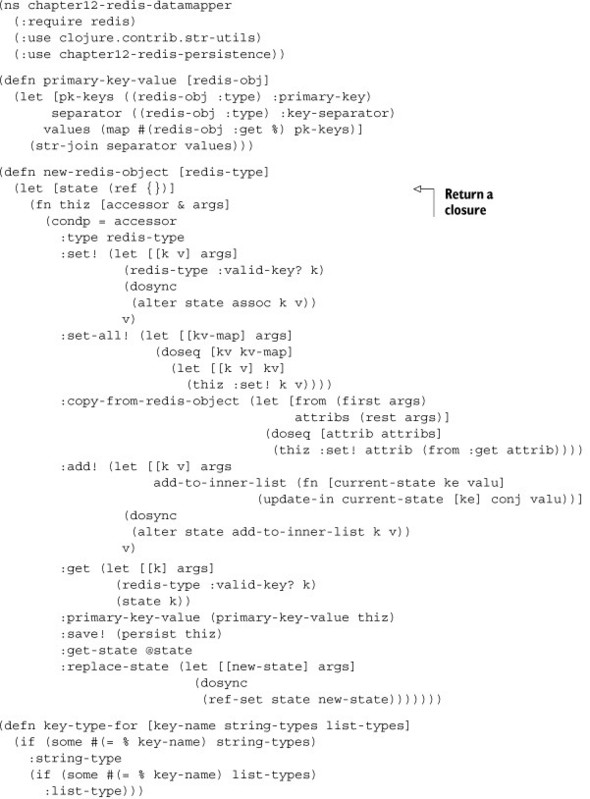
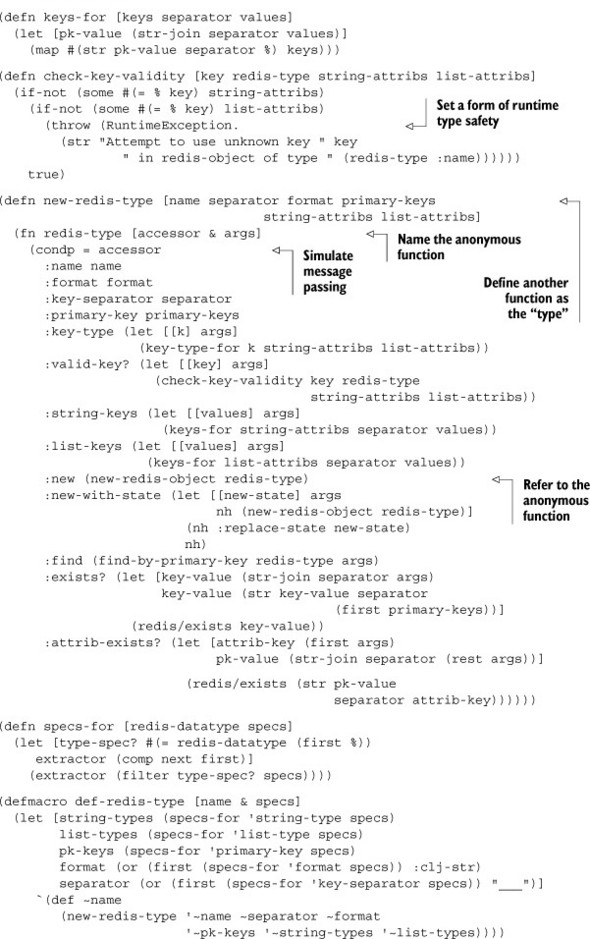
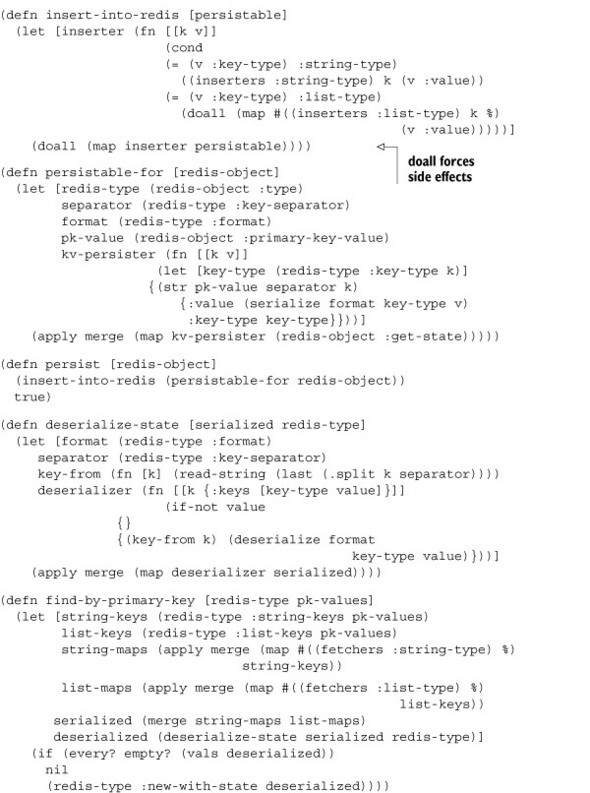
Listing 9.7. Namespace containing functions to persist and read back maps from Redis
Under the hood
There are a couple of things to talk about regarding the implementation. The first is the use of closures to represent Redis types and Redis objects. The second is the persistence side of things. The macro def-redis-type accepts the specification as expressed by the developer and converts it into a function. This function is created by calling new-redis-type, and the return value is held in a var (which is given the name specified in the macro call). Let’s look into this in a little more detail.
The new-redis-type function returns an anonymous function. Clojure functions are lexical closures, and this fact is used by the returned function to hang onto the parameters that were passed to new-redis-type (things like the name of the Redis type, options, and so on). The anonymous function itself is variadic: the first parameter is a command name, followed by any number of other arguments. It uses a condp form to execute specific code depending on what the command word is. For example, if the command is :name, it returns the name of the Redis type. Or if the command is :new, it calls new-redis-object, which gets returned to the caller, for use as a Redis-aware object.
new-redis-object is another function that returns a similar anonymous function. This technique of returning a function that accepts commands with arguments makes things look like traditional objects (albeit with a different syntax). You’ll see this approach again later when we implement our own flavor of traditional OO on top of Clojure.
The second namespace is the one that handles persistence, and most of the code here is rather straightforward. Of interest are the serialize and deserialize multimethods, which make it easy to add support for more Redis data types (strings, lists, sets, sorted sets, and the like) and for more formats in which to store values (clj-str, json, and so on.) The other thing to note is the inserters and fetchers maps that contain as values functions that will be called when needed. This lookup table makes it easy to write generic code to handle inserting things into Redis and fetching things from it. It’s a simple sort of polymorphism.
So there it is, a fairly workable solution to map Clojure maps into and out of Redis.
9.4. Summary
This chapter showed three ways in which data can be stored in your Clojure applications. Despite the fact that your data needs are growing and you need faster and faster access to your data, a traditional relational database like MySQL is sometimes just the right database for the job. We also looked at a solution that handles large volumes of data: the Apache HBase project, which is an implementation of Google’s own Big-Table. Finally, we looked at a new key-value data store named Redis, which is quickly gaining popularity among the developer community thanks to its support for higher-level data structures (such as lists and sets) and its extremely good performance and ease of use.
Hopefully, one of these will be suitable for your applications. The Clojure code we looked at to access these data stores is simple, compact, and easy to maintain and extend. That’s the promise of Clojure—making it easy to write code that does much more than the lines of code might signify.